1
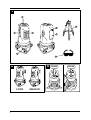
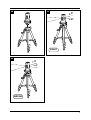
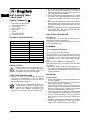
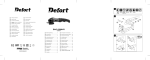
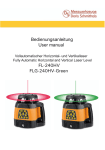
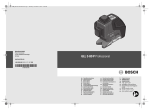
DLL-10T-K
98299472
Bedienungsanleitung..........................4
User’s Manual ....................................6
Mode d’emploi ................................... 8
Istruzione per l’uso ...........................10
Инструкция по эксплуатации .........12
1
3
6
4
7
1
5
8
2
2
3
LOCK
2
UNLOCK
PRESS
PRESS
4
5
± 4°
± 4°
RIGHT
6
> 4°
< 4°
WRONG
3
DE
DE
Selbstnivellierender
Horizontal- und Vertikallaser
WERKZEUG-ELEMENTE 1
1
2
3
4
5
6
7
8
9
Austrittsöffnung Laserstrahlung
Laser-Sichtbrille
Ein-/Ausschalter
Arretierung des Batteriefachdeckels
Batteriefachdeckel
Stativ
Laser-Warnschild
Stativaufnahme 1/4"
Schutztasche
TECHNISCHE DATEN
Arbeitsbereich bis ca.
5m
Nivelliergenauigkeit
±0,5 mm/m
Selbstnivellierbereich typisch
±4°
Betriebstemperatur +5 °C ... +40 °C
+5 °C ... +40 °C
Lagertemperatur –20 °C ... +70 °C
–20 °C ... +70 °C
Relative Luftfeuchte max. 90 %
90 %
Laserklasse
2
Lasertyp
650 nm, <1 mW
Stativaufnahme
1/4"
Batterien
2 x 1,5 V LR6 (AA)
Gewicht
3,15 kg
SICHERHEITSHINWEISE
Sämtliche Anweisungen sind zu lesen, um
mit dem Messwerkzeug gefahrlos und sicher
zu arbeiten. Bewahren sie diese anweisungen gut auf.
● Vorsicht – wenn andere als die hier angegebenen
Bedienungs- oder Justiereinrichtungen benutzt oder
andere Verfahrensweisen ausgeführt werden, kann
dies zu gefährlicher Strahlungsexposition führen.
Richten Sie den Laserstrahl nicht auf
Personen oder Tiere und blicken Sie nicht
selbst
in
den
Laserstrahl.
Dieses
Messwerkzeug erzeugt Laserstrahlung der
Laserklasse 2 gemäß IEC 60825-1. Dadurch
können Sie Personen blenden.
4
● Verwenden Sie die Laser-Sichtbrille nicht als
Schutzbrille. Die Laser-Sichtbrille dient zum besseren Erkennen des Laserstrahls, sie schützt jedoch
nicht vor der Laserstrahlung.
● Verwenden Sie die Laser-Sichtbrille nicht als Sonnenbrille oder im Straßenverkehr. Die Laser-Sichtbrille bietet keinen vollständigen UV-Schutz und
vermindert die Farbwahrnehmung.
● Lassen Sie das Messwerkzeug von qualifiziertem
Fachpersonal und nur mit Original-Ersatzteilen reparieren. Damit wird sichergestellt, dass die Sicherheit des Messwerkzeuges erhalten bleibt.
● Lassen Sie Kinder das Laser-Messwerkzeug nicht
unbeaufsichtigt benutzen. Sie könnten unbeabsichtigt Personen blenden.
FUNKTIONSBESCHREIBUNG
Bestimmungsgemäßer Gebrauch
Das Messwerkzeug ist bestimmt zum Ermitteln und
Überprüfen von waagrechten und senkrechten Linien.
Das Messwerkzeug ist ausschließlich für den Betrieb
an geschlossenen Einsatzorten geeignet.
MONTAGE
Batterien einsetzen/wechseln
Verwenden Sie ausschließlich Alkali-Mangan-Batterien.
Zum Öffnen des Batteriefachdeckels 5 drücken Sie auf
die Arretierung 4 und klappen den Batteriefachdeckel
auf. Setzen Sie die Batterien ein. Achten Sie dabei auf
die richtige Polung entsprechend der Darstellung auf
der Innenseite des Batteriefachs.
Ersetzen Sie immer alle Batterien gleichzeitig.
Verwenden Sie nur Batterien eines Herstellers und mit
gleicher Kapazität.
● Nehmen Sie die Batterien aus dem Messwerkzeug,
wenn Sie es längere Zeit nicht benutzen. Die Batterien können bei längerer Lagerung korrodieren und
sich selbst entladen.
BETRIEB
Inbetriebnahme
● Schützen Sie das Messwerkzeug vor Nässe und direkter Sonneneinstrahlung.
● Setzen Sie das Messwerkzeug keinen extremen
Temperaturen oder Temperaturschwankungen aus.
Lassen Sie es z.B. nicht längere Zeit im Auto liegen.
Lassen Sie das Messwerkzeug bei größeren Temperaturschwankungen erst austemperieren, bevor
Sie es in Betrieb nehmen.
● Vermeiden Sie heftige Stöße oder Stürze des Messwerkzeugs. Durch Beschädigungen des Messwerkzeugs kann die Genauigkeit beeinträchtigt werden.
Vergleichen Sie nach einem heftigen Stoß oder
Sturz die Laserlinie zur Kontrolle mit einer bekannten waagrechten oder senkrechten Referenzlinie.
● Schalten Sie das Messwerkzeug aus, wenn Sie es
transportieren. Beim Ausschalten wird die Pendeleinheit verriegelt, die sonst bei starken Bewegungen
beschädigt werden kann.
Ein-/Ausschalten
Zum Einschalten des Messwerkzeugs schieben Sie
den Ein-/Ausschalter 3 in Position „On“.
● Richten Sie den Laserstrahl nicht auf Personen oder
Tiere und blicken Sie nicht selbst in den Laserstrahl,
auch nicht aus größerer Entfernung. Zum Ausschalten des Messwerkzeugs schieben Sie den Ein-/Ausschalter 3 in Position „Off“.
● Lassen Sie das eingeschaltete Messwerkzeug nicht
unbeaufsichtigt und schalten Sie das Messwerkzeug nach Gebrauch ab. Andere Personen könnten
vom Laserstrahl geblendet werden.
ARBEITEN MIT NIVELLIERAUTOMATIK
Stellen Sie das Messwerkzeug auf eine waagrechte,
feste Unterlage oder befestigen Sie es auf einem Stativ 6.
Nach dem Einschalten gleicht die Nivellierautomatik
Unebenheiten innerhalb des Selbstnivellierbereiches
von ±4° automatisch aus. Die Nivellierung ist abgeschlossen, sobald sich die Laserlinien nicht mehr bewegen.
Außerhalb des Selbstnivellierbereiches von ±4° ist das
Arbeiten mit dem Messwerkzeug nicht möglich, da
sonst nicht gewährleistet werden kann, dass die Laserlinien im rechten Winkel zueinander verlaufen.
Bei Erschütterungen oder Lageänderungen während
des Betriebs wird das Messwerkzeug automatisch wieder einnivelliert. Überprüfen Sie nach einer erneuten
Nivellierung die Position der waagrechten bzw. senkrechten Laserlinie in Bezug auf Referenzpunkte, um
Fehler zu vermeiden.
WARTUNG UND SERVICE
Wartung und Reinigung
Lagern und transportieren Sie das Messwerkzeug nur
in der mitgelieferten Schutztasche.
Halten Sie das Messwerkzeug stets sauber.
Tauchen Sie das Messwerkzeug nicht ins Wasser oder
andere Flüssigkeiten.
Wischen Sie Verschmutzungen mit einem feuchten,
weichen Tuch ab. Verwenden Sie keine Reinigungsoder Lösemittel.
Reinigen Sie insbesondere die Flächen an der Austrittsöffnung des Lasers regelmäßig und achten Sie dabei
auf Fusseln.
Die Maschine braucht keine zusätzliche Schmierung.
Wenden Sie sich in Störungsfällen, z.B. durch Verschleiß eines Teils, an Ihren örtlichen SBM GroupVertragshändler.
UMWELT
Um Transportschäden zu verhinderen, wird die Maschine in einer soliden Verpackung geliefert. Die Verpackung besteht weitgehend aus verwertbarem Material. Benutzen Sie also die Möglichkeit zum Recyclen
der Verpackung. Bringen Sie bei Ersatz die alten Maschinen zu Ihren örtlichen SBM Group-Vertagshändler.
Er wird sich um eine umweltfreundliche Verarbeitung
ïhrer alten Maschine bemühen.
ARBEITSHINWEISE
Ein Stativ 6 bietet eine stabile, höheneinstellbare
Messunterlage. Setzen Sie das Messwerkzeug mit der
Stativaufnahme 8 auf das 1/4"-Gewinde des Stativs auf
und schrauben Sie es mit der Feststellschraube des
Stativs fest.
LASER-SICHTBRILLE (ZUBEHÖR)
Die Laser-Sichtbrille filtert das Umgebungslicht aus.
Dadurch erscheint das rote Licht des Lasers für das
Auge heller.
● Verwenden Sie die Laser-Sichtbrille nicht als
Schutzbrille. Die Laser-Sichtbrille dient zum besseren Erkennen des Laserstrahls, sie schützt jedoch
nicht vor der Laserstrahlung.
● Verwenden Sie die Laser-Sichtbrille nicht als Sonnenbrille oder im Straßenverkehr. Die Laser- Sichtbrille bietet keinen vollständigen UVSchutz und vermindert die Farbwahrnehmung.
5
DE
GB
Self levelling laser
cross level
PRODUCT ELEMENTS 1
1
2
3
4
5
6
7
8
Exit opening for laser beam
Laser viewing glasses
On/Off switch
Latch of battery lid
Battery lid
Tripod
Laser warning label
Tripod mount 1/4"
● Do not use the laser viewing glasses as safety goggles. The laser viewing glasses are used for improved visualisation of the laser beam, but they do
not protect against laser radiation.
● Do not use the laser viewing glasses as sun glasses
or in traffic. The laser viewing glasses do not afford
complete UV protection and reduce colour perception.
● Have the measuring tool repaired only through qualified specialists using original spare parts. This ensures that the safety of the measuring tool is maintained.
● Do not allow children to use the laser measuring tool
without supervision. They could unintentionally blind
other persons or themselves.
FUNCTIONAL DESCRIPTION
TECHNICAL SPECIFICATIONS
Working range to approx.
5m
Levelling accuracy
±0.5 mm/m
Self-levelling range, typically
±4°
Operating temperature
+5 °C ... +40 °C
Storage temperature
–20 °C ... +70 °C
Relative air humidity, max.
90 %
Laser class
2
Laser type
650 nm, <1 mW
Tripod mount
1/4"
Intended Use
The measuring tool is intended for determining and
checking horiontal and vertical lines.
The measuring tool is suitable exclusively for operation
in enclosed working sites.
ASSEMBLY
Inserting/Replacing the Battery
Working safely with the measuring tool is
possible only when the operating and safety
information are read completely and the instructions contained therein are strictly followed.
Use only alkali-manganese batteries.
To open the battery lid 5, press on the latch 4 and fold
the battery lid up. Insert the batteries. When inserting,
pay attention to the correct polarity according to the
representation on the inside of the battery compartment.
Always replace all batteries at the same time.
Only use batteries from one brand and with the identical capacity.
● Remove the batteries from the measuring tool when
not using it for extended periods. When storing for
extended periods, the batteries can corrode and discharge themselves.
SAVE THESE INSTRUCTIONS.
OPERATION
Batteries
2 x 1.5 V LR6 (AA)
Weight
3.15 kg
SAFETY NOTES
● Caution – The use of other operating or adjusting
equipment or the application of other processing
methods than those mentioned here, can lead to
dangerous radiation exposure.
Do not direct the laser beam at persons or
animals and do not stare into the laser beam
yourself. This measuring tool produces laser
class 2 laser radiation according to IEC
60825-1. This can lead to persons being blinded.
6
Initial Operation
● Protect the measuring tool against moisture and direct sun irradiation.
● Do not subject the measuring tool to extreme temperatures or variations in temperature.
As an example, do not leave it in vehicles for longer
periods. In case of large variations in temperature,
allow the measuring tool to adjust to the ambient
temperature before putting it into operation.
● Avoid heavy impact to or falling down of the measuring tool. Damage to the measuring tool can impair its
accuracy. After heavy impact or shock, compare the
laser line with a known horizontal or vertical reference line.
● Switch the measuring tool off during transport. When
switching off, the levelling unit, which can be damaged in case of intense movement, is locked.
Switching On and Off
To switch on the measuring tool, push the On/Off switch
3 to the “On” position.
● Do not point the laser beam at persons or animals
and do not look into the laser beam yourself, not
even from a large distance. To switch off the measuring tool, push the On/Off switch 3 to the “Off” position.
● Do not leave the switched on measuring tool unattended and switch the measuring tool off after use.
Other persons could be blinded by the laser beam.
WORKING WITH AUTOMATIC LEVELLING
Position the measuring tool on a level and firm support
or attach it to a tripod 6.
After switching on, the levelling function automatically
compensates irregularities within the self-levelling
range of ±4°. The levelling is finished as soon as the
laser beams do not move any more.
When not within the self-levelling range of ±4°, working with the measuring tool is not possible, because it
cannot be assured that the laser beams run at a right
angle to each other.
In case of ground vibrations or position changes during
operation, the measuring tool is automatically levelled
in again. To avoid errors, check the position of the horizontal and vertical laser line with regard to the reference points upon re-levelling.
MAINTENANCE AND SERVICE
Maintenance and Cleaning
Store and transport the measuring tool only in the supplied protective case.
Keep the measuring tool clean at all times.
Do not immerse the measuring tool into water or other
fluids.
Wipe off debris using a moist and soft cloth. Do not use
any cleaning agents or solvents.
Regularly clean the surfaces at the exit opening of the
laser in particular, and pay attention to any fluff of fibres.
Should a fault occur, e.g. after wear of a part, please
contact your local SBM Group dealer.
ENVIRONMENT
In order to prevent the machine from damage during
transport, it is delivered in a sturdy packaging. Most of
the packaging materials can be recycled. Take these
materials to the appropriate recycling locations. Take
your unwanted machines to your local SBM Group
dealer. Here they will be disposed of in an environmentally safe way.
WORKING ADVICE
A tripod 6 offers a stable, height-adjustable measuring
support. Place the measuring tool via the tripod mount
8 onto the 1/4" male thread of the tripod and screw the
locking screw of the tripod tight.
LASER VIEWING GLASSES (ACCESSORY)
The laser viewing glasses filter out the ambient light.
This makes the red light of the laser appear brighter
for the eyes.
● Do not use the laser viewing glasses as safety goggles. The laser viewing glasses are used for improved visualisation of the laser beam, but they do
not protect against laser radiation.
● Do not use the laser viewing glasses as sun glasses
or in traffic. The laser viewing glasses do not afford
complete UV protection and reduce colour perception.
7
GB
FR
Niveau laser rotatif horizontal
a nivellement automatic
ELEMENTS DE L’OUTIL 1
1 Orifice de sortie du faisceau laser
2 Lunettes de vision du faisceau laser
3 Interrupteur Marche/Arrêt
4 Blocage du couvercle du compartiment
à piles
5 Couvercle du compartiment à piles
6 Trépied
7 Plaque d’avertissement de laser
8 Raccord de trépied 1/4"
SPECIFICATIONS TECHNIQUES
Zone de travail jusqu’à environ
5m
Précision de nivellement
±0,5 mm/m
Plage typique de nivellement
automatique
±4°
Température de service
+5 °C ... +40 °C
Température de stockage
–20 °C ... +70 °C
Humidité relative de l’air
max. 90 %
Classe laser
2
Type de laser
650 nm, <1 mW
Raccord de trépied
1/4"
Piles
2 x 1,5 V LR6 (AA)
Poids
3,15 kg
CONSIGNES DE SÉCURITÉ
Lire toutes les instructions pour travailler
avec l’appareil de mesure sans risques et en
toute sécurité.
GARDER PRECIEUSEMENT CES INSTRUCTIONS
DE SECURITE.
● Attention – si d’autres dispositifs d’utilisation ou
d’ajustage que ceux indiqués ici sont utilisés ou si
d’autres procédés sont appliqués, ceci peut entraîner une exposition au rayonnement dangereuse.
Ne pas diriger le faisceau laser vers des personnes ou des animaux et ne jamais regarder soimême dans le faisceau laser. Cet appareil de mesure génère des rayonnements
laser Classe laser 2 suivant IEC 60825-1. D’autres
personnes peuvent être éblouies.
8
● Ne pas utiliser les lunettes de vision du faisceau laser en tant que lunettes de protection. Les lunettes
de vision du faisceau laser servent à mieux reconnaître le faisceau laser, elles ne protègent cependant pas du rayonnement laser.
● Ne pas utiliser les lunettes de vision du faisceau laser en tant que lunettes de soleil ou en circulation
routière. Les lunettes de vision du faisceau laser ne
protègent pas parfaitement contre les rayons ultraviolets et réduisent la perception des couleurs.
● Ne faire réparer l’appareil de mesure que par une
personne qualifiée et seulement avec des pièces de
rechange d’origine. Ceci permet d’assurer la sécurité de l’appareil de mesure.
● Ne pas laisser les enfants utiliser l’appareil de mesure laser sans surveillance. Ils risqueraient d’éblouir
par mégarde d’autres personnes.
DESCRIPTION DU FONCTIONNEMENT
Utilisation conforme
L’appareil de mesure est conçu pour déterminer et vérifier des lignes horizontales et verticales.
L’appareil de mesure est exclusivement conçu pour
fonctionner dans des locaux fermés.
MONTAGE
Mise en place/changement des piles
N’utiliser que des piles alcalines au manganèse.
Pour ouvrir le couvercle du compartiment à piles 5, appuyez sur le blocage 4 et ouvrez le couvercle du compartiment à piles. Introduisez les piles.
Veillez à la bonne position des pôles qui doit correspondre à la figure se trouvant à l’intérieur du compartiment à piles.
Toujours remplacer toutes les piles en même temps.
N’utiliser que des piles de la même marque avec la
même capacité.
● Sortir les piles de l’appareil de mesure au cas où
l’appareil ne serait pas utilisé pour une période assez longue. En cas de stockage long, les piles peuvent corroder et se décharger.
FONCTIONNEMENT
Mise en service
● Protéger l’appareil de mesure contre l’humidité, ne
pas l’exposer aux rayons directs du soleil.
● Ne pas exposer l’appareil de mesure à des températures extrêmes ou de forts changements de température. Ne pas le laisser traîner longtemps dans
la voiture p.ex. En cas d'importants changements
de température, laisser l’appareil de mesure prendre la température ambiante avant de le mettre en
service.
● Eviter les chocs ou les chutes de l’appareil de mesure. Les dommages peuvent entraver la précision de
l’appareil de mesure. Après un choc ou une chute,
comparer la ligne laser pour la vérifier avec une ligne de référence connue verticale ou horizontale.
● Eteignez l’appareil de mesure quand vous le transportez. Lorsque l’appareil est éteint, l’unité pendulaire se verrouille afin de prévenir son endommagement lors de mouvements forts.
Mise en Marche/Arrêt
Pour mettre en marche l’appareil de mesure, poussez
l’interrupteur Marche/Arrêt 3 dans la position «On».
● Ne pas diriger le faisceau laser vers des personnes
ou des animaux et ne jamais regarder dans le faisceau laser, même si vous êtes à grande distance de
ce dernier. Pour arrêter l’appareil de mesure, poussez l’interrupteur Marche/Arrêt 3 dans la position
«Off».
● Ne pas laisser sans surveillance l’appareil de mesure allumé et éteindre l’appareil de mesure après l’utilisation. D’autres personnes pourraient être éblouies
par le faisceau laser.
TRAVAILLER AVEC NIVELLEMENT
AUTOMATIQUE
Placez l’appareil de mesure sur un support horizontale
solide ou montez l’appareil sur un trépied 6.
Une fois l’appareil mis en marche, le nivellement automatique compense automatiquement les inégalités à
l’intérieur de la plage de nivellement automatique de
±4°. Dès que les lignes laser ne bougent plus, le nivellement est terminé.
Il n’est pas possible d’utiliser l’appareil de mesure à
l’extérieur de la plage de nivellement automatique de
±4°, parce que sinon il ne peut pas être garanti que les
lignes laser passent dans l’angle droit l’un par rapport
à l’autre.
Dans le cas de secousses ou de modifications pendant
l’utilisation, l’appareil de mesure est automatiquement
nivelé à nouveau. Après un nivellement, vérifier la position de la ligne laser horizontale ou verticale par rapport aux points de référence afin d’éviter des erreurs.
ENTRETIEN ET SERVICE APRÈS-VENTE
Nettoyage et entretien
Ne transporter et ranger l’appareil de mesure que dans
son étui de protection fourni avec l’appareil.
Maintenir l’appareil de mesure propre.
Ne jamais plonger l’appareil de mesure dans l’eau ou
dans d’autres liquides.
Nettoyer l’appareil à l’aide d’un chiffon doux et humide.
Ne pas utiliser de détergents ou de solvants.
Nettoyer régulièrement en particulier les surfaces
se trouvant près de l’ouverture de sortie du laser en
veillant à éliminer les poussières.
En cas de panne survenue par exemple à la suite de
l’usure d’une pièce, contactez votre distributeur SBM
Group local.
ENVIRONNEMENT
Pour éviter les dommages liés au transport, la machine
est livré dans un emballage robuste. L’emballage est
autant que possible constitué de matériau recyclable.
Veuillez par conséquent destiner cet emballage au recyclage.
Si vous allez changer de machines, apportez les machines usagées à votre distributeur SBM Group local
qui se chargera de les traiter de la manière la plus écologique possible.
INSTRUCTIONS D’UTILISATION
Un trépied 6 offre l’avantage d’être un support de mesure stable à hauteur réglable. Placez l’appareil de
mesure avec le raccord du trépied 8 sur le filet 1/4"
du trépied et serrez-le au moyen de la vis de blocage
du trépied.
LUNETTES DE VISION DU FAISCEAU
LASER (ACCESSOIRE)
Les lunettes de vision du faisceau laser filtrent la lumière ambiante. L’oeil perçoit ainsi la lumière rouge du
laser comme étant plus claire.
● Ne pas utiliser les lunettes de vision du faisceau laser en tant que lunettes de protection. Les lunettes
de vision du faisceau laser servent à mieux reconnaître le faisceau laser, elles ne protègent cependant pas du rayonnement laser.
● Ne pas utiliser les lunettes de vision du faisceau laser en tant que lunettes de soleil ou en circulation
routière. Les lunettes de vision du faisceau laser ne
protègent pas parfaitement contre les rayons ultraviolets et réduisent la perception des couleurs.
9
FR
Non dirigere mai il raggio laser verso persone oppure animali ed evitare di guardare direttamente il raggio laser. Questo strumento
di misura genera un raggio laser della classe
laser 2 conforme alla norma IEC 60825-1. Vi è dunque il pericolo di abbagliare altre persone.
Livello laser linee
autolivellante
ELEMENTI DELL’UTENSILE 1
IT
1
2
3
4
5
6
7
8
Uscita del raggio laser
Occhiali per la visualizzazione del laser
Interruttore di avvio/arresto
Bloccaggio del coperchio del vano batterie
Coperchio del vano batterie
Treppiede
Targhetta di indicazione di pericolo del raggio laser
Attacco treppiede 1/4"
CARATTERISTICHE TECNICHE
Campo operativo fino a ca.
5m
Precisione di livellamento
±0,5 mm/m
Campo di autolivellamento
tipico
±4°
Temperatura di esercizio
+5 °C ... +40 °C
Temperatura di magazzino
–20 °C ... +70 °C
Umidità relativa dell’aria
max.
90 %
Classe laser
2
DESCRIZIONE DEL FUNZIONAMENTO
Uso conforme alle norme
Lo strumento di misura è adatto per rilevare e verificare
linee orizzontali e verticali.
Lo strumento di misura è adatto per il funzionamento
esclusivamente in luoghi chiusi.
Fonte laser
650 nm, <1 mW
Attacco treppiede
1/4"
Batterie
2 x 1,5 V LR6 (AA)
Peso
3,15 kg
MONTAGGIO
Applicazione/sostituzione delle batterie
NORME DI SICUREZZA
È obbligatorio leggere completamente le
istruzioni in modo di essere in grado di operare con lo strumento di misura senza nessun
pericolo e con sicurezza.
CUSTODIRE ACCURATAMENTE
ISTRUZIONI.
LE
PRESENTI
● Attenzione – In caso di utilizzo di dispositivi di comando o di regolazione di natura diversa da quelli
riportati in questa sede oppure qualora si seguano procedure diverse vi è il pericolo di provocare
un’esposizione alle radiazioni particolarmente pericolosa.
10
● Non utilizzare gli occhiali visori per raggio laser
come occhiali di protezione. Gli occhiali visori per
raggio laser servono a riconoscere meglio il raggio
laser e non hanno la proprietà di proteggere dalla
radiazione laser.
● Non utilizzare gli occhiali visori per raggio laser come occhiali da sole e neppure alla guida di autoveicoli. Gli occhiali visori per raggio laser non sono
in grado di offrire una completa protezione ai raggi
UV e riducono la percezione delle variazioni cromatiche.
● Far riparare lo strumento di misura da personale
specializzato qualificato e solo con pezzi di ricambio
originali. In tale maniera potrà essere salvaguardata
la sicurezza dello strumento di misura.
● Non permettere a bambini di utilizzare lo strumento
di misura al laser senza sorveglianza. Vi è il pericolo
che abbaglino involontariamente altre persone.
Utilizzare esclusivamente batterie alcaline al manganese.
Per aprire il coperchio del vano batterie 5 premere sul
bloccaggio 4 ed sollevare il coperchio del vano batterie. Inserire le batterie, facendo attenzione alla corretta
polarizzazione, conformemente all’illustrazione riportata sul lato interno del vano batterie.
Sostituire sempre contemporaneamente tutte le batterie. Utilizzare esclusivamente batterie che siano di uno
stesso produttore e che abbiano la stessa capacità.
● In caso di non utilizzo per periodi di tempo molto
lunghi, estrarre le batterie dallo strumento di misura.
In caso di periodi di deposito molto lunghi, le batterie
possono subire corrosioni oppure e si possono scaricare.
USO
Messa in funzione
● Proteggere lo strumento di misura da liquidi e
dall’esposizione diretta ai raggi solari.
● Mai esporre lo strumento di misura a temperature
oppure a sbalzi di temperatura estremi. Per esempio, non lasciarlo a lungo all’interno di una macchina. In caso di maggiori sbalzi di temperatura, prima
di metterlo in funzione si deve attendere che lo strumento di misura si sia ristabilizzato sulla temperatura normale.
● Evitare urti oppure cadute violente dello strumento
di misura. Danneggiamenti dello strumento di misura possono pregiudicarne la precisione. Dopo un
urto o una caduta violenta effettuare il controllo del
raggio laser confrontandolo con una linea di riferimento orizzontale o verticale nota.
● Durante il trasporto spegnere lo strumento di misura. Spegnendo lo strumento viene bloccata l’unità
oscillante che altrimenti potrebbe venire danneggiata in caso di movimenti violenti.
Accendere/spegnere
Per accendere lo strumento di misura spingere l’interruttore di avvio/arresto 3 in posizione «On».
● Non dirigere mai il raggio laser su persone oppure
su animali ed evitare di guardare direttamente il raggio laser anche da distanze maggiori. Per spegnere
lo strumento di misura spingere l’interruttore di avvio/arresto 3 in posizione «Off».
● Non lasciare mai lo strumento di misura senza custodia quando è acceso ed avere cura di spegnere
lo strumento di misura subito dopo l’utilizzo. Vi è il
pericolo che altre persone potrebbero essere abbagliate dal raggio laser.
Utilizzo del sistema di autolivellamento
Posizionare lo strumento di misura su una base orizzontale e stabile oppure fissarlo su un treppiede 6.
Dopo l’accensione il sistema di autolivellamento livella automaticamente asperità all’interno del campo di
autolivellamento di ±4°. Il livellamento è concluso non
appena i raggi laser non si muovono più.
Al di fuori del campo di autolivellamento di ±4° non è
possibile lavorare con lo strumento di misura poiché
altrimenti lo scorrimento dei raggi laser ad angolo retto
uno rispetto all’altro non può essere garantito.
In caso di urti o di modifiche di posizione durante l’esercizio, lo strumento di misura esegue di nuovo un’operazione automatica di livellamento. In seguito ad una
nuova operazione di livellamento, per evitare errori si
deve controllare la posizione orizzontale o verticale del
raggio lineare in relazione ai punti di riferimento.
OCCHIALI VISORI PER RAGGIO LASER
(ACCESSORI)
Gli occhiali visori per raggio laser filtra la luce ambientale. In questo modo la luce rossa del laser appare più
chiara per l’occhio.
● Non utilizzare gli occhiali visori per raggio laser
come occhiali di protezione. Gli occhiali visori per
raggio laser servono a riconoscere meglio il raggio
laser e non hanno la proprietà di proteggere dalla
radiazione laser.
● Non utilizzare gli occhiali visori per raggio laser come occhiali da sole e neppure alla guida di autoveicoli. Gli occhiali visori per raggio laser non sono
in grado di offrire una completa protezione ai raggi
UV e riducono la percezione delle variazioni cromatiche.
MANUTENZIONE ED ASSISTENZA
Manutenzione e pulizia
Conservare e trasportare lo strumento di misura utilizzando esclusivamente l’astuccio di protezione fornito
in dotazione.
Avere cura di tenere lo strumento di misura sempre
pulito.
Non immergere mai lo strumento di misura in acqua
oppure in liquidi di altra natura.
Pulire ogni tipo di sporcizia utilizzando un panno umido e morbido. Non utilizzare mai prodotti detergenti e
neppure solventi.
Pulire regolarmente specialmente le superfici dell’uscita del raggio laser prestando particolare attenzione alla
presenza di peluria.
Se dovessero sorgere difetti, p. es. dopo il logorio di un
elemento, si prega di mettersi in contatto con il vostro
rivenditore locale della SBM Group.
AMBIENTE
L’apparecchio viene consegnato dentro un imballaggio
robusto per evitare che venga danneggiato durante il
trasporto. Si può riciclare la maggior parte dei materiali
dell’imballaggio. Portare questi materiali nei punti di riciclaggio appropriati.
Portare gli apparecchi che non desiderate più al vostro
rivenditore locale della SBM Group. Lì verranno eliminati in modo sicuro per l’ambiente.
INDICAZIONI OPERATIVE
Un treppiede 6 permette di avere una base di misurazione stabile e regolabile in altezza. Posizionare lo
strumento di misura con l’attacco treppiede 8 sulla filettatura da 1/4" del treppiede e serrarlo con la vite di
arresto del treppiede stesso.
11
IT
Лазерный уровень
УСТРОЙСТВО 1
1
2
3
4
5
6
7
Отверстие выхода лазерного излучения
Очки для работы с лазерным инструментом
Выключатель
Фиксатор крышки батарейного отсека
Крышка батарейного отсека
Штатив
Предупредительная табличка лазерного излучения
Гнездо под штатив 1/4"
8
ТЕХНИЧЕСКИЕ ДАННЫЕ
RU
Рабочий диапазон
до 5 м
Точность
компенсирования
±0,5 мм/м
Типичный диапазон автоматического
нивелирования
±4°
Рабочая температура
+5 °C ... +40 °C
Температура хранения
–20 °C ... +70 °C
Относительная влажность
воздуха не более
90 %
Класс лазера
2
Тип лазера
650 нм, <1 мВт
Резьба для штатива
1/4"
Батарейки
2 x 1,5 В LR6 (AA)
Вес
3,15 кг
УКАЗАНИЯ ПО БЕЗОПАСНОСТИ
Прочтите все инструкции, чтобы Вы могли
безопасно и надежно работать с настоящим измерительным инструментом. сохраняйте эти инструкции.
● Внимание – использование других не упомянутых здесь элементов управления и регулирования или других методов эксплуатации может подвергнуть Вас опасному для здоровья излучению.
● Измерительный инструмент поставляется с
предупредительной табличкой на немецком языке (на изображении измерительного инструмента
на странице с иллюстрациями обозначена номером 7).
Не направляйте лазерный луч на людей
или животных и не смотрите сами в лазерный луч. Настоящий измерительный инструмент создает лазерное излучение
класса 2 согласно IEC 60825-1. Этим излучением Вы можете непреднамеренно ослепить людей.
12
● Не применяйте лазерные очки в качестве защитных очков. Лазерные очки служат для лучшего
опознавания лазерного луча, однако, они не защищают от лазерного излучения.
● Не применяйте лазерные очки в качестве солнечных очков или в уличном движении. Лазерные
очки не дают полной защиты от ультрафиолетового излучения и ухудшают восприятие красок.
● Ремонт Вашего измерительного инструмента поручайте только квалифицированному персоналу
и только с оригинальными запасными частями.
Этим обеспечивается сохранность безопасности
измерительного инструмента.
Не разрешайте детям пользоваться лазерным измерительным инструментом без надзора. Они могут неумышленно ослепить людей.
ОПИСАНИЕ ФУНКЦИИ
Настоящий измерительный прибор предназначен
для построения и контроля горизонтальных и вертикальных линий.
Измерительный инструмент пригоден исключительно для эксплуатации в закрытых помещениях.
СБОРКА
Установка/замена батареек
Применяйте исключительно щелочные батареи.
Для открытия батарейного отсека 5 нажмите фиксатор 4 в направлении стрелки и снимите крышку.
Вложите батареи. Следите при этом за правильной
поляризацией в соответствии с изображением на
внутренней стенке отсека.
Всегда заменяйте все батарейки одновременно.
Применяйте только батарейки одного изготовителя
и с одинаковой емкостью.
● Если Вы не пользуйтесь продолжительное время измерительным инструментом, то батарейки
должны быть вынуты из инструмента. При продолжительном хранении батарейки могут окислиться и разрядиться.
РАБОТА С ИНСТРУМЕНТОМ
Эксплуатация
● Защищайте измерительный инструмент от влаги
и прямых солнечных лучей.
● Защищайте измерительный инструмент от экстремальных температур или колебаний температуры. Не оставляйте измерительный инструмент,
например, продолжительное время в автомобиле. При больших колебаниях температуры перед
включением следует выдержать инструмент до
выравнивания температуры.
● Защищайте измерительный инструмент от сильных ударов и падений. Повреждения инструмента могут отрицательно повлиять на точность
измерения. После сильного удара или падения
инструмента сравните лазерные линии для контроля с известными вертикальными или горизонтальными опорными линиями.
● При транспортировке выключайте измерительный инструмент. При выключении блокируется
маятниковый механизм, который иначе при резких движениях может быть поврежден.
Включение/выключение
Для включения измерительного инструмента передвиньте выключатель 3 в положение «On».
● Не направляйте лазерный луч на людей или
животных и не смотрите сами в лазерный луч,
включая и с большого расстояния. Для выключения измерительного инструмента передвиньте
выключатель 3 в положение «Off».
● Не оставляйте без присмотра включенный измерительный инструмент и выключайте его после
использования. Другие лица могут быть ослеплены лазерным лучом.
РАБОТА С АВТОМАТИЧЕСКИМ
НИВЕЛИРОВАНИЕМ
Установите измерительный инструмент на прочную
горизонтальную поверхность или закрепите его на
штативе 6.
После включение механизм автоматического самонивелирования выверяет неплоскостности в
пределах диапазона самонивелирования ±4°. Нивелирование закончено как только лазерные линии
остановятся.
За пределами диапазона самонивелирования в ±4°
работа с инструментом невозможна, так как при
этом не гарантируется прямой угол между лазерными линиями.
При толчках и изменениях положения во время
работы измерительный инструмент автоматически
выполняет компенсацию. После повторного компенсирования проверьте горизонтальное и вертикальное положение лазерных линий по отношению
к опорным точкам для предотвращения ошибок.
ТЕХОБСЛУЖИВАНИЕ И СЕРВИС
Техобслуживание и очистка
Храните и транспортируйте измерительный инструмент только в поставленном защитном чехле.
Содержите измерительный инструмент постоянно
в чистоте.
Никогда не погружайте измерительный инструмент
в воду или другие жидкости.
Загрязнения вытирайте влажной и мягкой салфеткой. Не используйте никаких очищающих средств
или растворителей.
Очищайте регулярно особенно поверхности у выходного отверстия лазера и следите при этом за
ворсинками.
Если электроинструмент, несмотря на тщательные методы изготовления и испытания, выйдет из
строя, то ремонт следует производить силами авторизованной сервисной мастерской для электроинструментов фирмы SBM group.
RU
УКАЗАНИЯ ПО ПРИМЕНЕНИЮ
Штатив 6 представляет собой прочную, изменяемую по высоте опору для измерения. Установите
измерительный инструмент гнездом под штатив 8
на резьбу 1/4" штатива, закрепив крепежным винтом штатива.
Очки для работы с лазерным инструментом
(принадлежности)
Лазерные очки отфильтровывают окружающий свет.
Благодаря этому красный свет лазера становится
более ярким для человеческого глаза.
● Не применяйте лазерные очки в качестве защитных очков. Лазерные очки служат для лучшего
опознавания лазерного луча, однако, они не защищают от лазерного излучения.
● Не применяйте лазерные очки в качестве солнечных очков или в уличном движении. Лазерные
очки не дают полной защиты от ультрафиолетового излучения и ухудшают восприятие красок.
13
DE
KONFORMITÄTSERKLÄRUNG
Wir erklären in alleiniger Verantwortung, daß dieses
Produkt mit den folgenden Normen oder normativen
Dokumenten übereinstimmt: EN 61326-1:2006, EN
61326-2-2:2006 gemäß den Bestimmungen der Richtlinien 2006/42/ЕG, 2006/95/ЕG, 2004/108/ЕGС.
GB
DECLARATION OF CONFORMITY
We declare under our sole responsibility that this
product is in conformity with the following standards
or standardized documents: EN 61326-1:2006, EN
61326-2-2:2006 in accordance with the regulations
2006/42/ЕEС, 2006/95/ЕEС, 2004/108/ЕEС.
FR
IT
DICHIARAZIONE DI CONFORMITÀ
Dichiaramo, assumendo la piena responsabilità di tale
dichiarazione, che il prodotto è conforme alle seguenti
normative e ai relativi documenti: EN 61326-1:2006,
EN 61326-2-2:2006 in base alle prescrizioni delle direttive 2006/42/СEE, 2006/95/СEE, 2004/108/СEE.
RU
ЗАЯВЛЕНИЕ О СООТВЕТСТВИИ
Мы с полной ответственностью заявляем, что настоящее изделие соответствует следующим стандартам и нормативным документам: EN 613261:2006, EN 61326-2-2:2006 - согласно правилам:
2006/42/EEC, 2006/95/EEC, 2004/108/EEC.
DÉCLARATION DE CONFORMITÉ
Nous déclarons sous notre propre responsabilité que
ce produit est en conformité avec les normes ou documents normalisés suivants: EN 61326-1:2006,
EN 61326-2-2:2006 conforme aux réglementations
2006/42/СEE, 2006/95/СEE, 2004/108/СEE.
Product managament
V. Nosik
SBM group GmbH
Kurfürstendamm 21
10719 Berlin, Germany
14
DE HINWEISE ZUM UMWELTSCHUTZ
Alt-Elektrogeräte sind Wertstoffe, sie gehören daher nicht in den
Hausmüll!
Wir möchten Sie daher bitten, uns mit Ihrem aktiven Beitrag bei
der Ressourcenschonung und beim Umweltschutz zu unterstützen und dieses Gerät bei den-falls vorhandeneingerichteten
Rücknahmestellen abzugeben.
GB
ENVIRONMENTAL PROTECTION
Discarded electric appliances are recyclable and should not be
discarded in the domestic waste! Please actively support us in
conserving resources and protecting the environment by
returning this appliance to the collection centres (if available).
FR
IT
AVVERTENZE PER LA TUTELA
DELL’AMBIENTE
Gli apparecchi elettrici vecchi sono materiali pregiati, non rientrano nei normali rifiuti domestici! Preghiamo quindi i gentili clienti
di contribuire alla salvaguardia dell’ambiente e delle risorse e di
consegnare il presente apparecchio ai centri di raccolta competenti, qualora siano presenti sul territorio
RU
УКАЗАНИЯ ПО ЗАЩИТЕ
ОКРУЖАЮЩЕЙ СРЕДЫ
Старые электроприборы подлежат вторичной переработке и поэтому не могут быть утилизированы с бытовыми отходами! Поэтому
мы хотели бы попросить Вас активно поддержать нас в деле экономии ресурсов и защиты окружающей среды и сдать этот прибор в
приемный пункт утилизации (если таковой имеется).
INFORMATIONS SUR LA
PROTECTION DE L’ENVIRONNEMENT
Tout appareil électrique usé est une matière recyclable et ne fait
pas pas partie des ordures ménagères! Nous vous demandons
de bien vouloir nous soutenir en contribuant activement au ménagement des ressources et à la protection de l’environnement
en déposant cet appareil dans sites de collecte(si existants).
15