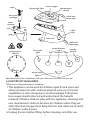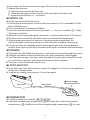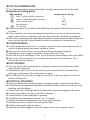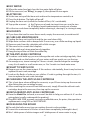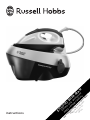
1
0
,0
0
0
pr
iz
e
dr
aw
w
w FR TR
w
.p E E A
ro
ye
R du rew ar
eg ct
is re ar gu
Se ter gis ds a
e on te
g ra
de bac lin r.co al nte
ta k e n .u ler e
ils fo o k/
y
r w rh
!
ob
bs
EX
£1
instructions
catch
steam trigger
thermostat light
anti-scale
cartridge
temperature
control
cable and
steam pipe
mark
water
max
ax
cable
tidy
reservoir
grip
base unit
cable and
steam pipe
temperature
control
steam buttons
low water
light
low
medium high
standby
button
2
e
S
T
U
S
max
steam ready
light
S
mark
Read the instructions, keep them safe, pass them on if you pass the iron on.
AIMPORTANT SAFEGUARDS
Follow basic safety precautions, including:
1This appliance can be used by children aged from 8 years and
above and persons with reduced physical, sensory or mental
capabilities or lack of experience and knowledge if they have
been supervised/instructed and understand the hazards
involved. Children shall not play with the appliance. Cleaning and
user maintenance shall not be done by children unless they are
older than 8 and supervised. Keep the iron and cable out of reach
of children under 8 years.
6Unplug the iron before filling, before cleaning, and after use.
2
2Sit the base unit on a stable, level, heat-resistant surface,
preferably a purpose-built “steam generator” type ironing board.
3Rest the iron only on the base unit.
4Use the iron only on a stable surface.
5Don’t leave the iron unattended while plugged in or standing on
the ironing board. It could be knocked over.
7Don’t use the iron if it’s dropped, damaged, malfunctions or leaks.
8If the cable is damaged, return the iron, to avoid hazard.
¬The surfaces of the appliance will get hot.
HDon’t put the iron in liquid, don’t use it in a bathroom, near water, or outdoors.
9 Don’t iron clothing while it’s being worn – you’ll burn or scald the wearer.
10Don’t touch the soleplate, and keep away from the steam coming from it.
11Don’t use the iron in the vicinity of children.
12Don’t sit the base unit on a soft, carpeted, or upholstered surface, as this may block
the vents underneath the base unit.
13Don’t fit any attachment or accessory other than those we supply.
14Don’t use the iron for any purpose other than those described in these instructions.
15Take care not to scratch the soleplate – avoid buttons, zips, etc.
16The iron has a protective thermal fuse, which will blow if it overheats. If this
happens, the iron will stop working, and must be returned for repair.
household use only
CREMOVE ALL PACKAGING
• Remove any labels, stickers or packaging from the iron and soleplate.
CCURE THE ELEMENT
• Before using the iron for the first time, or if it’s not been used for a long time, iron a
scrap piece of cotton (an old towel is ideal) to remove any accumulated residues.
• Don’t worry if the iron smokes a bit at first, it’ll stop as the residues evaporate.
CWATER
1 Use ordinary tap-water – the anti-scale cartridge will soften the water.
2 If the anti-scale cartridge needs replacing, and you don’t have a replacement, you
should use distilled water while you’re waiting for the replacement to be delivered.
3 If you buy distilled water, check that it’s marketed as suitable for irons.
4 Don’t add anything to the water, and don’t use water with anything added to it.
5 When the water is converted to steam, chemicals, perfume, and other additives will
coat the inside of the steam chamber, shortening the life of the iron.
CFILLING
6 Switch off (2), and unplug before filling.
7 Remove the reservoir:
a) put the fingers of one hand into the grip under the front of the reservoir
b)press the catch on the top rear of the reservoir with the other hand
c) pull the reservoir out of the base unit
3
8 Pour water into the front hole in the top of the reservoir, up to, but not over max.
9 Replace the reservoir:
d)slide the reservoir into the base unit
e) check that the catch on the reservoir clicks into place in the base unit
f) prime the iron before use – see below
CSWITCH ON
10Sit the iron on top of the base unit.
11Put the plug into the power socket (switch the socket on, if it’s switchable). All the
lights will flash once.
12Press the 2 button. The button will glow.
13Press the steam button for the level you want ( S = low, T = medium, U = high).
The button will glow.
14When the steam ready light glows, the boiler is ready to make steam (2-3 minutes).
16It’ll then cycle on and off as the boiler works to maintain the temperature.
17If the temperature control on the iron is set above room temperature, the
thermostat light on the iron will glow, to show that the soleplate is heating up.
18It’ll go out when the soleplate reaches the temperature set by the temperature
control, then cycle on and off, as the thermostat works to maintain the temperature.
CPRIMING
19Prime the iron after filling the reservoir, to get water and steam through the system.
20Hold the iron below the level of the base unit, and squeeze the steam trigger.
21You’ll hear the pump as it pushes water through the system, then, after 30 seconds
or so, it’ll start to quieten, and steam will come out of the soleplate.
22The iron is now primed and ready for use.
CAUTO-SHUT-OFF
23If you don’t press the steam buttons and/or the trigger for 15 minutes, the appliance
will go into standby mode.
24To continue ironing, jump to point 12, and start again.
base unit
steam pipe
CPREPARATION
steam trigger
squeeze to prime
25Check for textile care symbols (i j k l).
26Iron fabrics needing low temperatures j first, then those that need medium
temperatures k, and finish with those needing high temperatures l (or max).
4
CSET THE TEMPERATURE
27Turn the temperature control to bring the setting you require next to the mark.
temperature setting guide
label marking
temperature setting
j cool – nylon, acrylics, polyester
•
k warm – wool, polyester mixtures
••
l hot – cotton, linen
•••
denim/jeans
MAX
i do not iron
,If the instructions on the fabric label differ from this guide, follow the instructions on
the label.
28If the soleplate is at a lower temperature that the one you’ve set, the thermostat
light on top of the iron will glow, to let you know that the soleplate is heating up.
29When the soleplate reaches operating temperature, the thermostat light will go out,
then cycle on and off as the thermostat works to maintain the temperature
CSTEAM IRONING
30Set the temperature control to S or higher – otherwise the steam might condense
on the soleplate, giving you water, instead of steam.
,When you first want steam, you must prime the pump (opposite page).
31Squeeze the steam trigger to produce steam, release it to stop.
32Don’t let the reservoir empty in use, or you’ll have to prime it again when you refill it.
,Steam may still escape from the iron after you release the steam button. This is
normal, don’t worry about it.
CDRY IRONING
33You may do your dry ironing before setting the steam level (so that none of the
steam buttons glowing).
34Alternatively, you can turn off the steam by pressing whichever steam button is
glowing (so that none of the steam buttons glow).
,It’s unlikely, but if you’re dry ironing for more than 15 minutes, the auto-shut-off
feature will operate.
CVERTICAL STEAMING
35Remove wrinkles from hanging clothes, hanging curtains, and furnishing fabrics.
36Check that there’s adequate ventilation behind the fabric, otherwise moisture may
build up, causing mildew.
37Check that there’s nothing behind the fabric that may be damaged by the steam.
38Check that pockets, turn-ups, and cuffs are empty.
39Check that the steam ready light is glowing.
40Check that the temperature control is at S or higher.
41Wait till the thermostat light goes out, then start steaming.
42Hold the iron close to (but not touching) the fabric.
,Hold it well away for delicate fabrics.
43Squeeze the steam trigger to produce steam, release it to stop the steam.
5
CNO WATER
44When the water level gets low, the low water light will glow.
45Fill the reservoir (see “filling”, on page 4), then prime the iron again.
CAFTER USE
46Sit the iron on top of the base unit and turn the temperature control to •.
47Press the 2 button. The light will go off.
48Unplug the base unit (switch the socket off first, if it’s switchable).
49Top up the reservoir a) this’ll give you a head start next time you use the iron
b)it’ll help to avoid inadvertently running out of water
50Let the iron cool down completely before cleaning it, moving it, or storing it away.
CHOLIDAYS
51If you leave the iron for more than a week, empty the reservoir, to avoid mould.
CCARE AND MAINTENANCE
52Unplug the base unit, and let it and the iron cool down fully.
53Wipe outer surfaces with a damp cloth. If necessary, use a little washing-up liquid.
54Remove spots from the soleplate with a little vinegar.
55Take care not to scratch the soleplate.
56Coil the cable and steam pipe loosely together.
57Hang the top of the coil from the cable tidy.
CTHE ANTI-SCALE CARTRIDGE
58To reduce scale build-up, you must change the anti-scale cartridge regularly. How
often depends on the hardness of your water, and how much you use the iron.
59An average user, steam ironing for 2 hours a week, should change the cartridge
every 4 to 6 weeks in a soft water area, or 2 to 3 weeks in a hard water area.
CWHAT TO WATCH FOR
60Keep an eye on the steam output. If this reduces substantially, then it may be time to
replace the anti-scale cartridge.
61Look out for flecks of scale on your clothes. If scale is getting through the iron, it’s
time to replace the anti-scale cartridge.
CCHANGING THE ANTI-SCALE CARTRIDGE
62This is best done when refilling the reservoir, as you’ll have to top up the reservoir
after fitting the new cartridge anyway.
63After removing the reservoir from the base unit, simply lift out the old anti-scale
cartridge, drop in the new one, then top up the reservoir.
CREPLACEMENT ANTI-SCALE CARTRIDGES
64Have the Model No. to hand, as we won’t be able to help you without it. It’s on the
rating plate (usually underneath the product).
65Ring 0845 658 9700, or email [email protected], for prices, then purchase
replacements using VISA or MASTERCARD.
CDESCALING THE BOILER
66Descale the boiler every time you replace the anti-scale cartridge.
67Leave it for a minimum of 4 hours to cool down completely (overnight is best).
68Mix 1 tablespoon of white vinegar and 2 tablespoons of warm water in a jug.
6
69It’s best to do this on top of a towel on the work surface in the kitchen, as you’re
likely to spill a bit, and you’ll need access to water and a sink (or a basin).
70Remove the reservoir (you’re going to turn the base unit upside down).
71Set the iron down on the work surface – take care not to scratch the soleplate.
closed
72Turn the base unit upside down.
cover
position
73Use a coin or screwdriver to turn the cover 90°
anti-clockwise to unlock it.
74Move the cover sideways to expose the drain.
75Use the hexagonal wrench to unscrew the drain cap.
loosen
76Turn the base unit over, and empty the boiler into
the sink.
hexagonal wrench
77Turn the base upside down again, and pour the
vinegar/water mix into the hole.
tighten
78 Replace the drain cap and shake the base unit from
cover
side to side.
open
79Leave it for half an hour, then unscrew the cap again.
position
80Turn the base unit over, and empty the boiler into
the sink.
drain cap
81Now rinse, to remove scale and vinegar:
a) turn it upside down, fill with water
b)turn it back, and empty it into the sink
82Repeat point 80 till the water that comes out is clear, free of scale particles, and
doesn’t smell of vinegar.
83Finally, replace the cap, replace the cover, turn the cover 90° clockwise to lock it
closed, turn the base unit upright, and store it away.
,Products returned under guarantee with faults due to scale will be subject to a
repair charge.
CALL LIGHTS FLASHING?
84To ensure that it gets descaled at least once a year, even in soft water areas, the iron
has an internal counter.
85When the counter reaches 1000 minutes of use, it stops the boiler, and makes all the
lights flash.
86To return it to working condition, press the 2 button and hold it in for 5 seconds.
87If you have recently descaled the boiler, carry on ironing.
88If you haven’t recently descaled the boiler, descale it now.
7
WENVIRONMENTAL PROTECTION
To avoid environmental and health problems due to hazardous substances in
electrical and electronic goods, appliances marked with this symbol mustn’t be
disposed of with unsorted municipal waste, but recovered, reused, or recycled.
SSERVICE
If you ring Customer Service, please have the Model No. to hand, as we won’t be able
to help you without it. It’s on the rating plate (usually underneath the product).
The product isn’t user-serviceable. If it’s not working, read the instructions, check the
plug fuse and main fuse/circuit breaker. If it’s still not working, consult your retailer.
If that doesn’t solve the problem – ring Customer Service – they may be able to offer
technical advice.
If they advise you to return the product to us, pack it carefully, include a note with your
name, address, day phone number, and what’s wrong. If under guarantee, say where
and when purchased, and include proof of purchase (till receipt). Send it to:
Customer Service
Spectrum Brands (UK) Ltd
Fir Street, Failsworth, Manchester M35 0HS
email: [email protected]
telephone: 0845 658 9700 (local rate number)
EGUARANTEE
Defects affecting product functionality appearing within two years of first retail
purchase will be corrected by replacement or repair provided the product is used and
maintained in accordance with the instructions. Your statutory rights are not affected.
Documentation, packaging, and product specifications may change without notice.
JONLINE
www.russellhobbs.co.uk for more products
IREGISTER ONLINE FOR –
552-279
£10,000 prize draw, EXTRA year guarantee, FREE rewards gallery
Visit www.productregister.co.uk/rhobbs
You must register within 28 days of purchase.
8