1
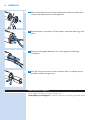
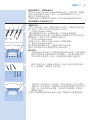
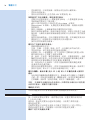
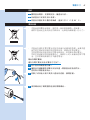
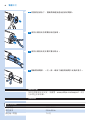
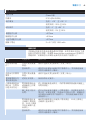
SC2008
SC2006
User manual
5
SC2008 SC2006
ENGLISH 6
繁體中文 31
6
ENGLISH
Table of contents
Introduction 7
Benefits 7
Intense Pulsed Light (IPL) technology for home use 7
Effective hair regrowth prevention for everyday smoothness 7
Gentle treatment, even on sensitive body areas 8
Cordless operation for maximum freedom and flexibility 8
Long-lasting battery for complete body and face treatment 8
No replacement parts needed, no hidden costs 8
How Philips’ Intense Pulsed Light technology works 8
Hair growth 8
Working principle 8
General description 9
Important 9
Danger 10
Warning 10
To prevent damage 10
Caution 11
Keep the following things in mind to avoid compromising
the lifetime of your Philips Lumea Precision Plus: 11
For whom is Philips Lumea Precision Plus NOT suitable? 11
Contraindications 11
Never use the appliance if you are pregnant or breast feeding. 11
Never use the appliance if you have an unsuitable
skin and/or hair colour, i.e.: 11
Never use the appliance if you suffer from any of the
diseases listed below, i.e.: 11
Never use the appliance if you take any of
the medications listed below, i.e.: 12
Never use the appliance on the following areas: 12
Never use the appliance on sunburnt, recently
tanned (last 48 hours) or fake-tanned skin: 12
Electromagnetic fields (EMF) 13
Charging 13
Preparing for use 13
Preparing treatment areas 13
Setting the light intensity 14
Recommended light intensities (1-5) 14
Important 15
Tanning advice 15
Using the appliance 16
Choosing the right attachment 16
First use and skin test 17
Subsequent use 17
Guidelines for treatment 20
Average treatment time 20
Intended treatment areas 20
Using the appliance on the legs 20
Tip: White eye pencil 21
Using the appliance in the bikini area 21
Using the appliance on the underarms 21
Using the appliance on the face (upper lip, chin, sideburns) 22
ENGLISH
7
How to achieve optimal results 22
Maintenance phase 22
Possible side effects and skin reactions 23
After use 23
Cleaning and maintenance 24
Storage 25
Environment 25
Removing the rechargeable batteries 25
Guarantee and support 26
Technical specifications 27
Troubleshooting 27
Introduction
Congratulations on your purchase and welcome to Philips! To fully benefit
from the support that Philips offers, register your product at
www.philips.com/welcome. Light-based hair removal is one of the most
effective methods to treat unwanted body hair with longer-lasting results.
It is different from current home hair removal methods because
it significantly reduces hair regrowth. Philips has been investigating this
method together with leading dermatologists for over 10 years. You can
now use this innovative technology comfortably in the privacy of your
own home, whenever and wherever you want. This appliance has been
specifically designed and optimised for use by women, but can be used by
men as well.
Philips Lumea Precision Plus enables treatment of unwanted hair on the
whole body, including the face (upper lip, chin and sideburns), using three
tailored attachments. Philips Lumea Precision Plus is designed for use by
one person only. For more information about Philips Lumea Precision Plus
and movies about how to use Lumea, see www.philips.com/lumea.
Check our homepage regularly for updates.
Benefits
This appliance provides the following benefits:
Intense Pulsed Light (IPL) technology for home use
Philips Lumea Precision Plus uses a light-based technology called ‘Intense
Pulsed Light’ (IPL). IPL is also used in the professional beauty market for
hair removal and has been in use for the last fifteen years. Philips Lumea
Precision Plus now brings you this innovative technology for safe and
effective use in the comfort of your home.
Effective hair regrowth prevention for everyday smoothness
This method provides you with long-lasting hair regrowth prevention and
silky-smooth skin. Our studies have shown a significant hair reduction
already after two treatments. Optimal results were generally achieved after
four to five treatments. A reduction in hair density is visible from treatment
to treatment. How fast the effect becomes visible and how long the results
last varies from person to person. For more information, see section
‘How to achieve optimal results’ in chapter ‘Using the appliance’.
8
ENGLISH
Gentle treatment, even on sensitive body areas
Philips Lumea Precision Plus has been developed in close cooperation with
leading dermatologists and has been tested by over 2000 women for an
effective and gentle treatment, even on the most sensitive body areas and
the face.
Cordless operation for maximum freedom and flexibility
Because the appliance runs on rechargeable batteries, it is portable and can
be used anywhere.
Long-lasting battery for complete body and face treatment
A fully charged battery provides a complete body and face treatment
(upper lip, underarms, bikini line and lower legs) in one go,
without recharging breaks.*
*Based on the average treatment times for each area and the
recommended intensities for one user.
No replacement parts needed, no hidden costs
Philips Lumea Precision Plus is equipped with a high-performance lamp
which does not require replacement. This lamp can generate over
140,000 flashes and should enable you to continuously maintain results for
more than 5 years* while saving money on expensive replacement lamps.
*Based on the average treatment times for each area and the
recommended intensities for one user.
How Philips’ Intense Pulsed Light technology works
Hair growth
Hair growth rates differ from person to person, depending on age,
metabolism and other factors. However, everyone’s hair normally grows in
3 phases.
1 Growing phase (anagen phase)
The hair grows actively from the root. In this phase the concentration of
melanin is highest. Melanin is responsible for the pigmentation of the hair.
Melanin concentration is also the determining factor for the efficacy of this
method. Only hairs in the growing phase are susceptible to treatment with light.
2 Degradation phase (catagen phase)
Hair growth stops and the root shrinks before the hair sheds.
3 Resting phase (telogen phase)
The old hair separates from its hair follicle and sheds. The follicle remains
at rest until the biological clock tells it to become active again and grow a
new hair.
Working principle
-- The appliance works by heating up the hair and root beneath the skin.
The melanin in the hair and hair root absorbs the released light pulses.
The darker the colour of the hair, the more light can be absorbed.
This process stimulates the hair to go into the resting phase.
ENGLISH
9
-- In between treatments, hair sheds naturally and regrowth is inhibited.
Hairs can take one or two weeks to shed.
--
Optimal hair removal cannot be obtained with a single session, since
only hairs in the growing phase are susceptible to treatment with light.
During a treatment, hairs on the treated area are usually in different
stages of the hair growth cycle. To effectively treat all hairs you have to
repeat the treatment every two weeks for a few times.
An integrated optical filter ensures that no UV light reaches the skin
and guarantees that the appliance is safe for the skin.
General description (Fig. 5)
1 Light exit window with integrated UV filter
2 Attachments Facial attachment: suitable for all body areas, including
upper lip, chin and sideburns Body attachment: suitable for all body
areas below the neck Bikini area attachment (SC2008 only): suitable for
the bikini area
3 Metallic frame inside the attachment
4 Safety system (safety ring with contact switches)
5 Flash button
6 Intensity lights (1- 5)
7 % Intensity increase button
8 ^ Intensity decrease button
9 Charging light and battery low indication
10 On/off button
11 Appliance socket
12 ’Ready to flash’ light
13 Air vents
14Adapter
15 Small plug
Important
Read this user manual carefully before you use the appliance and save it for
future reference.
10
ENGLISH
Danger
-- Water and electricity are a dangerous combination. Do not use this
appliance in wet surroundings (e.g. near a filled bath, a running shower
or a filled swimming pool).
-- Keep the appliance and the adapter dry.
-- If the appliance is broken, do not touch any inner part to avoid electric shock.
-- Never insert any objects into the appliance.
Warning
-- This appliance is not intended for use by persons (including children)
with reduced physical, sensory or mental capabilities, unless they have
been given supervision or instruction concerning use of the appliance
by a person responsible for their safety.
-- Children should be supervised to ensure that they do not play with the
appliance.
-- The appliance is not intended for children under the age of 15 years.
Teenagers aged between 15 and 18 years can use the appliance with
the consent and/or assistance of their parents or the persons who have
parental authority over them. Adults from 19 years and older can use
the appliance freely.
-- Only charge the appliance with the adapter supplied.
-- Do not use the appliance or the adapter if it is damaged.
-- The adapter contains a transformer. Do not cut off the adapter to
replace it with another plug, as this causes a hazardous situation.
-- If the adapter is damaged, always have it replaced with one of the
original type in order to avoid a hazard.
-- Do not use the appliance if the UV filter of the light exit window is broken.
-- Do not use the facial attachment or the bikini area attachment
(SC2008 only) if its filter is broken.
To prevent damage
-- Make sure nothing obstructs the air flow through the ventilation slots.
-- Never subject the appliance to heavy shocks and do not shake or drop it.
-- If you take the appliance from a very cold environment to a very warm
environment or vice versa, wait approximately 3 hours before you use it.
-- Store the appliance in a dust-free place to prevent it from becoming dusty.
-- Never leave the appliance unattended when it is switched on. Always
switch off the appliance after use.
-- Do not expose the appliance to direct sunlight or UV light for several hours.
-- Do not flash against any other surface than the skin. This can cause
severe damage to the attachments and/or the light exit window. Only
flash when the appliance is in contact with skin.
ENGLISH
11
Caution
-- Never use the appliance around the eyes and near the eyebrows to
avoid the risk of eye damage.
-- Use this appliance only at settings suitable for your skin type. Use at
higher settings than those recommended can increase the risk of skin
reactions and side effects.
-- This appliance is only intended for removing unwanted body hair from
areas below the cheek bones with the attachments supplied. Do not
use it for any other purpose.
Keep the following things in mind to avoid compromising the
lifetime of your Philips Lumea Precision Plus:
-- Do not expose the appliance to temperatures lower than 15°C or
higher than 35°C during use.
-- The appliance is equipped with a built-in overheat protection. If the
appliance overheats, it does not flash. Do not switch off the appliance,
but let it cool down for approx. 15 minutes before you continue with
your treatment.
-- Always return the appliance to a service centre authorised by Philips
for examination or repair. Repair by unqualified people could cause an
extremely hazardous situation for the user.
-- Never use the appliance in any of the cases mentioned in the section
‘Contraindications’.
For whom is Philips Lumea Precision Plus NOT suitable?
Philips Lumea Precision Plus is not designed for everyone. If any of the
following is true for you, then this appliance is not suitable for you to use!
Contraindications
Never use the appliance if you are pregnant or breast feeding.
Never use the appliance if you have an unsuitable skin and/or
hair colour, i.e.:
-- If your natural hair colour in the treatment areas is light blond, white,
grey or red.
-- If you are of skin type VI (you rarely or never get sunburnt and you tan
very darkly; your skin colour is brownish black or darker). In this case
you run a high risk of developing skin reactions, such as discolourations,
strong redness or burns, when you use Philips Lumea Precision Plus.
See also chapter ‘Using the appliance’, section ‘Possible side effects and
skin reactions’.
Never use the appliance if you suffer from any of the diseases
listed below, i.e.:
-- If you have a skin disease such as active skin cancer, you have a history
of skin cancer or any other localised cancer in the areas to be treated.
-- If you have pre-cancerous lesions or multiple atypical moles in the areas
to be treated.
-- If you have a history of collagen disorder, including a history of keloid
scar formation or a history of poor wound healing.
-- If you have a history of vascular disorder, such as the presence of
varicose veins or vascular ectasia in the areas to be treated.
-- If your skin is sensitive to light and easily develops a rash or an allergic
reaction.
12
ENGLISH
-- If you have infections, eczema, burns, inflammation of hair follicles,
open lacerations, abrasions, herpes simplex, wounds or lesions and
haematomas in the areas to be treated.
-- If you have had surgery in the areas to be treated.
-- If you have epilepsy with flashlight sensitivity.
-- If you have diabetes, lupus erythematodes, porphyria or congestive
heart disease.
-- If you have any bleeding disorder.
-- If you have a history of immunosuppressive disease (including HIV
infection or AIDS).
Never use the appliance if you take any of the medications
listed below, i.e.:
-- If your skin is currently being treated with or has recently been treated
with Alpha-Hydroxy Acids (AHAs), Beta- Hydroxy Acids (BHAs),
topical isotretinoin and azelaic acid.
-- If you have taken any form of isotretinoin Accutane® or Roaccutane® in
the last six months.This treatment can make skin more susceptible to
tears, wounds and irritations.
-- If you are on painkillers, which reduce the skin’s sensitivity to heat.
-- If you are taking photosensitising agents or medications, check the
package insert of your medicine and never use the appliance if it is
stated that it can cause photo-allergic reactions, photo-toxic reactions
or if you have to avoid sun when taking this medicine.
-- If you take anticoagulation medications, including heavy use of aspirin, in
a manner which does not allow for a minimum 1-week washout period
prior to each treatment.
-- If you take immunosuppressive medications.
Never use the appliance on the following areas:
-- Around the eyes and near the eyebrows.
-- On nipples, areolas, labia minora, vagina, anus and the inside of the
nostrils and ears.
-- Men must not use it on the scrotum and face.
-- Over or near anything artificial like silicone implants, pacemakers,
subcutaneous injection ports (insulin dispenser) or piercings.
-- On moles, freckles, large veins, darker pigmented areas, scars, skin
anomalies without consulting your doctor. This can result in a burn and
a change in skin colour, which makes it potentially harder to identify
skin-related diseases (e.g. skin cancer).
-- On warts, tattoos or permanent make-up. This can result in a burn and
a change in skin colour (hypopigmentation or hyperpigmentation).
-- On areas, where you use long-lasting deodorants. This can result in skin
reactions. See chapter ‘Using the appliance’, section ‘Possible side effects
and skin reactions’.
Never use the appliance on sunburnt, recently tanned
(last 48 hours) or fake-tanned skin:
-- All types of tanning can influence the safety of the treatment. This applies
to exposure to natural sunlight as well as artificial tanning methods,
such as tanning lotions, tanning appliances etc. If you are tanned or are
planning to tan, see chapter ‘Preparing for use’, section ‘Tanning advice’.
Note:This list is not exhaustive. If you are not sure whether you can use the
appliance we advise you to consult a doctor.
ENGLISH
13
Electromagnetic fields (EMF)
This Philips appliance complies with all applicable standards and regulations
regarding exposure to electromagnetic fields.
Charging
Fully charge the batteries before you use the appliance for the first time
and when the batteries are empty. Fully charging the batteries takes up to
1 hour and 40 minutes.
Charge the appliance when the charging light lights up orange during use
to indicate that the battery is low and will run out soon.
Fully charged batteries provide at least 370 flashes at light intensity 5.
Fully charge the appliance every 3 to 4 months, even if you do not use the
appliance for a longer time.
Charge the appliance in the following way:
1Switch off the appliance.
2Insert the small plug into the appliance and put the adapter in the
wall socket.
,, The charging light flashes green to indicate that the appliance is charging.
,, When the batteries are fully charged, the charging light
lights up green continuously.
Notes:
-- The adapter and the appliance feel warm during charging. This is normal.
-- You cannot use the appliance during charging.
-- This appliance is equipped with battery-overheat protection and does
not charge if the room temperature exceeds 40°C.
Never cover the appliance and adapter during charging.
3After charging, remove the adapter from the wall socket and pull the
small plug out of the appliance.
Preparing for use
For optimal results and greatest effect, prepare the areas on which you
intend to use the appliance in the manner described below.
Preparing treatment areas
1Shave the areas you intend to treat as long as you still experience
hair regrowth.
Note: If your last depilation method involved removing hairs by the roots
(e.g epilating, waxing etc.), wait until you notice significant hair regrowth before you
use Philips Lumea Precision Plus. Do not use depilatory creams instead of shaving.
Please note that treatment on unshaved or improperly shaved
areas has a number of undesired effects:
-- The light exit window and attachment may become contaminated with
stray hairs and dirt. A contaminated light exit window and attachment
can reduce the life and efficacy of the appliance. In addition, burns or
black spots that appear on the light exit window and attachments due
to contamination can cause the treatment to become painful or cause
skin reactions like redness and discolouration.
-- Hairs on your skin can burn, which can result in an unpleasant smell.
14
ENGLISH
2Clean your skin and make sure it is hair-free, entirely dry and
free from oily substances (e.g. present in cosmetic products like
deodorants, lotions, perfumes, tanning creams and sunscreens).
3Check the appliance, especially the light exit window and attachment,
for trapped hair, dust and fibres. If you see any contamination, clean
the appliance according to the instructions in chapter ‘Cleaning and
maintenance’.
Notes:
-- If shaving causes wounds or lesions, your skin may be more sensitive
and the light treatment may sometimes feel uncomfortable.
-- Once the hairs stop growing back, which usually happens after
4-5 treatments, you no longer have to shave before you use the appliance.
Setting the light intensity
Philips Lumea Precision Plus is an appliance developed for consumer
use at home and therefore not comparable with professional light-based
appliances with respect to pain sensation. The pulses of light delivered
by Philips Lumea Precision Plus are gentler than those from professional
appliances and therefore you can expect a convenient and effective
treatment. You have to adjust the light intensity to your skin and body
hair colour and to a level you find comfortable. The recommended light
intensities table below helps you to establish the right light intensity
1Consult the table below to determine which light intensities are most
suitable for your skin and body hair colour and to check if this method
is suitable for you (if it is not, this is indicated with x in the table).
2Each body area and possibly even parts of a body area may require a
separate appropriate light intensity according to the recommended
light intensities table below. The method is more effective at higher
intensities, but you should reduce the light intensity if you experience
any pain or discomfort.
Note:The required light intensity for different body areas may vary due to
different skin colours. For example, the skin of the lower legs can be darker
than the skin of the underarms due to more sun exposure.
Persons with darker skin run a higher risk of skin irritation because their
skin absorbs more light. Therefore lower intensities are recommended
for persons with darker skin.
The light pulse can feel warm or hot on the skin but should never be
painful. To prevent skin reactions, see chapter ‘Using the appliance’,
section ‘Possible side effects and skin reactions’.
Recommended light intensities (1-5)
In the table below, ‘x’means that the appliance is not suitable for you.
ENGLISH
Beige
(easy
sunburn,
minimal
tanning)
Light brown
(sometimes
sunburn, good
tanning)
Mid
brown
(rarely
sunburn,
fast and
good
tanning)
Dark
brown
(rarely
sunburn,
very good
tanning)
Brownish
black and
darker (rarely
to never
sunburn, very
dark tanning)
dark blond/light
4/5
brown/brown/
dark brown/black
4/5
4/5
3/4
1/2/3
x
white/grey/red/
light blond
x
x
x
x
x
Skin colour and
characteristics:
White
(always
sunburn,
no
tanning)
15
Body hair colour:
x
Important
To check whether Philips Lumea Precision Plus is suitable for you,
see section ‘For whom is Philips Lumea Precision Plus not suitable?’.
If your skin has been exposed to natural sunlight or an artificial tanning
method, it may be darker than during the previous treatment. Check the
table above to determine which settings are suitable for your skin colour.
Tanning advice
Sun exposure before treatment
-- If your skin is tanned, perform a skin test (see chapter ‘Using the
appliance’, section ‘First use’) on the area to be treated to determine the
appropriate light intensity. A failure to do so causes a risk of developing
skin reactions after treatment with Philips Lumea Precision Plus.
-- Wait at least 48 hours after sunbathing before you use the appliance.
Sunbathing can cause skin to darken (tan) and/or can cause sunburn
(reddening of the skin).
-- After these 48 hours, check the skin for any remaining sunburn. Do not
use Philips Lumea Precision Plus as long as sunburn persists.
-- When the sunburn has disappeared, perform a skin test (see chapter
‘Using the appliance’, section ‘First use’) on the area to be treated to
determine the appropriate light intensity.
Sun exposure after treatment
-- Wait at least 24 hours after treatment before you expose treated
areas to the sun. Even after 24 hours, make sure that the treated skin
does not show any redness from the treatment anymore before you
expose it to the sun.
-- Cover treated areas when you go out into the sun or use a sunblock
(SPF 30+) in the two weeks after treatment.
-- Exposing treated areas to sunlight without protection immediately
after treatment can increase the risk of adverse side effects and skin
reactions. See chapter ‘Using the appliance’, section ‘Possible side effects
and skin reactions’.
Tanning with artificial light
-- Follow the instructions in ‘Sun exposure before treatment’ and
‘Sun exposure after treatment’ above.
16
ENGLISH
Tanning with creams
-- If you have used an artificial tanning lotion, wait until the artificial tan
has fully disappeared before you use Philips Lumea Precision Plus.
Note: For more details on unwanted skin reactions, see chapter ‘Using the
appliance’, section ‘Possible side effects and skin reactions’.
Using the appliance
Check the recommended light intensities table in chapter ‘Preparing for
use’, section ‘Setting the light intensity’ to determine which light intensities
are most suitable for your skin and body hair colour. Use the appliance in
a well-lit room; this reduces the perceived brightness of the flash. Shave
the area you intend to treat before you use the appliance (see chapter
‘Preparing for use’, section ‘Preparing treatment areas’).
If the treatment becomes intolerably painful at any point in time,
reduce the light intensity setting until the treatment is comfortable again.
If you notice skin reactions stronger than slight redness, stop the
treatment immediately and read section ‘Possible side effects and skin
reactions’ in this chapter.
Choosing the right attachment
-- Body attachment
The body attachment can be used to treat unwanted body hair on all
body areas below the neck (for exceptions, see chapter ‘Important’, section
‘Contraindications’). The body attachment can cover an area of 4cm² and
has been specially designed for faster treatment of larger areas like legs.
Do not use the body attachment on the face.
-- Facial attachment
The facial attachment has an additional integrated light filter and can be
used for extra-safe treatment of unwanted facial hair on the upper lip, chin
and sideburns. It may also be used on other sensitive areas of the body,
such as the underarms and hard-to-reach areas.
Never use the appliance around the eyes and near the eyebrows.
-- Bikini area attachment (SC2008 only)
The bikini area attachment has a special filter for treating the bikini area.
The attachment is optimised for effective hair reduction in the bikini area. It
has been specifically designed to remove the coarser hairs in this area. You
can also use the bikini area attachment on the underarms.
Do not use the bikini area attachment on the face.
ENGLISH
17
First use and skin test
1Choose the attachment appropriate for the area you intend to treat.

2Choose an area close to the area you intend to treat.
Note: Before you use the appliance on the upper lip, chin or sideburns,
choose a mole- and hair-free area below your ear to perform the skin test.
3Press the on/off button to switch on the appliance.
,, The appliance always starts automatically at the lowest setting.
4Apply one flash at the lowest recommended intensity for your skin
type (for instructions on how to release a flash, see steps 6 to
9 of section ‘Subsequent use’ in this chapter).
5As long as it feels comfortable (not painful), increase the setting by
one level within the recommended range for your skin type and
apply one flash for each setting. Do not apply more than one flash on
the same spot.
6After the skin test, wait for 24 hours and check your skin for
any reaction. If your skin shows reactions, choose the highest setting
that did not result in any skin reaction for subsequent use.
When you use the appliance for the first time, we advise you to perform
a skin test on the area to be treated to check your skin’s reaction to the
treatment and to get accustomed to light-based treatment.
Subsequent use
1Before every treatment, clean the attachments, the light exit window
and the metallic frame inside the attachments of Philips Lumea
Precision Plus. For more information see chapter ‘Cleaning and
maintenance’.
2Choose the attachment appropriate for the area you intend to treat.
3Press the on/off button to switch on the appliance.
Note: It is normal that the appliance and the attachment become warm during use.
18
ENGLISH
4Start each treatment by selecting the light intensity very carefully, based
on your skin’s sensitivity and on how comfortable treatment feels.
Your skin may react differently on different days/occasions for a number of
reasons and especially after tanning. See section ‘Possible side effects and
skin reactions’ in this chapter for more information.
5Press the % button to increase the intensity. To lower the intensity,
press the ^button.
,, Every time you press the button, the corresponding intensity
light starts to flash. This takes a few seconds.
6Place the appliance at a 90° angle on the skin so that the attachment
and the safety ring are in contact with the skin.
7Press the safety ring fully onto the skin with slight pressure.
Note:The safety ring has contact switches that together are the safety system
of the appliance.This safety ring prevents unintentional flashing without skin
contact.
,, The ‘ready to flash’ light on the back of the appliance lights up green
when all contact switches of the safety ring are in contact with the
skin and the device is charged. This may take a few seconds.
Tip: For easier use, stretch the area of skin you want to treat. On areas with
softer skin, you may need to exert more pressure on the appliance to push in
all contact switches.
ENGLISH
19
8Press the flash button to release a flash. Now you have 2 options to
release the next flash:
A Keep the flash button pressed. The appliance releases one flash
after another as long as the safety ring is in full contact with the skin.
Immediately after the appliance has flashed, slide the appliance to the
next area. Make sure the safety ring is fully pressed onto the skin.
This ‘Slide & Flash mode’ is especially convenient for treatment of larger
areas like the legs.
B Let go of the flash button after each flash. For the next flash, place the
appliance on the area right next to the previously flashed area.
Make sure the safety ring is fully pressed onto the skin.
This ‘Step & Flash mode’ guarantees a precise treatment of e.g. the upper
lip, knees or ankles.
Note: After a few seconds, the appliance is ready to flash again, so make sure
that you move it to the next area immediately after it has flashed.
Do not treat exactly the same area multiple times during one session.
This does not improve the effectiveness of the treatment, but increases
the risk of skin reactions.
Note:The visible light produced by the appliance is the reflection of the flash
on the skin and is harmless to your eyes. It is not necessary to wear goggles
during use.
9To avoid untreated areas, always make sure there is a slight overlap
with the previously treated area when you place the appliance on the
skin. The effective light only comes out of the light exit window.
Make sure the flashes are produced close to each other.
10Switch off the appliance after you have finished the treatment.
11Check the light exit window and the attachment for hairs and
dirt and clean the appliance after use (see chapter ‘Cleaning and
maintenance’).
20
ENGLISH
Guidelines for treatment
Average treatment time
Area
Approx. treatment time
Recommended attachment SC2006
Underarms
1 minute per underarm
Body attachment/facial attachment
Bikini line
1 minute per side
Body attachment/ facial attachment
Entire bikini area
4 minutes
Body attachment/ facial attachment
One lower leg
8 minutes
Body attachment
One full leg
14 minutes
Body attachment
Upper lip/ chin/ sideburns
1 minute
Facial attachment
Area
Approx. treatment time
Recommended attachment SC2008
Underarms
1 minute per underarm
Body attachment/ Bikini area
attachment
Bikini line
1 minute per side
Bikini area attachment
Entire bikini area
4 minutes
Bikini area attachment
One lower leg
8 minutes
Body attachment
One full leg
14 minutes
Body attachment
Upper lip/ chin/ sideburns
1 minute
Facial attachment
Note:The average treatment times above have been observed during research
and tests. Individual treatment times may vary from person to person.
Note: Fully charged batteries offer at least 370 flashes at intensity 5. How long
you can use the appliance depends on the size of the area to be treated and
the intensity setting used.
Intended treatment areas
The appliance is intended to treat unwanted hairs from the upper lip,
chin, sideburns, underarms, arms, stomach, bikini area and legs.
Using the appliance on the legs
Check the recommended light intensities table in chapter ‘Preparing for
use’, section ‘Setting the light intensity’ to see which settings are suitable for
your legs.
-- You can move the appliance up and down or across the leg, whichever
is more convenient to you.
Note: Bony areas like shinbone and ankles are more sensitive than other areas
of the body.When you press the attachment hard onto these areas, the skin
can be more susceptible to skin reactions, such as skin irritation and redness.
See section ‘Possible side effects and skin reactions’ in this chapter. Press the
attachment onto the skin just hard enough to make the ‘ready to flash’ light go
on, but not harder.
ENGLISH
21
Tip: The appliance may leave imprints on the skin in the treated
areas.These imprints may show you where you can make the
treated areas overlap.
A fully charged battery provides a complete body and face treatment
(upper lip, underarms, bikini line and lower legs) in one go.* If you use
the appliance to treat both your lower and upper legs, you may have to
recharge the appliance during the treatment. This is normal. How long you
can use the appliance depends on the size of the treatment area and the
intensity setting used.
*Based on the average treatment times for each area and the
recommended intensities for one user.
Tip: Many users combine leg treatments with other activities
around the house such as watching TV or listening to music.
You can also try this to make the experience more enjoyable
and relaxing.
Tip: White eye pencil
To help you remember what part of your skin you have already treated,
you can mark sections on your leg with a white eye pencil.
1Take a white eye pencil and draw a line on your leg. Start at any point
of your leg and draw a straight line.
3 cm
2Draw additional lines at a distance of 3cm from the first line if you
use the appliance horizontally or at a distance of 1cm if you use the
appliance vertically.
Perform the treatment section by section. If you need to take a break
during a session, just mark the last treated area with the same eye pencil
and resume the treatment later.
Note: Only use a white eye pencil. Any other colour absorbs the light and may
cause skin irritation.
Using the appliance in the bikini area
Check the recommended light intensities table in chapter ‘Preparing for
use’, section ‘Setting the light intensity’ to see which settings are suitable for
your bikini area. In principle, Philips Lumea Precision Plus is safe and gentle
enough for treatment of the entire bikini area. For SC2008 only:
use the bikini area attachment to treat this area. Use a lower setting
on darker pigmented, more sensitive skin in the bikini area. Do not use the
appliance on inner labia, vagina and anus. Men who wish to treat their pubic
area must not use the appliance on the scrotum.
Note: For hygienic reasons, always clean the attachment used before you start
treating another body area.
Using the appliance on the underarms
Check the recommended light intensities table in chapter ‘Preparing for
use’, section ‘Setting the light intensity’ to see which settings are suitable for
your underarms.
Make sure you remove any deodorant, perfume, cream or other skin care
product from your underarms before treatment.
Tip:To achieve optimal results on your underarms, stand in front of a mirror to
get a good view of the area to be treated and the ‘ready to flash’ light. Raise
your arm and place your hand in your neck to stretch the skin in the underarm
22
ENGLISH
area. In this way the safety ring can be pressed more easily onto the skin,
which makes the treatment easier to perform.
Note:The reflected light does not harm your eyes. If the scattered light is
unpleasant, close your eyes when you release a flash.
Using the appliance on the face (upper lip, chin, sideburns)
Check the recommended light intensities table in chapter ‘Preparing for
use’, section ‘Setting the light intensity’ to see which settings are suitable for
your face (upper lip, chin, sideburns).
Always use only the facial attachment to treat the upper lip, chin and
sideburns. Never use the appliance around the eyes or near the eyebrows.
When you treat your upper lip, chin or sideburns, make sure you do not
expose your face to direct sunlight in the 24 hours following the treatment.
Apply a sunblock (SPF 30+) after the treatment for the next two weeks
when you expose your face to direct sunlight.
Tip:To achieve optimal results on your upper lip, chin and sideburns stand in
front of a mirror to get a good view of the area to be treated and the ‘ready to
flash’ light.
Tip: Apply a thick layer of white eyeliner to your lip and lip margin.This white
line ensures the energy of the flash is reflected and does not touch your lip if
you flash the lip unintentionally.
Tip: Because of the contours of the jaws, it may be difficult to bring the safety
ring into full contact with the skin and to release a flash. Put your tongue
between your teeth and upper lip or puff up your cheeks to make this easier.
Tip:The reflected light does not harm your eyes. If the scattered light is
unpleasant, close your eyes when you release a flash.
How to achieve optimal results
-- It is normal that hairs are still visible after the first few treatments (see
chapter ‘Introduction’, section ‘Working principle’ for more information).
-- To remove all hairs successfully and prevent the hair follicle from
becoming active again, the treatments have to be repeated once every
two weeks for the first two months. Your skin should be smooth by
then. Please read section ‘Maintenance phase’ to find out how you
can keep these results.
Maintenance phase
-- To ensure that your skin stays smooth, we advise you to repeat the
treatment every 4 to 8 weeks. The time between treatments may vary
based on your individual hair regrowth and also across different body
areas. If too many hairs grow back between treatments, simply shorten
the treatment interval again, but do not treat any area more often than
once every two weeks. When you use the appliance more frequently
than recommended, you do not increase the effectiveness but you do
increase the risk of skin reactions.
ENGLISH
23
Possible side effects and skin reactions
Common skin reactions:
-- Your skin may show slight redness and/or may prickle, tingle or feel
warm. This reaction is absolutely harmless and disappears quickly.
-- A skin reaction similar to sunburn may occur on the treated area for a
short while. If this does not disappear within 3 days, we advise you to
consult a doctor.
-- Dry skin and itching may occur because of the combination of shaving
and light treatment. This is harmless and disappears within a few days.
You can cool the area with an ice pack or a wet facecloth. If dryness
persists, you can apply a non-scented moisturiser on the treated area
24 hours after the treatment.
Rare side effects:
-- Burns, excessive redness and swelling: these reactions occur very rarely.
They are the result of using a light intensity that is too high for your
skin colour. If these reactions do not disappear within 3 days, we advise
you to consult a doctor. Wait with the next treatment until the skin has
healed completely and make sure you use a lower light intensity.
-- Skin discolouration: this occurs very rarely. Skin discolouration manifests
itself as either a darker patch (hyperpigmentation) or a lighter patch
(hypopigmentation) than the surrounding area. This is the result of using
a light intensity that is too high for your skin colour. If the discolouration
does not disappear within 2 weeks, we advise you to consult a doctor.
Do not treat discoloured areas until the discolouration has disappeared
and your skin has regained its normal skin colour.
-- Skin infection and inflammation: This occurs very rarely and may be
caused by using the appliance on wounds or cuts that resulted from
shaving, on already existing wounds or on ingrown hairs.
-- Excessive pain: this can occur during or after treatment if you have
used the appliance on unshaved skin, if you use the appliance at a light
intensity that is too high for your skin colour, if you flash the same
area more than once and if you use the appliance on open wounds,
inflammations, infections, tattoos, burns, etc. See chapter ‘Important’,
section ‘Contraindications’ for more information.
After use
-- Do not apply any perfumed cosmetics to the areas treated immediately
after treatment.
-- Do not use deodorant immediately after treating the underarms.
Wait until any skin redness has disappeared completely.
-- See chapter ‘Preparing for use’, section ‘Tanning advice’ for information
about sun exposure and artificial tanning.
24
ENGLISH
Cleaning and maintenance
To ensure optimal results and a long life for the appliance, clean the
appliance before and after each use and, if necessary, also during the
treatment. The appliance loses its effectiveness if you do not clean it
properly.
Never clean the appliance or any of its parts under the tap or in the
dishwasher.
Never use scouring pads, abrasive cleaning agents or aggressive liquids
such as petrol or acetone to clean the appliance.
Never scratch the light exit window or the metallic frame inside
the attachments.
Note: Make sure that the contact switches of the safety ring do not get
congested with dirt.
Note: Stop using the appliance when it is no longer possible to clean the
light exit window or the attachments. For replacement, see chapter ‘Ordering
accessories’.
1Switch off the appliance, unplug it and let it cool down.
Note:The light exit window becomes hot during use. Make sure it has cooled
down before you clean it.
2To remove the attachment, put your fingers in the recesses at the
top and bottom and pull gently. The attachment should come off
easily.
3Moisten the soft cloth supplied with the appliance with a few drops
of water and use it to clean the following parts:
-- the light exit window
-- the outside surface of the attachments
-- the metallic frame inside the attachments
-- the reddish filter glass inside the facial attachment
Note: If water does not clean effectively, use a few drops of high-percentage
alcohol to clean the parts mentioned above.
Note: A contaminated light exit window and/or attachment can look like this
picture. Make sure you clean the appliance before and after each use and,
if necessary, also during the treatment according to the instructions in this
section.
Tip: If it is no longer possible to clean the edges of the attachments with the
enclosed cleaning cloth, use a cotton bud instead. Make sure that no fluff
or fibres stay behind on the attachments or on the light exit window.
4If necessary, clean the outside of the appliance with the dry soft
cleaning cloth supplied with the appliance.
ENGLISH
25
Storage
1Switch off the appliance, unplug it and let it cool down.
2Clean the appliance before you store it.
3Store the appliance in a dust-free and dry place at a temperature
between 0°C and 60°C.
Environment
-- Do not throw away the appliance with the normal household waste
at the end of its life, but hand it in at an official collection point for
recycling. By doing this, you help to preserve the environment.
-- The built-in rechargeable batteries contain substances that may pollute
the environment. Always remove the batteries before you discard and
hand in the appliance at an official collection point. Dispose of the
batteries at an official collection point for batteries. If you have trouble
removing the batteries, you can also take the appliance to a Philips
service centre. The staff of this centre will remove the batteries for you
and will dispose of them in an environmentally safe way.
Removing the rechargeable batteries
Only remove the rechargeable batteries if they are completely empty.
1Disconnect the appliance from the adapter.
2Let the appliance operate until the batteries are completely empty.
Switch on the appliance and release flashes until you can no longer
switch on the appliance.
3Insert an awl or another pointed tool into the bottom cap of the
appliance and pry off the bottom cap.
4Undo the two screws in the bottom of the handle with a
screwdriver.
26
ENGLISH
5Remove the bottom part of the handle and cut the two wires that
connect the bottom part to the appliance.
6Pull the battery connectors off the battery terminals with long nose
pliers.
7Pull the rechargeable batteries out of the appliance with long
nose pliers.
8Cut the two wires one at a time to ensure that no mishaps due to
possible residual charge occur.
Guarantee and support
If you need information or support, please visit
www.philips.com/support or read the separate worldwide guarantee leaflet.
ENGLISH
27
Technical specifications
Model SC2006
Rated voltage
100V-240V
Rated frequency
50Hz-60Hz
Rated input
7.5W
Protection against electric shock
Class II Q
Protection rating
IP 30 (EN 60529)
Operating conditions
Temperature: +15° to +35°C
Relative humidity: 25% to 95%
Storage conditions
Temperature: 0° to +60°C
Relative humidity: 5% to 95%
Spectrum of body attachment
>570nm
Spectrum of facial attachment
>600nm
Spectrum of bikini area attachment
>570nm
Lithium-ion battery
2 x 3.7 Volt 1500 mAh
Troubleshooting
This chapter summarises the most common problems you could
encounter with the appliance. If you are unable to solve the problem with
the information below, visit www.philips.com/support for a list of frequently
asked questions or contact the Consumer Care Centre in your country.
Problem
Possible cause
The appliance does not
work.
The rechargeable
Charge the appliance (see chapter ‘Charging’).
batteries are empty.
The appliance is
defective.
Solution
Contact the Consumer Care Centre in your country,
your Philips dealer or a Philips service centre.
The appliance suddenly
switches off.
The rechargeable
Charge the appliance (see chapter ‘Charging’).
batteries are empty.
The adapter becomes
warm during charging.
This is normal.
No action required.
The charging light does
not go on when I put
the small plug in the
appliance socket.
You have not put
the adapter in the
wall socket.
Insert the small plug into the appliance socket and put
the adapter in the wall socket.
The wall socket is
not live.
Connect another appliance to the wall socket to check if
the wall socket is live. If the socket is live but the appliance
still does not charge, contact the Consumer Care Centre in
your country, your Philips dealer or a Philips service centre.
28
ENGLISH
Problem
Possible cause
Solution
The adapter is not Make sure the adapter is inserted properly into the
wall socket and/or the small plug is inserted properly
inserted properly
into the wall socket into the appliance socket.
and/or the small
plug is not inserted
properly into the
appliance socket.
The appliance is
defective.
Contact the Consumer Care Centre in your country,
your Philips dealer or a Philips service centre.
I have switched on the
appliance but I cannot
increase or decrease the
light intensity.
The appliance has
to be reset.
To reset the appliance, switch off the appliance and
then switch it on again. If you still cannot adjust the light
intensity, contact the Consumer Care Centre in your
country, your Philips dealer or a Philips service centre.
The ‘ready to flash’ light
does not go on when I
place the appliance on
the skin.
You have not put
the attachment with
safety ring properly
on the skin.
Place the appliance at a 90° angle onto the skin in such
a way that all contact switches touch the skin. Then
check if the ‘ready to flash’ light is on and press the
flash button.
If this does not work, place the appliance on a part
of your body where it is easy to establish full skin
contact, for example on your lower arm.Then check
if the ‘ready to flash’ light works. If the ‘ready to flash’
light still does not go on when you place the appliance
on the skin, contact the Consumer Care Centre in your
country, your Philips dealer or a Philips service centre.
The ‘ready to flash’ light
does not go on when I
place an attachment on
my skin, but the cooling
fan works.
The safety ring is
dirty.
Clean the safety ring carefully. If you are unable to clean
the safety ring properly, contact the Consumer Care
Centre in your country, your Philips dealer or a Philips
service centre to replace the attachment.
The overheat
protection has
been activated.
When the overheat protection has been activated, the
fan still works. Do not switch off the appliance and let it
cool down for approx. 15 minutes before you continue
to use it. If the ‘ready to flash’ light still does not go on
when you place the appliance on the skin, contact the
Consumer Care Centre in your country, your Philips
dealer or a Philips service centre.
The ‘ready to flash’ light is The appliance
needs to be reset.
green but the appliance
does not produce a flash
when I press the flash
button.
To reset the appliance, switch off the appliance and switch
it on again. If the ‘ready to flash’ light is green but the
appliance still does not produce a flash when you press the
flash button, contact the Consumer Care Centre in your
country, your Philips dealer or a Philips service centre.
The appliance becomes
warm during use.
This is normal.
No action required.
The appliance does not
show light intensity 1
when I switch it on.
The appliance
needs to be reset.
To reset the appliance, switch it off and on again. If the
appliance still does not show light intensity 1, contact
your Customer Care Centre, your Philips dealer or a
Philips Service Centre.
ENGLISH
Problem
Possible cause
Solution
The appliance produces
a strange smell.
The attachment
and/or the filter
glass is dirty.
Clean the attachment carefully. If you are unable to
clean the attachment properly, contact the Consumer
Care Centre in your country, your Philips dealer or a
Philips service centre to replace the attachment.
You have not
shaved the area
to be treated
properly.
If there are hairs on the area to be treated, these
hairs may get burnt when you use the appliance. As
a result, you notice a strange smell. Shave the area to
be treated properly before you use the appliance. If
shaving causes skin irritation, trim hairs as short as
possible and use a comfortable setting.
29
You stored the
The strange smell disappears after a few flashes.
appliance in a
dusty environment.
The skin feels more
sensitive than usual
during treatment.
I experience an
unacceptable pain
sensation when I use the
appliance.
The light intensity Check if you have selected the right light intensity.
you use is too high. If necessary, select a lower light intensity.
You did not shave
the areas to be
treated.
Shave the areas to be treated before you use the
appliance. If shaving causes skin irritation, trim hairs as
short as possible and use a comfortable setting.
The UV filter
of the light exit
window is broken.
If the UV filter of the light exit window is broken, do
not use the appliance anymore. Contact the Consumer
Care Centre in your country, your Philips dealer or a
Philips service centre.
The appliance is
defective.
Contact the Consumer Care Centre in your country,
your Philips dealer or a Philips service centre.
You did not shave
the areas to
be treated
Shave the areas to be treated before you use the
appliance. If shaving causes skin irritation, trim hairs as
short as possible and use a comfortable setting.
You treated an
area for which the
appliance is not
intended.
You must not use the appliance on your inner labia,
vagina, anus, nipples, areolas, lips, inside the nostrils and
ears, in the region of your eyes and eyebrows. Men
must not use it on their face or scrotum.
You have used
a light intensity
which is too high
for you.
Reduce the light intensity to a level that is comfortable
for you. See chapter ‘Preparing for use’, section ‘Setting
the light intensity’.
The light exit
window or reddish
filter glass of the
attachment is
broken.
If the light exit window or reddish filter glass of the
facial attachment is broken, do not use the appliance
with this attachment any more. Go to your dealer or
a Philips service centre or contact the Consumer Care
Centre to have the attachment replaced.
The appliance is
not suitable for
your skin colour.
Do not use the appliance if you have a very dark skin.
Do not use it either if your body hair is light blond, red,
grey or white.
30
ENGLISH
Problem
Possible cause
Solution
The treated areas
become red after the
treatment.
Slight redness
is harmless and
normal and
disappears quickly.
No action required.
The skin reaction after
the treatment lasts
longer than usual.
You have used
a light intensity
which is too high
for you.
Select a lower light intensity the next time. See chapter
‘Preparing for use’, section ‘Setting the light intensity.
If the skin reaction lasts longer than 3 days, contact
your doctor.
The hair-removal results
are not satisfactory.
Hair starts to grow again
in some spots on the
treated areas.
You have used
a light intensity
which is too low
for you.
Select a higher light intensity the next time.
You did not make
enough overlaps
when you used
the appliance.
For proper hair-removal results, you have to make
overlaps when you use the appliance. See chapter
‘Using the appliance’, section ‘Subsequent use’, step 9.
You do not use
the appliance
as often as
recommended.
To remove all hairs successfully and to prevent the hair
root from becoming active again, the treatments have
to be repeated once every two weeks for the first
two months. To ensure that your skin stays smooth,
we advise you to repeat the treatment every four to
six weeks. The time between treatments may vary
based on your individual hair regrowth and also across
different body areas. If too many hairs grow back
between treatments, simply shorten the treatment
interval again, but do not treat any area more often
than once every two weeks. When you use the
appliance more frequently than recommended, you do
not increase the effectiveness but you do increase the
risk of skin reactions.
The appliance is
not suitable for
your hair or skin
colour.
Do not use the appliance if your body hair is light
blond, red, grey or white. Do not use the appliance
either if you have very dark skin.
You did not make
enough overlaps
when you used
the appliance.
For proper hair-removal results, you have to make
overlaps when you use the appliance. See chapter
‘Using the appliance’, section ‘Subsequent use’, step 9.
Hair starts to grow This is normal. It is part of the natural cycle of hair
growth that hair starts growing again. The hairs that
again as part of
the natural cycle of come back, however, tend to be softer and thinner.
hair growth.
繁體中文
31
目錄
簡介 優點 家用的脈衝光 (IPL) 技術 有效防止毛髮重生,常保肌膚光滑 療程溫和,敏感的身體部位也能使用 無線操作,具有最大的自由與靈活 電池電力持久,能完成全身及臉部療程 無須更換零件,絕無隱藏成本 飛利浦脈衝光技術的運作方式 毛髮的生長 運作原理 一般說明 重要事項 危險 警示 為預防損壞 警告 請注意下列事項,以免耗損飛利浦
Lumea Precision Plus 的使用壽命: 哪些人不適合使用飛利浦 Lumea Precision Plus? 禁忌 懷孕或哺乳者請勿使用本產品。 膚色及/或髮色不適合者,請勿使用本產品: 如果罹患下列任何疾病,請勿使用本產品: 如果服用下列任何藥物,請勿使用本產品: 請勿在下列部位使用本產品: 請勿在曬傷、最近日曬 (至少 48 小時)
或人工日曬的皮膚上使用本產品: 電磁波 (EMF) 充電 使用前準備 療程部位準備作業 設定燈光強度 建議的燈光強度 (1-5) 重要事項 曬膚建議 使用本產品 選擇正確的配件 初次使用與皮膚測試 後續使用 療程指南 平均療程時間 想除毛的部位 使用產品去除腿毛 提示:白色眼線筆 在比基尼線使用產品 使用產品去除腋毛 在臉上使用產品 (上唇/下巴/鬢角) 如何達到最佳效果 維持期 可能的副作用和皮膚反應 32
32
32
32
32
32
32
33
33
33
33
34
34
34
34
35
35
35
35
35
35
35
35
36
36
36
36
36
37
37
38
38
38
38
39
39
40
40
43
43
43
43
44
44
44
44
45
45
45
32
繁體中文
使用完畢 清潔與保養
收納 環境保護 取出充電式電池 保 証 與支援 技術規格 疑難排解 46
46
47
47
47
48
48
49
簡介
恭喜您購買本產品並歡迎加入飛利浦!請於
www.philips.com/welcome 註冊您的產品,以善用飛利浦提供的
支援。 光學除毛是去除多餘體毛最有效的方法之一,而且效果持
久。這和市面上的家用除毛用品大不相同,因為光學除毛可以顯著
抑制毛髮重生。飛利浦和多位頂尖皮膚科學家,投注將近 10 年的
時間研發出這項產品。現在,您可以隨時在家裡舒適且私密地享受
這項創新技術。
這項產品專為女性進行特殊設計與最佳化,但男性也適用。
飛利浦 Lumea Precision Plus 讓您去除全身多餘體毛,包括使用三
種特製配件去除臉部毛髮 (上唇、下巴和鬢角)。
飛利浦 Lumea Precision Plus 經過設計,僅限一人使用。
如需有關 飛利浦 Lumea Precision Plus 的更多資訊,並觀賞
Lumea 用法的影片,請瀏覽 www.philips.com/lumea。請定期至我
們的網站首頁瞭解最新資訊。
優點
本產品具備下列優點:
家用的脈衝光 (IPL) 技術
飛利浦 Lumea Precision Plus 採用「脈衝光」(IPL) 的光學技術。
專業美容業者同樣會使用 IPL 來除去毛髮,這種除毛方式已有十五
年歷史。飛利浦 Lumea Precision Plus 現在為您帶來這項創新技
術,讓您在家即可舒適、安全又有效地進行光學除毛。
有效防止毛髮重生,常保肌膚光滑
這種除毛方式能長期抑制毛髮重生,讓您的肌膚光滑如絲。我們的
研究顯示,經過兩次療程後,毛髮會大幅減少。4 到 5 次療程後通
常可以達到最佳效果。隨著療程的進行,毛髮密度將會明顯地減
少。收效速度與效果持續時間因人而異。如需更多資訊,請參閱「
使用本產品」單元中「如何達到最佳效果」一節。
療程溫和,敏感的身體部位也能使用
我們在開發飛利浦 Lumea Precision Plus 時,與頂尖的皮膚科專家
密切合作,而且經過逾 2000 名女性測試,務求在最敏感的身體部
位及臉部也要達到有效且溫和的療程效果。
無線操作,具有最大的自由與靈活
本產品使用充電式電池,不僅便於攜帶,而且隨處可用。
電池電力持久,能完成全身及臉部療程
完整充電的電池可以讓您一次完成身體及臉部除毛療程 (上唇、
腋下、比基尼線及小腿),不必因重新充電而中斷療程。*
*根據每區的平均療程時間及針對一位使用者的建議強度而計算。
繁體中文
33
無須更換零件,絕無隱藏成本
飛利浦 Lumea Precision Plus 配備高效能燈泡,無需更換。這種燈
泡可以發出超過 140,000 次閃光,可以讓您連續使用 5 年以上*,
讓您省下更換燈泡的成本。
*根據每區的平均療程時間及針對一位使用者的建議強度而計算。
飛利浦脈衝光技術的運作方式
毛髮的生長
毛髮生長速度因人而異,影響的因素包括年齡、代謝速度和其他因
素。但是,每個人的毛髮生長通常分為 3 階段。
1 生長期 (Anagen Phase)
毛髮自髮根蓬勃生長。在這個時期中,黑色素的濃度最高。
毛髮的顏色取決於黑色素,黑色素濃度也是影響本除毛技術功效的
關鍵因素。光學除毛只對生長期的毛髮有效。
2 退化期 (Catagen Phase)
毛髮停止生長,髮根在毛髮尚未脫落之前開始萎縮。
3 靜止期 (Telogen Phase)
舊毛髮從毛囊脫離並掉落。毛囊依然處於休止狀態,
直到生理時鐘再次將其喚醒並開始生長新毛髮。
運作原理
-- 本產品藉由加熱皮膚下的毛髮和髮根達到除毛效果。毛髮和髮根
裡的黑色素會吸收產品釋放出來的脈衝光;而毛髮的顏色愈深,
可以吸收的光量愈多,如此一來就能刺激毛髮進入靜止期。
-- 療程中間的空檔,毛髮會自然脫落,而新的毛髮生長則受到抑
制。毛髮需要一到兩星期才會掉落。
--
理想的除毛成果無法一次就達成,因為光學除毛只對生長期的
毛髮有效。而在療程中,療程部位的毛髮通常會處於不同的生長
時期。為了有效去除所有毛髮,您必須每 2 週重複一次療程,
連續進行數次。
內建的光學濾鏡能抵擋紫外線進入皮膚,確保產品不會傷害皮膚。
34
繁體中文
一般說明 (圖 5)
1 出光口內建紫外線濾光片
2 配件 面部配件:適用於所有身體部位,包括上唇、下巴和鬢角
身體配件:適用於頸部以下的全身部位 比基尼線配件
(僅限 SC2008):適用於比基尼線
3 配件內金屬框
4 安全系統 (安全環與觸碰式開關)
5 閃光按鈕
6 強度指示燈 (1- 5)
7 % 強度增加按鈕
8 ^ 強度降低按鈕
9 充電指示燈,具備電力不足顯示功能
10 開/關 (On/Off) 按鈕
11 產品插孔
12 「閃光準備就緒」指示燈
13 通風口
14 轉換器
15 小插頭
重要事項
在使用本產品前,請先仔細閱讀本使用手冊,並保留使用手冊以供
日後參考。
危險
-- 水碰到電會產生危險!本產品不可於潮濕處使用
(如有水的浴缸、淋浴間或有水的游泳池附近)。
-- 本產品及電源轉換器請保持乾燥。
-- 如果產品損壞,請勿碰觸任何內部零件,以免發生電擊風險。
-- 請勿將任何物品放入產品中。
警示
-- 本產品不適合供下列人士 (包括孩童) 使用:身體官能或心智能
力退化者;他們需要有負責其安全的人員在旁監督,或指示產品
的使用方法,方可使用。
-- 請勿讓孩童使用本產品或將本產品當成玩具。
-- 本產品不適用於 15 歲以下的孩童。15 至 18 歲的青少年可在父
母或監護人同意及/或協助下使用本產品。19 歲以上的成人則能
自由使用本產品。
-- 請務必使用隨附的電源轉換器進行充電。
-- 電源轉換器損壞時,請勿使用本產品。
-- 電源轉換器內含一個變壓器。請勿切斷電源轉換器而以其他的插
頭取代,否則會造成危險。
-- 如果轉換器損壞,請務必使用原型號的轉換器進行更換,
以免發生危險。
-- 如果出光口的紫外線濾光片破損,請勿使用本產品。
-- 如果濾鏡破損,請勿使用臉部配件或比基尼線配件
(僅限 SC2008)。
繁體中文
35
為預防損壞
-- 確保通氣孔的空氣流動順暢沒有任何阻礙。
-- 請勿讓產品承受巨大震動,切勿搖晃或摔落。
-- 若您將本產品從寒冷環境攜帶到高溫環境中 (反之亦然),
請等待 3 小時之後再使用本產品。
-- 請將產品放置在無灰塵的地方,以免累積灰塵。
-- 不可在無人看顧的情況下任由產品運作。使用完畢後,
請關閉產品電源。
-- 請勿讓本產品直接曝曬在陽光或紫外線下達數小時。
-- 閃光僅限用於皮膚,請勿在其他表面上照射閃光,
這可能會嚴重損壞配件及/或出光口。僅限在產品與皮膚接觸時
讓產品發出閃光。
警告
-- 請勿將本產品用於眼睛周圍及靠近眉毛的區域,避免眼睛受傷。
-- 請務必使用適合個人膚質的設定。如果使用的強度超出建議設
定,會提高皮膚產生不良反應及副作用的風險。
-- 本產品僅限搭配專屬配件,用於去除顴骨下方的多餘毛髮。
請勿用作其他用途。
請注意下列事項,以免耗損飛利浦 Lumea Precision Plus 的使用壽
命:
-- 使用時請勿將此產品暴露於 15°C 以下或 35°C 以上的溫度中。
-- 本產品內建過熱保護裝置。產品一旦過熱,閃光便無法運作。
請勿關閉產品電源,等待約 15 分鐘冷卻後即可繼續療程。
-- 請將本產品送回飛利浦授權的服務中心檢查或維修,由不合格的
人員所做的維修可能導致使用上的危險。
-- 絕對不要在「禁忌」一節中提到的任何狀況下使用本產品。
哪些人不適合使用飛利浦 Lumea Precision Plus?
飛利浦 Lumea Precision Plus 並非適合每個人使用。
如果您符合下列任何情況,則您不適合使用本產品!
禁忌
懷孕或哺乳者請勿使用本產品。
膚色及/或髮色不適合者,請勿使用本產品:
-- 如果療程部位的自然毛髮顏色為淡金色、白色、灰色或紅色。
-- 皮膚類型為 VI (幾乎不會曬傷,而且膚色非常黝黑;膚色為深棕
色或更深) 者。這種膚色的人使用飛利浦 Lumea Precision Plus
時,很容易造成皮膚不良反應,例如變色、嚴重發紅或灼熱。
也請參閱「使用本產品」單元中「可能的反應和副作用」一節。
如果罹患下列任何疾病,請勿使用本產品:
-- 患有皮膚病者,例如目前為皮膚癌患者、療程部位曾有皮膚癌或
局部癌症病史者。
-- 療程部位有癌症初期病變或數個非典型胎塊 (痣) 者。
-- 具瘢瘤病歷或傷口癒合能力不良等膠原蛋白異常病史者。
-- 療程部位有靜脈曲張或血管擴張症等血管疾病病史者。
-- 皮膚對光敏感而易引發紅疹或過敏反應者。
-- 療程部位有感染、濕疹、灼傷、毛囊發炎、開放性撕裂傷、
擦傷、單純皰疹、創傷或病變和血腫者。
-- 要除毛的部位曾動過手術。
-- 易對閃光敏感而誘發癲癇者。
36
繁體中文
-- 患有糖尿病、紅斑性狼瘡、紫質症或充血性心臟病者。
-- 患有出血病症者。
-- 曾有免疫抑制病史 (包含感染 HIV 或愛滋病) 者。
如果服用下列任何藥物,請勿使用本產品:
-- 皮膚正在或曾經接受 α-氫氧基酸 (AHA)、β-氫氧基酸 (BHA)、
局部異維甲酸和壬二酸治療。
-- 過去 6 個月曾使用 (口服或外用) Accutane® A 酸或
Roaccutane® A 酸者。此療程使皮膚易對裂傷、創傷及刺激性
物質敏感。
-- 服用止痛藥者,止痛藥會降低皮膚對熱度的感知。
-- 服用光敏劑或藥物者,請參見藥盒內說明,若標示可能產生光過
敏反應、光毒性反應或服藥後應避免照射日光等說明,請勿使用
本產品。
-- 服用抗凝血藥物者,包括大量服用阿斯匹靈,其用藥程度無法在
療程前至少 1 星期停用以利藥物成分排出體外者。
-- 接受免疫抑制藥物治療者。
請勿在下列部位使用本產品:
-- 眼睛周圍和眉毛附近。
-- 乳頭、乳暈、小陰唇、陰道、肛門,以及鼻孔和耳朵內側。
-- 男性使用者,請勿將產品用於臉部或陰囊上。
-- 矽膠植入物、心律調整器、皮下注射端口 (胰島素注射器) 或身
體穿環等所有人工物質之表面及周圍。
-- 痣、雀斑、大血管、膚色較深區域、疤痕、皮膚異常部位,未經
醫師同意請勿使用。在這些部位使用可能導致灼傷與膚色異變,
使得潛在的皮膚相關疾病 (如皮膚癌) 更難察覺。
-- 疣、刺青或永久化妝部位;否則可能會導致灼傷與膚色異變
(色素脫失或色素沈澱)。
-- 使用長效型體香劑的部位;否則可能會導致皮膚反應。請參閱「
使用本產品」單元中「可能的反應和副作用」一節。
請勿在曬傷、最近日曬 (至少 48 小時) 或人工日曬的皮膚上使用本
產品:
-- 所有類型的曬膚都會影響療程安全,無論是自然日曬或人工曬膚方
式都一樣,例如使用助曬乳液、曬膚產品等。如果您把膚色曬深或
打算曬膚,請參閱「使用前準備」單元中「曬膚建議」一節。
注意: 本清單並未徹底列出所有情況。如果您無法確定自己是否適
合使用本產品,建議您向醫生諮詢。
電磁波 (EMF)
本飛利浦產品符合所有電磁波暴露的相關適用標準和法規。
充電
第一次使用或電池沒電時,請將電池充滿。完整充電的時間大約
1 小時 40 分鐘。
使用時,產品的充電指示燈如果亮橘燈,代表電力即將用盡,
請為產品充電。
充飽電的電池可以在燈光強度 5 的情況下提供至少 370 次閃光。
即使長時間不使用,仍建議每三到四個月將產品充滿電。
請依下列方式為產品充電:
繁體中文
37
1關閉產品。
2將小插頭連接到產品,再將電源轉換器連接到牆壁上的電源插
座。
,, 充電指示燈閃爍綠光,表示產品正在充電。
,, 當電池充飽電力後,充電指示燈會持續亮綠燈。
備註:
-- 充電時轉換器及產品會微微發熱,這是正常的現象。
-- 充電時無法使用本產品。
-- 本產品具備電池過熱保護功能,若室溫高於攝氏 40°,
就會停止充電。
充電時請勿覆蓋產品和電源轉換器。
3充電完畢請將電源轉換器拔離電源插座,並將小插頭從產品上拔除。
使用前準備
為求最佳效果及最大成效,請依下列方法針對產品要使用的部位,
做好療程前的準備。
療程部位準備作業
1只要療程部位毛髮持續生長,您就可以刮除毛髮。
注意: 如果您上次的除毛方式是連根拔除毛髮 (例如脫毛、
蜜蠟除毛等),請等待毛髮顯著重生後,再使用飛利浦 Lumea
Precision Plus 除毛。除毛前請刮除毛髮,切勿使用除毛膏代替。
請注意,如果您未刮除療程部位的毛髮,或未妥善刮除毛髮,
會導致不良效果:
-- 出光口和配件可能會因為多餘的毛髮和灰塵而受到污染。
受污染的出光口及配件會降低產品的使用壽命和功效。此外,
出光口及配件上因污染造成的燒灼痕跡或黑點,會讓除毛過程變
痛,或引起發紅及變色等皮膚反應。
-- 皮膚上的毛髮會燒焦,產生不良氣味。
2清潔肌膚並確定表面沒有任何毛髮、完全乾燥而且沒有油性物質
(例如體香劑、乳液、香水、助曬膏和防曬乳等化妝用品)。
3請檢查產品是否有纏住的毛髮、灰塵和纖維,尤其是出光口和配
件。如果看見任何污染物質,請根據「清潔與保養」單元中的說
明清潔產品。
備註:
-- 如果刮毛造成傷口或病變,皮膚會變得較為敏感,
光療時可能會有不舒服的感覺。
-- 通常當您做過 4 到 5 次療程,毛髮不再重生之後,
您就不必在使用本產品前刮除毛髮。
38
繁體中文
設定燈光強度
飛利浦 Lumea Precision Plus 是專為家居使用而開發的產品,
因此疼痛的感覺無法與專業光療設備相比。飛利浦 Lumea Precision
Plus 產生的脈衝光比專業設備溫和,為您帶來方便、有效的療程體驗。
您必須依照皮膚和體毛顏色調整燈光強度至您覺得舒服的程度。
下方的建議燈光強度表能協助您選擇正確的燈光強度
1請參閱下表,判斷您的皮膚與體毛顏色適合哪種燈光強度,
或整體而言是否適合使用本產品 (如不適合,表格中將以 x 表示)。
2每個身體區域,甚至大區中的部位,都要使用不同的燈光強度,
請根據下表建議的燈光強度進行調整。燈光強度愈高,
除毛效果愈好;如果您感到疼痛或不適,請降低燈光強度。
注意: 不同身體部位所需的燈光強度,會因膚色不同而異。
例如,小腿因為接受日曬較多,會比腋下的膚色深。
膚色較深者,會吸收較多光線,故容易引起皮膚刺激。
因此針對深色皮膚,建議使用較低的強度。
脈衝光可能會讓肌膚覺得溫熱,但絕不會痛。請參閱「使用本產
品」單元中「可能的反應和副作用」一節,以預防皮膚反應。
建議的燈光強度 (1-5)
在下表中,「x」代表產品不適合您使用。
白色 (極 米色 (易 淺褐色 (偶
易曬傷、 曬傷、小 爾曬傷、
無曬膚)
幅曬膚)
曬膚狀況
理想)
褐色 (極少
曬傷、曬
膚狀況理
想且快速)
深褐色 (極
少曬傷、
曬膚狀況
相當理想)
深棕色或更
深色 (幾乎不
會曬傷,膚
色非常黝黑)
暗金色/淺褐
色/棕色/深棕
色/黑色
4/5
4/5
4/5
3/4
1/2/3
x
白色/灰色/紅
色/淡金色
x
x
x
x
x
x
膚色與特性:
體毛顏色:
重要事項
如果要查看自己是否適合使用飛利浦 Lumea Precision Plus,請參
閱「哪些人不適合使用飛利浦 Lumea Precision Plus?」一節。 如
果您的皮膚受到自然日曬或人工助曬,膚色會比上次療程還深。請
查看下表決定適合自己膚色的設定。
曬膚建議
療程前日曬
-- 如果您的膚色曬深,請在要除毛的部位進行皮膚測試 (請參閱
「使用本產品」單元中「初次使用」一節),決定合適的燈光強
度。如果不這麼做而逕行使用飛利浦 Lumea Precision Plus 除
毛,可能會造成皮膚產生不良反應。
-- 日曬後請至少等候 48 小時再使用本產品。日曬會造成膚色變深
(曬黑),及/或造成曬傷 (皮膚發紅)。
-- 48 小時後,請檢查皮膚是否仍有曬傷的部位。只要有曬傷的情
況,則不要使用飛利浦 Lumea Precision Plus。
-- 曬傷消失後,請在要除毛的部位進行皮膚測試 (請參閱「使用本
產品」單元中「初次使用」一節),決定合適的燈光強度。
繁體中文
39
療程後日曬
-- 除毛療程過後,請等候至少 24 小時再讓療程部位接受日曬。
即使在 24 小時後,也要確認療程部位的皮膚沒有任何發紅症
狀,再接受日曬。
-- 除毛後的兩週內,外出日曬時請覆蓋療程部位,或使用防曬霜
(SPF 30+)。
-- 除毛過後不做任何防曬措施,直接讓療程部位接受日曬,
會提高皮膚產生不良副作用的風險。請參閱「使用本產品」
單元中「可能的反應和副作用」一節。
人造光源曬膚
-- 務請遵守上方「療程前日曬」及「療程後日曬」的指示。
使用助曬乳霜
-- 如果您使用助曬乳霜,請等待助曬乳霜完全褪去後,
再使用飛利浦 Lumea Precision Plus。
注意: 如需瞭解更多不良皮膚反應的詳情,請參閱「使用本產品」
單元中「可能的反應和副作用」一節。
使用本產品
請參閱「使用前準備」單元中「設定燈光強度」一節,查看建議的
燈光強度表,決定最適合膚色及體毛顏色的燈光強度。請在照明充
足的房間中使用本產品,這樣能降低閃光接收的亮度。使用產品以
前,請先將欲接受療程部位的毛髮刮除 (請參閱「使用前準備」單元
中「療程部位準備作業」一節)。
如果療程中覺得過度疼痛,請降低燈光強度設定,直到您覺得舒適
為止。如果您發現皮膚反應超過輕微發紅的程度,請立即停止療
程,並參閱本單元中「可能的反應和副作用」一節。
選擇正確的配件
-- 身體配件
身體配件可用來處理頸部以下的全身毛髮 (例外情況,請參閱「重
要事項」單元中「禁忌」一節)。身體配件可以涵蓋 4 平方公分的區
域,是專為腿部之類的區域而設計,能快速去除大範圍毛髮。
請勿在臉上使用身體配件。
-- 臉部配件
臉部配件包括額外的內建濾光片,可以用來處理上唇、下巴和鬢角
的多餘毛髮,安全無虞;也能用在身體上的其他敏感區域,
例如腋下及難以除毛的區域。
請勿將本產品用於眼睛周圍及靠近眉毛的區域。
40
繁體中文
-- 比基尼線配件 (僅限 SC2008)
比基尼線配件有特殊濾鏡可以處理比基尼線。配件經最佳設計,
能有效去除比基尼線毛髮。特殊設計的配件能去除此區較粗硬的毛
髮。您也可以使用比基尼線配件去除腋毛。
請勿在臉上使用比基尼線配件。
初次使用與皮膚測試
1選擇合適的配件處理您想要除毛的區域。

2選擇靠近欲進行療程的區域。
注意: 在上唇、下巴或鬢角使用產品前,請選擇耳下無痣及無毛髮
的區域,進行皮膚測試。
3按下開/關 (On/Off) 按鈕,開啟產品電源。
,, 產品開啟時會自動調至最低設定。
4選擇適合您膚色的最低建議強度,然後閃一次光 (如需施放閃光
的說明,請參閱本單元中「後續使用」一節的步驟 6 至 9)。
5只要您覺得舒適 (不會痛),就能在皮膚類型的建議範圍內,
將強度調高一級,然後每級設定都閃一次光。請勿在相同除毛點
閃光多次。
6皮膚測試後,請等待 24 小時,檢查皮膚是否有任何反應。
如果您的皮膚產生反應,請選擇不會引起皮膚反應的最高設定,
在後續除毛療程使用。
初次使用產品時,建議您在要除毛的部位進行皮膚測試,
看看皮膚對療程的反應,並習慣光療除毛。
後續使用
1每次療程前,請清潔飛利浦 Lumea Precision Plus 的配件、
出光口及配件內金屬框。如需更多資訊,請參閱「清潔與保養」
單元。
2選擇合適的配件處理您想要除毛的區域。
繁體中文
3按下開/關 (On/Off) 按鈕,開啟產品電源。
注意: 使用時,產品和配件微微發熱是正常現象。
4每次療程開始前,請根據皮膚敏感度及療程的舒適度,
仔細選擇燈光強度。
您的皮膚可能會在不同日子/場合產生不同反應,原因不一,
尤其在曬膚後。請參閱本單元中「可能的反應和副作用」一節,
瞭解更多資訊。
5按下 % 按鈕提高強度。若要降低強度,請按下 ^ 按鈕。
,, 每當您按下按鈕,對應的強度指示燈即開始閃爍,
並會持續數秒鐘。
6將產品以 90° 放置於肌膚上,讓配件與安全環觸碰肌膚。
7輕輕施力,將安全環完全按壓至皮膚上。
注意: 安全環具備觸碰式開關,構成產品的安全系統。
安全環可避免在沒有皮膚接觸時意外發出閃光。
41
42
繁體中文
,, 當安全環的觸碰式開關完全接觸肌膚且裝置充滿電時,
產品背面的「閃光準備就緒」指示燈會亮綠燈,這可能需要幾秒
鐘的時間。
提示: 為方便使用,您可以拉緊療程部位皮膚。至於比較柔軟的皮
膚部位,可能需要對產品施加更多壓力,才能將觸碰式開關完全壓
入。
8按下閃光按鈕,產品會發出一次閃光,現在您有兩種選擇可以發
出下一道閃光:
A 按住閃光按鈕。只要安全環完全接觸到肌膚,產品就會發出一
次又一次的閃光。請於產品發出閃光後,緊接著把產品滑往下個
療程部位。務必讓安全環完全緊貼肌膚。
這種「滑動與閃光模式」在去除腿毛之類的大範圍區域時尤其方便。
B 每次閃光後放開閃光按鈕。將產品放在之前閃光的區域旁,
即能發出下次閃光。務必讓安全環完全緊貼肌膚。
這種「一停一閃模式」可以精確去除上唇、膝蓋或腳踝的毛髮。
注意: 數秒後,產品已經就緒可以再度閃光,因此請在閃光後立即
將產品移往下一區。
單次除毛療程中,請勿重複在同一區域多次除毛,這樣並不能提高
除毛效果,反而會增加肌膚產生不良反應的風險。
注意: 產品發出的可見光為閃光照在皮膚上的反射,對眼睛無害,
使用時不需配戴護目鏡。
9為區隔非療程區域,當您將產品放在皮膚上的時候,請務必與先
前照射的區域些微重疊。有效光僅會從出光口發出。請確定發出
的光為連續閃光。
10 當您完成療程後,請關閉產品。
11 使用後,請檢查配件和出光口,看看是否有灰塵或毛髮,
並妥善清潔產品 (請參閱「清潔與保養」單元)。
繁體中文
43
療程指南
平均療程時間
區域
估計療程時間
SC2006 建議配件
腋下
1 分鐘
身體配件/臉部配件
比基尼線
1 分鐘
身體配件/臉部配件
比基尼線全區
4 分鐘
身體配件/臉部配件
單邊小腿
8 分鐘
身體配件
一整隻腳
14 分鐘
身體配件
上唇/下巴/鬢角
1 分鐘
臉部配件
區域
估計療程時間
SC2008 建議配件
腋下
1 分鐘
身體配件/比基尼線配件
比基尼線
1 分鐘
比基尼線配件
比基尼線全區
4 分鐘
比基尼線配件
單邊小腿
8 分鐘
身體配件
一整隻腳
14 分鐘
身體配件
上唇/下巴/鬢角
1 分鐘
臉部配件
注意: 上方的平均療程時間是在研究與測試期間觀察得知的結果。
個別療程時間因人而異。
注意: 充飽電的電池可以在燈光強度 5 的情況下提供至少 370 次閃
光。產品的使用時間,會因療程部位大小及使用的強度設定而異。
想除毛的部位
本產品可用來去除上唇、下巴、鬢角、腋下、手臂、腹部、
比基尼線與雙腿的毛髮。
使用產品去除腿毛
請參閱「使用前準備」單元中「設定燈光強度」一節,
查看建議的燈光強度表,決定最適合雙腿除毛的設定。
-- 您可以上下移動產品,或以水平方式在腿上移動產品,
以自己方便為主。
注意: 脛骨及腳踝等骨頭突出的區域,比其他部位更加敏感。
將配件硬壓在這些區域上時,皮膚比較容易產生不良反應,例如刺痛
發紅。請參閱本單元中「可能的反應和副作用」一節。將配件壓在皮
膚上,力道足以讓「閃光準備就緒」指示燈亮起即可,不必太用力。
44
繁體中文
提示: 療程部位的皮膚可能留下壓痕。這些壓痕可以讓您知道哪些
療程部位可以重疊。
完整充電的電池可以讓您一次完成身體及臉部除毛療程 (上唇、
腋下、比基尼線及小腿)。* 如果您使用產品處理上下腿毛,可能需
要在除毛過程中幫產品充電,這是正常現象。產品的使用時間,
會因療程部位大小及使用的強度設定而異。
*根據每區的平均療程時間及針對一位使用者的建議強度而計算。
提示: 許多使用者會在看電視或聽音樂時去除腿毛。您也可以做些
放鬆心情的活動,讓除毛體驗更愉悅。
提示:白色眼線筆
為了協助您記住已除毛的區域,您可以使用白色眼線筆在腿上做記號。
1拿出白色眼線筆,在腿上畫線。從腿部任何一點開始畫條直線。
3 cm
2如果您是水平移動產品,請在距離第一條線 3 公分處再畫其他
線;如果您是垂直移動產品,請在距離 1 公分處畫其他線。
請逐區除毛。如果療程中需要休息,只要使用相同的眼線筆在最後
一次療程部位做記號,稍後再繼續除毛即可。
注意: 僅限使用白色眼線筆。其他顏色的眼線筆會吸收光線,
可能造成皮膚過敏。
在比基尼線使用產品
請參閱「使用前準備」單元中「設定燈光強度」一節,
查看建議的燈光強度表,決定最適合比基尼線的設定。
通常飛利浦 Lumea Precision Plus 安全無虞,而且非常溫和,
適合去除比基尼線全區的毛髮。僅限 SC2008:使用比基尼線配件
去除此區毛髮。對於膚色較深、皮膚較敏感的比基尼線部位,
請使用強度較低的設定。請勿在內陰唇、陰道及肛門使用本產品。
男性如想去除陰毛,請勿在陰囊上使用本產品。
注意: 基於衛生考量,請務必妥善清潔使用過的配件,再去除其他
身體區域的毛髮。
使用產品去除腋毛
請參閱「使用前準備」單元中「設定燈光強度」一節,查看建議的
燈光強度表,決定最適合去除腋毛的設定。
務必去除腋下任何體香劑、香水、乳液或其他護膚產品的殘留物
後,再開始除毛。
提示: 為求最佳腋下除毛效果,請站在鏡子前,看清楚要除毛的部
位及「閃光準備就緒」指示燈。手臂舉高,將手放在脖子上,
讓腋下區域的皮膚伸展開來,這樣安全環才能更容易緊壓在皮膚
上,讓除毛更輕鬆。
注意: 反射的燈光不會傷害您的眼睛。如果發出的閃光讓您覺得不
舒服,請在施放閃光時閉上雙眼。
在臉上使用產品 (上唇/下巴/鬢角)
請參閱「使用前準備」單元中「設定燈光強度」一節,查看建議的
燈光強度表,決定最適合臉部除毛 (上唇/下巴/鬢角) 的設定。
務必使用臉部配件處理上唇、下巴及鬢角的毛髮。請勿將本產品用
於眼睛周圍及靠近眉毛的區域。處理上唇、下巴或鬢角的毛髮後
24 小時內,請不要讓臉曬到太陽。療程後的兩週內,如果臉會直接
曬到太陽,請塗抹防曬霜 (SPF 30+)。
繁體中文
45
提示: 為求最佳的上唇、下巴及鬢角除毛效果,請站在鏡子前,
看清楚要除毛的區域及「閃光準備就緒」指示燈。
提示: 在嘴唇和唇緣塗上厚厚一層白色眼線。萬一您不小心在唇上
施放閃光,白色線條可以反射閃光能量,讓閃光不要碰到您的嘴唇。
提示: 因為下顎輪廓的關係,安全環可能很難完全與皮膚接觸並施
放閃光。不妨試著將舌頭放在牙齒和上唇之間,或鼓起雙頰,
這樣比較容易除毛。
提示: 反射的燈光不會傷害您的眼睛。如果發出的閃光讓您覺得不
舒服,請在施放閃光時閉上雙眼。
如何達到最佳效果
-- 前幾次療程後,發現毛髮還存在是正常現象 (請參閱「簡介」單
元中「運作原理」一節,瞭解更多資訊)。
-- 為了成功去除所有毛髮,並抑制毛囊再度復甦,前兩個月必須每
兩週重複一次療程,之後您的肌膚就會變得滑順。請參閱「維持
期」一節,瞭解如何維持效果。
維持期
-- 為了讓肌膚常保光滑,建議您每 4 到 8 週重複一次療程。
療程間隔時間要視您個人的毛髮生長速度而定,身體各部位的情
況也不同。如果在療程間隔期間,毛髮生長的速度太快,只要縮
短療程間隔時間即可,但除毛頻率切勿高於每兩週一次。當您使
用產品的頻率超過建議次數,不但無法提高效果,反而會增加肌
膚產生不良反應的風險。
可能的副作用和皮膚反應
常見的皮膚反應:
-- 皮膚輕微紅腫及/或刺痛感或溫熱感。此反應無害,很快就會消失。
-- 療程部位短暫呈現近似曬傷的皮膚反應。若持續 3 天以上,
建議您儘速就醫。
-- 因為刮除毛髮加上光療除毛,可能會讓皮膚變得乾燥發癢。此反
應無害,很快就會消失。您可以冰敷或用濕毛巾止癢。如果皮膚
依然乾燥,可以在療程後的 24 小時內,於療程部位塗抹無香料
的保濕產品。
罕見副作用:
-- 燙傷、過度發紅腫脹:這些反應非常罕見,可能是因為您的膚色
用了過高的燈光強度所造成。如果 3 天內這些不良反應依然存
在,請儘速就醫。請在皮膚完全痊癒後再進行下次療程,
而且務必使用較低的燈光強度。
-- 皮膚變色:非常罕見。皮膚變色可能會有一塊區域,膚色比周圍
深 (色素沈澱) 或淺 (色素脫失),這是因為您的膚色用了過高的
燈光強度所造成。如果變色情況 2 週後未消失,請儘速就醫。
請在變色區域消失且恢復正常膚色後,再進行除毛療程。
-- 皮膚感染及發炎:非常罕見;在刮毛時造成傷口或割傷的部位使
用產品、在已經存在的傷口上或毛髮內生的部位使用產品,
都可能會引起這種副作用。
-- 過度疼痛:療程中或療程後感到過度疼痛的可能原因如下:
在未刮除毛髮的皮膚上使用產品;使用的燈光強度太高,不適合
您的膚色;在同一個地方閃光超過一次;在開放傷口、發炎、
感染部位、刺青或曬傷部位上使用產品。請參閱「重要事項」單
元中「禁忌」一節瞭解更多資訊。
46
繁體中文
使用完畢
-- 療程後,請勿在療程部位塗抹有香味的化妝品。
-- 腋下除毛後,請勿立即使用體香劑。請待皮膚發紅完全消失後再
使用體香劑。
-- 請參閱「使用前準備」單元中「曬膚建議」一節,
瞭解日曬及人工曬膚的資訊。
清潔與保養
為確保產品的使用壽命以及最佳效能,每次療程前和結束時請進行
清潔,如果需要,請在療程期間也進行清潔。若未妥善清潔產品,
會影響產品效能。
請勿將本產品或任何零件放置在洗碗機中或在水龍頭下清洗。
絕對不可使用鋼絲絨、磨蝕性的清潔劑或侵蝕性的液體
(例如汽油或丙酮) 清潔本產品。
請勿用指甲刮出光口或配件內金屬框。
注意: 確保安全環裡的觸碰式開關沒有污垢堵塞。
注意: 如果出光口或配件太過骯髒無法清理乾淨,請停止使用產
品。請參閱「訂購配件」單元瞭解更換配件的資訊。
1關閉產品電源,拔除插頭,讓產品冷卻。
注意: 使用時出光口會變熱。請於冷卻後再進行清潔。
2若要拆卸配件,請將手指放入上下凹槽,然後輕拉,
就能輕鬆取下配件。
3將產品隨附的清潔布沾濕,用來清潔下列零件:
-- 出光口
-- 配件外側表面
-- 配件內金屬框
-- 臉部配件內側的紅色濾鏡
注意: 如果沾水無法有效進行清潔,請滴幾滴高濃度酒精,
清潔上述零件。
注意: 受污染的出光口及/或配件就像圖片中一樣。每次使用前後,
務必清潔產品。如果需要,請依照此節中的說明,於療程中清潔產品。
提示: 若使用隨附的清潔布無法清除配件邊緣的髒污,請使用棉花
棒代替。務必確認沒有棉絮或纖維留在配件後或出光口上。
4如果需要,請使用產品隨附的乾軟布,清潔產品外觀。
繁體中文
47
收納
1關閉產品電源,將插頭拔掉,讓產品冷卻。
2收納產品之前請先加以清潔。
3將產品放置在無灰塵的乾燥處,溫度介於 0°C 至 60°C。
環境保護
-- 本產品使用壽命結束時,請勿與一般家庭廢棄物一併丟棄。
請將本產品送至政府指定的回收站,此舉能為環保盡一份心力。
-- 本產品內建的充電式電池可能含有會污染環境的物質。丟棄本產
品並將本產品放到政府指定回收站前,請務必先取出電池,
並且將電池送到政府指定的電池回收站。若您無法取出電池,
可將本產品拿到飛利浦服務中心,服務中心的人員會為您卸下電
池,並以對環境無害的方式處理電池。
取出充電式電池
僅在充電式電池完全沒電時才可拆下。
1將本產品與轉換器分離。
2讓產品持續運轉直到電池完全耗盡。開啟產品並施放閃光,
直到無法開啟產品為止。
3將錐子或其他尖銳工具插入產品的底蓋,撬開底蓋。
4使用螺絲起子轉開握柄底部的兩顆螺絲。
48
繁體中文
5將握柄底部拆下,剪斷兩條連接產品底部的電線。
6使用尖嘴長夾拉開電池端的接頭。
7使用尖嘴長夾將充電式電池取出。
8剪斷兩條電線,一次一條,確保不會因剩餘電力而造成意外。
保証與支援
如果您需要資訊或支援,請瀏覽:www.philips.com/support,或另
行參閱全球保證書。
技術規格
型號 SC2006
額定電壓
100V-240V
額定頻率
50Hz-60Hz
額定輸入電壓
7.5 瓦
繁體中文
49
型號 SC2006
電擊防護
Class II Q
防護率
IP 30 (EN 60529)
操作環境
溫度:+15° 至 +35°C
相對濕度:25% 至 95%
保存條件
溫度:0° 至 +60°C
相對濕度:5% 至 95%
身體配件光譜
>570nm
臉部配件光譜
>600nm
比基尼線配件光譜
>570nm
鋰離子電池
2 x 3.7 伏特 1500 mAh
疑難排解
本章概述您使用本產品時最常遇到的問題。如果您無法利用以下資
訊解決您遇到的問題,請瀏覽 www.philips.com/support 查看常見
問題清單,或聯絡您所在國家/地區的飛利浦客戶服務中心。
問題
可能原因
解決方法
本產品無法運
作。
充電式電池電量
耗盡。
請將本產品充電 (請參閱「充電」單元)。
產品故障。
請與您所在國家/地區的客戶服務中心、飛利浦經銷商
或飛利浦服務中心聯絡。
本產品忽然關閉
電源。
充電式電池電量
耗盡。
請將本產品充電 (請參閱「充電」單元)。
電源轉換器在充
電時變得溫熱。
這是正常現象。
無須採取任何動作。
小插頭連接產品
插孔時,充電指
示燈沒有亮起。
電源轉換器尚未
連接牆壁上的電
源插座。
將小插頭連接產品插孔,再將電源轉換器連接到牆壁上
的電源插座。
牆上插座可能沒
有電。
將其他產品連接至牆壁上的電源插座,測試插座是否供
電正常。若插座有電,但產品仍然無法充電,請聯絡您
所在國家/地區的客戶服務中心、飛利浦經銷商或飛利
浦服務中心。
電源轉換器沒有
正確插入電源插
座,且/或小插頭
沒有正確插入產
品插孔。
確認電源轉換器已正確插入電源插座,且/或小插頭已
正確插入產品插孔。
產品故障。
請與您所在國家/地區的客戶服務中心、飛利浦經銷商
或飛利浦服務中心聯絡。
50
繁體中文
問題
可能原因
解決方法
開啟產品電源後
無法增加或降低
燈光強度。
產品需要重新設
定。
若要重新設定產品,請關閉產品電源然後再次開啟。
若還是無法調整燈光強度,請與您所在國家/地區的客
戶服務中心、飛利浦經銷商或飛利浦服務中心聯絡。
將產品置於皮膚
上時,「閃光準
備就緒」指示燈
未亮起。
配件與安全環沒
有確實按壓在皮
膚上。
將產品以 90° 接觸皮膚,讓觸碰式開關完全接觸皮
膚。然後檢查「閃光準備就緒」指示燈是否亮起,
再按下閃光按鈕。
如果並未奏效,選擇身體上一處可輕易讓產品完整接觸
皮膚的部位,例如下手臂。然後檢查「閃光準備就緒」
指示燈是否亮起。如果產品接觸皮膚後「閃光準備就
緒」指示燈還是無法亮起,請與您所在國家/地區的客
戶服務中心、飛利浦經銷商或飛利浦服務中心聯絡。
安全環太髒。
請仔細清潔安全環。若無法妥善清潔安全環,請與您所
在國家/地區的客戶服務中心、飛利浦經銷商或飛利浦
服務中心聯絡,以更換配件。
我將配件放到皮膚
上,「閃光準備就
緒」指示燈並未亮
起,但冷卻風扇開
始運轉。
已啟動過熱保
護。
當過熱保護啟動時,風扇仍會持續運轉。請勿關閉產品
電源,等待約 15 分鐘冷卻後即可繼續使用。如果產品
接觸皮膚後「閃光準備就緒」指示燈還是無法亮起,
請與您所在國家/地區的客戶服務中心、飛利浦經銷商
或飛利浦服務中心聯絡。
「閃光準備就
緒」指示燈亮起
綠燈,但是按下
閃光按鈕時產品
並未發出閃光。
產品需要重新設
定。
若要重新設定產品,請關閉產品電源然後再次開啟。若
「閃光準備就緒」指示燈亮起綠燈,但是按下閃光按鈕
時產品依然無法發出閃光,請與您所在國家/地區的客
戶服務中心、飛利浦經銷商或飛利浦服務中心聯絡。
產品在使用中變
得溫熱。
這是正常現象。
無須採取任何動作。
開啟產品電源
時,產品沒有顯
示燈光強度 1。
產品需要重新設
定。
若要重新設定產品,請關閉產品電源然後再次開啟。
若產品依然沒有顯示燈光強度 1,請與客戶服務中心、
飛利浦經銷商或飛利浦服務中心聯絡。
使用產品時發出
異味。
配件及/或濾鏡太
髒。
請仔細清潔配件。若無法妥善清潔配件,請與您所在國
家/地區的客戶服務中心、飛利浦經銷商或飛利浦服務
中心聯絡,以便更換配件。
您尚未完全刮除
療程部位的毛
髮。
療程部位若有毛髮,則在使用產品時毛髮可能會燃燒,
產生您所聞到的異味。使用產品前,請將療程部位的毛
髮完全刮除。如果刮毛會造成皮膚過敏,請盡量將毛髮
修短,然後使用舒服的設定除毛。
您將產品存放在
滿是灰塵的環
境。
異味在幾次閃光之後就消散了。
您使用的燈光強
度太高。
檢查是否選取正確的燈光強度。必要時,請選擇較低的
強度。
進行療程時,皮
膚感覺比平常敏
感。
繁體中文
問題
51
可能原因
解決方法
您沒有刮除療程
部位的毛髮。
使用產品以前,請先將療程部位的毛髮刮除。如果刮毛
會造成皮膚過敏,請盡量將毛髮修短,然後使用舒服的
設定除毛。
出光口的紫外線
濾光片損壞。
若出光口的紫外線濾光片損壞,請停止使用本產品。
請與您所在國家/地區的客戶服務中心、飛利浦經銷商
或飛利浦服務中心聯絡。
產品故障。
請與您所在國家/地區的客戶服務中心、飛利浦經銷商
或飛利浦服務中心聯絡。
您沒有刮除療程
部位的毛髮
使用產品以前,請先將療程部位的毛髮刮除。如果刮毛
會造成皮膚過敏,請盡量將毛髮修短,然後使用舒服的
設定除毛。
您在不適用的部
位使用產品。
請勿將產品用於內陰唇、陰道、肛門、乳頭、乳暈、
嘴唇、鼻孔及耳朵內側,以及眼睛和眉毛周圍。男性使
用者,請勿將產品用於臉部或陰囊上。
您使用的燈光強
度太高。
降低燈光強度至您覺得舒服的程度。請參閱「使用前準
備」單元中「設定燈光強度」一節。
出光口或配件的
紅色濾鏡破損。
如果出光口或臉部配件的紅色濾鏡破損,請勿裝上破損
的配件使用本產品。請聯絡您的飛利浦經銷商,或飛利
浦服務中心,或聯絡客戶服務中心更換配件。
您的膚色不適用
本產品。
如果您的膚色非常深,請勿使用本產品。如果您的體毛
為淡金色、紅色、灰色或白色,請勿使用本產品。
療程結束時,療
程部位出現紅腫
現象。
輕微紅腫為正常
無害現象,會迅
速消退。
無須採取任何動作。
療程結束後的皮
膚反應比平常
久。
您使用的燈光強
度太高。
下次請選擇較低的燈光強度。請參閱「使用前準備」單
元中「設定燈光強度」一節。
使用產品時感到
無法忍受的疼
痛。
若皮膚反應持續 3 天沒有改善,請尋求醫生協助。
對除毛效果不滿
意。
您使用的燈光強
度太低。
下次請選擇較高的燈光強度。
使用產品時,按
壓區域的重疊部
份不足。
若要達到較佳的除毛效果,使用產品的區域必須有部分
重疊。請參閱「使用本產品」單元中「後續使用」一
節,步驟 9。
使用產品的頻率
不足。
為了成功去除所有毛髮,並且防止髮根再度復甦,前兩
個月必須每兩週重複一次療程。為了讓肌膚常保光滑,
建議您每 4 到 6 週重複一次療程。療程間隔時間要視您
個人的毛髮生長速度而定,身體各部位的情況也不同。
如果在療程間隔期間,毛髮生長的速度太快,只要縮短
療程間隔時間即可,但除毛頻率切勿高於每兩週一次。
當您使用產品的頻率超過建議次數,不但無法提高效
果,反而會增加肌膚產生不良反應的風險。
52
繁體中文
問題
療程部位中的某
些區域又重新長
出毛髮。
可能原因
解決方法
您的毛髮及皮膚
顏色不適用本產
品。
若您的體毛為淡金色、紅色、灰色或白色,
或者您的皮膚顏色非常深,請勿使用本產品。
使用產品時,按
壓區域的重疊部
份不足。
若要達到較佳的除毛效果,使用產品的區域必須有部分
重疊。請參閱「使用本產品」單元中「後續使用」一
節,步驟 9。
毛髮重生為其生
長的自然循環。
這很正常。毛髮重生為其生長的自然循環的一部分。
而重生的毛髮會變得更柔細。
4222.100.2672.1