1
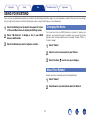
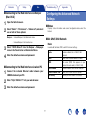
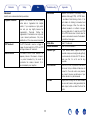
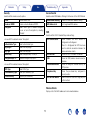
Contents
Setup
Use
Troubleshooting
Wireless Range Extender
Owner’s Manual
HEOS Extend
Appendix
Contents
Setup
Use
Troubleshooting
INTRODUCTION················································································ 3
BEFORE YOU BEGIN······································································· 4
Configuring the Advanced Network Settings······································· 17
Status······························································································ 17
2.4 GHz/5 GHz Network·································································· 17
Network··························································································· 20
Management···················································································· 20
Tools································································································ 21
BASIC TROUBLESHOOTING······················································· 22
The HEOS Extend doesn’t connect to my existing wireless network··· 22
My HEOS devices still can’t connect to my network after I
successfully added a HEOS Extend···················································· 22
I can not connect to HEOS Extend when it is configured as a
Wireless Access Point········································································· 22
I can’t access the Web Interface························································· 23
Music cuts out or delays sometimes··················································· 23
Connecting to a network using WPS ················································· 23
Resetting Your HEOS Extend ···························································· 24
Restoring the HEOS Extend to Factory Defaults ································· 24
INFORMATION················································································ 25
Contact Denon··················································································· 25
Specifications····················································································· 26
Wireless LAN··················································································· 26
General···························································································· 26
Trademarks························································································ 27
License······························································································· 28
License Information for the Software Used in the Unit······················· 28
System Requirements··········································································· 4
Network Requirements······································································· 4
Controller Requirements····································································· 5
Getting To Know Your Extend······························································ 6
Controls····························································································· 7
Back Panel························································································· 8
Powering Your Extend·········································································· 9
Getting the HEOS App·········································································· 9
CONFIGURING YOUR EXTEND·················································· 10
Extender Mode··················································································· 10
Access Point Mode············································································ 11
Placing Your Extend··········································································· 12
Wall Mounting·················································································· 13
USING YOUR EXTEND·································································· 14
Changing the Name············································································ 14
About Your Extend············································································· 14
ADVANCED SETTINGS - ACCESS POINT MODE·················· 15
Connecting to the Web Interface························································ 16
Connecting to the Web Interface via IP Address······························· 16
Connecting to the Web Interface via UPnP (Windows 8/7/Vista)······· 16
Connecting to the Web Interface via Bonjour (Mac OS X)················· 17
Connecting to the Web Interface via wired PC································· 17
Contents
Appendix
2
Contents
Setup
Use
Troubleshooting
Appendix
Thank you for purchasing this HEOS product. To ensure proper operation, please read this owner’s manual carefully.
NOTE
THIS DOCUMENT CONTAINS INFORMATION THAT IS SUBJECT TO CHANGE WITHOUT NOTICE.
For latest information, please visit HEOSbyDenon.com
INTRODUCTION
The HEOS Extend is designed provide wireless network access to your HEOS devices which may be located beyond the range of your existing home wireless
router. You can use multiple Extends to provide wireless network access for HEOS devices in very large homes or offices.
If you are in a hurry, you can learn how to install the HEOS Extend by following the steps outlined in the HEOS Extend Quick Start Guide.
HEOS Extend QUICK START GUIDE
Please continue reading this Owner’s Manual for more detailed information about the features and benefits of your HEOS Extend.
3
Contents
Setup
Use
Troubleshooting
Appendix
BEFORE YOU BEGIN
System Requirements
Before you begin installing the HEOS Extend, please make sure you understand and meet a few basic requirements.
22Network Requirements
Wireless Router – In order to use your HEOS system, you should have a working wireless (Wi-Fi) network in your home.
NOTE
If you do not have a wireless network, the HEOS Extend can optionally be configured to act as a wireless access point (instead of a wireless range extender). Please see the
section “USING YOUR EXTEND” (vpage 14) below.
High Speed Internet Connection – HEOS accesses the Internet to stream music to your home from many popular online music services. HEOS is also
designed to provide you with software updates, which are delivered via your home Internet connection. DSL, Cable, and Fiber services will provide the best
experience and reliability. You may experience performance issues with slower Internet connections like satellite based services.
4
Contents
Setup
Use
Troubleshooting
Appendix
22Controller Requirements
You can control your HEOS system using the free HEOS app on any iOS or Android mobile device that meets these minimum requirements:
iOS Minimum Requirements
Android Minimum Requirements
•iOS version 5.0 or later
•iPhone® (3GS or newer)
•iPad®
•iPod touch® (3rd generation or newer)
•Android OS version 2.3 or later
•All resolutions
5
Contents
Setup
Use
Troubleshooting
Appendix
Getting To Know Your Extend
Unpack your Extend from the box and verify that the following items are included:
qHEOS Extend
wMounting Bracket
tSafety Information Sheet
eScrews
yWarranty
uExtended Protection Plan
(North America model only)
(North America model only)
oPower supply
(European model only)
6
rQuick Start Guide
iEthernet cable
Contents
Setup
Use
Troubleshooting
Appendix
22Controls
Front Panel
t q we r
rConnect Button
qPower LED
wNetwork LED
eConnect LED
LED
Used for Wi-Fi setup (vpage 23).
tReset Button
Color
Used to reset the Extend (vpage 24).
Description
POWER
BLUE
[OFF] AC power is disconnected
[Blinking] Starting up
[ON] Power On - Ready
NETWORK
GREEN
[OFF] Not connected to any networks
[Blinking] Connecting
[Solid] Connected
CONNECT
GREEN
[OFF] Connection mode is not running
[Blinking] Searching for a device to
connect
7
Contents
Setup
Use
Troubleshooting
22Back Panel
q we
r
qEthernet Connector 1
wEthernet Connector 2
ePower Input (DC)
rPower Switch (mains)
8
Appendix
Contents
Setup
Use
Troubleshooting
Powering Your Extend
1
Insert the appropriate adapter into the power supply
(make sure it snaps into place).
2
Connect the power cord to the back of the Extend and
the plug into a wall outlet. The Extend is capable of
automatically switching between 100 – 240v.
Appendix
Getting the HEOS App
The HEOS app is the heart of the HEOS experience. Using your mobile
device and the HEOS app, you can setup, browse, explore, and control your
HEOS system right in the palm of your hand, from anywhere in your home.
Download the HEOS app for iOS or Android by searching App StoreSM or
Google Play™ store for “HEOS by Denon”.
9
Contents
Setup
Use
Appendix
Troubleshooting
CONFIGURING YOUR EXTEND
Your HEOS Extend can be configured to operate in two different modes, “Extender” mode and “Access Point” mode. Extender mode is used to extend the
range of your existing wireless network. Access Point mode is used to set up a new wireless network in the event you don’t have a wireless network installed
in your home or office.
Extender Mode
1
Make sure the Extend is plugged into a wall outlet and
has power (the blue power LED should be solid blue).
2
Connect the included Ethernet cable between one of
the two Ethernet jacks on the Extend and your existing
wireless router or switch.
4
Launch the HEOS app on your mobile
device.
5
Select the Settings
icon in the upper
left corner of the screen or tap “Setup
Now” button at the top of the screen.
6
Select My Devices -> HEOS Extend -> Mode -> Extender.
My Devices
3
Make sure your mobile device is connected to the
wireless network you want to extend. (You can check
this in the Settings/Wi-Fi menu of your mobile device)
7
10
HEOS Extend
Mode
Access Point
Music
Extender
Follow the instructions on the screen to complete the
configuration.
Contents
Setup
Use
Troubleshooting
Access Point Mode
1
Make sure the Extend is plugged into a wall outlet and
has power (the blue Power LED should be solid blue.)
2
Connect the included Ethernet cable between one of
the two Ethernet jacks on the Extend and your existing
router or switch (the Network LED will be flashing green.)
3
In a few seconds, the Network LED will stop flashing and
turn solid green indicating that the Extend is connected
to your router.
4
HEOS Extend is now operating in Access Point mode.
You can connect to the HEOS Extend by selecting the
network name (SSID) that starts with “HEOS_” and
entering the password printed on the bottom of the
HEOS Extend.
Appendix
NOTE
•The default network name and password are unique for every HEOS
Extend. This information is printed on the bottom of your HEOS Extend.
•Access Point mode will automatically be configured with both 2.4 GHz and
5 GHz networks enabled and set to the factory default settings. If you wish
to change any of the default settings, please see the Advanced Settings
section below.
•Once your HEOS Extend has been configured in Extender Mode, the
default network name is erased. If you decide to reconfigure your HEOS
Extend in Access Point Mode, the network name (SSID) will be set to the
same name as the network it was previously set to extend. Please see
the Advanced Settings section for instructions about how to change the
network name using the Web UI.
11
Contents
Setup
Use
Troubleshooting
Appendix
Placing Your Extend
Locate the HEOS Extend in a convenient location between your existing Wireless Network Router and the device that might be out of range of your Wireless
Network Router.
SPEAKER
SPEAKER
ROUTER
NEW RANGE
EXTENDER
12
INTERNET
Contents
Setup
Use
Troubleshooting
Appendix
22Wall Mounting
The HEOS Extend can optionally be mounted on a wall using the included mounting hardware.
1
2
Attach the mounting bracket to the wall using the provided wall mounting hardware kit.
Insert the provided short screws into the bottom cover of the Extend.
Finger-tighten the screws, do not overtighten!
Mounting Screw
Mounting Bracket
Mounting Screw
Mounting Screw
3
Wall
Mount the Extend on the mounting bracket by rotating the unit clockwise about 90 degrees to secure it in place.
13
Contents
Setup
Use
Troubleshooting
Appendix
USING YOUR EXTEND
Once you have your Extend connected to your network it will automatically extend the range of your existing wireless network. There are only a few settings
that you might want to adjust or confirm by following these steps using the HEOS app on your mobile device:
1
Select the Settings icon located in the upper left corner
of the main Music menu to display the Settings menu.
2
Select “My Devices” to display a list of your HEOS
devices and Extends.
3
Select the Extend you want to adjust or confirm.
Changing the Name
If you have more than one HEOS Extend, you may want to rename your
Extend so you can tell them apart. For example, you may want to give the
Extend a name that helps identify where it is located. “Extend – Office”, or
“Extend – Garage”.
1
2
3
Select “Name”.
Select or enter a new name for your Extend.
Select the Save
icon to save your changes.
About Your Extend
Used to view status information about the selected Extend.
1
2
14
Select “About”.
Scroll down to see information about the Extend.
Contents
Setup
Use
Troubleshooting
Appendix
ADVANCED SETTINGS - ACCESS POINT MODE
CAUTION
Adjusting these settings may disconnect your HEOS devices from your network and possibly render your HEOS devices unusable. Do not use these features
unless you are comfortable making advanced adjustments to your system!
HEOS Extend
Status
2.4GHz Network
5GHz Network
Network
Management
Tools
HEOS Extend Status Information
System
System Time
System Up Time
Hardware Version
Serial Number
Locale
Kernel Version
Application Version
LAN Settings
IP Address
Subnet Mask
MAC Address
2014/05/09 02:09:29
12 min 17 sec
1.0.0
000000001
NA
1.0.0
1.0.0
169.254.1.1
255.255.0.0
00:02:6F:C7:EC:A6
WLAN Settings 2.4GHz
Cchannel
Tx Packet
15
6
13351
Contents
Setup
Use
Troubleshooting
22Connecting to the Web Interface via UPnP
(Windows 8/7/Vista)
Connecting to the Web Interface
The HEOS Extend provides a web browser based user interface that can be
accessed by following these steps:
22Connecting to the Web Interface via IP Address
1
Determine the IP address of your Extend using the
“About” feature described above.
2
Enter the IP address of your Extend into your web
browser using your PC.
3
Enter the default username and password (you can
change this using the Web Interface).
Appendix
Default username : admin
Default password : password
16
1
2
Open Windows Explorer (File Explorer in Windows 8).
3
4
Right-click the HEOS Extend icon, then click Properties.
5
Enter the default username and password.
Click Network, then your HEOS Extend icon should
appear.
Click on the address link in Device webpage. Your web
browser opens.
Contents
Setup
Use
Troubleshooting
22Connecting to the Web Interface via Bonjour
(Mac OS X)
1
2
Configuring the Advanced Network
Settings
Open the Safari browser.
22Status
Displays status information and current configuration data about the
Extend.
Select “Safari” – “Preferences” – “Advanced”, and select
one or both of these options:
Bonjour : P Include Bonjour in the Bookmarks menu
222.4 GHz/5 GHz Network
P Include Bonjour in the Favorites bar
3
Select “HEOS Extend” from the Bonjour – Webpages
menu in the Favorites bar or Bookmarks Menu.
4
Enter the default username and password.
Basic
Used to edit the Band, SSID, and Wi-Fi channel settings.
22Connecting to the Web Interface via wired PC
1
Connect the included Ethernet cable between your
HEOS Extend and your PC.
2
3
Enter “http://169.254.1.1” into your web browser.
Appendix
Enter the default username and password.
17
Radio
Enable or disable the 2.4 GHz/5 GHz
network.
Band
Select which network bands to enable.
SSID
The name (SSID) that appears on your
network for each radio (2.4 GHz/5 GHz).
Auto Channel
Enable or disable auto channel selection.
Check Channel Time
Select auto channel selection period.
Site Survey
Used to perform network site surveys.
Contents
Setup
Use
Troubleshooting
Advanced
Used to access advanced network parameters.
Fragment Threshold
Specifies the maximum size for a packet
before data is fragmented into multiple
packets. If you experience a high packet
error rate, you may slightly increase the
Fragmentation Threshold. Setting the
Fragmentation Threshold too low may result
in poor network performance. Only minor
modifications of this value are recommended.
RTS Threshold
The RTS threshold is used as a trigger to
engage the back and forth of RTS and CTS
messages between AP and client.
Beacon Interval
The Beacon Interval value indicates the
frequency interval of the beacon. A beacon
is a packet broadcast by the router to
synchronize the wireless network. 50 is
recommended in poor reception.
18
Appendix
DTIM Period
Indicates the interval of the Delivery Traffic
Indication Message (DTIM). A DTIM field is
a countdown field informing clients of the
next window for listening to broadcast and
multicast messages. When the router has
buffered broadcast or multicast messages
for associated clients, it sends the next DTIM
with a DTIM Interval value. Its clients hear the
beacons and awaken to receive the broadcast
and multicast messages.
N Data Rate
Select 11n data rate.
Channel Bandwidth
Select channel bandwidth.
Preamble Type
If your wireless device supports the short
preamble and you are having trouble getting it
to communicate with other 802.11b devices,
make sure that it is set to use the long
preamble.
CTS Protection
When set to Auto, a protection mechanism
will ensure that your Wireless-B devices will
connect to the router when many devices
are present. However, performance of your
wireless devices may be decreased.
Tx Power
Higher power settings are not recommended
for users due to excess heat generated by the
radio chipset, which can affect the life of the
router.
Contents
Setup
Use
Troubleshooting
Security
Appendix
Access Control
Used to edit the wireless security options.
Used to enable MAC Address Filtering to limit access to the HEOS Extend.
ESSID
Shows current SSID.
Wireless MAC filtering
Enable or Disable MAC address filtering.
Broadcast ESSID
Enable or disable Broadcast ESSID.
MAC Address List
List of registered MAC address.
Encryption
Select which type of network encryption
to use or turn off encryption by selecting
“Disable”.
WPS
Used to edit the Wi-Fi Protected Setup mode settings.
•In case WEP is selected in above “Encryption”
WPS Current Status
Shows whether the WPS function is
Configured or unConfigured.
When it is Configured, the WPS has been
used to authorize connection between the
device and wireless clients.
Authentication Type
Select authentication type.
Key Length
Select WEP key length.
Key Type
Select WEP key type.
Default Key
Select Encryption Key 1 to Key 4.
Self Pin Code
Shows the WPS PIN code of this device.
Specifies encryption key up to 4.
SSID
Shows the SSID (wireless network name) for
reference.
Authentication Mode
Shows the encryption method used by the
WPS process.
Passphrase Key
Shows the pre-shared key configured in
Security section.
WPS via Push Button
Click this button to start WPS using the push
button method.
Encryption Keys 1-4
•In case WPA is selected in above “Encryption”
WPA Type
Select WPA Type.
Pre-shared Key Type
Select pre-shared key type.
Pre-Shared Key
Specifies pre-shared key.
Wireless Clients
Displays a list of the MAC addresses for all connected devices.
19
Contents
Setup
Use
Troubleshooting
22Network
Firmware Update
To perform the Firmware Update:
LAN
Configuration Type
Select Dynamic or Static configuration.
IP Address
IP address, subnet mask, default gateway.
22Management
Admin
Old Password
Appendix
Enter the current password for the Extend.
(default is “password”)
New Password
Enter the new password that you wish to use.
Confirm Password
Re-enter the new password that you wish to
use.
1
Click the Browse button and navigate the OS File System
to the location of the upgrade file.
2
Select the upgrade file. The name of the file will appear
in the Upgrade File field.
3
Click the Apply button to start the firmware upgrade
process.
Caution
The device is unavailable during the upgrade process and must restart when the
upgrade is completed. Any connections to or through the device will be lost.
20
Contents
Setup
Use
Troubleshooting
Appendix
22Tools
Configuration
Restore to Factory
Default
Click Reset button to restore the HEOS
Extend to its factory default settings. This is
the same as using pressing the button on the
top panel with a paper clip.
Backup Settings
Restore Settings
Time Server
Time Setup
Select what method
synchronization.
Click Save to save the current configured
settings to your PC.
Time Zone
Select the time zone for the location of the
Extend.
Restore settings that have been previously
backed up, click Browse, select the file, and
click Upload.
NTP Time Server
Select the name of the NTP time server from
which to retrieve the correct time over the
Internet.
Daylight Saving
Enable or disable Daylight Savings time and
specifies when it is active.
System Log
to
use
for
time
Displays information about the operation of the system over time.
Ping
Restart
Used to remotely reboot the wireless network extender. Settings are not
changed. To perform the restart, click on the Restart button. The restart will
be completed when the LED Power light stops blinking.
Address to Ping
Enter the address you want to send a ping
test to.
Ping Frequency
Select how many times to perform the ping
test.
Iperf
Used to perform an iperf server.
21
Contents
Setup
Use
Troubleshooting
Appendix
BASIC TROUBLESHOOTING
The HEOS Extend doesn’t connect to my existing wireless network
Solution
Refer to Page
•Move the HEOS device and the HEOS Extend closer to existing wireless access point and try again.
–
My HEOS devices still can’t connect to my network after I successfully added a HEOS
Extend
Solution
Refer to Page
•Move the HEOS device closer to the HEOS Extend.
•Move the HEOS Extend closer to your wireless access point.
–
–
I can not connect to HEOS Extend when it is configured as a Wireless Access Point
Solution
Refer to Page
•Connect to the HEOS Extend from your mobile device using the network name (SSID) and password printed on the label which is
located on the bottom of HEOS Extend.
•Once your HEOS Extend has been configured in Extender Mode, the network default name is erased. If you decide to reconfigure your
HEOS Extend in Access Point Mode, the network name will be set to the same name as the network it was previously set to extend.
•Make sure you have an Ethernet cable connected between your HEOS Extend and your network interface (cable modem, router,
switch, etc…).
•Make sure your mobile device and/or HEOS device is within range of HEOS Extend.
–
22
–
–
–
Contents
Setup
Use
Troubleshooting
Appendix
I can’t access the Web Interface
Solution
Refer to Page
•Make sure you have connected the power supply to the Extend and the Power LED is solid blue.
•Make sure your Extend is connected to your network and the network LED is solid green.
•Make sure your PC is on the same network as your Extend.
•Connect your Extend and PC to the same network using Ethernet cables.
7
7
–
–
Music cuts out or delays sometimes
Solution
Refer to Page
•Make sure your Internet connection is operating correctly.
•If you are sharing your network with other users or devices, they may be using most of your bandwidth (especially if they are streaming
video).
•Make sure your HEOS devices are within range of your wireless network.
•Make sure your HEOS devices are not located near other electronic devices that could interfere with it’s wireless connectivity (like
microwave ovens, cordless phones, TVs, etc…).
–
–
12
–
Connecting to a network using WPS
Solution
Refer to Page
If your wireless router support WPS (Wi-Fi Protected Setup™) your HEOS Extend can optionally connect to your network using the “Push
Button” method by following these steps:
1. Press the WPS button on your router.
2. Within 2 minutes, Press and Hold the Connect button on the front panel of the HEOS Extend for 5 seconds.
3. The CONNECT LED on the front of the HEOS Extend will flash green for several seconds as it connects to your router.
4. When the connection is complete, the NETWORK LED on the front of the HEOS Extend will turn solid green.
–
23
Contents
Setup
Use
Troubleshooting
Appendix
Resetting Your HEOS Extend
Solution
Refer to Page
Resetting your HEOS Extend will reboot the system.
To reset your HEOS Extend, gently insert a small paperclip into the Reset button hole on the front of the HEOS Extend and press, the
POWER LED will begin to flash blue in a few seconds.
–
Restoring the HEOS Extend to Factory Defaults
Solution
Refer to Page
Restoring the HEOS Extend to its factory defaults will clear all of the settings and restore the factory defaults including restoring the default
network name (SSID) and password (as printed on the bottom of the HEOS Extend).
–
Caution
All settings will be erased.
To restore your HEOS Extend to the factory defaults, insert a small paperclip into the Reset button hole on the front of the HEOS Extend
and hold it in until the NETWORK and CONNECT LEDs begin to flash green.
24
Contents
Setup
Use
Troubleshooting
Appendix
INFORMATION
Contact Denon
For US & Canada only:
If you need further assistance with your HEOS Product, please contact HEOS by Denon Customer Support Services below:
Website: www.HEOSbyDenon.com/Support
Email: [email protected]
Live Chat: www.HEOSbyDenon.com/LiveChat
Telephone: Toll Free (855) 499 2820
(M-F 10:00AM to 10:00PM EST / Sat 12:00PM to 8:00PM EST)
For the other region:
If you need additional help in solving problems, please contact Denon customer service in your area or visit HEOSbyDenon.com
25
Contents
Setup
Use
Appendix
Troubleshooting
Specifications
22Wireless LAN
Network type (wireless LAN standards):
Used frequency range:
Ethernet Port:
Conforming to IEEE 802.11a/b/g/n
2.4 GHz, 5 GHz
RJ-45 x 2 ports
22General
Operating temperature:
Power supply:
Power consumption:
41 °F – 95 °F (5 °C – 35 °C)
AC 100 – 240 V, 50/60 Hz
5W
Dimensions:
6 27/32 (174)
Unit : in. (mm)
1 37/64
(40)
6 39/64 (168)
Weight: 8.6 oz (245 g) (without the power supply)
26
Contents
Setup
Use
Troubleshooting
Appendix
Trademarks
Google Play is a trademark of Google Inc.
Wi-Fi Protected setup™ logo is trademark of Wi-Fi Alliance.
Apple, the Apple logo, iPad, iPhone, and iPod touch are trademarks of
Apple Inc., registered in the U.S. and other countries. App Store is a service
mark of Apple Inc.
Adobe, the Adobe logo and Reader are either registered trademarks or
trademarks of Adobe Systems Incorporated in the United States and/or
other countries
27
Contents
Setup
Use
Troubleshooting
Appendix
License
22License Information for the Software Used in
the Unit
nn LGPL
Open Source Used
uclibc
About GPL (GNU-General Public License), LGPL (GNU Lesser General
Public License) License
This product uses GPL/LGPL software and software made by other companies.
After you purchase this product, you may procure, modify or distribute the source
code of the GPL/LGPL software that is used in the product.
Denon provides the source code based on the GPL and LPGL licenses at the actual
cost upon your request to our customer service center. However, note that we
make no guarantees concerning the source code. Please also understand that we
do not offer support for the contents of the source code.
nn howl-1.0.0
Copyright 2003, 2004 Porchdog Software. All rights reserved.
Redistribution and use in source and binary forms, with or without modification, are
permitted provided that the following conditions are met:
1. Redistributions of source code must retain the above copyright notice, this list of
conditions and the following disclaimer.
2. Redistributions in binary form must reproduce the above copyright notice, this list of
conditions and the following disclaimer in the documentation and/or other materials
provided with the distribution.
This section describes software license used for this unit. To maintain the
correct content, the original (English) is used.
nn GPL
Open Source Used
bridge-utils
busybox
linuxigd
mtd-utils
u-boot
udhcp
utelnetd
wget
wireless-tools
hostapd
iptables
Linux Kernel
ntpclient
termcap
Version
0.9.29
THIS SOFTWARE IS PROVIDED BY PORCHDOG SOFTWARE “AS IS” AND ANY
EXPRESS OR IMPLIED WARRANTIES, INCLUDING, BUT NOT LIMITED TO, THE
IMPLIED WARRANTIES OF MERCHANTABILITY AND FITNESS FOR A PARTICULAR
PURPOSE ARE DISCLAIMED.
IN NO EVENT SHALL THE HOWL PROJECT OR CONTRIBUTORS BE LIABLE
FOR ANY DIRECT, INDIRECT, INCIDENTAL, SPECIAL, EXEMPLARY, OR
CONSEQUENTIAL DAMAGES (INCLUDING, BUT NOT LIMITED TO, PROCUREMENT
OF SUBSTITUTE GOODS OR SERVICES; LOSS OF USE, DATA, OR PROFITS;
OR BUSINESS INTERRUPTION) HOWEVER CAUSED AND ON ANY THEORY OF
LIABILITY, WHETHER IN CONTRACT, STRICT LIABILITY, OR TORT (INCLUDING
NEGLIGENCE OR OTHERWISE) ARISING IN ANY WAY OUT OF THE USE OF THIS
SOFTWARE, EVEN IF ADVISED OF THE POSSIBILITY OF SUCH DAMAGE.
Version
1.2
1.7.5
1
1.2
1.1.4
0.9.9-pre
0.1.9
1.11.3
2.8
0.8
1.4.4
2.6.34
2003_194
1.3.1
The views and conclusions contained in the software and documentation are those
of the authors and should not be interpreted as representing official policies, either
expressed or implied, of Porchdog Software.
28
Contents
Setup
Use
Troubleshooting
Appendix
nn Iperf-2.0.5
nn libupup-1.6.18
Copyright (c) 1999-2007, The Board of Trustees of the University of Illinois All Rights
Reserved.
Copyright (c) 2000-2003 Intel Corporation All rights reserved.
Redistribution and use in source and binary forms, with or without modification, are
permitted provided that the following conditions are met:
Iperf performance test
Mark Gates
Ajay Tirumala
Jim Ferguson
Jon Dugan
Feng Qin
Kevin Gibbs
John Estabrook
National Laboratory for Applied Network Research
National Center for Supercomputing Applications
University of Illinois at Urbana-Champaign
http://www.ncsa.uiuc.edu
* Redistributions of source code must retain the above copyright notice, this list of
conditions and the following disclaimer.
* Redistributions in binary form must reproduce the above copyright notice, this list of
conditions and the following disclaimer in the documentation and/or other materials
provided with the distribution.
* Neither name of Intel Corporation nor the names of its contributors may be used to
endorse or promote products derived from this software without specific prior written
permission.
THIS SOFTWARE IS PROVIDED BY THE COPYRIGHT HOLDERS AND
CONTRIBUTORS “AS IS” AND ANY EXPRESS OR IMPLIED WARRANTIES,
INCLUDING, BUT NOT LIMITED TO, THE IMPLIED WARRANTIES OF
MERCHANTABILITY AND FITNESS FOR A PARTICULAR PURPOSE ARE
DISCLAIMED. IN NO EVENT SHALL INTEL OR CONTRIBUTORS BE LIABLE
FOR ANY DIRECT, INDIRECT, INCIDENTAL, SPECIAL, EXEMPLARY, OR
CONSEQUENTIAL DAMAGES (INCLUDING, BUT NOT LIMITED TO, PROCUREMENT
OF SUBSTITUTE GOODS OR SERVICES; LOSS OF USE, DATA, OR PROFITS;
OR BUSINESS INTERRUPTION) HOWEVER CAUSED AND ON ANY THEORY OF
LIABILITY, WHETHER IN CONTRACT, STRICT LIABILITY, OR TORT (INCLUDING
NEGLIGENCE OR OTHERWISE) ARISING IN ANY WAY OUT OF THE USE OF THIS
SOFTWARE, EVEN IF ADVISED OF THE POSSIBILITY OF SUCH DAMAGE.
Permission is hereby granted, free of charge, to any person obtaining a copy of this
software (Iperf) and associated documentation files (the "Software"), to deal in the
Software without restriction, including without limitation the rights to use, copy, modify,
merge, publish, distribute, sublicense, and/or sell copies of the Software, and to permit
persons to whom the Software is furnished to do so, subject to the following conditions:
Redistributions of source code must retain the above copyright notice, this list of
conditions and the following disclaimers.
Redistributions in binary form must reproduce the above copyright notice, this list of
conditions and the following disclaimers in the documentation and/or other materials
provided with the distribution.
Neither the names of the University of Illinois, NCSA, nor the names of its contributors
may be used to endorse or promote products derived from this Software without
specific prior written permission. THE SOFTWARE IS PROVIDED “AS IS”, WITHOUT
WARRANTY OF ANY KIND, EXPRESS OR IMPLIED, INCLUDING BUT NOT LIMITED
TO THE WARRANTIES OF MERCHANTABILITY, FITNESS FOR A PARTICULAR
PURPOSE AND NONINFRINGEMENT. IN NO EVENT SHALL THE CONTIBUTORS
OR COPYRIGHT HOLDERS BE LIABLE FOR ANY CLAIM, DAMAGES OR OTHER
LIABILITY, WHETHER IN AN ACTION OF CONTRACT, TORT OR OTHERWISE,
ARISING FROM, OUT OF OR IN CONNECTION WITH THE SOFTWARE OR THE USE
OR OTHER DEALINGS IN THE SOFTWARE.
29
Contents
Setup
Use
Troubleshooting
nn OpenSSL License
Appendix
THIS SOFTWARE IS PROVIDED BY THE OpenSSL PROJECT “AS IS” AND ANY
EXPRESSED OR IMPLIED WARRANTIES, INCLUDING, BUT NOT LIMITED TO, THE
IMPLIED WARRANTIES OF MERCHANTABILITY AND FITNESS FOR A PARTICULAR
PURPOSE ARE DISCLAIMED. IN NO EVENT SHALL THE OpenSSL PROJECT
OR ITS CONTRIBUTORS BE LIABLE FOR ANY DIRECT, INDIRECT, INCIDENTAL,
SPECIAL, EXEMPLARY, OR CONSEQUENTIAL DAMAGES (INCLUDING, BUT NOT
LIMITED TO, PROCUREMENT OF SUBSTITUTE GOODS OR SERVICES; LOSS OF
USE, DATA, OR PROFITS; OR BUSINESS INTERRUPTION) HOWEVER CAUSED AND
ON ANY THEORY OF LIABILITY, WHETHER IN CONTRACT, STRICT LIABILITY, OR
TORT (INCLUDING NEGLIGENCE OR OTHERWISE) ARISING IN ANY WAY OUT OF
THE USE OF THIS SOFTWARE, EVEN IF ADVISED OF THE POSSIBILITY OF SUCH
DAMAGE.
Copyright (c) 1998-2011 The OpenSSL Project. All rights reserved.
Redistribution and use in source and binary forms, with or without modification, are
permitted provided that the following conditions are met:
1. Redistributions of source code must retain the above copyright notice, this list of
conditions and the following disclaimer.
2. Redistributions in binary form must reproduce the above copyright notice, this list of
conditions and the following disclaimer in the documentation and/or other materials
provided with the distribution.
This product includes cryptographic software written by Eric Young (eay@cryptsoft.
com). This product includes software written by Tim Hudson ([email protected]).
3. All advertising materials mentioning features or use of this software must display
the following acknowledgment: “This product includes software developed by the
OpenSSL Project for use in the OpenSSL Toolkit. (http://www.openssl.org/)”
4. The names “OpenSSL Toolkit” and “OpenSSL Project” must not be used to endorse
or promote products derived from this software without prior written permission. For
written permission, please contact [email protected].
5. Products derived from this software may not be called “OpenSSL” nor may
“OpenSSL” appear in their names without prior written permission of the OpenSSL
Project.
6. Redistributions of any form whatsoever must retain the following acknowledgment:
“This product includes software developed by the OpenSSL Project for use in the
OpenSSL Toolkit (http://www.openssl.org/)”
30
Contents
Setup
Use
Troubleshooting
Appendix
nn pcre-6.x
THE “BSD” LICENCE
PCRE LICENSE
-------------
-------------
* Redistributions of source code must retain the above copyright notice, this list of
conditions and the following disclaimer.
* Redistributions in binary form must reproduce the above copyright notice, this list of
conditions and the following disclaimer in the documentation and/or other materials
provided with the distribution.
* Neither the name of the University of Cambridge nor the name of Google Inc. nor the
names of their contributors may be used to endorse or promote products derived from
this software without specific prior written permission.
PCRE is a library of functions to support regular expressions whose syntax and
semantics are as close as possible to those of the Perl 5 language.
Release 6 of PCRE is distributed under the terms of the “BSD” licence, as specified
below. The documentation for PCRE, supplied in the “doc” directory, is distributed
under the same terms as the software itself.
The basic library functions are written in C and are freestanding. Also included in the
distribution is a set of C++ wrapper functions.
THIS SOFTWARE IS PROVIDED BY THE COPYRIGHT HOLDERS AND
CONTRIBUTORS “AS IS” AND ANY EXPRESS OR IMPLIED WARRANTIES,
INCLUDING, BUT NOT LIMITED TO, THE IMPLIED WARRANTIES OF
MERCHANTABILITY AND FITNESS FOR A PARTICULAR PURPOSE ARE
DISCLAIMED. IN NO EVENT SHALL THE COPYRIGHT OWNER OR CONTRIBUTORS
BE LIABLE FOR ANY DIRECT, INDIRECT, INCIDENTAL, SPECIAL, EXEMPLARY, OR
CONSEQUENTIAL DAMAGES (INCLUDING, BUT NOT LIMITED TO, PROCUREMENT
OF SUBSTITUTE GOODS OR SERVICES; LOSS OF USE, DATA, OR PROFITS;
OR BUSINESS INTERRUPTION) HOWEVER CAUSED AND ON ANY THEORY OF
LIABILITY, WHETHER IN CONTRACT, STRICT LIABILITY, OR TORT (INCLUDING
NEGLIGENCE OR OTHERWISE) ARISING IN ANY WAY OUT OF THE USE OF THIS
SOFTWARE, EVEN IF ADVISED OF THE POSSIBILITY OF SUCH DAMAGE.
LIABILITY, WHETHER IN CONTRACT, STRICT LIABILITY, OR TORT (INCLUDING
NEGLIGENCE OR OTHERWISE) ARISING IN ANY WAY OUT OF THE USE OF THIS
SOFTWARE, EVEN IF ADVISED OF THE POSSIBILITY OF SUCH DAMAGE.
THE BASIC LIBRARY FUNCTIONS
------------Written by:
Philip Hazel
Email local part: ph10
Email domain: cam.ac.uk
University of Cambridge Computing Service, Cambridge, England. Phone: +44 1223
334714.
Copyright (c) 1997-2006 University of Cambridge All rights reserved.
THE C++ WRAPPER FUNCTIONS
------------Contributed by: Google Inc.
Copyright (c) 2006, Google Inc.
All rights reserved.
31
Contents
Setup
Use
Troubleshooting
Appendix
nn popt-1.7
nn zlib
Copyright (c) 1998 Red Hat Software
http://www.zlib.net/
Permission is hereby granted, free of charge, to any person obtaining a copy of this
software and associated documentation files (the “Software”), to deal in the Software
without restriction, including without limitation the rights to use, copy, modify, merge,
publish, distribute, sublicense, and/or sell copies of the Software, and to permit persons
to whom the Software is furnished to do so, subject to the following conditions:
zlib.h -- interface of the ‘zlib’ general purpose compression library version 1.2.3, July
18th, 2005 Copyright (C) 1995-2004 Jean-loup Gailly and Mark Adler
This software is provided ‘as-is’, without any express or implied warranty. In no event
will the authors be held liable for any damages arising from the use of this software.
Permission is granted to anyone to use this software for any purpose, including
commercial applications, and to alter it and redistribute it freely, subject to the
following restrictions:
1. T
he origin of this software must not be misrepresented; you must not claim
that you wrote the original software. If you use this software in a product, an
acknowledgment in the product documentation would be appreciated but is not
required.
2. A
ltered source versions must be plainly marked as such, and must not be
misrepresented as being the original software.
3. T
his notice may not be removed or altered from any source distribution.
The above copyright notice and this permission notice shall be included in all copies or
substantial portions of the Software.
THE SOFTWARE IS PROVIDED “AS IS”, WITHOUT WARRANTY OF ANY KIND,
EXPRESS OR IMPLIED, INCLUDING BUT NOT LIMITED TO THE WARRANTIES
OF MERCHANTABILITY, FITNESS FOR A PARTICULAR PURPOSE AND
NONINFRINGEMENT. IN NO EVENT SHALL THE X CONSORTIUM BE LIABLE
FOR ANY CLAIM, DAMAGES OR OTHER LIABILITY, WHETHER IN AN ACTION OF
CONTRACT, TORT OR OTHERWISE, ARISING FROM, OUT OF OR IN CONNECTION
WITH THE SOFTWARE OR THE USE OR OTHER DEALINGS IN THE SOFTWARE.
Jean-loup Gailly [email protected], Mark Adler [email protected]
Except as contained in this notice, the name of the X Consortium shall not be used
in advertising or otherwise to promote the sale, use or other dealings in this Software
without prior written authorization from the X Consortium.
32
www.denon.com
D&M Holdings Inc.
3520 10342 00AD