1
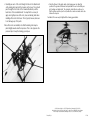
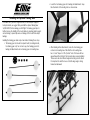
• Locate the four training gear rod to landing skid attachments. Snap
the attachments to the landing skids as shown below.
Installing the Optional Training Gear
If the Blade SR is your first single-rotor and/or collective-pitch equipped
helicopter model, we suggest that you install the optional Training Gear
Set (EFLH1527) before making your first flight. The training gear helps to
further increase the stability of the model while also providing added support
and cushioning to prevent tip-overs and damage to the model from abrupt
landings.
Installing the training gear takes only a few minutes following these steps.
• The training gear set includes four plastic balls, four ball grommets,
four training gear rods, four rod end caps, four training gear rod to
landing skid attachments and one training gear rod mounting base.
• After installing all four attachments, locate the four training gear
rods and rod mounting base. Note that the rod mounting base
has a “coned” shape to it. The “pointed” side of the base will face
upward toward the bottom of the helicopter when properly installed.
The base also has two different angles where the gear rods attach.
It is important to orient the base so that the large angle is facing
forward and backward.
• Carefully pass each of the rods through the holes in the attachments
on the landing skids and into the channels on the base. The rods will
pass through the front holes of the forward attachments, and the
back holes of the rear attachments. You may find it necessary to
apply some light pressure to the rods, base and landing skids when
installing all four rods in the base. This is typical; however, take care
to not damage any of the parts.
•Check the fitment of the plastic balls on the training gear rod. Adjust the
position of the grommets that were factory-installed on each rod until they are
just touching each plastic ball. The grommets should then be positioned so
that the ball can spin freely on the rod, without too much movement side-to-side
between the keepers.
Your Blade SR is now ready for flight with the training gear installed.
Once all four rods are installed, note that the landing skids may be
pulled slightly inward under their pressure. This is also typical as the
pressure helps to keep the training gear in place.
© 2010 Horizon Hobby, Inc., 4105 Fieldstone Road, Champaign, IL 61822 USA
Horizon Hobby UK, Units 1-4 Ployters Rd, Staple Tye, Harlow, Essex, CM18 7NS, United Kingdom
Horizon Hobby Deutschland GmbH, Hamburger Strasse 10, 25335 Elmshorn, Germany
Printed 11/09
17499