1
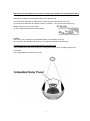
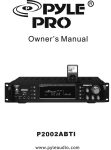
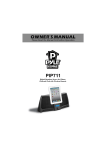
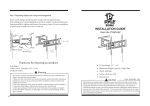
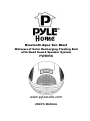
Bluetooth Aqua Sun Blast
Waterproof Solar Recharging Floating Ball
with Quad Sound Speaker System
PWR95S
www.pyleaudio.com
USER’S MANUAL
Important Safety Instructions
When used in the directed manner, this unit has been designed and manufactured to ensure your
personal safety. However, improper use can result in potential electrical shock or fire hazards.
Please read all safety and operating instructions carefully before installation and use, and keep
these instructions handy for future reference. Take special note of all warnings listed in these
instructions and on the unit.
1. Ventilation
The unit should be situated so that its location or position does not interfere with its proper
ventilation. For example, it should not be situated on a bed, sofa, rug or similar surface that may
block the ventilation openings. The ventilation should not be impeded by covering the ventilation
openings with items, such as newspapers, table-cloths, curtains, etc. Also, it should not be
placed in a built-in installation, such as a bookcase or cabinet, which may impede the flow of air
through the ventilation openings; minimum distances 20 cm around the apparatus for sufficient
ventilations.
2. Heat & Flame
The unit should be located far away from heat sources such as radiators, heat registers, stoves
or other appliances (including amplifiers) that produce heat.
No open flame sources, such as lighted candles, should be placed on the apparatus.
3. Power Source
The unit should be connected to a power supply only of the type described in the operating
instructions or as marked on the appliance. Where the power adaptor is used as the disconnect
device, the disconnect device shall remain readily operable.
4. Power Cord Protection
Power supply cords should be routed so that they are not likely to be walked on or pinched by
items placed upon or against them. It is always best to have a clear area from where the cord
exits the unit to where it is plugged into an AC outlet. The mains plug of apparatus should not be
obstructed OR should be easily accessed during intended use.
5. Cleaning
The unit should be cleaned only as recommended. See the section "Care and Maintenance" of
this manual for cleaning instructions.
6. Object and Liquid Entry
Care should be taken so that objects do not fall and liquids are not spilled into any openings or
vents located on the unit. It shall not be exposed to dripping or splashing and that no objects
filled with liquids, such as vases, shall be placed on the apparatus.
7. Attachments
Do not use attachments no recommended by the product manufacturer.
8. Lightning and Power Surge Protection
Unplug the unit from the wall outlet and disconnect the periods of time. This will prevent damage
to the product due to lightning and power-line surges.
9. Overloading
Do not overload wall outlets, extension cords, or integral convenience receptacles as this can
result in a risk of fire of electric shock.
10. Damage Requiring Service
This unit should be serviced by qualified service personnel when:
A. The power supply cord or plug has been damaged.
B. Objects have fallen into or liquid has been spilled into the enclosure.
C. The unit has been exposed to rain.
D. The unit has been dropped or the enclosure damaged.
E. The unit exhibits a marked change in performance or does not operate normally.
11. Periods of Nonuse
If the unit is to be left unused for an extended period of time, such as a month or longer, the
power cord should be unplugged from the unit to prevent damage or corrosion.
12. Servicing
The user should not attempt to service the unit beyond those methods described in the user's
1
operating instructions. Service methods not covered in the operating instructions should be
referred to qualified service personnel. Contact Pyle Technical Support for any issues:
[email protected]
13. Environment
Attention: Do not dispose of batteries improperly pay attention to the environmental aspects of
battery disposal and the use of unit in moderate climates.
Features
Thank you for purchasing the Bluetooth Floating Speaker.
This model incorporates following features:
- Playback iPad /iPhone/iPod Touch and Android smart phone streaming audio through Bluetooth
technology.
- Open air operating distance of up to 32 feet.
- Water proof Speaker
- LED Indicator
- USB cable (included) or AC-DC power adaptor (NOT included) for charging the rechargeable
battery of the system.
iPad, iPhone and iPod touch are trademarks of Apple Inc., registered in the U.S. and other
countries.
Smart phone, iPad, iPhone, iPod touch are not included.
2
Location of Controls
Main Unit
Front View
Bottom View
1. Power / Bluetooth mode LED Indicator
2. Power
3.
/
Button
Button
4. VOL +/- (Up/Down) Button
- Power off mode: LED indicator is off.
- Whilst power on and searching Bluetooth device, LED
indicator will blink in red and steadily light in green colour.
- Whilst power on and paired a Bluetooth device, LED indicator
lights steadily in amber (red + green) colour.
- Press to turn the unit on / off.
- In Bluetooth mode: Skip tracks Forward / Backward.
- Adjust the output volume level.
5. Speakers
6. Battery Compartment Cap
7. Battery Compartment
8. Battery Type Switch
9. DC IN Jack
-For the connection of USB cable or external DC power supply
10. Battery Type Switch position LED indicator
- At RECHARGEABLE position, LED lights on.
- At NON RECHARGEABLE position, LED turns off.
3
Installation
Use only Alkaline batteries or rechargeable batteries like those included inside unit.
A battery compartment located at bottom of the unit.
(1) Unscrew the compartment cap counter-clockwise and open it.
(2) For the first time use:
Just remove the insulation tab attached in the battery compartment (if battery is included).
Screw the compartment cap clockwise and close it tight.
To install Rechargeable Batteries: The battery type switch must be slid to the RECHARGEABLE
position. Follow the polarity diagram shown inside the compartment and install 3 x AA (UM-3)
rechargeable type batteries.
Screw the compartment cap clockwise and close it tight.
To install regular Alkaline battery:
In case of regular Alkaline type battery is installed, take out the old battery then follow the
polarity diagram shown inside the compartment and install 3 x AA (UM-3) type fresh batteries.
The battery type switch must be slid to the NON RECHARGEABLE position.
Screw the compartment cap clockwise and close it tight.
Note:
Switch to “RECHARGEABLE” position to charge the rechargeable battery.
Switch to “NON RECHARGEABLE” position when regular type (e.g. Alkaline type) battery is
used.
Caution:
Never switch to “RECHARGEABLE” position when regular battery (e.g. Alkaline type
battery) is installed which will damage the battery or may cause explosion.
Warnings:
- Battery should not be exposed to excessive heat such as sunshine, fire or the like.
- Be sure that the batteries are installed correctly. Wrong polarity may damage the unit.
- Do not mix old and new batteries.
- Do not mix alkaline, standard (carbon-zinc) or rechargeable (nickel-cadmium) batteries.
- Only batteries of the same or equivalent type are recommended to be used.
- If the unit is not to be used for an extended period of time, remove the batteries.
- Do not dispose of batteries in fire, battery may explode or leak.
- Danger of explosion if battery is incorrectly replaced.
4
USB cable or Power adaptor connection for charging the Speaker unit rechargeable battery
You can use the included USB cable or AC-DC power adaptor (the output DC 5V 500mA, NOT
Included) to charge the rechargeable battery in the Speaker unit.
(1) Connect the USB cable or adaptor's DC output plug to the DC IN jack of the unit.
(2) Connect the USB cable to USB port of lapop, computer…etc or firmly and securely plug
adaptor's AC plug into AC main outlet.
(3) The Charging RED LED Indicator will light.
Caution:
This set-up is for charging the rechargeable battery of the Speaker unit only.
Do not operate the Speaker with this set-up near Water and Moisture environment.
Charging the main unit rechargeable battery with Sun Light
The embedded Solar Panel will charge the rechargeable battery when operating outdoors in a
sunny area.
The Charging RED LED Indicator will light.
5
Bluetooth Operation
The unit playback iPad/iPhone/iPod touch and other smart phone music through Bluetooth
operation.
Before you did the Bluetooth pairing / connection, following information will help:
(A)
Whilst the main unit is searching for Bluetooth device (e.g. iPhone), the Bluetooth LED
indicator will blink in red and steadily light in green color.
Whilst the main unit paired with a Bluetooth device (e.g. iPhone), the Bluetooth LED indicator
will light steadily in amber (red + green) color.
(B) The Bluetooth device name of this model:
PWR95S
In case the mobile phone/device pops up a dialog box which requests a PIN:
--------- The PIN is “0000” for Bluetooth connection to this model
Bluetooth pairing/connection
1. Press the Power
button to turn on the unit.
2. The unit will search neighboring Bluetooth device and the Bluetooth LED indicator will blink in
red and steadily light in green color.
3. From the Android smart phone or iPad/iPhone/iPod touch, turn on its Bluetooth function and it
will also search for the neighboring Bluetooth device.
4. From the Bluetooth device list of your smart phone or iPad/iPhone/iPod touch, tap on
Bluetooth device name “BT speaker” of this model for the connection. In case it prompts for
the PIN, please enter “0000”.
5. Once the mobile device is paired with the unit, the Bluetooth LED indicator will light steadily in
amber (red + green) color.
Playback iPad/iPhone/iPod touch or smart phone music
6. Playback your iPad/iPhone/iPod touch or Android smart phone music.
7. You may adjust both the volume control of your mobile device and the volume control of this
unit to find the most desirable volume setting.
8. (a) You may tap the
/
button from the mobile device to Play / Pause the mobile device
music.
(b) Press the
/
button from the unit to skip tracks forward / backward.
Operation hints
(A) Auto-pairing/connection : When your mobile device is paired, in the case of turning the unit off
and on again, the unit will auto-pair with the previously connected mobile device.
(B) Manual pairing/connection: In the case you would like to pair/connect other mobile device,
(1) Switch off the Bluetooth function of the currently paired/connected mobile device.
(2) In Bluetooth mode, the Bluetooth LED indicator will blink in red and steadily light in green
6
color and the unit will search for the neighboring Bluetooth device.
(3) Turn on the Bluetooth function of the desired mobile device and pair with the main unit.
(C) Out of range situation:
(1) During Bluetooth music playback, if the mobile device is moved to another place which is
out of the Bluetooth communication range, the communication link disconnected then
moves back the mobile device within range.
(2) The main unit Bluetooth LED indicator will blink in red and steadily light in green color
which also searches for the neighboring Bluetooth device.
(3) In this case, you can reestablish the Bluetooth communication link and connect (pair) the
main unit from the mobile device again.
----- Turn the unit off then on again, like case (A) above, to reestablish the Bluetooth
communication link.
Energy Saving Note
In Bluetooth mode, if the Bluetooth communication link disconnected (the main unit) for around 5
minutes, the unit will turn off automatically.
Care and Maintenance
-
Do not subject the unit to excessive force, shock, dust or extreme temperature.
Do not tamper the internal components of the unit.
Clean your unit with a damp (never wet) cloth. Solvent or detergent should never be used.
Avoid leaving your unit in direct sunlight or in hot, humid or dusty places.
Keep your unit away from heating appliances and sources of electrical noise such as fluorescent
lamps or motors.
7
Specifications
POWER REQUIREMENT
Power Adaptor (NOT included)
Battery for the Speaker
Input:
AC 100V – 240V ~ 50/60Hz
Output:
DC 5V
500mA
3 x AA (UM-3) type rechargeable battery (Included)
Or,
3 x AA (UM-3) type Alkaline battery (NOT included)
If at any time in the future you want to dispose this product, please note that electrical
products should not be disposed with household waste. Find out where your nearest
recycling centre is. Consult your local authority or retailer for more details (Waste
Electrical and Electronic Equipment Directive).
THE SPECIFICATION AND EXTERNAL APPEARANCE OF THE SET ARE SUBJECT TO
CHANGE WITHOUT PRIOR NOTICE.
8