1
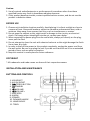
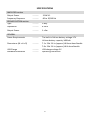
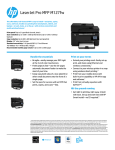
LED Bluetooth Flashlight Speaker w/ DC Hand Turbine and USB Charge, Built-in Alarm
PWPBT75
www.pyleaudio.com
Instruction Manual
TABLE OF CONTENTS
IMPORTANT SAFETY INSTRUCTIONS............................................................................... 1
BEFORE USE ................................................................................................................... 3
COPYRIGHT .................................................................................................................... 3
INSTALLATION AND MAINTENANCE ............................................................................... 3
BUTTONS AND CONTROLS ............................................................................................ 3
BLUETOOTH CONNECTIVITY ......................................................................................... 4
TURN ON THE APPARATUS ........................................................................................... 4
TO TURN OFF THE APPARATUS..................................................................................... 4
GETTING CONNECTED .................................................................................................. 4
ENJOY MUSIC FROM AN EXTERNAL DEVICE .................................................................. 4
USB CHARGING ............................................................................................................ 5
DYNAMO FUNCTION .................................................................................................... 5
AUX-IN FUNCTION ........................................................................................................ 5
ALARM FUNCTION........................................................................................................ 5
TORCH FUNCTION ........................................................................................................ 5
SPECIFICATIONS ............................................................................................................. 8
IMPORTANT SAFETY INSTRUCTIONS
WARNING: To reduce the risk of fire or electric shock, do not expose this appliance to rain
or moisture.
CAUTION: To reduce the risk of fire or electric shock, do not expose this apparatus to rain
or moisture. Also, do not remove the cover or back. No user serviceable parts inside.
Refer servicing to qualified service personnel.
This symbol is intended to alert user to the presence of non-insulated
‘dangerous voltage’ within the product’s enclosure that may be of sufficient
magnitude to constitute risk of electric shock to persons.
This symbol is intended to alert user to the presence of important operating
and maintenance (servicing) instructions in the literature accompanying the
appliance.
1.
2.
3.
4.
5.
6.
Read through the manual before operating.
Heed the instructions.
Follow all instructions in the manual.
Keep the manual for future reference.
Do not use the apparatus in places that are extremely hot, cold, dusty or humid.
Do not keep the apparatus in a high humidity area such as a bathroom, kitchen sink
or pool. Keep the apparatus away from heaters, stoves, etc. Never leave the
apparatus in an area exposed to direct sunlight where there could be a considerable
rise in temperature.
7. The apparatus should not be exposed to dripping or splashing, and no objects filled
with liquids such as vases, should be placed on the apparatus.
8. Do not block any ventilation openings. The ventilation should not be impeded by
covering the ventilation openings with items such as newspapers, table-cloths,
curtains and the like.
9. Install the apparatus in accordance with the manufacturer’s instructions.
10. Clean the cabinet with a soft cloth slightly moistened with a mild detergent solution.
Do not use strong solvents which may cause unpredictable damage to the apparatus.
11. Do not use attachments/accessories not recommended by the product manufacturer
as they may be hazardous.
12. Power-supply cords should be routed so that they are not likely to be trapped in any
way. Also protect the power cord from being walked on or pinched, particularly at
plugs, convenience receptacles and the pointers where they exist from the
apparatus.
13. This product should be operated only from the type of power source indicated on the
marking label. If you are not sure of the type of power supply to your home, consult
your product dealer or local power company. For products intended to operate from
battery power, or other sources, refer to the operation instructions.
14. The mains plug is used as disconnect device. The mains plug of apparatus should not
be obstructed OR should be easily accessed during intended use. To be completely
disconnect the power input, the mains plug of apparatus should be disconnected
from the mains.
15. An outside antenna system should not be located in the vicinity of overhead power
lines or other electric light or power circuits, or where it can fall into such power lines
or circuits. When installing an outside antenna system, extreme care should be taken
to keep from touching such power lines or circuits as contact with them might be
fatal.
16. If the apparatus is not used for a period of time, unplug the power cord.
17. If the remote control unit is not used for a period of time, remove batteries from the
remote control unit and store them in a cool dry area.
18. If it is lightening, unplug the power cord to prevent the unit from
unnecessary damages.
19. This product should be moved with care to avoid damage or
injury.
20. Never try to disassemble batteries. Neither put batteries under the direct sunlight
nor throw them into fire or heater. As all of these may cause unnecessary damages
to you.
21. Refer all servicing to qualified service personnel. Servicing required when the
apparatus does not operate normally or has been damaged in any way such as the
power cord or plug is damaged, liquids spilled into the apparatus, any hard object
fallen on the apparatus, the apparatus has been dropped, the apparatus has been
exposed to rain or moisture.
22. The marking information is located at the back of the apparatus.
23. Minimum distance 5 cm around the apparatus for sufficient ventilations
24. Do not place any flame sources such lighted candles on top of the apparatus.
25. Attentions should be drawn to the environmental aspects of batteries disposal.
26. Use the apparatus in moderate climates.
2
Caution:
1. Use of controls and adjustments or performance of procedures other than those
specified herein may result in hazardous radiation exposure.
2. If this product develops trouble, contact qualified service centers, and do not use the
product in defective states.
BEFORE USE
1. Choose unit installation location carefully. Avoid placing it in direct sunlight or close to
a source of heat. Also avoid locations subject to vibrations and excessive dust, cold or
moisture. Keep away from sources that hum, such as transformers or motors.
2. Do not open the cabinet as this might result in damage to the circuitry or electrical
shock. If a foreign object should get into the set, contact your dealer.
3. When removing the power plug from the wall outlet, always pull directly on the plug,
never pull the cord.
4. Do not attempt to clean the unit with chemical solvents as this might damage the finish.
Use a clean, dry cloth.
5. In order to shut off the power to this product completely, unplug the power cord from
the wall outlet. Be sure to unplug the unit if you do not intend to use it for an extended
period of time, such as while on vacation.
6. Keep this manual in a safe place for future reference.
COPYRIGHT
* All trademarks and trade names are those of their respective owners.
INSTALLATION AND MAINTENANCE
BUTTONS AND CONTROLS
1. USB SOCKET
2. AUX IN SOCKET
3.
/TORCH BUTTON
4. /STANDBY
5.
/VOLUME6.
/VOLUME+
7. INDICATOR
8. ALARM
9. SPEAKER
10. DYNAMO HANDLE
11. HAND BUCKLE
12. TORCH
3
BLUETOOTH CONNECTIVITY
External devices which have a built‐in Bluetooth feature can be connected to this
apparatus and played through the speakers.
TURN ON THE APPARATUS
- Press the
button to turn on the apparatus and you will hear a rising tune “do do do
do”. The indicator will light up and flash when the apparatus is on.
Note: If there is no Bluetooth connection for a long time, you will hear a falling tune “do
do”.
TO TURN OFF THE APPARATUS
Press and hold the
won’t light.
button again until you hear a long voice of “du” and the indicator
GETTING CONNECTED
1. Set the Bluetooth function of your external device when the apparatus is on.
2. Set to search Bluetooth device on your external device.
NOTE: The effective distance between your external device and this apparatus is 5
meters.
3. Wait for a while then find the “PWPBT75” on the paired devices list on your
external device and press “PWPBT75”.
NOTE: If a window asks you for a password. Fill in “0000” then press “OK” on your
external device.
6. A few seconds later your Bluetooth connection will be successful. And you can hear a
series of rising tones.
ENJOY MUSIC FROM AN EXTERNAL DEVICE
1. It will play automatically and the light will stop flashing once your external device is
paired. (See “Getting connected”);
2. Press and hold the
button to reduce the volume;
button to increase the volume;
3. Press and hold the
button to skip the start of the previous song;
4. Just press the
5. Just press the
button to skip the next song;
button to pause
6. Press the
button again to restart to play.
7. Press the
4
USB CHARGING
The apparatus can be charged by your PC, laptop and USB DC chargers that have USB
socket.
1. Plug the USB cable into the USB socket of the apparatus and Plug the other end of
USB cable into the USB socket of the computer or other devices that have the USB
socket;
2. Commonly, it will take 3 hours to charge the apparatus.
USB Charge voltage is 5V.
DC HAND TURBINE FUNCTION
The apparatus can be charged by rotating the hand turbine handle. Pull out the turbine
handle and rotate the handle at the speed of 120w/m to charge the apparatus.
Note: The speed of rotating the handle can’t exceed 120w/m. Otherwise, it will damage
the apparatus.
AUX-IN FUNCTION
The apparatus can play music from some devices that have Aux-out port.
1. Plug the 3.5 mm Aux cable into the Aux-in socket of the apparatus and plug the other
end of 3.5 mm Aux cable into the Aux-out socket of the computer or other devices
that have the Aux-out port;
2. Turn on the unit and it will play music automatically.
3. Press the
/
button to adjust volume.
button to skip the start of the previous song;
4. Just press the
button to skip the next song;
Just press the
button to pause
5. Press the
Press the
button again to restart to play.
ALARM FUNCTION
The apparatus can sound an alarm when you press the ALARM button. And you can press
this button again to stop the sound.
TORCH FUNCTION
The apparatus can be use as a torch. Press the
5
button to turn on or off the torch.
Warning
Changes or modifications to this unit not expressly approved by the party responsible for
compliance could void the user’s authority to operate the equipment.
NOTE: This equipment has been tested and found to comply with the limits for a Class B
digital device, pursuant to Part 15 of the FCC Rules. These limits are designed to provide
reasonable protection against harmful interference in a residential installation. This
equipment generates uses and can radiate radio frequency energy and, if not installed
and used in accordance with the instructions, may cause harmful interference to radio
communications.
However, there is no guarantee that interference will not occur in a particular installation.
If this equipment does cause harmful interference to radio or television reception, which
can be determined by turning the equipment off and on, the user is encouraged to try to
correct the interference by one or more of the following measures:
• Reorient or relocate the receiving antenna.
• Increase the separation between the equipment and receiver.
• Connect the equipment into an outlet on a circuit different from that to which the
receiver is connected.
• Consult the dealer or an experienced radio/TV technician for help.
This device complies with Industry Canada license-exempt RSS standard(s).
Operation is subject to the following two conditions: (1) this device may not cause
interference, and (2) this device must accept any interference, including interference that
may cause undesired operation of the device.
Under Industry Canada regulations, this radio transmitter may only operate using
an antenna of a type and maximum (or lesser) gain approved for the transmitter by
Industry Canada. To reduce potential radio interference to other users, the antenna type
and its gain should be so chosen that the equivalent isotropically radiated power (e.i.r.p.)
is not more than that necessary for successful communication.
Conformément à la réglementation d'Industrie Canada, le présent émetteur radio
6
peut fonctionner avec une antenne d'un type et d'un gain maximal (ou inférieur)
approuvé pour l'émetteur par Industrie Canada. Dans le but de réduire les risques de
brouillage radioélectrique à l'intention des autres utilisateurs, il faut choisir le type
d'antenne et son gain de sorte que la puissance isotrope rayonnée équivalente (p.i.r.e.) ne
dépasse pas l'intensité nécessaire à l'établissement d'une communication satisfaisante.
Le présent appareil est conforme aux CNR d'Industrie Canada applicables aux
appareils radio exempts de licence. L'exploitation est autorisée aux deux conditions
suivantes: (1) l'appareil ne doit pas produire de brouillage, et (2) l'utilisateur de l'appareil
doit accepter tout brouillage radioélectrique subi, même si le brouillage est susceptible
d'en compromettre le fonctionnement.
7
SPECIFICATIONS
AMPLIFIER section
Output Power
Frequency Response
SPEAKER SYSTEM section
Type
Impedance
………….
………….
3.0W X 1
60 to 20,000 Hz
………….
………….
1-way
4 Ohm
Output Power
………….
1 x 3w
GENERAL
Power Requirements
………….
Dimensions (W x H x D)
………….
USB Charge
Standard Accessories
………….
………….
The built-in lithium battery voltage 3.7V
Lithium battery capacity:1400mA
7.1 x 2.8x 2.8 in.(approx.) Without hand buckle
7.8 x 2.8x 2.8 in.(approx.) With hand buckle
USB charge voltage 5V
Operating Instruction
8