1
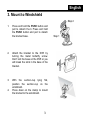
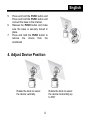
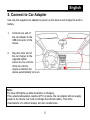
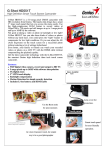
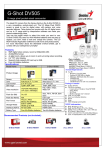
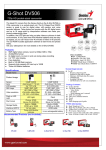
 English
1. Package Contents
The package contains the following items. In case there is any missing or
damaged item, contact your dealer immediately.
Car Recorder
Bracket
Quick Start Guide
Car adapter
1 English
2. Product Overview
No.
Item
1 Bracket Socket
2 USB Connector
3 Memory Card Slot
4 Power Button
5 HDMI Connector
6 MIC
7 Speaker
8 Wide Angle Lens
9 Mode button /M
10 Menu button/
11 Playback Button/
12 UP Button /
13 Enter Button /
14 Down Button /
15 LED Light
16 Reset
1. To operate the device, press the corresponding buttons (9~14) according to
the guide icons shown on the screen.
2. Insert the Micro HCSD card and remove the lens protection film if needed
before recording.
3. The Micro HCSD card is not included.
2 English
3. Mount to Windshield
Step 2
1.
Press and hold the PUSH button and
pull to detach the b Press and hold
the PUSH button and pull to detach
the bracket base.
2.
Attach the bracket to the DVR by
turning the metal butterfly screw.
Don’t turn the base on the DVR or you
will break the stick in the base of the
bracket.
3.
With the suction-cup lying flat,
position the suction-cup on the
windshield.
Press down on the clamp to mount
the bracket to the windshield.
4.
3 Step 1
English
5.
6.
7.
Press and hold the PUSH button and
Press and hold the PUSH button and
connect the base to the bracket.
Release the PUSH button and make
sure the base is securely locked in
place. Press and hold the PUSH button to
remove the device from the
windshield 4. Adjust Device Position
Rotate the knob to swivel
the device vertically.
Rotate the knob to swivel
the device horizontally up
to 360° 4 English
5. Connect to Car Adapter
Use only the supplied car adapter to power up the device and charge the built-in
battery.
1.
Connect one end of
the car adapter to the
USB connector of the
device.
2.
Plug the other end of
the car charger to the
cigarette lighter
socket of your vehicle.
Once the vehicle
engine is started, the
device automatically turns on.
Note:
The blue LED lights up while the battery is charging.
If the outside temperature reaches 45°C or above, the car adapter still can supply
power to the device, but it will not charge the Lithium battery. This is the
characteristic of a Lithium battery and not a malfunction.
5 English
6. Auto Power On/Off
Once the vehicle engine is started, the device automatically turns on; the REC
icon at the top of the screen on the left will start to blink. If the Automatic Record
function is enabled, the recording will automatically start right after the device
turns on.
Once the vehicle engine shuts down, the device automatically saves the
recording and turns off the power within 15 seconds (depends on seconds you
select when you shut down).
7. Manual Power On/Off
To manually turn on the power, press the POWER button.
To turn off, press and hold the POWER button for at least two seconds.
LED Indicator
Blue
Turn on DVR, Recording
Blue Blinking
Battery charging
Note:
On some cars, the recording will continue when the engine is switched off.
If this happens, do one of the following:
- Manually turn off the cigarette lighter.
- Remove the car adapter from the cigarette lighter.
6 English
8. Recording a Video
When the vehicle engine starts up and the Automatic Record function is enabled,
the device automatically turns on and starts recording.
Recording will automatically stop when the engine is switched off.
Or, press the OK button to stop recording manually and press the OK again to
start recording.
9. Taking a photo
Press the mode switch to capture function and press OK to take a picture.
10. Playback a file
Press the
button to view files, use the mode button to switch normal video,
/ to select desired videos or photos.
11. Adjust the Menu setting
protected video or photo, and use
You can customize the general Setting, video mode, playback via the on-screen
display (OSD) menus.
Use
1.
2.
/ to select function.
Press the “
“ button and use the mode button to change the menu for
general setting, recording setting, or playback.
/
button to select a menu option and to press the
Press the
button to enter the selected menu.
7 English
3.
4.
Press the
/
button to select the desired setting and press the
button to confirm the setting.
Press the menu button to exit the menu.
12. Vibration detection
Under recording mode, press the Menu and use mode button switch to Rec.
Mode and use
/
to select the vibration detection and press OK to make
sure the sensitivity is High/Normal/Low or Off .
13. Deleting a file
Select the file you want to delete, under playback mode use
Delete function, and press OK to delete one or all the files.
/
to select the
Note:
Under Recording, press Up button to turn off voice; and press Down button for
screen sleep mode.
The vibration detection fuction will create an emergency file which will be
overwritten if the memory is full. The system will show «no space to save
emergency file». You need to clear the memory card of unwanted files.
Otherwise, the emgerency file will start to overwrite existing files.
8 English
14. Possible Recording Time
In the recording mode, you can set the time to one, three or five minutes. When
the time is up, a new file will start to be recorded. The following list shows you
how many files can be stored depending on the size of your Micro HCSD card.
Setting for
3 mins
720p 30fps
1080p 30fps
Setting for
720p 60fps
5 mins
4GB
24 files
12 files
8GB
48 files
16GB
32GB
720p 30fps
1080p 30fps
720p 60fps
4GB
14 files
7 files
24 files
8GB
28 files
14 files
96 files
48 files
16GB
56 files
28 files
192 files
96 files
32GB
112 files
56 files
Note:
Since the vehicle recorder and the overwrite design are different than a regular
camcorder, when the memory is full, it will start to overwrite the files.
9