1
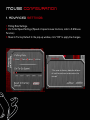
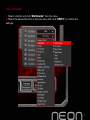
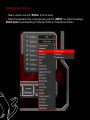
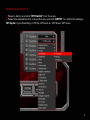
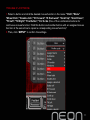
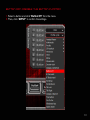
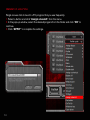
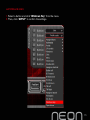
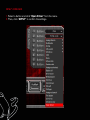
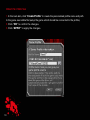
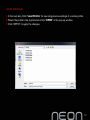
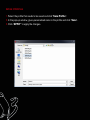
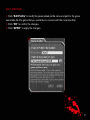
USER MANUAL
2
System RequirementS
1. Operation System: Windows XP / Vista / 7 / 8
2. Free USB 1.1/ 2.0 port
3. CD-ROM drive
4. 50 MB free hard disk space
InstallatiOn InstructiOnS
1. Plug USB connector of NEON to a USB port of your PC
2. Insert the enclosed driver CD into your CD-ROM drive
(or download the driver from www.ozonegaming.com)
3. Double Click “Setup.exe” to start the installation program. Click “Next” to continue
4. Select the folder to save the driver and click “Next” to continue
5. Installation will run automatically; click “Finish” to complete the installation
6
u
Left/Right Hand User Swap
1. Right to left hand user mode: click both left button (1) + scroll button (3) for 5 seconds.
2. Left to right hand user mode: click right button (2) + scroll button (3) for 5 seconds.
2
It’s all about evolution
MAIN NEON DRIVER SKIN
3
mOuse CONFIGURATION
1. ADVANCED SETTINGS:
1. Polling Rate Settings.
2. On-To-Go Speed Settings (Speed of repeat mouse functions, refer to 2.6 Mouse
Function)
3. Reset to Factory Default: In the pop-up window, click “OK” to apply the changes.
4
2. buttON SETTINGS:
MACRO MANAGER
k
u
Macro is a series of desired keystrokes which can be assigned to the mouse once
recorded. In other words, it is a series of key press and releases, in which every
keystroke pressed, released, and delays are recorded.
5
Create and Assign a Macro
1. Select a button and click ”Macro Manager” from the menu.
2. In the pop-up window, click “NEW” and give the macro a personalized name, then
start to create the macro.
3. Select the options of “Record Delays” and set the “Loop Times” from the right
column if needed.
4. Click ”Start Record” type your desired keys and click “Stop Record” when
finished. Click “OK” to continue.
5. Assign one of the “Marco” created to a “Button” and click “APPLY” to complete
the settings.
6
multimedia
1. Select a button and click ”Multimedia” from the menu.
2. Select the desired function in the sub-menu and click “APPLY” to confirm the
settings.
7
PROFILE SWITCHING
1. Select a button and click ”Profile” from the menu.
2. Select the desired function in the sub-menu and click “APPLY” to confirm the settings.
Profile Cycle: Cycle Switching / Profile Up: Profile + / Profile Down: Profile -
8
CPI/DPI Switching
1. Select a button and click ”CPI Switch” from the menu.
2. Select the desired function in the sub-menu and click “APPLY” to confirm the settings.
CPI Cycle: Cycle Switching / CPI Up: DPI level + / CPI Down: DPI level -
9
WINDOWS MANAGEMENT
1. Select a button and click ”Windows” from the menu.
2. Select the desired function in the sub-menu and click “APPLY” to confirm the settings.
10
MOUSE FUNCTIONS
1. Select a button and click the desired mouse function in the menu: “Click”, “Menu”
,“Wheel Click”, “Double-click”, “IE Forward”, “IE Backward”, “Scroll Up”, “Scroll Down”,
“Tilt Left”, “Tilt Right”, “Fire Button”, “On-To-Go (One of the combination buttons for
continuous mouse function: Hold this button and another button with an assigned mouse
function at the same time to repeat a corresponding mouse function)”.
2. Then, click “APPLY” to confirm the settings.
11
ASSIGN A SHORTCUT
Single mouse click to activate a combination of keys that you use frequently.
1. Select a button and click “Assign a Shortcut” from the menu.
2. Select and enter the desired combination of keys from the pop-up window and click
“OK” to continue.
3. Click “APPLY” to complete the settings. Ex. now the “Ctrl” + “C” will be executed.
12
BUTTON OFF: DISABLE THE BUTTON FUNCTION
1. Select a button and click ”Button Off” from the menu.
2. Then, click “APPLY” to confirm the settings.
13
Assign a Launch
Single mouse click to launch a PC program that you use frequently.
1. Select a button and click “Assign a Launch” from the menu.
2. In the pop-up window, select the desired program from the folder and click “OK” to
continue.
3. Click “APPLY” to complete the settings.
14
WINDOWS KEY
1. Select a button and click ”Windows Key” from the menu.
2. Then, click “APPLY” to confirm the settings.
15
Open Driver
1. Select a button and click ”Open Driver” from the menu.
2. Then, click “APPLY” to confirm the settings.
16
3. prOfile SETTINGS:
Each configuration profile corresponds to one personalized mouse setting. Therefore,
you can get powerful support from such a feature by creating specific configuration
profiles for certain game.
Defined configuration profiles can be saved (we suggest you name the configuration file
according to the name of related game). The driver equips 5 profiles: Profile 1 to Profile
5. The default saved paths of the configurations are in the “Config” folder under the
“Driver Installation Directory”, in which you can find 5 correspondent files for the 5
profiles on the main skin.
Under “Profile Setting”, there are options of “Create Profile”, “Load Profile”, “Save
Profile”, and “Edit Profile” for you to set personalized configurations.
You can create a variety of configurations and save them for future use. This will avoid
duplication of settings.
If you switch to a different computer, you can simply import your saved configurations
and you will not have to set your personalized settings again.
17
CREATE PROFILE
1. In the main skin, click “Create Profile” to create the personalized profile name and path
to the game executable file (setup the game which should be connected to the profile).
2. Click “OK” to confirm the changes.
3. Click “APPLY” to apply the changes.
k
B
18
lOad PROFILE
1. In the main skin, Click “Load Profile” for executing previous settings of a certain profile.
2. Select the profile to be imported and click “OPEN” in the pop-up window.
3. Click “APPLY” to apply the changes.
19
SAVE PROFILE
1. Select the profile that needs to be saved and click “Save Profile”.
2. In the pop-up window, give a personalized name to the profile and click “Save”.
3. Click “APPLY” to apply the changes.
20
EDIT PROFILE
1. Click “Edit Profile” to modify the personalized profile name and path to the game
executable file (the game that you would like to connect with the current profile).
2. Click “OK” to confirm the changes.
3. Click “APPLY” to apply the changes.
k
u
21
4. Sensitivity SETTINGS:
1. Horizontal X and Vertical Y - direction moving speed settings.
2. XY direction synchronous moving options.
3. DPI Settings: Red Dot = DPI lock / Sliding Bar = personalize DPI.
4. Click “APPLY” to confirm the settings.
4B
22
4. SYSTEM SETTINGS:
1. Speed of Double Click Settings.
2. Windows Pointer Speed & Precision Settings.
3. Tilt Wheel Scroll Speed Settings.
4. Mouse Wheel Scroll Speed Settings & Scroll by single page.
5. Click “APPLY” to confirm the settings.
23
m
2
It’s all about evolution
WWW.OZONEGAMING.COM