1
Drobo 5D Getting Started Guide
Table of Contents
Before You Begin ............................................................................................................ 3
Product Features at a Glance ................................................................................................................... 3
Checking Box Contents ............................................................................................................................ 4
Checking System Requirements .............................................................................................................. 5
Operating Systems Supported ......................................................................................................... 5
Connectivity Interfaces Supported for the Drobo 5D ....................................................................... 5
Checking the Hardware You Need ........................................................................................................... 8
Selecting Drives ............................................................................................................................... 8
Determining Drive Space Requirements........................................................................................ 10
Using Power Protection.................................................................................................................. 10
Setting Up Your Drobo 5D............................................................................................. 11
Installing Drobo Dashboard .................................................................................................................... 11
Installing an mSATA SSD ....................................................................................................................... 16
Inserting the Drives ................................................................................................................................. 17
Connecting Cables on Your Drobo 5D ................................................................................................... 18
Connecting Directly to Your Drobo 5D ........................................................................................... 18
Daisy-chaining with Your Drobo 5D ............................................................................................... 19
Formatting the Drives ............................................................................................................................. 22
Selecting a File System and Volume Size for Your Drobo 5D ....................................................... 22
Turning On Your Drobo 5D and Formatting the Drives ................................................................. 23
Where to Go Next.......................................................................................................... 28
Using Best Practices ............................................................................................................................... 28
Keeping Your Software Up to Date ........................................................................................................ 28
Checking for Software Updates Automatically ............................................................................... 28
Checking for Software Updates Now ............................................................................................. 30
Manually Updating Firmware from the Website ............................................................................. 30
Safely Shutting Down Your Drobo 5D .................................................................................................... 31
Safely Shutting Down Your Drobo 5D Using Drobo Dashboard .................................................... 32
Safely Shutting Down Your Drobo 5D Manually ............................................................................ 34
Using the Online User Guide .................................................................................................................. 34
Using Context-Sensitive Help ................................................................................................................. 34
Using the Knowledge Base .................................................................................................................... 35
Registering Your Drobo 5D .................................................................................................................... 35
Getting Support ....................................................................................................................................... 38
Copyright, Safety and Limited Warranty ........................................................................ 39
Drobo 5D Getting Started Guide
2
Before You Begin
Before you begin setting up your Drobo 5D, it’s a good idea to check system and hardware
requirements.
This section covers the following topics:
Product Features at a Glance
Checking Box Contents
Checking System Requirements
Checking the Hardware You Need
Product Features at a Glance
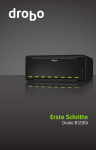
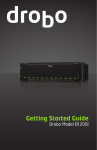
For a quick overview of features of the Drobo 5D, refer to the following images.
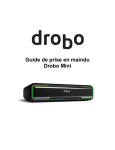
Figure 1: Front of the Drobo 5D with the bezel (faceplate) removed.
Drobo 5D Getting Started Guide
3
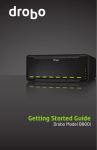
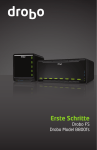
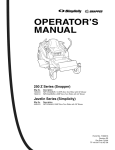
Figure 2: Back of the Drobo 5D.
Checking Box Contents
Check your product's box to ensure it contains all the components in the list below.
•
Drobo 5D
•
2 m (6.6 ft) USB 3.0 cable
•
1.8 m (6.6 ft) power cord with power supply
•
Quick Start Card
•
Safety and Warranty Guide
Drobo 5D Getting Started Guide
4
Checking System Requirements
Check to ensure your operating system and cable interface are supported.
This section covers the following topics:
Operating Systems Supported
Connectivity Interfaces Supported for the Drobo 5D
Operating Systems Supported
Operating systems supported for the Drobo 5D are as follows.
•
OS X 10.7.x Lion
•
OS X 10.8.x Mountain Lion
•
Windows 7 (Service Pack 1 or later, 32-bit and 64-bit)
•
Windows 8 (32-bit and 64-bit)
Notes:
-
For best performance and interoperability, ensure you are running the latest service packs for
the appropriate Windows operating systems.
-
For the most current list of supported operating systems, check the specifications for your
products online at www.drobo.com/products/index.php.
Connectivity Interfaces Supported for the Drobo 5D
Your Drobo 5D connects directly to your computer using one of the following connectivity ports.
We recommend that you use the fastest connection you have available on your computer.
Notes:
-
You can only use one connection at a time.
-
If you would like to use the USB 3.0 interface and it is not available on your computer, you
can purchase and install an add-on adapter card. (This is a circuit board that fits into an
expansion slot in your computer and provides the interface you want.)
Thunderbolt
Developed by Intel with collaboration from Apple, Thunderbolt is a flexible, high-performance
interface that provides a high-speed connection to peripheral devices from a computer. It has the
ability to combine data, video, audio and power all in a single connection, concurrently. Each
Thunderbolt connector can provide two full-duplex channels, with each channel providing 10
Gbps of bi-directional bandwidth, meaning it can transmit and receive data at the same time.
Drobo 5D Getting Started Guide
5
The Drobo 5D has two Thunderbolt ports, enabling you to take advantage of Thunderbolt's daisychaining capabilities. With Thunderbolt, you can daisy-chain up to six peripheral devices and one
display from a single computer. Note that because Thunderbolt has dual-protocol support (with
DisplayPort and PCI Express), you can connect your computer to Thunderbolt devices or
DisplayPort products. You can also connect non-Thunderbolt devices at the end of a daisy-chain
by using Thunderbolt technology adapters.
Here are three options for connecting your Drobo device using its Thunderbolt interface.
1. Your Drobo device directly connected to a computer (with no daisy-chain).
Drobo 5D Getting Started Guide
6
2. Multiple Drobo devices connected in a chain with a DisplayPort monitor at the end.
3. Your Drobo device connected to an external Thunderbolt monitor that is then connected to a
computer (with the Drobo device at the end).
Drobo 5D Getting Started Guide
7
USB 3.0
USB (Universal Serial Bus) is a popular interface that allows you to attach additional hardware
devices to your computer in a plug-and-play style. USB 3.0, also known as SuperSpeed USB,
provides data transfer speeds of up to 4.8 Gbit/s, much faster than USB 2.0.
In order to take advantage of this technology, your Drobo 5D must be connected to a USB 3.0
port on your computer. If your computer does not have USB 3.0, you can consult with your
computer manufacturer to find a compatible USB 3.0 card.
Note: If your computer only has a USB 2.0 connection, then Drobo 5D will auto-negotiate to USB
2.0 speeds.
Checking the Hardware You Need
To use your Drobo 5D, you will need at least two drives. If you plan to use Dual Disk
Redundancy, which protects your data against two drive failures, you will need at least three
drives.
This section covers the following topics:
Selecting Drives
Determining Drive Space Requirements
Using Power Protection
Selecting Drives
The Drobo 5D supports both standard 3.5” SATA hard disk drives (HDDs) as well as SATA solid
state drives (SSDs) for added performance. For HDDs, these drives can be from any
manufacturer and with any capacity. For SSDs, please visit our web page for compatible drive
options.
In addition, the Drobo 5D has a Drobo Accelerator Bay, which accepts an industry-standard
mSATA SSD(Solid State Drive). When the mSATA SSD is installed, Drobo’s Data-Aware Tiering
feature is enabled, accelerating performance when reading data from your Drobo device. Having
an mSATA SSD installed leaves all drive bays available for high-capacity hard disk drives (HDDs)
so that you can get both high-capacity and accelerated performance out of your Drobo device.
Using only SSDs in the main drive bays of your Drobo 5D provides the fastest performance when
reading and writing data to and from your Drobo device.
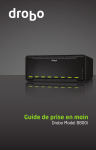
In summary, here are the recommended number and type of drives you can use with your
Drobo 5D. Note that you need at least two drives in the drive bays to ensure your data is
protected in the event of drive failure.
•
2 to 5 HDD(Hard Disk Drive)s in the main drive bays - enables you to maximize capacity
•
2 to 5 HDDs in the main drive bays plus an mSATA SSD installed - enables you to
maximize capacity and accelerate read performance
•
2 to 5 SSD(Solid State Drive)s in the main drive bays with no mSATA SSD - enables you
to maximize read and write performance
For a performance comparison of these options, see the following illustration.
Drobo 5D Getting Started Guide
8
Important Notes:
-
If an incompatible SSD is inserted into the Drobo device, the drive light will blink red,
indicating the need to replace that drive. Please refer to our web page on compatible drive
options. for more information.
-
The mSATA SSD card is not part of the disk pack of your Drobo 5D, allowing you to leave it
installed even if you transfer drives from the drive bays to another Drobo device, for example.
-
When Data-Aware Tiering is enabled, an icon displays in Drobo Dashboard, the software
companion to your Drobo device.
-
The Drobo 5D is not compatible with IDE(Integrated Drive Electronics), SCSI(Small
Computer System Interface), PATA(Parallel Advanced Technology Attachment) or
SAS(Serial Attached SCSI) drives.
Warning! Any pre-existing data on the drives will be erased when inserted into the Drobo 5D.
Drobo 5D Getting Started Guide
9
Determining Drive Space Requirements
In order to protect your data from drive failure, your Drobo 5D requires more space than what you
will use for your data, sometimes as much as double or more the amount of space.
The best way to determine how much usable, protected storage space you will have available for
your data, based on the number and capacity of your drives, is to use our Capacity Calculator at
www.drobo.com/calculator.
A shortcut to estimating the capacity available for your data is to omit the largest drive and then
add the capacity of the remaining drives. If you plan to use Dual Disk Redundancy, omit the
largest two drives. For example:
Single Disk (Default) Redundancy
Dual Disk Redundancy
Notes:
-
Actual capacity is often less than what is shown in the examples above due to the different
systems used for rating capacity. This has nothing to do with Drobo devices.
-
Know that all Drobo devices enable you to easily increase storage capacity at any time by
simply inserting additional drives or replacing smaller drives with larger ones.
Using Power Protection
We recommend using the following power protection with your Drobo device:
•
An uninterruptible power supply (UPS), which protects against sudden losses in power
•
A power surge protector to protect against power surges
Drobo 5D Getting Started Guide
10
Setting Up Your Drobo 5D
Once you have unpacked your Drobo 5D from its box and ensured you meet all system and
hardware requirements, it is time to set up your Drobo 5D for use. This can be done in just a few
easy steps!
1. Install Drobo Dashboard.
2. Install an mSATA Card (optional).
3. Insert the drives.
4. Connect the cables.
5. Turn on the power and format the drives.
Installing Drobo Dashboard
Drobo Dashboard is the software companion to your Drobo 5D, enabling you to easily set up and
manage your Drobo device. Immediately following installation, you can choose to set Drobo
Dashboard to automatically install version updates, which we highly recommend.
Drobo software and firmware updates can also be installed from
www.drobo.com/support/updates.
Note: You need to have administrator rights on the computer on which you install Drobo
Dashboard, and also have access to the Internet.
1. Navigate to www.drobo.com/start and click on the latest Drobo Dashboard for your Drobo
product to run and install it.
Note: The first time you install Drobo Dashboard, you will be asked to select a language from
the drop-down list. Please do this.
The Drobo Dashboard Installer (or Installation Wizard) opens, preparing to install.
Drobo 5D Getting Started Guide
11
On a Mac, this screen appears as follows.
In Windows, this screen appears as follows.
Drobo 5D Getting Started Guide
12
2. Click the Next (Windows) or Continue button (Mac), as appropriate.
Note: If the Microsoft iSCSI Initiator window appears, click the Yes button. Follow the
instructions to install the Microsoft iSCSI Initiator, clicking the Next button as needed. When
finished, you are returned to the InstallShield Wizard to continue installation.
3. Follow the directions of the Installation Wizard, clicking the Next or Continue button after
each page, as appropriate.
4. When you reach the installation page, click the Install button.
On a Mac, this screen appears as follows.
Drobo 5D Getting Started Guide
13
In Windows, this screen appears as follows.
Depending on your operating system, one of the following may result:
•
On a Mac, you will be prompted for your administrator password. Enter it and click the
appropriate button.
•
In some Windows operating systems, a Windows Access Control dialog box appears,
asking if you want to allow changes to your computer. Click the Allow or Yes button, as
appropriate.
Drobo Dashboard installs on your computer.
5. If you are on a Mac, you will be prompted to restart your computer in order to complete
installation. Do this.
6. After installation is complete, leave the Launch Drobo Dashboard check box selected and
click the Finish button.
Note: Before Drobo Dashboard launches, you may be asked if Drobo can collect anonymous
information on your usage. Click Yes or No, as desired. You may also be prompted to
register your Drobo device now.
The Drobo Dashboard application launches and the All Drobos page opens. After a few
seconds, Drobo "discovers" all Drobo devices currently connected and displays them on this
page.
If you have no Drobo devices yet connected or powered on, a "No Drobos Detected"
message displays until you do.
Drobo 5D Getting Started Guide
14
Drobo 5D Getting Started Guide
15
Installing an mSATA SSD
You can install an mSATA SSD into your Drobo 5D. Doing so provides accelerated performance
when reading data from your Drobo 5D. For more information on drive requirements, see
Selecting Drives.
It is best to install the mSATA SSD before inserting drives into the Drobo 5D's drive bays.
Important Notes:
- The mSATA SSD is not part of your Drobo device's disk pack, so you can add or remove it at
any time.
-
Your Drobo device must be powered off and unplugged before installation.
- It is important to ground yourself before installing the mSATA SSD in order to discharge
static electricity. To do so, touch a grounded metal object just before installation.
Warning! If there is any pre-existing data on the mSATA SSD it will be erased. If you wish to
keep the data, copy it to another drive or medium before using with your Drobo device.
1.
Gently turn the Drobo 5D on to its side to access the bottom of the Drobo 5D, and open the
Drobo Accelerator Bay door by turning the latch from lock to unlock using a coin.
2. Slide the mSATA SSD into the slot as depicted in the image below.
3. Make sure the mSATA SSD is aligned properly with its connector, and then close the Drobo
Accelerator Bay door, turn the latch back to the lock icon, and return the Drobo 5D to its
normal position.
Drobo 5D Getting Started Guide
16
Inserting the Drives
After installing Drobo Dashboard and, if needed, installing an mSATA SSD, you are ready to
insert drives into your Drobo 5D. For more information on drive requirements, see Selecting
Drives.
Warning! Any pre-existing data on the drives will be erased, as the drives will be formatted. If you
wish to keep the data, copy it to another drive or medium before using with your Drobo device.
Note: Once you insert the drives into your Drobo device, they function as a unit or “pack.” To
access the data on them, you will need the entire pack.
1. Remove the front bezel (faceplate) from the front of your Drobo device by pulling it off.
2. With one hand, hold the drive so that the label on the top of the drive faces up (and its
connectors are positioned at the device and toward the left). Refer to one of the images
below, depending on whether your Drobo device is vertical or horizontal.
3. With your other hand, use your thumb to depress and hold open one of the drive locks to a
selected drive bay. Refer to the image below.
4. Slide the drive into the drive bay, release the drive lock and push the drive into place until you
feel it connect.
The drive lock snaps behind the drive, securing it into place.
Note: If you are inserting an SSD (Solid State Drive), ensure that it is compatible by visiting
our web page on compatible drive options.
5. Insert additional drives in the same manner, following steps 2 through 4.
6. When finished, replace the faceplate right side up, so that when your Drobo device is turned
on, you will be able to see the indicator lights.
You are now ready to connect cables and power on your Drobo device.
Drobo 5D Getting Started Guide
17
Connecting Cables on Your Drobo 5D
After installing Drobo Dashboard and inserting the drives into your Drobo 5D, you are ready to
connect the power and data cables on your Drobo device. There are two ways you can connect
the data cables:
•
You can connect the Drobo 5D directly to your computer using the Thunderbolt port USB
or the 3.0 port. For information on the different connectivity interfaces available and their
requirements, see Connectivity Interfaces Supported for the Drobo 5D.
•
If you use the Thunderbolt port, you also have the option to connect the Drobo 5D to
another Thunderbolt-enabled device that is attached to your computer (including another
Drobo device or a display monitor) in a daisy-chain manner. The Drobo 5D can be the
first in the daisy-chain (directly attached to your computer), in the middle, or at the end.
For more information and steps, see Connecting Your Drobo 5D in a Daisy-chain.
Connecting Directly to Your Drobo 5D
You can connect the Drobo 5D directly to your computer using the Thunderbolt port or the USB
3.0 port. For information on the different connectivity interfaces available and their requirements,
see Connectivity Interfaces Supported for the Drobo 5D.
If you are using a Thunderbolt port and would like to connect the Drobo 5D in a daisy-chain, see
Connecting Your Drobo 5D in a Daisy-chain.
As you follow the steps below, refer to the following image.
1.
Plug one end of the USB or the Thunderbolt cable into the back of your Drobo 5D.
2. Plug the other end of the cable into your host computer.
3.
Connect the power supply to the power connection at the back of your Drobo device.
4.
Connect the other end of the power supply to a power source.
Note: We recommend plugging into an uninterruptible power supply (UPS) or surge
protector. For more information, see Using Power Protection.
You are now ready to turn on your Drobo device and format the drives.
Drobo 5D Getting Started Guide
18
Daisy-chaining with Your Drobo 5D
With the Thunderbolt port, you can connect the Drobo 5D directly to your computer or to another
Thunderbolt-enabled device in a daisy-chain manner. The Drobo 5D performs best when it is the
first in the daisy-chain, but it can also be in the middle or at the end.
You can daisy-chain up to six peripheral devices and one display (which can be a DisplayPort
monitor) from a single computer. The non-Thunderbolt display needs to be at the end of the
chain.
Note: As long as they are plugged in, Drobo devices do not need to be powered on for
Thunderbolt interfaces to remain active. This enables other devices in the chain to remain
accessible by the computer.
Here are three options for connecting your Drobo device using its Thunderbolt interface.
1. Your Drobo device directly connected to a computer (with no daisy-chain).
Drobo 5D Getting Started Guide
19
2. Multiple Drobo devices connected in a chain with a DisplayPort monitor at the end.
3. Your Drobo device connected to an external Thunderbolt monitor that is then connected to a
computer (with the Drobo device at the end).
Drobo 5D Getting Started Guide
20
As you follow the steps below, refer to the following image.
1. Plug one end of the Thunderbolt cable into the back of your Drobo 5D.
2. Do one of the following:
•
Plug the other end of the cable into your host computer, so that the Drobo 5D is the first
peripheral in the daisy-chain. Be sure to connect the next Thunderbolt-enabled peripheral
or non-Thunderbolt display monitor to the second port on your Drobo 5D, as needed to
extend the chain.
•
Plug the other end of your cable into another Thunderbolt-enabled device that is
attached to your host computer. You can optionally connect another Thunderbolt-enabled
peripheral or non-Thunderbolt display monitor to the second port on your Drobo 5D, as
needed to extend the chain.
3. Connect the power supply to the power connection at the back of your Drobo device.
4.
Connect the other end of the power supply to a power source.
Note: We recommend plugging into an uninterruptible power supply (UPS) or surge
protector. For more information, see Using Power Protection.
You are now ready to turn on your Drobo device and format the drives.
Drobo 5D Getting Started Guide
21
Formatting the Drives
After installing Drobo Dashboard, inserting the drives into your Drobo 5D and connecting cables,
you are ready to turn on your Drobo device and format the drives.
Before following steps for this, however, it is important to know what file system format and
volume size you will choose when you format the drives.
Selecting a File System and Volume Size for Your Drobo 5D
When you turn on your Drobo 5D, you will be prompted to format the drives in your Drobo 5D with
a particular file system. What file system formats are available to you depend on your operating
system. (See Figure 1 below.)
You will also be formatting your Drobo 5D into at least one volume, and you will need to choose a
size for that volume. A volume is a storage area that has been formatted with a file system format
your operating system can recognize. In Windows, volumes are sometimes called “logical drives”
or “partitions.”
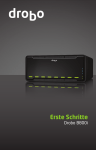
The largest volume size you are allowed depends on the file system format you choose and the
total capacity of the drives in your Drobo device. The following table (Figure 1) shows the
maximum volume size allowed for each file system format.
Figure 1: Table of file system formats and maximum volume sizes
Important Notes:
-
Volume size does not represent how much actual storage space is available on your Drobo
5D. It represents virtual storage space. For example, your Drobo 5D may be loaded with 2TB
of drive space, but you can create a volume of 16TB. What this enables you to do is add
more capacity to your Drobo 5D (by inserting an additional drive or replacing a smaller
capacity drive with a larger capacity one) without having to format an additional volume. The
additional capacity becomes part of the same volume you formatted originally.
-
Your operating system may show the virtual space you have available on your Drobo device,
as defined by the volume size.
-
If the amount of available, protected storage space in your Drobo 5D ever exceeds the size
of the volume that you chose (this may occur when you add one or more additional drives to
your Drobo 5D), then Drobo Dashboard will automatically create a new volume (or volumes)
of the same size as the original volume. Drobo Dashboard will notify you when this occurs
and ask you to format and name the new volume(s).
Tip: For most customers, we recommend choosing the largest volume size available for the
selected file system. Note, however, that smaller volume sizes can be more efficient and
manageable in certain situations, such as when indexing, scanning or searching volumes.
Drobo 5D Getting Started Guide
22
Turning On Your Drobo 5D and Formatting the Drives
With Drobo Dashboard installed on your host computer and cables connected, you are ready to
turn on your Drobo device and format the drives.
1. With Drobo Dashboard open on your computer, press the power toggle button on the back of
your Drobo device once.
Your Drobo device powers on and appears on the All Drobos page in Drobo Dashboard.
Note: Some Windows and Mac operating systems will also prompt you to format the drives.
Click Cancel or Ignore, as appropriate, and continue with formatting from Drobo Dashboard.
2.
Double-click on the Drobo 5D icon on the All Drobos page.
A message appears, asking if you would like to format the device.
3.
Click the Yes button.
The Format Type page opens. Depending on your operating system the page displays with
different options.
The File Format page for Drobo 5D in OS X:
Drobo 5D Getting Started Guide
23
The File Format page for Drobo 5D in Windows:
4. Select the appropriate file format for your operating system and click the Next button.
Drobo 5D Getting Started Guide
24
The Volume Size page opens.
5. Click and drag to slide the pointer to the size of the volume you would like to create, and then
click the Next button.
Tip: We recommend that you select the largest size available, enabling you to increase the
number and capacity of your drives without having to format an additional volume.
Drobo 5D Getting Started Guide
25
The Volume Name page opens.
6. If applicable, from the Drive Letter drop-down list, select the drive letter to assign to the
volume.
7. In the Name text box, modify the default name for the volume as you like.
Tip: We recommend using the word “volume” in the name so as not to confuse the volume
name with your Drobo device’s name.
8. Click the Next button.
The Confirm Format page opens.
9.
Click the Format button.
A message appears, informing you that it can take up to five minutes to format your drives,
and that this may require rebooting your Drobo device. Afterwards, the Format dialog box
opens.
Drobo 5D Getting Started Guide
26
10. Click the OK button.
Your Drobo device displays on the Status page of Drobo Dashboard, as follows.
Note: Drobo Dashboard automatically assigns “Drobo” as the default name for your Drobo
device, which you can rename later.
Drobo 5D Getting Started Guide
27
Where to Go Next
After you’ve set up your Drobo 5D, you’re ready to store and back up data onto it. Next steps
include the following. Click on a topic to learn more.
•
Implementing best practices to maximize the safety of your data
•
Ensuring optimal performance by keeping your software (Drobo Dashboard and your
Drobo device’s firmware) up to date
•
Knowing how to safely shut down your Drobo device
•
Using the Online User Guide and context-sensitive help to learn more about how to
manage and use your Drobo device
•
Using our knowledge base to answer almost any additional question
•
Registering your Drobo 5D
•
Getting the support you may need
Using Best Practices
Although your Drobo 5D provides redundancy and automatically protects your data against a
drive failure, it should only be one part of an overall, digital asset management strategy.
To better safeguard your valuable data, we strongly encourage you to review our guide on
best practices, which can be found at www.drobo.com/support/best_practices.
Our guide offers strategies to protect data beyond drive failures. Following best practices will help
maximize the safety of your data.
Keeping Your Software Up to Date
To ensure optimal performance, we highly recommend that you set your Drobo device to
automatically check for software updates. (You may have already done this during the initial
setup.) This feature keeps both Drobo Dashboard and your product’s firmware current.
You can also install updates from www.drobo.com/support/updates. If you would like to install a
firmware update from the Drobo website, see Manually Updating Firmware from the Website.
This section covers the following topics:
Checking for Software Updates Automatically
Checking for Software Updates Now
Manually Updating Firmware from the Website
Checking for Software Updates Automatically
The following steps keep your Drobo Dashboard and your Drobo device’s firmware up to date
automatically.
1. If it’s not already running, launch Drobo Dashboard from the host computer and select the
appropriate Drobo device on the All Drobos page.
2. Click Dashboard Preferences on the Navigation menu.
Drobo 5D Getting Started Guide
28
The Dashboard Preferences page opens.
3. Ensure that the Enable automatic check for updates check box is selected, and then click
the OK button.
You can also deselect the Enable automatic check for updates check box, though we
recommend that you keep it selected.
4. When one or more software updates are available, a message opens, asking if you would like
to install the update(s). If so, click the Yes button and follow the prompts to install them.
Drobo 5D Getting Started Guide
29
Checking for Software Updates Now
The following steps ensure that Drobo Dashboard and your Drobo device’s firmware are up to
date.
1. In Drobo Dashboard, select the appropriate Drobo device on the All Drobos page.
2. Click the Tools option on the Navigation menu to open the Tools page.
3. In the Software Updates area of the Tools page, click the Check for Updates option.
Note: If needed, ensure that you are logged in to this Drobo device.
4. If a software update is available, a dialog box opens, asking if you would like to install the
update. Click the Yes button and follow the prompts to install the update.
Manually Updating Firmware from the Website
To manually update the firmware from the website, take the following steps.
1. Go to www.drobo.com/support/updates and download the appropriate firmware file for your
Drobo 5D, saving it to a folder that is not located on your Drobo device.
The firmware file ends in the file extension of .zip (e.g., 1.0.2.zip) and applies to both
Windows-based computers and the Mac.
Please ensure that you have read and write privileges to this folder.
2. Launch Drobo Dashboard, select the Drobo 5D from the All Drobos page.
3. Click the Tools option on the Navigation menu for the selected Drobo device to open the
Tools page.
4. In the Software Updates section, click the Manual Update option.
A warning message opens, asking you to complete or stop any data transfers.
Drobo 5D Getting Started Guide
30
5. Ensure that the Drobo device is not actively transferring data (blinking yellow and green), and
then click the OK button.
A dialog box opens, asking you to locate the zip file on your computer.
6. Please do so and then click the Open or OK button.
Drobo install the firmware. When finished, a message opens, asking you to reboot your
Drobo device to complete the installation.
7. Click the Yes button.
Drobo shuts down and restarts after the new firmware is installed.
Safely Shutting Down Your Drobo 5D
If you plan to shut down your Drobo device for any reason, it is very important that you always do
so safely. Improper Drobo device shutdowns may cause file corruption and/or data loss.
Note: When the Drobo 5D is shut down, but still plugged in and connected to the computer via its
Thunderbolt connector, the Drobo 5D will still be able to pass data through a Thunderbolt daisychain. This allows the Drobo device to be off while a device or monitor down the chain continues
to function.
It is a good idea to shut down your Drobo device before any of the following situations:
•
You are not going to be using your Drobo device for an extended period
•
You are going to disconnect the cable(s) or power cord
•
You want to move your Drobo to another location
•
You are going to remove the entire disk pack
•
You are going to apply operating system updates
This section covers the following topics:
Safely Shutting Down Your Drobo 5D Using Drobo Dashboard
Safely Shutting Down Your Drobo 5D Manually
Drobo 5D Getting Started Guide
31
Safely Shutting Down Your Drobo 5D Using Drobo Dashboard
This is the recommended method for safely shutting down your Drobo device.
1. Check that the activity light on your Drobo device is off, indicating that no data is actively
being transferred to or from your Drobo device.
Note: If data is actively being transferred, the activity light will be blinking green.
2. Also check to ensure the drive bay action indicator lights are not blinking alternately between
yellow and green. This indicates that your Drobo device is busy working to protect your data.
Wait until these lights are a solid green.
Note: If one or more drive bay lights are red, you need to add capacity or replace the current
drive. However, you can still safely shut down your Drobo device.
3. In Drobo Dashboard, select the Drobo device that you would like to shut down from the All
Drobos page, and click the Tools option on the Navigation menu.
The Tools page opens.
Drobo 5D Getting Started Guide
32
4.
In the Drobo Operations area, select the Shutdown option.
A message box opens, asking you to confirm the shutdown.
5. Click the Yes button.
It can take up to two minutes for your Drobo device to power down. Afterwards, the power
light turns off, indicating your Drobo device has shut down.
Drobo 5D Getting Started Guide
33
Safely Shutting Down Your Drobo 5D Manually
Although we recommend that you use Drobo Dashboard to shut down the Drobo device, you can
also manually shut down the Drobo device safely using the following steps.
1. Check that the activity light on your Drobo device is off, indicating that no data is actively
being transferred to or from your Drobo device.
Note: If data is actively being transferred, the activity light will be blinking green.
2. Also check to ensure the drive bay action indicator lights are not blinking alternately between
yellow and green. This indicates that your Drobo device is busy working to protect your data.
Wait until these lights are a solid green.
Note: If one or more drive bay lights are red, you need to add capacity or replace the current
drive. However, you can still safely shut down your Drobo device.
3. Unmount or eject the Drobo device volume(s) by doing one of the following:
•
On a Mac, click and drag the Drobo device volume(s) to the trash.
•
In Windows, click on Safely Remove Hardware in your system tray (which is located in
the lower-right of your screen, and accessible by clicking an up arrow), and then select
the appropriate Drobo device.
4. Press the power toggle button on the back of your Drobo device once.
It can take up to two minutes for your Drobo device to power down. But afterwards, the power
light turns off, indicating your Drobo device has shut down.
Using the Online User Guide
After you’ve set up your Drobo device, you’re ready to use it to store and back up data. To learn
how to manage and use your Drobo device, refer to the Online User Guide for your product,
which can be found within Drobo Dashboard by clicking the Help & Support option on the
Navigation menu, and clicking the View Drobo User Guide icon. The latest version can also be
found at www.drobo.com/support/documentation.php.
Using Context-Sensitive Help
On the top right corner of Drobo Dashboard, you will find a ? button. Click this button to display
context-sensitive help. The Help window opens in your Internet browser, providing information
particular to the page from which you clicked for help.
Drobo 5D Getting Started Guide
34
Using the Knowledge Base
Our searchable knowledge base provides answers to almost any question related to your Drobo
device that you cannot find in the Online User Guide. To access our knowledge base follow the
steps below.
1. In the Drobo Dashboard, click the Help and Support option on the Navigation menu.
The Help and Support page opens.
2. In the Check Drobo online resources! area, click the Search Knowledge Base link to open
the Drobo Knowledge Base web page.
Note: You can access our knowledge base at http://support.drobo.com/app/answers/list.
Registering Your Drobo 5D
If you did not register your Drobo device during setup, you can do so from within Drobo
Dashboard.
Note: You will need to be connected to the Internet to perform this action.
1. In Drobo Dashboard on the All Drobos page, select the Drobo device you need to register
and click the Help and Support option on the Navigation menu.
The Help and Support page for that Drobo device opens.
Drobo 5D Getting Started Guide
35
2. In the Drobo Registration area, click on the Register my Drobo devices link.
The Registration page opens.
3.
Do one of the following:
•
If you do not have a Drobo account, click the Create a new Drobo account link. A onepage form opens in your web browser. Fill this in and click Create Account. Fill this in
and create your account, and then return to this step to log into your account.
•
If you already have a Drobo account, select the Register new Drobo with my Drobo
account option, and then enter your Drobo username and password. You can click the
Forgot username or password link if needed. Continue with step 4.
4. Click the Next button.
Your connected Drobo devices, and their serial numbers display.
5. Select the Drobo device you would like to register, enter its purchase date and select the
region from where you purchased it, as pictured.
Drobo 5D Getting Started Guide
36
Tip: You can click the Skip this step for now check box at any time.
6. Click the Register Drobo button.
The next page shows with a check mark that your product has been registered.
Note: You can choose to purchase a DroboCare license by clicking on that link.
7. Repeat steps 5 and 6 to register additional Drobo devices.
8. When finished, click the Done button.
You are returned to the Help and Support page.
Drobo 5D Getting Started Guide
37
Getting Support
To get support, first be sure to register your product at www.drobo.com/registration, if you haven’t
already done so. You can then go to www.drobo.com/support for details on how to contact
support.
You can also find support in Drobo Dashboard.
•
In Drobo Dashboard on the All Drobos page, select the Drobo device for which you need to
get support, and then click the Help and Support option on the Navigation menu.
The Help and Support page opens and allows you to register your Drobo, access the online
user guide and knowledge base, contact the Drobo support team and create a diagnostics
file.
You can also obtain additional hardware and phone support by purchasing DroboCare. The
DroboCare™ support program extends your peace of mind beyond the standard warranty term
and phone support that is included with your Drobo product purchase. To learn more about
DroboCare visit: www.drobo.com/drobocare. Also see our DroboCare FAQ at:
http://support.datarobotics.com/app/answers/detail/a_id/343.
Drobo 5D Getting Started Guide
38
Copyright, Safety and Limited Warranty
Copyright and Warranty
Drobo, Inc. supports lawful use of technology and does not endorse or encourage the use of its
products for purposes other than those permitted by copyright law.
Copyright 2012 Drobo, Inc., Drobo, DroboShare, DroboPro, DroboElite/B800i, Drobo B1200i and
BeyondRAID are trademarks of Drobo, Inc., which may be registered in some jurisdictions. All
other trademarks used are the property of their respective owners.
Information supplied by Drobo, Inc. is believed to be accurate and reliable at the time of
publication, but Drobo, Inc. assumes no responsibility for any errors that may appear in this online
documentation. Drobo, Inc. reserves the right, without notice, to make changes in product design
or specifications. Information is subject to change without notice.
Drobo, Inc., 2460 North First Street, Suite 100, San Jose, CA 95131 USA. For more info, visit:
www.drobo.com.
Safety and Warranty
Safety
This product was designed and manufactured to meet strict quality and safety standards. There
are, however, some installation and operational precautions of which you should be particularly
aware.
Please read these instructions before operating Drobo, DroboPro, DroboElite, DroboFS,
ProFS,B800i, B800fs, B1200i, Drobo 5D, Drobo 5N, or Drobo Mini and save them for future
reference.
1.
Read all instructions: All safety & operating instructions should be read and understood
before operation.
2.
Retain instructions: The safety and operating instructions should be retained for future
reference.
3.
Heed Warnings: All warnings on the appliance and in the operating instructions should be
followed.
4.
Follow Instructions: All operating and usage instructions should be followed.
5.
Drobo, DroboPro,DroboElite, Drobo FS, Pro FS, B800i, B800fs, B1200i, Drobo 5D, Drobo
5N, and Drobo Mini are to be used with UL Listed ITE Equipment only.
6.
Avoid Water and Moisture: Drobo, DroboPro,DroboElite, Drobo FS, Pro FS, B800i, B800fs,
B1200i, Drobo 5D, Drobo 5N, and Drobo Mini should not be used near water (for
example,near a bathtub, washbowl, kitchen sink, laundry tub, in a wet basement, or near a
swimming pool)
7.
Provide Adequate Ventilation: Drobo, DroboPro,DroboElite, Drobo FS, Pro FS, B800i,
B800fs, B1200i, Drobo 5D, Drobo 5N, and Drobo Mini should each be situated so that its
location or position does not interfere with its proper ventilation. For example, Drobo should
not be situated against a surface that may block the ventilation openings or placed in a builtin installation such as a bookcase or cabinet that may impede the flow of air through the
ventilation openings.
Drobo 5D Getting Started Guide
39
8.
Protect from Heat: Drobo, DroboPro, DroboElite, Drobo FS, Pro FS, B800i, B800fs, B1200i,
Drobo 5D, Drobo 5N, and Drobo Mini should be situated away from heat sources such as
radiators,heat registers, stoves, or other appliances (including amplifiers) that produce heat.
9.
Protect Power Cords: Power supply cords should be routed so that they are not likely to be
walked on or pinched by items placed upon or against them, paying particular attention to
cords and plugs, convenience receptacles, and the point at which they exit from the product.
10. Avoid Object and Liquid Entry: Never push objects of any kind into Drobo, DroboPro,
DroboElite, Drobo FS, Pro FS, B800i, B800fs, B1200i, Drobo 5D, Drobo 5N, and Drobo Mini
ventilation slots except drives compliant with the User Guide as they may touch dangerous
voltage points or short the parts, resulting in the risk of fire or electric shock. Never spill liquid
of any kind onto Drobo.
11. TO PREVENT ELECTRIC SHOCK, MATCH WIDE BLADE OF ELECTRICAL PLUG TO
WIDE SLOT AND INSERT FULLY.
12. DROBO, DROBOPRO, DROBOELITE, PRO FS, B800i, B800fs, B1200i, Drobo 5D, Drobo
5N, AND Drobo Mini CONTAIN A LITHIUM BATTERY WHICH CAN EXPLODE IF
MISHANDLED. BATTERY IS NOT FIELD OR USER-SERVICEABLE. Please dispose of
battery in a manner consistent with local jurisdictions.
13. DRIVES IN DROBO, DROBOPRO, DROBOELITE, DROBO FS, PRO FS, B800i, B800fs
AND B1200i WILL RETAIN HEAT AFTER USE. PLEASE USE CAUTION WHEN
REMOVING DRIVES FROM DROBO, DROBOPRO,DROBOELITE, DroboFS, ProFS, B800i,
B800fs, B1200i, Drobo 5D, Drobo 5N, OR Drobo Mini. TO SAFELY REMOVE DRIVES,
PRESS THE DRIVE LATCH TO RELEASE THE DRIVE AND ALLOW THE DRIVE TO
COOL IN THE DATA BAY FOR 10 MINUTES BEFORE COMPLETELY REMOVING THE
DRIVE FROM DROBO, DROBOPRO,DROBOELITE, DroboFS, ProFS, B800i, B800fs OR
B1200i. FAILURE TO FOLLOW THIS PROCEDURE MAY RESULT IN INJURY FROM HOT
DRIVES.
14. Damage Requiring Service: Drobo, DroboPro, DroboElite, Drobo FS, Pro FS, B800i, B800fs,
B1200i, Drobo 5D, Drobo 5N, and Drobo Mini should be serviced by an employee of Drobo,
Inc. or a Drobo, Inc. Authorized Reseller ("qualified service personnel"), and should be
serviced when:
A
THE POWER SUPPLY CORD OR PLUG IS DAMAGED OR FRAYED;
B
LIQUID HAS SPILLED INTO DROBO, DROBOPRO, DROBOELITE, DROBO FS, PRO FS, B800i, B800fs, B1200i, Drobo 5D, Drobo
5N, OR Drobo Mini;
C
DROBO, DROBOPRO, DROBOELITE, DROBO FS, PRO FS, B800i, B800fs, B1200i, Drobo 5D, Drobo 5N, OR Drobo Mini HAS
BEEN EXPOSED TO RAIN OR WATER;
D
DROBO, DROBOPRO, DROBOELITE, DROBO FS, PRO FS, B800i, B800fs, B1200i, Drobo 5D, Drobo 5N, OR Drobo Mini DOES
NOT OPERATE NORMALLY WHEN YOU FOLLOW THE OPERATING INSTRUCTIONS;
E
DROBO, DROBOPRO, DROBOELITE, DROBO FS, PRO FS, B800i, B800fs, B1200i, Drobo 5D, Drobo 5N, OR Drobo Mini HAS
BEEN DROPPED OR THE CHASSIS DAMAGED;
F
DROBO,DROBOPRO, DROBOELITE, DROBO FS, PRO FS, B800i, B800fs, B1200i, Drobo 5D, Drobo 5N, OR Drobo Mini EXHIBITS
A DISTINCT CHANGE IN PERFORMANCE.
15. Use only the supplied USB 2.0, USB3.0, FireWire 800, Ethernet, and power cables when
operating Drobo, DroboPro, DroboElite, Drobo FS,ProFS, B800i, B800fs, B1200i, Drobo 5D,
Drobo 5N, or Drobo Mini.
Servicing – The user should not attempt to service Drobo, DroboPro, DroboElite, Drobo FS, Pro
FS, B800i, B800fs, B1200i, Drobo 5D, Drobo 5N, or Drobo Mini beyond that described as user
service items in the FAQ section of this manual,the Troubleshooting sections of the Help Files, or
the support Knowledge Base. All other servicing should be referred to qualified service personnel.
Drobo 5D Getting Started Guide
40
Cleaning – Unplug Drobo, DroboPro, DroboElite, Drobo FS,Pro FS, B800i, B800fs, B1200i,
Drobo 5D, Drobo 5N, or Drobo Mini from the wall outlet before cleaning. Do not use liquid or
aerosol cleaners; use a damp cloth. If Drobo, DroboPro, DroboElite, Drobo FS, Pro FS, B800i,
B800fs or B1200icomes in contact with any liquid, unplug the power adaptor and let Drobo dry
thoroughly before plugging back in.
Power Source – Drobo, DroboPro,DroboElite, Drobo FS, Pro FS, B800i, B800fs, B1200i, Drobo
5D, Drobo 5N, or Drobo Mini should be operated only from the type of power source indicated on
the marking label or in this User Guide. If you are not sure of the type of power supplied to your
home or business, consult your local power company.
Overloaded Power Outlets – Do not overload wall outlets and extension cords, this can result in
risk of fire or electric shock.
Electric Shock – To reduce the risk of electric shock,do not disassemble Drobo,
DroboPro,DroboElite, DroboFS, ProfS, B800i, B800fs, B1200i, Drobo 5D, Drobo 5N, or Drobo
Mini. Doing so will void the warranty. Take it to a qualified service person when service or repair
work is required. Opening or removing covers may expose you to dangerous voltage or other
risks. Incorrect reassembly can cause electric shock when Drobo is used.
Moving – Avoid moving Drobo, DroboPro,DroboElite, DroboFS, ProfS, B800i, B800fs, B1200i,
Drobo 5D, Drobo 5N, or Drobo Mini while it is plugged in to avoid shock and vibration damage to
the installed hard disk drives.
Electrostatic Discharge- The components inside your Drobo and disk drives are sensitive to
static electricity, also known as electrostatic discharge. Before you install any disk drive, we
recommend that you do the following: 1) Avoid static-causing surfaces such as carpeted
floors,plastic, and packing foam; 2) Discharge yourself by touching an unpainted metal surface
such as a desk or rack mount; 3) Remove disk drives from their antistatic bags only when you
are ready to use them. Be sure to follow any additional recommendations that the disk drive
manufacturers provides.
Repair Technician Warning! Before opening the DroboPro, DroboElite. B800i, or B800fs unit or
removing the power supply assembly, the AC cord MUST be unplugged from the outside of the
unit and the unit must be unpowered. The System Earthing connections of the internal AC cable
must not be removed if the system is powered on for service access.
Drobo Specifications & Systems Requirements – Power Supply: AC Input: 100240VAC~2.5A, 50-60Hz;DC Output: 12-17VDC6.6A & 80W Max.; Drobo Power Consumption:4A
@ 12V (48W);Operating Temperature: 10°C-35°C (50°-95°F); Non-operating (storage): -10°60°C(14°-140°F); Operating Humidity: 5%- 80%; Dimensions: 6.0” wide x 6.3” tall x 10.7” long
(152.4mm wide x 160mm tall x 271.8mm long);Weight: 6 lb 11.3 oz (without power supply);
Storage: Accepts up to four 3.5” SATA I or II internal desktop hard drives;Interfaces: USB 2.0 and
FireWire 800 (2nd Generation Only); Drobo Dashboard Application (optional): Microsoft®
Windows® Operating Systems, Apple® Macintosh® OS-X v10.4+;File system support: NTFS,
HFS+, FAT32, and EXT3(via DroboShare).
Drobo 5D Getting Started Guide
41
Drobo S Specifications & Systems Requirements – Power Supply: AC Input: 100240VAC~2.5A, 50-60Hz;DC Output: 12VDC 8.33A & 100W Max; Drobo Power Consumption:4A
@ 12V (48W);Operating Temperature: 10°C-35°C (50°-95°F); Non-operating (storage): -10°60°C(14°-140°F); Operating Humidity: 5%- 80%; Dimensions: 5.9” wide x 7.3” tall x 10.3” long
(150.3mm wide x 185.4mmtall x 262.3mm long); Weight: 8 lbs (without power supply); Storage:
Accepts up to five 3.5” SATA I or II internal desktop hard drives;Interfaces: USB 2.0, FireWire
800, eSATA; Drobo Dashboard Application (recommended): Microsoft® Windows® Operating
Systems XP SP3+, Apple® Macintosh® OS-X v10.5+;File system support: NTFS, HFS+,
FAT32, and EXT3.
DroboPro Specifications &Systems Requirements – Power Supply: AC Input: 100/240VAC,
1.8/0.75 A, 50/60 Hz; Operating Temperature: 10°C-35°C (50°-95°F);
Non-operating (storage): -10°-60°C(14°-140°F); Operating Humidity: 5% - 80%; Dimensions:
12.17” wide x 5.46”tall x 14.1”long (309mm wide x 138.9mm tall x 357.4mmlong); Weight: 16 lb 3
oz.; Storage:Accepts up to eight 3.5” SATA I or II internal desktop hard drives;Interfaces: USB
2.0, FireWire 800, and iSCSI; Drobo Dashboard Application (required for iSCSI): Microsoft®
Windows® Operating Systems, Apple® Macintosh® OS-X v10.4+ (10.5.6+ required for iSCSI);
File system support: NTFS, HFS+, FAT32, and EXT3.
Drobo FS Specifications & Systems Requirements – Power Supply: AC Input: 100240VAC~2.5A, 50-60Hz;DC Output: 12-17VDC8.33A & 100W Max.; Drobo Power Consumption:
5A @ 12V (60W); Operating Temperature: 10°C-35°C (50°-95°F); Non-operating (storage): 10°-60°C(14°-140°F); Operating Humidity: 5%- 80%; Dimensions: 5.9” wide x 7.3” tall x 10.3”
long (150.3mm wide x 185.4mmtall x 262.3mm long); Weight: 8 lbs. (without power supply);
Storage: Accepts up to five 3.5” SATA-compliant internal desktop hard drives; Interface: Ethernet;
Drobo Dashboard Application (recommended):Microsoft® Windows® Operating Systems XP
SP3+, Apple® Macintosh® OS-X v10.5+;File system support: EXT3.
DroboPro FS Specifications & Systems Requirements – Power Supply: AC Input:
100/240VAC, 1.8/0.75 A, 50/60 Hz; Operating Temperature: 10°C-35°C (50°-95°F); Nonoperating (storage): -10°-60°C(14°-140°F); Operating Humidity: 5%-80%;Dimensions: 12.17”
wide x 5.46” tall x 14.1”long (309mm wide x 138.9mm tall x 357.4mmlong); Weight: 16 lb 3 oz.;
Storage: Accepts up to eight 3.5” SATA I or II internal desktop hard drives;Interfaces:Ethernet;
Drobo Dashboard Application (recommended): Microsoft® Windows®Operating Systems XP
SP3+, Apple® Macintosh® OS-X v10.5+;File system support: EXT3.
DroboElite Specifications & Systems Requirements – Power Supply: AC Input:
100/240VAC, 1.8/0.75 A, 50/60 Hz; Operating Temperature: 10°C-35°C (50°-95°F); Nonoperating (storage): -10°-60°C(14°-140°F); Operating Humidity: 5%-80%;Dimensions: 12.17”
wide x 5.46” tall x 14.1”long (309mm wide x 138.9mm tall x 357.4mmlong); Weight: 16 lb 3 oz;
Storage: Accepts up to eight 3.5” SATA I or II internal desktop hard drives;Interfaces: USB 2.0
(Admin only), and iSCSI; Drobo Dashboard Application (required for iSCSI): Microsoft®
Windows®Operating Systems, Apple® Macintosh® OS-Xv10.5+;File system support: NTFS,
HFS+, FAT32, and EXT3.
B800i Specifications & Systems Requirements – Power Supply: AC Input: 100/240 VAC,
1.8/0.75A, 50/60 Hz; Operating Temperature: 10°C-35°C (50°-95°F); Non- operating (storage): 10°-60°C (14°-140°F); Operating Humidity: 5%- 80%; Dimensions: 12.17” wide x 5.46”tall x
14.1”long (309mm wide x 138.9mm tall x 357.4mmlong); Weight: 16 lb 3 oz; Storage:Accepts up
to eight 3.5” SATA I or II internal desktop hard drives;Interfaces: USB 2.0 (Admin only), and
Drobo 5D Getting Started Guide
42
iSCSI; Drobo Dashboard Application (required for iSCSI): Microsoft® Windows®Operating
Systems, Apple® Macintosh® OS-Xv10.5+;File system support: NTFS, HFS+, FAT32, and
EXT3.
B800fsSpecifications &Systems Requirements – Power Supply: AC Input: 100/240VAC,
1.8/0.75 A, 50/60 Hz; Operating Temperature: 10°C-35°C (50°-95°F); Non-operating (storage): 10°-60°C(14°-140°F); Operating Humidity: 5% - 80%; Dimensions: 12.17” wide x 5.46”tall x
14.1”long (309mm wide x 138.9mm tall x 357.4mmlong); Weight: 16 lbs 3 ozs.; Storage: Accepts
up to eight 3.5” SATA I or II internal desktop hard drives;Interfaces:Ethernet; Drobo Dashboard
Application (recommended): Microsoft® Windows®Operating Systems XP SP3+, Apple®
Macintosh® OS-X v10.5+;File system support: EXT3.
Drobo 5D Specifications & Systems Requirements – Power Supply: AC Input: 100240VAC~2.5A, 50-60Hz; DC Output: 12VDC 12.5A & 150W Max.; Drobo Power Consumption:
1.5A @ 12V (18W); Operating Temperature: 10°C-35°C (50°-95°F); Non-operating (storage): 10°-60°C (14°-140°F); Operating Humidity: 5% - 80%; Dimensions: 5.9” wide x 7.3” tall x 10.3”
long (150.3mm wide x 185.4mm tall x 262.3mm long); Weight: 8 lbs (without power supply);
Storage: Accepts up to five 3.5” SATA I or II internal desktop hard drives; Interfaces: USB 3.0,
thunderbolt; Drobo Dashboard Application (recommended): Microsoft® Windows® 7 SP1+,
Microsoft® Windows® 8, Apple® Macintosh® OS-X 10.7.x, Apple® Macintosh® OS-X 10.8.x ;
File system support: NTFS, HFS+, FAT32, and EXT3.
Drobo 5N Specifications & Systems Requirements – Power Supply: AC Input: 100240VAC~2.5A, 50-60Hz; DC Output: 12VDC 8.33A & 100W Max.; Drobo Power Consumption:
5A @ 12V (60W); Operating Temperature: 10°C-35°C (50°-95°F); Non-operating (storage): -10°60°C (14°-140°F); Operating Humidity: 5% - 80%; Dimensions: 5.9” wide x 7.3” tall x 10.3” long
(150.3mm wide x 185.4mm tall x 262.3mm long); Weight: 8 lbs. (without power supply); Storage:
Accepts up to five 3.5” SATA-compliant internal desktop hard drives; Interface: Ethernet; Drobo
Dashboard Application (recommended): Microsoft® Windows® 7 SP1+, Microsoft® Windows® 8,
Apple® Macintosh® OS-X 10.7.x, Apple® Macintosh® OS-X 10.8.x ; File system support:
EXT3.
Drobo Mini Specifications & Systems Requirements – Power Supply: AC Input: 100240VAC~2.5A, 50-60Hz; DC Output: 12VDC 4.16A & 50W Max.; Drobo Power Consumption:
1.5A @ 12V (18W); Operating Temperature: 10°C-35°C (50°-95°F); Non-operating (storage): 10°-60°C (14°-140°F); Operating Humidity: 5% - 80%; Dimensions:7.25” wide x 2” tall x 7” long
(184mm wide x 50.8mm tall x 178mm long); Weight:2.2 lbs (without power supply) ; Storage:
Accepts up to four 2.5” SATA-compliant internal laptop drives; Interfaces: USB 3.0, Thunderbolt;
Drobo Dashboard Application (recommended Microsoft® Windows® 7 SP1+, Microsoft®
Windows® 8, Apple® Macintosh® OS-X 10.7.x, Apple® Macintosh® OS-X 10.8.x; File system
support: NTFS, HFS+, FAT32, and EXT3.
FCC Compliance & Advisory Statement – This equipment has been tested and found to
comply with the limits for a Class B digital device, pursuant to Part 15 of the FCC Rules. These
limits are designed to provide reasonable protection against harmful interference in a residential
installation. This equipment generates, uses and can radiate radio frequency energy and if not
installed and used in accordance with the instructions, may cause harmful interference to radio
communications. However, there is no guarantee that interference will not occur in a particular
installation. If this equipment does cause harmful interference to radio or television reception,
which can be determined by turning the equipment off and on, the user is encouraged to try to
correct the interference by one or more of the following measures: 1) Reorient or relocate the
Drobo 5D Getting Started Guide
43
receiving antenna. 2) Increase the separation between the equipment and receiver. 3) Connect
the equipment into an outlet on a circuit different from that to which the receiver is connected. 4)
Consult the dealer or an experienced radio/TV technician for help. Any changes or modification
not expressly approved by the party responsible for compliance could void the user’s authority to
operate the device. Where shielded interface cables have been provided with the product or
specified additional components or accessories elsewhere defined to be used with the installation
of the product, they must be used in order to ensure compliance with FCC regulations.
This Class B digital apparatus meets all requirements of the Canadian interference-Causing
Equipment Regulations. Cet appareil numeriquede la classe B respecte toutes les exigencesdu
Réglement sur le materiel brouilleur du Canada. Please see http://www.drobo.com for additional
compliancy information
Industry Canada Statement
Complies with the CanadianICES-003 Class B specifications. Cet appareil numérique de la
classe B est conforme à la norme NMB-003 du Canada. This device complies with RSS 210 of
Industry Canada.
This Class B device meets all requirements of the Canadian interference-causing equipment
regulations.
Cetappareil numérique de la Class B respecte toutes les exigences du Règlement sur le matériel
brouilleur du Canada.
VCCIClass B Statement
VCCI クラスB 基準について 情報処理装置等電波障害自主規制について
この装置は、情報処理装置等電波障害自主規制協議会(VCCI)の基準にもとづくクラスB情報技術装置です。
この装置は家庭環境で使用されることを目的としていますが、この装置がラジオやテレビジョン受信機に近接し
て使用されると、
受信障害を引き起こすことがあります。
説明書に従って正しい取扱いをしてください。
B1200i Specifications & Systems Requirements – Power Supply: AC Input: 100/240 VAC,
8A/5A, 50/60 Hz; Operating Temperature: 10°C-35°C (50°-95°F); Non- operating (storage): 10°-60°C (14°-140°F); Operating Humidity: 20% - 80%; Dimensions: 17.17” wide x 5.20”tall x
21.85 ” long (436.1 mm wide x 132.1 mmtall x 555.0 mm long); Weight: 47 lbs (21.3 kgs);
Storage:Accepts up to twelve 3.5” SATA II, SATA III, or SAS drives; Interfaces: Three Gigabit
iSCSI and one Gigabit Ethernet for management; Drobo Dashboard Application (recommended):
Microsoft® Windows® Operating Systems,Apple® Macintosh® OS-X v10.5+;File system
support: NTFS, HFS+, and EXT3.
FCC Compliance & Advisory Statement – This equipment has been tested and found to comply
with the limits for a Class A digital device, pursuant to Part 15 of the FCC Rules. These limits
are designed to provide reasonable protection against harmful interference in a residential
installation. This equipment generates, uses and can radiate radio frequency energy and if not
installed and used in accordance with the instructions, may cause harmful interference to radio
communications. However, there is no guarantee that interference will not occur in a particular
installation. If this equipment does cause harmful interference
Drobo 5D Getting Started Guide
44
to radio or television reception, which can be determined by turning the equipment off and on, the
user is encouraged to try to correct the interference by one or more of the following measures: 1)
Reorient or relocate the receiving antenna. 2) Increase the separation between the equipment
and receiver. 3) Connect the equipment into an outlet on a circuit different from that to which the
receiver is connected. 4) Consult the dealer or an experienced radio/TV technician for help. Any
changes or modification not expressly approved by the party responsible for compliance could
void the user’s authority to operate the device. Where shielded interface cables have been
provided with the product or specified additional components or accessories elsewhere defined to
be used with the installation ofthe product, they must be used in order to ensure compliance with
FCC regulations.
Industry Canada Statement
Complies with the CanadianICES-003 Class A specifications. Cetappareil numérique de la
classe A est conforme à la norme NMB-003 du Canada. This device complies with RSS 210 of
IndustryCanada.
This Class A device meets all requirements of the Canadian interference-causing equipment
regulations.
Cet appareil numériquede la Class A respecte toutes les exigencesdu Règlement sur le matériel
brouilleur du Canada.
VCCI Class A Statement
この装置は、クラスA情報技術装置です。この装置を家庭環境で使用すると電波妨害を引き起こすことがあ
ります。
この場合には使用者が適切な対応を講ずるよう要求されることがあります。
Europe–EU Declaration of Conformity
The equipment complies with the EU directives89/336/EEC, 73/23/EEC, and 93/68/EEC. This
equipment is in conformity with the essential requirements of EU directives:EN 55022:1998 plus
A1:2000 & A2:2003, EN 55024: 1998 plus A1:2001& A2:2003, EN 61000-3-2: 2000 plus
A2:2005,EN 61000-3-3: 1995 plus A1:2001& A2:2005, and EN 60950-1:2000+A11:2004.
Hereby, Drobo, Inc., declares that this Disk Storage Array and Network Attached Storage link
appliance are in compliance with the essential requirements and other relevant provisions of
Directive 1999/5/EC.
Disposal and Recycling Information
When this product reaches its end of life, dispose of the product and batteries used with it
according to your local environmental laws and guidelines. For information about Drobo's
recycling program, go to www.drobo.com/support/weee/.
European Union
Drobo 5D Getting Started Guide
45
The symbol above means that according to local laws and regulations your product should be
disposed of separately from household waste. When this product reaches its end of life, take it to
a collection point designated by local authorities. Some collection points accept products for free.
The separate collection and recycling of your product at the time of disposal will help conserve
natural resources and ensure that it is recycled in a manner that protects human health and the
environment.
Battery Disposal
YourDrobo, DroboPro, DroboElite, Drobo FS, DroboPro FS, B800i, B800fs, B1200i, Drobo 5D,
Drobo 5N, and Drobo Mini have internal batteries that preserve settings when the unit is off. Do
not attempt to change the battery. Only a Drobo, Inc. certified technician can change the battery.
When the product has reached the end of its useful life, please dispose of it according to your
local environmental laws and guidelines.
本製品の寿命が尽きたときは、お住まいの地域の環境法と廃棄基準に従って本製品と電池を廃棄して下さい。
drobo, inc. のリサイクルプログラムについては、次のwebサイトを参照してください。
LIMITED WARRANTY – NORTH AMERICA AND ASIA PACIFIC
COVERAGE
The warranty obligations of Drobo, Inc. (formerly known as Data Robotics, Inc.) are limited to the
terms set forth herein. This Limited Warranty applies only to: (i) product manufactured by or for
Drobo; and (ii) replacement components sold by Drobo, of the product manufactured by or for
Drobo; that can be identified by the "Data Robotics" or "Drobo" trademark, trade name, or logo
affixed to them (collectively, "Product") and is provided only to the original end-user purchaser of
the Product ("You" or "Your"). Drobo warrants against defects in materials and workmanship
under normal use for a period of: (i) ONE (1) YEAR, for Product sold outside of Europe; and (ii)
TWO (2) YEARS for Product sold in Europe; from the date of retail purchase by the original enduser purchaser ("Warranty Period").
Subject to applicable law, Drobo may require that You furnish proof of purchase details and/or
comply with registration requirements before receiving any portion of these warranty services.
To register your product or to obtain warranty service, call or submit an online request to Drobo
Support. Detailed instructions on how to contact Drobo Support and register your product are
located at: http://www.drobo.com/support/contact-support.php. Additional details on this and other
matters regarding obtaining warranty service are also available at http://www.drobo.com/support.
Subject to the terms and conditions herein, if a Product hardware defect arises and a valid claim
is received within the applicable Warranty Period Drobo will, at its option, either: (1) repair such
defect at no charge, using new or refurbished replacement parts; or (2) replace the defective
Product with a Product that is new or which has been manufactured from new or serviceable
used parts and is at least functionally equivalent to the original Product; or (3) refund the
purchase price of the Product, provided the Product for which the refund is provided is returned to
Drobo and such Product shall become Drobo's property.
EXCLUSIONS AND LIMITATIONS
Drobo 5D Getting Started Guide
46
The Limited Warranty does not apply to any non-Product or any software, even if packaged or
sold with Product. Manufacturers, suppliers, or publishers, other than Drobo may provide their
own warranties to You, but Drobo, to the extent permitted by law, provides such manufacturer’s
products "as is". SOFTWARE DISTRIBUTED BY DROBO WITH OR WITHOUT THE DROBO
BRAND NAME (INCLUDING, BUT NOT LIMITED TO SYSTEM SOFTWARE) IS NOT COVERED
UNDER THIS LIMITED WARRANTY. REFER TO THE LICENSING AGREEMENT
ACCOMPANYING THE SOFTWARE FOR DETAILS OF YOUR RIGHTS WITH RESPECT TO
ITS USE.
DROBO DOES NOT WARRANT THAT THE OPERATION OF THE PRODUCT WILL BE
UNINTERRUPTED OR ERROR-FREE. DROBO IS NOT RESPONSIBLE FOR DAMAGE
ARISING FROM FAILURE TO FOLLOW INSTRUCTIONS RELATING TO THE PRODUCT'S
USE AND/OR STORAGE.
In no event does this Limited Warranty apply: (a) to damage caused by use with non-Products;
(b) to damage caused by accident, abuse, misuse, flood, fire, earthquake or other external
causes; (b) loss passwords; (c) to damage caused by operating the Product outside the permitted
or intended uses described by Drobo; (d) to damage caused by service (including upgrades and
expansions) performed by a party other than an authorized representative of Drobo or a Drobo
Authorized Reseller; (e) to a Product or Product part that has been modified to significantly alter
functionality or capability without the written permission of Drobo; (f) to consumable parts, such
as batteries, unless damage has occurred due to a defect in materials or workmanship; or (h) if
any Drobo serial number has been removed or defaced.
TO THE EXTENT PERMITTED BY LAW, THIS WARRANTY AND REMEDIES SET FORTH
ABOVE ARE EXCLUSIVE AND IN LIEU OF ALL OTHER WARRANTIES, REMEDIES AND
CONDITIONS, WHETHER ORAL OR WRITTEN, STATUTORY, EXPRESS OR IMPLIED, AND
DROBO SPECIFICALLY DISCLAIMS ANY AND ALL STATUTORY OR IMPLIED WARRANTIES
OR CONDITIONS, INCLUDING, WITHOUT LIMITATION, WARRANTIES OR CONDITIONS OF
MERCHANTABILITY, FITNESS FOR A PARTICULAR PURPOSE AND WARRANTIES
AGAINST HIDDEN OR LATENT DEFECTS. IF DROBO CANNOT LAWFULLY DISCLAIM
STATUTORY OR IMPLIED WARRANTIES OR CONDITIONS, THEN TO THE EXTENT
PERMITTED BY LAW, ALL SUCH WARRANTIES AND CONDITIONS SHALL BE LIMITED IN
DURATION TO THE DURATION OF THIS EXPRESS WARRANTY AND TO REPAIR,
REPLACEMENT OR REFUND SERVICE AS DETERMINED BY DROBO IN ITS SOLE
DISCRETION. No Drobo reseller, agent, or employee is authorized to make any modification,
extension, or addition to this warranty. (Australia only: see note 1 below.)
EXCEPT AS PROVIDED IN THIS WARRANTY AND TO THE EXTENT PERMITTED BY LAW,
DROBO IS NOT RESPONSIBLE FOR DIRECT, SPECIAL, INCIDENTAL OR CONSEQUENTIAL
DAMAGES RESULTING FROM ANY BREACH OF WARRANTY OR CONDITION, OR UNDER
ANY OTHER LEGAL THEORY, INCLUDING BUT NOT LIMITED TO LOSS OF USE; LOSS OF
REVENUE; LOSS OF ACTUAL OR ANTICIPATED PROFITS (INCLUDING LOSS OF PROFITS
ON CONTRACTS); LOSS OF THE USE OF MONEY; LOSS OF ANTICIPATED SAVINGS; LOSS
OF BUSINESS; LOSS OF OPPORTUNITY; LOSS OF GOODWILL; LOSS OF REPUTATION;
LOSS OF, DAMAGE TO OR CORRUPTION OF DATA; OR ANY INDIRECT OR
CONSEQUENTIAL LOSS OR DAMAGE HOWSOEVER CAUSED INCLUDING THE
REPLACEMENT OF EQUIPMENT AND PROPERTY, ANY COSTS OF RECOVERING,
PROGRAMMING, OR REPRODUCING ANY PROGRAM OR DATA STORED OR USED WITH
DROBO PRODUCTS AND ANY FAILURE TO MAINTAIN THE CONFIDENTIALITY OF DATA
STORED ON THE PRODUCT. (Australia only: see note 1 below.)
THE FOREGOING LIMITATION SHALL NOT APPLY TO DEATH OR PERSONAL INJURY
CLAIMS. DROBO DISCLAIMS ANY REPRESENTATION THAT IT WILL BE ABLE TO REPAIR
ANY PRODUCT UNDER THIS WARRANTY OR MAKE A PRODUCT EXCHANGE WITHOUT
RISK TO OR LOSS OF THE PROGRAMS OR DATA.
CONSUMER PROTECTION LAWS
Drobo 5D Getting Started Guide
47
IF YOU ARE COVERED BY CONSUMER PROTECTION LAWS OR REGULATIONS IN YOUR
COUNTRY OR REGION OF PURCHASE, THE BENEFITS CONFERRED BY THIS WARRANTY
ARE IN ADDITION TO ALL RIGHTS AND REMEDIES CONVEYED BY SUCH CONSUMER
PROTECTION LAWS AND REGULATIONS. Some countries, states and provinces do not allow
the exclusion or limitation of incidental or consequential damages or exclusions or limitations on
the duration of implied warranties or conditions, so the above limitations or exclusions may not
apply to You. This warranty gives You specific legal rights, and You may also have other rights
that vary by country, state or province. This Limited Warranty is governed by and construed under
the laws of the country in which the product purchase took place. Drobo, the warrantor under this
Limited Warranty, is identified at the end of this document according to the country or region in
which the product purchase took place. (Australia only: see note 1 below.)
OBTAINING WARRANTY SERVICE
Product Replacement and Repair: No Product may be returned directly to Drobo without first
contacting Drobo for a Return Material Authorization ("RMA") number (Australia only: see notes 2
and 3 below). If it is determined that the Product may be defective, You will be given an RMA
number and instructions for Product return. An unauthorized return, i.e. one for which an RMA
number has not been issued, and/or one that does not conform to the instructions given for
Product return, will be returned to You at Your expense. You are responsible for the costs
incurred related to returning the Product to Drobo pursuant to the Product return instructions.
Drobo is responsible for the costs incurred related to shipping the Product back to You. In the
event the Product is to be repaired or replaced, upon receipt of the Product for which You were
issued an RMA in accordance with the Product return instructions, Drobo shall ship to you a
replacement Product by standard ground shipping. In the event the Product is to be repaired or
replaced, if You choose to provide Your credit card information to Drobo at the time You are
issued an RMA, Drobo will Advance Ship to You a replacement Product, and You agree to
promptly return Your Product at issue within seven (7) days of issuance of the RMA number. In
the event Drobo does not receive the Product for which You were issued an RMA within such
seven (7) days, Your credit card will be charged the manufacturer's suggested retail price of the
replacement Product. "Advance Ship" means if Your credit card information is received: (i) before
1 pm local time, ship the same day; or (ii) after 1 pm local time, ship the next business day.
Technical Support: During the Warranty Period, You, as part of this Limited Warranty coverage,
are entitled to access Drobo's online help resources to address any question about the Product
("Online Help Resources"). For a period of ninety days from purchase by You ("Technical Support
Access Period"), as part of this Limited Warranty coverage, if the Online Help Resources don't
address the support issue, You are entitled to initiate a support request online at
www.drobo.com/support. After the Technical Support Access Period, support requests may be
made at an additional fee. In response to support requests, during local business hours (of the
location from which the Product was originally purchased), a Drobo representative or Drobo
Authorized Reseller will help determine whether Your Product requires service and, if it does, will
inform you how Drobo will provide it. Drobo or its Drobo Authorized Resellers will provide
warranty service on Products that are tendered or presented for service during the Warranty
Period, as permitted by law. Warranty service will be provided from the country from which the
Product was originally purchased to the extent reasonably possible. Service options, parts
availability and response times will vary according to country.
Data Protection: You should make periodic backup copies of the data and programs contained on
the Product's hard drive to protect Your data and as a precaution against possible operational
failures. Before You deliver your Product for warranty service it is Your responsibility to keep a
separate backup copy of the system software, application software and data, and disable any
security passwords. You will be responsible for reinstalling all such software, data and
passwords. DROBO AND ITS AUTHORIZED RESELLERS ARE NOT LIABLE FOR ANY
DAMAGE TO OR LOSS OF ANY PROGRAMS, DATA, OR OTHER INFORMATION STORED
ON ANY MEDIA, OR ANY NON-DROBO PRODUCT OR PART NOT COVERED BY THIS
WARRANTY. RECOVERY AND REINSTALLATION OF SYSTEM, APPLICATION SOFTWARE,
AND USER DATA ARE NOT COVERED UNDER THIS LIMITED WARRANTY.
Drobo 5D Getting Started Guide
48
DROBOCARE
You may be eligible to purchase DroboCare, a support product which enhances the standard
warranty, and is available for an additional fee. Please see the DroboCare terms and conditions
at http://www.drobo.com/drobocare.
GENERAL INFORMATION
The information contained herein is subject to change without notice. The only warranties for
Drobo products and services are set forth in the warranty statements accompanying the products
and services. Nothing herein should be construed as constituting an additional warranty. Drobo
shall not be liable for technical or editorial errors or omissions contained herein.
Drobo, Inc.
2460 North First St.
San Jose, CA 95131 USA
Notes (Australia only)
The following applies if you purchased our goods in Australia and you are a consumer under the
ACL:
1. Our goods come with guarantees that cannot be excluded under the Australian Consumer
Law. You are also entitled to have the goods repaired or replaced if the goods fail to be of
acceptable quality and the failure does not amount to a major failure.
2. If you have an enquiry or you wish to claim under this Limited Warranty, please contact: Drobo
Technical Support online at: http://www.drobo.com/support/contact-support.php) or via:
Drobo Warranty Returns
c/o Drobo Technical Support
2460 North First St.
San Jose, CA 95131 USA
USA: +1 (866) 426 4280
Asia Pacific: + 65 6270 2653
Europe: Regional Telephone Numbers
(Please do NOT return equipment without first obtaining an authorization number else we may
refuse your shipment.)
3. Goods presented for repair may be replaced by refurbished goods of the same type rather than
being repaired. Refurbished parts may be used to repair the goods.
PLEASE PRINT AND RETAIN A COPY OF THIS AGREEMENT FOR YOUR RECORDS.
LIMITED WARRANTY - EMEA
WHAT THIS DOCUMENT IS ABOUT
This document gives you additional legal protection for faulty Drobo products. It is in addition to
and not in substitution for your statutory rights as a consumer against Drobo, where you bought
the product direct from our online store or the retailer who you bought the product from relating to
faulty or misdescribed goods or services.
Drobo's obligations over and above your normal legal rights to repair or replace faulty product are
set out in this document. So please read this document carefully and keep a copy safe.
This Limited Warranty applies only to Drobo products – that means products manufactured by or
for Drobo, and replacement components sold by Drobo and manufactured by or for Drobo.
These can be identified because they all have the "Data Robotics" or "Drobo" name, or logo on
them. In this Limited Warranty document, we call these products "Products". This Limited
Drobo 5D Getting Started Guide
49
Warranty does not apply, for instance, to the hard drives manufactured by other companies which
may be in the same package as our Product. This Limited Warranty is provided only to the
original end-user purchaser of the Product, who we call "You".
IMPORTANT: You need to produce the original receipt for the Product or other proof of the
original retail purchase from Drobo or one of its authorised resellers satisfactory to us in order to
benefit from this Limited Warranty.
We warrant Products against defects in materials and workmanship under normal use as set out
in this table:
Name of Product
All Products
Drobo 5D and Drobo Mini
All Products EXCEPT the
Drobo 5D and Drobo Mini
Where You bought the
product (for online orders,
this is the delivery address)
In the European Union
Outside the European Union
Outside the European Union
Length of limited warranty
protection (1)
Two years
Two years
One year
(1) from date of retail purchase by the original purchaser
We call the period set out in the right-hand column above the "Warranty Period". If a Product
hardware defect arises and a valid claim is received within the applicable Warranty Period, at our
option, we will either: (1) repair such defect at no charge, using new or refurbished replacement
parts; or (2) exchange the defective Product with a Product that is new or which has been
manufactured from new or serviceable used parts and is at least functionally equivalent to the
original Product; or (3) refund the purchase price of the Product. If we decide to refund You the
purchase price, You must first provide us with proof of purchase and return the defective Product
to us. Contact support to obtain a Return Material Authorization ("RMA") number. Telephone
numbers and details how to submit a request online are at http://www.drobo.com/support/contactsupport.php. You must pack the Product in appropriate protective packaging and return the unit at
your own cost. The returned Product will become our property.
IMPORTANT EXCLUSIONS AND LIMITATIONS
We don't manufacture the data drives on which your data and content is stored, and so we are
not responsible under this Limited Warranty for any issues, including defects and performance
problems, in those drives. When you return Products to us under this Limited Warranty, you must
take the drives out of the Product first because problems with a drive should be dealt with under
the warranty provided by its manufacturer, including where even if the drive is bought together
with a Product. Please note the instruction manuals’ warnings including the advice not to turn
your Product off whilst data is being copied across drives (in 'relayout') as you risk losing data.
For these reasons, we do not accept any responsibility under this Limited Warranty for
any data, including any lost or corrupted data, no matter how and why this may occur.
Back-ups: You should make periodic backup copies of the data and programs contained on the
Product's hard drive to protect Your data and as a precaution against possible operational
failures. Before You deliver your Product for warranty service it is Your responsibility to keep a
separate backup copy of the system software, application software and data, and disable any
security passwords. You will be responsible for reinstalling all such software, data and
passwords.
The Limited Warranty does not apply to any hardware or equipment that is not a Product (see
"What this document is about" above) or any software, even if packaged or sold with Product.
Manufacturers, suppliers, or publishers, other than Drobo may provide their own warranties to
You. DROBO IS NOT RESPONSIBLE FOR DAMAGE ARISING FROM FAILURE TO FOLLOW
INSTRUCTIONS RELATING TO THE PRODUCT'S USE AND/OR STORAGE.
In no event does this limited warranty apply: (a) to damage caused by use with equipment or
hardware that is not a Product (see "What this document is about" above); (b) to damage caused
by accident, abuse, misuse, flood, fire, earthquake or other external causes; (c) loss passwords;
Drobo 5D Getting Started Guide
50
(d) to damage caused by operating the Product outside the permitted or intended uses described
by Drobo; (e) to damage caused by service (including upgrades and expansions) performed by a
party other than an authorized representative of Drobo or a Drobo Authorized Reseller; (f) to a
Product or Product part that has been modified to significantly alter functionality or capability
without the written permission of Drobo; (g) to consumable parts, such as batteries, unless
damage has occurred due to a defect in materials or workmanship in the Product; or (h) if any
Drobo serial number has been removed or defaced.
No Drobo reseller, agent, or employee is authorized to make any modification, extension, or
addition to this warranty on behalf of Drobo.
Consumer users
Where you have bought the Product primarily for domestic and non-commercial use, the following
limitation on Drobo’s liability under this Limited Warranty apply:
DROBO IS NOT RESPONSIBLE TO YOU FOR ANY BUSINESS LOSS OR DAMAGE (SUCH AS
LOSS OF PROFIT) OR FOR ANY LOSS THAT IS NOT A REASONABLY FORSEEABLE
CONSEQUENCE OF YOUR USE OF THE PRODUCT.
THE FOREGOING LIMITATION SHALL NOT APPLY TO DEATH OR PERSONAL INJURY
CLAIMS, TO FRAUD, AND PRODUCT LIABILITY CLAIMS WHERE PRODUCTS ARE UNSAFE.
Business users
Where you have bought the Product primarily for business use, the following limitation on Drobo’s
liability under this Limited Warranty apply:
TO THE EXTENT PERMITTED BY LAW, THIS WARRANTY AND REMEDIES SET FORTH
ABOVE ARE EXCLUSIVE AND IN LIEU OF ALL OTHER WARRANTIES, REMEDIES AND
CONDITIONS, WHETHER ORAL OR WRITTEN, STATUTORY, EXPRESS OR IMPLIED, AND
DROBO SPECIFICALLY DISCLAIMS ANY AND ALL STATUTORY OR IMPLIED WARRANTIES
OR CONDITIONS, INCLUDING, WITHOUT LIMITATION, WARRANTIES OR CONDITIONS OF
MERCHANTABILITY, FITNESS FOR A PARTICULAR PURPOSE AND WARRANTIES
AGAINST HIDDEN OR LATENT DEFECTS. IF DROBO CANNOT LAWFULLY DISCLAIM
STATUTORY OR IMPLIED WARRANTIES OR CONDITIONS, THEN TO THE EXTENT
PERMITTED BY LAW, ALL SUCH WARRANTIES AND CONDITIONS SHALL BE LIMITED IN
DURATION TO THE DURATION OF THIS EXPRESS WARRANTY AND TO REPAIR OR
REPLACEMENT SERVICE AS DETERMINED BY DROBO IN ITS SOLE DISCRETION.
EXCEPT AS PROVIDED IN THIS WARRANTY AND TO THE EXTENT PERMITTED BY LAW,
DROBO IS NOT RESPONSIBLE FOR DIRECT, SPECIAL, INCIDENTAL OR CONSEQUENTIAL
DAMAGES RESULTING FROM ANY BREACH OF WARRANTY OR CONDITION, OR UNDER
ANY OTHER LEGAL THEORY, INCLUDING BUT NOT LIMITED TO LOSS OF USE; LOSS OF
REVENUE; LOSS OF ACTUAL OR ANTICIPATED PROFITS (INCLUDING LOSS OF PROFITS
ON CONTRACTS); LOSS OF THE USE OF MONEY; LOSS OF ANTICIPATED SAVINGS; LOSS
OF BUSINESS; LOSS OF OPPORTUNITY; LOSS OF GOODWILL; LOSS OF REPUTATION;
LOSS OF, DAMAGE TO OR CORRUPTION OF DATA; OR ANY INDIRECT OR
CONSEQUENTIAL LOSS OR DAMAGE HOWSOEVER CAUSED INCLUDING THE
REPLACEMENT OF EQUIPMENT AND PROPERTY, ANY COSTS OF RECOVERING,
PROGRAMMING, OR REPRODUCING ANY PROGRAM OR DATA STORED OR USED WITH
DROBO PRODUCTS AND ANY FAILURE TO MAINTAIN THE CONFIDENTIALITY OF DATA
STORED ON THE PRODUCT.
DROBO DISCLAIMS ANY REPRESENTATION THAT IT WILL BE ABLE TO REPAIR ANY
PRODUCT UNDER THIS WARRANTY OR MAKE A PRODUCT EXCHANGE WITHOUT RISK
TO OR LOSS OF THE PROGRAMS OR DATA.
DROBO AND ITS AUTHORIZED RESELLERS ARE NOT LIABLE FOR ANY DAMAGE TO OR
LOSS OF ANY PROGRAMS, DATA, OR OTHER INFORMATION STORED ON ANY MEDIA, OR
ANY NON-DROBO PRODUCT OR PART NOT COVERED BY THIS WARRANTY. RECOVERY
Drobo 5D Getting Started Guide
51
AND REINSTALLATION OF SYSTEM, APPLICATION SOFTWARE, AND USER DATA ARE
NOT COVERED UNDER THIS LIMITED WARRANTY.
CONSUMER PROTECTION LAWS
IF YOU ARE COVERED BY CONSUMER PROTECTION LAWS OR REGULATIONS IN YOUR
COUNTRY OR REGION OF PURCHASE, THE BENEFITS CONFERRED BY THIS WARRANTY
ARE IN ADDITION TO ALL RIGHTS AND REMEDIES CONVEYED BY SUCH CONSUMER
PROTECTION LAWS AND REGULATIONS. This warranty gives You specific legal rights, and
You may also have other rights that vary by country, state or province. Drobo, the warrantor
under this Limited Warranty, is identified at the end of this document according to the country or
region in which the product purchase took place.
OBTAINING WARRANTY SERVICE
Product Replacement: No Product may be returned directly to Drobo without first contacting
Drobo for a RMA number. You can contact us to request an RMA number by contacting technical
support. Telephone numbers and details how to submit a request online are at
http://www.drobo.com/support/contact-support.php.
If it is determined that the Product may be defective, You will be given an RMA number and
instructions to return the Product. An unauthorized return, i.e. one for which an RMA number has
not been issued, and/or one that does not conform to the instructions given for Product return, will
be returned to You at Your expense. You are responsible for the costs incurred related to
returning the Product to Drobo pursuant to the Product return instructions. Drobo is responsible
for the costs incurred related to shipping the Product back to You. In the event the Product is to
be repaired or replaced, upon receipt of the Product for which You were issued an RMA in
accordance with the Product return instructions, Drobo shall ship to you a replacement Product
by standard ground shipping. In the event the Product is to be repaired or replaced, if You
choose to provide Your credit card information to Drobo at the time You are issued an RMA,
Drobo will Advance Ship to You a replacement Product, and You agree to promptly return Your
Product at issue within seven (7) days of issuance of the RMA number. In the event Drobo does
not receive the Product for which You were issued an RMA within such seven (7) days, Your
credit card will be charged the manufacturer's suggested retail price of the replacement Product.
"Advance Ship" means, if Your credit card information is received: (i) before 1 pm local time, ship
the same day; or (ii) after 1 pm local time, ship the next business day; for express delivery.
Technical Support: During the Warranty Period, You, as part of this limited warranty coverage,
are entitled to access Drobo's online help resources to address any question about the Product
("Online Help Resources"). For a period of ninety days from retail purchase by You (we call this
ninety days the "Technical Support Access Period"), as part of this limited warranty coverage, if
the Online Help Resources don't address the support issue, You are entitled to initiate a support
request online at www.drobo.com/support. After the Technical Support Access Period, support
requests may be made at an additional fee available on request. In response to support requests,
during local business hours, a Drobo representative or Drobo Authorized Reseller will help
determine whether Your Product requires service and, if it does, will inform you how Drobo will
provide it. Drobo or its Drobo Authorized Resellers will provide warranty service on Products that
are tendered or presented for service during the Warranty Period. Warranty service will be
provided from the country from which the Product was originally purchased to the extent
reasonably possible. Service options, parts availability and response times will vary according to
country. In accordance with applicable law, Drobo may require that You furnish proof of purchase
details and/or comply with registration requirements before receiving warranty service. Please
refer to the online product documentation at www.drobo.com/support for more details on this and
other matters on obtaining warranty service.
DROBOCARE
You may be eligible to purchase DroboCare, a support product which enhances the standard
warranty, and is available for an additional fee. Please see the DroboCare terms and conditions
at www.drobo.com/drobocare.
Drobo 5D Getting Started Guide
52
GENERAL INFORMATION This limited warranty shall be, in all respects, governed by and
construed under the laws of California, without regard to its conflict of laws provisions, and the
parties submit to the exclusive jurisdiction of the courts of Santa Clara County, California. The
information contained herein is subject to change without notice in respect of subsequent
Products you may purchase. The only warranties for Drobo products and services are set forth in
the warranty statements accompanying the products and services. Nothing herein should be
construed as constituting an additional warranty. Drobo shall not be liable for technical or editorial
errors or omissions contained herein.
Drobo, Inc.
2460 North First St.
San Jose, CA 95131USA
PLEASE PRINT AND RETAIN A COPY OF THIS AGREEMENT FOR YOUR RECORDS.
Drobo 5D Getting Started Guide
53