Transcript
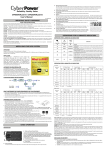
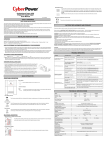
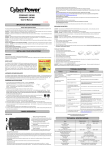
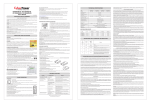
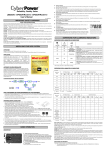
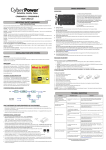
Intelligent LCD Series
Professional Tower Series
MODEL: CP600LCD, CP825LCD, CP800AVR, CP685AVR-G, CP825AVR-G, CP685AVRLCD-G,
CP825AVRLCD-G
1
3
3
4
+
+
-
1. Place the UPS on its top and remove the retaining screw (figure 1).
2. Slide the battery compartment cover completely off of the unit (figure 2).
3. Remove the battery from the compartment and disconnect the battery wires from the battery. Install the replacement
battery by connecting the red wire to the positive (+) terminal and the black wire to the negative (-) terminal of the
battery. (figure 3)
4. Slide the battery compartment cover over the battery and tighten the retaining screw.
5. Charge the unit for 4 – 8 hours to ensure the UPS performs expected runtimes.
2
-
2
1
MODEL: PP800SW
MODEL: CP850AVRLCD, CP1000AVRLCD
3
-
2
+
1
-
+
BATTERY REPLACEMENT
1. Place the UPS on its side and locate the battery compartment cover on the bottom of the UPS. Remove the four (4)
retaining screws and pull the battery compartment cover off the UPS (figure 1 & 2).
2. Remove the battery from the compartment and disconnect the battery wires from the batteries. Install the
replacement batteries by connecting the red wire and black wire to the same color wires from the battery pack. Put
the battery pack into the compartment (figure 3).
3. Slide the battery compartment cover over the battery and tighten the retaining screw. Charge the unit for 4 – 8 hours
to ensure the UPS performs expected runtimes.
1. Carefully placed the UPS on its side. Remove the 2 retaining screws then push the battery cover backward and
remove the cover.
2. Disconnect the battery wires from the battery, and then remove the battery from the compartment.
REMINDER: For PP800/PP1100/PP1500T, 2 batteries are attached with one single plastic strip. You can pull the
plastic strip to pull out the battery.
3. Install the replacement battery by connecting the red wire to the positive (+) terminal of the battery and connecting
the black wire to the negative (-) terminal of the battery.
4. Slide the battery back into the compartment. Carefully turn the UPS upside down to help the batteries slide all the
way into the compartment. Replace the cover and the retaining screws. Recharge the unit for 4 – 8 hours to ensure
the UPS performs expected runtime.
K09-0000065-00
AVR Series
MODEL: CP900AVR, CP1200AVR, CP1500AVRT, CP1285AVRLCD, CP1350AVRLCD,
CP1500AVRLCD
MODEL: PP1500SWT4, PP2200SW
1
1
2
2
3
4
5
6
3
4
BATTERY REPLACEMENT
1. Place the UPS on its side to locate and remove the front panel retaining screws from the bottom of the UPS.
2. Slide the cover (front panel) towards the bottom of the UPS.
3. Remove it from the unit.
4. Disconnect the cable located at the top of the cover.
5. Disconnect the battery wires from the batteries.
6. Remove the batteries from the compartment.
7. Install the replacement batteries by connecting the red and black wires to the same color wires from the battery
pack. Put the battery pack back into the compartment.
8. Replace the battery compartment cover and tighten the retaining screw. Charge the unit for 4-8 hours to ensure the
UPS performs expected runtimes.
K09-0000065-00
1. Carefully turn the UPS on its side. Remove the 6 retaining screws and the cover.
2. Disconnect the black and red cable from the battery set.
3. Remove the battery protection cover and take the battery pack out of the compartment.
4. Slide a new battery pack into the unit. Assemble the battery protection cover,cable, screws in the reverse order of
the previous steps. Recharge the unit for 4-8 hours to ensure the UPS performs expected runtime.