1
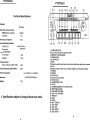
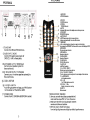
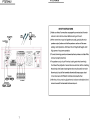
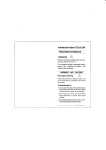
300 Watt Stero Receiver AM-FM Tuner, USB/SD,
Ipod Docking Station & Subwoofer Control
PyleAudio.com
718.535.1800
1600 63rd Street,
718.236.2400(fax)
Brooklyn NY
11204
www.PyleAudio.com
PT 70AIU
PT270AIU
PT270AIU
Foreword
Thank you for purchasing this Pyle Pro amplifier. Please read
these operating instructions carefully before use. They will
acquaint you fully with its features.
This product adopts highly advanced digital techniques, high
powered, four-channel outputs to be the media center of your
living room. It includes an AM/FM tuner, MP3liPod input jack,
headphone jack. This Pyle Pro hybrid amplifier also has sub-out
and pre-outs for a variety of applications.
Features
It PRE-Amp with AM/FM Tuner
It CPU managment of all functions, remote sensor
Digital fluorescent output display all the functions
I) Separate gain control of pre-amp and subwoofer
I) All the blue lights and blue rings gain control through LED Dimmer
I) AM/FM Quartz synthesized Tuner,auto station seek and store,
50 stations storeage, with both ma nual and automatic tu ning
It Ipod/Mp3lnputwith cable
It Digital karaoke system
It Over heat,over current protection
I)
Precautions
l.Power sou rce-The unit shoul d be conne cted to a power supply AC-llO/60Hz,
AC-220V/50Hz.
2.Ventilation- The unit shoul d be situated so that its location or position does not
interfere with its proper ventilation. Place the unit at least lOcm away from the
walls.
3.Water and moisture-The unit should not be used near water-for example, nea ra
swimming pool in a wet basement, etc.
4.Electric shock-if a metal obje ct, such as hai r pin or needl e comes into contact insid
this unit, a dangerous electric shock may result. For familie swith children, neve
permit children to put anything, especiall y metal, inside this unit.
S.Enciosure removal-Never remove the enclosure. Ifthe internal pa rts are tou ched
accidentally, a serious electric shock might occur.
6.Abnormal smell-if an abno rmal smell or smoke is detected, immediately turn the
power OFF and pullout the power cord. Contact your deal er or nea rest service
station.
PT270AIU
1
2
PT270AIU
PT270AIU
1 23
15
4 56 7 89 10
.....
Technical Specifications
Technical
PT270AlU
Main Channel Power Output
PMPO.8 Ohms. 1KHz test
THD(1KHz)
300WX2
<1%
Normal Load Impedance
80hm
Input Sensitivity Impedance
CD/DVD AUX
Microphone
6mV/600 Ohm
Sign,1 to Noise Ratio
Pure Amplifier
76d8
KARAOKE
71d8
Frequency Range
Frequency Response(40Hz-lSKHz)
Tone Ch,racteristlc(100Hz-IOKHz)
±2d8
±14d8
Power Requirements
AC-llOV/60Hz AC-220VSOHz
483 (W)X300 (D)X80(H) mm
Dimension
Weight
17 16
400mV/33k Ohm
7.2kg
* Specifications subject to change without prior notice
1. POWER SWITCH
Pre •• to switch the power unit ON Dr OFF
2. SD/MMC CARD READER
3. USB READER
4. PLAY/PAUSE
S.PREV
Thi. knoh Is used to select the preview station which have heen kept in system
6. NEXT
This knob 10 used to select the neIt station which have been kept In system
7. TUNING
8. TUNING
9. AUTO SCAN
Auto scan for radio station
10. IPOD DOCK
1l.AM/FM SELECTOR
12. MUTE
13. A/B SPEAKERS OUTPUT SELECTOR
14. INPUT SELECTOR
15. VOLUME CONTROL
16. SUB. VOL CONTROL
17. TREBLE
18. BASS
19. ECBO
20. M1C. TREBLE
21. MIC. BASS
22. MIC. VOL
23. MIC2 INPUT
24. MICIINPUT
4
3
PT270AIU
PT270AIU
1
1
4
5 6 7
(1 )TUNER ANT
Connect for AM and FM antenna s.
(2) AUDIO INPUT JAC KS
Connect the aud io oupu tjacks of
DVD/Co. AUX to these jacks.
( 3 ) A SP EAKER OUTPUT TERM INALS
Conn ect you r spea ker system to
these terminals.
( 4 )8 SPEAKEROUTPUTTERMINALS
Connect you r the other spea ker system(s) to
these terminals.
(5 ) COO LING FAN
( 6 ) 11 OV/220V SWITCH
According to power voltage ,push this button
to the station of thellOV or 220V.
10- - -
1.AUXlUSB
AUX/USB Selector
2.CDDVD
CD DVD Selector
3.TUNER
---4
TUNER Selector
4.AUTO
- - 5 Automatically search the single source when power on
5.IPOD/MP3
- - - 11 IPODIMP3 Selector
6.AUTOSCAN
AMlFM auto scan selector scan and store
stations automatically. Can store SO statioDS
=-- - , 15 7.MEMORY
_----'-6
:::.... 17 After a station has been found you can store the station
by pressing the MEMORY button and the screen will display SAVE.
8.STIMONO
Stereo and mono selector.
9.SPEAKERA
Speaker A selector
) -- - 21 10.SPEAKERB
Speaker B selector
1l.FMlPAUSE
1--- - 22
FM PAUSE selector
12.AM/PLAY
AMIPLAY selector
13114. NEXT> PREV<
Station next and preview selector
15/16. TUNING> TUNING<
The two keys are used to adjust to the best single of the stations
17.A+BSPEAKER
A+B speaker selector
18/21. LIR
Left I Right balance control
19/20 VOL- VOL+
Mastervolume down and up
22.MUTE
Mute selector
Remote Controller Operation
( 7 ) POWER CORD
Connect to AC llOV/60Hz&220V150Hz outlet.
1. Remote controller should be operated within6
meter and the scopedf30 in front of receiver.
2. Make sure that there is no big obstacle between
remote controller and machine.
3. Remote sensor should be far away
from the light,high amounts of light can affect its performance.
5
PT270AIU
PT270AIU
.. PUTS /
/
II
FMANTENNA
-,-
I •• e ___ e •• ) I
~
II
2MIC
AM ANTENNA
..
~n
'0R
Y-
~
$PEAKER/lMPEDANCii
It4g-1lgllPEAKEII
1.;4~-1lgIlPEAKEII
•• 8
8
••
·00 00·
~.~~ <~9.~~ o
0000
t
SAFETY INSTRUCTIONS
1. Make sure that all connections are properly connected and the main
g,poDor
MP3;npu'
volume is setto minimum level before turning on the unit.
2. When more then one pair of speakers are used, (specially the main
speaker output) make sure that the speakers used are of the same
wattage and impedance, otherwise the unit maybe damaged under
VOLTACESELECTOR
~~'Q,I
high power or long term operation.
3. To avoid humming sound s and unwanted noise, make sure that all the
wires are properly inserted.
4. For speaker cords, strip off the vinyl coating and twist the wire tip.
Push down the pinkjack or loosen the screw terminal, before inserting
the wire tip, then fasten it and tighten the screw. Be careful notto let
CDlDVD
8~
-
CiiiiJ9
O
o
M.lnSp••bn
CD Record.r
!Ie.....
-
~o
® ® ® ®
the wires stick out ofthe terminal otherwise this may causea short
circuit when wires of different terminal contact each other.
5. After the unit is turned on, adjust the main volume to the desired level
same is true with the bass and treble volume, etc.
=~
7