1
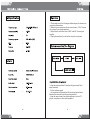
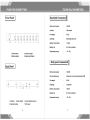
IMPORTANT: Pack carefully in original package if possible. We are not
responsible for damage incurred in returning items for repair. A letter
stating your exact street address, daytime phone number, and the problem
you are experiencing should be included. You must also enclose a copy
of original receipt as proof of date of purchase.
PDWMB400
~~PYLF
Brooklyn, NY 11204
1-800-444-5671
Monday Through Thursday.gAM to 5PM
Friday gAM to 1 PM Eastern.
PDWMB700
PDWMB400
PDWMB700
PDWMB900
8 Mic Professional Handheld VHF
Wireless Microphone System
Some common problems and their solutions are printed below.
Thanks for purchasing our wireless meeting microphone. Please read
these instructions carefully so that you fully understand how to
operate this microphone. Store these instructions in a safe place for
future reference.
- Uses VHF 170-270 MHZ frequency to avoid interference.
- Uses multilevel high frequency and midfrequency
narrowband filters to avoid interference.
- Quartz crystal oscillating circuits guarantee a steady
frequency.
- Audio compression and expansion technology to increase the
dynamic range and lower feedback.
- Uniform cardioid pickup pattern isolates the main sound
source –your voice – and minimizes background noise
- Effective, built-in spherical wind and pop filter
- Longest operating distance: ~100 yards.
- Best effective distance: ~50 yards.
1. Ensure the host receiver has a solid connection with the
microphone before use.
2. Do not drop, throw, or otherwise damage your equipment to
ensure its longevity.
3. Keep away from water – this microphone is not waterproof.
4. Keep away from electromagnetic fields, high voltage power
sources, and large metal objects.
5. Switch off the transmitter when changing the battery.
6. Take out the battery if you do not plan on using the microphone for
a long time.
7. Unplug the receiver if you do not plan on using it for a long time.
8. This equipment is not user-repairable. Contact the manufacturer if
equipment fails.
1. Please take note of the following workflow diagram for reference on
connecting this machine.
2. Make sure your system is set to the correct power (110 V). Then set
the volume of your sound equipment.
3. Adjust the mix so that the users of MIC 1 and MIC 2 sound good
together.
4. Unplug the machine if you will not be using it for a long time.
- Keep the machine at least 3 feet above the ground and 3 feet
away from walls.
- Pull the antenna upright.
- Your equipment will operate best if there is no physical barrier
between the microphone and the receiving antenna.
- Keep the receiver away from digital equipment, such as CD
players, computers, or other radio equipment.
I Front Panel
I
IHandheld Transmitter ~
o
tj;
o
0
t}
o
0
(0)
o
o
(0)
0
0
(0)
o
0
(0)
o
0
(0)
0
T T T T T T T
I
1 2
3333333
I.Powerswilch
3.Volume adjust
I Back Panel
o
4
>20mW
Antenna
Hide inside
Pre-weight
50 uS
Cartridge
Moving dynamic coil
Battery consumption
<30mA
Battery life
8 H time of duration
Temperature range
-10 --55 i
2.Power indicator
4.Receiving indicator
Body pack transmitter ~
I
o
AN'r.D
99
4
1. Antenna
3
Radio output power
2.3
2.Audio output
4. balanced output
o
5
o
Radio output power
>20mW
Carrying frequency
below the min carrying frequency 40dB
Pre-weight
50 uS
Cartridge
condenser
Battery consumption
<30mA
Battery life
8 H time of duration
Temperature range
-10 --55 i
3.mixed- balance output
5.DC power
6
3
The light on the microphone indicates that the battery has power and
that the microphone is functioning.