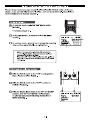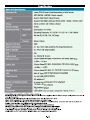
1
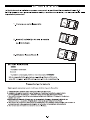
Ea Pro
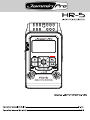
HR-5
LINEAR PCM RECRODER
0000000
000 000
~~
| ee I177207207 7 Fro |
REC
PEAK
MODE A = REC/STOP
A
| N 7
к ЛОТЫ
Г 7 \V/ N |
ERASE/ ! ! REPEAT/
PAUSE — L FOLDER
02293 5°90,
обо обо
00,0,0 OX] [/00,0,00
00 50g 00 00 50g 00
00 0 00 ооо “Оо
09090 HR-5 o2090
Ооо Ооо
LINEAR PCM RECORDER
www. Jammiinpro.net
Operation Manual (ENGLISH) E1-E18
Operation Manual (ITALIANO) IT1-IT18
Features/OvervieWw................ererecococccccccccccececererereee eee eeeeeeeeeenene e ‚ Е2
Important Safety NOTICE canis eee eer eee + . E3
LCD Screen Description..................e.....eeesscrr re DD ÍDTOOEEBTÍ ÉL É CC E ER RI IG IGG E O II IG GI IR II IR E RI IGIIGIGIZO IO . E4
Panel Description .....................ee..scerrre e DD ee ee eee e eee eee eee ee . ES
CONNECTION...............crscerscrsee nee nca race ne ane n an case a nee nn caca nee nn cen anne nn caen nee . E6
Battery Installation..…....….…...........rsssrerersne rene nanner nan aan ee ne nan anne nana nec cena nn en ce ve ee E/
Installing SD card and Basic Operation .....................eeeeeeeeeee ere eee eee ES
Folder / Microphone SEleCHiON. coir eee . E9
Select a File Folder....................eeee.rerreercccceerceree eee . E9
HOLD and MIC selection..................eeeeescssrcerccccee reee eee. E9
Recording a File......................eeerecerreeeeeree eee eee eee eee eee ooo 0 + ‚ЕТО
Prepare for Recording..................eeereeeerrcesrccoerrcee reee reee eee. E10
NY [el lCTele] fo |] ne FU E10
Playback and Repeat Moade.....................ee.eeer0srrrcrccccceeee eee e eee ‚ЕТ ]
Playback a FIle. eee eee eee eee es ‚ЕТ ]
Repeat Mode..................eeeeeeeeorrrrrccccccceeeeeenecco eee eee ecc. E11
AB LOO DING titties ETT
Deleting A Fl... ce ee eee reee eee nece eee EEEEG ‚ Е12
Tete] fo [TANT 1 1 Te TU E12-E13
Main Menu and Music Mode..................ee.erereeercerecerecereceraceereceeee. E13-E14
System Setting iii cc ce cere El4-E15
Time Setting / Schedule Record / Timing Shutdown ........................ .El4
Backlight time / Languages.................ee.eeceonvcccorvecooe reco eee El4
Device Info / Recover System / Format U Disk .......................e..s..... E15
Download and upload file TO PC. eee eee E15
Care aNd MAINTENANCE... oii reece reer eae aaa E15
SPECITICATION. e e eee eee rece ecoco e. Eló
Installing Magix Audio Cleaning Lao SE...........…......rcrrsccsrcennecrnnceunes E17-E18
Thank you, and congratulations on your choice of Jammin Pro’s HR-5
E-1
- Built-In 2GBytes memory
(Ready for more than 56 Hours stereo recording/music playback)
- Expandable SDHC memory up to 32GBytes, (SD card not included)
- Built-In 2 x dia. 9mm high sensitivity condenser microphone
- 2x 16mm Full ranger speakers built in
- Large 1.9” LCD display with backlight
- High speed USB2.0 for Mac and PC mass storage/card reader operation
- 9 Hours lifetime on 2 x AA batteries (included) or external adapter (not included)
- 3.9mm Stereo headphones output
- Tripod Mount for easy installation on stand (Tripod Stand included)
- High sensitivity stereo condenser microphones built in
- Selectable Mono/Stereo microphone recording
- Recording into 16/22.05/24/32/44.1/48/96kHz, 32-192 kbps MP3 or 16/24-bit WAV
- Adjustable recording level with peak LED indicators
- Adjustable voice activated (VOX) recording
- Inputs for connecting 1/8" mic and line-level audio
- ID3 music information display and song management
- Support 16/22.05/24/32/44.1/48/96kHz, 32— 320 kbps MP3 or 16/24-bit WAV
- 7 preset Equalizers setting for music playback
- 7 x 3D ambience effects for music playback
- 4 x PlayMode (Repeat One/Repeat All/Playlist Order/Intro Play)
Overview
The Jammin Pro HR-5 is an ultra small and extremely compact, but make no
mistake — it's a truly professional solid-state audio recorder with tfime-stamp capability
It captures audio directly on built-in 2GB memory, which is ready for more than 56 hours
stereo recording, and also on high capacity SD/SDHC cards. You can record at super-
clean 24-bit resolution with a wider dynamic range (up to 96kHz sampling rate) with HR-5,
providing twice the digital audio definition of ordinary CD's.
A new high grade stereo condenser microphone and stereo speaker optimized for monitor
are built into HR-5, complete with auto gain control, level meters, peak indicator and VOX
(voice activated recording).
Just point and record your takes!
E-2
Important Safety Notice
/N Read this manual before use and keep it handy for future reference.
Power requirements
AC adaptor operation:
- Be sure the use only an AC adaptor which supplies 5V DC and is equipped with a
center-plus plug. The use of an adaptor other than the specificed type may
damage the unit and pose a safety hazard
- Connect the AC adaptor only to an AC outlet that supplies the rated voltage
required by the adaptor
Battery Operation :
- Use to conventional AA size batteries.
- The HR-5 cannot be used for recharging
- If battery leakage has occurred, wipe the battery compartment and the battery
terminals carefully to remove all remnants of battery fluids
- While using the unit, the battery compartment cover should be closed.
Environment
To prevent the risk of fire, electric shock or malfunction, avoid using your HR-5 in
environments where it will be exposed to :
- extreme temperature
- Heat sources such as radiators or stoves
- High humidity or moisture
- Excessive dust or sand
- Excessive vibration or shock
Handling
- Never place objects filled with liquids, such as vases, on the HR-5 since this can
cause electric shock
- Do not place naked flame sources, such as lighted candles, on the HR-5 since
this can cause fire.
- The HR-5 is a precision instrument. Do not exert undue pressure on the keys and
other controls. Also take case not to drop the unit, and do not subject it to
shock or excessive pressure.
- Take care that no foreign objects (coins or pins etc.) or liquids can enter the
unit.
Connecting cables and input and output
You should always turn off the power to the HR-5 and all other equipment before
connecting or disconnecting any cables. Also make sure to disconnect all
connection cables and the power cord before moving the HR-5
Alternations
Never open the case of the HR-5 or attempt to modify the product in any way since
this can result in damage to the unit
Volume
Do not use the HR-5 at a loud volume for a long time since this can cause hearing
impairment.
E-3
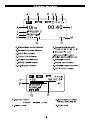
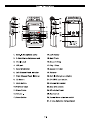
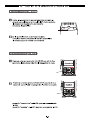
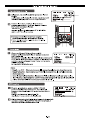
LCD Screen Description
С ОЕ Е
AH
PZ A 31 =
00:40—-—-
4 \FOLDER D
| ———RECO0010.wav
H—<5 Es Em © — М
С №
A. Stereo/Mono mode indicator
B. Sample frequency indicator
C. 24bit/16bit indicator
D. Button Lock indicator
E. Volume Level indicator
F. Battery Level Indicator
G. A-B Repeat indicator
H. Repeat mode indicator
SLY N HOLY 1 5 03 SD
|. Message file name
J. Message folder name
# Built-in Memory B SD card
K. Message number
L. Record time indicator
M. Schedule record indicator
N. SPLIT / CUT indicator
4 в
C31 Ca
О — -- ® 02 00:00:04
- 40
P & FOLDER D
REC0010.wav
O В
Q R
O. Operation Status
e Record
P. Record Level
E-4
Il Pause > Play
Q. Sound source indicator
MIC/EXT MIC/LINE IN
R. VOX Level
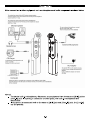
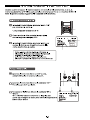
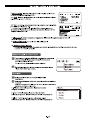
Panel Description
==
EC: = 2 Jammin Pro © o
ф 4 |
==
NEAR PE FEDER я я
Jl |: FE CE X
1. Built-In Microphone (Left) 14. LCD Display
2. 3.5mm Stereo Earphone Jack 15.Next Track
3. Line-In Jack 16.Record / Stop
4. USB port 17.Play / Stop
5. Record indicator 18.Repeat / Folder
6. Left Channel Peak Indicator 19. Volume +
7. Right Channel Peak Indicator 20. Built-In Microphone (Right)
8. Up button 21.SD /SDHC card socket
9. Mode button 22.External Mic socket
10. Previous track 23.REC level control
11.Erase/Pause 24. DC adaptor input
12. Volume - 25. Hold switch
13. Down button 26.Stereo/Mono selection switch
27. 2 x AA Batteries Compartment
E-5
Connection
Make connection to other equipment such as microphone and audio components as shown below
To monitor the output of the HR-5 using a stereo system,
connect a RCA to mini Jack cable to the Phones jack and adjust he
volume with the +/- keys
To monitor the output of the HR-5 using a headphones,
connect the phones to the Phones jack and adjust the volume
with the +/- Keys
Monitor System
To use a external microphone, connect
the mic to the ‘MIC’ jack.
(©) (9) Internal microphone will be disabled
ме]
т
External Microphone
Headphones
о == ©
DC5.0V
&—90
(
N
CD Player
To record the output signal of a CD — — D
player or similar,
connect it to the Line-In jack
AC Adaptor
To operate HR-5 on AC power, be sure
to use a correct voltage and polarity AC
adaptor,
Using a different adaptor can lead to
< D
| > en uN damage
Computer
When the HR-5 is connected to a computer via the USB port (mini USB),
audio file stored on the SD card and internal memory in the HR-5 can be transferred
to the computer
NOTES:
- To use the built-in microphones, disconnect any equipment from the external [MIC] jack or
[Line-IN] jack. If anything is connected to these jacks, the built-in microphones are
deactivated
- If equipment is connected both to the external [MIC] jack and [Line-IN] jack, the[Line-in]
has the priority.
E-6
Battery Installation
Replacing new batteries will not lose the files stored in the HR-5. If HR-5 is switched OFF with
normal operation, it will keep the Date / Time and preference setting as previous setting
1.Push to open the battery cover.
2.Insert 2 x AA size batteries with correct
polarity indicated.
3. Close the battery cover
BATTERY INDICATIORS:
* The batteries are fresh.
1
* The batteries are exhausted, and need to be charged up
or replaced.
Note: If necessary , it may provide power supply by connecting the unit ( USB jack ) to
a PC by USB cable ‚or connecting the unit ( DC jack ) to electrical outlet by AC Adapter.
BATTERY PRECAUTIONS
Follow these precautions when using batteries in this device:
1. Only use the battery with specified size and type .
2. Be sure to follow the correct polarity when installing the batteries as indicated on the
battery compartment .Reversed polarity may cause damage to the device .
3. Do not mix different types of batteries together (e.g.Alkaline and Carbon-zinc ) or old
batteries with fresh ones .
4. If the device would not be used for a long period of time , remove batteries to prevent
damage or harm from possible battery leakage .
5. Do not try to recharge batteries without rechargeable function , or they will overheat and
rupture .( Follow battery manufacturer's directions .)
6. Never try to remove the batteries while using .
E-7
Installing SD card and Basic Operation
Inserting and removing the Card
Open the SD card door, push the card fully
until it clicks. Being careful about the direction
you insert it.
Close the Card door .
e If the card door cannot be completely closed,
remove the card ,check its direction and then
insert it again.
To turn on/off the unit
Press and hold the PLAY/STOP key more than
two seconds, and the red indicator will flash, =
then enter into the default status --- voice mode.
Jam Pro
Press PLAY/STOP key more than two seconds » =
then the LCD goes out ‚and the unit is turned off. =
e it shows “Jammin Pro” on LCD while turning on the unit;
* it shows “byebye” on LCD while turning off the unit.
E-8
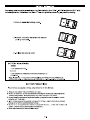
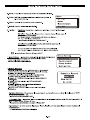
Select / Switch File Folder/MIC selection/Hold
There are four memory storage areas(file folders) labeled A,B,C,D in the unit for your
choice , it can store 99 files in each file folder , so it can store 396 in all . Absolutely ,it
must be subject to its memory capacity .
Select a file folder
At recorder mode, press the “A-B” key to switch
file folder .
ОО
* The Factory setting is “A”.
00
000
09820
As the right picture , it shows the file folder name
on LCD. r= Coca
10/10 00:40<
& FOLDER D
At recorder mode , press V key ¡it shows the recording REC0010.wav N a y ;
date and time about this file ,as right picture. E —— J
Note : The name at the left of the LCD indicates the
current file. The number at right indicates the total time
recorded in the selected file folder.
If the unit is full, “ FULL” will appear on the LCD . Delete or
move files, or change another new SD card , it may record
right along .
| |
Slide the HOLD switch to the “ ON ” (Lock) position, Vv „М
then all buttons will be locked . CD al
Slide the HOLD switch to the * OFF” position to
Unlock all buttons .
Slide the Mic Selector switch to the “ST” or “MONO” r Y y \
position, and “ ST ” or“ MONO ” will be shown dea
on LCD as right picture indicating Stereo (ST) or 10/10 00:40
Mono recording .
& FOLDER D
REC0010.wav
So
E-9
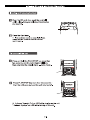
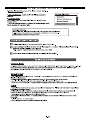
Recording a File
Before recording , you can enable the VOX function (Voice Activate Recroding) for automatic
record. You can go to « VOX setting » in the recording menu and select you desire VOX level.
When record button is pressed and the input signal from Microphone/Line-In reaches the VOX
level, recording will start automatically.
Preparing for recording
é в
At recorder mode ,you may select a desired file folder C31 =
by "A-B” key , and if VOX is enabled, will "02 00:00:04
appear on LCD. & FOLDER О
RECO010wav —
Press the REC/STOP button HR-5 will enter a (AE RO < у
pre-recording status and the REC record
indicator will blink.
ff NN
Current input level, recording status (bitrate, {31 са
resolution, Mono/Stereo) are then shown on 2 " 02 00:00:04
[OR RR ERE
_
LCD " + pe EEE
ITS | Y FOLDER D SS
REC0010.wav
3 | МС MVOX
3 N J
Recording file
Then you can turn the REC Level knob to adjust
the input level.
Input level, recording status (bitrate,
resolution, Mono/Stereo), File name are shown
on the LCD.
e If the L/R Peak indicator blinks ,it means the input
level is too high ,please turn the REC level knob to lower
input level in order to avoid unwanted distortion .
Then press REC/STOP or ERASE/PAUSE key to start
recording .However ,if you press Mode key it will cancel
recording to return to recorder mode .
You can pause the recording by pressing ERASE/PAUSE key . And then
REC indicator will flash,and press again to resume recording.
To Stop recording, you can press REC/STOP and the file will be stored in
the internal memory or SD card.
Note : There are three recording inputs (Internal Mic ,External Mic ,
Line in ) ,and the sign will display on LCD , current recording source will be
displayed on the LCD screen.
E-10
Playback and Repeat
( NN
C31 ca
Select a Folder by pressing REPEAT/FOLDER button
and select a file. File name / Duration / Location will be 10/4 0 0 0 " 4 O<
shown on the LCD as right picture. $ FOLDER D <
REC0010.wav «=
« SO р
Then press PLAY/STOP key to play it . you
may press ERASE/PAUSE key for a pause , press
PLAY/STOP key to stop it ‚then press KK or Di key
to go to the previous or next file, Press “+ / -” to
adjust speaker volume while “0” is minimum volume , “31” is
maximum volume.
e Press and hold KA or X key to run Fast Rewind
or Fast Forward while playing back a file.
* For private listening, connect an earphone to
EARPHONE jack.
Repeat Mode
There are four playback mode in HR-5.
(— NN
Press and hold REPEAT/FOLDER key to switch between C31 ca
Repeat one cs am, Repeat all <3 es Play normally cs es .
and Intro Play cs em while playing. Then the Repeat indicator 10/ 10 0 0 " 4 0
will display on the left bottom of LCD, and this setting will «+ FOLDER D
always be kept until you switch it to another mode REC0010.wav
* Factory setting is “5am”. o — р
Note:
Repeat one c3 em : Playing back the current selected file repeatedly ;
All Repeat <3es: Playing back all files in the current selected file folder repeatediy;
Play normally <5sas : Playing back the selected file just for one time ;
Intro Play <3 em : Playing back the first 10 seconds of each file from the current one to the
last orderly within this file folder .
A/B Looping
a >
While playing back a file, press REPEAT/FOLDER key {31 Ca
once to set the starting point ”A”, and RZlA- displays on » 02 00:00:04
the left bottom of LCD ,then press REPEAT/FOLDER _— ET 40
again to set the end point “B” at the desired point , & \FOLDER D
EZ1A-B displays on the left bottom of LCD. REC0010.wav
« uN ns «= J
9 HR-5 will then keep looping from point A to B until you press
the REPEAT/FOLDER once again to resume to normal playing
E-11
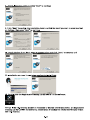
Delete File and Recorder Setting
Delete a file
Select a desired file , and press ERASE/PAUSE =
key once, and select “ YES ” for deleting the file Е
or“ NO "to cancel by pressing KK or b>i key , then |
Yes
press PLAY/STOP key to confirm to delete it.
* For the Deletion of all files within a file folder refer
to following section .
Recorder setting
At recorder mode, press Mode key to display the Recorder setting ,and select a setting
item by À or V key ,and then press PLAY/STOP or bbl key to enter into branch setting
menu .
Confirm your setting according as your demand by PLAY/STOP key ,then press Mode or
KK key to return upper setting menu.
(Recorder
a (Recorder `
* File Format 7
“Delay Recorder. Recorder
* VOX Setting
+ MIC ALC * Save lo * Edit Function
\ J | * Edit Function * Clean Up
q * Clean Up ) * Delete Folder File
" " " \ 7
Setting instructions .
1. Quality : (Quality |
If you set the file format for WAV ,then 96K for
Sample Rate and 24bit for Sample Bit are the best quality + HP:192/128Kbpps |
recording . * MP:128/96Kbps
If you set it for MP3 format , then HP is the best * SP:96/64Kbps
quality (192 kbps is for Stereo ,128kbps is for Mono) .
q * LP:64/32Kbps
* The better record quality you set , the larger
memory space it will occupy .
2. File Format : There are two kinds of formats for recording files (MP3 - WAV).
3. VOX Setting : You can enable the VOX (voice activated recording) or set the VOX recording level.
4. MIC ALC: You can turn ON the Mic Auto-Level-Control feature. The input level will be
automatically controlled by HR-5.
Notes: When ALC is ON, input level knob is disabled.
5. Delay Recorder : You can adjust the delay recording time from 5 sec — 60 sec count down.
Recording will start automatically after count down finish.
6. Save to: You can select either recroding to «Inside memory» or «SD Card».
E-12
Recorder setting and Main menu
7. Edit Function : Set the Split or Cut function ,’split ” or
7 N
“cut” will be shown on LCD. tc
<A> Split : While playing a file, press A-B key to select the split point. 1 0/1 0 0 0 4 0
Then the message will be splited into two sections by the @ FOLDER D
Split point ,and the second section is moved REC0010.wav
to the end of this file folder . | So sum |
<B> Cut : While playing a file, press A-B key once to select point A
B=) A- icon will be displayed on LCD , press the 2nd
A-B key again to select B. Then select “yes” and message
SIA Сэ! са °
> 02 00:00:04
from Point A to B will be cut. POR PR PR PRI EEE -40
& \FOLDER D
REC0010.wav
3 0B =A сот ;
8. Clean Up : It is for refreshing recording file list , and then goto recorder mode .
9. Delete Folder File : Delete all files within current file folder .
10. Continue Last Playback :
Continue the previous playing if you stop playing a file previously ,otherwise, it will just go back
recorder mode.
Main menu and basic operation
Press and hold MODE key for 3 secs. to goto
main menu , and current time will be shown on the
7
left top of the LCD , as right picture . 00:30:51 [|
Recorder
You can select the menu index by pressing A or V key, Music
and press PLAY/STOP key to enter. Toolbox
Select Recorder to return to recorder mode .
Select Music to enter Music mode, and please select MediaLib
Update to update the song list. It may takes a 1-2 minutes.
1. All Music : All recording files and downloading music Music a
(les are shown. Ce Al Music
2. Artist : All music files are sorted by artist * Artist
in the mp3's ID3 info except recording files. Album
3. Album : All music files are sorted by album * Genre
in the mp3's ID3 info except recording files. \ и
Е-13
Music Setting and System Setting
4. Genre : All files are sorted by genre in MP3's ID3 info
5. Dir List : All downloaded music files show here. (except the
recording file)
6. Record : All recording files show here .
7. Medialib Update : Refresh music files list .
Music a
* Dir List
* Record
* Medialib Update
ESAS ©
8. Play Set : PlayMode ,Repeat One - All Repeat - Intro Play - order (Play Normally ) ;
EQ select : You can select up to 7 preset EQ for music playback :
<1> No effect ; <2>Pop Music ;<3> Rock ; <4> Dance ;
<5> Jazz ; <6> Classic ;<7> Speech .
* factory setting is “ No effect ” .
3D select: You can select up to 8 ambience 3D effect for music playback
<1> Turn off tone ; <2> Generic ;<3> Studio ; <4> Cathedral ;
<5> Concert hall ; <6> Submerge ; <7> Interior ; <8>Psychotic .
* factory setting is “ Turn off tone ” .
Select Toolbox to enter System Setting mode
1. Time Setting : Set date and timeof HR-5 ,and the display format is
“Year/ Month/Day Hour : minute”, set the value by
UP and DOWN keys , then Press NEXT and
PREV keys to select another item .
2. Schedule Record:
You can schedule a recording at a desire time period by
clicking into «Schedule Record».
- Press UP / DOWN key to select the schedule is
Everyday / Once or turn OFF the schedule
- Press NEXT key to adjust the time period
- Press UP / DOWN to adjust your desire start time
period from 00:00 to 23:59
- Press NEXT key to adjust the your desire stop time
period from 00:00 to 23:59
- Press MODE button to exit the «Schedule Record»
and back to main menu
- Anicon G will be shown on the screen in recorder
mode
( System setting
Schedule Record
e Timing Shutdown
q * Backlight Time
Schedule Record
Every Day
From 09:10
To 10:00
3. Timing Shutdown : Set automatic power shut down timer for this unit from “ OFF ” ,10minutes , 30
minutes and 1 hour for you choice .
* Factory setting is OFF .
4. Backlight Time : Set automatic backlight timer for LCD from “ Always On ” ‚5 secs.,10 secs, 15 secs. 20
secs.,30 secs. for your choice .
* Factory setting is Always On .
5. Languages : There are four languages built for the menu. English
Chinese, and Japanese .
* Factory setting is English .
E-14
, simplified Chinese, Traditional
System Setting and connecting to PC
6. Device Information: It shows the all the HR-5 product information.
7 :
7. Recover System : Restore the unti to Factory setting. System Setting
8. Format U Disk :
Format the internal memory of the HR-5 and all recording will be
lost.
Notes: Please install or Backup the software — Magix Audio + Format U Disk |
Cleaning Lab SE before you format the HR-5.
\
* Languages
* Device Information
* Recover System
IMPORTANT NOTES:
- Once message(s) is deleted or the unit is formated, they can not be recovered.
- Format process will take about 20 seconds, during formatting time all keys are invalid.
Download and upload files to PC
Connect the HR-5 to a computer by the included USB cable .
Copy (recording) files to a removable disk or computer ,or copy music files to your
HR-5 according to Folder/Album/.Artist/Genre
HR-5 supports MP3, WAV, WMA, FLAC, AAC, OGG files
After finishing your operation, disconnect the unit from PC.
CARE AND MAINTENANCE
RESETTI NGTHE UNI T
If the unit is exposed to a strong static electrical charge, the unit may lock up, or the LCD
may darkle. This is rare, if it does happen, just remove the batteries, then reinstall it , at this
rate, all settings will return to their original values, but all previous messages are saved.
TRAFFICSAFETY
.Do not use it while operating a motorized vehicle. It may cause a traffic accident
and it is illegal in some areas.
.Even if your earphone is designed for open-air type to ensure you hear outside sound,
do not turn the volume up so high that you can not hear other voice around you.
.Use it with extreme caution or temporarily pause in latent accident situations.
CARE
Keep the unit dry. If it gets wet, wipe it immediately. Liquid may contain minerals that
can corrode the circuits.
.Use and keep the unit only in normal temperature environment , for extreme temperature
may shorten the life of electronic devices, damage batteries and/or melt plastic parts.
.Keep the unit away from dirt and dust.
.Handle the unit gently and carefully. Dropping it may cause damage and cause the unit to
work improperly.
.Clean, wipe the unit with a damp cloth occasionally to keep it new face.
.Do not use harsh chemical detergent to clean.
E-15
J
Specification
Main Unit Specification
Recording File Linear PCM (Pulsed Code Modulation) in WAV format
MP3 (MPEG-1/MPEG-2 Audio Layer3)
Build in 2GB NAND Flash Mmeory
Support SD(16MB-2GB) and SDHC (2GB ~ 32GB) memory card
35mm x 20mm with 128dot x 64dot
Memory
Display
=
®
Display backlight
Recording Format | PCM (WAV) RIEL GZ METAL ell
Sampling Frequency 16 / 22.05 / 24 / 32 / 44.1 / 48 / 96kHz
Bit rate 32, 64, 96, 128, 192 kbps,
Channel Stereo / Mono
Maximum File Size 2GB
Bulid-in Microphone 2 x dia. 9mm high senstivity full range Microphone
Build-in Speaker 2 x 16mm full range speaker
VOX Yes
Output power 2 x 100mW @ 16 ohm
3.5mm Stereo Mini jack, impedance 2K ohms, input level
0 dBm ~-60dBm
3.5mm Stereo Mini jack, impendance 10K ohms, input level
+6 dBm ~-20dBm
3.5mm Stereo Mini jack, 2 x 10mW @ impedance 32 ohms,
Microphone Jack
Line-In Jack
Eaphone Jack
USB Mini-B Type (USB2.0 High Speed Compatible)
Power Soruces 2 X AA (LR6) Alkaline Battery
AC adaptor 5V
Battery Life (Alkaline battery)
Unit size
Weight
Accessories
9 hours for recording and 10 for playback
112 mm x 21 mm x 60mm
76g (without battery)
USB cable / Line out cable / earphone / Stand /battery
*
N
©
D
O
=h
O
Q
=
O
=
N
Q
=
oD
0
с
©.
®
O
[a
[
O
O
=
Q
=
O
oD
=
[a
>
O
с
—
O
+
O
oD
E-16
Installing Magix Audio Cleaning Lab SE
1. Connect HR-5 to PC via the included USB cable
2. HR-5 will appear as a drive in your PC
( 2 Drives will appear as the 1° driver is for the internal memeory and the 2" driver is for the
SD card memory)
Su Removable Drive (F:) Su Removable Drive (G:)
3.Select the drive for the internal memory and click folder [Magix Audio Cleaning Lab SE]
| Г MUSIC | = RECORD J
4. Double Click the start.exe
9 5 (©
Magix Audio Cleanine Lab
addon: autorun taf start exe
Misi rian ен —
я fred wd 1 Cu
preci de п Brn le ah ETL par nora bi dr
soucher med fre pee
Your MAGI (eam
Fac E dim prog
6. Select you language
bn. MAGIX Audio Cleaning Lab SE В
browse CD ; | ne! £
Reger be LS
Vera rage DOTE
NPA
724 ыы“
~~ De,
7. Click “Next” to continous and tick the box to confirm the agreement
ST Il LEE TS
Welcome lo MAGDX Auda Cleaning Lab 5 Es SE setup pesram ==
EE
computer, |
AUDIO (Click Carcel lo qui setup and elas any pangrama ynu have AUDIO
CLEANING LAD iurreng C Lp pH CLEANING Lak
WARNING: The progism ii protected Ey copysght law: and
inlmnatinnal nating.
y Unauthonged inprociactión er distribution of His program, er any =
J portan of A, may 1esul in tevere civil and © tura <
Lea | |
i i
| wl
[feds | _ cons |
| accepl iha Icono beer and conditions
_ Cured |
E-17
8. Select Installation Type and click “Next” to continue
Select installation type >] |
Choose how MAGIA Audio Cleaning Lab SE and other private
user data from various User accounts should be used on the
computer.
AUDIO
CLEANING Lab
IW Private [Standard]
Each user account provides exclusive access to its
program settings and user data.
[Shared
Every user account has access to the same program
settings and user data.
9. Click “Next” to confirm the installation folder and tick the box if you want to creat shortcut
on Desktop, then press “Next” to continue
Select target paths xl Create link |X|
[=] The program components are saved in the folders listed below. Do you want to create a link for MAGIX Audio Cleaning Lab SE
[=] on your desktop?
IF you wish to specify other storage areas, please click on
"Browse",
AUDIO AUDIO
CLEANING Lab CLEANING Lab
Program file Browse I Create ink on desktop
sen Fles\MAG Audio Cleanng_ Lab 15 SE |
В andelfecte— Browse
CA. AMAG Audio Cleaning Lab 15 SE
User file Browse
ex Documents*MÁG E Audio Cleanina_ Lab 15 SE
в Сапсе! | < Back. | Мех! > | Cancel |
10. Untick the box if you don't want to register online and click “Next” to continue and
Register online Rs alain =]
[=] leo ial le le на Cia НТЕ [=] You are how ready to install MAGI Audio Cleaning Lab SE.
Press the Mest button to begin the installation or the Back
button to re-enter the installation information.
Furthermore, your registration enzures that you are kept up to
AU DIO date at all times. AU DIO
CLEANING Lab CLEANING Lab
|v Register online
E Cancel |
11. Installation start and it may takes couple minutes to finish,
Installation complete
; | | =) MAGE Audio Cleaning Lab SE has been successfully installed.
MAGIX Audio Cleaning Lab SE
Press the Finish button to exit this installation.
AUDIO
CLEANING Lab
CE ness vd Sula gh Vo ca D tk ad tt
CNEA
Installation progres: 22-45
LT IT
NOTES: If the HR-5 internal memory is formatted or deleted before installation, the Magix Audio
Cleaning Lab SE CANNOT be recovered, please install or backup the software before you format
the HR-5 memory.
E-18
Caratteristiche/Panoramicd....................e..reeeseeereirrrre recreo eeeeceeaceeeeceeerceeneeee IT2
Notizie importanti per la SICUrezZd......................eeerrrccrsarco cerro eco eeeecee ПЗ
Descrizione dello schermo LCD.................eeeeeeereeercerccrrece reee eee reee . 114
Descrizione del Pannello....................e....eeeeerecerrrec ee e eee eee eee eeeeeee. ITS
Connessioni...............ee.reerreerceercecrceree reee ere reeeroorecoreorerrocracorecrrvarrorrecce. IT6
Installazione delle batterie.......................e.rr.ercrrccrerrrecece reee eee. 117
Installazione scheda SD e Funzionamento di base:......................eeseeserrereecere NER REEENSTEGG 18
Folder / Microphone Selection..................e....eeerrrreerccrcececeerecee acerco (T9
Selezionare una cartella di File ....................eeeeeeeerrrececercecrreeo reee [T9
HOLD © MIC Sele CT ON. cate reer reece eee eae vanes (T9
Regisitrare Un File.....................eesrccccorercccocoreraccocerecacacereacacorornccocareracacoreacacoree. ПТО
Preparazione alla registrazione.................ee.....cerrrveccserrrccecerecece nene IT10
Iniziare la registrazione......................c.ecsrrrrrrrrerrcccererecec e naceceeoeee eee. IT10
Playback e Repeat Mode.................e.....e.eerrcccescrrccccereee eee reececenececorececoeceee. ПТ
Riprodurre Un Filner etter teeter eerie eeeeennns T1]
Repeat Mode...............eeeeerrrrrrccerrrcccererececcerrecececoceroacacereraccocerroccecereaen.. T1]
AJB LOO DING tetera erates IT11
Eliminare EEE [112
Recorder Sefting...................eeeereesecccccceracoreracccceoccereaacorocereccenec eee acera. IT12-IT13
Main Menu € MUSIC MOE... ui cc ede eee eens 113-1114
System Setting ..............eeeeerrecorcococeocooracereccoreocorracarroceorecarracererrecerrococ ee IT14-1115
Time Setting / Schedule Record / Timing Shutdown ovine... [114
Backlighi time / LIANQUOAGes.....……..…...…...….....…crrrsessenanaar era nana ne cena nnncnen nee m4
Device Info / Recover System / Format U Disk ................eererservcccccererccenn. IT15
Download e upload file Aa PC... cece eee ea, IT15
Pulizia e mantenimento...................e.rrerrrercer reee recorre eooreocoreoereeee.. IT15
Specification. .................eeeeeeercrresrccccreerce rece eceerececerocereraceceraceceraccerrecce. IT 16
Installazione Magix Audio Cleaning LAD SErssrrre eee, IT17-1718
IT-1
Caratteristiche
- 2GBvies di memoria integrata
(pronto per piu di 56 ore di registrazione/riproduzione stereo)
- Memoria SDHC espandibile fino a 32GBvtes, (SD card non inclusa)
- 2 microfoni infegrati a condensazione da 9mm high sensitivity
- 2 altoparianti integrati dalómm
- Grande display LCD da 1.9" refroilluminato
- Porta USB2.0 per Mac e PC per operazioni di lettura/scrittura
- Autonomia di 9 ore con 2 batterie AA (incluse) o alimentata da adattatore
esterno(non incluso)
- Uscita Stereo per cuffie da 3.5mm
- Foro per una facile installazione su stand o (Treppiede incluso)
- Registrazione Mono/Stereo selezionabile
- Registrazioni a 16/22.05/24/32/44.1/48/96 kHz, 32-192 kbps MP3 o 16/24-bit WAV
- Livello di registrazione regolabile con indicatore a led del picco
- Aftivazione vocale regolabile (VOX)
- Ingresso 1/8" per connessione di microfoni esterni o di linea
- ID3 music information display e song management
- Supporta 16/22.05/24/32/44.1/48/96 kHz, 32-320 kbps MP3 o 16/24-bit WAV
- 7 preset di Equalizzazione per la riproduzione della musica
- / effetti 3D per la riproduzione della musica
- 4 x PlayMode (Repeat One/Repeat All/Playlist Order/Intro Play)
Panoramica
Jammin Pro HRS e un registratore professionale ultracompatto che registra su
memorie allo stato solido.
La registrazione dell'audio sulla memoria integrata da 2Gb permette più di 56
ore di registrazioni stereo inoltre possibilita’ di espansione grazie allo slot per schede SD/SDHC
La qualita’ della registrane offre un suono pulito, con risoluzione a 24bit, e con dalla dinamica elevata
[sampling rate fino a Y6khz).
Il nuovo microfono a condensazione di classe alta e gli speaker stereo, ottimizzati
per il monitoraggio, sono integrati nell’Hr-5.
Inoltre sono presenti le funzioni auto gain, il level meter con indicatore di picco e la funzione VOX
(voice activated recording).
Con Hr5 basta direzionare il microfono e registrare!
IT-2
Notizie importanti per la sicurezza
Leggere questo manuale prima dell'uso e consultarlo per ulteriori spiegazioni
Power requirements
AC adaptor operation:
- Assicurarsi di usare solo adattatori AC con 5V DC e equipaggiati con il +
centrale. L'uso di un altro tipo di adattatore potrebbe danneggiare l'unitd e mettere
a repentaglio la sicurezza.
- Connettere | adattatore AC solo in una presa elettrica che supporti il voltaggio richiesto
dall’alimentatore.
Batterie:
- Usare le batterie standard batterie AA
- HR-5 non puo essere usato per ricaricare le batterie
- In caso di perdita di liquido da parte delle batterie, rmuovere delicatamente le
batterie dal compartimento e rimuovere il liquido rirmanente
- Durante luso lo scompartimento dove sono alloggiate le batterie deve essere
tenuto chiuso
Uso
Al fine di prevenire il rischio di incendio, di shock eleftrico o di malfunzionamento
evitare di usare il vostro HR-5 in situazioni di esposizione come:
- Temperature estreme
- Esposizione al caldo, come sopra un radiatore
- Umidita
- Eccessiva polvere o sabbia
- Eccessive vibrazioni o shock
Maneggiare
- Mai inserire Vunita dove siano presenti liquidi, come in vasi o bicchieri
- Non esporre a fiamme libere, come candele o accendini
- HR-5 € uno strumento di precisione. Non esercitare una pressione indebita sui tasti
e su altri controlli. Inoltre, non far cadere lunita, e non esercitare pressione
eccessiva o infliggere colpi all’unita.
- Assicurarsi che elementi estranei (monete,spille, ecc.) o liquidi entrino nell’unita.
Connessione dei cavi di Input ed output
Dovete sempre spegnere | alimentazione di HR-5 e tutte le altre apparecchiature
prima di collegare o scollegare i cavi. Assicuratevi anche di scollegare tutti | cavi
di collegamento e il cavo di alimentazione prima di spostare l'HR-5
Alterazioni
Non aprire mai UHr-5 o cercare di modificare l'unita’ in quanto comporterebbe il
malfunzionamento dellunita.
Volume
Non utilizzare | HR-5 ad alto volume per un lungo periodo in quanto potrebbe causare
seri danni alludito
IT-3
LCD Descrizione dello Schermo LCD
@& \FOLDER D
| ——REC0010.wav
H — E БЕЛ л-в ваш ©) М
|
С №
A. Indicatore Stereo/Mono H. Indicatore Repeat mode
SO OE COE < ^^ @в
|. Nome de file
J. Nome della cartella
B. Indicatore frequenza di campionamento
C. Indicatore 16/24-bit
D. Indicatore Button Lock # Built-in Memory BSD card
E. Indicatore livello Volume K. Message number
F. Indicatore livello Batteria L.Indicatore Record time
G. Indicatore A-B Repeat M. Indicatore Schedule record
N. Indicatore SPLIT / CUT
( D
(31 =
О — - e02 00:00:04
& \FOLDER D
REC0010.wav
X y
Q R
O. Operation Status Q. Indicatore dell'ingresso
e Record || Pause [> Play MIC/EXT MIC/LINE IN
P. Livello di registrazione R. VOX Level
IT-4
Descrizione del Pannello
| E
mie) 2 Tom Pro =|@— 2 > — 3
o FT 3 14 i 23
В
y 4 necro 15 E O 24 TD ab |
`_ 17 `` | AT
19
о © 27 анте
o de e
J LL ‚ FECEX
1. Microfono integrato (sinistra) 14. LCD Display
2. Jack 3.5mm per auricolari 15. Traccia Successiva
stereo 16. Record / Stop
3. Line-In Jack 17. Play / Stop
4. Ingresso USB 18. Repeat / Cartella
5. Indicatore Record 19. Volume +
6. Indicatore picco canale sinistro 20. Microfono integrato (destra)
7. Indicatore picco canale destro 21. Alloggiamento SD /SDHC card
8. Pulsante su 22. Alloggiamento microfono esterno
9. Pulsante Mode 23. controllo del livello di
10. traccia precedente registrazione
11. Erase/Pause 24. Ingresso adattatore DC
12. Volume - 25. Hold switch
13. Pulsante giu 26. Stereo/Mono selection switch
27. compartimento per batterie 2 x AA
IT-5
Connessioni
Eseguire il colegamento ad altri dispositivi come ¡ componenti audio e microfono, come illustrato
di seguito
To monitor the output of the HR-5 using a stereo system,
connect a RCA to mini Jack cable to the Phones jack and adjust he
volume with the +/- keys
To monitor the output of the HR-5 using a headphones,
connect the phones to the Phones jack and adjust he volume
with the +/- Keys
Monitor System
To use a external microphone, connect
the mic to the ‘MIC’ jack.
Internal microphone will be disabled
mic
т
External Microphone
Headphones
— REC LEVEL +
DC5.0V
—9O
CD Player
To record the output signal of a CD mu — Mi)
player or similar,
connect it to the Line-In jack
AC Adaptor
To operate HR-5 on AC power, be sure
to use a correct voltage and polarity AC
adaptor,
Using a different adaptor can lead to
= D
5 | Ne | damage
Computer
When the HR-5 is connected to a computer via the USB port (mini USB),
audio file stored on the SD card and internal memory in the HR-5 can be transferred
to the computer
NOTE:
- Per utilizzare ¡ microfoni incorporati, scollegare le unita dalla presa esterna [MIC] o
[Line-IN]. Se qualcosa e collegato a questi jack, ¡| microfoni incorporati saranno
disattivati
- Se lapparecchiatura e collegata sia alle unita esterne [MIC] e [Line-IN], il [Line-IN] ha la prioritd.
IT-6
Installazione delle batterie
La Sostituzione delle batterie nuove non comportera la perdita dei file memorizzati nella HR-5.
Se HR-5 è spento, con il normale funzionamento, si manterranno la data / ora e la preferenza delle
impostazioni precedenti
1. Premere per aprire il coperchio
2. Inserire 2 batterie tipo AA con la corretta
polaritd indicata.
3. Chiudere il coperchio della
BATTERY INDICATORS:
* Le batterie sono nuove
1
* Le batterie sono esaurite, e devono essere ricaricate o SOStituite
NB: Se necessario fornire alimentazione collegando l'unità ad un PC tramite
cavo USB, o collegare l'unita (DC jack) alla presa elettrica di un adattatore AC.
Precauzioni per le batterie
Seguire queste precauzioni quando si utilizzano batterie di questo dispositivo:
1. Utilizzare solo la batteria dalle dimensioni e del tipo specificate
2. Assicurarsi di seguire la corretta polarita quando si installano le batterie, come indicato
sull’alloggiamento delle batteri. L’inversione delle polarita puo danneggiare Vunita
3. Non mischiare diversi ti pi di batterie insieme (ad esempio Alkaline e Carbonzinco ) o batterie
vecchie con nuove
4 Se il dispositivo non sara utilizzato per un lungo periodo di tempo, rimuovere le batterie per
evitare un danno o la perdita di liquido dalla batterie che potrebbe rovinare Vunita
5. Non cercare di ricaricare le batterie se non sono batterie ricaricabiliin quanto sarebbe alto il rischio di
surriscaldamento e danneggiamento (Seguire le indicazioni del produttore della batterie)
6. Non tentare mai di rimuovere le batterie durante l'utilizzo.
IT-7
Installazione schede SD e Funzionamento di base
Inserimento e rimozione della scheda
Aprire l'alloggiamento per schede SD,e spingere la
scheda completamente fino al “click”. Assicurarsi che
la direzione di inserimento sia corretta.
Chiudere lo sportellino
Se lo sportellino non si dovesse chiudere
completamente rimuovere la card e controllare
la direzione,quindi inserire nuovamente.
Per Accendere/spengere l'unità
Premere e tenere premuto PLAY/STOP per piu di due
secondi e l'indicatore inizierd a lampeggiare in rosso
Premere e tenere premuto PLAY/STOP per piu di due
secondi quindi I'LCD si spengera e |'unita si spengera
apparira “Jammin Pro” sull’ LCD quando accenderete
I'unitq;
apparira “byebye"” sull' LCD quando spengerete l'unità
IT-8
Jm Pro
Selezione / Switch Cartelle MIC Selezionare/Hold
Selezionare una cartella di file
In modalita registrazione, premere il tasto "A-B"
per passare alle cartelle.
x
* L'imposiazione di fabbrica e "A"
Come mosira la foto a destra il nome della
cartella appare sul display LCD.
In modalita registrazione, premere il tasto, per
vedere la data e ora di registrazione del file,
come mostra foto a destra.
Ci sono quattro aree per la memorizzazione (di cartelle di file) etichettate A, B, C, D.
memorizzazione fino a 99 file in ogni cartella, e memorizzare fino a un massimo di 396 file
Tutte le specifiche sono soggette alla capacita della memoria.
ОВО
= (=
10/10 00:40<—
+ FOLDER 10/06/01
wav
18:30:02
| sæ / J
Note : || nome a sinistra del display LCD indica la
file corrente. Il numero a destra indica il tempo totale
registrato nella cartella del file selezionato.
Se l'unitáa e piena, "FULL" appare sul display LCD.
Eliminare o spostare i file, o inserire una nuova scheda SD.
Funzioni HOLD e MIC
Spostare l'interruttore HOLD su "ON" (Lock),
quindi tutti i pulsanti saranno bloccati .
Spostare linterruttore HOLD sulla posizione "OFF"
Per sbloccare tuttii pulsanti.
Far scorrere il selettore Mic dalla posizione "ST" a
"Mono".
"ST" 0 "MONO" saranno mostrato sul display LCD
come da immagine a destra,che indica la registrazione | ¿FOLDER D
Stereo (ST) o Mono.
IT-9
CD
MIC SELECT
U |
= BD OCs ca |
10/10 00:40
REC0010.wav
_ SS
Registrazione di un file
Prima della registrazione, € possibile attivare la funzione VOX (Voice Attiva Recroding) per la registrazione
automatica.
Si puo andare sulla impostazione «VOX setting» nel menu di registrazione e selezionare il livello desiderato del VOX.
Quando si preme il tasto di registrazione e il segnale di ingresso da Microphone / Line-In raggiunge il livello settato nel
menu VOX
la registrazione si avvierad automaticamente.
Preparazione della registrazione
@ >
In modalità registrazione, € possibile selezionare una Ga =
. , | " 02 00:00:04
cartella desiderata con il tasto "A-B, e se la funzione Lp rT
VOX viene attivata la scritta & FOLDER D
Apparirá sul display LCD REC0010.wav
_ Æ 7
Premere il tasto REC / STOP ed HR-5 entrerá in
Uno stato di pre-registrazione e la spia record
REC inizierd a lampeggliare. а >
I livello d'Ingresso e lo stato di registrazione {31 C=
(bitrate,risoluzione, Mono / Stereo) vengono - 102 00:00:04
quindi visualizzati sul LCD. < & FOLDER D >—
| REC0010.wav
y ( |
``
File di registrazione
e possibile ruotare la manopola del REC LEVEL
per regolare
il livello di ingresso. D
Livello di ingresso, lo stato di registrazione (bitrate,
risoluzione, mono / stereo), nome del file vengono
visualizzati
sul display LCD
e Se il picco di L / R lampegglia, significa che lingresso
livello e troppo alto, ruotare la manopola del livello REC per
abbassare
livello di ingresso, al fine di evitare distorsioni indesiderate.
premere il tasto REC / STOP o ERASE / PAUSE per avviare la
registrazione. Tuttaviq, se si preme il tasto Mode cancellera la
registrazione per tornare alla modalita registratore.
E possibile mettere in pausa la registrazione premendo il tasto ERASE / pausa.
I" Indicatore REC lampeggera e,premendo di nuovo si riprendera la
registrazione.
Per interrompere la registrazione, € possibile premere il tasto REC / STOP e il file
verrd memorizzato nel la memoria interna o sulla scheda SD.
Nota: Ci sono tre ingressi per la registrazione (microfono interno, microfono
esterno,line-in), verra visualizzato sul display LCD,la sorgente di registrazione
corrente
P12
IT-10
Riproduzione di un file
Selezionare una cartella da REPEAT premendo il tasto /
FOLDER
e selezionare un file. Nome file / durata. / posizione verrá
visualizzati sul display LCD come immagine a destra.
Premere il tasto PLAY / STOP per la riproduzione
premere il tasto ERASE / PAUSE per la pausa. Premere
PLAY / STOP per fermare il brano.
.Premere "+ / - per
regolare il volume dellaltoparlante "0 " e
x
minimo e "31" ë volume massimo.
il volume
® Tenere premuto il tasto "avanti per eseguire
Avanti veloce durante la riproduzione di un file.
* Per un ascolto privato, collegare un auricolare al
jack delluscita cuffie
Repeat Mode
-
C31 C=
10/10 00:40<
@ FOLDER D
REC0010.wav -—
So
N
—
Play Playback e Repeat
Ci sono quattro modi di riproduzione nell' HRS
Premere i pulsanti Repeat/Folder per passare da Repeat
one....Repeat all,
Riproduzione normale e Intro Play mentre la riproduzione e' in
corso. Quindi lindicatore REPEAT mostrera' sul display in basso
a sinistra e questo settaggio rimarra' finche' non tornerete
nell'alira modalita'
Le impostazioni di fabbrica sono:
N
у
(31
10/10 00:40
@& FOLDER D
REC0010.wav
SO <=
N
N ota:
ripetutamente
ultimo ordinato allinterno di questa cartella di file .
Se
A/B Looping
Durante la riproduzione, premere REPEAT / FOLDER
per impostare il punto di partenza "A", visualizzato sul
in basso a sinistra del display LCD, quindi premere REPEAT /
FOLDER
di nuovo per impostare il punto finale "В",
visualizzato in basso a sinistra del display LCD.
HR-5 sard manterrá quindi il ciclo (loop) dal punto A al punto B.
quando si premera il tasto REPEAT / FOLDER nuovamente, si
riprenderá quindi la riproduzione normale
11-11
Ripeti uno Se : Riproduzione del file corrente selezionato ripetutamente;
Ripeti tuttoc3 es : Riproduzione di tutti | file contenuti nella cartella corente
Ascolta normalmente «3 as : Riprodurre il file selezionato solo per una volta;
Intro Play «3 am : Riproduzione i primi 10 secondi di ogni file da quella attuale al
4 \
(31 a
» 02 00:00:04
PUR ER II PI rr II Er _A0
& \FOLDER D
REC0010.wav
« SO EAs zZ
Cancellare un File e Settaggi della registrazione
Cancellare un file
Selezionare il file desiderato e premere una volta il tasto
ERASE / PAUSE
e selezionare "SI" per l'eliminazione del file o "NO" per
annullare premendo il tasto o premere il tasto PLAY /
STOP per confermare leliminazione.
delete
REC00017. wav
АЙ
M oa
Kal bobo | No | Yes
E " |, f+ 1
* per la cancellazione di tutti i file allinterno di una
cartella di file fare riferimento
Settaggi per la registrazione
In modalita registrazione, premere il tasto Mode per visualizzare l'impostazione Recorder e selezionare
un'impostazione
e quindi premere il tasto PLAY / STOP o per entrare nelle impostazioni del menu.
Confermare limpostazione tramite il tasto PLAY / STOP, quindi premere Mode per
tornare al menu superiore..
-
Recorder
ESOS Recorder
+ File Format Er
VOX Setting
* MIC ALC
\_ J * Edit Function
* Save To
* Clean Up
N
Setting instructions .
1. Qualita:
Se siimposta il formato WAV: per un migliore qualita’ scegliere 96k
Frequenza di campionamento e 24 bit
Se lo si imposta il formato MP3, HP è la migliore
qualita (192 kbps € per Stereo, 128kbps € per Mono).
* Migliore e la qualita di registrazione piu spazio occupera nella
memoria
2. File Format : Ci sono due tipi di formati (MP3 - WAV)
3. VOX Setting : E possibile attivare il VOX (registrazione vocale) o impostare il livello di registrazione VOX
Recorder
* Edit Function
* Clean Up
* Delete Folder File
Quality
* MP: 128/9%6Kbps
* SP:96/64Kbps
q * LP:64/32Kbps
4. MIC ALC: E possibile attivare la funzione Auto-Mic Level-Control. Il livello di ingresso sara
controllata automaticamente da HR-5
La registrazione partird automaticamente al termine del conto alla rovescia
Notes: Quando ALC e ON, il livello di ingresso e disabilitato.
5. Delay Recorder : possibile regolare la registrazione dopo un conto alla rovescia dai 5a 60 sec
6. Save to: E possibile selezionare la registrazione «allinterno della memoriano «SD Card»
[T-12
Recorder setting e Main menu
7. Edit Function : Impostare la funzione Split o Taglia, "split"o "cut" f )
verranno visualizzato sul display LCD. taa
<A> Split : Durante la riproduzione di un file, premere il tasto A-B per 1 0/1 0 0 0 4 0
selezionare il punto di divisione. & FOLDER D
REC0010.wav
| Sm sum
<B> Cut : Durante la riproduzione di un file, premere una volta il tasto - 1
per selezionare il punto A, A-B {31 (=
L' icona viene visudlizzata sul display LCD, premere il secondo > 02 00:00:04
Nuovamente il tasto AB per selezionare B. Quindi selezionare "si" per OT rt 0
tagliare dal punto A al B. FOLDER D
REC0010.wav
5 OD EI CUT 9
8. Clean Up : Questa funzione € per aggiornare la lista dei file registrati e per tornare alla
modalitá registrazione
9. Delete Folder File : Cancella tutti | file della cartella
10. Continue Last Playback :
Continua la registrazione precedente se si arresta la riproduzione di un file precedente, in caso
contrario tornera alla modalità
Menu Principale e Funzioni basi
Tenere premuto il tasto MODE per 3 secondi per tornare al 7 x
menu principale il tempo corrente della traccia sara
visualizzata sul display LCD 00 . 30 . 51 [|
in alto a sinistra, come nellimmagine a destra.
Recorder
E possibile selezionare l'indice del menu premendo il tasto Mus 1 C
il tasto PLAY / STOP per entrare. Too 1 box
Selezionare Recorder per tornare alla modalità
registratore
Selezionare Music per entrare in modalita musica, e seleziona
medialib
Update per aggiornare l elenco dei brani. Questa operazione
potrebbe richiedere 1-2 minuti.
1. All Music : Tutti i file registrati e la musica scaricata (Music
vengono vsualzzal. Al Music
2. Artist : Tutti i file musicali sono in ordine di artista * Artist
nel formato mp3 info ID3 ad eccezione dei file di registrazione. * Album
3. Album : Tutti i file musicali sono ordinati per album * Genre
nel formato mp3 info ID3 ad eccezione dei file di registrazione. \
11-13
Music Setting and System Setting
4. Genre : Tutti i file sono ordinati per genere di informazioni ID3 MP3.
4 : N
5. Dir List : Tutti i file musicali scaricati sono mostrati qui. (tranne | Music
file di registrazione). * Dir List
et a as * Record
6. Record : Tutti ¡file di registrazione sono qui mostrati. E.
* Medialib Update
7. Medialib Update : aggiorna la lista dei filei. Play Set
\ J
8. Play Set : PlayMode ,Repeat One - All Repeat - Intro Play ~ order (Play Normally ) ;
EQ select : E possibile selezionare fino a 7 preset di equalizzazione per la
riproduzione di musica MP3:
<1> Nessun effetto ; <2>Pop Music ;<3> Rock ; <4> Dance ;
<5> Jazz ; <6> Classic ;</> Speech.
* Impostazione di fabbrica € "senza effetti” ” .
3D select: E possibile selezionare fino a 8 effetti 3D preset per la
riproduzione di musica MP3:
<1> Turn off tone ; <2> Generic ;<3> Studio ; <4> Cathedral ;
<5> Concert hall ; <6> Submerge ; <7> Interior ; <8>Psychotic .
Impostazione di fabbrica e "senza effetti ".
N
. . ( System Setting
1. Time Setting: Imposta data e ora dell' HR-5, il formato di visualizzazione &
“Anno / mese / giorno ora: minuti”, per impostare il valore usare i Time Setting
Tasti SU e GIU ‘ quindi premere Next e
PREV per selezionare un altro elemento. * Schedule Record
* Timing Shutdown
« * Backlight Time
O,
2.Schedule Record:
E possibile programmare una registrazione in un determinato
periodo di tempo desiderato cliccando «Schedule Record». a N
- Premere UP / DOWN per programmare Schedule Record
Tutti i giorni / Una volta o spegnere la programmazione
- Premere NEXT per regolare il periodo di tempo Every Day
- Premere UP / DOWN per regolare lora di inizio desiderata
fra 0:00-23:59 From 09:10
- Premere NEXT per regolare lora di fine desiderata ,
tra 0:00-23:59 « lo 10:00 В
- Premere MODE per uscire da «Schedule Record»
e tornare al menu principale
- Un'icona verra mostrata sullo schermo nella modalita di
registrazione
3. Timing Shutdown : Programma lo spegnimento automatico con un timer le scelte sono "OFF,
10 minuti, 30 minuti e 1 ora.
* Impostazione di fabbrica e OFF..
4. Backlight Time : Impostare il timer automatico della retroiluminazione dell’ LCD da "Always On", 5
sec., 10 sec., 15sec. 20 sec., 30 sec.
* Impostazione di fabbrica e sempre "Always On”
5. Languages : Ci sono quattro lingue per il menu. Inglese, cinese semplificato, Cinese tradizionale
e Giapponese.
* L impostazione di fabbrica e linglese
11-14
System Setting e connessione al pc
6. Device Information: Mostra tutte le informazioni di HR-5..
( ; N
7. Recover System : Ripristinare l'unità alle impostazioni di System Setting
fabbrica * Languages
8. Format U Disk: * Device Information
Formatta la memoria interna del HR-5 e tutte le registrazioni
saranno perse. * Recover System
. Notes: Si prega di installare il software di backup Magix Audio EE TAE:
Clenic SE prima di formattare l'HR-5. \ J
NOTE IMPORTANTI
-Una volta che lunita e formattata i file non possono essere recuperati.
“|| processo di formattazione impieghera circa 20 secondi. Durante la
formattazione tutti i tasti non sono affivi
Download e upload | files dal PC
Collegare 'HR-5 ad un computer mediante il cavo USB incluso .
Copiare (registrare) file su un disco rimovibile o computer, o copiare i file musicali per il vostro HR-5
secondo cartella / album / Artist / genere
HR-5 supporta ¡ formati MP3, WAV, WMA, FLAC, AAC, OGG
Dopo aver terminato | operazione, scollegare l'unita dal PC.
PULIZIA E MANUTENZIONE
Resettare l'Unità
Se l'apparecchio è esposto ad una forte carica di elettricità statica, l'unità si potrebbbe bloccare, o il display
LCD si potrebbe oscurare. Questo € raro ma se dovesse succedere, basta rimuovere le batterie, poi
reinstallarle e tutte le impostazioni torneranno ali valori originali.
TRAFFIC SAFETY
. Non Utilizzare durante la guida di un veicolo a motore potrebbe causare un incidente stradale ed e
ilegale in alcuni paesi.
. Anche se il vostro auricolare e progettato "open-air' assicurarsi di udire ¡ suoni esterni,
non alzare il volume cosi alto che non si possa sentire la voce di altri intorno a se.
. Usare con estrema cautela o mettere in pausa temporaneamente in situazioni di possibile incidente.
PULIZIA
. Tenere l'unita asciutta. Se si bagna, asciugarla immediatamente. ll liquido puo contenere minerali che
potrebbero corrodere i circuiti.
. Utilizzare l'unità solo in ambiente a temperatura normale, temperature estreme possono ridurre la
durata dei dispositivi elettronici, danneggiare le batterie e / o fondere le parti in plastica.
. Tenere I'apparecchio lontano da polvere e sporco.
. Maneggiare l'unitá con cura. La caduta puo provocare danni e causare il funzionamento in modo
improprio.
. Pulire l'unità con un panno umido.
. Non utilizzare detergenti corrosivi chimici per la pulizia.
IT-15
Specification
Main Unit Specification
Recording File Linear PCM (Pulsed Code Modulation) in WAV format
MP3 (MPEG-1/MPEG-2 Audio Layer3)
Memory Build in 2GB NAND Flash Mmeory
Support SD(16MB-2GB) and SDHC (2GB ~ 32GB) memory card
Display 35mm x 20mm with 128dot x 64dot
Display backlight
Recording Format | PCM (WAV) Met i(r2 ii ME
Sampling Frequency 16 / 22.05 / 24 / 32 / 44.1 / 48 / 96kHz
Bit rate 32, 64, 96, 128, 192 kbps,
=
®
Спаппе! Stereo / Mono
2GB
2 x dia. 9mm high senstivity full range Microphone
2 x 16mm full range speaker
Maximum File Size
Bulid-in Microphone
Build-in Speaker
VOX
<
E
Output power 2 x 100mW @ 16 ohm
Microphone Jack 3.5mm Stereo Mini jack, impedance 2K ohms, input level
0 dBm ~-60dBm
Line-In Jack 3.5mm Stereo Mini jack, impendance 10K ohms, input level
+6 dBm ~-20dBm
Earphone Jack 3.5mm Stereo Mini jack, 2 x 10mW @ impedance 32 ohms,
US Mini-B Type (USB2.0 High Speed Compatible)
Power Soruces 2 x AA (LR6) Alkaline Battery
AC adaptor 5V
9 hours for recording and 10 for playback
112 mm x 21 mm x 60mm
76g (without battery)
Accessories USB cable / Line out cable / earphone / Stand /battery
Battery Life (Alkaline battery)
Unit size
Le specifiche sono soggette a modifiche senza preavviso.
Smaltimento delle vecchie apparecchiature elettriche ed elettroniche (applicabile in tutti Unione europea e altri paesi europei con la
raccolta differenziata)
Questo simbolo sul prodotto o sulla confezione indica che il prodotto non deve
essere trattato come rifiuti domestici. Ma deve essere consegnato al
punto di raccolta per il riciclaggio di apparecchiature elettriche ed elettroniche. Assicurarsi che questo prodotto sia
smaltito correttamente, voi contribuirete a prevenire potenziali
conseguenze negative per ambiente e la salute umana, che potrebbero
altrimenti essere causati da uno smaltimento inadeguato del prodotto. ll riciclaggio
dei materiali aliuta a conservare le risorse naturali. Per informazioni più dettagliate
sul riciclaggio di questo prodotto, si prega di contattare il locale ufficio comunale, il
smaltimento dei rifiuti domestici o il negozio dove avete acauistato il prodotto.
11-16
Installazione di Magix Audio Cleaning Lab SE
1. Collegare HR-5 al PC tramite il cavo USB incluso
2. HR-5 verra visualizzato come un disco nel vostro PC
(appariranno 2 unita, una e per la memoria interna ed una e per la
Scheda di memoria SD)
= Hemovable Drive (F:) — Removable Drive (G:)
3. Selezionare l'unita e fare clic su cartella [Magix Audio Cleanic SE]
| Г MUSIC | = RECORD J
4. Fare doppio clic sul start.exe
9 *» ©
addon: autorun taf start exe
ETE MAT ET ECO
5. Fare clic su "Install" in alto a sinistra
г CEng ind Tir ул
sro Em ao a ll Brn le ah ETL par nora bi dr Er
che da ne
Your AAACTX (eam
Far E hsm prog de af d 1
6. Sceglere la lingua
bn. MAGIX Audio Cleaning Lab SE В
browse CD ; | ne! £
Reger be LS
Vera rage DOTE
NPA
724 ыы“
Te
7. Fare clic su "Avanti ” per continue e spuntare la casella per confermare laccordo
Felenme
ES | EEES
Welcome lo MAGDX Auda Cleaning Lab 5 Es LE =-
т
computer Т
AUDIO EE te EXE AUDIO
CLEANING Lab ap paire | OUAIS Las
WARNING: The progism ii protected Ey copysght law: and
inlmnatinnal nating.
Unauthonzed inprociuchon ordetmbubtnn ol His program, or any
| postion of, me resul in pewere Civil amd € WE
№
=|
Re | arcept e erfand berne And OP
11-17
8. Selezionare il tipo di installazione e fare clic su "Avanti" per continuare
Select installation type >] |
Choose how MAGIA Audio Cleaning Lab SE and other private
user data from various User accounts should be used on the
computer.
AUDIO
CLEANING Lab
IW Private [Standard]
Each user account provides exclusive access to its
program settings and user data.
[Shared
Every user account has access to the same program
settings and user data.
9. Fare clic su "Next per confermare la cartella di installazione e spuntare la casella se si vuole la
scelta rapida sul Desktop, quindi premere “Next” per continuare
Select target paths xl Create link |X|
[=] The program components are saved in the folders listed below. Do you want to create a link for MAGIX Audio Cleaning Lab SE
[=] on your desktop?
IF you wish to specify other storage areas, please click on
"Browse",
AUDIO AUDIO
CLEANING Lab CLEANING Lab
Program file Browse I Create ink on desktop
sen Fles\MAG Audio Cleanng_ Lab 15 SE |
В andelfecte— Browse
CA. AMAG Audio Cleaning Lab 15 SE
User file Browse
ex Documents*MÁG E Audio Cleanina_ Lab 15 SE
в Сапсе! | < Back. | Мех! > | Cancel |
10. Deselezionare la casella se non si desidera effettuare la registrazione online e cliccare su
"Avanti per continuare
Regizter online |x| |
. . . You are now ready to install MAGE Audio Cleaning Lab SE.
[=] You can register via the Internet. Only registered customers are
vis lts eun ves Mau es er: span Press the Hest button to begin the installation or the Back
button to re-enter the installation information.
Start installation ES |
Furthermore, your registration ensures that you are kept up to
AUDIO date at all times.
AUDIO
CLEANING Lab CLEANING Lab
+ Register online
Cancel
e yo e
11. Avviare l'installazione
Installation complete >]
_ ; | =] MAGES Audio Cleaning Lab SE has been successfully installed.
MAGIA Au d lo Cleanin q La b SE Press the Finish button to exit this installation.
a AUDIO
CLEANING Lab
EE x)
6 AD ES EC
CNAE ENEE
Installation pro peer: 79 E
NOTE: Se la memoria dell” HR-5 e formattata o eliminata prima dellinstallazione, il Magix Audio
Cleanic SE non puo recuperare, installare o eseguire il backup dell' HR-5
11-18