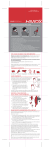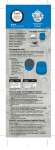
1
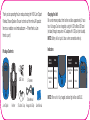
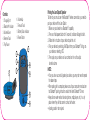
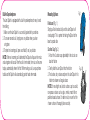
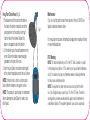
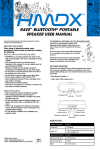
One Year Limited Warranty
For detailed Warranty Instructions and Information visit: http://www.hmdxaudio.com/
products/jam-wireless-portable-speaker.html. To obtain warranty service on your HMDX
product, contact a Consumer Relations Representative by telephone at 1-800-753-3000 or
email [email protected] for assistance. Please make sure to have the model number
of the product available. Representatives are available 8:30am–7:00pm EST Monday–Friday.
SPLASH
Por manual de instrucciones e Información de garantía en español visítenos en
www.hmdxaudio.com
HMDX Jam and HMDX are trademarks of HMDX.
©2013 HMDX. All Rights Reserved.
IB-HXP530
PLEASE TAKE A MOMENT NOW
AND REGISTER YOUR PRODUCT AT:
www.hmdxaudio.com
Your valuable input will help us create
even better products in the future.
SHOWER SPEAKER AND SPEAKERPHONE
USER GUIDE AND WARRANTY INFORMATION
Thank you for spreading the Jam and purchasing the HMDX Jam Splash
Wireless Shower Speaker. Be sure to check out the entire JAM product
line on our website: www.hmdxaudio.com — Where there’s a Jam
there’s a party!
Charging the Unit
Be sure to remove product from holster and allow approximately 3 hours
for a full charge. Can be charged by using the USB to Micro USB cord
(included) through computer or AC adapter with USB jack (not included).
NOTE: Battery will last up to 8 hours when connected wirelessly.
Package Contents
Indicators
Jam Splash
Holster
USB Cord
2 Fasteners
3 Suction Cups
Showerhead
Hangcord & Grip
Battery
Indicator
Status
Bluetooth®
Indicator
Dancing BLUE
Charging
Quickly Flashes
BLUE
Pairing Mode
Slow Blinking
BLUE
Low Battery
Solid BLUE
Paired
Status
NOTE: When unit is fully charged, indicator light will be solid BLUE.
User Manual
Controls
6. Volume Up
7. Forward Track
8. Battery Status Indicator
9. Power Button
1. Charging Port
2. Bluetooth® Indicator
3. Volume Down
4. Reverse Track
5. Play/Pause
2
3
1
4
5
6
7
8
9
Pairing the Jam Splash Speaker
To listen to your music over the Bluetooth® wireless connection, you need to
pair your device with the Jam Splash:
1. Make sure your device has Bluetooth® capability.
2. Press and hold power button for 5 seconds; indicator will begin to flash.
3. Follow the instructions of your device to pair the unit.
4. Pair your device by selecting JAM Splash from your Bluetooth® listings on
your device or selecting YES.
5. Press play on your device and use controls on the unit to adjust
desired volume.
NOTE:
•Once you have successfully paired your device, you may not need to repeat
the above steps.
•When pairing with a computer, please consult your computer manufacturer
for Bluetooth® pairing instructions and/or the latest Bluetooth® Drivers.
•Keep all non-water-resistant devices (phones, mp3 players, etc.) in a dry
place where they will not come in contact with water.
•A pairing code is not required.
Built-In Speakerphone
The Jam Splash is equipped with a built-in speakerphone, for easy hands
free talking:
1.Make sure the Jam Splash is successfully paired with y our device.
2.To answer or end a call, simply press any button when you hear
a ringtone.
3. To reject an incoming call, press and hold (5 sec.) any button.
NOTE: When an incoming call is detected, the Splash will pause the music
and a ringtone will sound. After the call is terminated, the music will resume
to play automatically where it left off. When making a call, use your phone
to dial and the Splash will automatically go into hands free mode.
Mounting Options
Fig. 1
Kickstand (Fig. 1):
Simply pull kickstand out fully and the Jam Splash will
stand upright. This is perfect for taking the Splash to the
beach or pool side.
Suction Cup (Fig. 2):
1. Attach the 3 suction cups (provided) in the cut outs on
back of holster.
2. Gently slide the Jam Splash into the holster.
Fig. 2
3. Find a clean, dry surface and press the Jam Splash in its
holster to shower wall or glass door.
NOTE: For an airtight seal, attach suction cups to a solid,
non-porous surface such as glass, metal, smooth tile or
polished wood surfaces. For best results, ensure that the
shower surface is thoroughly clean and dry.
Hang From Showerhead (Fig. 3):
1. Thread one end of the cord into the hole on
the side of the holster and attach one of the
spring fasteners to the cord by inserting it
into the hole in the fastener. Repeat this
process on opposite side of the holster.
2. Lift the holster up by the cord to determine the
center. Secure the rubber showerhead grip
(provided) to this part of the cord.
3. Insert the Jam Splash into holster and hang off
of the shower head pipe close to the wall surface.
NOTE: For best results, attach a suction cup to
back of holster and press unit against surface.
NOTE: This product is splash proof, not waterproof.
Never submerge the Jam Splash in water or any
other liquid.
Fig. 3
Maintenance
Only use a soft dry cloth to clean the enclosure of the unit. NEVER use
liquids or abrasive cleaner to clean.
Por manual de instrucciones e Información de garantía en español visítenos
en www.hmdxaudio.com
FCC Warning
NOTE: This device complies with part 15 of the FCC Rules. Operation is subject
to the following two conditions: (1) This device may not cause harmful interference,
and (2) this device must accept any interference received, including interference
that may cause undesired operation.
NOTE: This equipment has been tested and found to comply with the limits
for a Class B digital device, pursuant to part 15 of the FCC Rules. These limits
are designed to provide reasonable protection against harmful interference in
a residential installation. This equipment generates, uses and can radiate radio
frequency energy and, if not installed and used in accordance with the instructions,
may cause harmful interference to radio communications. However, there is no
guarantee that interference will not occur in a particular installation. If this equipment
does cause harmful interference to radio or television reception, which can be
determined by turning the equipment off and on, the user is encouraged to try to
correct the interference by one or more of the following measures:
• Reorient or relocate the receiving antenna.
• Increase the separation between the equipment and receiver.
• Connect the equipment into an outlet on a circuit different from that to which the
receiver is connected.
• Consult the dealer or an experienced radio/TV technician for help.
Changes or modifications not expressly approved by HMDX could void the user's
authority to operate the equipment.
IMPORTANT SAFEGUARDS:
When using an electrical product, basic precautions should always be followed,
including the following:
READ ALL INSTRUCTIONS BEFORE USING
• WARNING: Do not place speakers too close to ears. May cause damage to ear
drums, especially in young children.
• Use this product only for its intended use as described in this manual. Do not use
attachments not recommended by HMDX.
• HMDX is not liable for any damage caused to Smartphones, iPod/MP3 player
or any other device.
• Do not place or store this product where it can fall or be dropped into a tub or sink.
• Do not submerge into water or any other liquid.
• Not for use by children. THIS IS NOT A TOY.
• Never operate this product if it has a damaged cord, plug, cable or housing.
• Keep away from heated surfaces.
• Only set on dry surfaces. Do not place on surface wet from water or
cleaning solvents.