1
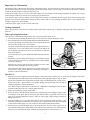
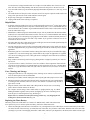
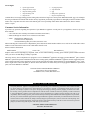
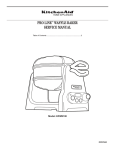
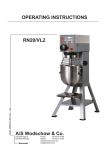
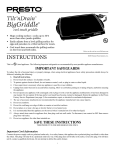
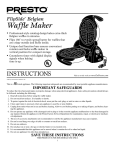
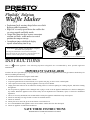
FlipSide™ Belgian Waffle Maker • Professional-style rotating design bakes extra-thick Belgian waffles in minutes. • Flips 180˚ to evenly spread batter for waffles that are crispy outside and fluffy inside. •Unique dual function base assures convenient rotation and locks waffle maker in vertical position for compact storage. •Countdown timer with digital display signals when baking time is up. Estas instrucciones también están disponibles en español. Para obtener una copia impresa: • Descargar en formato PDF en www.GoPresto.com/espanol. • Envíe un mensaje de correo electrónico a [email protected]. • Llame al 1-800-877-0441, presione 2 y deje un mensaje. Visit us on the web at www.GoPresto.com Instructions ©2012 National Presto Industries, Inc. This is a Listed appliance. The following important safeguards are recommended by most portable appliance manufacturers. IMPORTANT SAFEGUARDS To reduce the risk of personal injury or property damage, when using electrical appliances, basic safety precautions should always be followed, including the following: 1. Read all instructions before using the waffle maker. 2. Do not touch hot surfaces. Use handles or knobs. 3. To protect against the risk of electrical shock, never put the cord, plug, or unit in water or other liquids. 4. Close supervision is necessary when any appliance is used by or near children. 5. Unplug from outlet when not in use and before cleaning. Allow to cool before putting on or taking off parts, and before cleaning the appliance. 6. Do not operate any appliance with a damaged cord or plug or in the event the appliance malfunctions or has been damaged in any manner. Return the appliance to the Presto Factory Service Department for examination, repair, or electrical or mechanical adjustment. 7. The use of accessory attachments not recommended or sold by the appliance manufacturer may cause injuries. 8. Do not let cord hang over edge of table or counter or touch hot surfaces. 9. Do not use outdoors. 10. Do not place on or near a hot gas or electric burner or in a heated oven. 11. It is recommended that this appliance not be moved when it contains hot oil or other hot liquid. 12. Do not use appliance for other than intended use. SAVE THESE INSTRUCTIONS This product is for household use Only. 1 Important Cord Information This appliance has a polarized plug (one blade is wider than the other). To reduce the risk of electric shock, this plug is intended to fit into a polarized outlet only one way. If the plug does not fit fully into the outlet, reverse the plug. If it still does not fit, contact a qualified electrician. Do not attempt to modify the plug in any way. A short power supply cord (or cord set) is provided to reduce the risk resulting from becoming entangled in or tripping over a longer cord. Extension cords may be used if care is properly exercised in their use. If an extension cord is used, the marked electrical rating of the extension cord should be at least as great as the electrical rating of the appliance. The extension cord should be arranged so that it will not drape over the countertop or tabletop where it can be pulled on by children or tripped over unintentionally. Connect the power supply cord to a 120VAC outlet only. Getting Acquainted Before using for the first time, become familiar with the waffle maker features (Fig. A). Wipe the waffle grids with a damp cloth before initial use. Timer Operating Instructions Note: The timer works independently from the unit; it does not turn the unit on or off. 1. Activate the timer by holding the button (Fig. A) down until 00 is visible in the display screen. 2. Press the button once for each individual minute or hold the button down to increase the display time rapidly until you have reached the desired time. The timer can be set for 1 to 30 minutes. The timer will automatically begin counting down approximately two seconds after it is set. Note: Shortly after you depress the button, the time remaining will flash on the screen. It will continue to flash until the time has elapsed. To reset the timer to zero, press and hold the timer button for about two Waffle grids seconds. 3. When there is just one minute left on the timer, you will hear two beeps to alert you that time is almost up. In addition, the seconds remaining will now be displayed. When the set time has expired, the timer will beep five times. After about one minute, the display screen will go blank. Red locking lever Note: If the timer does not beep, this can be corrected by simply removing the battery, wiping it clean, and then reinserting it. (See pages 3-4 for battery removal instructions.) Fig. A Hinged base Signal light Timer display Timer button How To Use 1. Place the unit on the countertop so the timer display is facing towards you and the cover is closed (Fig. B). Plug the cord into an outlet and preheat the waffle maker in the closed position. The signal light will glow (Fig. A). When the unit has reached the correct temperature, the light will go out indicating the unit is ready for use. Fig. B Preheat time is short – approximately 3 to 5 minutes. During cooking, the light will go on and off indicating temperature is being maintained. Note: When using the waffle maker for the first time, a slight odor or smoking may occur as manufacturing residue burns off. This is normal during initial use. 2. While unit is preheating, prepare waffle batter. 3. Before the first use after the unit has preheated, use a brush or paper towel and apply a light coating of cooking oil to the grids. The oil seasons the grids and thereafter you typically will not need to Fig. C apply oil. If you find it difficult to remove a waffle, be sure to apply a light coating of cooking oil during your next use. 4. Pour approximately ¾ to 1 cup waffle batter into the center of the bottom waffle grid (Fig. C). The amount of waffle batter needed may vary with the recipe or brand of batter mix used. If using the recipes in this booklet (pages 4-5), refer to them for the recommended amount of batter. 5. Set the timer by pressing the button (Fig. A) to the desired time. See the recipes on pages 4-5 for recommended cooking times. Most waffle recipes will take about 4 minutes. Note: The timer has a delay start; it will automatically begin counting down approximately 2 seconds after it is set. 2 To reset the timer, simply hold the button for a couple of seconds and the timer will reset to zero. Note: The timer works independently from the unit; it does not turn power to the unit on or off. 6. Close the waffle maker (Fig. D) and while grasping both handles flip the unit over 180˚ (Fig. E and Fig. F). 7. The waffle maker will beep five times when the set time has expired. Open the waffle maker and using a fork spear the side of the waffle and lift it from the grids. 8. Repeat steps 4 through 7 for additional waffles. 9. Unplug waffle maker when cooking is completed. Fig. D Fig. E Helpful Hints * If desired, packaged waffle mixes may be prepared and baked in the Presto waffle maker. Batter made from some packaged mixes may have a shorter baking time, so it is recommended that you check for doneness after 2 minutes. A good indication that the waffle is done is when steam escaping from the waffle maker stops. * Waffle batters, whether using mixes or homemade recipes, will vary and therefore the amount of batter needed for an evenly filled waffle without overflow will vary. It is recommended that when making the first waffle you use a measuring cup to gauge how much batter is needed. Generally between ¾ and 1 cup works best. Never use more than 1 cup of batter. If you get some overflow, be sure to use less batter for the next waffle. * For batters that don’t flow when poured onto the waffle grid, use a heat-resistant spatula and spread out the batter evenly to the edges of the grid. * No-stick cooking sprays may be used to season the waffle maker. However, the waffle may not have a nice brown appearance like you get when using cooking oil. Instead, the waffle may have a mottled appearance. * Because the grids are covered with a nonstick coating, there will be only an occasional need to apply vegetable oil or a no-stick cooking spray. Dessert batters may require an application of vegetable oil or no-stick cooking spray to the waffle grids before cooking the first waffle and as needed for additional waffles. * Keep waffles warm and crisp until serving by placing them in a single layer directly on a rack in a 200˚F oven. * If you have leftover waffles, freeze them. Cool extra waffles to room temperature. Place them between layers of waxed paper in a resealable plastic freezer bag and freeze for up to 1 month. When ready to serve, pop the frozen waffles into your toaster or reheat in an oven at 350˚F for about 10 minutes. Care, Cleaning, and Storage 1. Unplug unit and allow to cool completely before cleaning. Never immerse waffle maker in water or other liquid or wash in a dishwasher. 2. Brush any loose crumbs from the waffle grids. Then wipe the grids with a paper towel or cloth. 3. Should any batter become baked onto the grids or the outside of the unit, pour a small amount of cooking oil onto the batter. Allow it to sit for a few minutes to soften and wipe off with a paper towel or cloth. 4. Wipe the outside of the waffle maker with a damp cloth. Do not use steel wool scouring pads or abrasive kitchen cleaners on the unit. 5. For compact vertical storage, rotate waffle maker to upright position (Fig. G). While holding the handles together, lock in position by flipping up one of the red locking levers from the grooves in the hinged base (Fig. H and Fig. I). Before next use, remember to unlock from storage position (Fig. I) by dropping the red locking levers back in towards base (Fig. H). Fig. F Fig. G Red locking lever Red locking lever Groove in hinged base Red locking lever in unlocked position Red locking lever in locked position Fig. H Fig. I Replacing the Timer Battery The battery used in the waffle maker is a CR2032 3V lithium battery which will seldom need to be replaced. If you ever need to replace the battery, follow the instructions below. 1.On the left and right side of the timer is an undercut. Use your fingernail or insert a thin object (such as a butter knife) in the undercut on the left side of the timer (Fig. J) and lift that side of the timer away from the waffle maker. Hold that side of the timer with your finger, to prevent it from slipping back in the waffle maker, and insert your fingernail (or the knife) in the undercut on the right 3 2. 3. 4. 5. 6. side of the timer and lift that side away from the waffle maker. Now Fig. K Fig. J pull the timer out completely from the opening in the waffle maker (Fig. M). Undercut Battery Turn the timer over so the back side is facing up. Using your thumb, compartment cover Timer remove the battery compartment cover by sliding it in the direction the arrow is pointing (Fig. K). Using a small paring knife, or some other narrow object, carefully press near the top of the interlock spring towards the wall of the timer to release the battery from under the hooks (Fig. L). Use the tip of the Fig. M Fig. L knife to remove the battery and discard. Interlock spring Notch Rib Hooks Position new CR2032 3V lithium battery, with writing facing up, in compartment fitting it underneath the plastic edge (Fig. L). Push Plastic edge battery down on the side by the interlock spring until the battery snaps into position under the hooks. Replace battery cover. Holding the cover with your thumb on the arrow, fit the sides of the cover in the grooves on the timer and slide the door towards the interlock spring. Turn the timer over and press the button to make sure it is operating. Place the timer back in the waffle maker by aligning the rib on the timer with the notch in the opening on the side of the waffle maker (Fig. M). Push the timer in so it is securely positioned. Recipes Classic Waffles 2 1 1 ¼ cups all-purpose flour tablespoon sugar tablespoon baking powder teaspoon salt 1¾ cups milk 2 eggs 2 tablespoons vegetable oil Combine flour, sugar, baking powder, and salt in large bowl. Whisk milk, eggs, and oil in medium bowl. Whisk milk mixture into dry ingredients just until dry ingredients are thoroughly moistened. Preheat waffle maker. Pour 1 cup batter onto the center of the bottom grid. Close top and flip waffle maker. Bake until brown, about 4 minutes. Makes 4 waffles Flavorful Whole Grain Waffles (Both delicious and healthy) 1 ¾ ½ 1 1 cup all-purpose flour cup whole wheat flour cup quick cooking oats tablespoon brown sugar tablespoon baking powder ¼ 2 2 2 teaspoon salt cups milk eggs tablespoons vegetable oil Combine flours, oats, brown sugar, baking powder, and salt in large bowl. Whisk milk, eggs, and oil in medium bowl. Whisk milk mixture into dry ingredients just until dry ingredients are thoroughly moistened. Allow batter to rest 5 minutes. Preheat waffle maker. Pour scant 1 cup batter onto the center of the bottom grid. Close top and flip waffle maker. Bake until waffle is brown, about 4 minutes. Makes 4 waffles Fluffy Waffles 1¾ cups all-purpose flour 1 tablespoon baking powder ¼ teaspoon salt 1¾ cups milk 2 eggs, separated 2 tablespoons vegetable oil Combine flour, baking powder, and salt in large bowl. Whisk milk, egg yolks, and oil in medium bowl. Whisk milk mixture into dry ingredients just until dry ingredients are thoroughly moistened. Using electric mixer beat egg whites in small bowl until stiff. Fold whites into batter, leaving a few fluffs. Preheat waffle maker. Pour 1 cup batter onto the center of the bottom grid. Close top and flip waffle maker. Bake until brown and crisp, about 4 minutes. Makes 4 waffles 4 Pecan Waffles 2 2 2 1 ¼ cups all-purpose flour tablespoons brown sugar teaspoons baking powder teaspoon baking soda teaspoon salt ¼ 2 2 3 ½ cup chopped pecans cups buttermilk eggs tablespoons vegetable oil teaspoon maple flavoring Combine flour, brown sugar, baking powder, baking soda, and salt in a large bowl. Stir in pecans. Whisk buttermilk, eggs, oil, and maple flavoring in medium bowl. Whisk milk mixture into dry ingredients just until dry ingredients are thoroughly moistened. Preheat waffle maker. Pour 1 cup batter onto the center of the bottom grid. Close top and flip waffle maker. Bake until brown, about 4 minutes. Makes 4 waffles Consumer Service Information If you have any questions regarding the operation of your Presto appliance or need parts for your appliance, contact us by any of these methods: • Call 1-800-877-0441 weekdays 8:00 AM to 4:00 PM (Central Time) • Email us through our website at www.GoPresto.com/contact • Write: National Presto Industries, Inc. Consumer Service Department 3925 North Hastings Way, Eau Claire, WI 54703-3703 When contacting the Consumer Service Department, please indicate the model number and the series code for the waffle maker. These numbers can be found on the bottom of the waffle maker near the cord. Please record this information: Model Number _____________________ Series Code __________________ Date Purchased __________________ Inquiries will be answered promptly by telephone, email, or letter. When emailing or writing, please include a phone number and a time when you can be reached during weekdays if possible. The Presto Factory Service Department is equipped to service all PRESTO appliances and supply genuine PRESTO parts. Genuine PRESTO replacement parts are manufactured to the same exacting quality standards as PRESTO appliances and are engineered specifically to function properly with its appliances. Presto can only guarantee the quality and performance of genuine PRESTO parts. “Lookalikes” might not be of the same quality or function in the same manner. To ensure that you are buying genuine PRESTO replacement parts, look for the PRESTO trademark. Canton Sales and Storage Company Presto Factory Service Department 555 Matthews Dr., Canton, MS 39046-3251 PRESTO Limited Warranty This quality PRESTO appliance is designed and built to provide many years of satisfactory performance under normal household use. Presto pledges to the original owner that should there be any defects in material or workmanship during the first year after purchase, we will repair or replace it at our option. Our pledge does not apply to damage caused by shipping. To obtain service under the warranty, call our Consumer Service Department at 1-800-877-0441. If unable to resolve the problem, you will be instructed to send your PRESTO appliance to the Presto Factory Service Department for a quality inspection; shipping costs will be you responsibility. When returning a product, please include a description of the problem and indicate the date the appliance was purchased. We want you to obtain maximum enjoyment from using this PRESTO appliance and ask that you read and follow the instructions enclosed. Failure to follow instructions, damage caused by improper replacement parts, abuse or misuse will void this pledge. This warranty gives you specific legal rights, and you may also have other rights which vary from state to state. This is Presto’s personal pledge to you and is being made in place of all other express warranties. NATIONAL PRESTO INDUSTRIES, INC. Eau Claire, WI 54703-3703 Form 72-919B 5