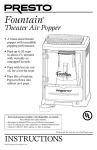
1
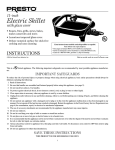
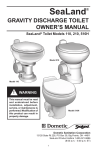
Caramel
Corn Maker
• Buttery, crunchy caramel corn as easy as 1-2-3.
Pop the corn, prepare caramel sauce, and mix—
all in the same unit.
• Makes delicious kettle corn with that
old-fashioned taste.
• Pops ups to 4.7 quarts of gourmet popcorn
in minutes.
Estas instrucciones también están disponibles en español.
maker
Para obtener una copia impresa:
• Descargue en formato PDF en www.GoPresto.com/espanol.
• Envíe un mensaje de correo electrónico a [email protected].
• Llame al 1-800-877-0441, oprima 2, y deje un mensaje.
Visit us on the web at www.GoPresto.com
Instructions
This is a
©2013 National Presto Industries, Inc.
Listed appliance. The following important safeguards are recommended by most portable appliance manufacturers.
IMPORTANT SAFEGUARDS
To reduce the risk of personal injury or property damage, when using electrical appliances, basic safety precautions should always be
followed, including the following:
1. Read all instructions.
2. A popper that is plugged into an outlet should not be left unattended.
3. Do not touch hot surfaces. Use handles or knobs.
4. To protect against the risk of electrical shock, never put the cord, plug, or popper base in water or other liquids.
5. Close supervision is necessary when any appliance is used by or near children.
6. Unplug from outlet when not in use and before cleaning. Allow to cool before putting on or taking off parts, and before cleaning
the appliance.
7. Extreme caution must be used when unloading popcorn. Always turn the unit over a countertop so that residual hot oil or water
running out will not cause burns.
8. Do not operate any appliance with a damaged cord or plug or in the event the appliance malfunctions or has been damaged in
any manner. Return the appliance to the Presto Factory Service Department for examination, repair, or electrical or mechanical
adjustment.
9. The use of accessory attachments not recommended or sold by the appliance manufacturer may cause injuries.
10. Do not let cord hang over edge of table or counter or touch hot surfaces.
11. Do not use outdoors.
12. Do not place on or near a hot gas or electric burner or in a heated oven.
13. Extreme caution must be used when moving an appliance containing hot oil or other hot liquid.
14. Do not use appliance for other than intended use.
SAVE THESE INSTRUCTIONS
This product is for household use Only.
1
Important Cord Information
• This appliance has a polarized plug (one blade is wider than the other). To reduce the risk of electric shock, this plug is intended
to fit into a polarized outlet only one way. If the plug does not fit fully into the outlet, reverse the plug. If it still does not fit,
contact a qualified electrician. Do not attempt to modify the plug in any way.
• A short power supply cord (or cord set) is provided to reduce the risk resulting from becoming entangled in or tripping over a
longer cord. Extension cords may be used if care is properly exercised in their use.
•If an extension cord is used, the marked electrical rating of the extension cord should be at least as great as the electrical rating
of the appliance. The extension cord should be arranged so that it will not drape over the countertop or tabletop where it can be
pulled on by children or tripped over.
• Connect the power supply cord to a 120VAC electrical outlet only.
Before First Use
1. Become familiar with the various parts of the caramel corn maker (Fig. A) and read and follow the instructions carefully.
2. Prior to making your first batch of popcorn, wash the popping/mixing bowl and removable cover in warm, sudsy water. Rinse
and dry thoroughly. Do not wash these parts in an automatic dishwasher.
Wipe the nonstick popping/mixing base surface with a damp cloth. Never immerse the popping/mixing base in water or any
other liquid.
Fig. A
Removable
cover
Bowl threads
Tabs
Popping/
mixing bowl
Bowl handle
Bowl handle
Rib
Rib
Groove
Groove
Base handle
Base handle
Popping/
mixing base
Nonstick popping/mixing surface
maker
2
How to Pop Popcorn
This Presto® caramel corn maker can pop different amounts of popcorn. Refer to the chart below and determine what size batch of popcorn
you want. Use the recommended amounts of popping corn and oil for that amount.
Volume of Popped Corn*
Amount of
Popping Corn
Amount of Oil
1½ to 2 quarts** (6 to 8 cups)
⅓ cup
1½ tablespoons***
2½ to 3 quarts (10 to 12 cups)
½ cup
2 tablespoons
4 to 4½ quarts (16 to 18 cups)
⅔ cup
3 tablespoons
*Volume of popped corn will vary depending on the type, quality, and freshness of the corn. In the chart above, there is a volume range for popped corn. The higher
side of the range is the volume produced when using fresh, gourmet, yellow popcorn, like Orville Redenbacher’s® Gourmet® Yellow Popping Corn. The smaller
quantity is the volume produced when using other types of corn. Yellow popcorn generally pops larger than white popcorn.
**Amount of popped corn recommended for caramel corn recipe on page 4.
***½ tablespoon = 1½ teaspoons
Orville Redenbacher’s® and Gourmet® are registered trademarks of ConAgra Foods RDM, Inc., used under license.
1. Pour popping corn into the popping/mixing base. Drizzle oil over the corn.
Fig. B
2. Place the popping/mixing bowl over the popping/mixing base so the bowl handles
align with the base handles and the two bowl ribs fit into the two base grooves
(Fig. B).
Rib
3. Position the removable cover over the popping/mixing bowl and rotate the cover
counterclockwise until you feel the cover drop onto the bowl threads. Rotate the
cover clockwise to the closed position (Fig. C).
Groove
Note: Do not press down. Pressing down actually prevents rotation.
Then, slowly rotate the cover counterclockwise until you reach the venting/stop
position (Fig. D). There will be resistance when the cover tab meets the stop
Cover in closed position
position on the bowl thread. There should be a small space (approximately ⅛ inch)
Fig. C
between the cover and bowl. Be sure to have the cover in the venting position
during popping to maximize volume and insure crisp popcorn.
4. Plug the popper into a 120VAC electrical outlet. When using the popper for the
first time, a slight odor may be noticeable as manufacturing residue evaporates.
Bowl
This is normal during initial use.
threads
Cover tab
Popping will begin in 2 to 3 minutes. For best popping performance, once corn
begins to pop, grasp the bowl handles and the base handles and occasionally shake
Cover in venting/stop position Fig. D
the popper in a back and forth motion so any unpopped kernels will drop back
Small
down to the bottom of the popping base.
space
Important: Never leave popper unattended while in use. During popping, keep
hands and face away from the small space between the bowl and cover.
5. When popping slows to approximately 2 to 3 seconds between pops, popping is
Cover tab
Bowl threads
done. Unplug the popper.
Rotate the cover clockwise to the closed position (Fig. C) to prevent hot oil and
condensation from dripping out when flipping the popper over.
6. Grasp the bowl handles and base handles together and carefully flip the unit over away from your body to avoid escaping steam.
7. Lift the popping base off the popping bowl and set the base aside.
8.If preparing caramel corn, refer to the section on page 4 “How to Make Caramel Corn”.
9. For regular popcorn, add salt or seasoning as desired. Serve popcorn in popping bowl or pour into another bowl if you would
like to make additional batches of popcorn. Wipe the outside of the bowl before placing on your lap or on furniture in case any
moisture or oil residue is present.
Note: If desired, after allowing the base to cool for 4 to 5 minutes, butter may be melted in the popper base and drizzled over
the popcorn.
10. Before making additional batches, cool base for 4 to 5 minutes. Then, with a paper towel, carefully wipe excess oil and hulls
from popping base and bowl. Then repeat steps 1 through 7.
For a more thorough cleaning, refer to page 5.
maker
3
How to Make Caramel Corn
For caramel corn, you will need a large heat resistant nylon, plastic, or wooden mixing spoon, rimmed cookie sheet, and the following
ingredients:
Classic Caramel Corn
1½ ⅓
3
½
2
⅛
tablespoons cooking oil
cup popcorn
. . . . . . . .
tablespoons butter or margarine
cup brown sugar, light or dark
tablespoons light or dark corn syrup
. . . . . . . .
teaspoon baking soda
Follow these easy steps:
1. Pop popcorn following steps 1 through 7 on page 3.
2. Spread the popped corn onto a rimmed cookie sheet. Allow the popcorn to cool for a couple of minutes and discard any unpopped
kernels.
3.Once you’ve emptied the popcorn from the popping bowl, invert the bowl and remove the cover by twisting the cover counterclockwise. Note: You will need to turn the cover firmly to move past the venting/stop position. Then lift the cover off and set
the bowl aside.
4. After popping/mixing base has cooled for 4 to 5 minutes, with a paper towel, carefully wipe excess oil and hulls from the base
before making the caramel sauce. Then place the popping/mixing bowl back onto the base, making sure the bowl ribs are in the
base grooves.
5. Combine the butter, brown sugar, and corn syrup in the popping/mixing base. Do not use metal utensils as they may damage
the nonstick surface.
6. Plug the base into a 120VAC electrical outlet and heat mixture. Stir continuously until butter is melted and bubbles begin
appearing on the surface of the mixture. Boil without stirring for 1½ minutes.
7. Unplug and stir in baking soda. This will cause the mixture to foam.
8. Pour the popped corn into the bowl and begin stirring until the popcorn is evenly coated with caramel sauce.
9. Pour the caramel-coated corn onto a rimmed cookie sheet and separate kernels while corn is still warm. Allow to cool completely.
10. Clean unit as described on page 5 before popping additional corn.
Other Favorite Recipes
Crispy Vanilla Popcorn
1½ ⅓
3
½
2
¼
⅛
tablespoons cooking oil
cup popcorn
. . . . . . . .
tablespoons butter
cup sugar
tablespoons light corn syrup
teaspoon vanilla extract
food coloring, optional
. . . . . . . .
teaspoon baking soda
Follow the steps for making caramel corn above except substitute these ingredients.
Molasses Flavored Caramel Corn
1½ ⅓
3
½
1
1
⅛
¼
tablespoons cooking oil
cup popcorn
. . . . . . . .
tablespoons butter
cup brown sugar
tablespoon dark molasses
tablespoon light corn syrup
. . . . . . . .
teaspoon baking soda
. . . . . . . .
cup salted Spanish peanuts
Follow the steps for making caramel corn above except substitute these ingredients. Stir in peanuts with the popcorn.
Recipe Variations—
If desired, the sugar in the above recipes can be reduced from ½ cup to ⅓ cup.
Up to ¼ cup of nuts, dried fruit, or candy-coated chocolate pieces can be added to the sauces prepared in the caramel
corn maker.
4
Cheesy Corn
1½ tablespoons cooking oil
⅓ cup popcorn
. . . . . . . .
2 tablespoons butter
1 tablespoon cheese-flavored
popcorn seasoning
Follow the first 4 steps for making caramel corn on page 4. Melt butter in the popping/mixing base. Add popcorn seasoning. Plug
the base into a 120VAC electrical outlet for 30 seconds; heat and stir until seasoning is mixed with melted butter. Unplug. Follow
steps 8 through 10 for making caramel corn on page 4.
Old-Fashioned Kettle Corn
½ cup popcorn
3 tablespoons vegetable oil
3 tablespoons granulated sugar
Pour popcorn into the popping/mixing base. Add vegetable oil and sugar and stir thoroughly. Pop popcorn following steps 2 through
7 on page 3.
Preparation tip: Sugar can easily burn; to help minimize scorched kernels of kettle corn, shake the popper frequently once popping
begins.
Helpful Hints
• For best results, use heat resistant nylon, plastic, or wooden utensils in the caramel corn maker. Do not use metal utensils as
they may damage the nonstick surface.
• To make a double batch of caramel corn, pop 4 quarts of popcorn (⅔ cup of unpopped corn equals approximately 4 quarts of
popped corn) then divide in two. Make caramel sauce recipe on page 4 and mix in 2 quarts of popcorn. You can make the second
batch of caramel sauce without cleaning the unit. The base must be washed, however, before popping more corn.
•If popcorn is not evenly covered with caramel, plug the popper base in for 10 to 20 seconds, stirring constantly. This will soften
the caramel and make it easier to evenly mix in with the popcorn.
• For a little different treat, in place of the popcorn, try mixing 6 to 8 cups of dry cereal in with the various sauces.
• Popped corn should be crisp. If it is chewy, you have popped the corn with the cover in the closed position. Always pop corn in
the venting position (see Fig. D, page 3).
•Humid weather may cause caramel corn to become sticky. To crisp sticky caramel corn, coat a rimmed cookie sheet with cooking spray and pour caramel corn onto cookie sheet. Heat in a 250°F oven for 10 to 15 minutes. Then pour caramel corn on wax
paper and separate kernels.
Care and Cleaning
1. Unplug unit and allow to cool completely before cleaning.
2. Wash the popping/mixing bowl and removable cover in warm, sudsy water. Rinse and dry thoroughly. Do not wash these parts
in an automatic dishwasher or scour surfaces with steel wool or abrasive cleaners. Note: If washing the bowl with the cover on,
the water will slowly drain out as the cover does not provide an airtight seal.
3. Wipe the nonstick popping/mixing base with a damp cloth. Never immerse the popping/mixing base in water or any other
liquid.
After preparing any of the recipes containing sugar or corn syrup, clean the popper base with a moistened cloth or a non-metal
cleaning pad, such as a Scotch-Brite* Multi-Purpose Scrub Sponge* or a Scotch-Brite* Dobie* Cleaning Pad. Firm pressure
can be applied, if necessary.
Do not use steel wool or abrasive kitchen cleaners.
4. After cleaning and drying, the popping/mixing base nests inside the popping/mixing bowl for convenient storage.
*Scotch-Brite and Dobie are registered trademarks of 3M.
5
Consumer Service Information
If you have any questions regarding the operation of your Presto® appliance or need parts for your appliance, contact us by any of
these methods:
• Call 1-800-877-0441 weekdays 8:00 AM to 4:00 PM (Central Time)
• Email us through our website at www.GoPresto.com/contact
• Write: National Presto Industries, Inc.
Consumer Service Department
3925 North Hastings Way, Eau Claire, WI 54703-3703
When contacting the Consumer Service Department, please indicate the model number and the series code for the caramel corn maker.
These numbers can be found on the bottom of the popping/mixing base.
Please record this information:
Model Number _______________________
Series Code ____________
Date Purchased ____________
Inquiries will be answered promptly by telephone, email, or letter. When emailing or writing, please include a phone number and a time
when you can be reached during weekdays if possible.
The Presto Factory Service Department is equipped to service PRESTO® appliances and supply genuine PRESTO® parts. Genuine PRESTO®
replacement parts are manufactured to the same exacting quality standards as PRESTO® appliances and are engineered specifically to
function properly with its appliances. Presto can only guarantee the quality and performance of genuine PRESTO® parts. “Look-alikes”
might not be of the same quality or function in the same manner. To ensure that you are buying genuine PRESTO® replacement parts,
look for the PRESTO® trademark.
Canton Sales and Storage Company
Presto Factory Service Department
555 Matthews Dr.
Canton, MS 39046-3251
PRESTO® Limited Warranty
(Applies Only in the United States and Canada)
This quality PRESTO appliance is designed and built to provide many years of satisfactory performance under normal household use. Presto pledges to the original owner that should there be any defects in material or workmanship during the first year
after purchase, we will repair or replace it at our option. Our pledge does not apply to damage caused by shipping. Outside the
United States and Canada, this limited warranty does not apply.
®
To obtain service under the warranty, please call our Consumer Service Department at 1-800-877-0441. If unable to resolve
the problem, you will be instructed to send your PRESTO® appliance to the Presto Factory Service Department for a quality
inspection; shipping costs will be your responsibility. When returning an appliance, please include your name, address, phone
number, and the date you purchased the appliance as well as a description of the problem you are encountering with the appliance.
We want you to obtain maximum enjoyment from using this PRESTO® appliance and ask that you read and follow the instructions enclosed. Failure to follow instructions, damage caused by improper replacement parts, abuse, misuse, or neglect will void
this pledge. This warranty gives you specific legal rights, and you may also have other rights which vary from state to state. This
is Presto’s personal pledge to you and is being made in place of all other express warranties.
NATIONAL PRESTO INDUSTRIES, INC.
Eau Claire, WI 54703-3703
Form 76-140B
6