1
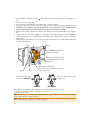
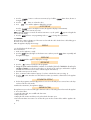
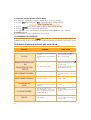
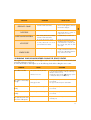
INDEX
1 DESCRIPTION OF THE APPLIANCE (see page 3) . . . . . . . . . . . . . . . . . . . . . . .24
2 SAFETY WARNINGS . . . . . . . . . . . . . . . . . . . . . . . . . . . . . . . . . . . . . . . . . .24
3 INSTALLATION
. . . . . . . . . . . . . . . . . . . . . . . . . . . . . . . . . . . . . . . . . . . . . .25
GB
4 USING FOR THE FIRST TIME . . . . . . . . . . . . . . . . . . . . . . . . . . . . . . . . . . . . .25
5 TURNING ON AND PREHEATING . . . . . . . . . . . . . . . . . . . . . . . . . . . . . . . . .26
6 PREPARING COFFEE (USING COFFEE BEANS) . . . . . . . . . . . . . . . . . . . . . . . .26
7 CHANGING THE QUANTITY OF COFFEE IN THE CUP
. . . . . . . . . . . . . . . . . .28
8 REGULATING THE COFFEE MILL . . . . . . . . . . . . . . . . . . . . . . . . . . . . . . . . . .28
9 PREPARING ESPRESSO COFFEE WITH PRE-GROUND COFFEE
(INSTEAD OF BEANS) . . . . . . . . . . . . . . . . . . . . . . . . . . . . . . . . . . . . . . . . .29
10 RUNNING OFF HOT WATER
. . . . . . . . . . . . . . . . . . . . . . . . . . . . . . . . . . . .29
11 CHANGING THE QUANTITY OF HOT WATER
. . . . . . . . . . . . . . . . . . . . . . . .30
12 PREPARING CAPPUCCINOS (FROTHED MILK AND COFFEE)
. . . . . . . . . . . . . .30
13 PREPARING FROTHED MILK (WITHOUT COFFEE) . . . . . . . . . . . . . . . . . . . . . . .31
14 CHANGING THE QUANTITY OF COFFEE AND MILK FOR CAPPUCCINOS . . . .31
15 CLEANING AND MAINTENANCE
. . . . . . . . . . . . . . . . . . . . . . . . . . . . . . . .31
15.1 CLEANING THE COFFEE MAKER
. . . . . . . . . . . . . . . . . . . . . . . . . . . . .31
15.2 CLEANING THE INFUSER . . . . . . . . . . . . . . . . . . . . . . . . . . . . . . . . . . .31
15.3 CLEANING THE MILK CONTAINER . . . . . . . . . . . . . . . . . . . . . . . . . . . .33
16 CHANGING AND SETTING THE MENU PARAMETERS
. . . . . . . . . . . . . . . . . .33
16.1 SETTING THE CLOCK . . . . . . . . . . . . . . . . . . . . . . . . . . . . . . . . . . . . . . . .33
16.2 SETTING AUTO-START TIME . . . . . . . . . . . . . . . . . . . . . . . . . . . . . . . . . . . .33
16.3 DESCALING . . . . . . . . . . . . . . . . . . . . . . . . . . . . . . . . . . . . . . . . . . . . . .34
16.4 CHANGING COFFEE TEMPERATURE
. . . . . . . . . . . . . . . . . . . . . . . . . . . . . .35
16.5 CHANGING THE LENGTH OF TIME THE APPLIANCE REMAINS ON . . . . . . . . . . .35
16.6 SETTING WATER HARDNESS
. . . . . . . . . . . . . . . . . . . . . . . . . . . . . . . . . . .35
16.7 RESETTING FACTORY DEFAULT SETTINGS . . . . . . . . . . . . . . . . . . . . . . . . . . .36
16.8 WASHING PROCESS . . . . . . . . . . . . . . . . . . . . . . . . . . . . . . . . . . . . . . . .36
17 CHANGING THE LANGUAGE
. . . . . . . . . . . . . . . . . . . . . . . . . . . . . . . . . . .36
18 MEANING OF MESSAGES AND WHAT TO DO . . . . . . . . . . . . . . . . . . . . . . .36
19 PROBLEMS THAT CAN BE RESOLVED BEFORE CALLING THE SERVICE CENTRE .37
20 TECHNICAL SPECIFICATION . . . . . . . . . . . . . . . . . . . . . . . . . . . . . . . . . . . . .38
IMPORTANT INFORMATION FOR CORRECT DISPOSAL OF THE PRODUCT IN ACCORDANCE WITH EC DIRECTIVE
2002/96/EC.
At the end of its working life, the product must not be disposed of as urban waste.
It must be taken to a special local authority differentiated waste collection centre or to a dealer providing this service.
Disposing of a household appliance separately avoids possible negative consequences for the environment and health deriving from inappropriate disposal and enables the constituent materials to
be recovered to obtain significant savings in energy and resources.As a reminder of the need to dispose of household appliances separately, the product is marked with a crossed-out wheeled dustbin.
23
1 DESCRIPTION OF THE APPLIANCE (SEE PAGE 3)
A.
B.
C.
D.
E.
F.
G.
H.
I.
J.
K.
L.
M.
N.
O.
P.
Q.
R.
S.
T.
U.
V.
X.
Z.
Grinding coarseness regulator
Coffee beans container
Bean container lid
Central lid for ground coffee
Compartment for measure
Cup warmer tray
Ground coffee funnel
Milk container lid/milk frother
Frothed milk spout
Milk intake tube
Nozzle
Water tank (removable)
Milk container
Power cable
Cup tray
Measure for pre-ground coffee
Drip tray (removable)
Hot water spout
Service door
Coffee grounds container (removable)
Coffee spout (adjustable in height)
Mobile drawer
Infuser
Control panel
Control Panel
1. Display
2. MENU light.
3. Button to activate or deactivate menu parameter setting mode
4. Button to select ground coffee or, if the MENU
light is on, to display the next parameter on the
menu
5. Button to rinse the appliance or, if the MENU
light is on, to confirm the menu parameters
6. Button to select hot water or, if the MENU light
is on, to confirm the menu parameters
7. Appliance ON/OFF button
8. Coffee taste selection button
9. One or two cups short coffee button
10. One or two cups normal coffee button
11. One or two cups long coffee button
12. Cappuccino or frothed milk button
2 SAFETY WARNINGS
READ THESE INSTRUCTIONS CAREFULLY AND KEEP FOR FUTURE CONSULTATION!
• This appliance is designed to "make espresso coffee" and "heat drinks". Use with care to avoid scalds
from the water and steam jets or through incorrect use.
• This appliance is intended for domestic use only. Any other use is considered improper and thus dangerous.
• The manufacturer cannot be held responsible for any damage caused through incorrect, wrong or unreasonable use.
• When using the appliance, do not touch the hot surfaces. Use the knobs or handles.
• Never touch the appliance with wet or damp hands or feet.
• The appliance is not intended for use by persons (including children) with reduced physical, sensory or
mental capabilities, or lack of experience and knowledge, unless they have been given supervision or
instruction concerning use of the appliance by a person responsible for their safety. Children should be
supervised to ensure that they do not play with the appliance.
• In the event of failure or malfunction, unplug the appliance from the mains and do not tamper with it in
any way. If it requires repair, contact an authorised service centre only and ask for original spare parts
to be used. Failure to respect the above could reduce the safety of the appliance.
• Materials and accessories coming into contact with food conform to EC regulation 1935/2004.
24
• After unpacking, make sure the appliance is complete and undamaged. If in doubt, do not use it. Contact
professionally qualified personnel.
• The packing elements (plastic bags, polystyrene foam, etc.) should be kept out of the reach of children as
they are a safety hazard.
• Place the appliance on a work surface far away from water taps, basins and sources of heat.
• After positioning the appliance on the work top, leave a space of at least 5 cm between the surfaces of
the appliance and the side and rear walls and at least 20 cm above the coffee maker.
• Never install the appliance in environments where the temperature may reach 0 or lower (the appliance
may be damaged if the water freezes).
• Make sure the mains voltage corresponds to the voltage indicated on the appliance rating plate.
Connect the appliance to an efficiently earthed socket with a minimum current rating of 10A only.
The manufacturer may not be considered liable for possible incidents caused by the failure to adequately
earth the mains.
• If the power socket does not match the plug on the appliance, have the socket replaced with a suitable
type by a qualified professional.
• The power cable on this appliance must not be replaced by the user as this operation requires the use of
special tools.
If the cable is damaged or requires replacing, contact an authorised service centre only to avoid all risks.
• You should personalise water hardness as soon as possible following the instructions in section 16.6.
To correctly learn how to use the appliance, when starting it for the first time, carefully follow the step-by-step
instructions described in the following paragraphs.
If the appliance malfunctions, do not contact the service centre straight away.
The problem can almost always be resolved by following the instructions indicated in paragraphs 18 and 19.
If this is not the case, or for further explanations, contact the customer service by calling the number listed on
the sheet enclosed on page pag.2.
If your country is not listed on the sheet, call the number indicated on the warranty.
When using the appliance for the first time, 4-5 cups of coffee need to be made before the appliance starts to give satisfying results.
4 USING FOR THE FIRST TIME
1. The first time you use the appliance, select the language.
To set English, plug the appliance into the mains socket and wait for the following message to be displayed:
PRESS OK TO INSTALL ENGLISH
While the message is displayed, press the
shows:
button (fig. 1) for at least three seconds until the display
ENGLISH INSTALLED
The appliance then displays the setting message in English. If you select the wrong language by mistake, follow the instructions in section 17 to choose the right one.
2. After 5 seconds, the appliance displays:
FILL TANK
To refill the tank, remove (fig. 2), rinse and fill it with fresh water. Never exceed the MAX line.
Put the tank back and push as far as it will go.
25
GB
3 INSTALLATION
3. Place a cup under the hot water spout (fig. 3). (If the water spout is not in place, INSERT WATER SPOUT
is displayed. Attach it as shown in figure 4, making sure the arrow on the spout is lined up with the arrow
on the control panel of the appliance, fig. 4). The appliance now displays:
PRESS OK
4. Press the OK button (fig. 1) and after a few seconds, a little water is run off from the spout. (Run off stops
automatically).
5. The appliance displays:
TURNING OFF PLEASE WAIT
and it goes off.
6. Fill the container with coffee beans (fig. 5).
IMPORTANT: to prevent malfunction, never fill with ground coffee, freeze dried coffee, caramelised beans
or anything else which could damage the appliance.
If the appliance malfunctions, do not contact the service centre straight away.
The problem can almost always be resolved by following the instructions indicated in paragraphs 18 and 19.
If this is not the case, or for further explanations, contact the customer service by calling the number listed on
the sheet enclosed on page pag.2.
If your country is not listed on the sheet, call the number indicated on the warranty.
When using the appliance for the first time, 4-5 cups of coffee need to be made before the appliance starts to give satisfying results.
5 TURNING ON AND PREHEATING
1. Press the
button (fig. 6). The appliance displays:
HEATING UP PLEASE WAIT...
to indicate preheating is underway.
2. Once preheating is completed, the appliance displays
RINSING PLEASE WAIT...
and performs an automatic rinse cycle (a little hot water is run off from the spouts and is collected in the
drip tray below. Take care to avoid scalds).
3. The appliance now displays:
READY FOR COFFEE
You can now make coffee.
4. To prepare cappuccino, hot water or frothed milk, wait for the appliance to display:
READY
All functions are now available.
6 PREPARING COFFEE (USING COFFEE BEANS)
1. The appliance is preset to make coffee with a normal taste. You can also choose coffee with an extralight, light, strong or extra-strong taste. To choose the required taste, press the
button (fig. 7). The
selected coffee taste will be displayed.
2. Place 1 cup under the spouts to make 1 coffee (fig. 8) or 2 cups for 2 coffees (fig. 9). For a creamier coffee, lower the spouts to bring them as close to the cups as possible (Fig. 10).
26
NOTE 1: If the coffee is delivered a drop at a time or not at all, turn the grinding coarseness regulator (fig.
12) one click clockwise (see section 8).
Turn one click at a time until the coffee is delivered satisfactorily.
NOTE 2: If the coffee is delivered too fast and is not creamy enough, turn the grinding coarseness regulator
(fig. 12) one click anticlockwise (see section 8). The grinding coarseness regulator must only be turned when
the coffee mill is on. Avoid turning the grinding coarseness regulator excessively otherwise when you select
2 cups, the coffee may run out in drips.
NOTE 3: Tips to make hotter coffee:
• When you turn the appliance on, if you want to make a short coffee (less than 60 cc), use the hot rinsethrough water to preheat the cups.
If 2/3 minutes have passed since you last made coffee, before making coffee again you must preheat the
infuser by pressing the
button (fig. 13).
• From the menu, set the high temperature (chapter 16.4).
• Unless preheated, do not use cups that are too thick, as they will absorb too much heat.
• Use cups that have been preheated by rinsing them with hot water or by leaving them for at least 30
minutes on the cup warmer tray on top of the appliance with the appliance on.
NOTE 4: while the appliance is making the coffee, delivery can be stopped at any time by pressing the
or
button as previously selected.
,
NOTE 5: as soon as delivery is complete, to increase the quantity of coffee, simply press and hold the
,
or
button as previously selected, until the desired quantity is reached (this operation must be
performed within 3 seconds from when coffee delivery from the spouts ceases).
NOTE 6: when the appliance displays:
FILL TANK
the water tank must be refilled or the appliance will not make coffee.
(It is normal for there to be a little water left in the tank when the message is displayed).
NOTE 7: every 14 single coffees (or 7 doubles) the appliance displays:
EMPTY GROUNDS CONTAINER
indicating that the grounds container is full and must be emptied and cleaned.
Until the grounds container has been cleaned, the appliance continues to display the message and cannot
make coffee.
To clean, open the service door at the front by pulling the handle (fig. 14), remove the drip tray (fig. 15),
empty and clean.
27
GB
3. Press the
button to make a short coffee (fig. 11), the
button for a normal coffee or the
button for a long coffee.
To make 2 coffees, press the button twice (within 2 seconds).
To change the quantity of coffee delivered automatically into the cup, follow the instructions in section 7.
(The appliance now grinds the beans and starts running off the coffee into the cup.
Once the desired quantity has been reached, the appliance automatically stops delivering the coffee and
ejects the grounds into the special container).
4. After a few seconds, the ready message is displayed again and you can make another coffee.
5. To turn the appliance off, press the
button.
Before going off, the appliance performs an automatic rinse cycle (a little hot water runs out from the
spouts and is collected in the drip tray beneath. Take care to avoid scalds).
Empty the grounds container and clean thoroughly, making sure all residues deposited on the bottom are
removed.
IMPORTANT: when removing the drip tray, the grounds container MUST be emptied, even if it is not completely full. If this is not done, when next making coffee the grounds in the container may exceed the maximum level and block the appliance.
NOTE 8: while the appliance is running off coffee, never remove the water tank. If it is removed, it will not
be possible to make the coffee and the appliance will display:
GROUND TOO FINE ADJUST MILL AND
INSERT WATER SPOUT AND PRESS OK
To turn the appliance on again, you must insert the water spout (fig. 4), press the
water from the spout for a few seconds.
button and run off
7 CHANGING THE QUANTITY OF COFFEE IN THE CUP
The appliance is factory preset to automatically deliver the following quantities of coffee:
- short coffee (40 ml) (when the
button is pressed);
- normal coffee (80 ml) (when the
button is pressed);
- long coffee (120 ml) (when the
button is pressed);
To change these quantities, proceed as follows:
1. press the button corresponding to the quantity you want to change (
,
or
) for at least 8
seconds then release until the message "PROGRAM QUANTITY" is displayed and coffee is delivered;
2. when the coffee in the cup reaches the required level, press the same button again to memorise the new
amount.
The appliance is now re-programmed with the new settings and displays: READY.
8 REGULATING THE COFFEE MILL
The coffee grinder is preset in the factory to prepare coffee correctly and should not require regulating initially.
However, after making the first coffees, if you find that coffee delivery is either too fast or too slow (in drips),
the grinding coarseness regulator can be adjusted (fig. 12).
Turning it 1 click clockwise speeds up coffee delivery (without drips).
Turning 1 click anticlockwise slows down delivery giving a creamier appearance to the coffee.
These adjustments will only be evident after at least 2 cups of coffee have been run off.
The grinding coarseness regulator must only be turned when the coffee mill is on.
Turn one click anticlockwise to obtain slower delivery and a
creamier appearance (finer ground coffee).
Turn one click clockwise for faster delivery (not a drop at a time)
(coarser ground coffee).
(Coffee has been used to factory test the appliance and it is therefore completely normal for there to be traces of coffee in the mill. This appliance is however guaranteed to be new).
28
9 PREPARING ESPRESSO COFFEE WITH PRE-GROUND COFFEE (INSTEAD OF BEANS)
1. Press the
button (fig. 16) to select the ground coffee function. This disables the coffee mill function.
The appliance displays:
2. Lift the lid in the centre, place one level measure of ground coffee in the funnel (see fig. 17) and proceed
as described in section 6. NB: You can make just one coffee at a time by pressing the
,
or
button once only.
3. After using the appliance with pre-ground coffee, to go back to making coffee using beans, deactivate
the ground coffee function by repressing the
button to prepare the grinder for operation again.
NOTE 1: Never add the ground coffee when the appliance is off to avoid it from being dispersed inside the
appliance.
NOTE 2: Never add more than 1 measure, otherwise either the appliance will not
make the coffee and the ground coffee will be lost inside the appliance, dirtying it, or
the coffee will run off in drips.
NOTE 3: When dosing the quantity of coffee to be added, use the measure supplied only.
NOTE 4: Use ground coffee for espresso coffee makers only. Do not use coffee beans, freeze-dried coffee
or other materials that could damage the appliance.
NOTE 5: If you add more than one measure of ground coffee and the funnel blocks, use a knife to push the
coffee down (fig. 18), then remove and clean the infuser and appliance as described in section 15.2
"Cleaning the infuser".
10 PRODUCING HOT WATER
1. Always make sure the appliance is ready.
2. Make sure the water spout is attached to the nozzle (fig. 4);
3. Position a container under the spout (fig. 3).
4. Press the
button (fig. 1).
The appliance displays:
HOT WATER
and hot water is run off from the water spout into the container below (you should not run off hot water
for more than two minutes at a time). To stop the flow, press the
button. Once the set quantity of hot
water has been reached, run-off stops automatically.
29
GB
READY PRE-GROUND
11 CHANGING THE QUANTITY OF HOT WATER
The appliance is factory preset to automatically deliver 250 ml of hot water.
To change these quantities, proceed as follows:
1. Attach the water spout (fig. 4).
2. Position a container under the spout (fig. 3).
3. Press the
button for at least 8 seconds then release. The appliance displays:
HOT WATER PROGRAM QUANTITY
and hot water is run off from the water spout.
4. When the hot water in the cup reaches the required level, press the
button to memorise the new
amount. (You should not run off hot water for more than two minutes at a time).
12 PREPARING CAPPUCCINOS (FROTHED MILK AND COFFEE)
1. Select the taste of the coffee you want to use to make the cappuccino by pressing the
button
2. Remove the lid of the milk container.
3. Fill the container with about 100 grams of milk for each cappuccino to be prepared (fig. 19). Never
exceed the MAX level (corresponding to about 750 ml) marked on the container. You are recommended to use skimmed or semi-skimmed milk at refrigerator temperature (about 5° C).
4. Make sure the intake tube is well inserted into the rubber washer (fig. 20), then replace the milk container lid.
5. Remove the hot water spout (fig 21) and attach the milk container to the nozzle, making sure the arrow on the
container lid is lined up with the arrow on the control panel of the appliance (fig. 22).
6. Position the milk tube as shown in fig. 23 and then place a sufficiently large cup under the coffee and
milk spouts (fig. 23).
7. Press the
button (fig. 24). The appliance displays:
CAPPUCCINO
and after a few seconds, the frothed milk is run off from the milk spout into the cup below. (Run off stops
automatically).
8. The appliance then grinds the beans, delivers the coffee and displays the "ready" message again.
9. The cappuccino is ready. Sweeten to taste and, if desired, sprinkle the froth with a little cocoa powder.
NOTE 1: While preparing the cappuccino, frothed milk or coffee run off can be interrupted by pressing button
.
NOTE 2: If you run out of milk while delivering frothed milk, remove the container and refill it. Then put it
back in place and press the
button to request a cappuccino again.
NOTE 3: To ensure the milk frother is absolutely clean and hygienic, after making cappuccinos, clean the
channels inside the milk container lid:
• Place a recipient under the milk spout;
• Press the
button on the milk container lid down and hold down for at least 8 seconds (fig. 25).
The appliance displays:
CLEANING
After cleaning is complete, remove the milk container and place in the refrigerator. You should not leave
the milk outside the refrigerator for more than 15 minutes.
NOTE 4: To change the quantity of coffee or frothed milk delivered automatically into the cup, follow the
instructions in section 14.
30
13 PREPARING FROTHED MILK (WITHOUT COFFEE)
Remove the lid of the milk container.
Fill the container with the quantity of milk you want to prepare (fig.19).
Replace the milk container lid.
Attach the milk container to the appliance (fig. 22).
Place a sufficiently large cup under the milk spout (fig. 23).
Press the
button twice (within 2 seconds). The appliance displays:
GB
1.
2.
3.
4.
5.
6.
MILK FROTHING
and after a few seconds, the frothed milk is run off from the milk spout into the cup below.
7. After run off, clean the channels inside the milk container by pressing the
button as described in
the previous section (note 3).
14 CHANGING THE QUANTITY OF COFFEE AND MILK FOR CAPPUCCINOS
The appliance is factory preset to automatically deliver 70 ml of frothed milk and 80 ml of coffee. To change these quantities, proceed as follows:
1. Fill the container with milk up to the maximum level indicated on the container.
2. Press the
button for at least 8 seconds until the appliance displays:
MILK FOR CAPPUCCINO PROGRAM QUANTITY
Now release the button. The appliance starts to run off milk.
3. Once the required quantity of milk has been run off, press the
button again. Milk delivery stops and
the quantity is memorised. You should not run off frothed milk for more than 3 minutes at a time.
4. After a few seconds, the appliance runs off coffee into the cup and displays:
COFFEE FOR CAPPUCCINO PROGRAM QUANTITY
5. Once the required quantity of coffee has been run off, press the
button again. Coffee delivery stops
and the quantity is memorised.
The appliance is now re-programmed with the new settings and displays: READY.
15 CLEANING AND MAINTENANCE
Before performing any cleaning operations, the appliance must have cooled down and must be disconnected from the mains power supply.
Never immerse the appliance in the water: it is an electrical appliance.
Do not use solvents or abrasive cleaning products to clean the appliance. A soft damp cloth will suffice.
NEVER wash ANY of the components of the appliance in a dishwasher.
15.1 CLEANING THE COFFEE MAKER
Clean the grounds container (as described in section 6, note 7) whenever it requires emptying.
Regularly (at least once per week) clean the water tank with warm water, a mild washing up liquid and possibly a brush.
The drip tray is fitted with a level indicator (red) showing the level of water it contains.
When the indicator starts to become visible (a few millimetres under the drip tray), the drip tray must be emptied and cleaned.
Check that the holes in the coffee spout are not blocked. To unblock them, scrape the dry coffee residues away
with a needle (fig. 27). Clean the nozzle regularly with a sponge as shown in fig. 26.
15.2 CLEANING THE INFUSER
The infuser must be cleaned regularly to avoid the build-up of coffee encrustations which could cause malfunction. Proceed as follows:
31
1. turn the appliance off by pressing the
button (fig. 6) (do not unplug) and wait for the display to go
off;
2. open the service door (Fig. 14);
3. remove the drip tray and the grounds container (Fig. 15) and clean them;
4. press the two red release buttons on the infuser sideways and towards the centre (Fig. 28) and pull it out;
5. IMPORTANT: THE INFUSER CAN ONLY BE REMOVED IF THE APPLIANCE IS OFF.. ATTEMPTING TO
REMOVE THE INFUSER WITH THE APPLIANCE ON MAY CAUSE SERIOUS DAMAGE.
6. wash the infuser under running water, without using detergents. Never wash the infuser in the dishwasher;
7. carefully clean the inside of the appliance. To remove the coffee stuck to the parts inside the appliance,
scrape it with a plastic or wooden fork (Fig. 29) and then pick up all the residues using a vacuum cleaner (Fig. 30);
8. replace the infuser by sliding it onto the supports and pin at the bottom, then push the PUSH symbol fully
in until it clicks into place.
Infuser
Push the PUSH symbol fully in
until it clicks into place.
After having heard the click,
check that the red buttons have
snapped out.
Support
Pin
Bottom pipe on the infuser.
The pin must be inserted into the bottom
pipe on the infuser.
The two red buttons have not
snapped out
The two red buttons have
snapped out CORRECTLY
CORRECT
INCORRECT
Check that the two red buttons have snapped out, otherwise the door cannot be closed.
9. replace the drip tray, complete with the grounds container;
10. close the service door.
NOTE 1: If the infuser is not inserted correctly until it clicks into place and the two red buttons have not snapped out, the service door cannot be closed.
NOTE 2: if it is hard to insert the infuser, before inserting it, squeeze to size by pressing it vigorously from
above and below at the same time, as shown in Figure 31.
32
3. Make sure there are no milk residues inside the
two holes in the lid of the milk container indicated
by the arrows in the figure.
4. Put back the intake tube and milk spout.
16 CHANGING AND SETTING THE MENU PARAMETERS
After pressing the
button, when the appliance is ready, you can use the internal menu to modify the following parameters and functions:
• Clock
• Auto-start time.
• Descaling process
• Coffee temperature
• Length of time the appliance remains on
• Water hardness
• Factory default values
• Washing process
16.1 SETTING THE CLOCK
To set the clock, proceed as follows:
1. Press the
button (the light over the button comes on) then press the
button repeatedly until
the appliance displays:
CLOCK 00:00
2. Press the
rapidly).
3. Press the
4. Press the
button to set the clock. (If you hold the
button to confirm the value;
button to exit programming mode or
button down, the time is changed
to change other parameters.
16.2 SETTING AUTO-START TIME
This enables the time the appliance will come on automatically and be ready for use to be programmed.
1. Make sure the clock on the appliance is set as described above.
2. Press the
button then press the
button repeatedly until the appliance displays:
START TIME 07:30
33
GB
NOTE 3: If it is still hard to insert the infuser, leave it out of the appliance, close the service door, unplug from
the mains, then plug in again. Wait for all the lights to go off after the self-diagnosis, then open the door and
replace the infuser.
15.3 CLEANING THE MILK CONTAINER
Proceed as follows:
1. Remove the milk spout (fig. 32) and intake tube.
2. Wash all the components thoroughly with hot water and washing-up liquid.
3. Press the
button to set the auto-start time. (If you hold the
changed rapidly).
4. Press the
button to confirm the value;
5. Press
once and the appliance displays the message:
button down, the time is
AUTO-START NO
Press the
button to modify the function (the appliance displays: AUTO-START Yes)
6. Press the
button to activate auto-start;
NOTE: when the appliance is turned off and auto-start time is set, the symbol
appears alongside the
time on the unlit display.
7. Press the
button to exit programming mode or
to change other parameters.
16.3 DESCALE
Over time, the continuous heating up of the water used to make the coffee leads to lime scale building up in
the inner circuits of the appliance.
When the appliance displays the message:
DESCALE
you should perform the descale cycle.
Proceed as follows:
1. make sure the appliance is ready.
2. press the
button (the light over the button comes on) then press the
the appliance displays:
button repeatedly until
DESCALE No
3. Press
and the appliance displays the message:
DESCALE Yes
4. Press the
button to start the descale programme.
5. Empty the water tank and add the contents of one bottle (125 ml) of DURGOL descaler plus
one litre of water. For subsequent descaling, use descaler of the same type and brand as supplied
(available from technical service centres authorised by the manufacturer).
6. attach the water spout to the nozzle;
7. place a container with a minimum capacity of 1.5 litres under the hot water spout (Fig. 3);
8. press the
button. Descaler runs off from the hot water spout into the container below. The appliance displays:
APPLIANCE IN DESCALE
9. the descale programme automatically performs a series of run offs and pauses to remove lime scale deposits from inside the coffee maker.
10. After about 30 minutes, the appliance displays:
RINSING FILL TANK
The appliance must now be rinsed through to eliminate residues of descaling solution from inside the appliance. Proceed as follows:
11. empty the water tank, rinse and fill with clean water.
12. Reposition the tank.
13. Empty the full container and then put it back under the hot water spout.
14. Press the OK button. Hot water is run off from the spout into the container below and the appliance displays:
34
RINSING
15. When the water tank is empty, the appliance displays the message:
16. Press the OK button and refill the water tank with clean water.
17. The descale programme is now terminated and the appliance is ready to make coffee again.
NOTE: if the descaling cycle is interrupted before completion, the appliance continues to display the descale
message and the programme must be started again from the beginning. Empty the water tank, rinse, fill with
clean water and run off a cup of hot water.
IMPORTANT: FAILURE TO DESCALE THE APPLIANCE REGULARLY INVALIDATES THE GUARANTEE.
16.4 CHANGING COFFEE TEMPERATURE
The appliance is factory preset to medium coffee temperature. To change the temperature of the coffee, proceed as follows:
1. Press the
button (the light over the button comes on) then press the
button repeatedly until
the appliance displays:
HIGH TEMPERATURE.
2. Press the
button until the appliance displays the required coffee temperature.
3. Press the
button to confirm the temperature selected;
4. Press the
button to exit programming mode or
to change other parameters.
16.5 Changing the length of time the appliance remains on
The appliance is factory preset to go off automatically one hour after the last coffee has been made.
The number of hours the appliance remains on (max. 3) can be increased as follows:
1. Press the
button (the light over the button comes on) then press the
button repeatedly until the
appliance displays: OFF AFTER 1 HOUR.
2. Press the
button to change the number of hours the appliance remains on.
3. Press the
button to confirm the value;
4. Press the
button to exit programming mode or
to change other parameters.
16.6 Setting water hardness
The descale message is displayed after the appliance has been operated for a factory set period of time calculated on the basis of the maximum quantity of lime scale which may be contained in the water used.
If necessary, this period of operation can be extended, making descaling less frequent, by programming the
appliance based on the actual lime content in the water used.
Proceed as follows:
1. remove the "Total Hardness Test" strip (enclosed on page 2) from its packaging then dip it fully in the
water for a few seconds. Remove it and wait around 30 seconds (until it changes colour and a number
of red dots are formed);
2. Turn the appliance on by pressing the
button (fig. 6).
3. Press the
button then press the
button repeatedly until the appliance displays:
WATER HARDNESS 4
4. Press the
button repeatedly until the number coincides with the number of red squares on the
test strip (for example, if there are 3 red squares on the test strip, press the button until WATER HARDNESS 3 is displayed).
5. Press the
button to confirm the value; The coffee maker is now programmed to provide the descaling warning when necessary, based on the actual hardness of the water.
35
GB
RINSING COMPLETE PRESS OK
16.7 RESETTING FACTORY DEFAULT SETTINGS (RESET)
If you change the original values, the factory default values can be reset as follows:
1. Press the
button then press
repeatedly until the appliance displays:
RESET TO DEFAULT NO
2. Press the
button and the appliance displays "RESET TO DEFAULT YES:
3. Press the
button to reset the factory default values;
4. The appliance is now reset to the factory default settings and the READY message is displayed.
16.8 Washing process
This function can be used by technical service personnel only.
17 CHANGING THE LANGUAGE
To change the language, press the
button for at least 5 seconds until the appliance displays the
installation message in various languages. To select the required language, follow the instructions in section
4.1 :
18 MEANING OF MESSAGE DISPLAYED AND WHAT TO DO
MESSAGE
MEANING
•
WHAT TO DO
The water tank is empty or is positioned •
incorrectly.
The tank is dirty or encrusted with lime •
scale.
Fill the water tank as described in section 6, note 6 and insert it fully.
Rinse or descale the tank.
FILL TANK
•
GROUND TOO FINE ADJUST MILL
AND
•
The appliance cannot make coffee
•
Insert the hot water spout, press the
button and run off water from the spout
for a few seconds.
INSERT WATER SPOUT AND
PRESS OK
•
The coffee runs off too slowly.
•
Turn the grinding regulator (fig. 12) one
click clockwise (see section 8).
•
The grounds container is full or missing. •
Empty the grounds container and clean
as described in section 6, note 7, then
replace.
•
After cleaning, the grounds container •
has not been replaced.
Open the service door and insert the
grounds container.
•
With the function selected, the pre- •
ground coffee has not been poured into
the funnel.
Add the ground coffee as described in
section 9.
•
•
The coffee beans have run out.
•
If the coffee grinder is very noisy, this •
means a small stone in the coffee beans
has blocked the mill.
Fill bean container
Contact an authorised De' Longhi service centre
•
This indicates the presence of lime scale •
in the appliance.
The descaling procedure, described in
section 16.3, needs to be performed as
soon as possible.
EMPTY GROUNDS CONTAINER
INSERT GROUNDS CONTAINER
ADD PRE-GROUND
COFFEE
FILL BEANS CONTAINER
DESCALE
36
MEANING
WHAT TO DO
•
After cleaning, the infuser has probably •
been left out of the coffee maker.
Leave the service door closed and the
infuser out of the appliance, then follow
the instructions displayed.
•
The service door is open
If the service door cannot be closed,
check that the infuser is inserted correctly (section 15.2 - note 1)
•
After cleaning, the infuser has probably
been left out of the coffee maker.
•
The ground coffee funnel is clogged.
•
Too many coffee beans or too much •
ground coffee has been added.
•
The inside of the appliance is very dirty. •
PRESS NEXT CHANGE
•
CLOSE DOOR
INSERT INFUSER ASSEMBLY
LESS COFFEE
GENERIC ALARM
•
•
Insert the infuser, see section 15.2
Empty the funnel with the help of a knife, as
described in section 9 note 5 (Fig.18).
Select a milder taste or reduce the quantity of ground coffee, then run off the
coffee again.
Clean the inside of the appliance thoroughly, as described in section 15.2 If
the message is still displayed after cleaning, contact a service centre.
19 PROBLEMS TO BE RESOLVED BEFORE CALLING THE SERVICE CENTRE
If the appliance is not working and an alarm light is on, the causes of the malfunction can be identified and
resolved by referring to section 18.
If, on the other hand, no alarm light is on, run the following checks before calling the service centre.
PROBLEM
The coffee is not hot
CAUSE
• The cups have not been preheated..
• The infuser is too cold
SOLUTION
• Heat the cups by rinsing them in hot water or leaving them
to rest for at least 30 minutes on the cup warmer tray on
the lid (see section 6, note 3).
• Heat the infuser by pressing the
button (fig. 13) before making the coffee (see section 6, note 3).
The coffee is not creamy
enough
• The coffee is ground too coarsely
The coffee runs out too
slowly.
• The coffee is ground too finely.
• Turn the grinding adjustment knob one click anticlockwise
(see section 8).
The coffee runs out too
quickly.
• The coffee is ground too coarsely.
• Turn the grinding adjustment knob one click anticlockwise
(see section 8).
• The spout holes are blocked.
• Scrape the remains of dry coffee accumulated with a
needle (Fig. 27).
The coffee does not come
out of one of the spouts.
• Wrong type of coffee
• Turn the grinding adjustment knob one click anticlockwise
(see section 8).
• Use a type of coffee for espresso coffee makers.
37
GB
MESSAGE
PROBLEM
When the
,
and
buttons are pressed, the
appliance does not deliver
coffee, but only water.
When the
button is
pressed, the appliance
does not come on.
The infuser cannot be
removed for cleaning.
Pre-ground coffee is
being used (not beans)
and the appliance does
not deliver coffee.
CAUSE
SOLUTION
• The ground coffee may be blocked in • Remove the ground coffee inside the funnel using a knife
the funnel.
(see note 5, section 9). Then clean the infuser and the inside of the appliance (see description in section 15.2)
• The appliance is not plugged in.
• Check that the power cable is plugged into the mains socket
• The appliance is on. The infuser can • Turn the appliance off and remove the infuser (see section
only be removed if the appliance is off
15.2). IMPORTANT: the infuser can only be removed if the
appliance is off. Attempting to remove the infuser with the
appliance on will risk causing damage.
• Too much ground coffee has been • Remove the infuser and thoroughly clean the inside of the
added.
appliance, as described in section 15.2. Repeat the opera• The
button has not been pressed
tion using a maximum of 1 measure of ground coffee.
and the appliance has used both the • Thoroughly clean the inside of the appliance, as described in
ground coffee added and the coffee
section 15.2. Repeat the operation, first pressing the
butground by the grinder.
ton as described in section 9.
• Ground coffee has been added when • Remove the infuser and thoroughly clean the inside of the
the appliance is off.
appliance, as described in section 15.2. Repeat the operation, but switch the appliance on first.
The coffee does not come
out of the spouts, but
rather around the service
door.
• The holes in the spouts are clogged • Scrape the holes with a needle (see section 15.1, Fig. 27).
with dry coffee.
• The mobile drawer inside the service • Thoroughly clean the mobile drawer, particularly near the
door is blocked and cannot swing.
hinges to ensure they are free to swing smoothly.
The milk does not run out
of the milk spout.
• The intake tube is not inserted or is • Insert the intake tube in the rubber washer in the milk coninserted incorrectly.
tainer lid (fig. 20).
The milk is not well frothed.
• The milk container lid is dirty.
The milk contains bubbles or squirts out of the
milk spout.
• The milk is not cold enough or is not • Use skimmed or semi-skimmed milk at refrigerator tempeskimmed or semi-skimmed.
rature. If you are still not getting the required results, try
changing brand of milk.
• Clean the milk lid as described in section 15.3.
20 TECHNICAL SPECIFICATION
Mains voltage:
Absorbed power:
Pump pressure:
Tank capacities:
220-240V~50-60Hz max. 10A
1350W
15bar
Water tank capacity: 1,760 l
Milk tank capacity: 0,820 l
Coffee bean container: 200 g
Dimensions LxHxW: 289x363x394mm
(444mm with milk tank)
Weight:
10,8Kg
(11,2kg with milk tank)
38
The appliance complies with the following EC
directives:
• 73/23/EEC of 19.02.1973 "Low Voltage
Directive", including the modified directive
93/68/EEC
• 89/336/EEC of 03.05.1989 "EMC directive"
including the modified directive 92/31/EEC