1
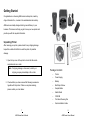
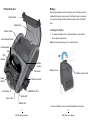
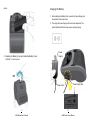
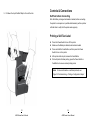
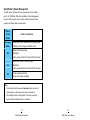
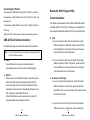
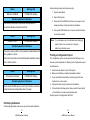
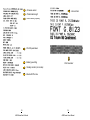
Argox Information Co., Ltd Table of Contents Proprietary Statement .............................................................. 4 AME-3230 AME-3230B AME-3230W MOBILE PRINTERS USER’S M ANUAL Safety ......................................................................................... 6 Getting Started.......................................................................... 7 Unpacking Printer ...................................................................7 Package Contents.................................................................8 Printer Overview.....................................................................9 Battery .................................................................................. 10 Installing the Battery.......................................................... 10 Charging the Battery .......................................................... 12 Battery & Power Notifications ........................................... 13 Loading Media...................................................................... 15 Wearing Belt Strap ................................................................ 18 Controls & Connections.......................................................... 24 Self-Test before Connecting .................................................. 24 Printer Controls and Indicators.............................................. 25 Smart Battery Power Management ........................................ 27 Connecting the Printer........................................................... 29 Drivers & Software ............................................................... 31 Aug. 02, 2011 Revision 7.0 Troubleshooting ...................................................................... 32 Printer Status Indications....................................................... 32 Performing Calibration.......................................................... 33 Printing a Configuration Report ............................................ 34 Printer Maintenance ............................................................... 37 Print Head Maintenance Guide.............................................. 37 Cleaning the Media Sensor:................................................... 38 Specifications........................................................................... 39 General Specifications .......................................................... 39 Website: http://www.argox.com 1 Address: 7F, No. 126, Lane AME 235, Series Pao-Chiao Hsin Tien, User’sRd., Manual Taipei, Taiwan, R.O.C. 2 AME Series User’s Manual Interface Specifications......................................................... 43 Serial Interface: ................................................................. 43 USB Interface: ................................................................... 44 Bluetooth Interface: ........................................................... 44 IrDA (Infrared) Interface:................................................... 45 WiFi (802.11 b/g) Interface: ............................................... 45 Proprietary Statement This manual contains proprietary information of Argox Information Co., Ltd. It is intended solely for the information and use of parties operating and maintaining the equipment described herein. Such proprietary information may not be used, reproduced, or disclosed to any other parties for any other purpose without the expressed written permission of Argox Information Co., Ltd. Product Improvements Continuous improvement of products is a policy of Argox Information Co., Ltd. All specifications and signs are subject to change without notice. FCC Compliance Statement This equipment has been tested and found to comply with the limits for a Class A digital device, pursuant to Part 15 of the FCC Rules. These limits are designed to provide reasonable protection against harmful interference in a residential installation. This equipment generates, uses, and can radiate radio frequency energy and, if not installed and used in accordance with the instructions, may cause harmful interference to radio communications. However, there is no guarantee that the interference will not occur in a particular installation. If this equipment does cause harmful interference to radio or television reception, which can be determined by turning the equipment off and on, the user is encouraged to try to correct the interference by the following measures: Reorient or relocate the receiving antenna. Increase the separation between the equipment and the receiver. Connect the equipment into a different outlet on a different circuit. Consult the dealer or an experienced Radio/TV technician for help. This unit was tested with shielded cables on the peripheral devices. Shielded cables must be used with the unit to insure compliance. The user is cautioned that any changes or modifications not expressly approved by Argox Information Co., Ltd. could void the user’s authority to operate the equipment. Liability Disclaimer Argox Information Co., Ltd. takes steps to assure that the company’s published engineering specifications and manuals are correct; however, errors do occur. Argox Information Co., Ltd. reserves the right to correct any such errors and disclaims any resulting liability. In no event shall Argox Information Co., Ltd. or anyone else involved in the creation, production, or delivery of the accompanying product (including hardware and software) be liable for any damages whatsoever (including, without limitation, damages for loss of business profits, business interruption, loss of business information, or other pecuniary loss) arising out of the use of or the results of use of or inability to use such product, even if Argox Information Co., Ltd. has been advised of the possibility of such damages. 3 4 AME Series User’s Manual AME Series User’s Manual RF exposure warning · The equipment complies with FCC RF exposure limits set forth for an uncontrolled environment. The equipment must not be co-located or operated in conjunction with any other antenna or transmitter. Safety The user is cautioned that any changes or modifications which are not recommended by Argox Information Co. Ltd. could result in the loss of the user's authority to operate the equipment. To ensure compliance, the users must use accessories and peripherals approved by Argox Information Co. Ltd. CAUTION: Any changes or modifications not expressly approved by the party responsible for compliance could void the user's authority to operate the equipment. Supplemental Information: This device complies with the requirement of FCC Part 15 Rules. Operation is subject to the following two Conditions: (1) This device may not cause harmful interference, and (2) this device must accept any interference received, including interference that may cause undesired operation. Please only use adapters with the following electrical characteristics and certified by current legislation. Using other adapters may damage the device and void the warranty, and pose risks to the user. Specifications Input: 100-240VAC, 50-60Hz, 1.0 A Features Output: 9VDC, 1.56A The manufacturer declares under sole responsibility that this product conforms to the following standards or other normative documents: EMC: EN 55022:2006+A1:2007, class A EN 55024:1998+A1:2001+A2:2003 EN 301489-1/-17 EN 300328 Argox Information Co., Ltd certifies that the following products and/or components are compliant with the current requirements of the European Union Restriction on the use of Hazardous Substances (RoHS) Directive, 2002/95/EC. 5 6 AME Series User’s Manual AME Series User’s Manual Getting Started Congratulations on choosing AME series mobile printer, made by Argox Information Co., a leader in the worldwide barcode industry. AME series are ideally designed to bring more efficiency to your business. This manual will help you get to know your new printer and provide you with the required information. Unpacking Printer After receiving your printer, please check for any shipping damage. Inspect the outside of both the box and the printer for possible damage. 1. Open the top cover of the printer to check that the media compartments are in order. Note: If shipping damage is discovered, contact your shipping company immediately to file a claim. Package Contents Printer Power Supply Battery together with the printer. If there are any items missing, Belt Strap & Screw please contact your local dealer. Sample Media Media Shield CD-ROM Print head Cleaning Pen Quick Installation Guide 2. Check whether you have received the following accessories 7 8 AME Series User’s Manual AME Series User’s Manual Printer Overview Battery Each printer package contains one battery pack. The battery must be installed for the printer to work, even if the Power Supply is connected. Platen Roller You must fully charge the battery before using the printer for the first time. Media Cover Installing the Battery Media Shield 1. To release the Battery Cover, rotate the Battery Cover Latch 90° to the right as shown below: Latch Release Button Note: We recommend using a coin to rotate the latch. Communication LED IrDA Window 90° Media Sensor Print Head Battery Cover Battery Cover Latch Power Button Power Input Jack USB/RS-232 Port Feed Button Media LED Power LED Battery LED 2. Remove the Battery Cover and install the Battery Pack into the 9 10 AME Series User’s Manual AME Series User’s Manual Charging the Battery printer: 1. After installing the Battery Pack, connect the Power Supply into the printer’s Power Input Jack. 2. Then plug the Power Supply into the AC wall receptacle. The printer’s Battery LED will remain yellow during charging. 2. Replace the Battery Cover and rotate the Battery Cover Latch 90° to lock in place: Power Supply 90° Power Input Jack Power Jack 11 12 AME Series User’s Manual AME Series User’s Manual 3. The battery is designed for fast-charge; after about 3.5 hours (210 minutes), the Battery LED will turn off, signifying that the battery is fully charged and ready for use. Note: Operating the printer when charging will increase charging time. Wait until battery is fully charged to operate the printer. Battery & Power Notifications 1. Do not disassemble the Battery Pack in case of malfunction. 2. Keep the Battery Pack and printer away from fire, liquids, and conductive material, for your own safety and to avoid possible damage. 3. Be sure only to use the Power Supply and Battery Pack provided or approved by Argox. 4. Any damage caused by abnormal use will void the warranty. 5. When the battery not used in long-term, maintained of power at 50% and stored at -20 ~ 25 ° C. 13 14 AME Series User’s Manual AME Series User’s Manual Loading Media 1. Press the Latch Release Button on printer to automatically open the Media Cover: Media Compartment Latch Release Button Print Head 3. For media supply rolls with width less than 3 inches: Load media supply first, and then align media supply roll to the right end for correct detection of Media Sensor: 2. Place the media supply roll into the Media Compartment. Make sure media supply unwinds near Print Head, as in the direction shown below: Media Sensor 4. Install the Media Shield into Media Compartment, and lean closely against the media supply roll: 15 16 AME Series User’s Manual AME Series User’s Manual 6. Tearing Media: To tear media, pull the media edge against the Tear Bar as in the Media Shield direction below: Tear Direction 5. Pull a short length of media out of the printer. Close the Media Tear Bar Cover and press until you hear a click, to properly latch: Media Cover Wearing Belt Strap The convenient Belt Strap design, a standard feature of Argox AME series, is easy to use and quick to install: 1. Prepare the Belt Strap and the Screw. Locate the Knob on the underside of the printer, right above the Battery Cover: 17 18 AME Series User’s Manual AME Series User’s Manual 2. Attach the Belt Strap onto the Knob. Screw Note that the exterior surface of the Belt Strap should face toward you: Knob Belt Strap Belt Strap Knob 19 20 AME Series User’s Manual AME Series User’s Manual 3. Insert the Screw onto the Knob, through the Belt Strap, and tighten clockwise until it is fully secured: 4. With the Belt Strap attached to the printer, place the top of the Belt Strap over your belt: 21 22 AME Series User’s Manual AME Series User’s Manual Controls & Connections 5. Pull down the top of the Belt Strap to fix onto the lock: Self-Test before Connecting After the Battery is charged and media is loaded, before connecting the printer to a computer or a portable data terminal, perform a printer self-test label to verify that the printer works properly: Printing a Self-Test Label Press the Power Switch to turn off the printer. Make sure the Battery is installed, and media is loaded. Press and hold the Feed Button, and then press the Power Switch to turn on the printer. After printer starts to print, release the Feed Button. Wait until printer finishes printing, press the Power Switch or Feed Button to resume normal printing mode. Note: For more information on self-test printouts, see Page 30. Troubleshooting – Printing a Configuration Report 23 24 AME Series User’s Manual AME Series User’s Manual The following table explains control and indicator functions to help Printer Controls and Indicators understand LED indications and printer status: The printer’s controls and indicators are shown in the diagram below: Power Battery Media Communication Printer LED LED LED LED (Blue) Status (Green) (Yellow (Orange) Beep & Red) Communication LED Power On ON Power Off Media Out ON Bluetooth ON Blinking Beep ON or 802.11b/g Beep x1 Connection IrDA ON Beep Connection Power Button RS232 Feed Button Media LED Battery LED x2 ON Connection x3 Charger ON Connected (Yellow) ON Battery Low Feed Button: Blinking slowly (Red) 1. Pressing this button during printing will make printer pause. Battery Out 2. To feed a blank label. Beep ON Blinking (printer will fast power off) (Red) Beep Power Button: Turn the printer ON/OFF. 25 26 AME Series User’s Manual AME Series User’s Manual Smart Battery Power Management The AME series mobile printers are equipped with a Li-ion battery pack (7.4V 2200mAH). With the Smart Battery Power Management function, AME series are able to monitor and automatically remind operators of different battery power status: Battery Power Status Printer’s Indications Charging Mode Battery Green LED remains On (Charging Mode) If Battery is fully charged, LED will be off. 10% Battery LED blinks slowly (Reminder: battery power will be 5% in about 30-60 minutes) 5% Battery LED blinks + warning beeps (Reminder: battery power will be 0% in about 30-60 minutes) 0% Printer suspends printing (some minor power remains) Note: 1. If the standby duration exceeds 3 minutes, printer will turn off automatically in order to decrease power consumption. 2. The standby duration is changeable, to be set by operators; printer’s default standby duration is 3 minutes. 27 28 AME Series User’s Manual AME Series User’s Manual Connecting the Printer The interfaces of AME-3230 include RS-232, USB (2.0), and IrDA. The interfaces of AME-3230B include RS-232, USB (2.0), IrDA, and Bluetooth, 802.11b/g and IrDA Communications: Bluetooth 2.0. The interfaces of AME-3230W include RS-232, USB(2.0), IrDA and 802.11b/g. The default communication mode of AME-3230B is Bluetooth and AME-3230W is 802.11b/g. Following is an explanation of how to switch between Bluetooth, 802.11b/g and IrDA modes. USB and RS-232 communication cables are optional accessories. USB & RS-232 Communications: IrDA: a. How do I switch to IrDA mode from Bluetooth mode? When the printer is in Bluetooth mode, press and hold the Feed Button for 5 seconds until you hear 2 beeps. The printer will then be in IrDA mode. No additional setups are required for cable communications. Note: Turn off the printer before connecting or disconnecting USB or RS-232 interface cables b. How do I switch to IrDA mode from 802.11b/g mode? When the printer is in 802.11b/g mode, press and hold the Feed Button for 5 seconds until you hear 2 beeps. The printer will then be in IrDA mode. USB: Once USB cable is connected, printer will detect automatically and link to host, without emitting beeps. RS-232: When printer is off and RS-232 cable is connected, printer will emit 3 beeps and automatically switch to RS-232 mode. Next time printer is turned on with RS-232 cable connected, printer will emit 1 beep (Bluetooth mode), and then 3 beeps to indicate RS-232 mode. When RS-232 cable is disconnected, printer will emit 1 beep and switch back to Bluetooth mode. Bluetooth or 802.11b/g: a. How do I switch to Bluetooth mode from IrDa mode? When the printer is in IrDA mode, press and hold the Feed Button until you hear one beep. The printer will then be in Bluetooth mode. b. How do I switch to 802.11b/g mode from IrDA mode? When the printer is in IrDA mode, press and hold the 29 30 AME Series User’s Manual AME Series User’s Manual Feed Button until you hear one beep. The printer will then be in 802.11b/g mode. Troubleshooting Normally, when the printer is not working properly, the "Power" LED As long as the printer is in Bluetooth mode or 802.11b/g mode, the Communication Indicator will remain blue, blinks continuously; while printing and communication between the host and printer stops. whether Bluetooth or 802.11b/g connection to host is Printer Status Indications linked or unlinked. Note: The Communication Indicator will blink blue during data transmission via all interfaces – Bluetooth, IrDA, RS-232, Printer status and error indications are displayed via LED indicators. Generally, when a malfunction or an abnormal condition is detected, the ERROR LED will blink. The table below shows the LED indications corresponding to various errors: 802.11b/g and USB. Drivers & Software Status Blinking LED PAUSE POWER LED blinking Possible Symptoms & Solutions AME series are bundled with their smart printer drivers. This way, users can easily print a receipt or label within any Windows applications, e.g. Microsoft Word, labeling software such as Bartender, .etc, in operation systems including Windows 2000/XP/Vista/Windows 7. The AME series drivers and Bartender labeling software are available via Argox CD-Rom included in the printer package. The printer is in PAUSE status. Press FEED button to return to normal printing mode. Status Blinking LED MEDIA OUT MEDIA LED blinking Possible Symptoms & Solutions 1. The media is not installed or is used up. 2. Printer fails to detect the media gaps/black marks. 31 32 AME Series User’s Manual AME Series User’s Manual Status Blinking LED SERIAL I/O ERROR POWER LED blinking before printing to make printer index correctly. 1. Properly install labels. 2. Power off the printer. Possible Symptoms & Solutions 3. Press and hold the FEED button then turn on power; do not The format or baud rate of the RS232 communication is inconsistent between the printer and host. release the button until printer starts to feed labels. 4. Then, press FEED button once or twice to check that labels are correctly indexed. Status Blinking LED MEMORY FULL POWER LED blinking Note: You must always carry out calibration when changing media. Failure to do so will result in improper Possible Symptoms & Solutions detection by the label sensor. The printer memory buffer is fully loaded with downloadable soft fonts, graphics or forms. Printing a Configuration Report Check the format and size of stored data with available memory size or call for service. The Configuration report, also known as the Self-Test report, can work as a printer diagnosis tool. Steps to print a Configuration report are listed below: Status Blinking LED Print Head overheated POWER LED blinking 1. Press the Power Button to turn off the printer. 2. Make sure the Battery is installed and media is loaded. 3. Switch to turn on the printer. Possible Symptoms & Solutions Printer enters PAUSE status to wait for print head to cool down; printer will resume printing tasks when it is ready. Press and hold the Feed Button, and then press the Power 4. After printer starts to print, release the Feed Button. 5. Wait until printer finishes printing, then press the Power Switch or Feed Button to resume normal printing mode. Sample printout of Configuration (Self-Test): Performing Calibration If labels with gaps/black marks are in use, perform media calibration 33 34 AME Series User’s Manual AME Series User’s Manual Firmware Version version Internal fonts Printed label length Flash memory capacity RS-232 parameters Media type setting Print Head test Standby duration (in minutes) Bluetooth PIN code 35 36 AME Series User’s Manual AME Series User’s Manual Printer Maintenance When cleaning the print head, always wipe in One Direction from Left to Right only, or, from Right to Left only, to gently clean Print Head Maintenance Guide the “Heating Line” of the print head without putting excessive To keep the Print Head in the best conditions and efficiency and to stress on the unit. extend duration for use, regular cleaning action is needed: Do not wipe back and forth to avoid dust or dirt on the cleaning cloth/cotton buds attaching to print head again. Note: Always switch off printer before cleaning. Cleaning the Media Sensor: 1. Cleaning Interval: It is strongly recommended to regularly clean print heads, or at Debris or dirt on the Media Sensor can cause a misread or unstable least every time a label roll is changed (in direct thermal printing detection to index label gaps/black marks. Clean the Media Sensor mode). In addition, if the printer is operated under critical properly with a cotton bud dampened with alcohol. applications or environments, or if print quality is found to have degraded, please clean print heads more frequently. 2. Cleaning Material: The surface of print head’s heating element is very fragile. To prevent from any possible damage, please use the Printhead Cleaning Pen supplied in the printer package, or a soft cloth/ cotton buds with “Ethanol” or “industrial alcohol” to clean print head’s surface. It is strongly recommended to wear gloves during cleaning Do not touch print head surface with bare hands or with any hard objects. Water and moisture should be kept away from the print head to avoid corrosion of the heating elements. 3. Cleaning Direction: 37 38 AME Series User’s Manual AME Series User’s Manual Specifications General Specifications Specifications Wireless WEP-128, Security WPA-PSK Authentication AME-3230 AME-3230B AME-3230W N/A (TKIP), and Encryption WPA2-PSK Options (AES) Internal character sets standard Printing Direct Thermal 5 alpha-numeric fonts from 0.049”H ~ 0.23” H Method (1.25mm ~ 6.0mm) Printing 203 dpi (8 dots/mm) Fonts Resolution Printing Speed 2~ 3ips (51 ~76mm/s) Printing Length 40” (1016mm) Printing Width 2.8" (72mm) All fonts are expandable up to 24x24 4 direction 0 ~ 270 rotation Ability to print any Windows True Type font easily with help of the Font Utility provided Code 39 (standard/with checksum digit), Code 93 8MB DRAM (6MB User available), Memory Interleaved 2 of 5 (standard/with checksum digit/with 4MB Flash ROM (3MB User available) CPU Type N/A human readable check digit), EAN-8, EAN-13, 32 bit RISC microprocessor 1D Barcodes UPC-A, UPC-E, Postnet, Codabar, Code 128 subset Media gap/black line sensor, Paper end sensor, Media Sensor A/B/C, Code 128 Auto, UPC/EAN-Extension, Open cover sensor Plessey, Industrial 2 of 5 , Standard 2 of 5, Logmars, LED indicator x 4 Operation MSI, Code 11, GS1 DataBar (Power status/Battery/Media/Communication), Interface MaxiCode, PDF417, Data Matrix (ECC 200 only), Button x 2 (Power/Feed) 2D Barcodes QR code, Composite codes RS-232, RS-232, USB Communication Interface RS-232, USB (2.0), IrDA 39 Graphics GRF, Hex and GDI USB(2.0), IrDA, (2.0), IrDA, Wireless 40 802.11b/g AME Series User’s Manual Bluetooth 2.0 AME Series User’s Manual Emulation PPLZ Windows Win CE.NET, Pocket PC, Windows Mobile, Shoulder Strap, Environmental Case, Spare Battery, compatibility Windows 2000/XP/VISTA/Windows 7 Software BarTender, Printer Utility, Font Utility Direct Thermal continuous receipt, Direct Thermal Optional Items One Battery Charger, 4 Bay Battery Charger, Vehicle Power Adapter, USB/RS-232 Cables ** Special configuration Media Type labels, die-cut, black mark, Direct Thermal stickers Max Width: 3” (78.5mm) Min Width:1” (25.4mm) Max roll capacity (OD): 2.2” (57mm) Media Thickness: Receipt (0.0508~0.1016mm)/Label: Max. 0.15mm Drop protection Dimensions Weight Power Source Battery 1.5m W 106mm x H 70mm x L 153mm 670g (Printer + Battery + 3” width OD 2.2” Paper roll) 100-240VAC 50-60 Hz Input;9 VDC 1.56 A output Rechargeable 7.4V Lithium-ion, 2200mAh, Operating 8 hours (Cover rate 30%), standby 14 hours Operation Temperature: 14F~122F (-10C~50C), Operation 0% ~ 90% non-condensing** Environment Storage Temperature: -4F~140F (-20C~60C) Belt Strap, Battery, AC adapter, Printhead Cleaning Standard Items Pen, Sample Receipt Paper Roll, Quick Installation Guide, CD-ROM 41 42 AME Series User’s Manual AME Series User’s Manual Interface Specifications Pin 3 Serial Interface: RS-232C port with a mini-type 10-pin convertor. 5 Signal Transmitted Data, TxD Received Data, RxD Flow Control mechanism is either RTS/CTS or X-on/X-off (control characters are DC2 and DC4). 7 Programmable parameters are listed below: Speed: 1200, 2400, 4800, 9600, 19200, 38400, 57600, 115200 bauds 9 Request to Send, RTS Clear to Send, 10 Description Output. Serial “Transmitted Data”. Input. Serial “Received Data” Output. Used as the control signal for “H/W Flow Control “ Input. Used as the control signal CTS for “H/W Flow Control” GND Signal ground Parity: Odd, Even or None. Data Bits: 7 or 8 bits. USB Interface: Stop Bit(s): 1 or 2 bits. Factory Default Parameters: 9600 bauds, no parity, 8 data bits, 1 stop bit. This port complies with USB 2.0 Full-Speed communication. The USB interface is a mini-type USB 10-pin convertor. Pin Signal Description 2 VBUS 5V 4 D- Differential data signaling pair - 6 D+ Differential data signaling pair + 10 GND Ground Bluetooth Interface: Bluetooth version: 2.0 Communication range: 10 meters 43 44 AME Series User’s Manual AME Series User’s Manual IrDA (Infrared) Interface: IrDA version: 1.0 Communication zone: Printer Printer Wi-Fi (802.11 b/g) Interface: Wireless Security Authentication and Encryption Options: WEP-128, WPA-PSK (TKIP), WPA2-PSK (AES) Wireless access modes: Infrastructure and ad-hoc Network support: DHCP, UDP, DNS, ARP, ICMP, TCP, sockets 45 AME Series User’s Manual