1
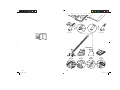
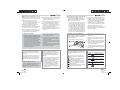
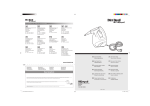
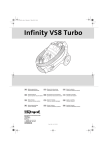
DE AUTOCLEAN-Set ES Juego AUTOCLEAN Bedienungsanleitung ..4 GB AUTOCLEAN Set Operating Manual ...... 6 FR Set AUTOCLEAN Mode d’emploil .......... 8 NL AUTOCLEAN-set Handleiding ............. 10 SK Súprava AUTOCLEAN Modo de empleo ..... 12 IT Set AUTOCLEAN Istruzioni per l'uso ... 14 TR AUTOCLEAN Seti Kullanim Klavuzu ..... 16 CZ Sada AUTOCLEAN Návod k obsluze...... 18 Návod na obsluhu .... 20 Sl Komplet AUTOCLEAN Navodila za uporabo .22 HR Komplet AUTOCLEAN Upute za uporabu..... 24 HU AUTOCLEAN készlet Kezelési útmutató ..... 26 Modell-Nr.: M277 (-0/..../-9) Roya-14730-2 • A5 • 2010-10-18 Autopflegeset.indd 1 16.10.2010 13:43:08 1 2 9 9 Ø 32 mm Ø 35 mm 3 4 2 Autopflegeset.indd 2-3 6 7 8 5 3 16.10.2010 13:44:04 Düse/Bürste aufsetzen Lieferumfang (Seite 3) n Zubehörkoffer oder Textilbeutel (je nach Mo- s Mini-Turbobürste zum gründlichen Bürstsaugen, eignet sich u. a. bestens für Tierhaare dell und Ausführung) zum Verstauen o Reduzierhülse Ø 35 mm auf Ø 32 mm, damit Sie die mitgelieferten Düsen (Ø 35 mm) auch für Saugrohre mit Ø 32 mm einsetzen können t Flachdüse zum großächigen Absaugen von z. B. Polstern u Microfaser-Handschuhe (2 Stück, 80 % Polyester, 20 % Polyamid) mit Grob- und Feinseite zum Staubwischen im Innenraum des Fahrzeugs p lange exible Fugendüse zum Saugen in schwer zugänglichen Zwischenräumen q Filzaufsatz der exiblen, langen Fugendüse k Saugrohr Ihres Staubsaugers (gehört nicht zum Lieferumfang des Autoclean-Sets) zum Schutz der Oberächen r Pinselaufsatz der exiblen, langen Fugendüse für besonders empndliche Oberächen Sicherheitshinweise Beachten Sie die ausführliche Bedienungsanleitung des eingesetzten Staubsaugers. Setzen Sie die Mini-Turbobürste nicht an Menschen, Tieren oder Panzen ein. Stellen Sie beim Bürstsaugen sicher, dass zu keiner Zeit Körperteile überfahren werden können. Überfahren Sie beim Bürstsaugen zudem keine Kabel, Leitungen usw., da die rotierende Bürstwalze diese beschädigen kann. Ferner besteht die Gefahr, dass sich diese in der Bürste verheddern. Bevor Sie die Mini-Turbobürste auf das Saugrohr aufstecken oder vom Saugrohr abziehen, schalten Sie den Staubsauger aus. Stecken Sie keinerlei Gegenstände als die hier beschriebenen in die Öffnungen des Gerätes oder seines Zubehörs. Bewahren Sie die Komponenten des Autoclean-Sets für Kinder unzugänglich auf! Verwenden Sie die Microfaser-Handschuhe (u) nicht, um das Fahrzeug von außen zu reinigen. Dies kann den Lack beschädigen. Saugrohre (k) werden überwiegend in den Größen Ø 32 mm oder Ø 35 mm gefertigt. Wenn Sie die lange, exible Fugendüse einsetzen, kann es unter Umständen dazu kommen, dass der Unterdruck im Staubsauger zu groß wird und deshalb das Sicherheitsventil im Staubsauger auslöst: Bei Fragen, Problemen oder zum Nachbestellen von Zubehör und Ersatzteilen, siehe Kontaktdaten Seite 29. 4 zur Fugendüse Sie haben Fragen? DE Autopflegeset.indd 4-5 – Falls ja, drehen Sie die Düse/Bürste beim Aufschieben etwas, damit sie straff sitzt. – Falls nein, benötigen Sie eine Reduzierhülse (o), um den Durchmesser der Düse/ Bürste an den des Saugrohrs anzupassen. Schieben Sie also die Reduzierhülse mit der abgerundeten Kante in Richtung der Öffnung auf. Setzen Sie nun die Düse/Bürste auf. Drehen Sie die Düse/Bürste beim Aufschieben etwas, damit sie straff sitzt. 2. Falls Sie die exible, lange Fugendüse (p) einsetzen, montieren Sie auf ihr entweder den Filzaufsatz (q) oder den Pinselaufsatz (r). So schützen Sie die Oberäche beim Saugen bestmöglich. (Beachten Sie bei Verwendung der exiblen langen Fugendüse außerdem die Hinweise in der Hinweisbox „zur Fugendüse“ Seite 4) 3. Verstauen Sie nicht benötigtes Zubehör im Zubehörkoffer oder im Textilbeutel (n). Mini-Turbobürste reinigen zur Reduzierhülse Damit Sie die Düsen (Ø 35 mm) in beiden Fällen einsetzen können, benden sich für Saugrohre mit Ø 32 mm 2 Reduzierhülsen (o) im Lieferumfang. 1. Probieren Sie, ob sich die Düse/Bürste Ihrer Wahl (p,s,t) ohne Reduzierhülse (o) sicher auf dem Saugrohr (k) befestigen lässt. Dies äußert sich z. B. durch einen Pfeifton (je nach Staubsaugermodell unterschiedlich) und deutlich verminderter Saugleistung. In diesem Fall müssen Sie, je nach Staubsaugermodell und Ausstattung, die Saugleistung verringern oder den Nebenluftregler öffnen, bis das Ventil nicht mehr auslöst. Für eine gründliche Reinigung können Sie die Mini-Turbobürste (s) wie folgt zerlegen: 3. Lösen Sie die Überwurfmutter durch Drehen in Richtung „UNLOCK“ (a). 1. Schalten Sie den Staubsauger aus. 4. Nehmen Sie die Gehäuseoberschale ab (b). 2. Ziehen Sie die Bürste vom Saugrohr ab. 5. Reinigen Sie die Bürste nun gründlich von Hand. d LOCK c b a UNLOCK 6. Setzen Sie die Gehäuseoberschale nach der Reinigung zuerst vorn in die 3 Nasen der Unterschale und klappen Sie sie dann hinten an (c). 7. Drehen Sie die Überwurfmutter abschließend in Richtung „LOCK“ fest (d). Microfaser-Handschuhe pegen Zubehör- und Ersatzteilliste Wenn Sie die Microfaser-Handschuhe (u) waschen, achten Sie unbedingt auf Folgendes: Artikelnr./Abb. Beschreibung/Inhalt 0277001 1 exible, lange Fugendüse + 2 Aufsätze Waschen Sie die Microfaser-Handschuhe von Hand oder bei max. 60 °C. 0277002 1 Flachdüse Verwenden Sie dabei ein mildes Flüssigwaschmittel und keinen Weichspüler. 0277003 2 Microfaser-Handschuhe Verzichten Sie darauf, die MicrofaserHandschuhe zu bleichen, zu bügeln oder im Trockner zu trocknen. 0230001 1 Reduzierhülse Lassen Sie die Microfaser-Handschuhe besser 24 Stunden lufttrocknen. M219 1 Mini-Turbobürste DE 5 16.10.2010 13:44:06 Attaching the nozzle/brush Scope of delivery (Page 3) n Accessories case or textile bag (depending s Mini turbo brush for thorough brush vacuuming, is particularly suited to cleaning up animal hair amongst other uses on model and features) for storage o Ø 35 mm to Ø 32 mm adapter piece, so that you can also use the supplied nozzles (Ø 35 mm) for Ø 32 mm suction tubes p long, exible crevice nozzle for vacuuming t Flat nozzle to vacuum large areas of e.g. upholstery u Micro-bre gloves (1 pair, 80% polyester, 20% polyamide) with rough and ne sides to wipe off dust from the interior of the vehicle hard-to-reach places q Felt attachment for the exible, long crevice nozzle to protect surfaces k Suction tube of your vacuum cleaner (not included in the autoclean set)) r Brush attachment for the exible, long crevice nozzle for particularly delicate surfaces Safety notices Comply with the detailed operating manual of the vacuum cleaner used. Do not use the mini turbo brush on persons, animals or plants. When cleaning ensure that body parts cannot be vacuumed at any time. In addition, do not vacuum above cables, lines, etc. as the rotating brush roller could damage them. There is also a risk of them getting tangled in the brush. 1. Try safely attaching the selected nozzle/brush (p,s,t) to the suction tube k) without using the adapter piece (o). – If it ts, twist the nozzle/brush slightly when pushing it on to secure it. – If it doesn’t t, you require an adapter piece (o) to adjust the diameter of the nozzle/ brush to that of the suction tube. Push the adapter piece with the rounded edge towards the opening. Now attach the nozzle/ brush. Twist the nozzle/brush slightly when pushing it on to secure it. 2. If you use the long, exible crevice nozzle (p), attach either the felt attachment (q) or the brush attachment (r) to it. This is the best way to protect the surfaces you are vacuuming. (When using the exible, long crevice nozzle, also follow the instructions in the box "About the crevice nozzle" Page 6) 3. Store accessories you don’t need in the accessories case or textile bag (n). Cleaning the mini turbo brush Before you put the mini turbo brush onto the suction tube or take it off, switch off the vacuum cleaner. To clean the mini turbo brush thoroughly (s), dismantle it as follows: 3. Release the retaining nut by turning in the “Unlock” direction (a). 1. Switch off the vacuum cleaner. 4. Remove the top section of the housing (b). Do not insert any objects into the openings of the device or its accessories other than those described here. 2. Pull the brush off the suction tube. 5. Now thoroughly clean the brush by hand. Store components of the autoclean set out of reach of children! Do not use the micro-bre gloves (u) to clean the outside of the vehicle. This could damage the paintwork. d LOCK c b a UNLOCK 6. After cleaning, rst put the top section of the housing into the three catches at the front of the bottom section and then shut it at the back (c). 7. Then tighten the retaining nut by turning in the “LOCK” direction (d). About the adapter piece About the crevice nozzle Looking after the micro-bre gloves Accessories and Spare Parts Suction tubes (k) are predominantly made with a 32-mm or 35-mm diameter. When you use the long, exible crevice nozzle, under certain circumstances the pressure inside the vacuum cleaner might drop too far thus triggering the safety valve. When washing the micro-bre gloves (u) make sure you observe the following: Article no./Fig. Description/Content 0277001 1 exible, long crevice nozzle & 2 attachments 0277002 1 at nozzle 0277003 1 pair of micro-bre gloves 0230001 1 adapter piece M219 1 mini turbo brush So that you can use the nozzles in either case, 2 adapter pieces (o) are supplied for suction tubes of 32 mm diameter. Do you have questions? If you have a question, problem or you want to order accessories and spare parts, see contact data page 29. 6 GB Autopflegeset.indd 6-7 The signal for this is e.g. a whistling noise (depending on the vacuum cleaner model) and greatly reduced suction performance. In this case, depending on the vacuum cleaner model and equipment, you have to reduce the suction power or open the bypass vent until the valve no longer triggers. Wash the micro-bre gloves by hand or at no more than 60 °C. Use a mild washing liquid without softener. Do not bleach the micro-bre gloves, iron them or dry them in a dryer. Instead, leave the micro-bre gloves to dry for 24 hours at room temperature. GB 7 16.10.2010 13:44:08 Mise en place d’un buse / d’une brosse Matériel fourni à la livraison (page 3) n Coffret pour accessoires ou sachet en tissu s Mini-turbobrosse servant à une aspiration par brossage en profondeur, convient par exemple bien aux poils d’animaux (selon le modèle et l‘exécution) pour le ranger o Manchon de réduction de Ø 35 mm à Ø 32 mm, an que les suceurs livrés (Ø 35 mm) puissent aussi être utilisés avec des tuyaux d’aspiration de Ø 32 mm p Suceur long et exible pour nettoyer les t Suceur plat pour l’aspiration de grandes surfaces, par exemple de parties rembourrées u Gants en micro-bres (2 pièces, 80 % en polyester, 20 % en polyamide), avec une face ne et une face grossière pour essuyer la poussière à l’intérieur du véhicule interstices difcilement accessibles q Housse de feutre servant à la protection des surfaces pour le suceur long et exible k Tuyau d‘aspiration de l‘aspirateur (ne fait pas r Brosse pouvant être montée sur le suceur partie du matériel fourni à la livraison du set Autoclean) long et exible et servant à la protection des surfaces particulièrement délicates Consignes de sécurité Veuillez respecter le mode d’emploi détaillé correspondant à l’aspirateur utilisé. N’utilisez pas la mini-turbobrosse sur des hommes, des animaux ou des plantes. Soyez vous-même attentif à ce qu’à aucun moment des parties du corps puissent être aspirées. Ne passez en outre pas la brosse rotative sur des câbles, des cordons électriques, etc., car la rouleau rotatif de la brosse pourrait les endommager. Il existe également un danger de voir ces éléments s’emmêler dans la brosse. Avant de mettre en place la mini-turbobrosse sur le tube d’aspiration ou de la retirer de celui-ci, éteignez l’aspirateur. N’emboîtez exclusivement que les objets décrits ici dans les ouvertures de l’appareil ou de ses accessoires. Conservez soigneusement les pièces du set Autoclean et maintenez-les hors de portée des enfants ! N’utilisez pas les gants en micro-bres (u) pour nettoyer l'extérieur du véhicule. Ceci peut endommager le vernis. – Si c’est le cas, tournez la buse / brosse en la mettant en place an qu’elle soit bien xée. – Si ce n’est pas le cas, utilisez un manchon de réduction (o), an d'adapter le diamètre de la buse / de la brosse au tube d'aspiration. Insérez alors le manchon de réduction avec l’arête arrondie placée en direction de l’ouverture. Emboîtez maintenant la buse / la brosse. Tournez la buse / la brosse en la mettant en place an qu’elle soit bien xée. Nettoyage de la mini-turbobrosse Pour un nettoyage à fond de la mini-turbobrosse (s), il vous faut la démonter comme suit : 1. Arrêtez l’aspirateur. c 3. Placez les accessoires dont vous n’avez pas besoin dans le support pour accessoires ou le sachet en tissu (n). 3. Déverrouillez le couvercle par une rotation de la collerette de xation en direction de «UNLOCK» (a). 4. Retirez la coque supérieure du boîtier (b). 5. Nettoyez maintenant la brosse à fond et à la main. 2. Retirez la brosse du tube d’aspiration. d LOCK 2. Au cas où vous souhaitez utiliser le suceur long (p), montez sur celui-ci l'embout en feutre (q) ou l'embout muni d'une brosse (r). Vous protégez ainsi de la meilleure manière les surfaces lors de l'aspiration. (Lors de l'utilisation du suceur long et exible, veuillez en outre respecter les indications encadrées consacrées au suceur long page 8) b a UNLOCK 6. Après le nettoyage, placez d‘abord la coque supérieure du boîtier à l‘avant dans les trois tenons de la coque inférieure et refermez ensuite sa partie arrière (c). 7. Verrouillez ensuite le couvercle par une rotation de la collerette de xation en direction de „LOCK“ (d). concernant le manchon de réduction concernant le suceur long Entretien des gants en micro-bres Liste des accessoires Les tuyaux d’aspiration (k) se font essentiellement dans des dimensions de Ø 32 mm ou Ø 35 mm. Lorsque vous utilisez le suceur long et exible, il peut arriver que la sous-pression dans l’aspirateur devienne trop forte et que la soupape de sécurité de l’aspirateur se déclenche : Lorsque vous lavez les gants en micro-bres (u), veuillez absolument prendre garde à ce qui suit : No d’article / Ill. Description / contenu 0277001 Lavez les gants en micro-bres à la main ou à une température maximale de 60 °C. 1 suceur long et exible + 2 embouts 0277002 1 suceur plat Utilisez pour cela un détergent liquide doux et pas d‘adoucisseur. 0277003 2 gants en micro-bres 0230001 1 manchon de réduction M219 1 mini-turbobrosse An que les buses (Ø 35 mm) puissent être utilisées dans les deux cas, les tuyaux d'aspiration disposent de 2 manchons de réduction de Ø 32 mm (o) fournis à la livraison. Avez-vous des questions ? En cas de questions, de problèmes ou pour passer commande d’accessoires ou de pièces de rechange, veuillez vous référer aux indications page 29. 8 1. Essayez si la buse / la brosse que vous souhaitez utiliser (p,s,t) peut se xer de manière sûre et sans manchon de réduction (o) sur le tube d'aspiration (k). FR Autopflegeset.indd 8-9 Cela se remarque par exemple par l’émission d’un sifement (peut varier selon le modèle d’aspirateur) et une puissance d’aspiration nettement réduite. Vous devez dans ce cas, en fonction du modèle d’aspirateur et de son équipement, réduire la puissance d’aspiration ou ouvrir le variateur mécanique de puissance jusqu’à ce que la soupape ne se déclenche pas. Renoncez impérativement à laver les gants en micro-bres avec de l‘eau de Javel, à les repasser ou à les sécher dans un séchoir. Laissez plutôt les gants en micro-bres sécher à l‘air durant 24 heures. FR 9 16.10.2010 13:44:09 ________________________________________________________________ ________________________________________________________________ ________________________________________________________________ ________________________________________________________________ ________________________________________________________________ DE Royal Appliance International GmbH Abt. Kundenservice Jagenbergstraße 19 41468 NEUSS GERMANY Tel.: +49 - 2131 - 60 90 0 Fax: +49 - 2131 - 60 90 60 95 www.dirtdevil.de CH Bluepoint-Service SAGL Via Cantonale 14 6917 BARBENGO SWITZERLAND Tel. +41 (0)91 980 49 73 E-Mail: [email protected] www.bluepoint-service.ch BE AT Zmugg Elektronik Service und Vertriebges. M.b.H. Fabriksgasse 27 8020 GRAZ ÖSTERREICH Tel. +43 - 316 - 77 21 20 Fax +43 - 316 - 77 21 20 10 [email protected] Z.E.S. Goes B.V. T.a.v. afd. Service Pearyweg 1 4462 GT GOES NEDERLAND Tel: +31 - 113 - 24 07 00 Fax: +31 - 113 - 24 07 50 Mail: [email protected] ES CZ Le Cygne electronic service spol. s r.o. Jablonecká 722/8 190 00 PRAHA 9 ESKÁ REPUBLIKA Tel: +420 - 28 68 83 940 Fax: +420 - 28 68 85 064 [email protected] Royal Appliance Espana, SL Royal, Dirt Devil, Stellar C/ Jazmin, 66 - 3° 28033 MADRID ESPAÑA Tel.: +34 - 902 - 43 06 63 ________________________________________________________________ FR ________________________________________________________________ ________________________________________________________________ Pièce de rechange service OPM NANTÉS Enterprises 33 rue de Bois Briand 44316 NANTES Cedex 3 FRANCE Tel: +33 - 2 - 40 49 64 25 Fax: +33 - 2 - 40 93 96 22 www.opm-france.com Nur für Deutschland: IT SERVICE-HOTLINE 0180 501 50 50 * In Deutschland stehen wir Ihnen für Fragen, Anregungen oder bei Problemen gerne zur Verfügung. Mo.-Fr. 8-20 Uhr * 0,14 € /Min. aus dem deutschen Festnetz (deutscher Mobilfunkhöchstpreis 0,42€ /Min.) 28 Service-Hotline für DE Autopflegeset.indd 28-29 Smart s.r.l. Via Tintoretto, 12 21012, Cassano Magnago, (VA) ITALIA Assistenza Tecnica: 199 24 44 24 Orari: 9:00 - 13:00h / 14:00 - 18:00h Fax: +39 0331 181 21 37 [email protected] SK Aspico Slovakia s. r.o. Kracanska 40/104 92901 DUNAJSKÁ STREDA SLOVAKIA Tel: +42 - 031- 55 11 815 HR HU TD „MEDJIMURKA“ D.D. Trg Republike 6 40000 AKOVEC HRVATSKA Tel: +385 - 40 - 31 27 60 Fax: +385 - 40 - 32 86 61 Aspico Kft. Puskás Tivadar út.4. 9027 GYR MAGYARORSZÁG Tel: +36 - 96 - 51 12 91 Mail: [email protected] SI NL Z.E.S. Goes B.V. T.a.v. afd. Service Pearyweg 1 4462 GT GOES NEDERLAND Tel: +31 - 113 - 24 07 00 Fax: +31 - 113 - 24 07 50 Mail: [email protected] Strojinc Ciril s.p. Koseskega ul. 1a 1000 LJUBLJANA SLOVENIJA Tel: +386 -1- 42 28 489 TR GERCEKLER ITH. IHR. PAZ. DAGITIM LTD. STI Egitim Mah. Kasap Ismail Cikmazi No:6/3 Hasanpasa / Kadiköy ISTANBUL, TURKEY Tel: +90 (216) 5508941 Fax:+90 (216) 5508943 http://www.gerceklergroup.com International Service 29 16.10.2010 13:44:27 Garantiekarte • Warranty card • Card de garantie • Garantiekaart • Tarjeta de garantía • Tagliando di garanzia • Garanti Kart • Záruní list • Záruný list • Garancijski list • Jamstveni list • Garancialevél Name • Name • Nom • Naam • Nombres y apellidos • Nome sim • Jméno • Priezvisko • Ime • Ime i prezime • Név Straße und Hausnummer • Street and house number • Rue et numéro de maison • Straat en huisnummer • Calle y número • Via e numero civico Sokak ve ev no • Ulice a íslo domu • Ulica a íslo domu • Ulica in hišna številka • Ulica i kuni broj • Utca és házszám PLZ und Ort • Zip code and town • Numéro postal et lieu • Postcode en plaats • C.P. y ciudad • CAP e località Posta kodu ve yer • PS a obec • PS a miesto • Poštna številka in kraj • Poštanski broj i mjesto • Irányítószám és település E-Mail • email • Courriel • E-mail • Correo electrónico • e-mail E-Posta • E-mail • Email • E-naslov • E-mail • E-mail Telefon mit Vorwahl • Phone number with area code • Téléphone avec indicatif • Telefoon met kengetal • Teléfono con prejo • Telefono con presso • ehirleraras kodla telefon • Telefon s pedvolbou • Telefón s predvo bou • Telefon s številko omrežne skupine • Broj telefona s pozivnim brojem • Telefonszám, körzetszámmal Fehlerbeschreibung • Description of the malfunction • Description du problème • Omschrijving van de fout • Descripción del fallo • Descrizione del difetto • Hata tanm • Popis závady • Popis chyby • Opis okvare • Opis neispravnosti • Hibaleírás: ___________________________________________________________________ ___________________________________________________________________ ___________________________________________________________________ Bitte diesen Abschnitt ausschneiden und dem Gerät beilegen. • Please detach this part and send it in with the appliance. Veuillez détacher cette partie et la joindre à l‘appareil. • Dit deel a.u.b. uitknippen en bij het apparaat leggen. Por favor, recorte este resguardo y añádelo al aparato. • Per cortesia ritagliare questa sezione e allegarla all‘apparecchio. Lütfen bu bölümü kesin ve cihazn yanna ekleyin. •Tuto ást prosím odstihnte a piložte k pístroji. Odstrihnite túto as a priložte ju k prístroju. • Ta del izrežite in priložite napravi. Izrežite ovaj odjeljak i priložite ga ureaju. • Vágja ki ezt a részt és csomagolja a készülék mellé. Autopflegeset.indd 30 16.10.2010 13:44:29