1
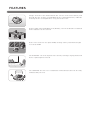
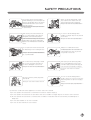
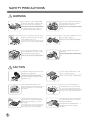
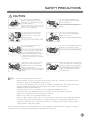
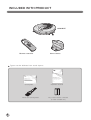
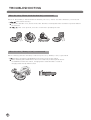
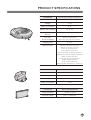
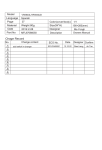
Model
Language
Page
Material
Date
Part No
VR5942L
English
36
Weight 80g
2012.3.26
MFL67086051
Color(cover/body) 1/1
Size(W*H)
190×260(mm)
Designer
Ma Yongli
Owners Manual
Description
Chage Record
No.
1
2
3
4
5
6
7
8
9
Change content
ECO No.
Date
Designer Confirm
OWNER’S MANUAL
CLEANING ROBOT
Before using, please carefully read the Safety Precautions pages to
allow for safe operation of the product. After reading the operation
manual, please keep it in an easily accessible location.
VR59**L
VR59**L*
www.lg.com
FEATURES
Images of the floor are obtained from the sensors of the lower camera, and
through this, the location of HOM-BOT will be confirmed,therefore, elaborate
cleaning can be accomplished for every part of the room.
Camera sensor
As the height of the HOM-BOT is low (90mm), even the underside of a framed
bed or furniture can be cleaned.
As the noise levels are at a quiet 60dB, cleaning can be performed at night.
*Less than 60dB
The HOM-BOT can clean all parts of the area by cleaning in zigzag mode and
then in spatial expansion mode.
Please, check
the dust bin
The HOM-BOT also has voice confirmation and instruction that can be easily
understood by the user.
CONTENTS
1
4
BEFORE USING
ADDITIONAL INFORMATION
1~4
Safety Precautions
26~28 Troubleshooting
5
Included with Product
29
6~7
Parts Descriptions
8~9
Button Functions
10
Display Status Information
11
Before You Start
12
Overview
2
HOW TO USE
13
How to Install the Home Station
14
How to Turn the Power Supply On and Off.
15
How to Start and Stop Cleaning
16~17 How to Charge the Battery
18
Cleaning Modes
19
Auxiliary Cleaning Modes
3
CARE AND MAINTENANCE
21
Cleaning the Dust Bin
22
Cleaning the Dust Bin Filter
23
Cleaning the Brush
24
Cleaning the Sensor/Charging Terminal
25
Cleaning the Side Brush
Before You Call for Service
5
REFERENCE
30
Product Specifications
SAFETY PRECAUTIONS
The purpose of the safety precautions described below is for the user to use the product safely and correctly
to prevent any unexpected risk or damage.
Basic safety precautions
After reading this manual, please keep it in an easily accessible location.
This is the safety alert symbol. This symbol alerts you to potential hazards that can result in property damage and/or serious bodily harm or death.
WARNING Indicates a hazardous situation which, if not avoided, could result in death or serious injury.
CAUTION Indicates a hazardous situation which, if not avoided, could result in minor or moderate injury.
WARNING
1. This appliance is not intended for use by persons
(including children) with reduced physical, sensory or
mental capabilities, or lack of experience and knowledge, unless they have been given supervision or
instruction concerning use of the appliance by a person
responsible for their safety.
2. Children should be supervised to ensure that they do
not play with the appliance.
3. If the supply cord is damaged, it must be replaced by
LG Electronics Service Agent in order to avoid a hazard.
4. This appliance can be used by children aged from 8
years and above and persons with reduced physical,
sensory or mental capabilities or lack of experience and
knowledge if they have been given supervision or
instruction concerning use of the appliance in a safe
way and understand the hazards involved. Children shall
not play with the appliance. Cleaning and user maintenance shall not be made by children without supervision.
1
SAFETY PRECAUTIONS
For your safety, do not remove the battery
from the Roboking. If you need to replace the
battery or the Roboking, take it to the nearest
authorized LG Electronics service center or
dealer for assistance.
Failure to follow this warning can cause fire
or product failure.
Never use the Roboking with a battery and/or home station from any
other product than the Roboking.
Doing so can cause fire or product failure.
Make sure the power cord of the home station is not crushed under a heavy object or
damaged by contact with sharp objects.
Failure to follow this warning can cause fire or
product failure. If the power cord is broken,
replace it at an LG Electronics customer care
center.
Do not use the Roboking when
candles or fragile objects are placed
on the floor.
Do not place the home station and
the Roboking near a heating device.
Always use a dedicated outlet.
Doing so can cause product deformation,
fire, or product failure.
Do not force the power plug to bend.
Do not use the power plug when it
has been damaged or loosened.
Doing so can cause fire or product failure.
Doing so can cause fire or product failure.
If multiple appliances are connected to an
outlet simultaneously, they can generate
enough heat to cause a fire.
When pulling out the power plug, always
pull it out by grabbing the plug, not the
cord. When pulling out the power plug, do
not to touch the prongs with your fingers.
Doing so can cause an electric
shock.
Do not touch the power plug with
wet hands.
Doing so can cause electric shock.
Do not use the Roboking while a
child or object is on it. Do not use the
Roboking while an object is hanging
from it.
Doing so can cause injury or product damage.
* 1) Place the cords from other appliances out of the area to be cleaned.
2) Do not operate the vacuum in a room where an infant or child is sleeping.
3) Do not operate the vacuum in an area where there are lit candles or fragile objects on the floor to be cleaned.
4) Do not operate the vacuum in a room that has lit candles on furniture that the vacuum may accidentally hit or
bump into.
5) Do not allow children to sit on the vacuum.
6) Do not use the vacuum on a wet surface.
2
SAFETY PRECAUTIONS
WARNING
Do not spray or suck in inflammable
materials, surfactants, or drinking water in the vicinity of the Roboking.
Doing so can cause fire or product failure.
* Inflammable materials: gasoline, thinner, etc.
* Surfactant: detergent, articles for bath, etc.
Turn the power supply off immediately if
any abnormal sound, odor, or smoke is
generated from the Roboking.
Failure to do so can cause fire or product
failure.
Do not insert any part of the body, such as
a hand or foot, below the brush or wheels
of the Roboking while in use.
Do not operate the Roboking in a room
where a child is sleeping.
Doing so can cause injury or product damage.
Do not operate the Roboking on narrow and high furniture such as a wardrobe, refrigerator, desk, table, etc.
Doing so can cause injury or product failure.
Doing so can cause injury or product damage.
Do not let children play with the
Roboking.
Doing so can cause injury or product damage.
CAUTION
Frequently empty the dust bin and
maintain its cleanliness.
Do not drop the Roboking or subject it to strong impacts.
The dust collected in the dust bin
can trigger allergies and may contain
harmful insects.
Doing so can cause injury or product failure.
Use the Roboking indoors only.
Do not expose the Roboking to
cold temperatures (less than 23°F
or -5°C) for a long period of time.
Using it outdoors can cause product failure.
Doing so can cause product failure.
The Roboking may bump into furniture such as chair legs, table legs,
thin and long furniture, etc. while
operating.
For a quicker and cleaner performance,
place the chairs on top of the table.
3
Cleaning will not proceed smoothly
on carpets with tassels or carpets
thicker than 10 mm.
It may be more convenient to
arrange them before using the
product.
SAFETY PRECAUTIONS
CAUTION
In rare cases, the HOM-BOT’s
brush can damage the carpet. If
this happens, immediately stop the
cleaning operation.
When a carpet has long tassels, the
tassels can be damaged.
Do not let the main frame and
charging terminal of the home
station come into contact with
metallic objects.
Do not allow the HOM-BOT to
sweep up liquids, blades, thumb
tacks, kindling, etc.
These items can cause product
failure.
Do not put sharp objects into
the opening of the HOM-BOT’s
supersonic sensor.
Doing so can cause product failure.
Doing so can cause product failure.
Do not put water, detergent, etc.
into the HOM-BOT.
Do not use the HOM-BOT when the
dust bin is completely filled up.
Doing so can cause product failure.
Do not put any water or detergent
on the HOM-BOT. If liquids get
inside of the HOM-BOT, turn off the
power supply and contact an LG
Electronics sales agent or customer
care center.
Doing so can cause product failure.
If the floor is wet or has wet spots,
wipe them up before using the
HOM-BOT. Do not use the HOMBOT on a wet surface.
When the robot cleaner is operating,
it may hit Chair,desk and table legs
or other narrow pieces of furniture.
Failure to do so can cause product
failure.
Tip
For quicker and better cleaning,
place the dining chairs on top of
the dining table.
Check the following items before use:
ţ3FNPWFGSBHJMFPSVOOFDFTTBSZPCKFDUTGSPNUIFSPPNUPCFDMFBOFE'PSFYBNQMFSFNPWF
expensive ceramics and valuables from the floor.
ţ%POPUVTFUIJTQSPEVDUJOUIFSPPNXIFSFBDIJMEJTTMFFQJOHBMPOF5IFDIJMEDBOCFIVSU
ţ$POGJSNXIFUIFSUIFCBUUFSZIBTTVGGJDJFOUQPXFSBOEJGJUJTMPXSFDIBSHFJU
ţ&NQUZUIFEVTUCJOBGUFSJGGJMMTVQ
ţ$MPTFUIFEPPSTPGBOZSPPNUIBUZPVEPOPUXBOUUIF)0.#05UPFOUFS
During cleaning, the HOM-BOT may enter another room and continue cleaning.
ţ3FNPWFBOZNPJTUVSFGSPNUIFGMPPSCFGPSFDMFBOJOH
ţ3FNPWFBOZDBCMFTPSMPOHTUSJOHTGSPNUIFGMPPS
ţRemove cables, strips, towels, socks, etc. from the floor so they will not get caught by the brush.
ţ$MFBOJOHXJMMOPUQSPDFFETNPPUIMZPODBSQFUTXJUIUBTTFMTPSDBSQFUTUIJDLFSUIBONN
(0.315 in). It may be more convenient to remove or rearrange the position of these rugs or
carpets before using the product.
Please note, this product is not intended for use in any workshop, commercial office, garage or outdoor
environment. It is for internal normal Domestic internal home use only.
4
INCLUDED WITH PRODUCT
HOM-BOT
Remote controller
Home station
Figures can be different from actual objects.
ENGLISH
FRANÇAIS
DEUTSCH
ITALIANO
ENGLISH
DEUTSCH
OWNER’S MANUAL
CLEANING ROBOT
QUICK GUIDE
CLEANING ROBOT
Before using, please carefully read the Safety Precautions pages to
allow for safe operation of the product. After reading the operation
manual, please keep it in an easily accessible location.
This guide briefly describes how to use the Cleaning Robot.
For more detail, please refer to the user manual
VR5940L
VR5940L
P/No.: MFL67086024
P/No.: MHK63425321
Quick guide
Brush for cleaning Filter
5
www.lg.com
www.lg.com
Operation manual
Dry cell for remote controller
(2 units of AAA size)
PARTS DESCRIPTION - HOM-BOT
Plan view
Dust bin cover button
Dust bin cover
State indication lamp
Manipulation Button
Detecting sensor of home station &
receiving sensor of remote controller
Front view
Ultrasonic sensor
Rear view
Ventilation port
Bottom view
Cliff detection sensor
Charging terminal
Brush
Side brush
Wheel
Lower camera sensor
Battery
Power switch
ᶀ Figures can be different from actual objects.
6
PART DESCRIPTION – HOME STATION / DUST BIN
Home station
Power lamp
Charging terminal
Reset button
Power cord fixing groove
Dust bin
Dust bin handle
Dust bin cover
Suction port cover
Dust bin cover opening button
ᶀ Figures can be different from actual objects.
7
Sponge filter
HEPA filter
BUTTON FUNCTIONS – HOM-BOT
START/STOP
ţPress the START/STOP button to turn the HOM-BOT on/off or start/stop cleaning.
ţ1SFTTUIF45"354501CVUUPOXIJMFUIF)0.#05JTPOBOEJUXJMMBVUPNBUJcally start cleaning.
ţ*GUIF45"354501CVUUPOJTQSFTTFEEVSJOHBVUPNBUJDDMFBOJOHUIF)0.
BOT will stop cleaning.
ţ1SFTTBOEIPMEUIF45"354501CVUUPOGPSBQQSPYJNBUFMZUXPTFDPOETUPUVSO
off the HOM-BOT.
ţ5IJTQVUTUIF)0.#05JOUPUIF4UBOE#ZNPEF
ţIf the button is pressed while in the timer mode, the timer setting will be canceled.
8
BUTTON FUNCTIONS – REMOTE CONTROL
Start
Charging
The HOM-BOT will start cleaning
The HOM-BOT will move to the
home station for charging.
Directional button
The HOM-BOT will move as
desired by the user: to front,
rear, left, and right sides for
cleaning.
Stop
If the HOM-BOT is in operation it
will be stopped. If it has been
set for timer cleaning, the timer
will be canceled.
Spot
Timer
Cleaning will concentrate within a
TQBDFPGBCPVUNGU
The timer can be set from 1-12
hours in advance.
Zigzag cleaning and then
spatial expansion
The Hom-BOT will clean while
maneuvering in a zigzag
pattern and then expand the
cleaning area.
Tip
9
ţ5IF)0.#05ŜTQPXFSTVQQMZDBOOPUCFUVSOFEPOXJUIUIFSFNPUFDPOUSPM
ţ5PUVSOPOUIFQPXFSTVQQMZVTF45"354501CVUUPOPOUIFUPQPG)0.#05
ţ*OPSEFSUPEPTQPUDMFBOJOHUJNFSDMFBOJOH[JH[BHDMFBOJOHBOETQBUJBMFYQBOTJPODMFBOJOHZPV
must first stop the operation of the HOM-BOT.
ţ*GUIFNBJOQPXFSTXJUDIPOUIFVOEFSTJEFPGUIF)0.#05JTUVSOFEPGGUIFSFNPUFXJMMOPUGVODtion, and the battery cannot be charged.
ţIf the main switch on the underside of the HOM-BOT is in the off position, the Status display will
flash and sound when the unit is manually placed onto the home station, to indicate that the
main switch is off.
DISPLAY STATUS INFORMATION
Battery and timer hour indication
ţ8IFOJO4UBOECZXJUIPVUBOZ
timer setting, the remaining battery
charge will be shown.
ţ8IJMFXBJUJOHGPSUJNFSDMFBOJOHUIF
reservation time will be shown.
Timer icon
ţ5IJTJOEJDBUFTXIFO
timer cleaning has
been set up.
Tip
Battery icon
ţ-JHIUTXIFOUIFSFNBJOJOH
charge is displayed on the
battery charge remaining
section, and will flash
when charging is required.
ţ6TFUIFSFNPUFDPOUSPMUPDIBOHFUIFDMFBOJOHNPEF
ţ0ODFUIFDMFBOJOHNPEFIBTCFFOTFMFDUFEJUXJMMCFNFNPSJTFEBOEBVUPNBUJDBMMZTFMFDUFE
when the unit is turned on again, unit it is changed again.
ţ5PDBODFMUIFUJNFSTFUUJOHQSFTTUIF4501CVUUPOPOUIFSFNPUFDPOUSPMPSUIF45"354501
button on the HOM-BOT.
10
BEFORE YOU START
Check these items before cleaning
ţ%POPUVTFUIJTEFWJDFJOBSPPNXIFSFBDIJMEJTMFGUBMPOF5IFDIJMEDPVMECFJOKVSFE
ţ3FNPWFGSBHJMFPSVOOFDFTTBSZPCKFDUTGSPNUIFSPPNUPCFDMFBOFE
Especially, remove expensive ceramics and valuables from the floor.
ţ3FNPWFBOZNPJTUVSFUIBUNJHIUCFPOUIFGMPPS
ţ3FNPWFDBCMFTTUSJQTUPXFMTTPDLTFUDGSPNUIFGMPPSTPUIFZXJMMOPUHFUDBVHIUCZUIFCSVTI
ţ$POGJSNXIFUIFSCBUUFSZDIBSHFJTTVGGJDJFOUBOEJGJUJTMPXSFDIBSHFJU
ţ&NQUZUIFEVTUCJOJGJUJTGVMM
ţ$MPTFUIFEPPSTPGBOZSPPNUIBUZPVEPOPUXBOUUIF)0.#05UPFOUFS%VSJOHDMFBOJOHUIF)0.#05
may enter another room and continue cleaning.
Loading the remote control battery
1. Open the battery cover by lifting the rear hook of the remote control.
2. Insert two AAA batteries, checking for +, - nodes while loading.
3. Close the battery cover completely so that the batteries will not fall out.
Precautions while using the remote control
ţ0OMZQSFTTPOFCVUUPOBUBUJNF
ţ%POPUESPQPSTVCKFDUJUUPGPSDFGVMJNQBDU
ţ%POPUTUPSFJUOFBSEFWJDFTUIBUHJWFPGGIFBUGJSFPSIPUBJS
ţ$FSUBJOGMVPSFTDFOUMBNQTTVDIBTXBWFMFOHUIGMVPSFTDFOUMBNQTDBOJOUFSGFSFXJUIUIFBDUJWBUJPOPGUIF
remote control. Therefore, use it as far away as possible from such lamps.
ţ*GUIFSFNPUFDPOUSPMJTUPPGBSGSPNUIF)0.#05XIFOPQFSBUFEJUNBZGBJMUPPQFSBUFQSPQFSMZ6TFUIF
EFWJDFXJUIJONGU
PGUIF)0.#05JGQPTTJCMF
11
OVERVIEW
1
2
3
4
5
Install the home station. (page 13)
Insert the power cord plug into an outlet and locate the
station against a wall. If power is not supplied to the
home station, the HOM-BOT will not charge.
Turn on the power supply of the HOM-BOT. (page 14)
Turn on the power switch located on the bottom of the
HOM-BOT and press the upper START/STOP button
to turn on the power supply.
* If the power supply is not turned on, refer to page 14.
Start cleaning. (page 15)
Press the START/STOP button once again while the
HOM-BOT is turned on. You will hear the sound of
cleaning and cleaning will begin.
Automatic charge. (page 16-17)
The HOM-BOT will self-diagnose and automatically
return to the home station to recharge before the
complete discharge of the battery. It can take up to three
hours to charge the battery.
6TFDMFBOJOHNFUIPETBOEBVYJMJBSZGVODUJPOTQBHF_
With remote controller, auxiliary function can be used. For
auxiliary functions, manual cleaning, spot, timer function.
12
HOW TO INSTALL THE HOME STATION
How to Install the Home Station
1. Position the home station against a wall, to prevent sliding during docking, on hard level flooring.
Remove objects within 1.5m. to the right and left side and
within 2m. to the front.
2. Plug the power cord into an outlet.
Wrap the power cord around the fixed hanger on the back side
of the home station or along the wall surface so that the travel
path of the HOM-BOT will not be obstructed.
Fixing groove of power cord
3. Fix the home station against the wall so that it does not move.
Tip
13
ţ"MXBZTLFFQUIFIPNFTUBUJPOQMVHHFEJO*GUIFIPNFTUBUJPOJTOPUQMVHHFEJOUIF)0.#05
will not return to the station to charge automatically.
ţSince the HOM-BOT cleans along the wall, if the charging station is installed on the straight
surface of the wall, you can get a more efficient cleaning.
ţDo not operate the Home Station if it has a damaged cord or plug, if it is not working properly,
or if it has been damaged or dropped. To avoid any electrical hazard, the cord must be replaced
by LG Electronics, or a qualified service person.
HOW TO TURN THE HOM-BOT POWER SUPPLY ON & OFF
Turning on the main power supply
To turn the power supply on, turn the HOM-BOT upside down
on a smooth/soft surface and check whether the main power
supply switch is turned on.
If the main power supply switch is turned off, turn on the
switch.
ٙ When turning on the power switch, do not press the button
located at the upper section of the HOM-BOT. Operation of
the button can be delayed.
ٙ Turn off the power switch if the HOM-BOT will not be used
for a long period of time, in order to protect the battery.
ٙ The power switch cover is used for protecting the switch
from the dust. Always keep the cover attached.
Turning on from Stand By power.
When the HOM-BOT is not at the Home Station, and is in
the Stand by mode, press the ‘START/STOP’ button for
more than 1 second. The HOM-BOT will be turned on and
a melody will be sounded.
ٙ If the power is turned on while the HOM-BOT is not at
the Home Station, and nothing is done for ten minutes,
the power supply will automatically turn off to reduce
battery consumption.
Turning off the power supply
Press the START/STOP button for two seconds while the
HOM-BOT is turned on. A melody will sound when the
power is turned off.
Tip
ţ5IFQPXFSDBOCFUVSOFEPGGEVFUPUIFTUBUJDFMFDUSJDJUZEVSJOHUIFPQFSBUJPO
- If the power is turned off, turn off the main power switch and
then turn it back on.
ţ*GUIFQPXFSDBOOPUCFUVSOFEPOEPUIFGPMMPXJOH
- Turn on the power switch and wait for more than 3 seconds.
- Press the ‘START/STOP’ button when the power switch is
turned on.
- If the power is not turned on or if there is no display but only
the “Ting” sound, put the HOM-BOT on the home station.
- If there is no change even when HOM-BOT is attached to the
home station, press the reset switch located on the rear side
of the home station while the HOM-BOT is attached on the
home station.
14
HOW TO START AND STOP CLEANING
Using the buttons on the HOM-BOT
After the HOM-BOT is turned on, press the START/STOP button to
begin cleaning. A melody will sound and cleaning will begin.
Press the START/STOP button during the cleaning cycle to stop cleaning.
ٙ When the ‘START/STOP’ button is pressed while the power supply
of the HOM-BOT is turned off, the power will be turned on. Press the
‘START/STOP’ button one more time to start cleaning.
Using the remote control
After the HOM-BOT is turned on, press the START button on the remote control. A melody will sound and cleaning will begin.
Press the STOP button during the cleaning cycle to stop cleaning.
ٙ The HOM-BOT cannot be turned on from Stand By, by using the
remote control when the power of the HOM-BOT is off. When the
power is off, press the ‘START/STOP’ button on the upper side
of HOM-BOT to turn the power on and to allow the remote to be
used.
ٙ When the START button on the main unit or remote control is pressed, HOM-BOT will start cleaning in
‘Spatial expansion’ mode.
ٙ During cleaning, collisions can happen when the sensor cannot detect objects because of their shape.
When this happens, the internal impact detecting sensor will activate and engage a backward motion.
ٙ If the HOM-BOT is set to start cleaning at a location away from the home station, put the device on a flat
floor in order to prevent a malfunction of the obstacle detecting sensor. In addition, start cleaning from a
location where there are no obstacles such as curtains or walls within 30 cm (11.8 in) of the HOM-BOT.
Tip
15
For best results:
ţ#SJFGMZTDBOUIFBSFBUPCFDMFBOFEGPSCJHBOETNBMMPCKFDUTUIBUNBZDBVTFEJGGJDVMUZGPSUIF
HOM-BOT.
ţ*GDMFBOJOHJTTUBSUFEXIFOUIF)0.#05JTBUUIFIPNFTUBUJPOUIFEFWJDFDBOSBQJEMZCFSFturned to the home station as the current home position has been accurately read.
HOW TO CHARGE THE BATTERY
Automatic charging
The HOM-BOT returns to the home station at the end of a cleaning cycle
or when its battery is running low.
ٙ If the HOM-BOT is unable to dock to the home station on its first attempt, it will try again until it docks successfully.
ٙ When the HOM-BOT has cleaned all areas that it can clean, it will
return to the home station even when the battery level is not low.
Manual charging
If using the HOM-BOT for the first time or to charge the battery by interrupting the cleaning, you can
manually charge the battery.
Method 1. Attach the HOM-BOT to the home station by matching
up the two arrows on the HOM-BOT and the home
station. A melody will sound and charging will begin.
ٙ When the HOM-BOT is attached to the home station,
and a “TING” sound is generated repeatedly, please
check and ensure that the main On/Off on the underside
of the HOM-BOT is in the ON position.
Method 2. When the HOMING button of the remote control
charging will start automatically when the HOM-BOT has
returned to the Home Station.
ٙ If the HOM-BOT is within 10 cm (3.9 in) of the front of the charging terminal while the power supply is
turned on, it will automatically be returned to the home station and charging will begin.
Tip
Take the following precautions when using the home station:
ţ If foreign material is caught in the charging terminal, charging may not proceed smoothly.
Wipe the terminal from time to time with a dry cloth after the power plug is disconnected.
ţ To prevent electric shock, do not touch the charging terminal with any metallic objects.
ţ To avoid fire or electric shock, never disassemble or modify the home station.
ţ Do not to place the home station or power plug near to a heating appliance.
16
HOW TO CHARGE THE BATTERY
Remaining Battery Charge Indicator
The remaining battery charge can be confirmed from the charge indication lights, which will indicate charge
as follows:
ţ%VSJOHDIBSHJOHUIFDIBSHFSFNBJOJOHJOEJDBUJPOMJHIUTXJMMGMJDLFS
ţ8IFODIBSHJOHJTDPNQMFUFEBUUIFIPNFTUBUJPOPOMZUIFCBUUFSZJDPOXJMMJMMVNJOBUFUPTBWFQPXFS
ţ5IFCBUUFSZJDPOXJMMGMJDLFSXIFOCBUUFSZDIBSHJOHJTSFRVJSFE
Flickering
Full charging
(Under charging)
High
Middle
Low
If the Battery is Not Charging
Check 1. If the battery is not charging even when the HOM-BOT is attached to the home station, check the following items.
- Turn the power switch on the bottom of the HOM-BOT off
once and then on again.
- Unplug and plug in the power plug on the home station.
- Wipe the terminal on the home station with a dry cloth.
Check 2. If the battery is still not charging after the previous check, try
the following.
- Attach the HOM-BOT to the home station.
- Press the reset button at the rear of the home station for
three seconds.
17
Charging is
required
CLEANING MODES
Cleaning pattern of large spaces after
the zigzag process is completed
After the zigzag cleaning process is completed, the spaces
are divided into rectangles and the whole apartment surface
is cleaned in detail.
1. Press the " ZIGZAG + Cell by cell" button on the remote
control.
2. HOM-BOT cleans to the left until it meets the wall or it
cleans over a distance of up to 3 meters.
3. After cleaning to the left, the HOM-BOT goes back to the
starting position and begins cleaning to the right. If HOMBOT meets the wall or cleans over a distance of 3 meters,
for a total of 6 meters, the zigzag cleaning is completed.
4. The cleaning mode is switched to the space expansion
mode - self-cleaning - and the cleaning is enabled.
The 1st stage : The maximum outline of 3m x 3m of cleaning
area will be cleaned. (The size of outline will
be changed in accordance with the shape of
the house inside.)
The 2nd stage : Inside of the outline will be cleaned with
zigzag traveling.
When the 1st, 2nd stages are completed, the inside of the
house will be cleaned through the repetition of above cleaning
method as the device is being moved to the next cleaning
area.
Tip
ţ5IFDMFBOJOHNPEFDBOPOMZCFDIBOHFEXJUIUIFSFNPUFDPOUSPM
18
AUXILIARY CLEANING MODES
Manual cleaning
This method of cleaning involves manually moving the HOM-BOT by pressing the directional (arrow) buttons
on the remote control.
The interior space will be cleaned by the HOM-BOT as it is being moved to the front, rear, or rotated to the
left and right side according to the input of the directional buttons.
㷡
㩅
㬅
Spot Cleaning
Use this cleaning method when concentrated cleaning of a small interior space is required.
After moving the HOM-BOT to the location to be cleaned, press the SPOT button on the remote control.
The spot cleaning icon will illuminate on the HOM-BOT, and concentrated cleaning will be performed for a
TQBDFXJUIJOBSBEJVTPGNGU
ٙ During charging, the spot cleaning button on the remote control will not activate.
19
TIMER CLEANING
Hom-Bot can be scheduled to start cleaning after a certain period of time.
The time can be set among 2 hours, 6 hours and 12 hours.
1. When HOM-BOT is connected to the charging
station, the cleaning time can be set by
pressing the TIMER button on the remote.
2. Adjust the time by multiple pressures on the
TIMER button.
Each time the button is pressed, the time will
increase to 2 hours, 6 hours and 12 hours.
2 hour
6 hours
12 hours
3. After setting up the start time, press the START/
STOP button on the HOM-BOT or wait about five
seconds. When the timer setting is complete,
a melody will sound, and the timer indicator will
remain on.
Tip
ţ8IFOUIFTFUVQUJNFJTCFJOHFMBQTFEDMFBOJOHXJMMCFTUBSUFEBVUPNBUJDBMMZ
ţ6TFUIFUJNFSTFUUJOHXIFOUIF)0.#05JTBUUBDIFEUPUIFIPNFTUBUJPO*GUIFUJNFSJTTFU
up when the HOM-BOT is detached from the home station, the cleaning time may not be
accurate.
ţ5PDBODFMUIFUJNFSTFUUJOHEVSJOHUIFTFUVQUJNFQSFTTUIF4501CVUUPOPOUIFSFNPUF
control or the START/STOP button on the HOM-BOT.
ţ8IFO3PCPLJOHJTEFUBDIFEGSPNUIFIPNFTUBUJPOUIFUJNFSTFUUJOHXJMMBVUPNBUJDBMMZCF
canceled.
20
CLEANING THE DUST BIN
If the dust bin is full, suction power can be weakened. Clean the dust bin before and after each cleaning session. Clean the dust bin using the following sequence:
1. Open the dust bin cover by pressing the PUSH button
on the HOM-BOT.
2. Grab the handle of the dust bin and pull it upward.
3. Separate the HEPA filter and the inside sponge filter by
removing the HEPA filter
To clean the dust bin filter, refer to page 23.
4. Lift the cover upward while pressing the separation
button on the dust bin.
5. Empty the dust bin and clean it with a cleaning brush
or under running water.
6. After cleaning with water, completely dry the dust bin
in a well-ventilated area out of the direct sunlight.
7. When you have completed cleaning the dust bin, close
the cover and replace the sponge filter and HEPA filter.
8. Put the dust bin into the HOM-BOT and close the dust
bin cover.
Tip
21
After cleaning, always mount the dust bin filters (HEPA filter, sponge filter) to the dust bin. If
they are not mounted, dust may enter the HOM-BOT interior and cause product failure.
When dust bin filter (HEPA filter, sponge filter) is full the warning sound "empty the dust bin!"
may be generated. In this case, clean the filter by referring to "cleaning of dust bin filter" on
page 23.
CLEANING THE DUST BIN FILTER
The dust bin filters are comprised of the HEPA filter and the sponge filter.
Clean the HEPA filter and the sponge filter according to the following sequence:
1. Separate the HEPA filter and the inside
sponge filter by removing the HEPA
filter (as shown).
2. Carefully clean any fine dust off the HEPA
filter and the sponge filter with a vacuum
cleaner or water.
3. After washing the HEPA filter and the
sponge filter with water, place them out
of direct sunlight and allow them to dry
completely.
4. Mount the cleaned HEPA filter and sponge
filter into the dust bin according to the
sequence shown to the right. When assembling the filter, the filter handle should face
upward.
Tip
In order to maintain the performance of the HOM-BOT, the HEPA filter should be cleaned with
a cleaning brush or vacuum cleaner at least once a week, and should be washed under running
water at least once a month.
22
CLEANING THE BRUSH
The brush, located on the bottom of the HOM-BOT, helps with the suction of foreign objects. Perform the following steps to clean the brush:
Lay a smooth cloth on the floor.
Turn the HOM-BOT over and
put the HOM-BOT on the cloth.
Turn off the power switch before
cleaning.
Separate the cover by pressing the fixing hook and pulling
upward.
Wearing gloves turn the brush
until the separation groove of
the brush appears.
Separation
groove of
brush
Grab the brush and remove by
pulling it up.
Insert the fixing hook on the opposite side of the brush (marked
with a rounded rectangle) by
matching it to the separation
groove of the brush.
23
Clean the brush with a vacuum cleaner, scissors, etc.
Insert the fixing hook on the
side of the brush (marked with
the square) by matching it to
the fixing groove of the brush.
Align the cover with the
fixing guides on the edge,
by matching it to the fixing
groove located on the main
frame.
Close the cover by pressing
it down until you hear a click
from the fixing hook.
NOTE: Please make sure that
the side rotating brushes are
not caught under the cover
when refitting.
CLEANING THE SENSOR/CHARGING TERMINAL
There are sensors on the HOM-BOT that can detect obstacles, stairways and
the home station for charging the battery. In order to maintain the performance
of the HOM-BOT, regularly clean the sensors and charging terminal as follows:
1. Lay a smooth cloth on the floor, overturn the HOM-BOT and put it on the
cloth.
2. Turn off the power switch on the bottom of the HOM-BOT. Injury can be
caused by the activation of the HOM-BOT if the main power is not turned off.
3. Use a smooth cloth or cleaning brush to wipe the dust off each sensor and
the charging terminal as described below.
Obstacle detection sensor
Receiving sensor of
remote controller
Camera sensor
Cliff detection sensor
Charging terminal
Charging terminal
Lens
Tip
ot clean the HOM-BOT by directly spraying it with water, thinner, benzene, etc.
Call the service center if the sensors or charging terminals are damaged. Sensor and terminal
damage can cause the product to malfunction.
24
CLEANING THE SIDE BRUSH
Foreign objects/materials such as hair can easily adhere to the side
brush. Remove such materials at least once a week.
If excessive amounts of foreign materials are stuck to the brush, there is a
risk of damage to the brushes.
If the floor is rough or wall skirtings are frequently cleaned, the side brush may bend or become damaged.
In this case, use the following method to straighten the side brush.
1. The following procedure is helpful in restoring deformed brushes.
2. Turn off the power supply by pressing the
START/STOP button on the HOM-BOT for two
seconds.
3. Place the HOM-BOT at the end of a table to make
cleaning the side brush easier. Make sure that the
HOM-BOT is not in danger of falling.
4. Soak the side brush in warm water.
5. Press down on the side brush for about ten seconds
so that it is completely submerged in the water.
6. Slowly wipe the side brush by sliding it through your
hand.
7. Rotate the side brush and repeat steps 4-6 for each
section of the brush.
8. Use the side brush only after it has completely dried.
25
TROUBLESHOOTING
When the voice, “Please check the wheels”, is announced.
If the unit becomes stuck or suspended and the wheels do not allow the unit move, the voice,
“Please check the wheels”, will be announced.
wheel trapped in the front door, balcony, stairway, etc?
Move the HOM-BOT on to the flat floor.
foreign material wound around the wheel?
Lay smooth cloth on the floor, overturn the HOM-BOT, and put it on the cloth.
Remove foreign material by confirming the wheel.
26
TROUBLESHOOTING
When the voice, “Please check the dust bin”, is announced
When an abnormality is detected with the dust bin, the voice, “Please check the dust bin”, is announced.
st bin fitted correctly?
Open the dust bin cover, and if check if the dust bin is actually fitted. the unit will not operate without
the dust bin.
st bin cover opened, close the cover before operating the unit.
When the voice, “Battery is low”, is announced.
When remaining amount of battery is almost nil, the voice, “Battery is low”, is generated.
ate battery charging of HOM-BOT by moving it to the home station.
When attaching the HOM-BOT to the home station by matching both arrows
of HOM-BOT and home station, charging will be started and the sound of
charging start melody will be heard.
27
TROUBLESHOOTING
When the voice, “Please check the brush”, is announced.
When the Roboking detects that the brush is not functioning properly, you will hear the message
“Please check the brush.”
Lay a smooth cloth on the floor, overturn the Roboking, and place it on the cloth.
The side brush is stuck.
Remove any foreign materials such as cables, thread or hair caught in the side brush or the brush.
Confirm the correct assembly of the brush by checking the separation groove of the brush.
Separation
groove of brush
Proper assembly assures that the rotation of the brush becomes smooth.
The brush is making a loud, abnormal sound.
Remove the brush from the Roboking and remove any foreign material from the brush.
Separation
groove of brush
For a more detailed description of this process, refer to the instructions on page 24.
28
BEFORE YOU CALL FOR SERVICE
Confirm before reporting the failure of HOM-BOT.
Problem
29
Solutions (Reference page)
The HOM-BOT will not
activate.
Confirm that the power switch is turned on. (page 14)
Confirm that the battery has been charged. (page 17)
Movements or travel path are
abnormal.
Carefully wipe the sensor with a smooth cloth. (page 24)
Turn on the power switch off and on.
Suction power becomes weak.
Check whether there is foreign material blocking the suction port.
(page 23)
Empty the dust bin. (page 21 )
Clean the dust bin filter. (page 22)
Noise becomes louder.
Confirm that the dust bin has been fitted properly.
Confirm that the dust bin filter has been fitted properly. (page 22)
Check whether foreign material is caught in the brush. (page 23)
The HOM-BOT cannot be
activated with the remote
control.
Replace the remote control batteries. (page 11)
Confirm that the control is within the coverage area of the main
frame, which is up to 3 m or 9.84 ft. (page 11)
The brush does not rotate.
Clean the brush. (page 23)
Confirm that the brush has been fitted properly. (page 23)
The HOM-BOT will not charge.
Remove objects around the home station. (page 13)
Confirm that the power supply is connected to the home station.
(page 13)
Wipe the charging terminal with a dry cloth.
The power supply
automatically turns off.
This is not a failure. HOM-BOT has its own power saving function. If it is
not used for ten minutes after the power supply is turned on, the power
will automatically turn off.
The power supply cannot be
turned on.
Check that the power switch on the underside is turned on. (Page 14)
PRODUCT SPECIFICATIONS
Item/Model
LG Roboking VR59**L VR59**L*
External dimensions
Φ360 mm X 90 mm
Weight
3.2 kg
Power consumption
15 W
Battery (fully charged)
DC 16.8 V
Maximum Traveling
Velocity
350 mm/sec
Use time
(1 time charging)
Approx. 90 minutes
Based on general floor surface
Charging time
3 hours
Main functions
Obstacle detection function
Falling prevention function
Timer cleaning function
Error indication function
Dry mop function (wiping) (option)
Automatic, manual charging function
Edge cleaning function
Voice announcement function
Map building function
Spot cleaning function
Zigzag cleaning function + cell by cell
Item/Model
Home station VR594
External dimension
204 mm × 158 mm × 125 mm
Rating
AC 220-240 V,50 Hz
Output voltage/current
17.1 VDC / 1.1 A
Power consumption
23 W
Item/Model
Battery EAC60766102
Charging battery
Lithium polymer
Nominal voltage
14.8 V / 1900mAh
30
31