Transcript
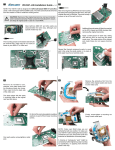
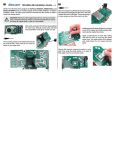
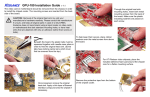
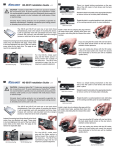
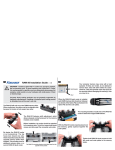
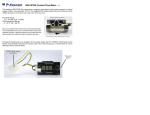
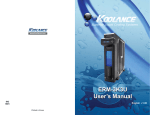
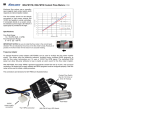
1
RP-452X2 Rev.2.0 Installation Guide v 1.0
2
If you need to remove the pump blocker, lift
up one edge of this circular piece. This is only
necessary when installing two pumps.
The Koolance RP-452X2 is designed for one or two PMP-450 or PMP-450S
pumps (not included). It mounts into two consecutive 5.25” computer drive bays
using the included screws.
O-ring
Pump Disassembly
The o-ring for this side’s pump is found below
the pump blocker. This o-ring will be used if a
pump is installed here.
The pumps must be disassembled for installation.
Unscrew the large ribbed collar on each pump by
hand.
Place the Koolance black o-ring (removed from
the RP-452X2 or pump blocker) around the rim
of the pump motor. Do NOT use the original
pump’s o-ring.
Remove the original pump o-ring and ribbed outer
collar. These are not used with the RP-452X2.
The pump is now ready to be installed into the
RP-452X2.
Slide the metal bracket around the rear of the
pump. The pump’s wiring should go INSIDE
this metal ring.
Original pump o-ring (not used)
Pump Installation
Unscrew the metal bracket from the side
you wish to install the first pump.
Gently screw the pump to the RP-452X2 by
tightening its metal bracket. To prevent leaks, be
sure the o-ring stays clean and properly aligned
during installation.
Beneath the metal bracket is a black rubber
o-ring. Keep this for later use.
4
3
Also for serial operation, an acrylic bypass piece is
included for optional installation. This can improve
performance by preventing coolant from entering
the reservoir twice. With this installed, the reservoirs
can also be combined (see page 3).
To mount the second pump, repeat the above
process for the other pump location on the RP452X2.
Operation with One Pump
Pump Blocker
The RP-452X2 is shipped with one pump side
“blocked”. Leave this in place with its o-ring and
metal bracket if you are only installing one pump.
Inlet/Outlet
Plugs
Unscrew the front aluminum bezel and remove
the bezel and acrylic window. Try to keep both
reservoir o-rings in place behind the window.
In addition, the inlet and outlet of this pump must
stay plugged on the rear nozzle ports to prevent
leaking.
Unscrew and remove
the acrylic piece from
the left front reservoir
(P2 side).
O-ring
Combining the Reservoirs
Both reservoirs can be merged into a single
larger tank by removing the bottom connection
plug. This is done by unscrewing the front metal
plate beneath the RP-452X2, removing the plug,
and replacing the metal plate. (Be sure the black
o-ring stays in place during this process.)
Install the acrylic bypass
piece in the left front
reservoir (P2 side).
Tighten with included
screws and replace
the front window and
aluminum bezel.
Remove
Plug
Serial and Parallel Pump Operation
For parallel operation, the inlet and outlet of each pump
(P1 and P2) are used separately. Each pump simply
uses its own reservoir.
For serial operation, the rear outlet from pump one
(P1) will directly connect to the inlet of pump two (P2).
A 180-degree connecting pipe is included to make this
easier.
LED Lighting (Optional)
There are two holes on each side of the acrylic for 3mm
wide LED lights (sold separately).
Slide each LED into the small receptacles in the edge of
the acrylic. A small drop of hot glue can help hold each
LED in place.