1
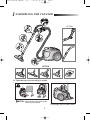
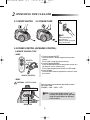
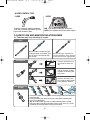
DJ68-00321M (EN+AR) (0.5) 3/27/09 11:45 AM Page 1 Operating Instructions VACUUM CLEANER ❈ Before ❈ Indoor operating this unit, please read the instructions carefully. use only. Register your product at www.samsung.com/register DJ68-00321M REV(0.5) DJ68-00321M (EN+AR) (0.5) 3/27/09 11:45 AM Page 2 IMPORTANT SAFEGUARDS 1. Read all instructions carefully. Before switching on, make sure that the voltage of your electricity supply is the same as that indicated on the rating plate on the bottom of the cleaner. 2. WARNING: Do not use the vacuum cleaner when rug or floor is wet. Do not use to suck up water. 3. Close supervision is necessary when any appliance is used by or near children. Do not allow the vacuum cleaner to be used as a toy. Do not allow the vacuum cleaner to run unattended at any time. Use the vacuum cleaner only for its intended use as described in these instructions. 4. Do not use the vacuum cleaner without a dust bin. Empty the dust bin before it is full in order to maintain the best efficiency. 5. Do not use the vacuum cleaner to pick up matches, live ashes or cigarette butts. Keep the vacuum cleaner away from stoves and other heat sources. Heat can deform and discolour the plastic parts of the unit. 6. Avoid picking up hard, sharp objects with the vacuum cleaner as they may damage the cleaner parts. Do not stand on the hose assembly. Do not put weight on the hose. Do not block the suction or the exhaust port. 7. Switch the vacuum cleaner off on the body of the machine before unplugging from the electrical outlet. Disconnect the plug from the electrical outlet before changing the dust bag or dust container. To avoid damage, please remove the plug by grasping the plug itself, not by pulling on the cord. 8. This appliance is not intended for use by persons (including children) with reduced physical, sensory or mental capabilities, or lack of experience and knowledge, unless they have been given supervision or instruction concerning use of the appliance by a person responsible for their safety. Children should be supervised to ensure that they do not play with the appliance. 9. The plug must be removed from the socket outlet before cleaning or maintaining the appliance. 10. The use of an extension cord is not recommended. 11. If your vacuum cleaner is not operating correctly, switch off the power supply and consult an authorized service agent. 12. If the supply cord is damaged, it must be replaced by the manufacturer or its service agent or a similarly qualified person in order to avoid a hazard. 13. Don’t carry the vacuum cleaner by holding the hose. Use the handle on the vacuum cleaner set. 1 DJ68-00321M (EN+AR) (0.5) 3/27/09 11:45 AM Page 3 1 ASSEMBLING THE CLEANER OPTION ▼ OPTION Features may vary according to model. CAUTION : Please do not use dust bin handle when carrying machine. For storage, park the floor nozzle. 2 DJ68-00321M (EN+AR) (0.5) 3/27/09 11:45 AM Page 4 2 OPERATING THE CLEANER 2-1 ON/OFF SWITCH 2-2 POWER CORD NOTE When removing the plug from the electrical outlet, grasp the plug, not the cord. 2-3 POWER CONTROL (INFRARED CONTROL) 1) REMOTE CONTROL TYPE - HOSE SENDER 1. Vacuum cleaner ON/OFF Press the ON/OFF button to operate the vacuum cleaner. Press again to stop the vacuum cleaner. 2. Vacuum cleaner MIN/MID Press the MIN/MID button to operate the vacuum at a low level (for curtain cleaning, etc.). Press again to operate the vacuum in a MID mode. 3. Using at MAX Press the MAX button to operate the vacuum at maximum intake. HANDLE CONTROL - BODY OPTIONAL - DIGITAL SIGNAL POWER CONTROL Press the power control button repeatedly to select the correct mode. (ON(MIN) → MID → MAX → OFF) NOTE : If the remote handle control is not working, the cleaner can be operated using the control button on the body of the machine. RECEIVER 3 DJ68-00321M (EN+AR) (0.5) 3/27/09 11:45 AM 2) BODY-CONTROL TYPE - HOSE Page 5 - BODY To reduce suction for cleaning draperies, small rugs, and other light fabrics, pull the tap air until the hole is open. MIN = For delicate surface e.g. net curtains. MAX = For hard floors and heavily soiled carpets. ▼ 2-4 HOW TO USE AND MAINTAIN THE ACCESSORIES Features may vary according to model. PIPE Adjust the length of the telescopic pipe by sliding the length control button located in the center of the telescopic pipe back and forth. To check for blockages, separate the telescopic pipe and adjust to shorten. This allows for easier removal of waste clogging the tube. ACCESSORY Push the accessory on to the end of the hose handle. Pull out and turn the dusting brush for cleaning delicate areas. To use the upholstery tool, push the accessory on to the end of the hose handle in the opposite direction. ELBOW EXTENDING TUBE 1 (OPTION) 2 3 4 5 1. Connect the elbow extending tube to connecting part for hose knob and telescopic pipe. 2. Fit the telescopic pipe to the lower part of the elbow extending tube. 3. Press the PUSH button. 4. With the PUSH button pressed, the elbow extending tube is folded. 5. Using the elbow extending tube allows hard to reach areas (e.g. under furniture)to be cleaned without having to kneel down. 4 DJ68-00321M (EN+AR) (0.5) OPTION 3/27/09 11:45 AM Page 6 Carpet Cleaning Floor Cleaning Adjust the inlet lever according to the floor surface. Remove waste matter completely if the inlet is blocked. OPTION Vacuum dust in wide area at once Remove waste matter completely if the inlet is blocked. OPTION Frequent vacuuming of hair or pet fur may cause a falling-off of the rotation due to matters tangled around the drum. In this case, clean the drum with care. 1 2 3 Remove waste matter Remove the brushbar such as dust and hair Push the Open button of from the transparent tangled around the the transparent screen brushbar using scissors. cover to separate the cover. screen. 4 5 6 For improved pickup of pet hair and fibre on carpets Remove dust inside the Insert brushbar into brush housing using a rotating belt and dry duster or crevice tool. assemble. OPTION Click the transparent screen cover back into place to reassemble. Clogs on turbine keeps brush from turning, and in this case, take care of it. Turbine Brush Remove waste To reassemble, align the cover to the Turn the lock button to matter comfront of the main body and close. After ‘UNLOCK’, and remove closing the cover, ensure that the lock For picking up pet hair pletely when waste matter. button is turned to the ‘LOCK’ position. and fibre on upholstery inlet is blocked. Warning : Use for bedclothes only. Be cautious not to damage brush during unclogging. and bed linen. Brush for blanket 5 DJ68-00321M (EN+AR) (0.5) 3/27/09 11:45 AM Page 7 3 EMPTYING THE DUST BIN 1 2 Once dust reaches the dust full mark, or once the dust full light is on, empty the dust bin. 4 3 Take the dust bin out by pressing the button. 5 Throw away dust in the bin. CLICK 6 Close the dust bin cover. Before use, push the dust bin into the main body of the vacuum cleaner until you hear the "click" sound. - Empty into a plastic bag (recommended for asthma/allergy sufferers) NOTE You may rinse the dust bin with cold water 6 Separate the dust bin cover. DJ68-00321M (EN+AR) (0.5) 3/27/09 11:45 AM Page 8 4 CLEANING THE DUST PACK 4-1. WHEN TO CLEAN THE DUST PACK - If suction is noticeably reduced during cleaning, please check the dust pack as indicated below. Suction is significantly weakened during cleaning. Shaking sound of inlet stuck to the floor (soft mats, blankets, etc.) is heard. SENDER Turn the vacuum power to 'MAX' HANDLE CONTROL If the filter check indicator turns red with the inlet floating 10 cm above flat floor, clean it. When the indicator light comes on, please empty the Dust Pack(4-2) as shown in the following illustrations. 7 DJ68-00321M (EN+AR) (0.5) 3/27/09 11:45 AM Page 9 4-2 CLEANING THE DUST PACK 1 2 Remove the dust bin and dust pack as shown. 3 Remove the fixed frame of the dust pack cover. 5 4 Wash the sponge and the filter of the dust pack with water. 7 Remove the sponge and filter from the dust pack. 6 Let the sponge and filter dry in the shade for more than 12 hours. Put the sponge and filter into the dust pack. 8 Before reassembly, align the dust pack cover and dust pack correctly. Put the assembled dust pack into the main body. NOTE : Make sure the filter is completely dry before putting it back into the vacuum cleaner. Allow 12 hours for it to dry. 8 DJ68-00321M (EN+AR) (0.5) 3/27/09 11:45 AM Page 10 5 CLEANING THE MOTOR PROTECTION FILTER Remove the motor protection filter from the vacuum cleaner. Shake and tap the dust from it and put back in machine. Take out both the dust bin and the dust pack. 6 CLEANING THE OUTLET FILTER Press the fixed frame part at the back of the main body to remove. Pull out the HEPA Filter Dust the HEPA filter. using the tab. Put the HEPA filter into the main body until you hear a ‘click’ sound. OPTION - MICRO CARBON FILTER NOTE : Replacement filters are available at your local Samsung distributor. Remove and replace the blocked outlet filter. 9 DJ68-00321M (EN+AR) (0.5) 3/27/09 11:45 AM Page 11 7 CHANGE THE BATTERY(OPTIONAL) BATTERY TYPE : AA Size NOTE 1. When the vacuum cleaner does not work, replace the batteries. If the problem persists, please contact our authorized dealer. 2. Use 2 batteries of size AA. 1. Never disassemble or recharge the batteries. WARNING 2. Never heat up the batteries or throw them into fire. 3. Do not reverse (+),(-) poles. 4. Dispose of the batteries properly. - IF YOU HAVE A PROBLEM PROBLEM Motor does not start. CAUSE REMEDY 0 No power supply. Thermal cut-out. Nozzle, suction hose or tube is blocked. Check cable, plug and socket. Leave to cool. Check for blockage and remove it. Check that the cord is not twisted or wound unevenly. Pull the cord out 2-3m and push the cord rewind button. Vacuum cleaner does not pick up dirt. Crack or hole in hose. Check hose and replace if required. Low or decreasing suction Filter is full of dust. Please check filter and, if necessary, clean as illustrated in the instructions. Suction force is gradually decreasing. Cord does not rewind fully. 10 DJ68-00321M (EN+AR) (0.5) 3/27/09 11:45 AM Page 12 DJ68-00321M (EN+AR) (0.5) 3/27/09 11:45 AM Page 13 Page 14 ٧ 3/27/09 11:45 AM )DJ68-00321M (EN+AR) (0.5 ﺗﻐﻴﻴﺮ اﻟﺒﻄﺎرﻳﺔ )اﺧﺘﻴﺎري( ﻧﻮع اﻟﺒﻄﺎرﻳﺔ :ﺣﺠﻢ AA ﻣﻼﺣﻈﺔ .١إن ﻛﺎﻧﺖ اﳌﻜﻨﺴﺔ اﻟﻜﻬﺮﺑﺎﺋﻴﺔ ﻻ ﺗﻌﻤﻞ ،اﺳﺘﺒﺪل اﻟﺒﻄﺎرﻳﺎت. إن اﺳﺘﻤﺮت اﳌﺸﻜﻠﺔ ،اﺗﺼﻞ ﲟﻮزﻋﻨﺎ اﳌﻌﺘﻤﺪ. .٢اﺳﺘﻌﻤﻞ ﺑﻄﺎرﻳﺘﲔ ﻣﻦ ﺣﺠﻢ .AA .١ﻻ ﺗﻔﻚ اﻟﺒﻄﺎرﻳﺎت أﺑﺪًا أو ﺗﻌﻴﺪ ﺷﺤﻨﻬﺎ. ﲢﺬﻳﺮ .٢اﺣﺮص ﻋﻠﻰ ﻋﺪم ﺗﺴﺨﲔ اﻟﺒﻄﺎرﻳﺎت أو إﻟﻘﺎﺋﻬﺎ ﺑﺎﻟﻨﺎر. .٣ﻻ ﺗﻌﻜﺲ اﻟﻘﻄﺒﲔ ).(-) ،(+ .٤ﺗﺨﻠﺺ ﻣﻦ اﻟﺒﻄﺎرﻳﺎت ﺑﺸﻜﻞ ﺻﺤﻴﺢ. إن ﻛﺎﻧﺖ ﻟﺪﻳﻚ ﻣﺸﻜﻠﺔاﻟﺴﺒﺐ اﳊﻞ اﶈﺮك ﻻ ﻳﻌﻤﻞ . ﻻ ﻳﻮﺟﺪ ﺗﻴﺎر ﻛﻬﺮﺑﺎء. اﻧﻘﻄﺎع ﺑﺴﺒﺐ ارﺗﻔﺎع اﳊﺮارة. اﻓﺤﺺ اﻟﻜﺎﺑﻞ واﻟﻔﻴﺸﺔ واﳌﻘﺒﺲ. اﺗﺮﻛﻪ ﻳﺒﺮد. ﻗﻮة اﻟﺸﻔﻂ ﺗﻘﻞ ﺗﺪرﻳﺠﻴًﺎ. اﻟﻔﻮﻫﺔ أو ﺧﺮﻃﻮم أو أﻧﺒﻮب اﻟﺸﻔﻂ ﻣﺴﺪود. ﺗﺄﻛﺪ ﻣﻦ وﺟﻮد أي اﻧﺴﺪادات وﺗﺨﻠﺺ ﻣﻨﻬﺎ. اﻟﺴﻠﻚ ﻻ ﻳﻠﻒ ﺑﺎﻟﻜﺎﻣﻞ. ﺗﺄﻛﺪ ﻣﻦ أن اﻟﺴﻠﻚ ﻏﻴﺮ ﻣﻠﺘﻮ أو ﻣﻠﺘﻒ ﺑﺸﻜﻞ ﻏﻴﺮ ﻣﺘﺴﺎو. اﺳﺤﺐ اﻟﺴﻠﻚ إﻟﻰ اﳋﺎرج ﻣﻦ ٢ إﻟﻰ ٣م ﺛﻢ اﺿﻐﻂ زر ﻟﻒ اﻟﺴﻠﻚ. اﳌﻜﻨﺴﺔ اﻟﻜﻬﺮﺑﺎﺋﻴﺔ ﻻ ﺗﻠﺘﻘﻂ اﻷوﺳﺎخ. ﻳﻮﺟﺪ ﺷﺮخ أو ﻓﺘﺤﺔ ﺑﺎﳋﺮﻃﻮم. اﻓﺤﺺ اﳋﺮﻃﻮم واﺳﺘﺒﺪﻟﻪ إذا ﻟﺰم اﻷﻣﺮ. ﻗﻮة اﻟﺸﻔﻂ ﻣﻨﺨﻔﻀﺔ أو ﺗﺘﻨﺎﻗﺺ. اﻟﻔﻠﺘﺮ ﳑﺘﻠﺊ ﺑﺎﻟﻐﺒﺎر. اﻓﺤﺺ اﻟﻔﻠﺘﺮ وﻧﻈﻔﻪ إذا ﻟﺰم اﻷﻣﺮ ﺑﺎﺗﺒﺎع اﻟﺘﻌﻠﻴﻤﺎت اﳌﻮﺿﺤﺔ. اﳌﺸﻜﻠﺔ ١٠ Page 15 ٥ 3/27/09 11:45 AM ﺗﻨﻈﻴﻒ ﻓﻠﺘﺮ ﺣﻤﺎﻳﺔ اﶈﺮك اﻧﺰع ﻓﻠﺘﺮ ﺣﻤﺎﻳﺔ اﶈﺮك ﻣﻦ اﳌﻜﻨﺴﺔ اﻟﻜﻬﺮﺑﺎﺋﻴﺔ. اﻧﻔﺾ اﻟﻐﺒﺎر ﻣﻨﻪ وﺿﻌﻪ ﻣﺮة أﺧﺮى ﺑﺎﳉﻬﺎز. أﺧﺮج ﻛﻼً ﻣﻦ ﺻﻨﺪوق اﻟﻐﺒﺎر وﻛﻴﺲ اﻟﻐﺒﺎر. ٦ )DJ68-00321M (EN+AR) (0.5 ﺗﻨﻈﻴﻒ ﻓﻠﺘﺮ اﻟﺘﻔﺮﻳﻎ اﺿﻐﻂ ﺟﺰء اﻹﻃﺎر اﻟﺜﺎﺑﺖ اﳌﻮﺟﻮد ﺧﻠﻒ اﳉﺴﻢ اﻟﺮﺋﻴﺴﻲ واﻧﺰﻋﻪ. اﺳﺤﺐ ﻓﻠﺘﺮ HEPAﺑﺎﺳﺘﻌﻤﺎل اﻟﻠﺴﺎن. اﻧﻔﺾ اﻟﺘﺮاب ﻣﻦ ﻓﻠﺘﺮ .HEPA ﺿﻊ ﻓﻠﺘﺮ HEPAﻣﻜﺎﻧﻪ داﺧﻞ اﳉﺴﻢ اﻟﺮﺋﻴﺴﻲ إﻟﻰ أن ﺗﺴﻤﻊ ﺻﻮت ﻃﻘﻄﻘﺔ. اﺧﺘﻴﺎري -ﻓﻠﺘﺮ MICRO CARBON ﻣﻼﺣﻈﺔ :ﻗﻄﻊ ﻏﻴﺎر اﻟﻔﻼﺗﺮ ﻣﺘﻮﻓﺮة ﻟﺪى ﻣﻮزع ﺳﺎﻣﺴﻮﱋ اﶈﻠﻲ. اﻧﺰع ﻓﻠﺘﺮ اﻟﺘﻔﺮﻳﻎ اﳌﺴﺪود ﺛﻢ ﺿﻌﻪ ﻣﻜﺎﻧﻪ ﺛﺎﻧﻴﺔ. ٩ DJ68-00321M (EN+AR) (0.5) 3/27/09 11:45 AM Page 16 Page 17 ٤ )DJ68-00321M (EN+AR) (0.5 3/27/09 11:45 AM ﺗﻨﻈﻴﻒ ﻛﻴﺲ اﻟﻐﺒﺎر ١-٤ﻣﺘﻰ ﻳﻨﺒﻐﻲ ﺗﻨﻈﻴﻒ ﻛﻴﺲ اﻟﻐﺒﺎر -إن ﻗﻠﺖ ﻗﻮة اﻟﺸﻔﻂ ﺑﺸﻜﻞ ﻣﻠﺤﻮظ أﺛﻨﺎء اﻟﺘﻨﻈﻴﻒ ،اﻓﺤﺺ ﻛﻴﺲ اﻟﻐﺒﺎر ﻛﻤﺎ ﻫﻮ ﻣﻮﺿﺢ. وﺣﺪة اﻹرﺳﺎل أدر ﻗﻮة ﺷﻔﻂ اﳌﻜﻨﺴﺔ إﻟﻰ ص'MAX اﻟﺘﺤﻜﻢ ﺑﺎﳌﻘﺒﺾ ○ ○ ○ ○ ○ ○ ○ ○ ○ ○ ○ ○ ○ ○ ○ ○ ○ ○ ○ ○ ○ ○ ○ ○ ○ ○ ○ ○ ○ ○ ○ ○ ○ ○ ○ ○ ○ ○ ○ ○ ○ ○ ○ ○ ○ ○ ○ ○ ○ ○ ○ ○ ○ ○ ○ ○ ○ ○ ○ ○ ○ ○ ○ ○ ○ ○ ○ ○ ○ ○ ○ ○ ○ إن أﺿﺎء ﻣﺆﺷﺮ ﻓﺤﺺ اﻟﻔﻠﺘﺮ ﺑﺎﻟﻠﻮن اﻷﺣﻤﺮ وﻛﺎن ﻣﺴﺘﻮى اﻟﺸﻔﻂ ١٠ﺳﻢ ﻓﻮق اﻷرﺿﻴﺔ، ﻳﺠﺐ ﺗﻨﻈﻴﻔﻪ. ○ ○ ○ ○ ○ ○ ○ ○ ○ ○ ○ ○ ○ ○ ○ ○ ﻋﻨﺪﻣﺎ ﻳﻀﻲء اﳌﺆﺷﺮ ،ﻳﺮﺟﻰ ﺗﻔﺮﻳﻎ ﻛﻴﺲ اﻟﻐﺒﺎر ) (٢-٤ﺑﺎﻟﻄﺮﻳﻘﺔ اﳌﻮﺿﺤﺔ ﻓﻲ اﻷﺷﻜﺎل اﻟﺘﺎﻟﻴﺔ. ٧ ○ Page 18 ٣ 3/27/09 11:45 AM )DJ68-00321M (EN+AR) (0.5 ﺗﻔﺮﻳﻎ ﺻﻨﺪوق اﻟﻐﺒﺎر ٣ ١ ٢ ﻓﻮر أن ﻳﺼﻞ اﻟﻐﺒﺎر إﻟﻰ ﻋﻼﻣﺔ اﻻﻣﺘﻼء، أو ﻓﻮر إﺿﺎءة ﻣﺼﺒﺎح اﻻﻣﺘﻼء ،ﻳﺠﺐ ﺗﻔﺮﻳﻎ ﺻﻨﺪوق اﻟﻐﺒﺎر. اﻧﺰع ﺻﻨﺪوق اﻟﻐﺒﺎر ﺑﺎﻟﻀﻐﻂ ﻋﻠﻰ اﻟﺰر. ٦ ٤ ٥ ﺗﺨﻠﺺ ﻣﻦ اﻟﻐﺒﺎر اﳌﻮﺟﻮد ﺑﺎﻟﺼﻨﺪوق. أﻏﻠﻖ ﻏﻄﺎء ﺻﻨﺪوق اﻟﻐﺒﺎر. ﻓﺮغ اﻟﻐﺒﺎر ﻓﻲ ﻛﻴﺲ ﺑﻼﺳﺘﻴﻚ.)ﻳﻨﺼﺢ ﺑﻬﺬا ﻟﺼﺎﻟﺢ ﻣﺮﺿﻰ اﻟﺮﺑﻮ واﳊﺴﺎﺳﻴﺔ( ﻣﻼﺣﻈﺔ ﳝﻜﻨﻚ ﺷﻄﻒ ﺻﻨﺪوق اﻟﻐﺒﺎر ﺑﺎﳌﺎء اﻟﺒﺎرد. ٦ اﻓﺼﻞ ﻏﻄﺎء ﺻﻨﺪوق اﻟﻐﺒﺎر. CLICK ﻗﺒﻞ اﻻﺳﺘﻌﻤﺎل ،ادﻓﻊ ﺻﻨﺪوق اﻟﻐﺒﺎر داﺧﻞ ﺟﺴﻢ اﳌﻜﻨﺴﺔ اﻟﻜﻬﺮﺑﺎﺋﻴﺔ إﻟﻰ أن ﺗﺴﻤﻊ ﺻﻮت ﻃﻘﻄﻘﺔ. Page 19 اﺧﺘﻴﺎري )DJ68-00321M (EN+AR) (0.5 3/27/09 11:45 AM bﺗﻨﻈﻴﻒ اﻟﺴﺠﺎد bﺗﻨﻈﻴﻒ اﻷرﺿﻴﺔ ﻗﻢ ﺑﺘﻌﺪﻳﻞ ﻣﺴﺘﻮى اﻟﺸﻔﻂ ﺗﺒﻌًﺎ ﻟﻨﻮع ﺳﻄﺢ اﻷرﺿﻴﺔ. ﺗﺨﻠﺺ ﻣﻦ أي ﻓﻀﻼت ﲤﺎﻣًﺎ إن ﻛﺎﻧﺖ ﻓﺘﺤﺔ اﻟﺸﻔﻂ ﻣﺴﺪودة. اﺧﺘﻴﺎري اﻛﻨﺲ اﻷﺗﺮﺑﺔ ﻓﻲ اﳌﻨﺎﻃﻖ اﻟﻮاﺳﻌﺔ ﻣﺮة واﺣﺪة. ﲤﺎﻣﺎ إن ﻛﺎﻧﺖ ﺗﺨﻠﺺ ﻣﻦ أي ﻓﻀﻼت ً ﻓﺘﺤﺔ اﻟﺸﻔﻂ ﻣﺴﺪودة. اﺧﺘﻴﺎري إن اﻟﻜﻨﺲ اﳌﺴﺘﻤﺮ ﻟﺸﻌﺮ أو ﻓﺮو اﳊﻴﻮاﻧﺎت ﻗﺪ ﻳﺆﺛﺮ ﻋﻠﻰ اﻟﺪوران ﺑﺴﺒﺐ ﺗﺸﺎﺑﻚ ﺗﻠﻚ اﳌﻮاد ﺣﻮل اﻟﻘﻄﻌﺔ اﻟﺪوارة .ﻓﻲ ﻫﺬه اﳊﺎﻟﺔ ﻧﻈﻒ اﻟﻘﻄﻌﺔ اﻟﺪوارة ﺑﻌﻨﺎﻳﺔ. ١ ٢ اﺿﻐﻂ ﻋﻠﻰ زر OPEN ﺑﻐﻄﺎء اﳊﺎﺟﺰ اﻟﺸﻔﺎف ﻟﻔﺼﻞ اﻟﻐﻄﺎء. ٤ ﻟﺘﺤﺴﲔ اﻟﺘﻘﺎط ﺷﻌﺮ اﳊﻴﻮاﻧﺎت واﳋﻴﻮط ﻣﻦ اﻟﺴﺠﺎد. اﺧﺘﻴﺎري اﻧﺰع ﻗﻀﻴﺐ اﻟﻔﺮﺷﺎة ﻣﻦ اﳊﺎﺟﺰ اﻟﺸﻔﺎف. ٥ ﺗﺨﻠﺺ ﻣﻦ اﻷﺗﺮﺑﺔ داﺧﻞ ﲡﻮﻳﻒ اﻟﻔﺮﺷﺎة ﺑﺎﺳﺘﻌﻤﺎل أداة ﻧﻔﺾ اﻟﻐﺒﺎر أو أداة اﻟﺘﺨﻠﺺ ﻣﻦ اﻟﺘﺮاب ﺑﺎﻟﺸﻘﻮق. ﻻﻟﺘﻘﺎط ﺷﻌﺮ اﳊﻴﻮاﻧﺎت واﳋﻴﻮط ﻣﻦ اﻷﺛﺎث وأﻏﻄﻴﺔ اﻟﺴﺮﻳﺮ. ﺗﺨﻠﺺ ﻣﻦ أي ﻓﻀﻼت ﻣﺜﻞ اﻷﺗﺮﺑﺔ أو اﻟﺸﻌﺮ اﳌﺘﺸﺎﺑﻚ ﺣﻮل ﻗﻀﻴﺐ اﻟﻔﺮﺷﺎة ﺑﻮاﺳﻄﺔ ﻣﻘﺺ. ٦ أدﺧﻞ ﻗﻀﻴﺐ اﻟﻔﺮﺷﺎة داﺧﻞ اﳊﺰام اﻟﺪوار وﻗﻢ ﺑﺘﺮﻛﻴﺒﻪ. ﺿﻊ ﻏﻄﺎء اﳊﺎﺟﺰ اﻟﺸﻔﺎف ﻣﻜﺎﻧﻪ ﻟﺘﺮﻛﻴﺒﻪ. إن وﺟﻮد أي اﻧﺴﺪادات ﻓﻲ اﻟﺘﺮﺑﲔ ﲤﻨﻊ اﻟﻔﺮﺷﺎة ﻣﻦ اﻟﺪوران ،وﻓﻲ ﻫﺬه اﳊﺎﻟﺔ ﻳﺠﺐ اﻟﺘﻌﺎﻣﻞ ﻣﻌﻬﺎ. ﺗﺮﺑﲔ ﻓﺮﺷﺎة اﻟﻔﺮﺷﺎة ﻟﻠﺒﻄﺎﻧﻴﺎت ٣ ﺗﺨﻠﺺ ﻣﻦ أي ﲤﺎﻣﺎ إن ﻓﻀﻼت ً ﻛﺎﻧﺖ ﻓﺘﺤﺔ اﻟﺸﻔﻂ ﻣﺴﺪودة. أدر ﻣﻔﺘﺎح اﻟﻘﻔﻞ إﻟﻰ '،'UNLOCK وﺗﺨﻠﺺ ﻣﻦ اﻟﻔﻀﻼت. ﻹﻋﺎدة اﻟﺘﺮﻛﻴﺐ ،ﺿﻊ اﻟﻐﻄﺎء ﲟﺤﺎذاة اﳉﻬﺔ اﻷﻣﺎﻣﻴﺔ ﻣﻦ اﳉﺴﻢ اﻟﺮﺋﻴﺴﻲ وأﻏﻠﻘﻪ .ﺑﻌﺪ إﻏﻼق اﻟﻐﻄﺎء ،ﺗﺄﻛﺪ ﻣﻦ ﲢﻮﻳﻞ زر إﻟﻰ '.'LOCK ﺣﺬرا ﻛﻲ ﻻ ﺗﺘﻠﻒ اﻟﻔﺮﺷﺎة ﻋﻦ ﲢﺬﻳﺮ :ﻟﻼﺳﺘﻌﻤﺎل ﻣﻊ أﻏﻄﻴﺔ اﻟﺴﺮﻳﺮ ﻓﻘﻂ .ﻛﻦ ً اﻟﺘﺨﻠﺺ ﻣﻦ اﻻﻧﺴﺪاد. ٥ Page 20 3/27/09 11:45 AM ○ (٢ﻧﻮع اﻟﺘﺤﻜﻢ ﻣﻦ ﺟﺴﻢ اﳌﻜﻨﺴﺔ -اﳋﺮﻃﻮم )DJ68-00321M (EN+AR) (0.5 ○ -اﳉﺴﻢ ○ ○ ○ ○ ○ ○ ○ ○ ﻟﺘﻘﻠﻴﻞ ﻗﻮة اﻟﺸﻔﻂ ﻟﺘﻨﻈﻴﻒ أﻏﻄﻴﺔ اﻷﺛﺎث واﻟﺴﺠﺎد اﻟﺼﻐﻴﺮ وﻏﻴﺮﻫﻢ ﻣﻦ اﳌﻨﺴﻮﺟﺎت اﻟﺼﻐﻴﺮة ،اﺳﺤﺐ ﺳﺪادة اﻟﻬﻮاء ﺣﺘﻰ ﺗﻔﺘﺢ اﻟﻔﺘﺤﺔ. ○ ○ ○ ○ = MINﻟﻠﺴﻄﺢ اﻟﺮﻗﻴﻖ ﻣﺜﻞ اﻟﺴﺘﺎﺋﺮ اﻟﺸﺒﻜﻴﺔ. = MAXﻟﻸرﺿﻴﺎت اﻟﺼﻠﺒﺔ واﻟﺴﺠﺎد ﺷﺪﻳﺪ اﻻﺗﺴﺎخ. ٤-٢ﻛﻴﻔﻴﺔ اﺳﺘﻌﻤﺎل اﻟﻜﻤﺎﻟﻴﺎت واﻻﺣﺘﻔﺎظ ﺑﻬﺎ bﻗﺪ ﺗﺨﺘﻠﻒ اﳋﺼﺎﺋﺺ ﺑﺎﺧﺘﻼف اﳌﻮدﻳﻞ. اﻷﻧﺒﻮب ﻗﻢ ﺑﺘﻌﺪﻳﻞ ﻃﻮل اﻷﻧﺒﻮب اﳌﺘﺪاﺧﻞ ﻋﻦ ﻃﺮﻳﻖ ﲢﺮﻳﻚ زر اﻟﺘﺤﻜﻢ ﺑﺎﻟﻄﻮل اﳌﻮﺟﻮد ﻟﻠﺘﺤﻘﻖ ﻣﻦ وﺟﻮد اﻧﺴﺪاد ،اﻓﺼﻞ اﻷﻧﺒﻮب اﳌﺘﺪاﺧﻞ وﻗﻢ ﺑﺘﻘﺼﻴﺮه .ﻫﺬا ﻳﺴﻤﺢ ﺑﺴﻬﻮﻟﺔ ﻓﻲ ﻣﻨﺘﺼﻒ اﻷﻧﺒﻮب اﳌﺘﺪاﺧﻞ ﻧﺤﻮ اﻟﺘﺨﻠﺺ ﻣﻦ اﻟﻔﻀﻼت اﻟﺘﻲ ﺗﺴﺪ اﻷﻧﺒﻮب. اﻷﻣﺎم واﳋﻠﻒ. ﻗﻄﻌﺔ ﻛﻤﺎﻟﻴﺎت ﻗﻢ ﺑﺘﺜﺒﻴﺖ ﻗﻄﻌﺔ اﻟﻜﻤﺎﻟﻴﺎت ﻓﻲ ﻧﻬﺎﻳﺔ ﻣﻘﺒﺾ اﳋﺮﻃﻮم. اﺳﺤﺐ ﻓﺮﺷﺎة اﻟﻐﺒﺎر ﺛﻢ أدرﻫﺎ ﻟﺘﻨﻈﻴﻒ اﻷﻣﺎﻛﻦ اﻟﺮﻗﻴﻘﺔ. ﻻﺳﺘﻌﻤﺎل أداة اﻷﺛﺎث ،ﺛﺒﺖ ﻗﻄﻌﺔ اﻟﻜﻤﺎﻟﻴﺎت ﻓﻲ ﻧﻬﺎﻳﺔ ﻣﻘﺒﺾ اﳋﺮﻃﻮم ﻓﻲ اﻻﲡﺎه اﳌﻌﺎﻛﺲ. أﻧﺒﻮب اﻟﺘﻤﺪﻳﺪ اﳌﻨﺤﻨﻲ )اﺧﺘﻴﺎري( ١ .١ .٢ .٣ .٤ .٥ ٢ ٤ ٣ ٥ ﺻﻞ أﻧﺒﻮب اﻟﺘﻤﺪﻳﺪ اﳌﻨﺤﻨﻲ ﺑﻘﻄﻌﺔ اﻟﺘﻮﺻﻴﻞ ﺑﲔ ﻣﻘﺒﺾ اﳋﺮﻃﻮم واﻷﻧﺒﻮب اﳌﺘﺪاﺧﻞ. ﺛﺒﺖ اﻷﻧﺒﻮب اﳌﺘﺪاﺧﻞ ﺑﺎﳉﺰء اﻟﺴﻔﻠﻲ ﻣﻦ أﻧﺒﻮب اﻟﺘﻤﺪﻳﺪ اﳌﻨﺤﻨﻲ. اﺿﻐﻂ زر .PUSH أﺛﻨﺎء اﻟﻀﻐﻂ ﻋﻠﻰ زر ،PUSHﻳﻄﻮى أﻧﺒﻮب اﻟﺘﻤﺪﻳﺪ اﳌﻨﺤﻨﻲ. إن اﺳﺘﻌﻤﺎل أﻧﺒﻮب اﻟﺘﻤﺪﻳﺪ اﳌﻨﺤﻨﻲ ﻳﺴﻤﺢ ﺑﺎﻟﻮﺻﻮل إﻟﻰ اﻷﻣﺎﻛﻦ اﻟﺘﻲ ﻳﺼﻌﺐ اﻟﻮﺻﻮل إﻟﻴﻬﺎ )ﻣﺜﻞ ﲢﺖ ﻗﻄﻊ اﻷﺛﺎث( ﻟﺘﻨﻈﻴﻔﻬﺎ ﺑﺪون اﳊﺎﺟﺔ إﻟﻰ اﻻﻧﺤﻨﺎء. ٤ Page 21 ٢ 3/27/09 11:45 AM )DJ68-00321M (EN+AR) (0.5 ﺗﺸﻐﻴﻞ اﳌﻜﻨﺴﺔ ١-٢ﻣﻔﺘﺎح اﻟﺘﺸﻐﻴﻞ/اﻹﻳﻘﺎف ٢-٢ﺳﻠﻚ اﻟﻜﻬﺮﺑﺎء ﻣﻼﺣﻈﺔ ﻋﻨﺪ ﻧﺰع اﻟﻔﻴﺸﺔ ﻣﻦ ﻣﺼﺪر اﻟﺘﻴﺎر ،اﻣﺴﻚ ﺑﺎﻟﻔﻴﺸﺔ وﻟﻴﺲ ﺑﺴﻠﻚ اﻟﻜﻬﺮﺑﺎء. ٣-٢اﻟﺘﺤﻜﻢ ﻓﻲ اﻟﻘﻮة ) اﻟﺘﺤﻜﻢ ﺑﺎﻷﺷﻌﺔ ﲢﺖ اﳊﻤﺮاء( (١ﻧﻮع وﺣﺪة اﻟﺘﺤﻜﻢ ﻋﻦ ﺑﻌﺪ اﳋﺮﻃﻮم○ ○ ○ ○ وﺣﺪة اﻹرﺳﺎل ○ ○ ○ ○ ○ ○ ○ ○ ○ ○ ○ اﻟﺘﺤﻜﻢ ﺑﺎﳌﻘﺒﺾ ○ ○ ]ﻳﺘﻢ اﻟﺘﺤﻜﻢ ﺑﺎﳌﻜﻨﺴﺔ ﺑﻮاﺳﻄﺔ اﻹﺷﺎرات ﲢﺖ اﳊﻤﺮاء[ .١ﺗﺸﻐﻴﻞ/إﻳﻘﺎف اﳌﻜﻨﺴﺔ اﻟﻜﻬﺮﺑﺎﺋﻴﺔ اﺿﻐﻂ زر اﻟﺘﺸﻐﻴﻞ/اﻹﻳﻘﺎف ﻟﺘﺸﻐﻴﻞ اﳌﻜﻨﺴﺔ اﻟﻜﻬﺮﺑﺎﺋﻴﺔ. اﺿﻐﻂ ﺛﺎﻧﻴﺔ ﻹﻳﻘﺎف اﳌﻜﻨﺴﺔ اﻟﻜﻬﺮﺑﺎﺋﻴﺔ. MIN/MID .٢ﺑﺎﳌﻜﻨﺴﺔ اﻟﻜﻬﺮﺑﺎﺋﻴﺔ اﺿﻐﻂ زر MIN/MIDﻟﺘﺸﻐﻴﻞ اﳌﻜﻨﺴﺔ ﻋﻠﻰ ﻣﺴﺘﻮى ﻣﻨﺨﻔﺾ )ﻟﺘﻨﻈﻴﻒ اﻟﺴﺘﺎﺋﺮ وﻏﻴﺮﻫﺎ(. اﺿﻐﻂ ﺛﺎﻧﻴﺔ ﻟﺘﺸﻐﻴﻞ اﳌﻜﻨﺴﺔ ﻋﻠﻰ وﺿﻊ .MID .٣اﺳﺘﻌﻤﺎل MAX اﺿﻐﻂ زر MAXﻟﺘﺸﻐﻴﻞ اﳌﻜﻨﺴﺔ ﺑﺄﻋﻠﻰ ﻗﻮة ﺷﻔﻂ. ○ اﳉﺴﻢ○ اﺧﺘﻴﺎري -إﺷﺎرة رﻗﻤﻴﺔ ○ ○ ○ ○ اﻟﺘﺤﻜﻢ ﺑﻘﻮة اﻟﺸﻔﻂ ارا ﻻﺧﺘﻴﺎر اﺿﻐﻂ زر اﻟﺘﺤﻜﻢ ﺑﻘﻮة اﻟﺸﻔﻂ ﻣﺮ ً اﻟﻮﺿﻊ اﻟﺼﺤﻴﺢ. )(ON(MIN) t MID t MAX t OFF ○ ○ ﻣﻼﺣﻈﺔ :إن ﻛﺎن اﻟﺘﺤﻜﻢ ﻋﻦ ﺑﻌﺪ ﺑﻮاﺳﻄﺔ اﳌﻘﺒﺾ ﻻ ﻳﻌﻤﻞ ،ﳝﻜﻦ ﺗﺸﻐﻴﻞ اﳌﻜﻨﺴﺔ ﺑﻮاﺳﻄﺔ زر اﻟﺘﺤﻜﻢ اﳌﻮﺟﻮد ﺑﺠﺴﻢ اﳌﻜﻨﺴﺔ. ○ ○ ○ ○ ○ ○ ○ ○ ○ وﺣﺪة اﻻﺳﺘﻘﺒﺎل ٣ Page 22 ١ 3/27/09 11:45 AM )DJ68-00321M (EN+AR) (0.5 ﲡﻤﻴﻊ اﳌﻜﻨﺴﺔ اﺧﺘﻴﺎري اﺧﺘﻴﺎري bﻗﺪ ﺗﺨﺘﻠﻒ اﳋﺼﺎﺋﺺ ﺑﺎﺧﺘﻼف اﳌﻮدﻳﻞ. ﺗﻨﺒﻴﻪ :ﻻ ﺗﺴﺘﻌﻤﻞ ﻣﻘﺒﺾ ﺻﻨﺪوق اﻟﻐﺒﺎر ﻋﻨﺪ ﺣﻤﻞ اﳉﻬﺎز. ارﻛﻦ ﻓﻮﻫﺔ اﻟﺒﻼط ﻟﺘﺨﺰﻳﻦ اﳌﻜﻨﺴﺔ اﻟﻜﻬﺮﺑﺎﺋﻴﺔ. ٢ Page 23 3/27/09 11:45 AM )DJ68-00321M (EN+AR) (0.5 اﺣﺘﻴﺎﻃﺎت ﻫﺎﻣﺔ .١اﻗﺮأ ﻛﻞ اﻟﺘﻌﻠﻴﻤﺎت ﺑﻌﻨﺎﻳﺔ .ﻗﺒﻞ ﺗﺸﻐﻴﻞ اﳉﻬﺎز ،ﺗﺄﻛﺪ ﻣﻦ أن ﻓﻮﻟﺖ اﻟﻜﻬﺮﺑﺎء ﻟﺪﻳﻚ ﳝﺎﺛﻞ اﻟﻔﻮﻟﺖ اﳌﺸﺎر إﻟﻴﻪ ﻋﻠﻰ اﻟﻠﻮﺣﺔ اﳌﻮﺟﻮدة أﺳﻔﻞ اﳌﻜﻨﺴﺔ. .٢ﲢﺬﻳﺮ :ﻻ ﺗﺴﺘﻌﻤﻞ اﳌﻜﻨﺴﺔ اﻟﻜﻬﺮﺑﺎﺋﻴﺔ إن ﻛﺎﻧﺖ اﻷرض ﻣﺒﻠﻠﺔ. ﻻ ﺗﺴﺘﺨﺪﻣﻬﺎ ﻟﺸﻔﻂ اﳌﺎء. .٣ﻳﺠﺐ ﺗﻮﺧﻲ اﳊﺬر ﻋﻨﺪ اﺳﺘﻌﻤﺎل اﳉﻬﺎز ﻓﻲ وﺟﻮد أﻃﻔﺎل .ﻻ ﺗﺘﺮك ﻟﻬﻢ اﻟﻔﺮﺻﺔ ﻻﺳﺘﻌﻤﺎل اﳉﻬﺎز ﻛﻠﻌﺒﺔ .وﻻ ﺗﺴﻤﺢ ﺑﺘﺸﻐﻴﻞ اﳉﻬﺎز ﺑﺪون ﺣﻀﻮر أﺣﺪ اﻟﺒﺎﻟﻐﲔ .اﺳﺘﻌﻤﻞ اﳌﻜﻨﺴﺔ اﻟﻜﻬﺮﺑﺎﺋﻴﺔ ﻓﻘﻂ ﻓﻲ اﻷﻏﺮاض اﶈﺪدة ﻟﻬﺎ اﳌﻮﺿﺤﺔ ﺑﺎﻟﺘﻌﻠﻴﻤﺎت. .٤ﻻ ﺗﺴﺘﻌﻤﻞ اﳌﻜﻨﺴﺔ اﻟﻜﻬﺮﺑﺎﺋﻴﺔ ﺑﺪون ﺻﻨﺪوق اﻟﻐﺒﺎر .ﻳﺠﺐ ﺗﻔﺮﻳﻎ ﺻﻨﺪوق اﻟﻐﺒﺎر ﻗﺒﻞ اﻣﺘﻼﺋﻪ ﻟﻼﺣﺘﻔﺎظ ﺑﺄﻋﻠﻰ ﻣﺴﺘﻮى ﻛﻔﺎءة. .٥ﻻ ﺗﺴﺘﻌﻤﻞ اﳌﻜﻨﺴﺔ اﻟﻜﻬﺮﺑﺎﺋﻴﺔ ﻓﻲ اﻟﺘﻘﺎط أﻋﻮاد اﻟﺜﻘﺎب ،أو اﻟﺮﻣﺎد اﳌﺸﺘﻌﻞ ،أو أﻋﻘﺎب اﻟﺴﺠﺎﺋﺮ .اﺣﺘﻔﻆ ﺑﺎﳌﻜﻨﺴﺔ اﻟﻜﻬﺮﺑﺎﺋﻴﺔ ﺑﻌﻴﺪًا ﻋﻦ اﳌﻮﻗﺪ أو أي ﻣﺼﺎدر ﻟﻠﺤﺮارة. ﻓﻘﺪ ﺗﺆدي اﳊﺮارة إﻟﻰ ﺗﻐﻴﻴﺮ ﺷﻜﻞ أو ﻟﻮن اﻷﺟﺰاء اﻟﺒﻼﺳﺘﻴﻜﻴﺔ ﺑﺎﻟﻮﺣﺪة. .٦ﲡﻨﺐ اﻟﺘﻘﺎط اﻷﺷﻴﺎء اﻟﺼﻠﺒﺔ واﳊﺎدة ﻓﻘﺪ ﺗﺘﻠﻒ أﺟﺰاء اﳌﻜﻨﺴﺔ .ﻻ ﺗﻘﻒ ﻓﻮق اﳋﺮﻃﻮم. وﻻ ﺗﻀﻊ أي أﺷﻴﺎء ﺛﻘﻴﻠﺔ ﻓﻮق اﳋﺮﻃﻮم.اﺣﺮص ﻋﻠﻰ ﻋﺪم اﻧﺴﺪاد اﳉﺰء اﳋﺎص ﺑﺎﻟﺸﻔﻂ أو اﻟﻄﺮد. .٧أوﻗﻒ ﺗﺸﻐﻴﻞ اﳌﻜﻨﺴﺔ اﻟﻜﻬﺮﺑﺎﺋﻴﺔ ﻣﻦ ﺟﺴﻢ اﳌﻜﻨﺴﺔ ﻗﺒﻞ ﻓﺼﻠﻬﺎ ﻋﻦ ﻣﺼﺪر اﻟﺘﻴﺎر. اﻓﺼﻞ اﻟﻔﻴﺸﺔ ﻣﻦ ﻣﺼﺪر اﻟﺘﻴﺎر ﻗﺒﻞ ﺗﻐﻴﻴﺮ ﻛﻴﺲ اﻟﻐﺒﺎر أو ﺣﺎوﻳﺔ اﻟﻐﺒﺎر .ﻟﺘﺠﻨﺐ أي ﺗﻠﻒ ،اﻧﺰع اﻟﻔﻴﺸﺔ ﺑﻌﺪ ﻣﺴﻜﻬﺎ وﻟﻴﺲ ﻋﻦ ﻃﺮﻳﻖ ﺳﺤﺐ اﻟﺴﻠﻚ. ٨ ﻫﺬا اﳉﻬﺎز ﻏﻴﺮ ﻣﺨﺼﺺ ﻟﻼﺳﺘﻌﻤﺎل ﻣﻦ ﻗﺒﻞ اﻟﺼﻐﺎر أو ﻏﻴﺮ اﻷﺳﻮﻳﺎء ﺑﺪون إﺷﺮاف ،إﻻ ﲢﺖ إﺷﺮاف ﺷﺨﺺ ﻣﺴﺆول ﻟﻴﺘﺄﻛﺪ ﻣﻦ ﺳﻼﻣﺔ اﺳﺘﻌﻤﺎل اﳉﻬﺎز. ﻳﺠﺐ ﻣﺮاﻗﺒﺔ اﻷﻃﻔﺎل اﻟﺼﻐﺎر ﻟﻠﺘﺄﻛﺪ ﻣﻦ ﻋﺪم ﻋﺒﺜﻬﻢ ﺑﺎﳉﻬﺎز. .٩ﻳﺠﺐ ﻧﺰع اﻟﻔﻴﺸﺔ ﻣﻦ اﳌﻘﺒﺲ ﻗﺒﻞ ﺗﻨﻈﻴﻒ اﳉﻬﺎز أو ﺻﻴﺎﻧﺘﻪ. .١٠ﻻ ﺑﻨﺼﺢ ﺑﺎﺳﺘﻌﻤﺎل أﺟﺰاء ﲤﺪﻳﺪ ﺳﻠﻚ اﻟﻜﻬﺮﺑﺎء. .١١إن ﻛﺎﻧﺖ اﳌﻜﻨﺴﺔ اﻟﻜﻬﺮﺑﺎﺋﻴﺔ ﻻ ﺗﻌﻤﻞ ﺑﺸﻜﻞ ﺻﺤﻴﺢ ،أوﻗﻒ اﻟﺘﺸﻐﻴﻞ واﺳﺘﺸﺮ وﻛﻴﻞ اﳋﺪﻣﺔ اﳌﻌﺘﻤﺪ. .١٢إن ﺗﻠﻒ ﺳﻠﻚ اﻟﻜﻬﺮﺑﺎء ،ﻳﺠﺐ اﺳﺘﺒﺪاﻟﻪ ﻋﻦ ﻃﺮﻳﻖ اﳌﺼﻨﻊ أو وﻛﻴﻞ اﳋﺪﻣﺔ أو ﺑﻮاﺳﻄﺔ اﻟﻔﻨﻲ اﺨﻤﻟﺘﺺ ﻟﺘﺠﻨﺐ وﻗﻮع أي ﻣﺨﺎﻃﺮ. .١٣ﻻ ﲢﻤﻞ اﳌﻜﻨﺴﺔ اﻟﻜﻬﺮﺑﺎﺋﻴﺔ ﻋﻢ ﻃﺮﻳﻖ ﺣﻤﻞ اﳋﺮﻃﻮم. اﺳﺘﻌﻤﻞ اﳌﻘﺒﺾ اﳌﻮﺟﻮد ﻋﻠﻰ ﺟﺴﻢ اﳌﻜﻨﺴﺔ اﻟﻜﻬﺮﺑﺎﺋﻴﺔ. ١ Page 24 3/27/09 11:45 AM )DJ68-00321M (EN+AR) (0.5 ﺗﻌﻠﻴﻤﺎت اﻟﺘﺸﻐﻴﻞ اﻟﻜﻬﺮﺑﺎﺋﻴﺔ اﻟﻜﻬﺮﺑﺎﺋﻴﺔ اﳌﻜﻨﺴﺔ اﳌﻜﻨﺴﺔ ❋ اﻗﺮأ ﺗﻌﻠﻴﻤﺎت اﻟﺘﺸﻐﻴﻞ ﺑﻌﻨﺎﻳﺔ ﻗﺒﻞ ﺗﺸﻐﻴﻞ ﻫﺬه اﻟﻮﺣﺪة. ❋ ﻟﻼﺳﺘﺨﺪام اﻟﺪاﺧﻠﻲ ﻓﻘﻂ. ﻟﺘﺴﺠﻴﻞ اﳌﻨﺘﺞ ﻗﻢ ﺑﺰﻳﺎرة www.samsung.com/grobal/register )DJ68-00321M REV(0.5