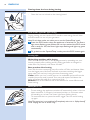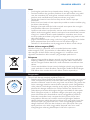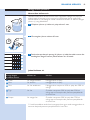
1
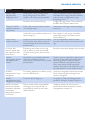
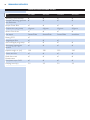
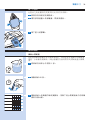
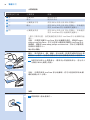
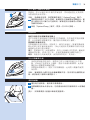
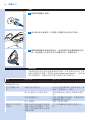
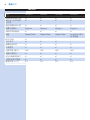
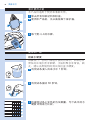
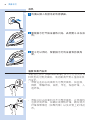
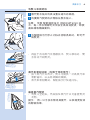
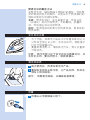
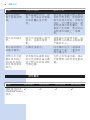
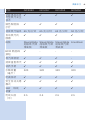
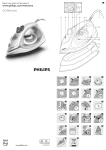
GC5000
series
User manual / 用户手册
1
GC5000 series
English 6
Bahasa Melayu 16
繁體中文 27
简体中文 37
6
English
Table of contents
Important Introduction Product overview Before first use Using the appliance Checking the water hardness Filling the water tank Heating up Temperature and steam setting Ironing Putting down the iron during ironing ECO mode (specific types only) Ironing tips Safety Auto-off Cleaning and maintenance Storage Troubleshooting Overview of models 6
7
8
8
8
8
9
9
10
11
12
12
12
12
13
13
13
15
Important
Read this user manual carefully before you use the appliance and save it for
future reference.
Danger
-- Never immerse the appliance in water.
Warning
-- Check if the voltage indicated on the type plate corresponds to the
local mains voltage before you connect the appliance.
-- Check to make sure the wall socket has the correct rating (16A)
before you connect the appliance.
-- Do not use the appliance if the plug, the mains cord or the appliance
itself shows visible damage, or if the appliance has been dropped
or leaks.
-- If the mains cord is damaged, you must have it replaced by Philips, a
service centre authorised by Philips or similarly qualified persons in
order to avoid a hazard.
-- Never leave the appliance unattended when it is connected to the mains.
-- This appliance can be used by children aged 8 or above and by
persons with reduced physical, sensory or mental capabilities or lack
of experience and knowledge if they have been given instructions in
safe use of the appliance or supervision to establish safe use and if they
have been made aware of the hazards involved.
-- Do not allow children to play with the appliance.
-- Keep the appliance and its mains cord out of the reach of children
aged 8 or under when the appliance is switched on or cooling down.
-- Children are not allowed to clean the appliance without supervision.
-- Do not let the mains cord come into contact with the hot soleplate of
the iron.
Caution
-- Only connect the appliance to an earthed wall socket.
-- Always place and use the appliance on a stable, level and horizontal
surface. If you prefer to place the iron on its heel, make sure that you
place it on a stable surface.
-- Check the mains cord regularly for possible damage.
English
7
-- Fully unwind the mains cord before you plug it in the wall socket.
-- The soleplate of the iron can become extremely hot and may cause
burns if touched.
-- When you have finished ironing, when you clean the appliance, when
you leave the iron even for a short while and also during water filling:
put the iron in horizontal position or on its heel on a stable surface and
remove the mains plug from the wall socket.
-- Do not put perfume, vinegar, starch, descaling agents, ironing aids or
other chemicals in the water tank.
-- This appliance is intended for indoor household use only.
Electromagnetic fields (EMF)
This Philips appliance complies with all standards regarding electromagnetic
fields (EMF). If handled properly and according to the instructions in this
user manual, the appliance is safe to use based on scientific evidence
available today.
Disposal
-- Do not throw away the appliance with the normal household waste
at the end of its life, but hand it in at an official collection point for
recycling. By doing this, you help to preserve the environment.
-- To make recycling possible, the plastic parts used for this appliance
have been coded. The cardboard packaging is made of 90% recycled
material and is fully recyclable.
Introduction
Thank you for buying this Philips appliance.
-- The new Philips PerfectCare Xpress steam iron offers you an innovative
way to iron your garments. We all know the fuss with traditional irons:
choosing the right temperature for your tough and delicate fabrics,
waiting for the iron to warm up and cool down to avoid the risk of
damaging clothes with a too hot iron.  Those hassles are things of the
past with the new Philips PerfectCare Xpress steam iron.
-- In principle, wrinkle removal is done by transferring heat to
fabric. Historically, this was done with a very hot soleplate. Then
steam was added to enhance heat transfer, thus making ironing much
faster. Our research confirmed that the best way to remove wrinkles
effectively is a perfect combination of intense steam and optimal
soleplate temperature. The key to effective wrinkle removal is the
steam, not the soleplate temperature. The soleplate temperature needs
to be just above the steam temperature to remove any moisture. This
is the optimal temperature.
-- In the past, a high amount of steam at this optimal temperature would
have led to water leakage. We developed a unique steam chamber that
generates a consistent output of moisture-rich steam that penetrates
deep into the fabric for fast ironing with no risk of water leakage.
-- Ironing is now truly simple - no temperature adjustment, no scorching,
no waiting for heating up and cooling down. Ironing takes less time, no
matter who does the ironing. With this OptimalTemp technology, every
single garment can be ironed effectively and safely.
-- This iron has been approved by The Woolmark Company Pty Ltd for
the ironing of wool-only products, provided that the garments are
ironed according to the instructions on the garment label and those
issued by the manufacturer of this iron. R1201. In the United Kingdom,
Eire, Hong Kong and India, the Woolmark trademark is a certification
trademark.
8
English
Product overview (Fig. 4)
1 ECO button (specific types only)
2 Steam trigger for vertical steaming and Steam Boost
3 Cap of filling opening
4 Water tank with water level indication
5 Smart light
6Soleplate
7 Type plate
8 Mains cord with plug
Before first use
This appliance is intended for ironing and refreshing fabrics only.
1Remove all packaging material and stickers.
2Remove the protective cover from the soleplate before you use the
appliance.
3Remove the hangtag from the iron.
Using the appliance
Checking the water hardness
Your appliance has been designed to be used with tap water. If you live in
an area with very hard water, fast scale build-up will occur. It is therefore
recommended to check the water hardness first with the test strips
provided.
1Dip the test strip in tap water for 1 second.
2Shake the strip for 60 seconds.
60 sec.
English
3Check how many squares on the test strip have changed colour and
compare with the details in the water hardness table below.
Water hardness table
Squares with colour
change
1
None
Water hardness
Advice
Very soft water
Use tap water
2
One
Soft water
Use tap water
3
Two
Medium hard water
Use mixture of 50% tap water and 50% distilled
water*
4
Three
Hard water
Use mixture of 50% tap water and 50% distilled
water or filtered water from IronCare water descale
filter.
5
Four
Very hard water
Use mixture of 30% tap water and 70% distilled
water or filtered water from IronCare water descale
filter.
* For your convenience, we recommend that you use filtered water from
IronCare water descale filter.
Note: Please visit www.philips.com/IronCare for more information on the
IronCare water descale filter.You can buy an IronCare water descale filter in
the online webshop at www.shop.philips.com/service.You can also contact the
Philips Consumer Care Centre.
Filling the water tank
Caution: Do not put perfume, vinegar, starch, descaling agents, ironing
aids or other chemicals in the water tank, as your appliance is not
designed to work with these chemicals.
1Fill the water tank up to the MAX indication with the filling cup
supplied if your tap water is soft.
Note: If you use the IronCare water descale filter, you can fill the water tank
with filtered water straight from this filter.
9
10
English
Heating up
1Put the plug in an earthed wall socket.
2The Smart light starts flashing blue to indicate that the iron is heating
up.
3When the iron is ready for use, the Smart light lights up blue
continuously.
Temperature and steam setting
The OptimalTemp technology enables you to iron all types of ironable
fabrics, in any order, without adjusting the iron temperature or steam
setting.
-- Fabrics with these symbols are ironable, for example linen, cotton,
polyester, silk, wool, viscose, rayon.
-- Fabrics with this symbol are not ironable. These fabrics include synthetic
fabrics such as Spandex or elastane, Spandex-mixed fabrics and
polyolefins (e.g. polypropylene), but also prints on garments.
English
11
Ironing
1Unfold your ironing board and set it to the appropriate height.
2Place the garment you want to steam iron on the ironing board.
Note:With the OptimalTemp technology, every single garment can be ironed
effectively and safely, even delicate fabrics like silk.
3You can start ironing when the Smart light stops flashing and lights
up continuously.
-- Thanks to the Auto Steam Sensor technology, the iron starts steaming
automatically when it is moved.
Steam Boost function (specific types only)
-- Press the steam trigger twice. The iron delivers one single shot of high
steam output to remove stubborn wrinkles.
-- During delivery of the Steam Boost, the Smart light flashes quickly.
Vertical steam ironing
-- Hold the iron in vertical position. Then press and hold the steam trigger
to steam the garment vertically.
Tip: Pull the garment with one hand to stretch it for more effective wrinkle
removal.
Hot steam is emitted from the iron. Never attempt to remove wrinkles
from a garment while someone is wearing it. Do not apply steam near
your or someone else’s body to prevent burns.
Note:Water is regularly pumped into the steam chamber, which causes the
iron to produce a pumping sound. This is normal.
12
English
Putting down the iron during ironing
-- Place the iron on its heel on the ironing board.
ECO mode (specific types only)
During ironing, you can use the ECO mode to save energy but still have
sufficient steam to iron all your garments.
Note: For the best results, we advise you to use the ‘OptimalTemp’ mode.
1Press the ECO button when the appliance is switched on. The Smart
light starts flashing green. When the iron has reached the ECO mode
and is ready for use, the Smart light stops flashing and lights up green
continuously.
2To go back to the ‘OptimalTemp’ mode, press the ECO button again.
Ironing tips
Minimising wrinkles while drying
Start wrinkle removal early in the drying process by spreading out your
laundry properly after washing and by putting garments on hangers to
make them dry naturally with fewer wrinkles.
Best practice shirt ironing
Start with the time-consuming parts like collar, cuff links and sleeves. Next,
iron the bigger parts like front and back to prevent wrinkling the bigger
parts when you are busy ironing the time-consuming parts.
Collar: When you iron a collar, start on its underside and work from the
outside (the pointy end) inwards. Turn over and repeat. Fold down the
collar and press the edge for a more crisp finish.
Buttons: Iron on the reverse side of the buttons for more effective and
faster ironing.
Safety Auto-off
-- To save energy, the appliance switches off automatically when it has not
been moved for 3 minutes in horizontal position, or 8 minutes when
left standing on its heel. The Smart light starts flashing slowly.
-- To reactivate the iron, press the steam trigger. The iron starts heating
up again.
Note:The steam iron is not switched off completely when it is in Safety Auto-off
mode. Unplug the iron to switch it off.
English
13
Cleaning and maintenance
1Clean the appliance with a moist cloth after every use.
2To easily and effectively remove stains, let the appliance heat up and
move the soleplate over a moist cloth.
Tip: Clean the soleplate regularly to ensure smooth gliding.
Storage
1Remove the plug from the wall socket.
2Empty the water tank and let the iron cool down in a safe place.
3Wind the mains cord round the heel of the appliance and fix it with
the cord clip. Store the iron on its heel in a safe and dry place.
Troubleshooting
This chapter summarises the most common problems you could
encounter with the appliance. If you are unable to solve the problem with
the information below, visit www.philips.com/support for a list of
frequently asked questions or contact the Consumer Care Centre in your
country.
14
English
Problem
Possible cause
Solution
The iron is plugged
in, but the soleplate
is cold.
There is a connection problem.
Check the mains cord, the plug and the
wall socket.
The iron does not
produce any steam.
There is not enough water in the
water tank.
Fill the water tank (see chapter ‘Using
the appliance’, section ‘Filling the water
tank’).
The iron is not hot enough to
produce steam.
Wait until the Smart light has stopped
flashing and lights up continuously.
You did not move the iron.
This iron is equipped with a motion
sensor and starts producing steam as
soon as it is moved.
The iron is not plugged in.
Plug in the iron to switch it on.
The iron does not
produce any steam
when moved.
Although the Auto Steam Sensor
technology covers a large number
of ironing movements, there may
still be some movements that do
not activate the sensor.
Press the steam trigger to start
steaming.
The iron continues to
steam when it is not
moved.
Because of the Auto Steam Sensor
Technology, steam may continue
to be produced for 1-4 seconds
to ensure good wrinkle removal at
the end of the ironing stroke. This is
normal.
If you want to avoid this, place the iron
on its heel.
The iron does not
produce Steam Boost.
You have used the Steam Boost
function too often within a very
short period.
Continue ironing in horizontal position
and wait a while before you use the
Steam Boost function again.
The iron is not hot enough.
Wait until the Smart light has stopped
flashing and lights up continuously.
You have not closed the cap of the
filling opening properly.
Press the cap until you hear a click.
You have put a chemical in the
water tank.
Rinse the water tank and do not put any
perfume or any chemical in the water
tank.
Water droplets drip
onto the fabric during
ironing.
The Smart light flashes The Safety Auto-off mode is active.
slowly.
The iron has been switched to
standby mode(see chapter ‘Safety
Auto-off ’).
Dirty water and
impurities come out
of the soleplate or the
soleplate is dirty.
Impurities or chemicals present in
the water have deposited in the
steam vents or on the soleplate.
To reactivate the iron, press the steam
trigger. The iron starts heating up again.
Clean the soleplate with a damp cloth.
English
Problem
Possible cause
15
Solution
The iron leaves a shine The surface to be ironed was
or an imprint on the
uneven, for instance because you
garment.
ironed over a seam or a fold in the
garment.
The iron is safe to use on all garments.
The shine or imprint is not permanent
and disappears when you wash the
garment. Avoid ironing over seams or
folds. You can also place a cotton cloth
over the area to be ironed to avoid
imprints.
The iron produces a
pumping sound.
Water is being pumped into the
steam chamber. This is normal.
If the pumping sound continues nonstop,
unplug the iron and contact the
Consumer Care Centre.
The iron produces a
loud pumping noise.
There is no water in the water tank.
Fill the water tank (see chapter ‘Using
the appliance’, section ‘Filling the water
tank’).
The iron steams
continuously when
placed horizontally on
the ironing board for
20-30 seconds.
The ironing board did not provide a
good flat support and this activated
the Auto Steam Sensor in the iron.
Place the iron on its heel when you are
not ironing to prevent this problem.
Overview of models
Feature
GC5060
GC5057
GC5055
GC5050
OptimalTemp technology
3
3
3
3
Compact, powerful steam
generation technology
3
3
3
3
Blue Smart light
3
3
3
3
Constant steam output
65g/min
65g/min
65g/min
50g/min
Auto Steam Sensor
3
3
3
3
Soleplate
SteamGlide
SteamGlide
SteamGlide
anodilium
ECO button
3
-
-
-
Steam Boost
3
3
3
-
Constant vertical steam
3
3
3
3
Soft-grip handle
3
3
3
3
Water tank capacity (ml)
320
320
320
320
Anti-drip system
3
3
3
3
Safety Auto-off mode
3
3
3
3
360° swivel cord
3
3
3
3
Cord length (m)
2.5
2.5
2.5
2.5
16
Bahasa Melayu
Daftar kandungan
Penting Pengenalan Gambaran keseluruhan produk Sebelum penggunaan pertama Menggunakan perkakas Memeriksa keliatan air Mengisi tangki air
Memanas Tetapan suhu dan stim Penyeterikaan Meletakkan seterika ke bawah semasa menyeterika Mod ECO (jenis tertentu sahaja)
Petua menyeterika Auto-mati Keselamatan Pembersihan dan penyelenggaraan
Penyimpanan Mencarisilapan Gambaran keseluruhan model 16
17
18
18
19
19
20
20
21
21
22
22
23
23
23
23
24
26
Penting
Baca manual pengguna ini dengan teliti sebelum anda menggunakan
perkakas dan simpan ia untuk rujukan masa depan.
Bahaya
-- Jangan sekali-kali menenggelamkan perkakas ke dalam air.
Amaran
-- Periksa sama ada voltan yang ditandakan di atas plat jenis sepadan
dengan voltan sesalur kuasa setempat sebelum anda menyambungkan
perkakas.
-- Periksa untuk pastikan soket dinding mempunyai pengkadaran betul
(16A) sebelum menyambungkan perkakas.
-- Jangan gunakan perkakas jika plag, kord sesalur kuasa atau perkakas
itu sendiri menunjukkan kerosakan yang nyata, atau jika perkakas telah
terjatuh atau bocor.
-- Jika kord sesalur kuasa rosak, ia mesti diganti oleh Philips, pusat servis
yang dibenarkan oleh Philips ataupun pihak lain seumpamanya yang
layak bagi mengelakkan bahaya.
-- Jangan biarkan perkakas tanpa dijaga apabila ia bersambung dengan
sesalur kuasa.
-- Perkakas ini boleh digunakan oleh kanak-kanak berusia 8 tahun atau
lebih dan oleh orang-orang yang kurang keupayaan fizikal, deria atau
mental atau kurang pengalaman dan pengetahuan jika mereka telah
diberi arahan dalam menggunakan perkakas ini dengan selamat atau
diberi pengawasan untuk menggunakannya dengan selamat dan jika
mereka telah dimaklumkan tentang bahaya yang ada.
-- Jangan biarkan kanak-kanak bermain dengan perkakas ini.
-- Simpan perkakas dan kord sesalur kuasa jauh dari capaian kanak-kanak
berumur 8 tahun atau kurang apabila perkakas dihidupkan atau sedang
disejukkan.
-- Kanak-kanak tidak dibenarkan membersihkan perkakas tanpa
pengawasan.
-- Jangan biarkan kord sesalur kuasa bersentuhan dengan plat tapak
seterika yang panas.
Bahasa Melayu
17
Awas
-- Sambungkan perkakas hanya kepada soket dinding yang dibumikan.
-- Sentiasa letakkan dan gunakan perkakas di atas permukaan yang stabil,
rata dan mendatar. Jika anda gemar meletak seterika pada tumitnya,
pastikan anda meletakkannya pada permukaan yang stabil.
-- Periksa kord sesalur kuasa secara tetap untuk mencari apa-apa
kerosakan.
-- Buka lilitan kord sesalur kuasa sepenuhnya sebelum anda masukkan plag
ke dalam soket dinding.
-- Bahagian plat tapak seterika boleh menjadi amat panas dan mungkin
menyebabkan kelecuran jika tersentuh.
-- Apabila anda selesai menyeterika, semasa anda membersihkan perkakas,
apabila anda meninggalkan seterika walaupun buat seketika dan semasa
mengisi air: letakkan seterika pada kedudukan mendatar atau di atas
tumitnya pada permukaan yang stabil dan tanggalkan plag sesalur kuasa
dari soket dinding.
-- Jangan masukkan minyak wangi, cuka, kanji, agen penanggal kerak, bahan
bantu penyeterikaan atau bahan kimia lain ke dalam tangki air.
-- Perkakas ini dimaksudkan untuk penggunaan di dalam rumah sahaja.
Medan elektromagnet (EMF)
Perkakas Philips ini mematuhi semua standard berkenaan medan
elektromagnet (EMF). Jika perkakas ini dikendalikan dengan betul
dan mengikut arahan dalam manual pengguna ini, ia selamat untuk
digunakan berdasarkan bukti saintifik yang terdapat pada hari ini.
Pelupusan
-- Jangan buang perkakas dengan sampah rumah yang biasa pada akhir
hayatnya, sebaliknya serahkan ke pusat pungutan rasmi untuk dikitar
semula. Dengan berbuat demikian, anda membantu memelihara alam
sekitar.
-- Untuk membolehkan kitaran semula, bahagian plastik yang digunakan
untuk perkakas ini telah dikodkan. Pembungkus kadbod dibuat dengan
90% bahan kitar semula dan boleh dikitar semula sepenuhnya.
Pengenalan
Terima kasih kerana membeli parkakas Philips ini.
-- Seterika stim Philips PerfectCare Xpress baru menawarkan cara inovatif
untuk menyeterika pakaian anda. Kita sedar akan kerunsingan dengan
seterika tradisional: memilih suhu yang betul untuk fabrik yang kasar dan
halus, menunggu seterika memanas dan menyejuk untuk mengelakkan
risiko pakaian rosak dengan seterika terlalu panas. Semua kesukaran ini
telah berlalu dengan seterika stim Philips PerfectCare Xpress baru.
-- Pada dasarnya, kedutan dihilangkan dengan memindahkan haba pada
fabrik. Mengikut sejarah, ini dilakukan dengan plat tapak yang sangat
panas. Kemudian stim ditambahkan untuk menggalakkan peralihan
haba dan menjadikan kerja menyeterika lebih pantas. Kajian kami
mengesahkan bahawa cara terbaik untuk menghilangkan kedutan
dengan berkesan adalah dengan kombinasi stim yang terlalu kuat dan
suhu plat tapak yang optimum. Kunci untuk menghilangkan kedutan
dengan berkesan ialah stim dan bukannya suhu plat tapak. Suhu plat
tapak perlukan suhu lebih tinggi sedikit daripada suhu stim untuk
menghilangkan sebarang kelembapan. Inilah suhu optimum.
18
Bahasa Melayu
-- Pada masa dahulu, sejumlah besar stim pada suhu optimum ini
akan menyebabkan air bocor. Kami membangunkan ruang stim unik
yang menjana stim kaya kelembapan dengan output konsisten yang
menembusi jauh ke dalam fabrik untuk penseterikaan pantas tanpa
risiko air bocor.
-- Menyeterika sekarang benar-benar mudah - tiada pelarasan suhu, tiada
penghangusan, tiada menunggu untuk pemanasan dan penyejukan. Masa
menyeterika berkurangan, tidak kira siapa yang menyeterika. Dengan
teknologi OptimalTemp ini, setiap sehelai pakaian boleh diseterika
dengan berkesan dan selamat.
-- Seterika ini telah diluluskan oleh The Woolmark Company Pty Ltd
untuk menyeterika produk sakhlat sahaja, asalkan pakaian diseterika
mengikut arahan pada label pakaian dan yang telah dikeluarkan oleh
pengilang seterika ini. R1201. Di United Kingdom, Eire, Hong Kong dan
India, tanda dagangan Woolmark adalah tanda dagangan perakuan.
Gambaran keseluruhan produk (Gamb. 4)
1
2
3
4
5
6
7
8
Butang ECO (jenis tertentu sahaja)
Pencetus stim untuk stim menegak dan Rangsangan Stim
Tukup bukaan isian
Tangki air dengan penunjuk aras air
Lampu pintar
Plat tapak
Plat jenis
Kord sesalur kuasa dengan plag
Sebelum penggunaan pertama
Perkakas dimaksudkan untuk menyeterika dan menyegarkan fabrik semula.
1Buang semua bahan pembungkus dan pelekat.
2Alihkan penutup pelindung dari plat tapak sebelum anda
menggunakan perkakas.
3Alihkan tag tergantung daripada seterika.
Bahasa Melayu
19
Menggunakan perkakas
Memeriksa keliatan air
Perkakas anda telah direka bentuk untuk digunakan dengan air paip. Jika
anda tinggal di kawasan airnya sangat liat, pembinaan kerak cepat akan
berlaku. Oleh itu dicadangkan untuk memeriksa keliatan air dahulu dengan
jaluran uji yang dibekalkan.
1Celupkan jaluran uji dalam air paip selama 1 saat.
2Goncangkan jaluran selama 60 saat.
60 sec.
3Periksa berapa banyak persegi di jaluran uji telah berubah warna dan
bandingkan dengan butiran jadual keliatan air di bawah.
Jadual keliatan air
Persegi dengan
perubahan warna
Keliatan air
Nasihat
1
Tiada
Air sangat lembut
menggunakan air paip
2
Dua
Air lembut
menggunakan air paip
3
Dua
Air liat sederhana
Menggunakan campuran 50% air paip dan 50% air
suling*
4
Tiga
Air liat
Gunakan campuran 50% air paip dan 50% air
suling atau air bertapis dari penuras penyahkerak
air IronCare.
5
Empat
Air sangat liat
Gunakan campuran 30% air paip dan 70% air
suling atau air bertapis dari penuras penyahkerak
air IronCare.
* Untuk kemudahan anda, kami mengesyorkan agar anda menggunakan air
terturas daripada penuras penyahkerak air IronCare.
20
Bahasa Melayu
Nota: Sila lawati www.philips.com/IronCare untuk maklumat lanjut tentang
penuras penyahkerak air IronCare. Anda boleh membeli penuras penyahkerak
air IronCare di kedai web dalam talian di www.philips.com/service. Anda juga
boleh menghubungi Pusat Layanan Pelanggan Philips.
Mengisi tangki air.
Awas Jangan letakkan minyak wangi, cuka, kanji, agen penyahkerak kerak,
pembantu penyeterikaan atau bahan kimia lain dalam tangki air, kerana
perkakas anda tidak direka bentuk untuk berfungsi dengan bahan-bahan
kimia ini.
1Isikan tangki air sehingga ke penunjuk MAKS dengan cawan pengisian
dibekalkan jika air paip anda lembut.
Nota: Jika anda gunakan penuras penyahkerak air IronCare, anda boleh
mengisi tangki air dengan air terturas terus daripada penuras ini.
Memanas
1Masukkan plag ke dalam soket dinding yang dibumikan.
2Lampu Pintar mula berkelip biru untuk menunjukkan seterika sedang
dipanaskan.
Bahasa Melayu
21
3Apabila seterika sedia untuk digunakan, lampu Pintar menyala biru
berterusan.
Tetapan suhu dan stim
Teknologi OptimalTemp membolehkan anda menyeterika pelbagai jenis
fabrik yang boleh diseterika, dengan apa saja cara, tanpa perlu melaras suhu
atau tetapan stim.
-- Fabrik dengan simbol ini boleh diseterika, seperti linen, kapas, poliester,
sutera, sakhlat, viskos, rayon.
-- Fabrik dengan simbol ini tidak boleh diseterika. Fabrik ini termasuk
fabrik sintetik seperti Spandex atau elastan, fabrik campuran Spandex
dan poliolefin (seperti polipropilena), tetapi juga corak pada pakaian.
Penyeterikaan
1Buka papan penyeterikaan anda dan laraskannya kepada ketinggian
yang sesuai.
2Letakkan pakaian yang mahu anda seterika dengan stim.
Nota: Dengan teknologi OptimalTemp, setiap helaian pakaian boleh
diseterikakan dengan berkesan dan selamat, walaupun fabrik halus seperti
sutera.
3Anda boleh mula menyeterika apabila lampu Pintar berhenti berkelip
dan menyala berterusan.
22
Bahasa Melayu
-- Terima kasih kepada teknologi Sensor Auto Steam, seterika mula
menstim secara automatik apabila ia digerakkan.
Fungsi Rangsangan Stim (jenis tertentu sahaja)
-- Tekan pencetus stim dua kali. Seterika akan menghantar satu pancutan
tinggi output stim untuk melicinkan kedutan degil.
-- Semasa menggunakan Rangsangan Stim, lampu Pintar berkelip dengan
cepat.
Penyeterikaan stim secara menegak
-- Pegang seterika dalam kedudukan menegak. Kemudian tekan pencetus
stim untuk menstim pakaian secara menegak.
Petua:Tarik pakaian dengan sebelah tangan untuk menegangkannya bagi
menghilangkan kedutan dengan lebih berkesan.
Stim panas dikeluarkan dari seterika. Jangan cuba membuang kedutan
pada pakaian ketika seseorang sedang memakainya. Jangan hembuskan
stim pada badan anda atau orang lain untuk mengelakkan melecur.
Nota: Air sentiasa dipamkan ke dalam ruang stim, yang menyebabkan seterika
menghasilkan bunyi pam. Ini adalah biasa.
Meletakkan seterika ke bawah semasa menyeterika
-- Letakkan seterika pada tumitnya di papan seterika.
Mod ECO (jenis tertentu sahaja)
Semasa menyeterika, anda boleh gunakan mod ECO untuk menjimatkan tenaga,
dan masih memiliki aliran stim yang cukup untuk menyeterika semua pakaian anda.
Nota: Untuk hasil terbaik, kami nasihatkan anda untuk menggunakan
mod ‘OptimalTemp’.
1Tekan butang ECO apabila perkakas dihidupkan. Lampu Pintar
mula berkelip hijau. Apabila seterika telah mencapai mod ECO dan
bersedia untuk digunakan, lampu Pintar berhenti berkelip dan lampu
hijau menyala berterusan.
2Untuk kembali ke mod ‘OptimalTemp’, tekan butang ECO sekali lagi.
Bahasa Melayu
23
Petua menyeterika
Meminimumkan kedutan semasa mengering
Mulakan pembuangan kedutan dari proses mengering dengan
membentangkan pakaian dengan betul selepas membasuh dan dengan
menggantung pakaian pada penyangkut untuk mengeringkannya secara
semula jadi tanpa banyak kedutan.
Langkah terbaik menyeterika kemeja
Mulakan dengan bahagian yang memakan masa seperti kolar, rangkai
manset dan lengan baju. Kemudian, seterika bahagian yang lebih besar
seperti depan dan belakang untuk mengelakkan kedutan pada bahagian ini
semasa anda menyeterika bahagian yang memakan masa.
Kolar: Apabila anda menyeterika kolar, mulakan dengan bahagian dalam
dan seterika dari luar (bahagian berbucu) ke dalam. Terbalikkan dan ulang.
Lipat kolar ke bawah dan tekan bucunya untuk hasil yang lebih kemas.
Butang: Seterika pada bahagian dalam butang untuk kerja menyeterika
yang lebih berkesan dan pantas.
Auto-mati Keselamatan
-- Untuk menjimatkan tenaga, perkakas ini mati secara automatik apabila
ia tidak digerakkan selama 3 minit dalam kedudukan mendatar, atau
selama 8 minit apabila ditinggalkan berdiri di atas tumitnya. Lampu
Pintar mula berkelip secara perlahan.
-- Untuk mengaktifkan seterika, tekan pencetus stim. Seterika mula
pemanasan lagi.
Nota: Seterika stim tidak mati sepenuhnya apabila ia dalam mod Auto-mati
Keselamatan. Cabut plag seterika untuk matikannya.
Pembersihan dan penyelenggaraan
1Bersihkan perkakas dengan kain lembab selepas setiap penggunaan.
2Untuk menghilangkan kotoran dengan mudah dan berkesan, biarkan
perkakas memanas dan gerakkan plat tapak pada kain lembap.
Petua: Bersihkan plat tapak dengan kerap untuk memastikan luncuran yang
lancar.
Penyimpanan
1Keluarkan plag dari soket dinding.
24
Bahasa Melayu
2Kosongkan tangki air dan biarkan seterika menyejuk dalam tempat
yang selamat.
3Gulungkan sesalur kuasa sekeliling tumit perkakas dan tetapkannya
dengan pengetip kord. Simpan seterika di atas tumitnya di tempat
selamat dan kering.
Mencarisilapan
Bab ini meringkaskan masalah paling lazim yang mungkin anda hadapi
dengan perkakas ini. Jika anda tidak dapat menyelesaikan masalah
dengan maklumat di bawah, lawati www.philips.com/support untuk
mendapatkan senarai soalan lazim atau hubungi Pusat Layanan Pelanggan di
negara anda.
Masalah
Penyebab yang mungkin
Penyelesaian
Plag seterika
dipasang tetapi plat
tapak dingin.
Terdapat masalah sambungan.
Periksa kord sesalur kuasa, palam dan
soket dinding.
Seterika tidak
menghasilkan stim.
Air di dalam tangki air tidak
mencukupi.
Isi tangki air (lihat bab ‘Menggunakan
perkakas’, bahagian ‘Mengisi tangki air’).
Seterika tidak cukup panas untuk
hasilkan stim.
Tunggu sehingga lampu Pintar berhenti
berkelip dan menyala berterusan.
Anda tidak alihkan seterika.
Seterika dilengkapi sensor gerak dan
mula mengeluarkan stim sebaik sahaja
digerakkan.
Seterika tidak dipasangkan plag.
Pasangkan plag untuk seterika dihidupkan.
Seterika tidak
menghasilkan stim
apabila digerakkan.
Walaupun teknologi Sensor Auto
Steam meliputi sebilangan besar
pergerakan seterika, mungkin
terdapat juga beberapa pergerakan
yang tidak mengaktifkan sensor.
Tekan pencetus stim untuk mulakan stim.
Seterika terus
mengeluarkan stim
semasa ia tidak
digerakkan.
Jika anda mahu mengelakkan ini, letakkan
Disebabkan Teknologi Sensor Auto
Steam, stim mungkin terus dihasilkan seterika di atas tumitnya.
selama 1-4 saat untuk memastikan
pembuangan kedutan yang baik di
hujung gerakan menggosok. Ini adalah
biasa.
Bahasa Melayu
25
Masalah
Penyebab yang mungkin
Penyelesaian
Seterika tidak
mengeluarkan
Rangsangan Stim.
Anda terlalu kerap menggunakan
fungsi Rangsangan Stim dalam
tempoh masa yang terlalu pendek.
Terus menyeterika dalam kedudukan
mendatar dan tunggu seketika sebelum
anda kembali menggunakan fungsi
Rangsangan Stim.
Panasnya alat seterika kurang.
Tunggu sehingga lampu Pintar berhenti
berkelip dan menyala berterusan.
Anda tidak menutup tukup bukaan
isian dengan betul.
Tekan tukup sehingga anda mendengar
bunyi klik.
Anda telah memasukkan bahan kimia
dalam tangki air.
Bilas tangki air dan jangan masukkan
sebarang pewangi atau bahan kimia
dalam tangki air.
Lampu Pintar
berkelip perlahan.
Mod Auto-mati Keselamatan sedang
aktif. Seterika telah ditukar kepada
mod bersedia (lihat bab ‘Auto-mati
Keselamatan’).
Untuk mengaktifkan seterika, tekan
pencetus stim. Seterika mula pemanasan
lagi.
Air kotor dan
kotoran keluar dari
plat tapak atau plat
tapak kotor.
Bendasing atau bahan kimia yang
ada di dalam air telah termendap
di dalam bolong stim dan/atau plat
tapak.
Bersihkan plat tapak dengan kain lembap.
Seterika
meninggalkan kilatan
atau kesan pada
pakaian.
Permukaan yang hendak diseterika
tidak rata, contohnya kerana
menyeterika di atas kelim atau lipatan
pada pakaian.
Seterika selamat digunakan pada semua
pakaian. Kilatan atau kesan tidak kekal
dan hilang apabila anda membasuh
pakaian. Elakkan menyeterika di atas
kelim atau lipatan. Anda juga boleh
letakkan kain kapas di atas kawasan yang
hendak diseterika untuk elakkan kesan.
Perkakas
mengeluarkan bunyi
mengepam.
Air sedang dipamkan ke dalam ruang
stim. Ini adalah biasa.
Jika bunyi mengepam berterusan tanpa
henti, cabut plag dan hubungi Pusat
Layanan Pengguna.
Titisan air menitik
pada fabrik semasa
menyeterika.
Tiada air dalam tangki air.
Seterika
mengeluarkan bunyi
mengepam yang kuat.
Seterika menstim
berterusan apabila
diletakkan mendatar
pada papan
menyeterika selama
20-30 saat.
Papan seterika tidak menyediakan
sokongan rata yang baik dan ini
mengaktifkan sensor Auto Steam
dalam seterika.
Isi tangki air (lihat bab ‘Menggunakan
perkakas’, bahagian ‘Mengisi tangki air’).
Letakkan seterika di atas tumitnya
apabila anda tidak menyeterika untuk
mengelakkan masalah ini.
26
Bahasa Melayu
Gambaran keseluruhan model
Ciri
GC5060
GC5057
GC5055
GC5050
Teknologi OptimalTemp
3
3
3
3
Kompak, teknologi generasi
stim berkuasa
3
3
3
3
Lampu Pintar Biru
3
3
3
3
Output stim yang tetap
65g/min
65g/min
65g/min
50g/min
Sensor Stim Auto
3
3
3
3
Plat tapak
SteamGlide
SteamGlide
SteamGlide
anodilium
Butang ECO
3
-
-
-
Rangsangan Stim
3
3
3
-
Stim menegak yang tetap
3
3
3
3
Pemegang gegenggam
lembut
3
3
3
3
Kapasiti tangki air (ml)
320
320
320
320
Sistem anti titis
3
3
3
3
Mod Auto-mati
Keselamatan
3
3
3
3
Kord putar ayun 360°
3
3
3
3
Panjang kord (m)
2.5
2.5
2.5
2.5
繁體中文
27
目錄
重要事項 簡介 產品概要 第一次使用 使用此產品 檢查水質硬度 加水至水箱內 加熱 溫度和蒸氣設定 熨燙 熨燙過程中放下熨斗 ECO 模式 (僅限特定類型) 熨燙秘訣 安全自動斷電功能 清潔與維護 收納 故障排除 機型概要 27
28
28
29
29
29
30
30
31
31
32
33
33
33
33
34
34
36
重要事項
在使用本產品前,請先仔細閱讀本使用手冊,並保留使用手冊以供
日後參考。
危險
-- 切勿將本產品浸泡於水中。
警示
-- 在使用前,請先檢查標籤上所標示的電壓是否與當地的電源系統
電壓一致。
-- 在您連接產品之前,請檢查並確定牆上插座的功率正確 (16A)。
-- 插頭、電源線或產品本身受損時,或是產品曾摔落或漏電時,請
勿使用。
-- 如果電線損壞,則必須交由飛利浦、飛利浦授權之服務中心,或
是具備相同資格的技師更換,以免發生危險。
-- 當本產品連接到電源時,必須有人看顧。
-- 8 歲以上兒童及身體官能或心智能力退化者,或是經驗與使用知
識缺乏者,可在獲得本產品之安全使用說明,或由確認安全使用
產品的人士從旁監督,並且瞭解潛在危險的狀況下使用本產品。
-- 請勿讓孩童將本產品當成玩具。
-- 當產品開啟或正在冷卻時,請勿讓 8 歲以下的兒童接觸產品或
電源線。
-- 兒童不能在沒有旁人監督的情況下清潔產品。
-- 請勿讓電源線靠近接觸熨斗的發熱底盤。
警告
-- 只將產品連接到有接地的電源插座。
-- 請將本產品放在平穩的水平面上。若您想要將熨斗直立放置,請
確認您將它放在穩固的平面上。
-- 定期檢查電線是否受損。
-- 將電源插頭插入牆上插座之前,先將電源線完全拉出。
-- 熨斗的底盤可能會變得很燙,如果碰到可能會燙傷。
-- 在您熨燙完畢、清理熨斗、即便只是短暫離開熨斗或者在注水期
間,請將熨斗水平放置或直立放置於穩固的平面上,並且將電源
插頭從牆上插座拔下。
28
繁體中文
-- 請勿將香水、醋、澱粉、除水垢劑、熨燙添加劑或其他化學物質
加入水箱中。
-- 本產品僅供居家室內使用。
電磁波 (EMF)
本飛利浦產品符合電磁波 (Electromagnetic fields,EMF) 所有相關
標準。只要使用方式正確並依照本使用手冊之說明進行操作,根據
現有的科學研究資料,使用本產品並無安全顧慮。
處理方式
-- 本產品使用壽命結束時請勿與一般家庭廢棄物一併丟棄。請將該
產品放置於政府指定的回收站,此舉能為環保盡一份心力。
-- 為利於資源回收,本產品使用的塑膠零件已標記材質編號。本產
品的紙板包裝 90% 採用再生材質製成,可完全回收。
簡介
感謝您購買此飛利浦產品。
-- 全新的飛利浦 PerfectCare Xpress 蒸氣熨斗提供您創新的熨燙
衣物方式。我們都知道傳統熨斗的麻煩之處:為粗糙和細緻的
布料選擇適合的溫度、等待熨斗加熱和冷卻以免熨斗太燙損壞衣
物。這些煩人的事在全新的飛利浦 PerfectCare Xpress 蒸氣熨
斗上已不復見。
-- 原則上,只要將熱傳導到衣料,就能輕鬆擺平頑強皺褶。歷史
上,這必須使用非常熱的熨斗底盤才能完成,後來加入了蒸氣以
加強熱傳導,如此使得熨燙更快。我們的研究肯定,密集蒸氣與
最佳熨斗底盤溫度二者的完美結合,是去除皺摺的最佳方法。有
效擺平縐褶的關鍵在於蒸氣,而不是底盤溫度。底盤溫度必須略
高於蒸氣溫度才能去除溼氣,這就是最佳溫度。
-- 在過去,這個最佳溫度下的大量蒸氣會導致蒸氣製造器漏水。我
們開發了獨特的蒸氣室以持續產出濕潤的蒸氣,其製造出的蒸氣
可滲入衣料深層,不但熨燙快速而且毫無水滴溢漏之虞。
-- 熨燙現在真的很簡單 - 無須溫度調整、不用擔心燙壞,不
需等候加熱和冷卻。不論誰熨燙衣物都比過去快速。有了
OptimalTemp 技術,您可以有效安全地熨燙每一件衣物。
-- 本熨斗獲得國際羊毛局之核准,可用於熨燙純羊毛製品,但您
須根據衣物標籤及本熨斗製造商所提供的說明熨燙衣物。R1201
。在英國、愛爾蘭、香港和印度,國際羊毛品質合格標記為認
證商標。
產品概要 (圖 4)
1
2
3
4
5
6
7
8
ECO 按鈕 (僅限特定機型)
適用垂直蒸氣與強力蒸氣的蒸氣觸動器
注水口蓋子
水箱 (附水位刻度)
智慧型指示燈
底盤
機型標籤
附插頭電源線
繁體中文
29
第一次使用
此產品之用途僅限於熨燙衣料及去除衣料異味。
1移除所有包裝材料與貼紙。
2請先移除底盤上的保護蓋,再使用產品。
3取下熨斗的標籤。
使用此產品
檢查水質硬度
您的產品專為搭配自來水使用而設計。如果您居住地區的水質硬度
很高,水垢會快速堆積。因此建議您先使用提供的試紙檢查水質硬
度。
1將試紙在自來水中浸泡 1 秒。
2甩動試紙 60 秒。
60 sec.
3檢查試紙上有幾個方塊改變顏色,並與下列水質硬度表中的詳細
資料互相比較。
繁體中文
30
水質硬度表
改變顏色的方塊
水質硬度
建議
1
無
水質很軟
使用自來水
2
一
軟水
使用自來水
3
二
水質硬度中等
混用 50% 自來水與 50% 蒸餾水*
4
三
硬水
混用 50% 自來水與 50% 蒸餾水,或者使用
來自 IronCare 除水垢濾網的過濾水。
5
四
水質硬度很高
混用 30% 自來水與 70% 蒸餾水,或者使用
來自 IronCare 除水垢濾網的過濾水。
* 基於方便性考量,我們建議您使用來自 IronCare 除水垢濾網的過
濾水。
注意: 如需更多關於 IronCare 除水垢濾網的資訊,請造訪 www.
philips.com/IronCare。您可以在線上網路商店購買 IronCare 除水
垢濾網,請造訪 www.shop.philips.com/service。您也可以聯絡飛
利浦客戶服務中心。
加水至水箱內
警告: 請勿將香水、醋、澱粉、除水垢劑、熨燙添加劑或其他化學
物質加入水箱中,因為您的產品並未設計搭配使用這些化學物質。
1如果您的自來水水質是軟水,請用注水杯盛裝自來水,將水注入
水箱至 MAX (最高) 刻度。
注意: 如果您使用 IronCare 除水垢濾網,你可以直接將來自此濾
網的過濾水注入水箱。
加熱
1將插頭插入接地插座中。
繁體中文
31
2智慧型指示燈會開始閃爍藍光,表示熨斗正在進行加熱。
3當智慧型指示燈持續亮藍光,表示熨斗已可使用。
溫度和蒸氣設定
此 OptimalTemp 技術讓您無需調整熨斗溫度或蒸氣設定,便能熨燙
各種可熨燙衣料。
-- 有亞麻、棉、聚酯纖維、絲、羊毛、人造絲、嫘縈等標誌的衣料
皆可熨燙。
-- 有 Spandex 彈性纖維或 Spandex 彈性纖維混紡衣料和聚烯烴 (
如聚丙烯) 等標誌的衣料還有印花衣物,皆不可熨燙。
熨燙
1展開熨衣板並架好適當高度。
2將您想要進行蒸汽熨燙的衣服放在熨燙板上。
注意: 有了 OptimalTemp 技術,您可以有效安全地熨燙每一件衣
物,甚至絲類的細緻衣物也沒問題。
32
繁體中文
3當智慧型指示燈停止閃爍並持續亮起時,您便可開始熨燙。
-- 拜自動蒸氣感應器技術之賜,只要移動一下,熨斗就會自動開
始蒸燙。
強力蒸氣功能 (限特定機型)
-- 按兩下蒸氣觸動器,熨斗會產生單次的高蒸氣輸出以燙平頑強
的皺摺。
-- 產生強力蒸氣時,智慧型燈會快速閃爍。
垂直蒸氣熨燙
-- 直立握住熨斗然後按住蒸氣觸動器,用蒸氣垂直熨燙衣物。
提示: 用一隻手拉直衣服,以便更有效地平撫縐褶。
熱蒸氣直接由熨斗發散而出。切勿試圖熨燙穿在任何人身上的衣
物。請勿在靠近您或他人身旁之處使用蒸氣,以防燙傷。
注意: 因為水被定時打進蒸氣室,使得熨斗產生汲水聲音,這是正
常現象。
熨燙過程中放下熨斗
-- 您也可以將熨斗直立放置在熨燙板上。
繁體中文
33
ECO 模式 (僅限特定類型)
熨燙時,您可以使用 ECO 模式節省能源,同時還能產生足夠蒸氣
以熨燙您的所有衣物。
注意: 為達最佳效果,我們建議您使用「OptimalTemp」模式。
1開啟產品後按下 ECO 按鈕,智慧型指示燈會開始閃爍綠光。當
熨斗達到 ECO 模式且可使用時,智慧型指示燈會停止閃爍,並
持續亮起綠光。
2回到「OptimalTemp」模式,再按一次 ECO 按鈕。
熨燙秘訣
晾乾衣服的同時將皺摺減到最少
提早在晾乾衣服的過程中開始擺平衣物皺褶:洗衣後將衣物妥善攤
開,以及用曬衣架掛曬衣物,讓衣服自然風乾減少皺痕。
熨燙襯衫的最佳作法
先從最費時的部分開始,例如領子、袖扣孔和袖子。接著熨燙面積
較大的部分如正面和背面部分,如此可避免在熨燙費時的部分時使
面積較大的部分產生皺摺。
領子:熨燙袖子時,由底面開始,從外 (尖角處) 向內熨燙。翻過來
重複相同步驟。 將領子折下來,然後熨燙邊緣使外觀更為挺立。
鈕扣:從鈕扣孔的背面熨燙,使熨燙效果更好、更快速。
安全自動斷電功能
-- 為達到節省能源的目的,當產品已有 3 分鐘沒有進行水平移
動,或者直立放置達 8 分鐘時,產品本身會自動關閉。此時智
慧型指示燈會開始緩慢閃爍。
-- 若要重新啟動熨斗,請按下蒸氣觸動器。此時熨斗便會再度開
始加熱。
注意: 當蒸氣熨斗處於安全自動斷電模式時,並非是完全關閉的狀
態。請拔掉熨斗插頭以關閉熨斗。
清潔與維護
1請在每次使用後,使用濕布清潔產品。
2若要輕鬆有效地去除水垢,可將產品加熱並在微濕的布上移動底
盤。
提示: 定期清潔熨斗底盤以確保熨燙滑順。
34
繁體中文
收納
1將插頭拔離牆上插座。
2將水箱內的水倒乾淨,並將熨斗放置於安全的地方冷卻。
3將電源線捲繞在產品的跟部上,並用其固定夾將電源線固定起
來。然後將熨斗以直立的方式放置在安全、乾燥的地方。
故障排除
本章概述您使用本產品時最常遇到的問題。如果您無法利用以下資
訊解決您遇到的問題,請造訪 www.philips.com/support,上面列有
常見問題清單,或聯絡您所在國家/地區的客戶服務中心。
問題
可能原因
解決方法
熨斗已經插電,但
是底盤仍是冷的。
電源連接有問題。
檢查電源線,插頭和插座。
熨斗不會產生蒸
氣。
水箱中的水量不足。
加水至水箱 (請參閱「使用此產品」單
元的「水箱加水」一節)。
熨斗的溫度不足以產生蒸氣。
等待智慧型指示燈停止閃爍且持續亮
起。
您沒有移動熨斗。
本熨斗配備動作感測器,只要有所移
動便會開始產生蒸氣。
熨斗未插電。
將熨斗插電並開啟。
儘管自動蒸氣感應器技術能夠
涵蓋大部份的熨燙動作,其中
仍有一些熨燙動作無法引起感
測器的反應。
按下蒸氣觸動器來啟動蒸氣產生功
能。
移動熨斗時沒有產
生蒸氣。
繁體中文
問題
可能原因
解決方法
熨斗不移動時會持
續產生蒸氣。
因為具備自動蒸氣感測器技
術,熨斗可能會繼續產生蒸氣
1 至 4 秒,以確保在熨燙動作
接近完成時能妥善燙平皺褶。
這是正常現象。
如果您要避免這種情形,請將熨斗直
立放置。
熨斗沒有產生強力
蒸氣。
您在非常短的時間內過度使用
強力蒸氣功能。
請保持水平位置繼續熨燙,靜待一陣
子之後,再使用強力蒸氣功能。
熨斗不夠燙。
等待智慧型指示燈停止閃爍且持續亮
起。
您沒有正確地蓋上加水蓋。
按壓加水蓋,直到聽到喀搭聲。
您在水箱中加了化學物質。
以水清洗水箱,不要將任何的香水或
化學物質倒入水箱中。
熨燙時,水滴滴到
衣料上。
35
智慧型指示燈緩慢
閃爍。
若要重新啟動熨斗,請按下蒸氣觸動
安全自動斷電模式處於啟動狀
態。熨斗已切換到待機模式 (請 器。此時熨斗便會再度開始加熱。
參閱本單元的「安全自動斷電
模式」)。
污水和雜質從底盤
產生或者底盤太
髒。
水中雜質或化學物質可能會沈
積在蒸氣通氣孔或底盤上。
請用濕布清潔底盤。
熨斗在衣服上留下
亮痕或燙印。
待熨燙的表面不平整,例如褶
縫或折線。
此熨斗適合熨燙各種衣物。亮痕或燙
印並非永久,會在衣服洗滌後消失。
請避開褶縫或折線熨燙。您也可以在
待熨燙的區域上放置一塊棉布,以避
免留下燙印。
熨斗會發出汲水聲
音。
這是因為水被打進蒸氣室,此
為正常現象。
如果汲水聲音持續不停,請拔掉熨斗
插頭,並聯絡客戶服務中心。
熨斗會發出響亮的
汲水噪音。
水箱中沒有水。
加水至水箱 (請參閱「使用此產品」單
元的「水箱加水」一節)。
熨斗水平放在熨燙
板上 20 到 30 秒
後,會不斷產生蒸
氣。
熨燙板並未提供良好平坦的支
撐,因此啟動了熨斗的自動蒸
氣感應器。
不使用熨斗時,將熨斗直立放置以避
免此問題發生。
36
繁體中文
機型概要
功能
GC5060
GC5057
GC5055
GC5050
OptimalTemp 技術
3
3
3
3
輕巧強力的蒸氣產
生技術
3
3
3
3
藍色智慧型指示燈
3
3
3
3
連續蒸氣輸出
65g/min
65g/min
65g/min
50g/min
自動蒸氣感應器
3
3
3
3
底盤
SteamGlide
SteamGlide
SteamGlide
Anodilium 極化
超滑底盤
ECO 按鈕
3
-
-
-
強力蒸汽
3
3
3
-
連續垂直蒸氣
3
3
3
3
防滑握把
3
3
3
3
水箱容量 (毫升)
320
320
320
320
底盤防漏設計
3
3
3
3
安全自動斷電模式
3
3
3
3
360度旋轉式電線
3
3
3
3
電線長度 (公尺)
2.5
2.5
2.5
2.5
简体中文
目录
注意事项 简介 产品概述 首次使用之前 使用本产品 检查水硬度 给水箱注水
加热 温度和蒸汽设定 电熨斗和挂烫机 熨烫期间放下熨斗 ECO 低能耗模式(仅限于特定型号) 熨烫提示
安全自动关熄 清洁和保养 存储 故障种类和处理方法 型号概述 37
37
39
39
40
40
40
41
42
42
43
44
44
44
45
45
45
46
48
注意事项
使用本产品之前,请仔细阅读本使用说明书,并
妥善保管以备日后参考。
危险
-- 切勿将产品浸入水中。
警告
-- 连接产品电源前,请检查型号铭牌所标示的电
压与当地电源电压是否一致。
-- 在将产品连接电源之前,检查以确保电源插座
具有正确的额定功率(16 安)。
-- 如果插头、电源线或产品本身已经明显损坏,
或产品曾坠落或出现渗漏,请勿再使用产品。
-- 如果电源软线损坏,为了避免危险,必须由制
造商、其维修部或类似部门的专业人员来更换。
-- 在产品接通电源期间,使用者不得离开。
-- 本产品不适合由 8 岁或以上 下年龄的儿童以
及肢体不健全、感觉或精神上有障碍或缺乏相
关经验和知识的人士使用,除非有人对他们使
用本产品进行监督或指导,以确保他们安全使
用,并且让他们意识到相关的危害。
38
简体中文
-- 切勿让儿童玩耍本产品。
-- 当产品已通电或者正在冷却时,应将产品及其
电源线置于 8 岁或以下儿童触及不到的地方。
-- 儿童只有在监督下才可清洁本产品。
-- 切勿让电源线触及高温电熨斗底板。
注意
-- 产品只能使用带接地线的插座。
-- 务必在稳固、平整且水平的表面上放置和使用
本产品。如果您倾向于将熨斗竖立放置,请确
保将其放在稳固的表面上。
-- 定期检查电源线是否损坏。
-- 将产品插入电源插座之前,请将电源线完全解
开。
-- 熨斗的底板会变得非常烫,如触摸喷嘴,则会
导致烫伤。
-- 当完成熨烫、清洁产品以及在短时间离开熨
斗,抑或是在注水时:请将熨斗水平放置,或
竖立放置在稳固的表面上,并且从电源插座上
拔下电源插头。
-- 切勿将香水、醋、淀粉、除垢剂、烫衣剂或其
它化学品注入水箱内。
-- 本产品仅限于室内使用。
电磁场 (EMF)
这款飞利浦产品符合关于电磁场 (EMF) 的相关标
准。据目前的科学证明,如果正确使用并按照本
用户手册中的说明进行操作,本产品是安全的。
弃置
-- 弃置产品时,请不要将其与一般生活垃圾堆放
在一起;应将其交给官方指定的回收点。这样
做有利于环保。
-- 为了实现回收,本产品使用的塑料部件已编
码。纸板包装由 90% 的可回收材料制造并且
完全可回收。
简体中文
39
简介
感谢您购买本飞利浦产品。
-- 全新的飞利浦 PerfectCare Xpress 蒸汽电熨
斗可让您以创新的方式熨烫衣物。我们完全了
解传统熨烫的不便之处:为难烫的面料和精细
面料选择合适的温度;等待熨斗加热和冷却,
以免过烫的熨斗损坏衣物。有了全新飞利浦
PerfectCare Xpress 蒸汽电熨斗,您可以彻底
告别这些麻烦。
-- 原则上,除皱是通过将热量传递至衣物来完成
的。过去,这通过极烫的底板来实现。随后引
入了蒸汽来提高热传递,从而大大加快了熨烫
速度。我们的研究表明,有效除去褶皱的最佳
方法是将强力蒸汽和最佳底板温度完美组合。
有效去除顽固褶皱的关键是蒸汽,而不是底板
温度。底板温度需要高于蒸汽温度来去除湿
气。这就是最佳温度。
-- 过去,在此最佳温度下的大量蒸汽会导致漏
水。我们研发了一种独特的蒸汽室,可持续输
出水汽丰富的蒸汽,其产生的蒸汽可深入渗透
面料,实现快速熨烫,而不会产生漏水风险。
-- 现在熨烫变得真正轻松而简单 - 无需调节温
度、不会烧焦且无需等待加热和冷却。谁都可
以轻松熨烫,熨烫更省时。得益于 智能温控技
术(OptimalTemp) 技术,每一件衣物都可实现安
全高效地熨烫
-- 本熨斗已获得 The Woolmark Company Pty
Ltd 的批准,只要严格按照按照衣物标签和本
熨斗制造商提供的说明熨烫衣物,就可用来熨
烫纯羊毛产品。R1201。在英国、爱尔兰、中
国香港和印度,Woolmark 商标是认证商标。
产品概述 (图 4)
1 ECO 低能耗按钮(仅限于特定型号)
2 蒸汽开关用于垂直蒸汽熨烫和蒸汽束喷射
3 注水口盖
4 水箱(带水位指示)
5 智能指示灯
6 底板
7 型号铭牌
8 带插头的电源线
40
简体中文
首次使用之前
本产品仅适用于熨烫和清新衣物。
1除去所有包装材料和标签。
2使用本产品前,先从底板取下保护盖。
3取下熨斗上的吊牌。
使用本产品
检查水硬度
根据设计,您的产品适合使用自来水。如果您所
居住的区域水质非常硬,水垢积聚会非常快。因
此,建议先用随附的测试条检查水硬度。
1将测试条浸入自来水中 1 秒钟。
2将测试条摇动 60 秒钟。
60 sec.
3检查测试条上变色的方块数量,与下表中的水
硬度详情进行比较。
简体中文
41
水硬度表
变色的方块
1
无
水硬度
水很软
建议
使用自来水
2
一个
软水
使用自来水
3
二个
中等硬水
混用 50% 自来水和 50% 蒸馏水*
4
三个
硬水
5
四个
水很硬
使用 50% 自来水和 50% 蒸馏
水的混合水,或经过 熨水净
(IronCare) 除水垢滤网过滤的水。
使用 30% 自来水和 70% 蒸馏
水的混合水,或经过 熨水净
(IronCare) 除水垢滤网过滤的水。
* 为了您的方便,建议您使用经 熨水净
(IronCare) 除水垢滤网过滤的水。
注意: 有关 熨水净 (IronCare) 除水垢滤网的详
细信息,请访问 www.philips.com/IronCare。
您可以通过在线商店 www.shop.philips.com/
service 购买 熨水净 (IronCare) 除水垢滤网。您
也可以联系飞利浦客户服务中心。
给水箱注水
注意: 切勿将香水、醋、淀粉、除垢剂、烫衣剂
或其它化学品注入水箱内,因为您的产品不适合
使用这些化学品。
1如果自来水水质较软,则用随附的注水杯为水
箱注水至 MAX(最高)标示。
注意: 如果使用 熨水净 (IronCare) 除水垢滤
网,则可以使用直接从该滤网过滤的水为水箱注
水。
42
简体中文
加热
1将插头插入有接地的电源插座。
2智能指示灯开始呈蓝色闪烁,表明熨斗正在加
热。
3熨斗可以用时,智能指示灯将呈蓝色持续亮
起。
温度和蒸汽设定
智能温控技术 (OptimalTemp) 技术可让您熨烫各
种类型的可熨烫面料,而无需调节熨斗温度或蒸
汽设定。
-- 带有这些标志的面料为可熨烫面料,如亚麻、
棉质、聚酯纤维、丝质、羊毛、粘胶纤维、人
造纤维。
-- 带有此标志的面料为不可熨烫面料,此类面料
包括合成纤维,如氨纶或弹性纤维、氨纶混合
纤维和聚烯烃(如聚丙烯)以及衣物上的印花
布。
简体中文
43
电熨斗和挂烫机
1展开熨衣板并将其设置在适当的高度。
2将要蒸汽熨烫的衣物放在熨衣板上。
注意: 凭借 智能温控技术 (OptimalTemp) 技
术,每一件衣物都可实现安全高效地熨烫,即使
是丝绸等精细面料。
3当智能指示灯停止闪烁并持续亮起时,即可开
始熨烫。
-- 得益于自动蒸汽传感器技术,熨斗移动时,便
会自动开始熨烫。
蒸汽束喷射功能(仅限于特定型号)
-- 按下蒸汽开关两次。熨斗可提供一次高蒸汽束
喷射输出,以去除顽固的皱褶。
-- 蒸汽束喷射期间,智能指示灯快速闪烁。
垂直蒸汽熨烫
-- 将熨斗竖起来。然后按住蒸汽开关可垂直熨烫
衣物。
提示: 用一只手拉衣物将其展开,以获得更有效
的除皱效果。
44
简体中文
熨斗将喷射出高温蒸汽。切勿尝试对有人穿着的
衣物除皱。切勿在您或其他人的身边使用蒸汽,
以免烫伤。
注意: 水会定期抽入蒸汽室中,因此会导致熨斗
产生抽水声。这是正常现象。
熨烫期间放下熨斗
-- 将熨斗竖放在烫衣板上。
ECO 低能耗模式(仅限于特定型号)
在熨烫过程中,您可以使用 ECO 低能耗模式实
现节能,同时拥有足够蒸汽来熨烫您的所有衣
物。
注意: 为了获得最佳效果,我们建议您使用
“智能温控技术 (OptimalTemp) 技术”模式。
1开启产品电源后,按 ECO 低能耗按钮。
智能指示灯开始呈绿色闪烁。当熨斗达到
ECO 低能耗模式且可以使用时,智能指示灯
会停止闪烁而呈绿色持续亮起。
2要返回“智能温控技术 (OptimalTemp) 技术”
模式,请再次按 ECO 低能耗按钮。
熨烫提示
在晾干时最大程度地减少褶皱
在晾干过程中先开始除皱,即洗衣后正确展开衣
物,然后将衣物挂在衣架上自然晾干,以减少褶
皱。
简体中文
45
熨烫衬衫的最佳方法
先熨烫衣领、袖扣和袖子等耗时的部位,然后熨
烫衣物前后较大的部位,以免在忙于熨烫耗时的
部位时使较大的部位起皱。
衣领:熨烫衣领时,先从底面开始,然后从外
(尖端处)到内开始熨烫。不断翻动。折叠衣
领,然后按压领边完成熨烫。
纽扣:熨烫纽扣的反面可实现更快速、更有效的
熨烫效果。
安全自动关熄
-- 为了节能,如果本产品在水平位置未移动达 3
分钟或竖放达 8 分钟,会自动关闭。智能指示
灯会开始缓慢闪烁。
-- 要重新激活熨斗,请按蒸汽开关。熨斗会重新
开始加热。
注意: 蒸汽电熨斗处于安全自动关熄模式时,并
未完全关闭。要关闭熨斗,请拔掉插头。
清洁和保养
1每次使用后,用湿布清洁本产品。
2要轻松有效地去除污渍,让产品加热,然后在
湿布上移动底板。
提示: 定期清洁底板,以确保底板顺滑。
存储
1将插头从电源插座上拔下。
46
简体中文
2将水箱倒空,让熨斗在安全的地方充分冷却。
3将电源线绕在产品的底部,然后用线夹固定。
将熨斗竖立存放在安全干燥的地方。
故障种类和处理方法
本章归纳了使用本产品时最常见的一些问题。如
果您无法根据以下信息解决问题,请访问 www.
philips.com/support 查阅常见问题列表,或联系
您所在国家/地区的客户服务中心。
问题
可能的原因
解决方法
熨斗已经插好
插头,但底板
仍是冷的。
接触不良。
检查电源线、插头和电源
插座。
熨斗没有蒸
汽。
水箱中水不足。
向水箱中注水(请参阅“
使用本产品”一章中的“
给水箱注水”一节)。
熨斗温度不够高,无
法产生蒸汽。
等待智能指示灯停止闪烁
并持续亮起。
您未移动熨斗。
该熨斗配有动作感应器,
只要移动,便会产生蒸
汽。
简体中文
问题
可能的原因
解决方法
熨斗的插头未插入插
座。
将插头插入插座,打开熨
斗。
熨斗移动时未
产生蒸汽。
虽然自动蒸汽传感器
技术可感应大量熨斗
动作,但仍有一些动
作不会激活感应器。
按蒸汽开关开始熨烫。
熨斗在没有移
动时持续冒蒸
汽。
由于采用了自动蒸汽
传感器技术,蒸汽会
继续产生 1-4 秒,以
确保在熨烫结束时更
好地去除褶皱。这是
正常的。
如果您要避免出现这种情
况,请将熨斗竖放。
熨斗不产生蒸
汽束喷射。
您在很短的时间内过
于频繁地使用了蒸汽
束喷射功能。
持续按水平方向熨烫,稍
等片刻后再使用蒸汽束喷
射功能。
熨斗不够热。
等待智能指示灯停止闪烁
并持续亮起。
您没有正确地盖上注
水口盖。
按下盖子,直到听到喀哒
一声。
您在水箱中放入了化
学物质。
冲洗水箱,切勿将香水或
化学物质放入水箱。
智能指示灯缓
慢闪烁。
安全自动关熄模式启
动。熨斗已切换至待
机模式(请参阅“安
全自动关熄”一章)
。
要重新激活熨斗,请按蒸
汽开关。熨斗会重新开始
加热。
底板内冒出脏
水和杂质,或
底板变脏。
水中的杂质或化学物
质沉积在蒸汽出口或
底板上。
用湿布清洁熨斗底板。
熨烫时,水滴
会滴在布料
上。
47
48
简体中文
问题
可能的原因
解决方法
熨斗在衣物上
留下亮斑或印
痕。
熨烫表面不均匀,例
如,由于是在衣物缝
合或折叠处进行熨
烫。
您可放心地用此熨斗熨烫
各种可熨衣物。亮斑或印
痕不会持久存在,衣物洗
涤后,它们便会消失。避
免熨烫缝合或折叠处。为
避免产生印痕,您也可以
在熨烫区域放上一块棉
布。
熨斗发出抽水
声。
因为水正被抽入蒸汽
室中。这是正常现
象。
如果抽水声持续不断,请
拔掉熨斗的插头并联系客
户服务中心。
熨斗发出很大
的抽水噪音。
水箱中没有水。
向水箱中注水(请参阅“
使用本产品”一章中的“
给水箱注水”一节)。
将熨斗水平放
置在烫衣板上
20-30 秒钟后,
其会持续喷出
蒸汽。
烫衣板无法提供良好
的平坦支撑并由此激
活了熨斗中的自动蒸
汽感应器。
为防止出现该问题,请在
不使用熨斗时将其竖直放
置。
型号概述
功能
GC5060
智能温控技术 3
(OptimalTemp)
技术
GC5057
GC5055
GC5050
3
3
3
简体中文
功能
GC5060
49
GC5057
GC5055
GC5050
功能强劲的灵 3
巧型蒸汽发生
技术
3
3
3
蓝色智能指
示灯
3
3
3
持续蒸汽输出 65 克/分钟
65 克/分钟
65 克/分钟
50 克/分钟
自动蒸汽传
感器
3
3
3
3
底板
SteamGlide SteamGlide SteamGlide Anodilium
超级蒸汽顺 超级蒸汽顺 超级蒸汽顺
滑底板
滑底板
滑底板
ECO 低能耗
按钮
3
-
-
-
蒸汽束喷射
3
3
3
-
持续垂直蒸汽 3
3
3
3
软质手柄
3
3
3
3
水箱容量
(毫升)
320
320
320
320
防滴系统
3
3
3
3
安全自动关熄 3
模式
3
3
3
360° 绕线
装置
3
3
3
3
电线长度
(米)
2.5
2.5
2.5
2.5
3
GC50 6 0
220 V
50 H z
2350 W
218 16 0 2-16 0 5
: 40 0 8 80 0 0 0 8
GB 470 6. 1-20 0 5,
GB 470 6. 2-20 0 7, GB 4343. 1-20 0 9
GB 176 25. 1-20 0 3
26/10/2012
GC50 57
220 V
50 H z
2350 W
218 16 0 2-16 0 5
: 40 0 8 80 0 0 0 8
GB 470 6. 1-20 0 5,
GB 470 6. 2-20 0 7, GB 4343. 1-20 0 9
GB 176 25. 1-20 0 3
26/10/2012
4239.000.8080.2