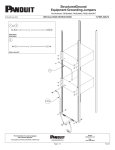
1
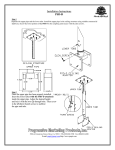
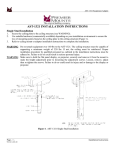
Installation Instructions
MCC/MCP UNIVERSAL “C” CLAMP ADAPTERS
Step 1: If you are installing the MCP model, make sure the 1 ½” jam nut is installed on the “C” clamps
1 ½” pipe threads prior to installing the “C” clamp in the system.
Step 2: Using a suitable pipe wrench(s), screw the “C” clamp adapter onto the (coupling) or into the (pipe)
as tight as possible its 1 ½” N.P.S (National Pipe Standard) threaded mount mating components.
Step 3:
Once maximum thread depth has been achieved, firmly tighten the ¼”x20” allen bolt on the coupling
model or the 1 ½” jam nut on the pipe model to maintain maximum thread depth.
Step 4:
With the 3” securing bolt sufficiently backed out for clearance, the “C” clamp opening can be placed
around a suitable 1” minimum to 2” maximum outside diameter pipe (truss) section. Once installed
the 3” securing bolt and locking nut are tightened to eliminate any clearance between the “C” clamp
interior opening and truss pipe.
WARNING
The ceiling should be capable of supporting a weight of at least five(5) times the projector(s) or monitor(s) weight. If it
cannot, the ceiling must be reinforced. Proper installation procedures by qualified personnel as outlined in the installation instructions
must be adhered to. Failure to do so could result in serious personal injury.
2980-A Enterprise Street, Brea, Ca. 92821 / Ph. (800) 368-9700 Fax (800) 832-4888
E-mail: [email protected] http://www.pmpi.com
03/98