1
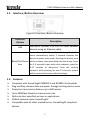
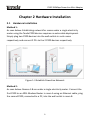
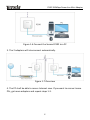
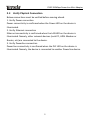
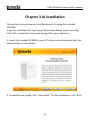
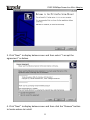
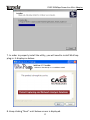
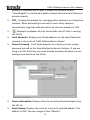
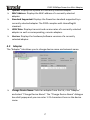
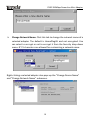
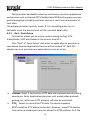
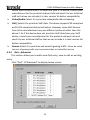
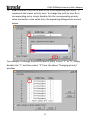
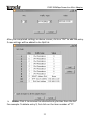
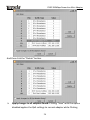
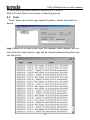
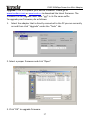
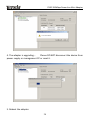
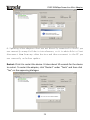
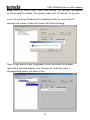
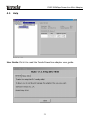
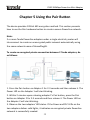
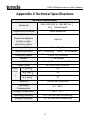
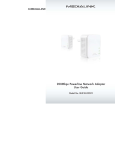
P200 200Mbps PowerLine Mini Adapter P200 200Mbps PowerLine Mini Adapter Copyright Statement is the registered trademark of Shenzhen Tenda Technology Co., Ltd. All the products and product names mentioned herein are the trademarks or registered trademarks of their respective holders. Copyright of the whole product as integration, including its accessories and software, belongs to Shenzhen Tenda Technology Co., Ltd. Without prior expressed written permission from Shenzhen Tenda Technology Co., Ltd, any individual or party is not allowed to copy, plagiarize, reproduce, or translate it into other languages. All photos and product specifications mentioned in this manual are for references only. Upgrades of software and hardware may occur; Tenda reserves the right to revise this publication and to make changes in the content hereof without obligation to notify any person or organization of such revisions or changes. If you would like to know more about our product information, please visit our website at www.tendacn.com or www.tenda.cn P200 200Mbps PowerLine Mini Adapter Table of Contents CHAPTER 1 PRODUCT OVERVIEW ................................ 1 1.1 PACKAGE CONTENTS ...................................................................... 1 1.2 LED OVERVIEW ............................................................................. 2 1.3 INTERFACE /BUTTON OVERVIEW .................................................... 3 1.4 FEATURES ....................................................................................... 3 1.5 SAFETY CONSIDERATIONS .............................................................. 4 CHAPTER 2 HARDWARE INSTALLATION ...................... 6 2.1 HARDWARE INSTALLATION ............................................................. 6 2.2 INSTALLATION INSTRUCTIONS ........................................................ 7 2.3 VERIFY PHYSICAL CONNECTION ..................................................... 9 CHAPTER 3 UI INSTALLATION ..................................... 10 CHAPTER 4 CONFIGURATION ...................................... 15 4.1 INTERFACE OVERVIEW.................................................................. 15 4.2 ADAPTER ...................................................................................... 17 4.3 QOS ....................................................................................... 19 4.3.1 4.3.2 QoS---Quick Setup .................................................................. 19 QoS---Advanced ...................................................................... 20 4.4 TOOLS ....................................................................................... 26 4.5 HELP ....................................................................................... 31 CHAPTER 5 USING THE PAIR BUTTON ....................... 32 P200 200Mbps PowerLine Mini Adapter APPENDIX 1 FAQS ......................................................... 35 APPENDIX 2 TECHNICAL SPECIFICATIONS ............... 37 APPENDIX 3 EMC STATEMENT .................................... 38 P200 200Mbps PowerLine Mini Adapter Chapter 1 Product Overview To build a network at home or office with minimum effort and cost, the Tenda 200Mbps Powerline Mini Adapter P200 is your choice. In many cases, Ethernet is just not available in places where network connectivity is needed. However, almost every room at home or office has power circuitry, which can be used to extend network connections from your broadband router Just simply plug one P200 that links to a broadband modem/router into the power outlet in one room, and plug another P200 linking to a PC or any Ethernet device in the other, you can then easily and instantly connect to the network of up to 200Mbps transmission rate. Also, it delivers data to a distance up to 300 meters away. P200 provides Quality of Service (QoS) guaranteeing high reliability and tight control of latency allowing you to quickly assign higher priority to Internet surfing/IPTV/audio/video/VOIP/online game services or specified IP/MAC addresses. The device supports 128-bit AES encryption to secure your data transmission with simple operation. Plus, the "Pair/Reset" hardware button allows you to quickly create a private Powerline network with multiple adapters involved. 1.1 Package Contents P200 200Mbps Powerline Mini Adapter CD-ROM (User Guide and Utility included) Quick Installation Guide Ethernet Cable 1 P200 200Mbps PowerLine Mini Adapter 1.2 LED Overview Figure1-1 Front Panel Overview LED Power PLC Color Status Description The device is NOT receiving Off electrical power The device is receiving electrical Solid power Green Connecting to other Powerline Fast Blink devices. The device blinks every 7~8 Slow seconds under power saving Blink mode. The device is NOT connected to a Off Powerline network. The device is connected to a Green Solid Powerline network but is not transmitting data. Blink The device is transmitting data. Off LAN Green Solid Cable NOT connected Cable connected 2 P200 200Mbps PowerLine Mini Adapter 1.3 Interface /Button Overview Figure2-2 Interface /Button Overview Interface /Button LAN Description RJ45 port: Connect it to a PC or other network devices using an Ethernet cable. System Restore/Pair/Power Save: Pressing the button twice consecutively within 2 seconds switches the device to power save mode. Pressing the button once Reset/Pair/Power while in power save mode wakes up the device. Press for 2-3 seconds to pair with other adapters; press for Save 9-11 seconds to disconnect from the existing network; while pressing for over 15 seconds, system will be restored to factory default settings. 1.4 Features Compliant with HomePlugAV IEEE802.3 and IEEE802.3u standards Plug and Play; delivers data and power through existing electric wires Powerline transmission distance up to 300 meters Up to 200Mbps Powerline transmission rate QoS prioritizes specified services or applications Default network name: HomePlugAV Compatible with all other manufacturers’ HomePlugAV-compliant devices 3 P200 200Mbps PowerLine Mini Adapter 1.5 Management utility allows you to manage all Tenda Powerline adapters on the network. 1 x 10/100Mbps Auto-MDIX Fast Ethernet port 1 x Pair/Reset button to quickly establish a secured private Powerline network Power Saving mode reduces electrical consumption down to 0.5W Advanced 128-bit AES encryption to ensure total network security Safety Considerations Observe the following to avoid any potential harm caused from improper use. DO NOT expose the device to flammable , conductive or humid objects; Make sure there is no worn-out electric wire and other appliances are stably placed. Operate it in a well-ventilated environment. DO NOT expose the device to sun shine or other heat sources; DO NOT expose the device to corrosive substances (such as acid and alkali, etc) Connect the device to a wall outlet that matches rated power requirements. Input voltage fluctuation should be less than 10%. For optimal result, connect the device to a regular wall outlet without any other devices like hair drier, electric iron, fridge or charger connected to the same outlet. Read the Quick Installation Guide before using the device. Note all safety instructions stated in both user guide and quick installation guide. Use of accessories that are not included to this product may cause fire or damage. DO NOT place any objects on the device. DO NOT expose the device to water. Keep it clean. 4 P200 200Mbps PowerLine Mini Adapter It is advisable to disconnect the device from power outlet and any other connections in lightning and storm weather though it is lightning-proof; Clean the device with a piece of soft and dry cloth instead of using liquid or aerosol cleaner. Do unplug it from wall outlet before cleaning. DO disconnect the device from power supply when not in use. Keep ventilator clean and unblocked. Substances or objects that fall into it may cause short circuit, worse even, cause fire or damage the device. DO NOT spray any liquid onto the device surface. DO NOT open the device’s shell/outer case whether working or not; Be careful when unplugging the device from wall outlet. It may be hot. Contact Tenda technical staff if you are running into problems that you are not able to solve. 5 P200 200Mbps PowerLine Mini Adapter Chapter 2 Hardware Installation 2.1 Hardware Installation Method 1: As seen below: Establishing network for rooms under a single electricity meter using the Tenda P200 devices requires no extra cable deployment. Simply plug two P200 devices into the wall outlets in such rooms respectively and connect 2 PCs to the 2 P200 devices respectively. Figure 1-3 Establish Powerline Network Method 2: As seen below: Rooms A-B are under a single electricity meter. Connect the first P200 to an ADSL Modem Router in room A using an Ethernet cable, plug the second P200, connected to a PC, into the wall outlet in room B. 6 P200 200Mbps PowerLine Mini Adapter Figure 1-4 Connect Powerline Network to Internet 2.2 Installation Instructions 1. First connect the RJ45 port on the first P200 to one of the LAN ports on the ADSL2+ Modem Router. And then plug it to a wall outlet as seen below: Figure 1-5 Connect the First P200 to the Internet-enabled ADSL2+ Modem Router 2. First connect the second P200 to the PC using an Ethernet cable. And then plug it into a wall outlet as seen below: 7 P200 200Mbps PowerLine Mini Adapter Figure 1-6 Connect the Second P200 to a PC 3. The 2 adapters will interconnect automatically. Figure 1-7 Overview 4. The PC shall be able to access Internet now. If you want to connect more PCs, get more adapters and repeat steps 1-3. 8 P200 200Mbps PowerLine Mini Adapter 2.3 Verify Physical Connection Below connections must be verified before moving ahead. 1. Verify Power connection Power connectivity is confirmed when the Power LED on the device is illuminated. 2. Verify Ethernet connection Ethernet connectivity is confirmed when the LAN LED on the device is illuminated. Namely, other network devices (such PC, ADSL Modem or Router, etc) are connected to the device. 3. Verify Powerline connection Powerline connectivity is confirmed when the PLC LED on the device is illuminated. Namely, the device is connected to another Powerline device. 9 P200 200Mbps PowerLine Mini Adapter Chapter 3 UI Installation This section instructs how to install the device’s UI using the included CD-ROM. If you are a Windows XP user, simply follow steps below. If you are using other OSs, instructions herein are also good for your references. 1. Insert the included CD-ROM to your PC’s drive and setup wizard shall run automatically as seen below: 2. To read the user guide, click “User Guide”. To start installation, click “Run”. 10 P200 200Mbps PowerLine Mini Adapter 3. Click “Next” to display below screen and then select “I accept the agreement” as below. 4. Click “Next” to display below screen and then click the “Browse” button to locate where to install. 11 P200 200Mbps PowerLine Mini Adapter 5. Keep clicking “Next” until below screen is displayed. 6. Click “Install” to display below screen. 12 P200 200Mbps PowerLine Mini Adapter 7. In order to properly install the utility, you will need to install WinPcap plug-in. It displays as below: 8. Keep clicking “Next” until below screen is displayed. 13 P200 200Mbps PowerLine Mini Adapter 9. Click “Finish” on WinPcap Setup Wizard and then “Finish” on below screen: 10. To run the utility, simply double click 14 on your desktop. P200 200Mbps PowerLine Mini Adapter Chapter 4 Configuration This section instructs you how to config advanced settings on the P200 utility, such as encryption, changing device name, QoS, and restore factory defaults, etc. You can also view other adapters on the powerline network and their link rates. 4.1 Interface Overview After the utility is installed, double-click the Tenda PowerLine AV Utility icon on your desktop to start the configuration of the P200. Four menus are included on the utility as seen below: Adapter, QoS, Tools and Help. The left area on the Utility displays a list of local Powerline adapters while the right area shows more info of such adapters. HomePlugAV Displays local Powerline network name. Powerline adapters MUST share an identical network name to establish a Powerline network. Based on the network name, the Powerline 15 P200 200Mbps PowerLine Mini Adapter network is classified into 2 types: a Powerlilne network named “HomePlugAV” is considered a public network otherwise identified as a private network. CCO Displays the adapter for managing other adapters on a Powerline network. When attempting to connect to each other, adapters automatically negotiate with each other to select an adapter as CCO. : Displays the adapter directly connected to the PC that is running the Utility. Local Networks: Displays only Tenda adapters on the same Powerline network in the order of “MAC Address/Device Name”. Device Password Each Tenda adapter has a factory preset, unique password printed on the label attached to device’s bottom. If you are using it for the first time, you must provide a password before you can manage such device via the Utility. Device Information: Displays info of a currently selected adapter from the left list. Device Name: Displays the name of a currently selected adapter. The default is P200. You can change it from “Adapter”. 16 P200 200Mbps PowerLine Mini Adapter 4.2 Uptime: Displays the uptime of a currently selected adapter. MAC Address: Displays the MAC address of a currently selected adapter. Standard Supported: Displays the Powerline standard supported by a currently selected adapter. The P200 complies with HomePlugAV standard. HPAV Rate: Displays transmit and receive rates of a currently selected adapter as well as corresponding, remote adapters. Version: Displays the hardware/software versions of a currently selected adapter. Adapter The “Adapter” tab allows you to change device name and network name. Change Device Name: Select an adapter from the list, click “Adapter” and select “Change Device Name”. The “Change Device Name” dialogue box shall popup and you can enter 1-21 characters there as the device name. 17 P200 200Mbps PowerLine Mini Adapter Change Network Name: Click this tab to change the network name of a selected adapter. The default is HomePlugAV and not encrypted. You can select to encrypt or not to encrypt it from the Security drop-down menu. 8~21 characters are allowed for customizing a network name. Right-clicking a selected adapter also pops up the “Change Device Name” and “Change Network Name” submenus. 18 P200 200Mbps PowerLine Mini Adapter 4.3 QoS QoS prioritizes bandwidth-intensive and latency-sensitive applications and services such as Internet/IPTV/audio/video/VOIP/online game services, guaranteeing high reliability and least latency in real-time transmission of such data. The adapter provides 4 priority levels: 0~3 in ascending order. So it is advisable to set the priority level of 3 for essential data traffic. 4.3.1 QoS---Quick Setup This section allows you to set any option among Surfing, IPTV, Video/Audio, VOIP and Games to the priority level of 3. Click “QoS”→" Quick Setup” and select an application to prioritize as seen below. Selected application/service will be marked “√”. Each PLC adapter can only prioritize one application/service at a time. Internet: Select it to prioritize HTTP data and improve Internet surfing experience. Note: Applications/services such as web video and web gaming, etc, which use HTTP protocol, will also be prioritized. IPTV Select it to prioritize IPTV data. The device supports RTSP-compliant IPTV data prioritization. However, some IPTV devices from other manufacturers may not adopt the RTSP protocol. So if the 19 P200 200Mbps PowerLine Mini Adapter device does not prioritize IPTV data from your IPTV device, consult your manufacturer for the protocol and port info and send it to our technical staff so that we can include it in later version for better compatibility. Video/Audio: Select it to prioritize video/audio data streaming. VoIP Select it to prioritize VoIP data. The device supports SIP-compliant and H.323-compliant data prioritization. However, some VoIP devices from other manufacturers may use different protocols other than the above 2. So if the device does not prioritize VoIP data from your VoIP device, consult your manufacturer for the protocol and port info and send it to our technical staff so that we can include it in later version for better compatibility. Games: Select it to prioritize and smooth gaming traffic. Please be noted that not all gaming traffic can be prioritized due to limited QoS entries. 4.3.2 QoS---Advanced This section allows you to add a new QoS entry, view or edit an existing entry. Click “QoS” “Advanced” to display below screen. 20 P200 200Mbps PowerLine Mini Adapter Prio: Indicates the priority level set to a corresponding QoS entry. “0” represents the lowest priority level. To change the priority level for a corresponding entry, simply double click the corresponding priority value and select a new value from the appearing dialogue box as seen below. For example: To change the priority level in entry 1 from “1" to “3”, simply double click “1" and then select “3" from the above “Changing priority” window. 21 P200 200Mbps PowerLine Mini Adapter Traffic Type: data type. The“Ipv4 Precedence” in entry 1 on the above screen Value: Indicates a value set for or to assign to a corresponding QoS entry. “None” indicates no set value. For example, with entry 1 activated, the ToS value of “0” in packets indicates priority level of 3 (highest priority); namely, packets carrying the ToS value of “0” will be prioritized. The Value is configurable. To change it, simply double click on it. However, if you are not sure of which values are valid for such data, we recommend you not to make any changes thereon, particularly QoS entries created using the “Quick Setup” feature. As any change on such value may deactivate the corresponding functionality. Add: Click it to add a MAC/IP based priority entry. Prio: Short for Priority. Select a number from the drop-down list. To set highest priority level, select “3”. Traffic Type: Select MAC address or IPv4 address from the drop-down list. Value: MAC address must be entered in the form of xx:xx:xx:xx:xx:xx (for example: 00:12:34:56:78:9a) while IP address must be in the form of yyy.yyy.yyy.yyy (for example: 192.168.0.100). For example: to set data carrying the IP address of 192.168.1.100 to the priority level of 2, config as seen below: 22 P200 200Mbps PowerLine Mini Adapter After you completed settings on above screen, click on “OK” to add the entry. 2 new settings will be added to the QoS list. Delete: Click it to remove the selected entry/entries from the list. For example: To delete entry 9, first click on the item number of “9”. 23 P200 200Mbps PowerLine Mini Adapter And then click the “Delete” button. Apply changes to all adapters found: Clicking “Save” with the option disabled applies the QoS settings to current adapter while Clicking 24 P200 200Mbps PowerLine Mini Adapter “Save” with the option enabled applies the QoS settings to all adapters discovered on the network and authenticated by the Utility. Save: Click it to save settings to corresponding adapter. Cancel: When clicked, current settings will not be saved. Tips 1. The default QoS policy for the device includes 8 ToS rules and 1 IP multicast rule, which will be deleted if the QoS-Quick Setup functionality is activated. 2. You can only apply a single option in Quick Setup to an adapter at a time. When you switch from one option to another, the former will be deactivated automatically. 3. Activating application/service under QoS-Quick Setup does not remove existing MAC/IP based QoS entry. 4. There is a limit on the number of configurable QoS entries for each data type: up to 14 entries respectively for MAC address based data (Eth Source Address+ Eth Dest Address) and IP address based data (IPv4 Source Address + IPv4 Dest address), up to 8 entries for IPv4 Precedence, and 16 entries for port based data (TCP Source Port + TCP Dest Port + UDP Source Port + UDP Dest Port). Errors will be reported when configured entries exceed limit and such entries will not be saved. 5. The QoS feature does not increase your existing bandwidth. It prioritizes specified data over your existing bandwidth. 6. Advantages of the QoS feature are typically seen on congested networks. Normally, Powerline network is not confronted with congestion as powerline transmission rate reaches up to 200M while ADSL Internet connection rate is only 12M at most and yet shared by multiple users. So, you may not experience obviously tremendous benefits from your QoS settings if you are enjoying a smooth network. However the QoS feature does bring you more or less benefits, they are just not as tremendous as in a congested network. 7. If you set a PC’s MAC priority level to “0”, IP priority to “2” and enabled Surfing priority in QoS--Quick Setup section, then adapter will consider the MAC priority of “0” a currently valid priority for packets received from such 25 P200 200Mbps PowerLine Mini Adapter PC when deciding which packets to prioritize as it checks MAC→IP→ToS→port successively in matching priority. 4.4 Tools “Tools” allow you to view logs, update firmware, reboot and reset the device. Logs: Allows you to view system logs, for example, which adapter joins or exits from the local network. Logs will be cleared automatically when you exit the utility. 26 P200 200Mbps PowerLine Mini Adapter Upgrade: Click it to update your device firmware. Please go to www.tendacn.com or www.tenda.cn to download the latest firmware. The firmware file for upgrade must have “.ggl” in its file name suffix. To upgrade your firmware, do as follows: 1. Select the adapter that is directly connected to the PC you are currently on and then click “Upgrade” under the “Tools” tab. 2. Select a proper firmware and click “Open”. 3. Click “OK” to upgrade firmware. 27 P200 200Mbps PowerLine Mini Adapter 4. The adapter is upgrading… Please DO NOT disconnect the device from power supply or management PC or reset it. 5. Reboot the adapter. 28 P200 200Mbps PowerLine Mini Adapter 6. Updating other adapters that are not directly connected to the PC you are currently on may fail due to interference, so it is advisible to first disconnect them from any other devices and then reconnect to the PC you are currently on before update. Restart: Click it to restart the device. It takes about 10 seconds for the device to restart. To restart the adapter, click “Restart” under “Tools” and then click “Yes” on the appearing dialogue. 29 P200 200Mbps PowerLine Mini Adapter Reset: Selecting “Reset” from “Tools” and clicking “Yes” restores the adapter to factory default settings. This process takes over 10 seconds. Or you can reset it by pressing the Reset/Pair hardware button for more than 15 seconds and release it when the Power LED starts blinking. There is also another way to upgrade, restart and reset the adapter: right-click a selected adapter, click "Advanced” and then select a corresponding option you want to use. 30 P200 200Mbps PowerLine Mini Adapter 4.5 Help User Guide: Click it to read the Tenda Powerline adapter user guide. 31 P200 200Mbps PowerLine Mini Adapter Chapter 5 Using the Pair Button The device provides 128-bit AES encryption method. This section presents how to use the Pair hardware button to create a secure Powerline network. Note: 2 or more Tenda Powerline adapters under a single electricity meter will interconnect to create an unencrypted public network automatically using the same network name of HomePlugAV. To create an encrypted private connection between 2 Tenda adapters, do as follows: 1. Press the Pair button on Adapter 1 for 2-3 seconds and then release it. The Power LED on the Adapter 1 will start blinking. 2. Within 2 minutes upon releasing adapter 1’s Pair button, press the Pair button on Adapter 2 for 2-3 seconds and then release it. The Power LED on the Adapter 2 will start blinking. 3. Observe the two adapters’ LED status. If the Power and PLC LEDs on the two adapters deliver solid lights, it indicates an encrypted private Powerline network is successfully created. 32 P200 200Mbps PowerLine Mini Adapter How to add more adapters to the encrypted private network Now that Adapter 1 and Adapter 2 created a network, say N1, and you’re trying to add Adapter 3 to this network, do as follows: 1. Press the Pair button on Adapter 3 for 2-3 seconds and then release it. If the Power LED on the Adapter 3 starts blinking, it indicates adapter 3 is searching for available network. 2. Within 2 minutes upon releasing adapter 3’s Pair button, press the Pair button on either Adapter 2 or Adapter 1 for 2-3 seconds and then release it. The Power LED on the Adapter 3 will start blinking, indicating that such adapters are interconnecting. 3. Observe adapter 3’s LED status. If both Power and PLC LEDs deliver solid lights, it indicates Adapter 3 has been successfully connected to Network 1. To disconnect an adapter from the existing Powerline network, do as follows: 33 P200 200Mbps PowerLine Mini Adapter As displayed above, the 3 adapters have interconnected on a private Powerline network. If you want to disconnect Adapter 3 from the network, then press the Pair button on Adapter 3 for 9-11 seconds and then release it. The Power LED on Adapter 3 goes off and then light up again. The adapter will restart automatically and leave Network 1. Note: When adding a new adapter to an encrypted powerline network, make sure its network name is exactly same to the existing network’s and “Encrypt” is enabled on it. You must go to the utility to change such adapter’s network name and enable “Encrypt” only. Pressing the Pair button will not help in this case. 34 P200 200Mbps PowerLine Mini Adapter Appendix 1 FAQs Q1. What is Powerline networking? A: Powerline technology upgrades your existing electric wiring, enabling transmission of both network data and electric power in a single power line at a high speed of up to 200Mbps, low cost and with better stability while without new wires required. Q2. Can a single Powerline adapter establish a Powerline network? A: No. A minimum of 2 powerline adapters are required. One should be connected to an ADSL Modem or Router, the other to a PC. Q3. Can I just plug one Powerline adapter into a wall outlet to access Internet? A: No. You must connect one more such adapter to an Internet-enabled ADSL Modem or Router. When the 2 adapters interconnect successfully, you can access Internet. Q4. Do I need to install a utility to use the device? A: No. The device is plug-&-play powerline adapter. Two such devices connected to the same electricity meter are able to interconnect automatically, no configuration required. Yet, there is still an included utility for advanced features such as QoS, private network, etc. See User Guide for details. Q5. How many Powerline adapters at most can be included under a single electricity meter? A: Up to 8 adapters. However you can create numerous private networks. Q6. What is the maximum distance that a Powerline adapter can transfer? A: Up to 300m can be reached with least interference. However transmission rate decreases gradually beyond 100m. Q7. What main advantages does a Powerline adapter have over a wireless device? 35 P200 200Mbps PowerLine Mini Adapter A: The Powerline adapter is a plug-&-play device, requiring no configuration. Besides, wireless signal not only is easily to be affected adversely by obstacles like walls and ceilings but also deliver harmful electromagnetic wave. Q8: Can Powerline devices of different brands communicate with each other? A: Yes. This Tenda Powerline adapter complies with HomePlug AV standard and thus can communicate with other manufacturers’ HomePlug AV-compliant Powerline devices. Q9. Will the Powerline network get disconnected upon blackout? A: Yes. The Powerline network delivers data over electric wiring via electricity. Without presence of electricity alone the wires, data transmission by Powerline adapters is made impossible. Q10. Would it be dangerous to use the Powerline adapter in a thunderstorm? A: The adapter’s internal thunder-/lightning-proof facility protects PC or other devices connected against any potential and harmful thunder or lightning attacks even when the building where the adapter lies is unfortunately thunderstorm-struck. 36 P200 200Mbps PowerLine Mini Adapter Appendix 2 Technical Specifications Hardware Specifications Standards RJ45: IEEE 802.3 PLC Transmission Distance Max Number of Powerline adapters (under a single electricity meter) Compatibility Transmission Rate Interface/Speed Button LED Input Power Dime L mm nsion W mm s H mm Security Operating Temperature Storage Temperature Operating Humidity Storage Humidity IEEE 802.3u HomePlugAV 300m powerline Up to 8 HomePlugAV PLC 200Mbps RJ45 10/100Mbps 1*RJ45 10/100Mbps 1*Pair/Reset Power/Powerline/LAN LEDs AC 100V-240V 50/60Hz 53 53 27 128-bit AES encrytion 0℃~40℃ -40℃~70℃ 10%~90%RH Non-condensing 5%~90%RH Non-condensing 37 P200 200Mbps PowerLine Mini Adapter Appendix 3 EMC Statement CE Mark Warning This is a Class B product In a domestic environment,this product may cause radio interference,in which case the user may be required to take adequate measures. NOTE: (1) The manufacturer is not responsible for any radio or TV interference caused by unauthorized modifications to this equipment. (2) To avoid unnecessary radiation interference, it is recommended to use a shielded RJ45 cable. FCC Statement This equipment has been tested and found to comply with the limits for a Class B digital device, pursuant to part 15 of the FCC Rules. These limits are designed to pro-vide reasonable protection against harmful interference when the equipment is operate din a commercial environment. This equipment generates, uses, and can radiate radiofrequency energy and, if not installed and used in accordance with the instruction manual, may cause harmful interference to radio communications. Operation of this equipment in a residential area is likely to cause harmful interference in which case the user will be required to correct the interference at his own expense. FCC Caution: Any changes or modifications not expressly approved by the party responsible for compliance could void the user's authority to operate this equipment. This device complies with part 15 of the FCC Rules. 38 P200 200Mbps PowerLine Mini Adapter Operation is subject to the following two conditions: (1) This device may not cause harmful interference, and(2) this device must accept any interference received, including interference that may cause undesired operation. The manufacturer is not responsible for any radio or TV interference caused by unauthorized modifications to this equipment. NOTE: (1) The manufacturer is not responsible for any radio or TV interference caused by unauthorized modifications to this equipment. (2) To avoid unnecessary radiation interference, it is recommended to use a shielded RJ45 cable 39