1
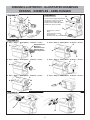
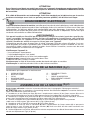
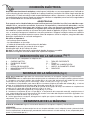
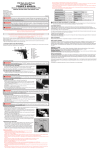
®
Libretto
di istruzioni
Instructions Manual
Manuel d’instructions
Gebrauchsanleitung
Manual de instrucciones
Qualità e tradizione italiana, dal 1932.
DISEGNI ILLUSTRATIVI - ILLUSTRATED EXAMPLES
DESSINS - EXEMPLES - ABBILDUNGEN
Fig./Abb. 1
C
Fig./Abb. 3
B
A
C
B
Inserimento formaggio da grattugiare
Inserting the cheese to be grated
Introduction fromage à râper
Eingeben des zu reibenden Käses
Introducción queso por rallar
D
L
M
H
Spina presa corrente
Plug
Fiche prise de courant
Stromstecker
Enchufe toma de corriente
E
F
G
I
H
Fig./Abb. 2
1° Fase - Step 1 - 1ème phase - 1. Phase - 1ª fase
L
A
2° Fase - Step 2 - 2ème phase - 2. Phase - 2ª fase
D
Estremità Fresata
Milled end
Extrémité fraisée
Gefrästes Ende
Punta avellanada
A
D
E
4° Fase - Step 4 - 4ème phase - 4. Phase - 4ª fase
3° Fase - Step 3 - 3ème phase - 3. Phase - 3ª fase
E
E
F
A
A
G
6° Fase - Step 6 - 6ème phase - 6. Phase - 6ª fase
5° Fase - Step 5 - 5ème phase - 5. Phase - 5ª fase
E
A
M
F
G
Fig./Abb. 4
C
H
2
®
destinata ad un utilizzo casalingo è prodotta sulla base di standard di qualità molto alti
per garantirVi affidabilità e sicurezza nel tempo.
AVVERTENZE.
IL PRESENTE MANUALE È PARTE INTEGRANTE DELLA MACCHINA.
Prima di compiere qualsiasi operazione, leggere attentamente TUTTE le norme di sicurezza, le
istruzioni e le condizioni di garanzia di seguito riportate. Qualsiasi utilizzo della macchina per
scopi diversi e non previsti dal presente manuale di istruzioni deve considerarsi scorretto o improprio.
Il fabbricante si ritiene sollevato da eventuali responsabilià nel caso di:
- uso improprio;
- non corretta installazione;
- alimentazione elettrica non idonea;
- modifiche o interventi non autorizzati dal fabbricante;
- utilizzo di ricambi non originali o non specifici per il modello.
L’uso improprio della grattugia può comportare condizioni di pericolo; si consiglia quindi di conservare con cura e a portata di mano queste istruzioni per consultarle in caso di necessità.
ATTENZIONE!
Per qualsiasi dubbio e per qualunque impiego non previsto da questo manuale, interpellare il
rivenditore prima dell’installazione. Per qualsiasi comunicazione indicare sempre il MODELLO ed
il NUMERO DI MATRICOLA della macchina.
ATTENZIONE!
Se il cavo di alimentazione è danneggiato, esso deve essere sostituito dal costruttore o dal suo
servizio assistenza tecnica o comunque da una persona con qualifica similare, in modo da prevenire
ogni rischio.
COLLEGAMENTO ELETTRICO
Prima di far funzionare la macchina, controllare che la tensione della Vostra abitazione sia quella indicata
nella scheda tecnica del presente manuale e dalla targhetta posta sulla macchina.
Non utilizzare nessun altro tipo di alimentazione. Il fabbricante declina ogni responsabilità per danni a persone
o cose derivanti dalla mancata osservazione di questa norma. Ove necessario montare un adattatore
per la spina, assicurandosi della sua conformità al cavo di alimentazione.
AVVERTENZE
Questo apparecchio non è inteso per uso di persone (inclusi bambini) con ridotte capacità fisiche, sensoriali o mentali, o senza esperienza e conoscenza, a meno che abbiano ricevuto istruzioni relativamente all’uso dell’apparecchio e siano controllati da una persona responsabile per la loro sicurezza.
I bambini dovrebbero essere controllati in modo da assicurare che non giochino con l’apparecchio.
Non introdurre corpi estranei nel vano della tramoggia sede formaggio.
Si consiglia per ragioni igieniche di tenere i capelli raccolti sul capo all’interno di una cuffia protettiva.
Sistemare la macchina su di una superficie piana e stabile, in grado di sopportarne il peso.
Prima di iniziare l’utilizzo assicurarsi di saper arrestare velocemente la macchina in caso di emergenza.
Non utilizzare l'apparecchio se:
- non funziona correttamente;
- è stato danneggiato o è caduto;
- il cavo di alimentazione o la spina sono danneggiati.
Non immergere l'apparecchio e/o sue parti in acqua.
Tenerli lontani da superfici calde.
Non lasciare pendere il cavo di alimentazione da bordi di tavoli o mobili.
Non usare questa macchina vicino a lavandini o su basamenti bagnati.
3
ITALIANO
Ci congratuliamo con Voi per l'ottima scelta.
DESCRIZIONE DELLA MACCHINA (fig.1)
Gli elementi componenti la macchina sono:
A
B
C
D
E
F
-
CORPO MOTORE
PULSANTE "PUSH"
PESTELLO
RULLI GRATTUGIA
MANOPOLA FRONTALINO
VASCHETTA
G
H
I
L
M
-
COPERCHIO VASCHETTA
TRAMOGGIA
CAVO ALIMENTAZIONE
VANO SEDE POMELLO
GANCETTI
MONTAGGIO DELLA MACCHINA (fig.2)
Prima di ogni utilizzo: seguire le istruzioni descritte nel paragrafo "Pulizia e manutenzione".
ATTENZIONE tutte le operazioni di montaggio vanno sempre eseguite con macchina ferma e spina presa
corrente disinserita.
1. Inserire uno dei Rulli grattugia (D) nel vano sede rullo (L) del Corpo motore (A) con il perno (estremità fresata)
per l'accoppiamento all'albero motore come indicato in Fig.2 (1ª fase).
2. Inserire la Manopola frontalino (E) sull'estremità cilindrica del Rullo grattugia (D) e contemporaneamente
nella sede manopola del Corpo motore (A) Fig.2 (2ª fase).
3. Ruotare la Manopola frontalino (E) in senso orario sino ad ottenere un accoppiamento stabile con il Corpo
motore (A) come in Fig.2 (3ª fase).
4. Inserire sotto la Vaschetta (F) il coperchio (G) Fig.2 (4ª fase).
5. Inserire la Vaschetta (F) completa di Coperchio (G) nella sede del Corpo motore (A), spingerla fino in fondo,
assicurandosi che i due gancetti (M) posti ai lati della vaschetta siano in presa con le pareti del corpo motore.
Fig.2 (5ª fase).
6. Inclinare leggermente la macchina, sganciare lo sportello ritegno cavo di alimentazione ed estrarre lo stesso
dalla sua sede. Fig.2 (6ª fase).
SMONTAGGIO DELLA MACCHINA
Al termine di ogni utilizzo: seguire le istruzioni descritte nel paragrafo "Pulizia e manutenzione".
ATTENZIONE tutte le operazioni di smontaggio vanno sempre eseguite con macchina ferma e spina presa
corrente disinserita.
Per le operazioni di smontaggio procedere in modo inverso a quelle di montaggio, ossia partendo dal
capoverso 6 fino al capoverso 1.
IMPIEGO DELLA MACCHINA (fig.3)
Posizionare la macchina su di un piano idoneo a sostenere il peso, inserire la spina nella presa di corrente. Inserire
il formaggio da grattugiare, preparato precedentemente in pezzi non eccessivamente grandi, nel vano della
tramoggia (H) indicato in Fig.3. Esercitare una lieve pressione sul formaggio con l'apposito Pestello (C).
Premere il pulsante "Push" (B) per l'azionamento della macchina.
AVVERTENZE
NON PREMERE MAI I PEZZI INTRODOTTI NELLA MACCHINA CON LE DITA O MEDIANTE
QUALUNQUE ALTRO OGGETTO, USARE SEMPRE L'APPOSITO PESTELLO (C).
All’inserimento della spina nella presa di corrente si accende la spia posta sotto il pulsante (B).
La macchina entra in funzione soltanto con vaschetta (F) completamente inserita, pestello (C) abbassato, pulsate
"Push" (B) premuto. Se anche una sola di queste condizioni non viene rispettata la macchina non parte o si ferma.
PULIZIA E MANUTENZIONE PRIMA E
AL TERMINE DI OGNI UTILIZZO
La pulizia è la sola manutenzione richiesta.
PRIMA DI OGNI OPERAZIONE ASSICURARSI SEMPRE CHE LA SPINA SIA DISINSERITA DALLA CORRENTE.
Per una corretta pulizia oltre alle indicazioni illustrate nel paragrafo "SMONTAGGIO DELLA MACCHINA" è possibile
smontare anche il pestello (C) e la tramoggia (H) come indicato in Fig.4. Per rimuovere eventuali residui di polvere
pulire accuratamente i componenti della macchina con un panno o un pennello morbido.
Per rimuovere eventuali residui di formaggio usare una spugna umida ed asciugare accuratamente
NON LAVARE MAI IL CORPO MOTORE CON GETTI D'ACQUA OPPURE DETERSIVI.
NON LAVARE MAI IN LAVASTOVIGLIE NESSUNA DELLE PARTI DELLA MACCHINA.
4
IN CASO DI MANCATO FUNZIONAMENTO
In caso di mancato funzionamento, controllare che non si sia verificata una delle seguenti anomalie:
RICERCA GUASTI
PROBLEMA
CAUSA PROBABILE
A - Spina disinserita o non
correttamente inserita.
Il motore
non si avvia?
La grattugia
non lavora?
RIMEDIO
A - Inserire correttamente la spina.
B - Mancanza di corrente in rete.
B - Controllare l'interruttore
generale del locale.
C - Quantità eccesiva di
formaggio nella tramoggia.
C - Provare con una quantità minore.
D - Vaschetta non
completamente inserita.
D - Inserire completamente
la vaschetta.
E - Errato montaggio del
Rullo grattugia o Frontalino.
E - Controllare in base alle
istruzioni di montaggio.
Nel caso in cui i rimedi non risolvano le anomalie riscontrate, rivolgersi al Rivenditore Autorizzato di fiducia.
ATTENZIONE!
Congratulations on your excellent choice.
®
intended for household use and manufactured to very high quality standards to offer
you reliability and safety over time.
CAUTIONS
THIS MANUAL IS AN INTEGRATING PART OF THE MACHINE.
Please carefully read through ALL the rules of safety, instructions and warranty conditions given
below before using the machine.
Any use of the machine not provided for herein shall be considered incorrect or improper.
The Manufacturer disclaims any liability in the event of:
- improper use;
- incorrect installation;
- unsuitable electrical supply;
- alterations or operations not authorised by the Manufacturer;
- use of non genuine spares or not specific to the model.
Improper use of the grater may involve dangerous conditions; you are therefore advised to keep these
instructions carefully and near at hand to be able to refer to them for any need.
CAUTION!
For any doubts or use not dealt with herein, inquire with your dealer before installation, always quoting the
machine MODEL and SERIAL NUMBER.
CAUTION!
If the power lead is damaged, it must be replaced by the manufacturer or Service Dept. or in any case
by similarly qualified persons to prevent any possible hazard.
5
ENGLISH
Nel caso che la macchina si fermi durante la lavorazione ricordarsi SEMPRE che prima di iniziare qualunque
operazione di smontaggio, si deve staccare la spina dalla presa di corrente.
ELECTRICAL CONNECTION
Before operating the machine, check that the mains voltage of your home corresponds with the one given
in the technical sheet of this manual and on the machine data plate. Do not use any other type of supply.
The manufacturer disclaims any liability for damage to persons or property deriving from the failure to adhere to
this rule. Where necessary fit an adapter for the plug, making sure that it is suitable for the power lead.
CAUTIONS. This device is not intended for use by persons (including children) with impaired physical, sensorial or mental ability, or without experience and knowledge, unless they have received instructions about
the use of the device and are controlled by a person responsible for their safety.
Children should be controlled to make sure they do not play with the device.
Do not insert foreign substances in the cheese hopper compartment. For reasons of hygiene you are advised
to gather your hair in a protective cap. Place the machine on a firm surface, able to bear its weight.
Before using the machine make sure you know how to stop it quickly in an emergency.
Do not use the machine if:
- it is not working properly;
- it has been damaged or dropped;
- if the power lead or plug are damaged.
Never put the machine and/or its parts in water. Keep them away from hot surfaces.
Do not allow the power lead to hang from tables or furniture. Do not use this machine near sinks or on wet surfaces.
DESCRIPTION OF THE MACHINE (fig.1)
The machine components are:
A
B
C
D
–
–
–
–
MOTOR BODY
PUSHBUTTON
PESTLE
GRATER ROLLERS
E
F
G
H
–
–
–
–
FRONT KNOB
TRAY
TRAY COVER
HOPPER
I –
L M –
POWER LEAD
KNOB HOUSING
CATCHES
MACHINE ASSEMBLY (fig.2)
Before each time of use: Follow the instructions given in the “Cleaning and maintenance” paragraph.
CAUTION.
All assembly operations should always be carried out with the machine stopped and the plug disconnected.
1. Insert one of the grater rollers (D) in the roller housing (L) of the motor body (A) with the pin (milled end) for
coupling to the motor shaft as shown in Fig. 2 (step 1).
2. Insert the front knob (E) on the cylindrical end of the grater roller (D) and at the same time in the knob housing
of the motor body (A) Fig. 2 (step 2).
3. Turn the front knob (E) clockwise until obtaining firm coupling with the motor body (A) as in Fig. 2 (step 3).
4. Under the tray (F) insert the cover (G) Fig. 2 (step 4).
5. Insert the tray (F) complete with cover (G) in the housing of the motor body (A) push it as far as it will go, making
sure that the two catches (M) at the sides of the tray are correctly in place in relation to the sides of the machine
body. Fig. 2 (step 5).
6. Slightly slope the machine, release the power lead retainer lid and take the lead out. Fig. 2 (step 6).
MACHINE DISASSEMBLY
At the end of every time of use: follow the instructions given in the “Cleaning and maintenance” paragraph.
CAUTION. All disassembly operations should always be carried out with the machine stopped and the plug
disconnected. For disassembly operations, reverse the sequence followed for assembly, i.e. starting from
point 6 up to point 1.
USE OF THE MACHINE (fig.3)
Set the machine on a suitable surface able to support its weight, put the plug in the power socket. Put the cheese
to be grated (prepared previously cut into pieces of the right size) in the hopper compartment (H) shown in Fig. 3.
Exert a light pressure on the cheese with the pestle (C). Press the pushbutton (B) to operate the machine.
CAUTIONS. NEVER USE YOUR FINGERS TO PRESS THE PIECES PUT IN THE MACHINE OR USING ANY
OTHER OBJECT, ALWAYS USE THE PESTLE PROVIDED (C).
When the plug is put in the socket the warning light under the button (B) lights up.
The machine starts working only with the tray (F) completely inserted, the pestle (C) down, and the pushbutton (B)
Pressed. If even only one of these conditions fails to be met the machine will either not start or it will stop.
6
CLEANING AND MAINTENANCE BEFORE
AND AFTER EVERY TIME OF USE
Cleaning is the only maintenance normally required.
BEFORE EACH TIME OF USE ALWAYS MAKE SURE THAT THE PLUG IS DISCONNECTED FROM THE POWER SOCKET.
For correct cleaning, in addition to the instructions given in the “MACHINE DISASSEMBLY” paragraph, it is also possible to remove the pestle (C) and the hopper (H) as shown in Fig. 4.
To remove any remaining dust, thoroughly clean the machine and components with a dry cloth or soft brush.
To remove any remainders of cheese, use a moist sponge and dry carefully.
NEVER WASH THE MOTOR BODY WITH WATER OR DETERSIVES.
NEVER WASH ANY PART OF THE MACHINE IN A DISHWASHER.
IF THE MACHINE FAILS TO WORK
Should the machine fail to work, check the following:
TROUBLESHOOTING
PROBLEM
LIKELY CAUSE
REMEDY
A - Plug disconnected or incorrectly
plugged in.
Does the motor fail
to start?
Is the grater failing
to work?
A - Plug in correctly.
B - Mains failure.
B - Check the main switch of the room.
C - Too much cheese in the hopper.
C - Try with a smaller amount.
D - Tray not fully inserted.
B -Insert the tray completely.
E - Incorrect assembly of the
grater roller or Front.
E - Check according to the
assembly instructions.
If the above inconveniences are not solved by the remedies, contact your Authorised Dealer.
CAUTION!
Nous nous congratulons avec vous pour le choix excellent.
®
Destinée à être utilisée à la maison, elle est fabriquée selon des standards de qualité
très élevés pour vous assurer fiabilité et sécurité dans le temps.
AVERTISSEMENTS
CE MANUEL FAIT PARTIE INTEGRANTE DE LA MACHINE
Avant d’effectuer toute opération, lisez avec attention TOUTES les normes de sécurité, le mode
d’emploi et les conditions de garantie indiqués ci-après. Tout emploi de la machine pour des buts
autres que ceux prévus par le présent manuel est considéré comme incorrect ou inapproprié.
Le Fabricant est exonéré de toute responsabilité éventuelle dans les cas suivants:
- usage impropre;
- installation incorrecte;
- alimentation électrique non appropriée;
- changements ou interventions non autorisés par le Fabricant;
- utilisation de pièces de rechange non originales ou non spécifiques pour le modèle.
L’usage impropre de la râpe peut comporter des situations de danger; il est donc conseillé de
garder avec soin et à la portée de la main ce manuel et de le consulter s’il est nécessaire.
7
FRANÇAIS
Should the machine stop while grating, ALWAYS remember to disconnect the plug from the power socket.
ATTENTION!
Pour n’importe quel doute ou emploi non prévu par ce manuel, demandez au vendeur avant l’installation. Pour toute communication indiquez toujours le MODELE et le NUMERO D’IMMATRICULATION
de la machine.
ATTENTION!
Si le câble d’alimentation est endommagé, il doit être remplacé par le fabricant ou par le service
assistance technique ou en tout cas par une personne qualifiée, afin d’éviter tout risque.
BRANCHEMENT ELECTRIQUE
Avant de faire fonctionner la machine, contrôlez que la tension de votre habitation est celle indiquée dans
la fiche technique du présent manuel et dans la plaquette située sur la machine. N’utilisez aucun autre type
d’alimentation. Le fabricant décline toute responsabilité pour des dommages à personnes ou choses
découlant du non-respect de cette norme. S’il est nécessaire d’installer un adaptateur, assurez-vous que
ce dernier soit conforme au câble d’alimentation.
AVERTISSEMENTS
Cet appareil ne doit pas être utilisé par des personnes (y compris les enfants) ayant des capacités physiques, sensorielles ou mentales réduites, ou bien sans expérience ni connaissance, sauf si elles ont
reçu une formation sur l'appareil ou si elles sont contrôlées par une personne responsable de leur
sécurité. Surveiller les enfants et ne pas les laisser jouer avec l'appareil.
N’introduisez pas de corps étranger dans la trémie à fromage. Pour des raisons d’hygiène, il est conseillé de garder les cheveux rassemblés dans un bonnet de protection. Placez la machine sur une surface plate et stable à même d’en soutenir le poids. Avant d’utiliser la machine, assurez-vous de savoir
arrêter rapidement la machine en cas d’urgence.
N’utilisez pas l’appareil si:
- il ne marche pas correctement;
- il a été endommagé ou il est tombé;
- le câble d’alimentation ou la fiche sont endommagés.
Ne plongez pas l'appareil et/ou ses parties dans l’eau.
Gardez-les loin des surfaces chaudes.
Ne laissez pas le câble d’alimentation pendre des bords de tables ou meubles.
N’utilisez pas la machine près des éviers ou de surfaces mouillées.
DESCRIPTION DE LA MACHINE (fig.1)
Les éléments qui composent la machine sont:
A
B
C
D
E
F
-
CORPS MOTEUR
BOUTON "PUSH"
PILON
ROULEAUX RAPE
POIGNEE PARTIE FRONTALE
TIROIR
G
H
I
L
M
-
COUVERCLE TIROIR
TREMIE
CABLE ALIMENTATION
EMPLACEMENT POIGNEE
CROCHETS
ASSEMBLAGE DE LA MACHINE (fig.2)
Avant chaque utilisation: suivez les instructions décrites dans le paragraphe "Nettoyage et entretien".
ATTENTION toutes les opérations d’assemblage doivent être effectuées toujours la machine éteinte et
après avoir débranché la prise de courant.
1. Introduisez un des Rouleaux râpe (D) dans l’emplacement rouleau (L) du Corps moteur (A) avec le
pivot (extrémité fraisée) pour l’ajuster à l’arbre moteur comme il est indiqué dans la Figure 2 (1ère phase).
2. Introduisez la Poignée de la partie frontale (E) sur l’extrémité cylindrique du Rouleau râpe (D) et, en même
temps, dans l’emplacement de la poignée du Corps moteur (A) Fig.2 (2ème phase).
3. Tournez la Poignée de la partie frontale (E) dans le sens horaire jusqu’à obtenir un ajustement
stable avec le Corps moteur (A) comme dans la Fig.2 (3ème phase).
4. Introduisez sous le Tiroir (F) le couvercle (G) Fig.2 (4ème phase).
5. Introduisez le Tiroir (F) avec le Couvercle (G) dans l’emplacement du Corps moteur (A) et poussez-le
jusqu’au bout en vous assurant que les deux crochets (M) situés aux côtés du tiroir soient accrochés aux
parois du corps moteur. Fig.2 (5ème phase).
6. Inclinez légèrement la machine, décrochez le volet du compartiment du câble d’alimentation et tirez ce dernier de son emplacement. Fig.2 (6ª phase).
8
DESASSAMBLAGE DE LA MACHINE
A la fin de chaque utilisation: suivez les instructions décrites dans le paragraphe "Nettoyage et entretien ".
ATTENTION toutes les opérations de désassemblage doivent être toujours effectuées la machine éteinte et
après avoir débranché la prise de courant. Pour les opérations de désassemblage, procédez de façon
contraire à l’assemblage, c’est-à-dire à partir de l’alinéa 6 jusqu’à l’alinéa 1.
UTILISATION DE LA MACHINE (fig.3)
Placez la machine sur un plan approprié à supporter le poids, enfoncez la fiche dans la prise de courant. Mettez
le fromage à râper, préparé auparavant en pièces pas trop grandes, dans l’emplacement de la trémie (H) indiqué
dans la Fig.3. Faites une légère pression sur le fromage en vous servant du pilon (C).
Appuyez sur le bouton "Push" (B) pour la mise en marche de la machine.
NOTICE
NE PRESSEZ JAMAIS LES PIECES INTRODUITES DANS LA MACHINE A L’AIDE DE VOS DOIGTS
OU DE TOUT AUTRE OBJET. UTILISEZ TOUJOURS LE PILON (C).
Lorsque vous enfoncez la fiche dans la prise de courant, le voyant situé sous le bouton (B) s’allume.
La machine entre en fonction seulement si le tiroir (F) est complètement introduit, si le pilon (C) est baissé et si le
bouton "Push" (B) est pressé. Si une de ces conditions n’est pas satisfaite, la machine ne démarre pas ou s’arrête.
NETTOYAGE ET ENTRETIEN AVANT ET A LA FIN
DE CHAQUE UTILISATION
Le nettoyage est le seul entretien demandé.
AVANT ET APRES CHAQUE UTILISATION ASSUREZ-VOUS TOUJOURS QUE LA FICHE SOIT DEBRANCHEE DE LA
PRISE DE COURANT.
Pour un nettoyage correct, en plus des indications montrées au paragraphe " DESASSEMBLAGE DE LA MACHINE ",
il est possible de désassembler également le pilon (C ) et la trémie (H) comme il est indiqué dans la Fig. 4.
Pour enlever d’éventuels résidus de poussière, nettoyez soigneusement les composants de la machine avec un chiffon
sec ou un pinceau souple.
Pour enlever d’éventuels résidus de fromage, utilisez une éponge humide et essuyez soigneusement
NE LAVEZ JAMAIS LE CORPS MOTEUR A L’AIDE DE JETS D’EAU OU DE DETERGENTS.
NE LAVEZ JAMAIS DANS LE LAVE-VAISSELLE AUCUNE DES PARTIES DE LA MACHINE.
EN CAS DE NON-FONCTIONNEMENT
En cas de non-fonctionnement, contrôlez qu’une des anomalies suivantes ne se soit pas produite:
RECHERCHE PANNES
PROBLEME
CAUSA PROBABILE
A - Fiche débranchée ou branchée
de manière incorrecte.
Le moteur
ne démarre pas ?
La râpe ne
marche pas ?
REMEDE
A - Introduisez correctement
la fiche.
B - Manque de courant.
B - Contrôlez l’interrupteur général.
C - Quantité excessive de
fromage dans la trémie.
C - Baissez la protection de sécurité.
D - Tiroir non complètement
introduit.
D - Introduisez complètement
le bac.
E -Erreur d’assemblage du
Rouleau Râpe ou Partie frontale.
E - Contrôlez sur la base des
instructions d’assemblage.
Au cas où les remèdes ne résolvent pas les anomalies, contactez votre Vendeur Agréé de confiance.
ATTENTION!
Si la machine s’arrête pendant le fonctionnement, rappelez-vous TOUJOURS qu’avant de commencer toute
opération de désassemblage, le fiche doit être débranchée de la prise de courant.
9
DEUTSCH
Wir gratulieren Ihnen zur Wahl dieses Geräts!
®
Für den Hausgebrauch–bester Qualitätsstandard, um Ihnen langfristige Zuverlässigkeit
und Sicherheit zu garantieren.
HINWEISE.
DIE VORLIEGENDE GEBRAUCHSANLEITUNG IST EIN VERVOLLSTÄNDIGENDER TEIL DES GERÄTS.
Vor dem Gebrauch, müssen ALLE Sicherheitsvorschriften, die Gebrauchsanleitung und die
Garantiebedingungen aufmerksam gelesen werden. Jegliche Anwendung des Geräts, die für andere
Zwecke bestimmt und nicht von dieser Gebrauchsanleitung vorgesehen ist, muss als falsch oder
ungeeignet betrachtet werden.
Der Hersteller übernimmt keine Verantwortung für:
- falsche Anwendung;
- falsche Installierung;
- ungeeigneter Stromanschluss;
- Änderungen oder Eingriffe, die nicht vom Hersteller zugelassen sind;
- Verwendung von nicht Original-Ersatzteilen oder für das Modell nicht geeigneten Ersatzteilen.
Die falsche Anwendung der Käsereibe kann Gefahren hervorrufen; wir empfehlen somit, diese
Anleitung sorgfältig und griffbereit aufzubewahren und im Bedarfsfall nachzuschlagen.
ACHTUNG!
Bei jedem Zweifel oder bei von dieser Anleitung nicht vorgesehenen Anwendungen muss der
Händler vor der Installierung zu Rate gezogen werden. Für jede Mitteilung immer das MODELL
und die KENNNUMMER des Geräts angeben.
ACHTUNG!
Wenn das Stromkabel beschädigt ist, muss es vom Hersteller oder seinem technischen
Kundendienst oder von einer qualifizierten ähnlichen Person ersetzt werden, damit jedem Risiko
vorgebeugt wird.
STROMANSCHLUSS
Vor der Inbetriebnahme des Geräts, muss kontrolliert werden, dass die Stromversorgung Ihrer Wohnung
den Angaben des technischen Datenblatts dieser Gebrauchsanleitung oder des Schilds auf dem Gerät
entspricht. Keine andere Stromversorgung anwenden. Der Hersteller übernimmt keine Verantwortung für
Schäden an Personen oder Gegenständen, die durch die Nichtbeachtung dieser Vorschrift verursacht
werden. Wenn notwendig, einen Adapter für den Stecker anbringen, wobei seine Konformität mit dem
Stromkabel geprüft werden muss.
HINWEIS
Dieses Gerät darf nicht von Personen (einschließlich Kindern) mit eingeschränkten körperlichen, empfindungsbezogenen oder geistigen Fähigkeiten verwendet werden, oder die keine Erfahrung und
Kenntnisse besitzen, außer wenn sie über die Anwendung des Geräts informiert wurden und von einer
für ihre Sicherheit verantwortliche Person kontrolliert werden.
Kinder sollten beaufsichtigt werden, um sicherzustellen, dass sie nicht mit dem Gerät spielen.
Keine Fremdkörper in den Käsetrichter bringen. Wir empfehlen aus hygienischen Gründen, die Haare
unter einer Haube auf dem Kopf zusammenzubinden. Das Gerät auf eine stabile und flache Ebene stellen, die das Gewicht aushält. Vor dem Gebrauch sicherstellen, dass man in der Lage ist, das Gerät im
Notfall schnell anzuhalten.
Das Gerät nicht verwenden, wenn:
- es nicht korrekt funktioniert;
- wenn es beschädigt oder hinunter gefallen ist;
- das Stromkabel oder der Stecker beschädigt sind.
Das Gerät oder Teile davon nicht in Wasser eintauchen.
Von heißen Oberflächen entfernt halten.
Das Stromkabel nicht von Tisch-oder Möbelkanten herunterhängen lassen.
Dieses Gerät nicht in der Nähe von Spülbecken oder auf nassen Flächen verwenden.
10
BESCHREIBUNG DER MASCHINE (Abb.1)
Die Bestandteile des Geräts lauten:
A
B
C
D
E
F
–
–
–
–
–
–
MOTORENGEHÄUSE
DRUCKKNOPF „PUSH“
STÖSSEL
REIBEROLLEN
DREHKNOPF VORDERE ABDECKUNG
BEHÄLTER
G
H
I
L
M
–
–
–
–
–
BEHÄLTERDECKEL
TRICHTER
STROMKABEL
KNOPFBEREICH
HAKEN
MONTAGE DES GERÄTS (Abb.2)
Vor jeder Anwendung: Die im Abschnitt „Reinigung und Wartung“ beschriebenen Anleitungen befolgen.
ACHTUNG: Alle Montagearbeiten werden immer bei stehendem Geräte und ausgestecktem Stecker ausgeführt.
1. Eine der Reiberollen (D) in den Rollenbereich (L) des Motorengehäuses (A) mit dem Stift (gefrästes Ende) zur
Anpassung an die Motorenwelle, wie in Abb. 2 angegeben, einsetzen (1. Phase).
2. Den Knopf der vorderen Abdeckung (E) an das zylindrische Ende der Reiberolle (D) und gleichzeitig in den
Knopfsitz des Motorengehäuses (A) einsetzen. Abb. 2 (2. Phase).
3. Den Knopf der vorderen Abdeckung (E) im Uhrzeigersinn drehen, bis eine feste Passung mit dem
Motorengehäuse (A) wie in Abb. 2 angegeben (3. Phase) erreicht wird.
4. Unter den Behälter (F) den Deckel (G) Abb. 2 (4. Phase) einsetzen.
5. Den Behälter (F) komplett mit Deckel (G) in den Sitz des Motorengehäuses (A) einsetzen, tief eindrücken
und sicherstellen, dass die beiden Haken (M) an den Seiten des Behälters in den Wänden des
Motorengehäuses eingehakt sind. Abb. 2 (5. Phase)
6. Das Gerät leicht neigen, die Halteklappe des Stromkabels aushaken und das Kabel aus seinem Sitz
entnehmen. Abb. 2 (6. Phase).
ZERLEGEN DES GERÄTS
Am Ende jeder Anwendung: Die im Abschnitt „Reinigung und Wartung“ beschriebenen Anleitungen befolgen.
ACHTUNG: Alle Zerlegearbeiten werden immer bei stehendem Gerät und ausgestecktem Stromstecker
ausgeführt. Hinsichtlich der Zerlegearbeiten wird in umgekehrter Reihenfolge zur Montage vorgegangen bzw.
von Punkt 6 bis Punkt 1.
ANWENDUNG DES GERÄTS (Abb.3)
Das Gerät auf eine für sein Gewicht geeignete Fläche stellen, den Stecker in die Steckdose einstecken. Den zu
reibenden Käse, der zuvor in nicht zu große Stücke geschnitten wurde, in den Trichterbereich (H) gemäß Abb. 3
geben. Einen leichten Druck auf den Käse mit dem hierfür vorgesehenen Stößel (C) ausüben.
Den Druckknopf „Push“ (B) zur Betätigung des Geräts drücken.
HINWEIS
DIE IN DAS GERÄT GEGEBENE STÜCKE NIE MIT DEN FINGERN ODER EINEM ANDEREN
GEGENSTAND EINDRÜCKEN, IMMER DEN DIESBEZÜGLICHEN STÖSSEL (C) VERWENDEN.
Beim Einstecken des Steckers in die Steckdose erleuchtet die Anzeigeleuchte unter dem Druckknopf (B).
Das Gerät funktioniert nur, wenn der Behälter (F) vollständig eingerastet, der Stößel (C) hinunter gedrückt und der
Druckknopf „Push“ (B) gedrückt ist.
Wenn auch nur eine dieser Bedingungen nicht eingehalten wird, startet das Gerät nicht oder hält an.
REINIGUNG UND WARTUNG VOR UND
NACH DEM GEBRAUCH
Die Reinigung ist die einzige geforderte Wartung.
VOR JEDER REINIGUNG IMMER SICHERSTELLEN, DASS DER STROMSTECKER AUSGESTECKT IST.
Zur korrekten Reinigung kann zusätzlich zu den im Abschnitt „ZERLEGEN DES GERÄTS“ dargestellten Angaben auch
der Stößel (C) und der Trichter (H) wie in Abb. 4 gezeigt ausgebaut werden.
Um eventuelle Staubreste zu entfernen, die Geräteteile sorgfältig mit einem Tuch oder einem weichen Pinsel reinigen.
Um eventuelle Käsereste zu entfernen, einen feuchten Schwamm verwenden und sorgfältig trocknen
DAS MOTORENGEHÄUSE NICHT MIT EINEM WASSERSTRAHL ODER REINIGUNGSMITTELN WASCHEN.
DIE GERÄTETEILE NIE IN DER GESCHIRRSPÜLMASCHINE WASCHEN.
11
IM STÖRUNGSFALL
Bei Funktionsstörungen kontrollieren, ob eine der folgenden Störungen aufgetreten ist:
STÖRUNGSSUCHE
WAHRSCHEINLICHE URSACHE
PROBLEM
A - Ausgesteckter Stecker oder
nicht korrekt eingesteckt.
Startet der Motor nicht?
Arbeitet die Reibe nicht?
LÖSUNG
A - Den Stecker richtig einstecken.
B - Kein Strom im Stromnetz.
B - Den Hauptschalter des
Lokals kontrollieren.
C - Zuviel Käse im Trichter.
C - Mit einer kleineren Menge
versuchen.
D - Behälter nicht vollständig
eingesetzt.
D - Den Behälter vollständig
einsetzen.
E - Falsche Montage der Reiberolle
oder der vorderen Abdeckung.
E - In Bezug auf die
Montageanleitungen kontrollieren.
Falls diese Lösungen die festgestellten Störungen nicht beseitigen, wenden Sie sich bitte an den zugelassenen
Händler.
ACHTUNG!
ESPAÑOL
Wenn das Gerät während dem Betrieb anhält, IMMER daran denken, dass vor jedem Zerlegevorgang der
Stromstecker ausgesteckt wird.
¡Les felicitamos por la óptima elección!
®
PrestoCheese, destinada a un uso doméstico, está producida con estándares
de calidad altísimos para garantizarles fiabilidad y seguridad a lo largo del tiempo.
ADVERTENCIAS
EL PRESENTE MANUAL FORMA PARTE INTEGRANTE DE LA MÁQUINA.
Antes de efectuar cualquier operación, lea atentamente TODAS las normas de seguridad, las instrucciones
y las condiciones de garantía que se ilustran a continuación. Cualquier uso de la máquina con fines
diferentes y no previstos en el presente manual de instrucciones, se considerará incorrecto o impropio.
El fabricante se considera libre de toda responsabilidad en caso de:
- uso impropio;
- instalación no correcta;
- alimentación eléctrica no idónea;
- modificaciones o intervenciones no autorizadas por el fabricante;
- utilización de repuestos no originales o no específicos para el modelo.
El uso impropio del rallador puede significar condiciones de peligro; por ello, se aconseja guardar con
atención y al alcance de la mano este manual de instrucciones para poder consultarlo en caso de necesidad.
¡ATENCIÓN!
Para cualquier duda o para cualquier uso no previsto en este manual, diríjase al vendedor antes de la
instalación. Para cualquier comunicación, indique siempre el MODELO y el NÚMERO DE MATRÍCULA
de la máquina.
¡ATENCIÓN!
Si el cable de alimentación está dañado, ha de ser sustituido por el fabricante o por su servicio de
asistencia técnica, o por personal cualificado para ello, con el fin de evitar riesgos.
12
CONEXIÓN ELÉCTRICA
Antes de hacer funcionar la máquina, controle que el voltaje de su casa corresponda con el indicado en
la ficha técnica de este manual y también en la placa situada en la máquina. No utilice ningún otro tipo de
alimentación. El fabricante declina toda responsabilidad por daños a personas o cosas que deriven del
incumplimiento de esta norma. Donde sea necesario, móntese un adaptador para el enchufe, asegurándose
de su conformidad con el cable de alimentación.
ADVERTENCIAS
Este aparato no ha sido diseñado para que lo utilicen personas (incluídos los niños) con reducidas capacidades físicas, sensoriales o mentales, o personas sin experiencia y conocimiento adecuados, a no ser
que hayan recibido instrucciones para usarlo; en este caso, una persona encargada de su seguridad
deberá vigilarles. Los niños deberían ser vigilados para evitar que puedan jugar con el aparato.
No introduzca cuerpos extraños en el hueco de la tolva donde se deposita el queso. Por razones higiénicas, se aconseja recogerse el cabello en una cofia protectora. Coloque la máquina sobre una superficie
plana y estable y que pueda soportar su peso. Antes de empezar a utilizar la máquina, asegúrese de saber
detenerla rápidamente en caso de emergencia.
No utilice el aparato si:
- no funciona correctamente
- ha sido dañado o se ha caído
- el cable de alimentación o el enchufe están dañados.
No sumerja el aparato y/o partes de él en el agua.
Manténgase lejos de las fuentes de calor.
No deje el cable de alimentación colgando de bordes de mesas o muebles.
No use esta máquina cerca de lavabos o de superficies mojadas.
DESCRIPCIÓN DE LA MÁQUINA (fig.1)
Los elementos que componen la máquina son:
A
B
C
D
E
F
-
CUERPO MOTOR
PULSADOS “PUSH”
MAJA
RODILLOS RALLADOR
MANOPOLA PARTE FRONTAL
RECIPIENTE
G
H
I
L
M
-
TAPA DEL RECIPIENTE
TOLVA
CABLE DE ALIMENTACIÓN
HUECO ALOJAMIENTO POMO
GANCHOS
MONTAJE DE LA MÁQUINA (fig.2)
Antes de su utilización: siga todas las instrucciones descritas en el capítulo “Limpieza y mantenimiento”.
ATENCIÓN todas las operaciones de montaje han de ser realizadas con la máquina parada y desenchufada.
1. Introduzca uno de los rodillos del rallador (D) en el hueco del alojamiento del rodillo (L) del cuerpo
motor (A) con el pasador (punta avellanada), como se indica en la Fig. 2 (1ª fase).
2. Introduzca la empuñadura parte frontal (E) en el extremo cilíndrico del rodillo del rallador (D) y, al mismo
tiempo, en el alojamiento empuñadura del cuerpo del motor (A) Fig. 2 (2ª fase).
3. Gire la empuñadura de la parte frontal (E) en sentido de las agujas del reloj, hasta obtener un acoplamiento
estable con el cuerpo del motor (A) como en la Fig. 2 (3ª fase)
4. Introduzca debajo del recipiente (F) la tapa (G) Fig. 2 (4ª fase).
5. Introduzca el recipiente (F) con su tapa (G) en el alojamiento del cuerpo del motor (A), empújelo hasta el
final, asegurándose de que los dos ganchos (M) situados a los lados del recipiente estén bien agarrados a las
paredes del cuerpo del motor. Fig. 2 (5ª fase).
6. Incline ligeramente la máquina, deseganche la tapilla que sujeta el cable de alimentación y sáquelo de su
alojamiento. Fig. 2 (6ª fase).
DESMONTAJE DE LA MÁQUINA
Al final de su utilización: siga las instrucciones descritas en el capítulo “Limpieza y mantenimiento”.
¡ATENCIÓN!
Todas las operaciones de desmontaje han de ser siempre realizadas con la máquina parada y desenchufada.
Para las operaciones de desmontaje, proceda de manera contraria a la del montaje, o sea, empezando por el
punto 6 y terminando por el 1.
13
USO DE LA MÁQUINA (fig.3)
Coloque la máquina sobre una superficie idónea que pueda soportar su peso; introduzca el enchufe en la toma
de corriente. Meta el queso por rallar, preparado precedentemente cortado a trozos no demasiado grandes, en
el hueco de la tolva (H) indicado en la Fig. 3. Efectúe una presión leve sobre el queso usando la específica maja (C).
Presione el pulsador “Push” (B) para accionar la máquina.
ADVERTENCIAS
NUNCA APRIETE LOS TROZOS DE QUESO QUE METE EN LA MÁQUINA CON LA MANO O CON
NINGÚN OTRO UTENSILIO. USE SIEMPRE LA ESPECÍFICA MAJA.
Al introducir el enchufe en la toma de corriente se enciende el testigo luminoso situado bajo el pulsador (B).
La máquina se pone en función solamente si el recipiente (F) está completamente introducido, si la maja (C) está
completamente bajada y si el pulsador “Push” (B) está presionado.
Si una sola de estas condiciones no se respeta, la máquina no entra en funcionamiento o se detiene.
LIMPIEZA Y MANTENIMIENTO ANTES
Y DESPUÉS DE CADA UTILIZACIÓN
La limpieza es el único mantenimiento que se requiere.
ANTES DE CUALQUIER OPERACIÓN, ASEGÚRESE DE QUE EL ENCHUFE ESTÉ DESCONECTADO DE LA TOMA DE
CORRIENTE.
Para una limpieza correcta, además de las indicaciones ilustradas en el capítulo “DESMONTAJE DE LA MÁQUINA”,
es posible desmontar también la maza (C), y la tolva (H), como se indica en la Fig. 4.
Para quitar eventuales residuos de polvo, limpie cuidadosamente los componentes de la máquina con un trapo suave
o con un pincel suave.
Para quitar eventuales restos de queso, use una esponja humedecida y después seque todo cuidadosamente.
NUNCA LAVE EL CUERPO DEL MOTOR CON CHORROS DE AGUA NI CON DETERGENTES.
NUNCA LAVE EN EL LAVAVAJILLAS NINGUNA DE LAS PARTES DE LA MÁQUINA.
SI LA MÁQUINA NO FUNCIONA
En caso de falta de funcionamiento, controle que no se haya verificado una de las siguietes anomalías:
BÚSQUEDA DE AVERÍAS
PROBLEMA
PROBABLE CAUSA
A - Enchufe sin poner
o mal colocado.
¿El motor no se
pone en marcha?
¿El rallador no funciona?
REMEDIO
A - Introducir correctamente
el enchufe.
B - Falta de corriente eléctrica.
B - Controlar el interruptor
general del local.
C - Excesiva cantidad de queso
en la tolva.
C - Probar con menos cantidad.
D - Recipiente no introducido
correctamente.
D - Introducir correctamente
el recipiente.
E - Error al montar el Rodillo
o la parte frontal.
E - Controlar siguiendo las
instrucciones de montaje.
En caso de que los remedios no resuelvan las anomalías, diríjase a su Vendedor Autorizado.
¡ATENCIÓN!
En caso de que la máquina se detenga durante la elaboración, recuerde SIEMPRE que antes de empezar
cualquier operación de desmontaje, es necesario quitar el enchufe de la toma de corriente.
14
®
SCHEDA TECNICA - TECHNICAL DESCRIPTION
FICHE TECHNIQUE - TECHNISCHE DATEN - FICHA TÉCNICA
GRATTUGIA COMPLETA - COMPLETE GRATER - RAPE COMPLETE
KOMPLETTE KÄSEREIBE - RALLADOR COMPLETO
Dimensioni-Size-Dimensions-Abmessungen-Tamaño
270 x 220 x 170 cm
Peso netto-Net weight-Poids net-Nettogewicht-Peso neto
4 Kg
Tensione di alimentazione-Power supply
Tension d’alimentation-Netzspannung
Voltaje de alimentación
230 V / 50 Hz
Potenza nominale-Nominal power-Puissance nominale
Nominale Potenz-Potencia nominal
190 W
Velocità di rotazione del rullo-Roller rotation speed
Vitesse de rotation du rouleau - Drehgeschwindigkeit der Rolle
Velocidad de rotación del rodillo
1070 RPM
Tempo funzionamento massimo 5 minuti per 250 g di formaggio a riempimento della vaschetta.
Maximum operating time 5 minutes for 250 g of cheese to fill the tray.
Temps de fonctionnement maximum 5 minutes pour 250 g de fromage à remplissage du tiroir.
Funktionszeit: Höchstens 5 Minuten pro 250 g Käse bis zum Füllen des Behälters.
Tiempo máximo de funcionamiento 5 minutos por 250 g de queso con el recipiente lleno.
15
®
ASSISTENZA
L’apparecchio contiene parti elettriche e meccaniche delicate, pertanto ogni riparazione
deve essere effettuata esclusivamente da personale specializzato.
Si ricorda che la garanzia decade:
- se vengono eseguite riparazioni da persone non autorizzate;
- se vengono utilizzati componenti non originali della Casa;
- se la macchina viene usata in modo improprio.
SERVICE
This appliance contains delicate electrical and mechanical parts therefore all repairs may only be carried out
by specialised personnel.
Il est rappelé que la garantie n’est plus valable si:
- des réparations sont effectuées par des personnes non autorisées;
- si des pièces non originales de la Maison sont utilisées;
- si la machine est utilisée de manière impropre.
KUNDENDIENST
Das Gerät enthält elektrische und mechanische empfindliche Teile, somit muss jede Reparatur ausschließlich
von spezialisiertem Personal ausgeführt werden.
Die Garantie verfällt:
- wenn Reparaturen von nicht zugelassenem Personal ausgeführt werden;
- wenn nicht Original-Teile des Herstellers verwendet werden;
- wenn das Gerät falsch verwendet wird.
ASISTENCIA
El aparato contiene partes eléctricas y mecánicas delicadas; por lo tanto, toda reparación ha de ser efectuada exclusivamente por personal especializado.
Se recuerda que la garantía vence:
- si se efectúan reparaciones por personas no autorizadas;
- si se utilizan componentes no originales de la casa constructora;
- si la máquina se usa de manera impropia.
LY
MADE IN ITA
10057 Sant’Ambrogio di Torino - Italia
www.imperia.com
04/2009 -1490
ASSISTANCE
L’appareil contient des parties électriques et mécaniques délicates.
Par conséquent, toute réparation doit être effectuée exclusivement par le personnel spécialisé.
Adottando una politica di continuo sviluppo Imperia si riserva il diritto di effettuare modifiche e miglioramenti a qualsiasi prodotto descritto nel presente documento senza previo preavviso.
As Imperia adopts a policy of continual development, it reserves the right to make changes and improvements to any of the products described in this document without prior warning.
Please remember that the warranty will be invalidated:
- if repairs are carried out by unauthorised persons;
- if components not made by the manufacturer are used;
- if the machine is used incorrectly.