1
31
32
33
35
36
T
34
37
40
38
41
#
39
Q
42
I
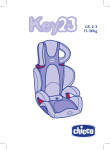
GB
Istruzioni d’uso
Pag. 3-6
Instructions for use
Pag. 7-10
F
Notice d’instructions
Pag. 11-14
D
Gebrauchsanleitung
Pag. 15-18
E
Instrucciones de uso
Pag. 19-22
P
Instruções de utilização
Pag. 23-26
NL
Gebruiksaanwijzing
Pag. 27-30
GR
Οδηγίες χρήσης
Pag. 31-35
RUS
Инструкция по использованию
Pag. 36-40
Bruksanvisning
Pag. 41-44
HR
Upute Za Uporabu
Pag. 45-48
SLO
Navodila Za Uporabo
Pag. 49-52
CS
Návod K Použití
Pag. 53-56
SK
Návod na Použitie
Pag. 57-60
BG
Инструкции за употреба
Pag. 61-65
H
Használati Utasítás
Pag. 66-70
R
Instrucţiuni de folosire
Pag. 71-75
PL
Instrukcja sposobu użycia
Pag. 76-80
TR
Kullanım bilgileri
Pag. 81-85
S
SA
Pag. 86-89
Pag. 90-93
C
2
6
I Istruzioni d’uso
•
0
IMPORTANTISSIMO! DA LEGGERE SUBITO
•
4
•
•
•
8
2
6
•
•
0
5
0
•
•
4
•
8
•
2
•
6
•
0
5
0
5
0
5
9
3
•
•
•
•
•
•
Per il montaggio e l’installazione del prodotto seguire
scrupolosamente le istruzioni. Evitare che qualcuno utilizzi
il prodotto senza aver letto le istruzioni.
Conservare questo manuale per utilizzi futuri.
ATTENZIONE! In base alle statistiche sugli incidenti,
generalmente i sedili posteriori del veicolo sono più sicuri
di quello anteriore: si consiglia pertanto di installare il
Seggiolino sui sedili posteriori. In particolare il sedile
più sicuro è quello centrale posteriore, se dotato di
cintura a 3 punti.
Si raccomanda che tutti i passeggeri occupanti siano
informati della modalità di sgancio del bambino in
caso di emergenza.
Se il Seggiolino viene posizionato sul sedile anteriore
con l’airbag frontale attivato, per maggiore sicurezza
si raccomanda di arretrare il più possibile il sedile
compatibilmente con la presenza di altri passeggeri
sul sedile posteriore.
Non utilizzare mai questo Seggiolino su sedili rivolti
lateralmente o opposti al senso di marcia.
Installare il Seggiolino solo su sedili correttamente fissati
alla struttura dell’auto e rivolti nel senso di marcia. Fare
attenzione a non lasciare sedili auto pieghevoli o rotanti
non ben agganciati, in caso di incidente potrebbero
costituire un pericolo.
Prestare attenzione a come si installa il Seggiolino in auto
in modo da evitare che un sedile mobile o la portiera
possano interferire con esso.
Non allacciare mai il Seggiolino su un sedile auto dotato
di una cintura solo addominale (a due punti).
Nessun Seggiolino può garantire la totale sicurezza del
bambino in caso d’incidente, ma l’utilizzo di questo
prodotto riduce il rischio di lesioni gravi o di morte.
Il rischio di seri danni al bambino, non solo in caso d’incidente, ma anche in altre circostanze (per es. brusche
frenate, ecc.), aumenta se le indicazioni riportate in
questo manuale non vengono seguite in modo scrupoloso: verificare sempre che il Seggiolino sia agganciato
correttamente al sedile.
Nel caso in cui il Seggiolino fosse danneggiato, deformato
o fortemente usurato, questo deve essere sostituito,
poiché potrebbe aver perso le caratteristiche originali
di sicurezza.
Non effettuare modifiche o aggiunte al prodotto senza
l’approvazione del costruttore.
Non installare accessori, parti di ricambio e componenti
non forniti dal costruttore.
Non lasciare mai il bambino incustodito nel Seggiolino
per nessun motivo.
Non interporre nulla, che non sia un accessorio approvato
per il prodotto sia tra il sedile auto e il Seggiolino sia tra il
Seggiolino e il bambino: in caso di incidente il Seggiolino
potrebbe non funzionare correttamente.
Nel caso in cui l’auto venisse lasciata sotto il sole, ispezionare accuratamente il Seggiolino, prima di accomodare
il bambino, verificando che alcune parti di esso non
si siano surriscaldate: in tal caso lasciarle raffreddare
prima di far sedere il bambino, in modo da evitare che
possa scottarsi.
•
•
•
•
•
•
•
•
•
In seguito ad un incidente anche lieve il Seggiolino può
subire danni non sempre visibili a occhio nudo: è pertanto
necessario sostituirlo.
Non utilizzare Seggiolini di seconda mano: potrebbero
avere subito danni strutturali non visibili a occhio nudo,
ma compromettenti la sicurezza del prodotto.
La società Artsana declina ogni responsabilità per un uso
improprio del prodotto.
La fodera può essere sostituita esclusivamente con una
approvata dal costruttore, poiché costituisce una parte
integrante del Seggiolino. Il Seggiolino non deve essere
mai usato senza la fodera, per non compromettere la
sicurezza del bambino.
Controllare che il nastro della cintura non risulti attorcigliato ed evitare che quest’ultimo o parti del Seggiolino
vengano pizzicate tra le portiere o sfreghino contro
punti taglienti.
Il Seggiolino non è più utilizzabile qualora la cintura
presenti tagli o sfilacciature.
Quando non si trasporta il bambino, il Seggiolino deve
essere comunque lasciato agganciato, oppure va riposto
nel bagagliaio. Il Seggiolino non agganciato può infatti
costituire un pericolo per i passeggeri in caso di incidente
o di brusche frenate.
Verificare che non vengano trasportati, in particolare
sul ripiano posteriore all’interno del veicolo, oggetti o
bagagli che non siano stati fissati o posizionati in maniera
sicura: in caso di incidente o brusca frenata potrebbero
ferire i passeggeri.
Verificare che l’appoggiatesta del sedile non interferisca
con l’appoggiatesta del Seggiolino: non deve spingerlo in
avanti. Qualora questo avvenga rimuovere l’appoggiatesta
dal sedile dell’auto sul quale viene installato il Seggiolino
avendo cura di non appoggiarlo sulla cappelliera.
Assicurarsi che tutti i passeggeri della vettura utilizzino
la propria cintura di sicurezza sia per la propria sicurezza
sia perché durante il viaggio, in caso di incidente o brusca
frenata, potrebbero ferire il bambino.
In caso di lunghi viaggi fate delle soste frequenti. Il
bambino si stanca molto facilmente. Per nessuna
ragione estrarre il bambino dal Seggiolino auto
mentre l’auto è in movimento. Se il bambino ha
bisogno di attenzione, è necessario trovare un posto
sicuro e accostare.
ISTRUZIONI D’USO
INDICE
•
•
•
•
•
•
•
•
•
3
Descrizione componenti
Caratteristiche del prodotto
Limitazioni e requisiti d’uso relativi al prodotto e al
sedile auto
Installazione in auto del Seggiolino e alloggiamento del
bambino in Gr. 1 (9-18 kg)
Installazione in auto del Seggiolino e alloggiamento del
bambino in Gr. 2-3 (15-36 kg) con schienale
Installazione in auto del Seggiolino e alloggiamento del
bambino in Gr. 3 (22-36 kg) senza schienale
Regolazione dell’altezza dell’appoggiatesta
Ripristino delle cinture per utilizzo in Gr. 1 (9-18 kg)
Pulizia e manutenzione
DESCRIZIONE COMPONENTI
LIMITAZIONI E REQUISITI D’USO RELATIVI AL
PRODOTTO E AL SEDILE AUTO
Fig. 1 (fronte):
A. Manopola di regolazione appoggiatesta e cinture
B. Appoggiatesta;
C. passaggi cintura diagonale
D. Spallacci
E. Cinture del seggiolino
F. Fibbia
G. Protezione infragambe;
H. Pulsante di regolazione delle cinture
I. Nastro di regolazione delle cinture.
ATTENZIONE! Rispettare scrupolosamente le seguenti
limitazioni e requisiti d’uso relativi al prodotto e al sedile
auto: in caso contrario non è garantita la sicurezza.
• Questo Seggiolino è omologato per l’utilizzo con bambini
di peso esclusivamente da 9 a 36 kg di peso (da 2 fino
a 12 anni circa).
• Il sedile dell’auto deve essere dotato di cintura di sicurezza a 3 punti, statica o con arrotolatore, omologata
in base al Regolamento UNI/ECE N°16 o altri standard
equivalenti (Fig. 5).
• Non installare mai il seggiolino con la cintura dell’auto
a due punti di ancoraggio (Fig. 6).
• Il Seggiolino può essere installato sul sedile anteriore
lato passeggero o su uno qualsiasi dei sedili posteriori.
Non utilizzare mai questo Seggiolino su sedili rivolti
lateralmente o opposti al senso di marcia (Fig. 7).
• Il prodotto è destinato esclusivamente a un uso come
Seggiolino per auto e non all’utilizzo in casa.
• Per una corretta installazione, fare in modo che l’appoggiatesta del sedile dell’auto non interferisca in alcun
modo con lo schienale del Seggiolino.
Fig. 2 (Profilo):
J. Schienale
K. Seduta
L. Braccioli
M. Passaggi cinture.
Fig. 3 (Retro):
N. Piastrine di fissaggio degli spallacci e di passaggio delle
cinture
O. Nastri cinture
P. Vani per il passaggio delle cinture dell’auto (solo installazione in Gr. 1)
Q. Piastra di fissaggio delle cinture.
INSTALLAZIONEINAUTODELSEGGIOLINOEALLOGGIAMENTO DEL BAMBINO IN GR. 1 (9-18 KG)
Fig. 4 (Sotto):
R. Piastrine di fissaggio delle cinture alla seduta
S. Piastra di fissaggio della fibbia alla seduta
T. Leve di sgancio dello schienale dalla seduta.
ATTENZIONE! Queste istruzioni si riferiscono, sia nel testo
che nei disegni, a un’installazione del Seggiolino sul sedile
posteriore lato destro. Per installazioni in altre posizioni
eseguire comunque la stessa sequenza di operazioni.
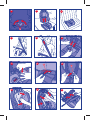
1. Posizionare il Seggiolino sul sedile in senso di marcia sul
sedile prescelto per l’installazione (Fig. 8).
2. Introdurre la cintura a 3 punti dell’auto attraverso
l’apposito vano P dello schienale del Seggiolino (Fig. 9A
e 9B), facendola fuoriuscire dal vano opposto sull’altro
lato dello schienale (Fig. 9C).
3. Agganciare la cintura dell’auto alla fibbia facendo in modo
che sia il ramo addominale che quello diagonale della
stessa passino al di sotto del bracciolo (Fig. 10).
4. Tendere il più possibile la cintura dell’auto facendo aderire
bene il Seggiolino al sedile (Fig. 11), se necessario salendo
con un ginocchio sul Seggiolino stesso.
5. Verificare la correttezza dell’installazione, che la cintura
sia ben tesa e che il Seggiolino sia fermamente fissato e
aderente al sedile. Se così non fosse, ripetere l’operazione
di installazione dall’inizio (Fig. 12)
CARATTERISTICHE DEL PRODOTTO
•
•
Questo Seggiolino è omologato “Gruppo 1, 2 e 3”, per
il trasporto di bambini da 9 a 36 kg di peso (da 9 mesi
a 12 anni circa), nel rispetto del regolamento europeo
ECE R44/04.
L’omologazione è di tipo “Universal”, quindi il Seggiolino
può essere utilizzato su qualsiasi modello di automobile.
ATTENZIONE! “Universal” significa che è compatibile con
la maggior parte, ma non con tutti i sedili auto.
AVVISO IMPORTANTE
1. Questo è un dispositivo di ritenuta bambini “Universale”, omologato secondo Regolamento N°44,
emendamenti serie 04. Adatto all’impiego generale
nei veicoli e compatibile con la maggior parte, ma non
tutti, i sedili di veicolo.
2. La perfetta compatibilità è più facilmente ottenibile
nei casi in cui il costruttore del veicolo dichiara nel
manuale veicolare che il veicolo prevede l’installazione
di dispositivi di ritenuta bambini “Universali” per la fascia
d’età in questione.
3. Questo dispositivo di ritenuta è stato classificato “Universale” secondo criteri di omologazione più severi
rispetto a modelli precedenti che non dispongono del
presente avviso.
4. Adatto solamente per l’impiego nei veicoli dotati di
cintura di sicurezza a 3 punti, statica o con arrotolatore,
omologata in base al Regolamento UN/ECE N°16 o altri
standard equivalenti.
5. In caso di dubbio, contattare il produttore del dispositivo
di ritenuta oppure il venditore.
ATTENZIONE!
• Verificare sempre che la cintura sia distribuita uniformemente in tutti i punti e non presenti attorcigliamenti.
• Non far passare MAI la cintura dell’auto in posizioni
diverse da quelle indicate.
Completata l’installazione del Seggiolino, per far alloggiare il
bambino su di esso procedere come descritto di seguito:
6. Premere il pulsante di regolazione delle cinture H e
contemporaneamente impugnare e tirare verso di sè la
parte inferiore delle cinture del seggiolino, fino a ottenerne
la massima estensione possibile (Fig 13).
7. Sganciare le cinture del Seggiolino premendo il pulsante
della fibbia e adagiarle sui lati (Fig. 14).
8. Sistemare con cura il bambino nel Seggiolino, adattando
le cinture intorno al suo corpo senza tirarle, unire le due
4
linguette della cintura (Fig. 15A) e agganciarle nuovamente
nella fibbia (Fig. 15B).
9. Attraverso l’apposita manopola di regolazioneA posta sulla
sommità dello schienale, regolare l’altezza dell’appoggiatesta del Seggiolino, in modo che le cinture fuoriescano
all’altezza delle spalle del bambino (Fig. 16).
10. Per regolare la tensione delle cinture del Seggiolino,
adattandole al corpo del bambino, tirare con cautela il
nastro di regolazione I fino ad ottenere il giusto livello
di tensionamento (Fig. 17).
11. Verificare che il Seggiolino sia fissato correttamente
come evidenziato in figura (Fig. 18).
Per togliere il bambino dal Seggiolino, premere il pulsante
della fibbia e sganciare le cinture (Fig 19).
•
eserciti pressione sul collo; se necessario regolare
l’appoggiatesta.
Verificare che l’arrotolatore della cintura dell’auto
risulti in posizione arretrata (o al massimo allineata)
allo schienale del sedile dell’auto.
Per togliere il bambino dal Seggiolino in Gruppo 2 e 3:
1. Sganciare la cintura dell’auto dalla sua fibbia.
2. Sfilare la cintura dell’auto dal corpo del bambino.
3. Rimuovere con cura il bambino dal Seggiolino.
ATTENZIONE! Nel caso in cui non si intenda rimuovere
il Seggiolino dall’auto, provvedere a riallacciare la cintura
dell’auto nell’apposita fibbia, di modo che essa trattenga il
Seggiolino all’auto anche senza il bambino; potrebbe altrimenti
costituire un pericolo in caso di frenata o incidente.
INSTALLAZIONE IN AUTO DEL SEGGIOLINO E
ALLOGGIAMENTO DEL BAMBINO IN GR. 2 e 3
(15-36 KG) CON SCHIENALE
INSTALLAZIONE IN AUTO DEL SEGGIOLINO E
ALLOGGIAMENTO DEL BAMBINO IN GR. 3 (22-36
KG) SENZA SCHIENALE
Per cambiare la configurazione del Seggiolino dal gr. 1 al
gr. 23 è necessario preliminarmente rimuovere le cinture
secondo le operazioni di seguito descritte:
1. Sganciare le cinture del seggiolino dalla fibbia (Fig. 14).
2. Ruotare e sganciare le due piastrine di fissaggio delle cinture
R poste sotto la seduta (Fig. 20A)facendolefuoriuscire anche
dalle due fessure sulla fodera tessile (Fig. 20B).
3. Sganciare i due lembi delle cinture dalla piastra di
fissaggio Q (Fig. 21).
4. Ruotare e sganciare le due piastrine di passaggio delle
cinture N dallo schienale (Fig. 22).
5. Estrarre frontalmente i due rami cintura facendoli
passare attraverso i due passaggi cintura diagonale
rossi C (Fig. 23).
6. Riporre e custodire in luogo apposito i due rami cinture
così rimossi.
7. Far passare la fibbia e lo spartigambe in stoffa attraverso
l’apposita fessura posta al centro della seduta, riponendo
il tutto nell’apposito vano nella seduta (Fig. 24A, 24B
e 24C). Ora il seggiolino è pronto e configurato per
l’installazione in gruppo 2 e 3.
8. Posizionare il Seggiolino sul sedile in senso di marcia sul
sedile prescelto per l’installazione (Fig. 25).
9. Far passare il ramo diagonale della cintura dell’auto dietro
all’appoggiatesta e attraverso l’apposito passaggio cintura
rosso C sotto all’appoggiatesta stesso. Far sedere con
cura il bambino, assicurandosi che la sua schiena sia ben
aderente allo schienale del Seggiolino (Fig. 26).
10. Agganciare la cintura dell’auto alla fibbia facendo in modo
che sia il ramo addominale che quello diagonale della
stessa passino al di sotto del bracciolo (Fig. 27).
11. Verificare l’altezza dell’appoggiatesta e, se non è corretta,
regolarla: si veda il paragrafo “REGOLAZIONE DELL’
ALTEZZA DELL’APPOGGIATESTA”.
12. Tirare la parte diagonale della cintura auto verso il suo
arrotolatore, in modo che tutta la cintura risulti tesa e ben
aderente al torace e alle gambe del bambino (Fig. 28).
13. Verificare che il Seggiolino sia fissato correttamente
come evidenziato in figura (Fig. 29).
In gruppo 1 (9-18 kg) e 2 (15-25 kg), l’uso del Seggiolino
è consentito solamente CON lo schienale correttamente
montato sulla seduta.
In gruppo 3 (22-36 kg), il Seggiolino presenta la possibilità di
un doppio utilizzo, alternativamente CON schienale (scelta
comunque sempre più sicura e quindi raccomandabile) o
SENZA schienale.
Per l’utilizzo senza schienale, è necessario sganciare lo schienale
dalla seduta:
1. Posizionare ilSeggiolino auto su un pianoorizzontale in modo
che sia accessibile la parte inferiore della seduta (Fig. 30).
2. Ruotare le due leve di sgancio dallo schienale T nella
direzione indicata (Fig. 31).
3. Estrarre lo schienale dalla seduta (Fig. 32).
4. Posizionare la sedutadelSeggiolino in modo che sia aderente
allo schienale dell’auto (Fig. 33).
5. Posizionare il bambino sul Seggiolino e agganciare la
cintura dell’auto alla fibbia facendone passare il ramo
addominale sotto al bracciolo del Seggiolino e quello
diagonale sopra (Fig. 34).
6. Tendereaccuratamenteilramodiagonaledellacinturafacendo
in modo che passi sulla spalla del bambino (Fig. 35).
ATTENZIONE! Per fissare lo schienale alla seduta ripetere le
operazioni appena descritte in senso inverso. Al termine delle
operazioni di fissaggio verificare che la parte superiore e inferiore
della seduta siano correttamente agganciate tra loro.
REGOLAZIONE DELL’ALTEZZA DELL’APPOGGIATESTA
E’ possibile regolare l’altezzadell’appoggiatesta in infinite posizioni
per permettere di adattare al meglio il Seggiolino all’altezza del
bambino. Una regolazione ottimale consente:
che la testa sia sempre ben contenuta e protetta (Gr. 1-2-3).
che le cinture di sicurezza del seggiolino siano sempre all’altezza
corretta, cioè quella delle spalle (Gr. 1).
che la cinturadiagonaledell’auto sia sempre all’altezza giusta grazie
ai passaggi cintura integrati nell’appoggiatesta C (Gr. 2-3).
Per effettuare la regolazione dell’altezza dell’appoggiatesta,
girare la manopola A posta sulla sommità dello schienale,
fino a raggiungere l’altezza desiderata (Fig. 16).
ATTENZIONE!
• Verificare sempre che la cintura sia distribuita uniformemente in tutti i punti e non presenti attorcigliamenti.
• Verificare che la cintura diagonale sia appoggiata
correttamente contro la spalla del bambino e non
RIPRISTINO DELLE CINTURE PER UTILIZZO IN
GR. 1 (9-18 KG)
Per rimontare le cinture al seggiolino operare come segue:
1. Unire le due linguette dei due rami cintura, inserirle e
5
agganciarle alla fibbia (Fig. 36).
2. Inserire le due piastrine di fissaggio alla seduta R attraverso la fodera facendole fuoriuscire dalla parte sotto
della seduta (Fig. 37).
3. Far passare le due piastrine di fissaggio degli spallacci
e di passaggio delle cinture N prima attraverso i due
passaggi cintura diagonale rossi C e poi attraverso lo
schienale (Fig. 38).
4. Agganciare i due lembi delle cinture alla piastra di
fissaggio Q (Fig. 39).
•
ATTENZIONE! Nel caso in cui il Seggiolino risultasse deformato
o fortemente usurato deve essere sostituito: potrebbe aver
perso le caratteristiche originali di sicurezza.
CONSERVAZIONE DEL PRODOTTO
Quando non installato sull’auto si raccomanda di conservare
il Seggiolino in un posto asciutto, lontano da fonti di calore e
al riparo da polvere, umidità e luce solare diretta.
PULIZIA E MANUTENZIONE
PULIZIA DELLA FODERA
La fodera del Seggiolino è completamente sfoderabile e
lavabile a mano o in lavatrice a 30°C. Per il lavaggio seguire le
istruzioni riportate sull’etichetta del rivestimento contenente
i seguenti simboli per il lavaggio:
Lavaggio in
lavatrice a 30°C
Lavaggio
a mano
Non
candeggiare
Non lavare
a secco
di regolazione delle cinture.
Plastiche: verificare lo stato di usura di tutte le parti in
plastica che non devono presentare evidenti segni di
danneggiamento o di scolorimento.
Non asciugare
in asciugatrice
SMALTIMENTO DEL PRODOTTO
Raggiunto il limite di utilizzo previsto per il Seggiolino,
interrompere l’uso dello stesso e depositarlo tra i rifiuti.
Per motivi di rispetto dell’ambiente, separare i diversi tipi
di rifiuti secondo quanto previsto dalla normativa vigente
nel proprio Paese.
Non
stirare
Non usare mai detergenti abrasivi o solventi. Non centrifugare
la fodera e lasciarla asciugare senza strizzarla.
Per rimuovere i diversi componenti della fodera tessile
dalla struttura del Seggiolino, operare come di seguito
descritto:
1. Sganciare le cinture del seggiolino dalla fibbia (Fig. 14).
2. Ruotare e sganciare le due piastrine di fissaggio delle
cinture R poste sotto la seduta (Fig. 20A) facendole
fuoriuscire anche dalle due fessure sulla fodera tessile
(Fig. 20B).
3. Sfilare il rivestimento dell’appoggiatesta (Fig. 40).
4. Sfilare il rivestimento dello schienale staccando tutti i velcri
di fissaggio e sfilando i due rami cintura (Fig. 41).
5. Staccare lo schienale dalla seduta come spiegato nel
paragrafo “INSTALLAZIONE IN AUTO DEL SEGGIOLINO
E ALLOGGIAMENTO DEL BAMBINO IN GR. 3 (22-36
KG) SENZA SCHIENALE” (punti 1-3).
6. Sfilare il rivestimento della seduta staccando tutti i velcri
di fissaggio e aprendo le due zip (Fig. 42)
Per ripristinare i componenti della fodera nella posizione iniziale
eseguire al contrario le operazioni appena descritte.
PULIZIA DELLE PARTI PLASTICHE E DI METALLO
Per la pulizia delle parti in plastica o in metallo verniciato
utilizzare solamente un panno umido. Non utilizzare mai
detergenti abrasivi o solventi.
Le parti mobili del Seggiolino non devono essere in alcun
modo lubrificate.
CONTROLLO DELL’INTEGRITA’ DEICOMPONENTI
Si raccomanda di verificare regolarmente l’integrità e lo
stato di usura dei seguenti componenti:
• Fodera: verificare che non fuoriescano imbottiture o che
non ci sia rilascio di parti di esse. Verificare lo stato delle
cuciture che devono essere sempre integre.
• Cinture: verificare che non ci sia un anomalo sfibramento
della trama tessile con evidente riduzione dello spessore in corrispondenza del nastro di regolazione, dello
spartigambe, sui rami spalle e nella zona della piastra
PER ULTERIORI INFORMAZIONI
Artsana S. P. A. - Servizio Clienti
Via Saldarini Catelli, 1
22070 GRANDATE – Como – Italia
Telefono: 800-188 898 - www.chicco.com
6
GB Instructions for use
VERY IMPORTANT! TO BE READ IMMEDIATELY
• Read these instructions carefully before fitting and installing the product. The product must not be used by
anybody who has not read these instructions.
• Keep this manual for future reference.
• WARNING! According to car accident statistics, the
rear seats of a car are generally safer than the front
seat: it is therefore recommended to fit the child
car seat into the rear seats of the car. In particular,
the central rear seat is the safest, when fitted with a
3-point safety strap.
• It is recommended to ensure that all passengers
know how to release the child from the car seat in the
case of an emergency.
• If the child car seat is fitted in the front seat of the
car with the front airbag installed, in order to ensure maximum safety, it is recommended to push the
seat back as much as possible, bearing in mind the
comfort of the passenger sitting in the seat directly
behind it.
• Never use this child car seat fitted into car seats facing sideways or facing rearwards.
• Only fit the child car seat onto seats which are fastened to the car chassis and facing forwards. Make
sure that all folding or rotating car seats are always
firmly fastened in place, otherwise they could be
dangerous.
• Pay close attention on how to fit the child seat into
the vehicle, to prevent a loose seat or car door from
interfering with it.
• Never fit the child car seat to a seat that is only equipped with an abdominal/lap safety belt with 2-points.
• No child car seat can guarantee the total safety of
your child in the event of an accident, but the use
of this product reduces the risk of serious injuries or
death.
• The risk of serious injuries to the child increases, not
only in the case of accidents, but also in other circumstances (i.e.: sudden braking etc.), if these instructions
are not followed carefully: always check that the child
car seat is fitted correctly onto the vehicle seat.
• If the child car seat is damaged, deformed or worn
out, it must be replaced, as its original safety features
may have been compromised.
• This product must not be modified in any way, unless
the modification is approved by the manufacturer.
• Do not install accessories, spare parts, or any component not supplied by the manufacturer.
• Never leave your child unattended in the car seat for
any reason.
• Never place anything except an approved accessory
between the vehicle seat and the child car seat or
between the child car seat and the child: in the event
of an accident, the child car seat may not operate
correctly.
• If the vehicle has been left in the sun, check that the
different parts of the child car seat are not too hot
•
•
•
•
•
•
•
•
•
•
•
before seating the child in it: in such an event, let the
child car seat cool down first before placing the child
into it, in order to avoid burns.
After an accident, even a slight one, the child seat
could have been damaged, even if it not visible to the
naked eye. it therefore must be replaced.
Never use second-hand child car seats: they may
have suffered structural damage which is not visible
to the naked eye but however compromise the safety
of the product.
ARTSANA declines all responsibility for the incorrect
use of this product.
The seat fabric must only be replaced with another
approved by the manufacturer as it constitutes an
integral part of the child car seat. To ensure the safety
of the child car seat, never use it without its fabric
cover.
Check that the harness straps are not twisted and
try to prevent them, or any other part of the car
seat from getting trapped in the car door or rubbing
against sharp objects.
The child car seat must be replaced should the harness be cut or frayed.
When the child car seat is not in use inside the vehicle,
it should be left secured to the car’s seat, or stowed in
the car’s boot. An unsecured child car seat may be a
source of danger for the passengers in the event of an
accident or sudden braking.
Do not transport loose or unsecured objects or baggage on the back shelf of the vehicle: in the event, of
an accident or sudden braking, they may injure the
passengers.
Check that the car seat headrest does not interfere
with the child seat headrest: do not push it forwards.
If this is the case, remove the headrest from the car
seat on which the child seat is fitted, without resting
it on the luggage rack.
Ensure that all the car passengers fasten their seat
belt, for their own safety and because, during the
journey, they may injure the child in the event of an
accident or sudden braking of the car.
0n long journeys make frequent stops. Children tire
easily. Never take your child out of the child seat
whilst the car is moving for any reason. If your child
needs attention, find a safe place and pull over.
INSTRUCTIONS FOR USE
INDEX
• Description of the parts
• Product features
• Restrictions and requisites regarding the use of the
product and car seat
• Fitting the child car seat into the car and seating a Gr.
1 child 1 (9-18 kg)
• Fitting the child car seat into the car and seating a Gr.
2-3 child (15-36 kg) with the backrest
• Fitting the child car seat into the car and seating a Gr.
3 child (22-36 kg) without the backrest
• Adjusting the height of the head rest
• Refitting the harness for seating a Gr. 1 child (9-18 kg)
7
•
RESTRICTIONS AND REQUISITES REGARDINGTHE
USE OF THE PRODUCT AND CAR SEAT
WARNING! Read these restrictions and requisites carefully to ensure the product and car seat are used safely: if
you don’t the safety levels cannot be guaranteed.
This child seat is approved for seating children weighing
from 9 to 36 kilos only (from 9 months to approximately 12 yeas of age).
The car seat must be fitted with a 3-point static or
3-point retractor safety belts approved to UN/ECE Regulation No.16, or other equivalent standards (diag. 5).
Never fit the child car seat to a seat that is only equipped
with a 2-point safety belt (diag. 6)
The child car seat can be fitted into the front passenger
seat or any other back seats. Never use this child car seat
fitted into car seats facing sideways or facing rearwards
(diag. 7)
This product is expressly intended to be used only as a
child car seat; it should not be used indoors.
To ensure correct installation, check that the car seat headrest does not interfere with the child seat’s backrest.
Cleaning and maintenance
DESCRIPTION OF THE PARTS
diag. 1 (Front)
A. Adjustment knob for the headrest and restraint
harness
B. Headrest
C. Diagonal belt routing slots
D. Shoulder straps
E. Child car seat restraint harness
F. Buckle
G. Crotch protection strap
H. Restraint harness adjustment button
I. Restraint harness adjustment strap
diag. 2 (Profile)
J. Backrest
K. Seat
L. Armrests
M. Belt routing
diag. 3 (Back)
N. Plates for locking the shoulder straps and for the
belt routing
O. Harness straps
P. Slots for inserting the car seat belts (only for installation
in Gr. 1)
Q. Plate for locking the belts
FITTING THE CHILD CAR SEAT INTO THE CAR AND
SEATING A GR. 1 CHILD (9-18 KG)
WARNING! These instructions and diagrams are for the
installation of the child car seat on the right back seat.
To fit the child car seat in other positions, carry out these
operations in the same order.
1. Place the child car seat onto the chosen forward facing car seat (diag. 8)
2. Thread the 3-point car safety belt through slot P on
the back of the child car seat (diag. 9A and 9B), and
pull it out of the slot on the other side of the backrest
(diag. 9C).
3. Click the car safety belt into the buckle so that both
the abdominal and the diagonal straps pass under the
armrest (diag. 10).
4. Pull the car safety belt firmly, ensuring that the child
car seat adheres correctly to the car seat (diag. 11), if
necessary, carry out this operation exercising some
pressure on the child car seat with your knee.
5. Check that the child car seat is fitted firmly in place
and adheres correctly to the vehicle seat; check that
the seat belt is tight. If this is not the case, repeat the
fitting procedure from the beginning (diag. 12).
WARNING! Always check that the seat belt is positioned
correctly and no parts are twisted.
NEVER fit the car safety belt in any way other than that
indicated in these instructions.
diag. 4 (Below)
R. Plates for locking the belts to the seat
S. Plates for locking the buckle to the seat
T. Lever to remove the backrest from the seat
PRODUCT FEATURES
• This child car seat is approved for “Group 1, 2 and
3”, for the transport of children from 9 up to 36 Kg
of weight (from 9 months to approximately 12 years
of age), and conforms to European Standard ECE R
44/04.
• This approval is “Universal”, which means that the
child car seat can be used on all types of cars. WARNING! “Universal” means that it is compatible with
most, but not all car seats.
WARNING
This is a “Universal” child restraint device and is approved to ECE
Regulation No. 44, amendment series 04 standards. It is suitable for use in vehicles and will fit most, but not all car seats.
A correct fit is likely if the vehicle manufacturer has declared that
thevehicle is capable of accepting a “Universal” child restraintfor
this age group.
This child restraint has been classified as “Universal” under more
stringent conditions than those that were applied to earlier designs not displaying this notice.
Only suitable if the vehicle is fitted with a 3-point static or
3-point retractor safety belts approved to UN/ECE Regulation
No.16, or other equivalent standard.
If in doubt, consult either the child restraint manufacturer or
the retailer.
When the child car seat is fitted correctly, follow the instructions below to seat the child:
6. Press the restraint harnesses adjustment button H
and, at the same time grasp the lower part of the
child seat straps and pull in your direction as far as
possible (diag. 13)
7. Unfasten the child car seat restraint harness, pressing
the button on the buckle and move them to the sides
(diag.14)
8. Make sure your child is seated comfortably on the
8
child car seat, adjust the harness straps around the
childs body without pulling them too tight, join the
two harness straps (diag. 15A) and click them into the
buckle (diag. 15B).
9. Use the adjuster knob A fitted at the top of the
backrest to adjust the height of the child car seat’s
headrest, it must be fitted so as to allow the harness
straps to come out at the height of the child’s shoulders (diag. 16)
10. To tighten the restraint harnesses of the child car seat,
pull the adjustment strap I until it is correctly fitted to
the child’s body.
11. Check that the child car seat is fitted correctly as seen
in the diagram (diag. 18).
To remove the child from the child car seat, press the
button on the buckle and release the restraint harness
(diag.19)
over the child’s legs and chest (diag. 28).
13. Check that the child car seat is fitted correctly as seen
in the diagram (diag. 29).
FITTING THE CHILD CAR SEAT INTO THE CAR AND
SEATING A GR. 2 or 3 CHILD (15-36 KG) WITH
THE BACKREST
To change the configuration of the child car seat from
Gr. 1 to Gr. 2-3, it is necessary first of all to remove the
restraint harness following the instructions below:
1. Release the child car seat harnesses from the buckle
(diag. 14)
2. Rotate and release the two belt routing plates R
found under the seat (diag. 20A) sliding them out of
the two slots in the fabric cover (diag. 20B).
3. Remove the two harness straps from the locking plate Q (diag. 21)
4. Rotate and release the two belt routing plates N from
the backrest (diag. 22)
5. From the front of the seat, slide out the two sections
of the harness through the two red diagonal belt routing slots C (diag. 23).
6. Store these two harness straps in a safe place for
future use.
7. Now slide the buckle and the fabric crotch strap
through the slot in the centre of the seat, so that it
all fits inside the housing on the child seat (diag. 24A,
24B and 24C).
The child car seat is now ready to be installed for Group
2 and 3 children.
8. Place the child car seat onto the chosen forward facing car seat (diag. 25)
9. Thread the diagonal car safety belt down behind the
headrest and through the relative red diagonal belt
routing slot C below the headrest. Place your child
carefully into the car seat, and check that the child
is sitting with his back correctly placed against the
backrest of the child car seat (diag. 26)
10. Click the car safety belt into the buckle so that both
the abdominal and the diagonal straps pass under the
armrest (diag. 27).
11. Check the height of the head rest and, if it is not
correct, adjust it accordingly: see paragraph “ADJUSTING THE HEIGHT OF THE HEAD REST”
12. Pull the diagonal car safety belt strap towards the retractor, to ensure the belt is tight and fitting properly
WARNING! If you do not intend to remove the child car
seat from the vehicle, slot the car safety belts back into
the buckle, so that the child car seat remains fastened safely inside the vehicle even when not used; this will avoid
danger during an accident or sudden braking of the car.
WARNING!
• Always check that the seat belt is positioned correctly
and no parts are twisted.
• Check that the diagonal safety belt fits correctly
across the child’s shoulder and does not press on he
childs neck; adjust the headrest accordingly.
• Check that the car safety belt retractor is behind the
backrest of the car seat (or at least aligned to it).
To remove a child from a Group 2 and 3 child car seat:
1. Release the car safety belt from its buckle.
2. Remove the car safety belt from the child’s body.
3. Carefully remove the child from the car seat.
FITTING THE CHILD CAR SEAT INTO THE CAR AND
SEATING A GR. 3 CHILD (22-36 KG) WITHOUT
THE BACKREST
For Groups 1 (9-18 kg) and 2 (15-25 kg), it is compulsory
to use the child car seat WITH the backrest fitted onto
the child car seat.
For Group 3 (22-36 kg) the child car seat can be used
in two different ways, WITH the backrest (which is the
safest and therefore the most recommended choice) or
WITHOUT the backrest.
To use the child car seat without the backrest, it must be
removed from the seat:
1. Place the child car seat on a flat surface so that the lower part of the seat can easily be accessed (diag. 30).
2. Rotate the two release levers on the backrest T as seen
in the diagram (diag. 31)
3. Remove the backrest from the child car seat (diag. 32).
4. Place the seat section of the child car seat so that it adheres to the backrest of the seat of the car (diag. 33).
5. Place the child onto the child car seat and click the car
safety belt into the buckle, sliding the abdominal strap
under the child car seat armrest, and the diagonal strap
over it (diag. 34).
6. Pull the diagonal safety belt strap so that is slides over
the child’s shoulder (diag. 35).
WARNING! To replace the backrest, repeat the procedure
illustrated above in the reverse order. On completing this
procedure, check that the top and bottom parts of the
seat are appropriately attached to each other.
ADJUSTING THE HEIGHT OF THE HEAD REST
The height of the headrest can be adjusted to a range of
positions to adapt the child car seat to the height of the
child. When it is correctly adjusted, it ensures:
• That the child’s head is always held in place and well
9
protected (Gr. 1-2-3).
That the child car seat restraint harnesses are always
at the right height, that is the shoulder straps (Gr. 1).
• That the diagonal car safety belts are always at the
right height as the straps are slotted through the headrest C (Gr. 2-3).
To adjust the height of the headrest, turn the knob A fitted at the top of the backrest until you reach the required
height (diag. 16).
Clean the plastic and coated metal parts only with a
damp cloth. Never use abrasive detergents or solvents.
The movable parts of the child car seat must not be lubricated.
•
CHECKING THE CONDITION OF THE COMPONENTS
It is recommended to check regularly the condition of
the following components to ensure that they are not
damaged or worn out:
• Lining: check that the padding does not come out
from the seams. Check the condition of the seams:
they must always be intact and undamaged.
• Harnesses: Check that the fabric weft is not frayed or
the harness strap worn out in the parts corresponding
to the adjustment strap, crotch, shoulders and harness adjustment plate.
• Plastic parts: Check that the plastic parts are not worn
out, damaged or faded.
WARNING! If the child car seat is deformed or worn out,
it must be replaced: it may no longer comply with the
original safety standards.
REFITTING THE HARNESS FOR SEATING A GR. 1
CHILD (9-18 KG)
To refit the restraint harness to the child car seat, proceed
as follows:
1. Join the two ends of the harness straps, insert them
and connect them to the buckle (diag. 36)
2. Insert the two locking plates R, sliding them out
through the slots in the fabric cover and pulling them
out from under the seat (diag. 37).
3. Insert the two shoulder strap and the belt sequence N
locking plates through the two red diagonal belt slots
C and then through the backrest (diag. 38).
4. Connect the two harness straps to the locking plate
Q (diag. 39).
STORING THE PRODUCT
When it is not fitted into the car, it is recommended to
store the child car seat in a dry place, away from sources
of heat and to protect it from dust, humidity and direct
sunlight.
CLEANING AND MAINTENANCE
• HOW TO CLEAN THE FABRIC COVER
The child car seat’s fabric cover can be removed and cleaned by hand or in a washing machine at 30°C. Please refer to the cleaning instructions on seat fabric label which
illustrates the following washing symbols:
Machine
washable at 30°
Hand
washable
Do not
bleach
Do not dry
clean
Do not
spin dry
DISPOSING OF THE PRODUCT
When the child car seat no longer complies with the
original safety standards, stop its use and dispose of it at
an appropriate collection point. Dispose of the product
as laid down in the environmental regulations in force in
the Country of use.
Do not
iron
Never use abrasive detergents or solvents. Do not spin
dry the fabric cover, let it dry without wringing.
To remove the various sections of the fabric cover from
the child car seat frame, follow the instructions below:
1. Release the child car seat harnesses from the buckle
(diag. 14)
2. Rotate and release the two belt locking plates R found
under the seat (diag. 20A) sliding them out of the two
slots in the fabric cover (diag. 20B).
3. Pull the cover up over the headrest and remove (diag.
40).
4. To remove the backrest cover, open the velcro fasteners and slide out the two harness straps (diag. 41).
5. Remove the child car seat backrest following the instructions in the paragraph “FITTING THE CHILD CAR
SEAT INTO THE CAR AND SEATING A GR. 3 CHILD
(22-36 KG) WITHOUT THE BACKREST” (points 1-3).
6. Remove the seat cover by opening the velcro fasteners and the two zips (diag. 42).
To replace the parts of the fabric cover, follow the above
instructions in the reverse order.
FOR FURTHER INFORMATION:
ARTSANA SPA
Customer Care
Via Saldarini Catelli, 1
22070 Grandate COMO-ITALY
Free-phone 800.188.898
http://www.chicco.com
HOW TO CLEAN THE PLASTIC OR METAL PARTS
10
F
Notice d’instruction
TRÈS IMPORTANT ! À LIRE IMMEDIATEMENT
•
Pour le montage et l’installation du siège-auto,
suivre scrupuleusement les instructions. Lire
attentivement et intégralement la notice avant
d’utiliser le produit.
•
Conserver cette notice d’instructions pour toute
utilisation ultérieure.
•
ATTENTION ! Les statistiques sur les accidents
de voiture montrent que les sièges arrière des
véhicules sont plus sûrs que les sièges avant. Par
conséquent, il est conseillé d’installer le siègeauto sur les sièges arrière. Le plus sûr est le siège
central, s’il est muni d’une ceinture à 3 points.
•
Il est recommandé d’informer tous les passagers
sur la façon de détacher l’enfant du siège-auto en
cas d’urgence.
•
Si le siège-auto est installé sur le siège avant
avec l’airbag activé, pour plus de sécurité, il est
recommandé de le reculer, sans toutefois gêner
les passagers du siège arrière.
•
Ne jamais utiliser ce siège-auto sur des sièges
tournés vers sur le côté ou dos à la route dans le
sens contraire de la marche.
•
Installer le siège-auto uniquement sur des sièges
correctement fixés à la structure du véhicule et
tourné face à la route. Ne jamais laisser les sièges
de la voiture pliés, tournés sur le côté ou encore
mal accrochés, en cas d’accident ils pourraient
constituer un danger.
•
Installer correctement le siège-auto en évitant
qu’un siège mal fixé ou qu’une portière n’interfèrent avec le siège-auto.
•
Ne jamais fixer le siège-auto sur un siège de voiture muni uniquement d’une ceinture abdominale (à deux points).
•
Aucun siège-auto ne peut garantir la sécurité
totale de l’enfant en cas d’accident, mais l’utilisation de ce produit réduit le risque de blessures
graves et d’accident mortel.
•
Ne pas suivre exactement les indications de ce
manuel augmente le risque de blessures graves à
pour l’enfant, en cas d’accident, mais aussi dans
d’autres circonstances (ex : freinage brusque,
etc). Notamment, toujours s’assurer que le siègeauto est correctement accroché au siège de la
voiture.
•
En cas de dommages, de déformations ou de forte usure du siège-auto, il faut le remplacer car il
pourrait avoir perdu ses caractéristiques de sécurité d’origine.
•
Ne pas faire de modifications sur le produit sans
l’approbation du fabricant.
•
Ne pas intégrer d’accessoires, de pièces détachées
et d’éléments non fournis par le fabricant.
•
Ne jamais laisser l’enfant sans surveillance dans
le siège-auto.
•
Ne rien mettre, excepté un accessoire approuvé
pour le produit, entre le siège de la voiture et le
siège-auto et entre le siège-auto et l’enfant : en
cas d’accident, le siège-auto pourrait ne pas fonctionner correctement.
•
Si le véhicule est exposé au soleil, s’assurer, avant
•
•
•
•
•
•
•
•
•
•
•
d’installer l’enfant sur le siège-auto, que les différentes parties de celui-ci ne sont pas trop chaudes, auquel cas, les laisser refroidir avant d’y installer l’enfant pour éviter tout risque de brûlure.
À la suite d’un accident, même léger, le siègeauto pourrait avoir subi des dommages invisibles
à l’œil nu. Par conséquent, il est nécessaire de le
remplacer.
Ne pas utiliser de sièges-auto d’occasion : ils
pourraient avoir subi des dommages structuraux
invisibles à l’œil nu susceptibles de compromettre la sécurité du produit.
La société Artsana décline toute responsabilité en
cas de mauvaise utilisation du siège-auto.
On ne peut remplacer la housse du siège-auto
que par une autre housse approuvée par le fabricant car elle fait partie intégrante du siège-auto.
Le siège-auto ne doit jamais être utilisé sans sa
housse pour ne pas compromettre la sécurité de
l’enfant.
Vérifier que le harnais de sécurité n’est pas entortillé et éviter que ce dernier ou des parties du
siège-auto ne se coincent entre les portières ou
frottent contre des éléments coupants.
Le siège-auto ne peut plus être utilisé lorsqu’il
présente des coupures ou s’effiloche.
Quand l’enfant n’est pas dans le véhicule, laisser
le siège-auto attaché dans la voiture ou le mettre dans le coffre. Lorsqu’il n’est pas attaché, le
siège-auto peut constituer une source de danger
pour les passagers en cas d’accident ou de coup
de frein brusque.
S’assurer que le véhicule ne transporte pas, en particulier sur la plage arrière, d’objets ou de bagages
qui n’ont pas été attachés ou positionnés de façon
sûre: en cas d’accident ou de coup de frein brusque,
ils pourraient blesser les passagers.
Vérifier que l’appui-tête du siège de la voiture
n’interfère pas avec l’appui-tête du siège-auto : il
ne doit pas le pousser en avant. Si cela se produit,
retirer l’appui-tête du siège de la voiture contre
lequel le siège-auto est installé, en évitant le
laisser sur la plage arrière.
S’assurer que tous les passagers de la voiture
mettent leur ceinture de sécurité, pour leur
propre sécurité mais aussi parce que pendant le
voyage, en cas d’accident ou de coup de frein brusque, ils pourraient blesser l’enfant.
Pour les longs voyages, il faut s’arrêter fréquemment: l’enfant se fatigue facilement. Ne jamais
retirer l’enfant de son siège-auto lorsque la voiture est en marche, quelqu’en soit le motif. Si
l’enfant a besoin que l’on s’occupe de lui, il faut
trouver un endroit sûr et s’arrêter sur le bas côté.
MODE D’EMPLOI
SOMMAIRE
•
Description des éléments
•
Caractéristiques du produit
•
Limitations et conditions d’emploi liées au siègeauto et au siège de la voiture
•
Installation dans la voiture du siège-auto et mise
en place de l’enfant dans le siège-auto- configuration Groupe 1 (9-18 kg)
•
Installation dans la voiture du siège-auto et mise
11
•
•
•
•
en place de l’enfant dans le siège-auto- configuration Groupe 2-3 (15-36 kg) avec dossier
Installation dans la voiture du siège-auto et mise
en place de l’enfant dans le siège-auto- configuration Groupe 3 (22-36 kg) sans dossier
Réglage de la hauteur de l’appui-tête
Réglage en hauteur du harnais de sécurité pour une
utilisation en configuration Groupe 1 (9-18 kg)
Nettoyage et entretien
3.
4.
DESCRIPTION DES ÉLÉMENTS
Fig. 1 (Face)
A. Bouton de réglage de l’appui-tête et du harnais
de sécurité
B. Appui-tête
C. Guide de passage de la ceinture diagonale
D. Couvre-harnais
E. Harnais de sécurité du siège-auto
F. Boucle
G. Protection de l’entrejambe
H. Bouton de réglage du harnais
I. Courroie de réglage du harnais
5.
LIMITATIONS ET CONDITIONS D’EMPLOI LIEES AU
SIEGE-AUTO ET AU SIÈGE DE LA VOITURE
ATTENTION ! Suivre scrupuleusement les limitations
et les conditions d’emploi suivantes concernant le
siège-auto et le siège de la voiture : dans le cas
contraire, la sécurité est compromise.
•
Ce siège-auto est homologué pour des enfants
d’un poids compris entre 9 et 36 kg (de 2 à 12 ans
environ).
•
Le siège de la voiture doit être muni d’une ceinture de sécurité à 3 points, statique ou à enrouleur,
homologuée conformément à la norme UNI/ECE
N°16 ou à d’autres normes équivalentes (Fig. 5).
•
Ne jamais installer le siège-auto avec la une ceinture de sécurité à deux points d’ancrage (Fig. 6).
•
Le siège-auto peut être installé sur le siège avant
côté passager ou sur l’un des sièges arrière. Ne jamais utiliser ce siège-auto sur des sièges tournés
sur le côté ou dos à la route (Fig. 7).
•
Ce produit doit servir uniquement de siège-auto
et n’est pas destiné à une utilisation domestique.
•
Pour une installation correcte, faire en sorte que
l’appui-tête du siège de la voiture n’interfère pas
avec le dossier du siège-auto.
Fig. 2 (Profil)
J. Dossier
K. Assise
L. Accoudoirs
M. Guide de passage des ceintures
Fig. 3 (Arrière)
N. Plaques de fixation des bretelles du harnais du
siège-auto
O. Courroies de réglage des ceintures
P. Ouvertures pour le passage des ceintures de
la voiture (uniquement pour la configuration
Groupe 1)
Q. Plaque de fixation des ceintures
Fig. 4 (Dessous)
R. Plaques de fixation des ceintures à l’assise
S. Plaque de fixation de la boucle à l’assise
T. Levier de décrochage du dossier de l’assise
INSTALLATION DU SIÈGE-AUTO EN VOITURE ET
MISE EN PLACE DE L’ENFANT – CONFIGURATION
GROUPE 1 (9-18 KG)
ATTENTION ! Ces instructions se réfèrent, à la fois
dans le texte et dans les dessins, à une installation
du siège-auto sur le siège arrière côté droit. Pour
l’installer ailleurs, suivre les mêmes instructions.
CARACTÉRISTIQUES DU PRODUIT
•
Ce siège-auto est homologué « Groupe 1, 2 et
3 », pour le transport des enfants de 9 à 36 kg
(entre 2 et 12 ans environ), conformément à la
norme européenne ECE R44/04.
•
L’homologation est de type « Universel », le siège-auto peut donc être utilisé sur n’importe quel
modèle de voiture. ATTENTION ! « Universel »
signifie qu’il est compatible avec la plupart des
sièges de voiture mais pas avec tous.
1.
2.
de maintien a été classé « Universel » selon des
critères d’homologation plus sévères par rapport
aux modèles précédents qui ne disposent pas de
la même mention.
Ce dispositif de maintien a été classé « Universel
» selon des critères d’homologation plus sévères
par rapport aux modèles précédents qui ne disposent pas de la même mention.
Adapté uniquement à l’emploi dans les véhicules
munis d’une ceinture de sécurité à 3 points, statique ou à enrouleur, homologuée conformément
au règlement UN/ECE N°16 ou à d’autres normes
équivalentes.
En cas de doute, contacter le fabricant du siègeauto ou le revendeur.
1.
2.
AVIS IMPORTANT
Ce dispositif de maintien pour enfant est « Universel », homologué conformément au Règlement ECE R44/04. Il est adapté à une utilisation
quotidienne en voiture est compatible avec la
plupart des sièges de voiture mais pas avec tous.
Pour s’assurer de la compatibilité du siège-auto
et du véhicule, vérifier dans le manuel de ce
dernier la présence de l’indication « Universel »
pour la tranche d’âge en question. Ce dispositif
3.
4.
5.
12
Installer le siège-auto sur le siège de la voiture
face à la route (Fig. 8).
Faire passer la ceinture à 3 points de la voiture dans
l’ouverture P entre le dossier et le siège-auto (Fig.
9A et 9B), en la faisant sortir par l’ouverture opposée, sur l’autre côté du dossier (Fig. 9C).
Accrocher la ceinture de la voiture à la boucle afin
que la ceinture abdominale et la ceinture diagonale passent en dessous de l’accoudoir (Fig. 10).
Tendre le plus possible la ceinture de la voiture
en faisant bien adhérer le siège-auto au siège de
la voiture (Fig. 11). Pousser, le cas échéant, sur le
siège-auto.
Vérifier que l’installation est correcte, que la ceinture est bien tendue et le siège-auto est correctement fixé et adhère bien au siège de la voiture.
Dans le cas contraire, recommencer l’opération
d’installation du début (Fig. 12).
9.
ATTENTION !
•
Toujours vérifier que la ceinture de sécurité est
correctement tendue et n’est pas entortillée. .
•
Ne JAMAIS faire passer la ceinture de sécurité
ailleurs qu’aux points indiqués.
10.
11.
Après avoir installé le siège-auto, installer l’enfant en
procédant de la manière suivante :
6. Appuyer sur le bouton de réglage du harnais H
tout en prenant et en tirant vers soi la partie inférieure du harnais du siège-auto, jusqu’à obtenir
l’extension maximale (Fig 13).
7. Décrocher le harnais du siège-auto en appuyant
sur le bouton de la boucle et les mettre sur les
côtés (Fig. 14).
8. Placer l’enfant dans le siège-auto en adaptant les
ceintures autour de son corps sans les tirer, unir
les deux crochets métalliques (Fig. 15A) et les accrocher une nouvelle fois à la boucle (Fig. 15B).
9. Régler la hauteur de l’appui-tête du siège-auto,
à l’aide du bouton de réglage A placé en haut du
dossier, de manière à ce que les ceintures sortent
au niveau des épaules de l’enfant (Fig. 16).
10. Pour régler la tension des ceintures du siège-auto,
en les adaptant au corps de l’enfant, tirer avec
précaution la courroie de réglage I jusqu’à obtenir
le bon niveau de tension (Fig. 17).
11. Vérifier que le siège-auto est correctement fixé,
comme indiqué sur la figure (Fig. 18).
12.
13.
celui-ci sera installé face à la route (Fig. 25).
Faire passer la partie diagonale de la ceinture du
véhicule derrière l’appui-tête et à travers le guide
rouge C prévu à cet effet, sous l’appui-tête. Faire
asseoir l’enfant en s’assurant que son dos adhère
bien au dossier du siège-auto (Fig. 26).
Attacher la ceinture du véhicule en veillant à ce
que les parties abdominale et diagonale passent
en dessous de l’accoudoir (Fig. 27).
Vérifier la hauteur de l’appui-tête. Si elle est incorrecte, la régler : voir le paragraphe « RÉGLAGE
DE LA HAUTEUR DE L’APPUI-TÊTE ».
Tirer la partie diagonale de la ceinture de la voiture vers son enrouleur, de manière à ce que toute
la ceinture soit bien tendue et adhère parfaitement au thorax et aux jambes de l’enfant (Fig.
28).
Vérifier que le siège-auto est correctement fixé,
comme indiqué dans sur la figure (Fig. 29).
ATTENTION !
• Toujours vérifier que la ceinture est uniformément
tendue et qu’elle n’est pas entortillée.
• Vérifier que la ceinture diagonale s’appuie
correctement contre l’épaule de l’enfant et
qu’elle n’exerce pas de pression sur son cou ;
régler l’appui-tête le cas échéant.
• Vérifier que l’enrouleur de la ceinture du véhicule
est derrière (ou au maximum aligné sur) le dossier
du siège de la voiture.
Pour retirer l’enfant du siège-auto en configuration
groupe 2 et 3 :
1. Décrocher la ceinture du véhicule.
2. Ecarter la ceinture de l’enfant.
3. Retirer soigneusement l’enfant du siège-auto.
Pour retirer l’enfant du siège-auto, appuyer sur le
bouton de la boucle et décrocher le harnais (Fig
19).
ATTENTION ! Si le siège-auto reste dans la voiture,
veiller à ce que ce dernier soit correctement attaché à
l’aide de la ceinture de sécurité du véhicule, même en
l’absence d’enfant. Dans le cas contraire, cela pourrait
constituer un danger en cas de coup de frein brusque
ou d’accident.
INSTALLATION DU SIÈGE-AUTO ET MISE EN PLACE
DE L’ENFANT – CONFIGURATION GROUPE 2 et 3
(15-36 KG) AVEC DOSSIER
Pour changer la configuration du siège-auto en
passant du groupe 1 au groupe 2/3, il faut tout
d’abord retirer les ceintures conformément aux
opérations décrites ci-dessous :
1. Décrocher le harnais du siège-auto (Fig. 14).
2. Tourner et décrocher les deux plaques de fixation
du harnais R placées sous l’assise (Fig. 20A) en les
faisant sortir des deux ouvertures situées sur la
housse (Fig. 20B).
3. Décrocher les deux parties du harnais de la plaque de fixation Q (Fig. 21).
4. Tourner et décrocher les deux plaques de passage
du harnais N du dossier (Fig. 22).
5. Extraire frontalement les deux parties du harnais
en les glissant dans les deux guides rouges de la
ceinture diagonale C (Fig. 23).
6. Ranger et conserver dans un lieu approprié les
deux parties du harnais.
7. Faire passer la boucle et l’entrejambes en tissu
dans l’ouverture placée au centre de l’assise, en
replaçant le tout dans l’ouverture se trouvant dans
l’assise (Fig. 24A, 24B et 24C).
Désormais le siège-auto est en configuration groupe
2 et 3.
8. Placer le siège-auto sur le siège de la voiture, où
INSTALLATION DU SIÈGE-AUTO ET MISE EN PLACE
DE L’ENFANT – CONFIGURATION GROUPE 3 (22-36
KG) SANS DOSSIER
Pour les groupes 1 (9-18 kg) et 2 (15-25 kg),
l’utilisation du siège-auto est uniquement autorisée
AVEC le dossier correctement monté sur l’assise.
Pour le groupe 3 (22-36 kg), le siège-auto présente
une double utilisation, AVEC dossier (configuration
plus sûre et recommandée) ou SANS dossier.
Pour l’utilisation sans dossier, il est nécessaire de
décrocher le dossier de l’assise :
1. Placer le siège-auto sur un plan horizontal de manière à ce que la partie inférieure de l’assise soit
accessible (Fig. 30).
2. Tourner les deux leviers de décrochage du dossier
T dans la direction indiquée (Fig. 31).
3. Retirer le dossier de l’assise (Fig. 32).
4. Placer l’assise du siège-auto de manière à ce
qu’elle adhère au dossier de la voiture (Fig. 33).
5. Placer l’enfant sur le siège-auto et l’attacher à l’aide de la ceinture de sécurité, en faisant passer la
13
partie abdominale sous l’accoudoir du siège-auto
et la partie diagonale au-dessus (Fig. 34).
Tendre soigneusement la partie diagonale de la
ceinture pour qu’elle passe sur l’épaule de l’enfant (Fig. 35).
ATTENTION ! Pour fixer le dossier à l’assise, répéter
les opérations dans le sens contraire. À la fin
des opérations de fixation, vérifier que la partie
supérieure et inférieure de l’assise sont correctement
accrochées entre elles.
3.
4.
Retirer le revêtement de l’appui-tête (Fig. 40).
Retirer le revêtement du dossier en enlevant tous
les velcros de fixation et en retirant les deux parties de la ceinture (Fig. 41).
5. Décrocher le dossier de l’assise comme expliqué
dans le paragraphe « INSTALLATION DANS LA
VOITURE DU SIÈGE-AUTO ET MISE EN PLACE
DE L’ENFANT EN GROUPE 3 (22-36 KG) SANS
DOSSIER » (points 1-3).
6. Retirer le revêtement de l’assise en enlevant toutes les attaches velcros et en ouvrant les deux
fermetures-éclair (Fig. 42).
Pour replacer les éléments de la housse en position
initiale, effectuer ces opérations dans l’ordre
inverse.
6.
RÉGLAGE DE LA HAUTEUR DE L’APPUI-TÊTE
Il est possible de régler la hauteur de l’appui-tête
sur plusieurs positions pour permettre d’adapter au
mieux le siège-auto à la taille de l’enfant. Un réglage
optimal permet :
• que la tête soit toujours bien soutenue et
protégée (Groupe 1-2-3).
• que les ceintures de sécurité du siège-auto
soient toujours à la bonne hauteur, c’est-à-dire
à la hauteur des épaules (Groupe 1).
• que la ceinture diagonale de la voiture soit
toujours à la bonne hauteur grâce aux guides de
la ceinture intégrés dans l’appui-tête C (Gr. 2-3).
Pour effectuer le réglage de la hauteur de l’appuitête, tourner le bouton A placé en haut du dossier,
jusqu’à atteindre la hauteur désirée (Fig. 16).
NETTOYAGE DES PARTIES EN PLASTIQUE OU
MÉTALLIQUES
Pour nettoyer les parties en plastique ou métalliques
peintes, utiliser uniquement un chiffon humique.
Ne jamais utiliser de détergents agressifs ou de
solvants.
Les parties mobiles du siège-auto ne doivent jamais
être lubrifiées.
CONTRÔLE DE L’INTÉGRITÉ DES ÉLÉMENTS
Il est recommandé de vérifier régulièrement
l’intégrité et l’état d’usure des éléments suivants :
•
Housse : vérifier si le rembourrage ou des parties de celui-ci sont correctement en place.
Vérifier l’état des coutures qui doivent toujours
rester intactes.
•
Ceintures : vérifier s’il n’y a pas d’effilochement
anormal du tissu avec une réduction évidente
de l’épaisseur au niveau de la courroie de réglage, de l’entrejambe, sur les parties des épaules
et dans la zone de la plaque de réglage des ceintures.
•
Parties en plastique : vérifier l’état d’usure de
toutes les parties en plastique, qui ne doivent
montrer aucun signe de dommage ou de décoloration.
REGLAGE DES CEINTURES POUR L’UTILISATION EN
CONFIGURATION GROUPE 1 (9-18 KG)
Pour régler les harnais du siège-auto procéder de la
manière suivante :
1. Unir les deux crochets des deux parties de la
ceinture, les insérer et les accrocher à la boucle
(Fig. 36).
2. Insérer les deux plaques de fixation à l’assise R
dans la housse et les faire ressortir sous l’assise
(Fig. 37).
3. Faire passer les deux plaques de fixation des
bretelles du harnais du siège-auto N d’abord à
travers les deux guides rouges C de la ceinture
diagonale puis à travers le dossier (Fig. 38).
4. Accrocher les deux parties du harnais à la plaque
de fixation Q (Fig. 39).
ATTENTION ! En cas de déformation ou de forte usure
du siège-auto, le remplacer. Ses caractéristiques de
sécurité d’origine pourraient être compromises.
NETTOYAGE ET ENTRETIEN
NETTOYAGE DE LA HOUSSE
La housse du siège-auto est entièrement déhoussable
et lavable à la main ou en machine à 30°C. Pour le
lavage, suivre les instructions de l’étiquette du
revêtement contenant les symboles suivants:
Lavage en
machine à 30°C
Lavage
à la main
Ne pas
blanchir
Ne pas
nettoyer
à sec
Ne pas sécher
au sèche-linge
CONSERVATION DU PRODUIT
Quand il n’est pas installé dans la voiture, il est
recommandé de ranger le siège-auto dans un
endroit sec, loin des sources de chaleur et à l’abri de
la poussière, de l’humidité des rayons solaires.
Ne pas
repasser
Ne jamais utiliser de détergents agressifs ou de
solvants. Ne pas essorer la housse et la laisser sécher
sans la tordre.
Pour retirer les différents éléments de la housse du
siège-auto, procéder comme suit :
1. Décrocher le harnais du siège-auto (Fig. 14).
2. Tourner et décrocher les deux plaques de fixation
des ceintures R placées sous l’assise (Fig. 20A) en
les faisant sortir des deux ouvertures situées sur
la housse (Fig. 20B).
ÉLIMINATION DU PRODUIT
Quand le siège-auto est trop usé, ne plus l’utiliser et
le mettre au rebut. Pour des
motifs de respect de l’environnement, trier les
déchets selon les normes en vigueur dans le pays.
POUR PLUS D’INFORMATIONS :
CHICCO Puériculture de France S.A.S
17-19, avenue de le Métallurgie
93210 Saint-Denis La Plaine
www.chicco.fr
14
D
Gebrauchsanleitung
SEHR WICHTIG! BITTE SOFORT LESEN
• Bitte befolgen Sie bei der Montage und Installation genau
die Anweisungen der Gebrauchsanleitung. Vermeiden Sie,
dass jemand das Produkt verwendet, ohne die Anleitung
gelesen zu haben.
• Bewahren Sie dieses Handbuch für den zukünftigen
Gebrauch auf.
• WARNUNG! NachdenUnfallstatistiken, sind imAllgemeinen
die Rücksitze des Fahrzeugs sicherer als die Vordersitze:
Deshalb wird empfohlen, den Kinderautositz auf den
Rücksitzen zu installieren. Insbesondere ist der sicherste Sitz
der in der Mitte hinten, sofern dieser mit einem DreipunktSicherheitsgurt ausgestattet ist.
• Es wird empfohlen, alle Insassendarüber in Kenntnis zu setzen,
wie sie das Kind im Notfall abschnallen müssen.
• Wird der Kinderautositz auf demVordersitz mit aktiviertem
Frontalairbag montiert, empfiehlt es sich ausSicherheitsgründen, den Fahrzeugsitz so weit zurückzustellen, wie es mit den
anderen Insassen auf dem Rücksitz vereinbar ist.
• Verwenden Sie diesen Kinderautositz niemals auf seitlich
ausgerichteten oder gegen die Fahrtrichtung montierten
Sitzen.
• Den Kinderautositz nur aufAutositzen installieren, die korrekt
auf das Fahrgestell montiert wurden und in Fahrtrichtung
ausgerichtet sind. Achten Sie darauf, dass umklappbare oder
drehbare Autositze gut eingerastet sind. Diese könnten bei
einem Unfall eine Gefahr darstellen.
• Achten Sie darauf, wie der Kinderautositz im Fahrzeug
installiert wird, damit ein beweglicher Autositz oder die
Autotür keine Gefahr bergen.
• Nie den Kinderautositz auf einem Autositz festschnallen, der lediglich mit einem (Zweipunkt-) Beckengurt
ausgestattet ist.
• Kein Kinderautositz kann bei einem Unfall die totale
Sicherheit des Kindes gewährleisten, aber die Verwendung dieses Produktes reduziert das Verletzungs- und
Todesrisiko des Kindes.
• Das Risiko ernsthafter Schäden an dem Kind, nicht nur im
Falle eines Unfalls, sondern auch unter anderen Umständen
(z. B. scharfes Bremsen usw.) steigt, wenn die in diesem
Handbuch angegebenen Anweisungen nicht gewissenhaft
befolgt werden: Überprüfen Sie immer, ob der Kinderautositz
korrekt an dem Autositz festgemacht ist.
• Sollte der Kinderautositz beschädigt, verformt oder stark
abgenutzt sein, muss dieser ausgetauscht werden, da es
möglich wäre, dass die ursprünglichen Sicherheitseigenschaften nicht mehr gegeben sind.
• Nehmen Sie ohne die Zustimmung des Herstellers keine
Änderungen oder Ergänzungen am Produkt vor.
• Installieren Sie ausschließlich Zubehör, Ersatzteile und Komponenten, die Sie vom Hersteller bekommen haben.
• Lassen Sie Ihr Kind niemals unbeaufsichtigt im Kinderautositz sitzen.
• Vergewissern Sie sich, dass zwischen Fahrzeugsitz und
Kinderautositz sowie zwischen Kinderautositz und Kind
nur für das Produkt genehmigte Ersatzteile montiert sind:
Sonst könnte es sein, dass der Kinderautositz bei einem
Unfall nicht ordnungsgemäß funktioniert.
• Falls Ihr Fahrzeug länger in der Sonne stand, vergewissern Sie
sich bitte, bevor Sie das Kind in den Kinderautositz setzen,
•
•
•
•
•
•
•
•
•
•
•
dass kein Teil des Kinderautositzes überhitzt ist: In einem
solchen Fall lassen Sie den Kinderautositz abkühlen bevor Sie
das Kind hineinsetzen, damit es sich nicht verbrennt.
Auch nach einem leichten Unfall kann der Kinderautositz
Schäden davon tragen, die nicht immer mit bloßem
Auge sichtbar sind: es ist deshalb notwendig, ihn auszutauschen.
Benutzen Sie bitte keine gebrauchten Kinderautositze:
Diese könnten Strukturschäden erlitten haben, die nicht
mit bloßem Auge sichtbar sind und somit die Sicherheit
des Produktes gefährden.
Die Gesellschaft Artsana übernimmt keine Haftung bei
unsachgemäßem Gebrauch des Produktes.
Der Bezug kann nur durch einenvom Hersteller genehmigten
Bezug ersetzt werden, da dieser ein fester Bestandteil des
Kinderautositzes ist. Der Kinderautositz darf niemals ohne
Bezug verwendet werden, um die Sicherheit des Kindes
nicht zu beeinträchtigen.
Achten Sie darauf, dass das Gurtband nicht verdreht ist
und vermeiden Sie, dass dieses oder Teile des Kinderautositzes in die Türen eingeklemmt werden oder scharfe
Stellen streifen.
Der Kinderautositz kann nicht mehrverwendet werden, wenn
der Gurt Schnitte oder Ausfransungen aufweist.
Wenn das Kind nicht transportiert wird, muss der Kinderautositz trotzdem befestigt bleiben oder in den Kofferraum
gelegt werden. Der nicht befestigte Kinderautositz kann im
Falle eines Unfalls oder scharfen Bremsens für die Fahrgäste
eine Gefahr darstellen.
Vergewissern Sie sich, dass insbesondere auf der Rückablage
im Fahrzeug weder Gegenstände noch Gepäck transportiert
werden, die nicht sicher festgemacht oder positioniert
wurden: Bei einem Unfall oder bei ruckartigem Bremsen
könnten diese die Insassen verletzen.
Vergewissern Sie sich, dass die Kopfstütze des Autositzes
nicht gegen die Kopfstütze des Kinderautositzes stößt: Sie
darf diese nicht nach vorne drücken. Sollte dies jedoch der
Fall sein, entfernen Sie die Kopfstütze vom Autositz, auf
welchem der Kinderautositz installiert wird und legen Sie
diese nicht auf die Hutablage.
AchtenSiedarauf,dass alle Insassen zu ihrer eigenenSicherheit
im Fahrzeug angeschnallt sind. Ein Insasse, der nicht mit dem
Sicherheitsgurt angeschnallt ist, kann bei einem Unfall eine
Gefahr für das Kind im Kinderautositz darstellen.
Legen Sie bei langen reisen oft Pausen ein. Das Kind ermüdet
sehr schnell. Nehmen Sie das Kind während der Fahrt auf
keinen Fall aus dem Kinderautositz. Falls das Kind Ihre
Aufmerksamkeit benötigt, bringen Sie das Fahrzeug an
einem sicheren Ort zum Stillstand.
GEBRAUCHSANLEITUNG
INHALTSANGABE
• Beschreibung der Bestandteile
• Produkteigenschaften
• Einsatzbeschränkungen und –Anforderungen für
Produkt und Fahrzeugsitz
• Installation des Kinderautositzes im Auto und Hineinsetzen des Kindes in den Kinderautositz in
Gruppe 1 (9-18 kg)
• Installation des Kinderautositzes im Auto und Hineinsetzen des Kindes in den Kinderautositz in Gruppe 2-3
(15-36 kg) mit Rückenlehne
• Installation des Kinderautositzes im Auto und Hinein-
15
•
•
•
geren Bedingungen in die Klasse „Universal“ eingestuft
als vorhergehende Ausführungen, die diese Aufschrift
nicht tragen.
4. Nur geeignet, wenn das genehmigte Fahrzeug mit Dreipunkt-/
Statik- oder Retraktor-Sicherheitsgurten ausgerüstet ist, die
der UNI/ECE-Regelung Nr. 16 oder anderen vergleichbaren
Normen entsprechen.
5. Sollten Zweifel bestehen, kann der Hersteller der Rückhalteeinrichtung für Kinder oder der Fachhändler befragt werden.
setzen des Kindes in den Kinderautositz in Gruppe 3
(22-36 kg) ohne Rückenlehne
Verstellen der Kopflehnenhöhe
Wiedereinrichtung der Gurte für den Gebrauch in
Gruppe 1 (9-18 kg)
Reinigung und Wartung
BESCHREIBUNG DER BESTANDTEILE
Abb. 1 (Vorderseite)
A. Verstelltaste für Kopflehne und Gurte
B. Kopflehne
C. diagonale Abzweigung des Dreipunkt-Sicherhei
tsautogurtes
D. Schulterpolster
E. Kinderautositzgurte
F. Sicherheitsschloss
G. Gepolsterter Mittelsteg
H. Gurtlängenverstelltaste
I. Gurtlängenverstellband
EINSATZBESCHRÄNKUNGENUND –ANFORDERUNGEN
FÜR PRODUKT UND FAHRZEUGSITZ
WARNUNG! Halten Sie gewissenhaft die folgenden Verwendungsbeschränkungen und -Anforderungen des Produktes und des Fahrzeugsitzes ein: Andernfalls ist keine
Sicherheit gewährt.
Dieser Kinderautositz ist ausschließlich für Kinder mit 9
bis 36 kg Körpergewicht (ab 9. Lebensmonat bis ca. 12
Jahren) zugelassen.
Der Kinderautositz muss mit Dreipunkt-/ Statik- oder
Retraktor- Sicherheitsgurten ausgerüstet sein, die der UNI/
ECE-Regelung Nr. 16 oder anderen vergleichbaren Normen
entsprechen. (Abb. 5).
Der Kinderautositz darf nie mit dem Zweipunkt-Sicherheitsgurt
des Fahrzeugs installiert werden (Abb. 6).
Der Kinderautositz kann beliebig auf dem vorderen Beifahrersitz oder auf einem der Rücksitze installiert werden.
Verwenden Sie diesen Kinderautositz niemals auf seitlich
ausgerichteten oder gegen die Fahrtrichtung montierten
Sitzen (Abb. 7).
Das Produkt ist ausschließlich für den Gebrauch als Kinderautositz und nicht für die Verwendung im Haus bestimmt.
Bei einer korrekten Installation des Kinderautositzes, darf
die Kopflehne des Autos nicht mit der Rückenlehne des
Kinderautositzes in Kontakt kommen.
Abb. 2 (Seitenansicht)
J. Rückenlehne
K. Sitzfläche
L. Armlehnen
M. Gurtführungsschlitze
Abb. 3 (Rückseite)
N. Befestigungsplatte der Schulterpolster und der
Durchzugsführung der Gurte
O. Gurtbänder
P. Durchzugsführungen für die Autogurte (Installation
nur in Gruppe 1)
Q. Befestigungsplatte der Sicherheitsgurte
Abb. 4 (Unterseite)
R. Platte zur Befestigung der Sicherheitsgurte an der Sitzfläche
S. Platte zur Befestigung des Sicherheitsschlosses an
der Sitzfläche
T. Hebel zur Abtrennung der Rückenlehne von der Sitzfläche
INSTALLATION DES KINDERAUTOSITZES IM AUTO UND
HINEINSETZEN DES KINDES IN DEN KINDERAUTOSITZ
IN GRUPPE 1 (9-18 KG)
WARNUNG! DieseAnleitung bezieht sich sowohl imText als auch
in den Zeichnungen auf eine Installation auf dem hinteren rechten
Fahrzeugsitz.FürdieInstallationinanderenPositionenmussdieselbe
Abfolge der Arbeitsgänge vorgenommen werden.
PRODUKTEIGENSCHAFTEN
• Dieser Kinderautositz ist nach “Gruppe 1, 2 und 3” für den
Transport für Kinder mit 9 bis 36 kg Körpergewicht (ab
9. Lebensmonat bis ca. 12 Jahren) unter Einhaltung der
europäischen Regelung ECE R 44/04 zugelassen.
• Der Kinderautositz wurde in die Klasse „Universal“
eingestuft und ist somit für alle PKW-Modelle geeignet.
WARNUNG! “Universal” bedeutet, dass der Kinderautositz mit den meisten, aber nicht mit allen PKW-Sitzen
kompatibel ist.
1. Den Kinderautositz auf dem gewählten Sitz in Fahrtrichtung
positionieren (Abb. 8).
2. Den Dreipunkt-Sicherheitsgurt des Fahrzeugs in die dafür
vorgeseheneÖffnung P inder Rückenlehnedes Kinderautositzes
einführen (Abb. 9A und 9B) und diesen aus der gegenüberliegendenÖffnung auf der anderen Seite der Rückenlehne wieder
herausziehen (Abb. 9C).
3. Den Fahrzeuggurt in das Sicherheitsschloss stecken und dabei
sicherstellen, dass sowohl das Bauchgurtband als auch das diagonale Gurtband unter der Armlehne verlaufen (Abb. 10).
4. Den Fahrzeuggurt so stark wie möglich spannen und dafür
sorgen, dass der Kinderautositz gut auf dem Fahrzeugsitz
anliegt (Abb. 11), sich gegebenenfalls mit einem Knie auf den
Kinderautositz stützen.
5. Vergewissern Sie sich, dass die Installation gut vorgenommen
wurde, der Gurt gespannt ist und der Kinderautositz gut auf
dem Fahrzeugsitz festgemacht wurde. Wenn dem nicht so ist,
nehmen Sie die Installation noch einmal vor (Abb. 12).
WICHTIGER HINWEIS
1. Dies ist es eine „Universal“- Rückhalteeinrichtung für
Kinder, die gemäß der Regelung Nr. 44, Serienänderungen 04, zugelassen ist. Sie eignet sich für die allgemeine
Verwendung in PKWs und ist mit den meisten, aber nicht
mit allen PKW-Sitzen kompatibel.
2. Die perfekte Kompatibilität ist in den Fällen leichter
erhältlich, wo der Fahrzeughersteller in dem Fahrzeughandbuch erklärt, dass das Fahrzeug den Einbau von
„Universal“-Rückhalteeinrichtungen für Kinder der jeweiligen
Altersgruppe vorsieht.
3. Diese Rückhalteeinrichtung für Kinder wurde nach stren-
16
positionieren (Abb. 25).
9. Das diagonale Gurtband des Fahrzeugs hinter der Kopflehne
durch die dafür vorgesehene rote Gurtführung C unter der
Kopflehne ziehen. Das Kind vorsichtig in den Sitz setzen und
sich vergewissern, dass sein Rücken gut auf der Rückenlehne
des Kinderautositzes (Abb. 26) aufliegt.
10. Den Fahrzeuggurt in das Sicherheitsschloss stecken und
dabei sicherstellen, dass sowohl das Bauchgurtband
als auch das diagonale Gurtband unter der Armlehne
verlaufen (Abb. 27).
11. Die Höhe der Kopflehne prüfen und diese verstellen, falls
sie nicht korrekt ist: Siehe Paragraf “VERSTELLEN DER
KOPFLEHNENHÖHE”.
12. Das diagonale Gurtband des Fahrzeuggurtes in Richtung
seiner Rolle ziehen, damit der gesamte Gurt gespannt
wird und eng an Brustkorb und Beinen des Kindes anliegt
(Abb. 28).
13. Prüfen, ob der Kinderautositz korrekt, wie in der Abbildung
(Abb. 29) aufgezeigt, angebracht wurde.
WARNUNG!
• Vergewissern Sie sich immer, dass der Gurt an allen
Punkten gleichmäßig angelegt und an keiner Stelle
verdreht ist.
• Den Fahrzeuggurt NUR in den vorgegebenen Positionen
anbringen.
Befolgen Sie nach Beendigung der Installation folgende Schritte,
bevor Sie das Kind in den Kinderautositz setzen:
6. Die Gurtlängenverstelltaste H drücken und gleichzeitig den
unteren Teil der Gurtbänder des Kinderautositzes in Ihre
Richtung ziehen, bis der Gurt seine maximale Spannung
erreicht (Abb. 13).
7. Die Gurte des Kinderautositzes lösen. Hierzu auf die Taste
des Sicherheitsschlosses drücken und die Gurte auf die
Seite legen (Abb. 14).
8. Das Kind vorsichtig in den Kinderautositz setzen. Dabei die
Gurte um seinen Körper legen, ohne an ihnen zu ziehen, die
zwei Gurtschlosszungen (Abb. 15A) zusammenführen und
diese wieder in das Gurtschloss einhaken (Abb. 15B).
9. Die Höhe der Kopfstütze des Kinderautositzes anhand
der Verstelltaste A auf der Oberseite der Rückenlehne so
verstellen, dass sich die Gurte in Schulterhöhe des Kindes
befinden (Abb. 16).
10. Um die Spannung der Kinderautositzgurte einzustellen,
diese an den Körper des Kindes legen, mit Vorsicht an
dem Gurtlängenverstellband I ziehen, bis die richtige
Spannung erreicht ist (Abb. 17).
11. Prüfen, ob der Kinderautositz richtig, wie in der Abbildung
aufgezeigt (Abb. 18), festgemacht wurde.
Um das Kind aus dem Kinderautositz zu nehmen, auf die
Taste des Sicherheitsschlosses drücken und die Gurte lösen
(Abb. 19).
WARNUNG!
• Vergewissern Sie sich immer, dass der Gurt gleichmäßig
angebracht und an keiner Stelle verdreht ist.
• Prüfen Sie, ob das diagonale Gurtband richtig an der Schulter
des Kindes anliegt und keinen Druck auf den Hals ausübt;
wenn notwendig, verstellen Sie die Kopflehne.
• Prüfen Sie dann, ob der Gurtregler sich in zurückgestellter
(oder maximal gleichgerichteter) Position zur Rückenlehne
des Fahrzeugsitzes befindet.
Um das Kind in Gruppe 2 und 3 aus dem Kinderautositz zu
nehmen:
1. Den Fahrzeuggurt aus seinem Sicherheitsschloss lösen.
2. Den Fahrzeuggurt von dem Körper des Kindes streifen.
3. Vorsichtig das Kind aus dem Kinderfahrzeugsitz nehmen.
INSTALLATION DES KINDERAUTOSITZES IM FAHRZEUG
UND HINEINSETZEN DES KINDES IN DEN KINDERAUTOSITZ IN GRUPPE 2 UND 3 (15-36 KG) MIT
RÜCKENLEHNE
Um die Konfiguration des Kinderautositzes von Gruppe 1 auf
Gruppe 2, 3 zu ändern, ist es in erster Linie notwendig, die
Gurte wie nachfolgend beschrieben zu lösen:
1. Die Gurte des Kinderautositzes aus dem Sicherheitsschloss
lösen (Abb. 14).
2. Die zwei Befestigungsplatten der Gurte R, die unter der
Sitzfläche (Abb. 20A) befestigt sind drehen und lösen
und diese durch die zwei Schlitze im Bezug herausziehen
(Abb. 20B).
3. Die zwei Gurtenden von der Befestigungsplatte Q lösen
(Abb. 21).
4. Die zwei Befestigungsplatten derGurtdurchzugsführung N aus
der Rückenlehne drehen und von dieser lösen (Abb. 22).
5. Frontal die zwei Gurtbänder entlang der roten diagonalen
Gurtführungen C herausnehmen (Abb. 23).
6. Die zwei abgenommenen Gurtbänder wieder an den für sie
vorgesehenen Platz legen und dort aufbewahren.
7. Das Sicherheitsschloss und den gepolsterten Mittelsteg
durch den dafür vorgesehenen Schlitz in der Mitte der
Sitzfläche schieben und diese wieder in die dafür vorgesehene Öffnung in der Sitzfläche einführen (Abb. 24A,
24B und 24C).
Jetzt ist der Kinderautositz fertig und für die Installation in
Gruppe 2 und 3 konfiguriert.
8. Den Kinderautositz auf dem gewählten Sitz in Fahrtrichtung
WARNUNG! Wenn man den Kinderfahrzeugsitz nicht aus
dem Fahrzeug entfernen möchte, den Fahrzeuggurt wieder
in das vorgesehene Sicherheitsschloss einhaken, damit der
Gurt den Kinderautositz auch ohne das Kind hält; andernfalls
könnte dieser eine Gefahr beim Bremsen oder bei einem
Unfall darstellen.
INSTALLATION DES KINDERAUTOSITZES IM AUTO UND
HINEINSETZEN DES KINDES IN DEN KINDERAUTOSITZ
IN GRUPPE 3 (22-36 KG ) OHNE RÜCKENLEHNE
In Gruppe 1 (9-18 kg) und 2 (15-25 kg), ist der Gebrauch des
Kinderautositzes nur MIT korrekt auf den Sitz montierter
Rückenlehne erlaubt.
In Gruppe 3 (22-36 kg) ermöglicht der Kinderautositz eine
Doppelverwendung, MIT Rückenlehne (sicherere Variante,
wird deshalb empfohlen) oder OHNE Rückenlehne.
Für den Gebrauch ohne Rückenlehne muss die Rückenlehne
von der Sitzfläche gelöst werden:
1. Den Kinderautositz auf einer horizontalen Fläche positionieren,
damit die Unterseite der Sitzfläche zugänglich ist (Abb. 30).
2. Die zwei Hebel in der Rückenlehne T in die vorgegebene
Richtung drehen (Abb. 31).
3. Die Rückenlehne aus der Sitzfläche ziehen (Abb. 32).
4. Die Sitzfläche des Kinderautositzes so positionieren, dass diese
an der Rückenlehne des Fahrzeugs anliegt (Abb. 33).
5. Das Kind in den Kinderautositz setzen und den Fahrzeuggurt
in das Sicherheitsschloss stecken. Hierbei das Bauchgurtband
17
der Sitzfläche (Abb. 20A) festgemacht sind, drehen
und lösen und diese auch durch die Schlitze im Bezug
ziehen (Abb. 20B).
3. Den Bezug der Kopfstütze abziehen (Abb. 40).
4. Den Bezug der Rückenlehne abziehen. Hierbei müssen
alle Klettverschlüsse abgenommen und die zwei
Gurtbänder entfernt werden (Abb. 41).
5. Die Rückenlehne von der Sitzfläche trennen, wie in
Paragraf “INSTALLATION DES KINDERAUTOSITZES
IM AUTO UND HINEINSETZEN DES KINDES IN DEN
KINDERAUTOSITZ IN GRUPPE 3 (22-36 KG) OHNE
RÜCKENLEHNE” (Punkte 1-3) erklärt.
6. Den Bezug der Sitzfläche abziehen und alle Klettverschlüsse abnehmen sowie die zwei Reisverschlüsse
öffnen (Abb. 42).
Um die Bestandteile des Bezugs wieder in ihre ursprüngliche
Position zu bringen, die soeben beschriebenen Maßnahmen
in umgekehrter Reihenfolge durchführen.
unter und das diagonale Gurtband über die Armlehne des
Kinderautositzes führen (Abb. 34).
6. Das diagonale Gurtband sorgfältig spannen und es über
die Schulter des Kindes führen (Abb. 35).
WARNUNG! Um die Rückenlehne an der Sitzfläche festzumachen, die soeben beschriebenen Maßnahmen in umgekehrter
Reihenfolge durchführen. Am Ende der Befestigung prüfen,
dass der obere und der untere Teil der Sitzfläche korrekt
ineinander verhakt sind.
VERSTELLEN DER KOPFLEHNENHÖHE
Die Höhe der Kopflehne kann in unendlich viele Positionen
verstellt werden. Dies ermöglicht, dass der Kinderautositz
bestmöglich der Größe des Kindes angepasst wird. Eine
optimale Verstellung ermöglicht:
• dass der Kopf immer gut gehalten und geschützt ist
(Gruppe 1-2-3).
• dass die Sicherheitsgurte des Kinderautositzes immer
die richtige Höhe haben, bzw. in Schulterhöhe sind
(Gruppe 1).
• dass das diagonale Fahrzeuggurtband, dank der in die
Kopflehne C integrierten Gurtführungen immer die
richtige Höhe hat (Gr. 2-3).
Um die Höhe der Kopflehne zu verstellen, den auf der
Rückenlehne angebrachten Drehgriff A so lange drehen, bis
die gewünschte Höhe erreicht wird (Abb. 16).
• REINIGUNG DER KUNSTSTOFF-UND METALLTEILE
Für die Reinigung der Kunststoff- oder lackierten Metallteile
sollte nur ein feuchtes Tuch verwendet werden. Benutzen
Sie keine Scheuer- oder Lösungsmittel.
Die beweglichen Teile des Kinderautositzes dürfen
keinesfalls geschmiert werden.
• KONTROLLE AUF BESCHÄDIGUNG DER BESTANDTEILE
Es wird empfohlen, folgende Teile regelmäßig auf Beschädigung und Verschleiß zu prüfen:
• Bezug: Prüfen, ob die Polsterungen oder Teile davon
beschädigt sind. Prüfen, ob die Nähte in perfektem
Zustand sind.
• Gurte: Prüfen, ob das Gurtband nicht mit deutlicher
Abnutzung der Dicke in Höhe des Verstellbands, des
Mittelstegs, an den Schulterabzweigungen und im
Bereich der Verstellplatte der Gurte ausgefranst ist.
• Kunststoffe: Alle Kunststoffteile auf ihren Verschleißzustand prüfen. Sie dürfen keine sichtbaren Zeichen
von Beschädigung, Verschleiß oder Ausbleichung
zeigen.
WIEDEREINRICHTUNG DERGURTE FÜR DENGEBRAUCH
IN GRUPPE 1 (9-18 KG)
Um die Gurte erneut an dem Kinderautositz festzumachen,
gehen Sie folgendermaßen vor:
1. Die beiden Gurtzungen in das Sicherheitsschloss stecken
und einhaken (Abb. 36).
2. Die zwei Befestigungsplatten an der Sitzfläche R in
den Bezug einführen und sie aus der Unterseite der
Sitzfläche wieder herausführen (Abb. 37).
3. Die zwei Befestigungsplatten der Schulterpolster und
der Durchzugsführung der Gurte N zuerst durch die zwei
roten diagonalen Gurtführungen C und dann über die
Rückenlehne (Abb. 38) führen.
4. Die zwei Gurtenden an der Befestigungsplatte Q
einhaken (Abb. 39).
WARNUNG! Bei starker Verformung oder Abnutzung muss
der Kinderautositz ersetzt werden: Die ursprünglichen
Sicherheitskriterien könnten nicht mehr gegeben sein.
REINIGUNG UND WARTUNG
• REINIGUNG DES BEZUGS
Der Bezug des Kinderautositzes kann vollständig abgezogen
und von Hand oder in der Maschine bei 30°C gewaschen
werden. Für die Reinigung befolgen Sie bitte die Anleitung
auf dem Pflege-Etikett, auf dem die folgenden Symbole
für das Waschen abgedruckt sind:
Waschen in der
Waschmaschine
bei 30°C
Handwäsche
Nicht
bleichen
Nicht trocken
reinigen
Nicht im Trockner trocknen
• AUFBEWAHRUNG DES PRODUKTES
Wenn der Kinderautositz nicht im Auto installiert ist,
wird empfohlen, ihn an einem trockenen Ort, vor Wärmequellen, Staub, Feuchtigkeit und direktem Sonnenlicht
geschützt, aufzubewahren.
• ENTSORGUNG DES PRODUKTES
Ist die für den Kinderautositz vorgesehene Gebrauchsgrenze
erreicht, entsorgen Sie ihn. Aus Umweltschutzgründen
müssen die verschiedenen Einzelteile des Kinderautositzes
getrennt und die Entsorgungsbestimmungen Ihres Landes
befolgt werden.
Nicht
bügeln
Niemals Scheuer- oder Lösungsmittel verwenden. Den Bezug
nicht schleudern und ihn ohne Auswringen trocknen.
Um die verschiedenen Bestandteile des Bezugs von
der Kinderautositzstruktur zu entfernen, gehen Sie
folgendermaßen vor:
1. Die Gurte des Kinderautositzes aus dem Sicherheitsschloss lösen (Abb. 14).
2. Die zwei Befestigungsplatten der Gurte R, die unter
FÜR WEITERE INFORMATIONEN:
CHICCO Babyausstattung GmbH
Postfach 2086 - 63120 Dietzenbach
Service-Tel. 08000 244226 - www.chicco.com
18
E
Instrucciones de uso
•
¡MUY IMPORTANTE! LEER INMEDIATAMENTE
•
•
•
•
•
•
•
•
•
•
•
•
•
•
•
•
•
Para el montaje y la instalación del producto, sigan
exactamente las instrucciones. Eviten que alguien utilice
el producto sin haber leído antes las instrucciones.
Guarden este manual para futuras consultas.
¡ATENCIÓN! Según las estadísticas sobre accidentes,
generalmente los asientos traseros del vehículo son
más seguros que los asientos delanteros: por tanto,
les recomendamos que instalen la Silla para coches
en los asientos posteriores. En particular, el asiento
más seguro es el central posterior, si está provisto de
cinturón de 3 puntos.
Les recomendamos que todos los pasajeros que ocupen el
coche estén informados sobre el modo de desenganchar
al niño en caso de emergencia.
La Silla para coches se puede colocar en el asiento delantero
con el airbag frontal activado, para mayor seguridad les
recomendamos que coloquen el asiento lo más atrás
posible mientras sea compatible con la presencia de
otros pasajeros en el asiento posterior.
No utilicen nunca esta Silla en asientos orientados
lateralmente u opuestos al sentido de la marcha.
Instalen la Silla sólo en asientos fijados correctamente
en la estructura del coche y orientados en el sentido de
la marcha. Presten atención en no dejar los asientos del
coche plegables o rotativos incorrectamente fijados: en
caso de accidente podrían representar un peligro.
Fíjense en cómo se instala la Silla en el coche para evitar
que un asiento móvil o la puerta del coche puedan
interferir con el mismo.
No fijen nunca la Silla en un asiento del coche provisto
sólo de cinturón abdominal (de dos puntos).
Ninguna Silla para coches puede garantizar la seguridad
total del bebé en caso de accidente, pero la utilización
de este producto reduce el riesgo de lesiones graves
o de muerte.
El riesgo de daños graves al niño, no sólo en caso de
accidente, sino en otras circunstancias (por ejemplo,
frenazos bruscos, etc.) aumenta si no se siguen las
instrucciones de este manual de forma escrupulosa:
controlen siempre que la Silla para coches se encuentre
fijada correctamente al asiento.
En el caso en que la Silla se dañara, deformara o se
deteriorara considerablemente, deberá sustituirse, ya
que podría haber perdido las características originales
de seguridad.
No efectúen modificaciones o integraciones en el
producto sin haber recibido antes la aprobación del
fabricante.
No instalen accesorios, piezas de recambio o componentes no suministrados por el fabricante.
No dejen nunca al niño solo sin vigilancia en la Silla
por ningún motivo.
No coloquen nada que no sea un accesorio aprobado
para el producto tanto entre el asiento del coche y la
Silla como entre la Silla y el niño: en caso de accidente
la Silla podría no funcionar correctamente.
En caso de dejar el coche bajo el sol, inspeccionen con
cuidado la Silla antes de acomodar al niño, comprobando
que no se haya recalentado ninguna de sus partes. En
•
•
•
•
•
•
•
•
•
•
tal caso dejen que se enfríen antes de sentar al niño,
para evitar que se queme.
Tras un accidente, incluso leve, la Silla puede sufrir
daños no siempre visibles a simple vista. Por tanto es
necesario sustituirla.
No utilicen Sillas de segunda mano: pueden haber sufrido
daños estructurales no visibles a simple vista, pero que
comprometen la seguridad del producto.
La empresa Artsana declina toda responsabilidad por
un uso incorrecto del producto.
La funda puede ser sustituida sólo y únicamente por
una funda aprobada por el fabricante, ya que constituye un parte integral de la Silla. La Silla no debe
utilizarse nunca sin la funda para no comprometer la
seguridad del niño.
Controlen que el cinturón no este enrollado y eviten que
éste o partes de la Silla queden pilladas entre las puertas
del coche o rocen contra puntos cortantes.
La Silla ya no podrá utilizase en caso de cortes o
deterioros en el cinturón.
Cuando no se trasporte al bebé, la Silla debe permanecer fijada al asiento del automóvil o colocarla
en el maletero. La Silla no fijada puede constituir un
peligro para los pasajeros en caso de accidente o de
frenazos bruscos.
Comprueben que no se trasporten, especialmente en la
zona posterior del vehículo, objetos o equipajes no fijados
o colocados de forma segura: en caso de accidente o de
frenazos bruscos podrían herir a los pasajeros.
Comprueben que el apoya-cabezas del asiento del
automóvil no interfiera en la colocación de la Silla:
no debe empujarla hacia adelante. En el caso de que
esto ocurra, quiten el apoya-cabezas del asiento del
coche en el que se vaya a instalar la Silla cuidando no
apoyarla en el panel trasero del coche.
Asegúrense de que todos los pasajeros del vehículo
utilicen el correspondiente cinturón de seguridad
tanto por su seguridad como para evitar que durante
el viaje, en caso de accidente o de frenazo brusco,
puedan herir al niño.
En caso de viajes largos, hagan paradas frecuentes.
El niño se cansa muy fácilmente. Por ningún motivo
extraigan al bebé de la Silla para coches mientras el
coche esté en movimiento. Si el niño requiere atención, es necesario que encuentren un lugar seguro y
paren el coche.
INSTRUCCIONES DE USO
ÍNDICE
•
•
•
•
•
•
•
•
•
19
Descripción de los componentes
Características del producto
Limitaciones y requisitos para el uso relativos al producto
y al asiento del coche
Instalación de la Silla en el coche y colocación del bebé
en Gr. 1 (9-18 kg)
Instalación de la Silla en el coche y colocación del bebé
en Gr. 2-3 (15-36 kg) con respaldo
Instalación de la Silla en el coche y colocación del bebé
en Gr. 3 (22-36 kg) sin respaldo
Regulación de la altura del apoya-cabezas
Reajuste de los cinturones para su utilización en Gr.
1 (9-18 kg)
Limpieza y mantenimiento
DESCRIPCIÓN DE LOS COMPONENTES
LIMITACIONES Y REQUISITOS PARA EL USO
RELATIVOS AL PRODUCTO Y AL ASIENTO DEL
COCHE
Fig. 1 (frente)
A. Manilla de ajuste del apoya-cabezas y cinturones
B. Apoya-cabezas
C. Pasadores del cinturón diagonal
D. Tirantes
E. Cinturones de la Silla
F. Hebilla
G. Protección separa-piernas
H. Botón de regulación de los cinturones
I. Cinta de regulación de los cinturones
¡ATENCIÓN! Cumplan estrictamente con las siguientes
limitaciones y con los requisitos de uso relativos al
producto y al asiento del coche: en caso contrario no se
garantiza la seguridad.
•
•
Fig. 2 (perfil)
J. Respaldo
K. Asiento
L. Reposa-brazos
M. Pasadores del cinturón
•
•
Fig. 3 (detrás)
N. Placas de fijación de los tirantes y pasa-cinturones
O. Cintas de los cinturones
P. Alojamientos para el pasaje de los cinturones del coche
(sólo instalación en Gr. 1)
Q. Placa de fijación de los cinturones
•
•
Fig. 4 (debajo)
R. Placas de fijación de los cinturones al asiento
S. Placa de fijación de la hebilla al asiento
T. Palancas para soltar el respaldo del asiento
INSTALACIÓN DE LA SILLA EN EL COCHE Y COLOCACIÓN DEL BEBÉ EN GR. 1 (9-18 KG)
CARACTERÍSTICAS DEL PRODUCTO
•
•
Esta Silla está homologada para ser utilizada con niños
únicamente de 9 a 36 kg de peso (de 9 meses a 12 años
aproximadamente).
El asiento del coche debe estar provisto de cinturón de
seguridad de 3 puntos, estático o extensible, homologado
sobre la base del Reglamento UNI/ECE N.°16 u de otros
estándares equivalentes (Fig. 5).
No instalen nunca la Silla con el cinturón del coche de
dos puntos de anclaje (Fig. 6).
La Silla para coches puede instalarse en el asiento
anterior en el lado del pasajero o en cualquier otro
asiento posterior. No utilicen nunca esta Silla en
asientos orientados lateralmente u opuestos al sentido
de la marcha (Fig. 7).
El producto está destinado únicamente a su uso como
Silla para coches y no para ser utilizado en casa.
Para una instalación correcta, pongan el apoya-cabezas
del asiento del coche en una posición que no interfiera
con el respaldo de la Silla.
¡ATENCIÓN! Estas instrucciones se refieren, tanto en el
texto como en las ilustraciones, a una instalación de la
Silla en el asiento posterior, lado derecho. Para instalarla
en otras posiciones, realicen la misma secuencia de
operaciones.
Esta Silla para coches está homologada en el “Grupo 1, 2
y 3” para el transporte de niños de 9 a 36 kg de peso (de
9 meses a 12 años aproximadamente), de conformidad
con el reglamento europeo ECE R44/04.
La homologación es de tipo Universal, por tanto la
Silla se puede utilizar en cualquier modelo de coche.
¡ATENCIÓN! Universal significa que es compatible
con la mayor parte de los asientos de coche, pero
no con todos.
1. Coloquen la Silla en el asiento en el sentido de marcha,
en el asiento elegido para la instalación (Fig. 8).
2. Introduzcan el cinturón de 3 puntos del coche a través
del correspondiente alojamiento P del respaldo de la
Silla (Fig. 9A y 9B) hasta extraerlo por el orificio opuesto
en el otro lado del respaldo (Fig. 9C).
3. Fijen el cinturón del coche a la hebilla hasta que tanto
el tramo abdominal como el diagonal pasen debajo
del reposa-brazos (Fig. 10).
4. Tensen el máximo posible el cinturón del coche hasta que
la Silla se ajuste bien al asiento (Fig. 11), si es necesario
coloque la rodilla en la propia Silla.
5. Comprueben la exactitud de la instalación, que el
cinturón se haya tensado bien y que la Silla se haya
fijado firmemente y esté adherida al asiento. De lo
contrario, repitan la operación de instalación desde
el inicio (Fig. 12).
¡ATENCIÓN!
• Comprueben siempre que el cinturón se haya distribuido
uniformemente en todos los puntos y que no presente
enrollamientos.
• No pasar NUNCA el cinturón del coche por posiciones
diferentes a las indicadas.
Una vez completada la instalación de la Silla, para acomodar al bebé en el mismo, procedan como se describe
a continuación:
6. Presionen el botón de regulación de los cinturones H y
AVISO IMPORTANTE
1) Este es un dispositivo de retención de bebes Universal,
homologado según el Reglamento Nº 44 enmiendas
serie 04. Apto para el uso general en los vehículos y
compatible con la mayor parte de los asientos de coche,
pero no con todos.
2) La compatibilidad perfecta puede obtenerse fácilmente
en los casos en que el fabricante del vehículo declare en
el manual del vehículo que éste prevé la instalación de
los dispositivos de retención Universales de los niños
para el grupo de edad en cuestión.
3) Este dispositivo de retención ha sido clasificado Universal
según los criterios de homologación más severos con
respecto a los modelos anteriores que no disponen
del presente aviso.
4) Apto sólo para el uso en los vehículos dotados de
cinturones de seguridad de tres puntos, estáticos o
extensibles, homologados en base al Reglamento UN/
ECE N. 16 u otros estándares equivalentes.
5) En caso de dudas, consulte al fabricante del dispositivo
de retención o al vendedor del mismo.
20
simultáneamente agarren y tiren hacia ustedes la parte
inferior de los cinturones de la silla, hasta obtener la
máxima extensión posible (Fig. 13).
7. Suelten los cinturones de la Silla apretando el botón
de la hebilla y apóyenlos en los lados (Fig. 14).
8. Acomoden con cuidado al niño en la Silla, adaptando
los cinturones alrededor de su cuerpo sin tirar, unan
las dos lengüetas del cinturón (Fig. 15A) y vuélvanlas
a fijar a la hebilla (Fig. 15B).
9. A través de la manilla de regulación correspondiente
A colocada encima del respaldo, regulen la altura del
apoya-cabezas de la Silla, de forma que los cinturones
salgan a la altura de los hombros del niño (Fig. 16).
10. Para regular la tensión de los cinturones de la Silla y
adaptarlos al cuerpo del bebé, tiren con cuidado de la
cinta de regulación I hasta alcanzar el nivel de tensión
correcto (Fig. 17).
11. Comprueben que la Silla se haya fijado correctamente como se ha indicado en la figura (Fig. 18).
Para sacar al niño de la Silla aprieten el botón de la
hebilla y suelten los cinturones (Fig. 19).
CIÓN DE LA ALTURA DEL APOYA-CABEZAS”.
12. Tiren de la parte diagonal del cinturón del coche
hacia el enrollador de forma que todo el cinturón
esté tensado y bien adherido al tórax y a las piernas
del bebé (Fig. 28).
13. Comprueben que la Silla se haya fijado correctamente
tal y como se ha indicado en la figura (Fig. 29).
¡ATENCIÓN!
• Controlen siempre que el cinturón esté distribuido
correctamente en todos los puntos y que no presenta
enrollamientos.
• Comprueben que el cinturón diagonal está apoyado
correctamente sobre el hombro del niño y que no
produce presión alguna en el cuello. Si procede, regulen
el apoya-cabezas.
• Comprueben que el enrollador del cinturón del
coche se encuentre en posición hacia atrás (o como
máximo alineada) con respecto al respaldo del
asiento del coche.
Para retirar al niño de la Silla en Grupo 2 y 3:
1. Suelten el cinturón del coche de su hebilla.
2. Extraigan el cinturón del coche del cuerpo del niño.
3. Saquen con cuidado al niño de la Silla.
INSTALACIÓN EN EL COCHE DE LA SILLA Y COLOCACIÓN DEL BEBÉ EN GR. 2 Y 3 (15-36 KG)
CON RESPALDO
Para cambiar la configuración de la Silla de Gr. 1 a Gr. 2 y
3 antes es necesario quitar los cinturones de la Silla según
las operaciones descritas a continuación:
1. Suelten los cinturones de la Silla de la hebilla (Fig.
14).
2. Giren y suelten las dos placas de fijación de los cinturones R colocados bajo el asiento (Fig. 20A) hasta
que pasen también por las dos ranuras de la funda
textil (Fig. 20B).
3. Suelten los dos extremos de los cinturones de la placa
de fijación Q (Fig. 21).
4. Giren y suelten las dos placas de pasaje de los dos
cinturones N del respaldo (Fig. 22).
5. Extraigan frontalmente los dos tramos de cinturón
pasándolos por los pasadores del cinturón diagonal
rojos C (Fig. 23).
6. Vuelvan a colocar y guarden en un lugar específico los
dos tramos de cinturón quitados de esta forma.
7. Pasen la hebilla y el elemento separa-piernas del tejido
por la ranura correspondiente colocada en el centro
del asiento, colocando todos los componentes en
el alojamiento correspondiente en el asiento (Fig.
24A, 24B y 24C).
Ahora la silla está lista y configurada para la instalación
en grupo 2 y 3.
8. Posicionen la Silla en el asiento en sentido de la marcha
en el asiento elegido para la instalación (Fig. 25).
9. Pasen el tramo diagonal del cinturón del coche detrás
del apoya-cabezas y mediante el correspondiente
pasador de cinturón rojo C debajo del mismo apoyacabezas. Acomoden con cuidado al niño, asegurándose
de que su espalda se adhiera bien al respaldo de la
Silla (Fig. 26).
10. Fijen el cinturón del coche a la hebilla pasando el
tramo abdominal y el tramo diagonal debajo del
reposa-brazos (Fig. 27).
11. Comprueben la altura del apoya-cabezas y si es incorrecta,
ajústenla: tomen como referencia el párrafo “REGULA-
¡ATENCIÓN! En el caso de que no tengan la intención de
quitar la Silla del coche, procedan a fijarla otra vez con el
cinturón del coche en la hebilla correspondiente de forma
que mantenga la posición de la Silla en el coche incluso
sin el bebé. De lo contrario, podría constituir un peligro en
caso de frenazo o de accidente.
INSTALACIÓN EN EL COCHE DE LA SILLA Y COLOCACIÓN DEL BEBÉ EN GR. 3 (22-36 KG) SIN
RESPALDO
En el grupo 1 (9-18 kg) y 2 (15-25 kg), el uso de la Silla
está permitido únicamente CON el respaldo montado
en el asiento.
En el grupo 3 (22-36 kg), la Silla presenta la posibilidad de
una doble utilización, alternativamente CON el respaldo
(decisión siempre más segura y, por tanto, recomendable)
o SIN respaldo.
Para el uso sin respaldo, es necesario soltar el respaldo
del asiento:
1. Coloquen la Silla para coche en un plano horizontal
de forma que sea accesible la parte inferior del
asiento (Fig. 30).
2. Giren las dos levas de desenganche del respaldo T en
la dirección indicada (Fig. 31).
3. Extraigan el respaldo del asiento (Fig. 32).
4. Coloquen el asiento de la Silla de forma que se adhiera
al asiento del coche (Fig. 33).
5. Coloquen al niño en la Silla y fijen el cinturón del
coche a la hebilla pasando el tramo abdominal debajo
del reposa-brazos de la Silla y el tramo diagonal por
encima del niño. (Fig. 34).
6. Tiren con cuidado del tramo diagonal del cinturón
pasándolo por el hombro del niño (Fig. 35).
¡ATENCIÓN! Para fijar el respaldo al asiento, repitan en
orden inverso las operaciones que acabamos de describir.
Una vez finalizadas las operaciones de fijación, comprueben
21
que la parte superior y la parte inferior del asiento están
fijadas correctamente entre sí.
REGULACIÓN DE LA ALTURA DEL APOYA-CABEZAS
Es posible regular la altura del apoya-cabezas en muchas
posiciones para permitir adaptarla lo mejor posible a la
altura del niño. Una regulación óptima permite:
• que la cabeza esté siempre sujeta y bien protegida
(Gr. 1-2-3).
• que los cinturones de seguridad de la silla se encuentren
siempre a la altura correcta, o sea a la altura de los
hombros(Gr. 1).
• que el cinturón diagonal del coche se encuentre siempre
a la altura correcta gracias a los pasadores del cinturón
integrados en el apoya-cabezas C (Gr. 2-3).
Para efectuar la regulación de la altura del apoya-cabezas
giren la manilla A que se encuentra encima del respaldo
hasta que se alcance la altura deseada (Fig. 16).
REAJUSTE DE LOS CINTURONES PARA SU UTILIZACIÓN EN GR. 1 (9-18 KG)
Para volver a montar los cinturones a la silla siga el procedimiento siguiente:
1. Unan las dos lengüetas de los dos tramos del cinturón,
insértenlas y fíjenlas a la hebilla (Fig. 36).
2. Inserten las dos placas de fijación al asiento R a través de
la funda pasándolas por la parte de debajo del asiento
hasta extraerlas (Fig. 37).
3. Pasen antes las dos placas de fijación de los tirantes y de
pasaje de los cinturones N a través de los dos pasadores
del cinturón diagonal rojos C y posteriormente a través
del respaldo (Fig. 38).
4. Fijen los dos extremos de los cinturones a la placa de
fijación Q (Fig. 39).
La funda de la Silla puede quitarse y lavarse a mano o en
la lavadora a 30°C. Para el lavado sigan las instrucciones
indicadas en la etiqueta del revestimiento que contiene
los siguientes símbolos para el lavado:
Lavado a
mano
No usar lejía
No lavar en
seco
LIMPIEZA DE LAS PARTES DE PLÁSTICO Y METAL
Para la limpieza de las partes de plástico o metal barnizado,
utilicen únicamente un trapo húmedo. No utilicen nunca
detergentes abrasivos y disolventes.
Las partes móviles de la Silla no se deben lubricar por
ningún motivo.
CONTROL DE LA INTEGRIDAD DE LOS COMPONENTES
Les recomendamos que comprueben regularmente la
integridad y el estado de deterioro de los siguientes
componentes:
• Funda: comprueben que no salga el almohadillado o
que no haya pérdidas de este material. Compruebe
el estado de los cinturones, que siempre tienen que
estar íntegros.
• Cinturones:Verificar que la parte de tejido no este deshilachada y que no se haya reducido el espesor de la cinta
de las correas, sobre todo en la parte de la regulación
entre las piernas, en la zona de los hombros o en la zona
de la placa de regulación de las correas.l
• Plásticos: comprueben el estado de deterioro de todas las
piezas de plástico, que no deben presentar signos evidentes
de daños o de pérdida de tono de los colores.
¡ATENCIÓN! En el caso de que la Silla se deformara o se
deteriorara fuertemente, sustitúyala. Podría haber perdido
sus características originales de seguridad.
LIMPIEZA Y MANTENIMIENTO
LIMPIEZA DE LA FUNDA
Lavado a 30°C
Y COLOCACIÓN DEL NIÑO EN GR. 3 (22-36 kg) SIN
RESPALDO” (puntos 1-3).
6. Suelten el revestimiento del asiento despegando
todos los velcros de fijación y abriendo las dos
bisagras (Fig. 42).
Para volver a colocar los componentes de la funda en su
posición original, repitan en orden inverso las operaciones
que acabamos de describir.
No utilizar
secadora
No
planchar
No utilicen nunca detergentes abrasivos o disolventes . No
centrifuguen la funda y dejen que se seque sin escurrir.
Para quitar los diferentes componentes de la funda textil de
la estructura de la Silla, sigan el procedimiento siguiente:
1. Suelten de la hebilla los cinturones de la silla (Fig.
14).
2. Giren y suelten las dos placas de fijación de los
cinturones R colocadas debajo del asiento (Fig. 20A)
pasándolas también por las dos ranuras en la funda
textil (Fig. 20B).
3. Quiten el revestimiento del apoya-cabezas(Fig. 40).
4. Extraigan el revestimiento del respaldo soltando todos
los velcros de fijación y extrayendo los dos tramos de
cinturón (Fig. 41).
5. Suelten el respaldo del asiento tal y como se ha explicado en el apartado “INSTALACIÓN DEL ASIENTO 22
CONSERVACIÓN DEL PRODUCTO
Cuando no esté instalada en el coche, les recomendamos que mantengan la Silla en un lugar seco, lejos de
fuentes de calor y protegido del polvo, la humedad y la
luz solar directa.
ELIMINACIÓN DEL PRODUCTO
Cuando hayan acabado de usar la Silla, y no la vaya a utilizar
mas, deposítenla como residuo. Por razones de respeto al
medio ambiente, separen los diversos tipos de desecho según
lo previsto por la normativa vigente en su país.
PARA MÁS INFORMACIÓN:
Dirección: Chicco Española, S.A.
Servicio de Atención al Consumidor
C/ Industrias, 10
Polígono Industrial Urtinsa
28923 – Alcorcón (Madrid)
Teléfono: 902.11.70.93
www.chicco.com
P Instruções de utilização
•
MUITO IMPORTANTE! LEIA DE IMEDIATO
•
•
•
•
•
•
•
•
•
•
•
•
•
•
•
•
•
•
Para a montagem e instalação do produto, siga escrupulosamente as instruções. Não permita que alguém
utilize o produto sem ter lido as instruções.
Conserve este manual para consultas futuras.
ATENÇÃO! Segundo as estatísticas sobre acidentes,
de um modo geral os bancos traseiros do veículo são
mais seguros do que o banco da frente: é aconselhável,
portanto, instalar a Cadeira auto num dos bancos de
trás. Nomeadamente, o lugar mais seguro é o do meio,
se tiver cinto de 3 pontos.
É aconselhável que todos os passageiros ocupantes
do carro saibam como libertar a criança, em caso
de emergência.
Se a cadeira auto estiver colocada no banco da frente
com o airbag frontal activado, para maior segurança
é aconselhável recuar o banco o mais possível, tendo
em consideração a presença de outros passageiros
no banco de trás.
Nunca utilize esta cadeira auto sobre bancos dispostos
lateralmente ou no sentido inverso à marcha.
Instale a cadeira auto apenas em bancos correctamente
fixados à estrutura do automóvel e virados no sentido
da marcha. Não deixe cadeiras auto dobráveis ou
rotativas mal fixadas pois, em caso de acidente, podem
constituir perigo.
Preste atenção à forma como se instala a cadeira auto
no carro, de forma a evitar que um banco móvel ou a
porta possam interferir com ela.
Nunca monte a cadeira auto no banco de um carro
que tenha apenas um cinto abdominal (com dois
pontos).
Nenhuma cadeira auto pode garantir a total segurança
da criança em caso de acidente, mas a utilização deste
produto reduz o risco de lesões graves ou morte.
O risco de sérios danos para a criança, não só em caso
de acidente mas também noutras circunstâncias, (por
ex. travagens bruscas, etc.), aumenta se as indicações
dadas neste manual não forem escrupulosamente
respeitadas: verifique sempre se a cadeira auto está
correctamente presa ao banco.
Se a cadeira auto estiver danificada, deformada ou muito
desgastada, deve ser substituída, pois pode ter perdido
as características originais de segurança.
Não introduza alterações ao produto sem a aprovação
do fabricante.
Não instale acessórios, peças de substituição ou componentes não fornecidos pelo fabricante.
Nunca deixe a criança na cadeira auto sem vigilância,
por motivo algum.
Não coloque nada que não seja um acessório aprovado
para o produto quer entre o banco do carro e a cadeira
auto, como entre esta e a criança: em caso de acidente, a
cadeira auto poderá não funcionar correctamente.
Se o automóvel estiver ao sol, inspeccione cuidadosamente a cadeira auto antes de instalar a criança,
verificando se algumas partes estão demasiado quentes:
se for o caso, deixe arrefecer antes de sentar a criainça,
para evitar que ela se queime.
•
•
•
•
•
•
•
•
•
Após um acidente, ainda que ligeiro, a cadeira auto
pode ter sofrido danos nem sempre visíveis a olho nu:
é, portanto, necessário substituí-la.
Não utilize cadeiras auto em segunda mão: podem ter
sofrido danos estruturais não visíveis a olho nu mas que
comprometem a segurança do produto.
A empresa Artsana declina qualquer responsabilidade
pelo uso indevido do produto.
O forro só pode ser substituído por outro aprovado pelo
fabricante, pois é parte integrante da cadeira auto. A
cadeira auto nunca deve ser usada sem o forro, para
não comprometer a segurança da criança.
Certifique-se de que o cinto não fica torcido e evite que
este último ou partes da cadeira auto fiquem presas nas
portas ou raspem em pontas cortantes.
A cadeira auto deixa de ser utilizável se o cinto apresentar
cortes ou partes desfiadas.
Quando não está a transportar uma criança, a cadeira
auto deve estar fixada ou arrumada no porta-bagagem.
Se a cadeira não estiver fixada pode constituir um
perigo para os passageiros, em caso de acidente ou
travagens bruscas.
Certifique-se de que não são transportados, nomeadamente na prateleira posterior do automóvel, objectos
ou bagagens que não estejam presos ou colocados de
forma segura: em caso de acidente ou travagem brusca
podem ferir os passageiros.
Verifique se o apoio de cabeça do banco não interfere
com o apoio de cabeça da cadeira auto: não deve
empurrá-lo para a frente. Se tal suceder, retire o apoio
de cabeça do banco do automóvel onde é instalada a
cadeira auto, tendo o cuidado de não o colocar solto
na prateleira posterior.
Certifique-se de que todos os passageiros do automóvel
colocam o cinto de segurança, não só para sua própria
segurança mas também porque, durante a viagem,
em caso de acidente ou travagem brusca, podem
magoar a criança.
No caso de viagens longas faça paragens frequentes.
A criança cansa-se muito facilmente. Por motivo
algum retire a criança da cadeira auto com o carro em
movimento. Se a criança precisar de atenção, procure
um local seguro e encoste.
INSTRUÇÕES DE UTILIZAÇÃO
ÍNDICE
•
•
•
•
•
•
•
•
•
23
Descrição das peças
Características do produto
Limitações e requisitos de uso relativos ao produto
e ao banco do automóvel
Instalação da cadeira auto no automóvel e colocação
da criança no Grupo 1 (9-18 kg)
Instalação da cadeira auto no automóvel e colocação
da criança no Grupo 2-3 (15-36 kg) com encosto
Instalação da cadeira auto no automóvel e colocação
da criança no Grupo 3 (22-36 kg) sem encosto
Regulação da altura do apoio da cabeça
Reposição dos cintos para utilização no Grupo
1 (9-18 kg)
Limpeza e manutenção
COMPONENTES
standard equivalentes.
5. Em caso de dúvida, contacte o fabricante do dispositivo
de retenção ou o revendedor.
Fig. 1 (Frente)
A. Botão de regulação do apoio da cabeça e cintos
B. Apoio da cabeça
C. Passagem do cinto diagonal
D. Correias dos ombros
E. Cintos da cadeira auto
F. Fecho
G. Protecção entre-pernas
H. Botão de regulação dos cintos
I. Correia de regulação dos cintos
LIMITAÇÕES E REQUISITOS DE UTILIZAÇÃO
RELATIVOS AO PRODUTO E AO BANCO DO
AUTOMÓVEL
ATENÇÃO! Respeite escrupulosamente as seguintes
limitações e requisitos de utilização relativos ao produto
e ao banco do automóvel: caso contrário, a segurança
não é garantida.
Esta cadeira auto está homologada exclusivamente para
a utilização com crianças com peso entre 9 e 36 kg (dos
9 meses aos 12 anos, aproximadamente).
O banco do automóvel deve estar equipado com cinto de
segurança de 3 pontos de fixação, estático ou com enrolador,
homologado segundo o Regulamento UNI/ECE N°16 ou
outras normas standard equivalentes (Fig. 5).
Nunca instale a cadeira auto com um cinto de automóvel
de dois pontos de fixação (Fig. 6).
A cadeira auto pode ser instalada no banco da frente no
lado do passageiro (por favor consulte o Código da Estrada
para saber em que condições) ou em qualquer um dos
bancos traseiros. Nunca instale esta cadeira auto em
bancos posicionados lateralmente ou virados no sentido
oposto à marcha (Fig. 7).
O produto destina-se exclusivamente ao uso como cadeira
auto para automóvel e não para usar em casa.
Para estar correctamente instalada, o apoio de cabeça do
banco do automóvel não deve interferir, de forma alguma,
com o encosto da cadeira auto.
Fig. 2 (Lado)
J. Encosto
K. Assento
L. Apoios dos braços
M. Passagens dos cintos
Fig. 3 (Trás)
N. Placas de fixação das Correias dos ombros e de
passagem dos cintos
O. Correias dos cintos
P. Aberturas para passagem dos cintos do automóvel
(apenas para instalação no Grupo 1)
Q. Placa de fixação dos cintos
Fig. 4 (Por baixo)
R. Placas de fixação dos cintos ao assento
S. Placa de fixação do fecho ao assento
T. Patilhas para desprender o encosto do assento
CARACTERÍSTICAS DO PRODUTO
•
•
Esta cadeira auto está homologada para os “Grupos
1, 2 e 3”, para o transporte de crianças com peso
entre os 9 e os 36 kg (dos 9 meses aos 12 anos,
aproximadamente), em conformidade com a norma
europeia ECE R44/04.
A homologação é de tipo “Universal”, portanto a
cadeira auto pode ser utilizada em qualquer modelo
de automóvel. ATENÇÃO! “Universal” significa que
é compatível com a maior parte mas não com todos
os bancos de automóvel.
INSTALAÇÃO DA CADEIRA AUTO E COLOCAÇÃO
DA CRIANÇA NO GRUPO 1 (9-18 kg)
ATENÇÃO! Estas instruções aplicam-se, tanto no texto
como nos desenhos, à instalação da cadeira auto no banco
da frente, do lado direito. Para instalação noutras posições,
execute a mesma sequência de operações.
1. Coloque a cadeira auto no lugar escolhido, no sentido
da marcha (Fig. 8).
2. Introduza o cinto de 3 pontos do automóvel na
abertura P do encosto da cadeira auto (Fig. 9A e 9B),
fazendo-o sair pela abertura oposta do outro lado do
encosto (Fig. 9C).
3. Prenda o cinto do automóvel ao fecho, de modo a que,
tanto a correia abdominal como a diagonal passem
por baixo do apoio de braços (Fig. 10).
4. Puxe o mais possível o cinto do automóvel fazendo
com que a cadeira auto fique bem apertada contra o
banco (Fig. 11), se necessário pondo o joelho sobre a
própria cadeira auto de modo a pressioná-la.
5. Certifique-se de que a cadeira está instalada correctamente: se o cinto está bem esticado e se a cadeira
auto está firmemente presa e encostada ao banco.
Se não estiver, repita a operação de instalação desde
o início (Fig. 12).
AVISO IMPORTANTE
1. Este é um dispositivo de retenção para crianças “Universal”, homologado pelo Regulamento N°44, extensão
série 04. Adequado para a utilização generalizada em
veículos e compatível com a maior parte, mas não
todos, os modelos de bancos de automóvel.
2. Obtém-se mais facilmente a perfeita compatibilidade,
nos casos em que o construtor do automóvel declara
no manual do veículo que o mesmo prevê a instalação
de dispositivos de retenção para crianças, tipo “Universal”, para a faixa etária em questão.
3. Este dispositivo de retenção foi classificado “Universal”
de acordo com os critérios de homologação mais
rigorosos relativamente a modelos anteriores que
não dispõem deste aviso.
4. É adequado exclusivamente para veículos equipados
com cinto de segurança com 3 pontos de fixação,
estático ou com enrolador, homologado segundo
o Regulamento UN/ECE N°16 ou outras normas
ATENÇÃO!
• Verifique sempre se o cinto está uniformemente distribuído em todos os pontos e se não está torcido.
• NUNCA passe o cinto do automóvel em posições
24
diferentes das indicadas.
Terminada a instalação da cadeira auto, para colocar a
criança proceda da seguinte forma:
6. Pressione o botão de regulação dos cintos H e, simultaneamente, segure e puxe para si a parte inferior dos
cintos da Cadeira auto, até obter a máxima extensão
possível (Fig 13).
7. Abra os cintos da cadeira auto, pressionando o botão
do fecho e afaste-os para os lados (Fig. 14).
8. Coloque a criança na cadeira auto com cuidado,
ponha-lhe os cintos sobre o corpo sem os puxar,
una as duas linguetas do cinto (Fig. 15A) e encaixe-as
novamente no fecho (Fig. 15B).
9. Com o botão de regulação A situado na parte de
cima do encosto, regule a altura do apoio da cabeça
da cadeira auto, de modo a que os cintos fiquem à
altura dos ombros da criança (Fig. 16).
10. Para regular a tensão dos cintos da cadeira auto,
ajustando-a ao corpo da criança, puxe com cautela
a correia de regulação I até obter o nível certo de
tensão (Fig. 17).
11. Certifique-se de que a cadeira auto está instalada
correctamente, como mostra a figura (Fig. 18).
Para retirar a criança da cadeira auto, pressione o botão
do fecho e liberte os cintos (Fig 19).
correcta, regule-a: veja o parágrafo “REGULAÇÃO DA
ALTURA DO APOIO DA CABEÇA”.
12. Puxe a parte diagonal do cinto auto para o enrolador, de
forma que o cinto fique bem esticado e bem encostado
ao tórax e às coxas da criança (Fig. 28).
13. Certifique-se de que a cadeira auto está instalada
correctamente, como mostra a figura (Fig. 29).
ATENÇÃO!
• Verifique sempre se o cinto está uniformemente distribuído em todos os pontos e se não está torcido.
• Certifique-se de que o cinto diagonal está correctamente
apoiado nos ombros da criança e que não exerce pressão
no pescoço; se necessário, regule o apoio da cabeça.
• Certifique-se de que o enrolador do cinto do automóvel
fica em posição recuada (ou, no máximo, alinhada) em
relação ao encosto do banco do automóvel.
Para retirar a criança da cadeira auto nos Grupos 2 e 3:
1. Solte o cinto do automóvel abrindo o fecho.
2. Afaste o cinto do automóvel do corpo da criança.
3. Retire a criança da cadeira auto com cuidado.
ATENÇÃO! Caso não tencione desmontar a cadeira auto
do automóvel, volte a fechar os cintos do automóvel, de
modo a prender a cadeira auto, mesmo sem a criança;
de outra forma, poderia constituir um perigo em caso de
travagem ou acidente.
INSTALAÇÃO DA CADEIRA AUTO E COLOCAÇÃO
DA CRIANÇA NOS GRUPOS 2 e 3 (15-36 kg) COM
ENCOSTO
INSTALAÇÃO DA CADEIRA AUTO E COLOCAÇÃO
DA CRIANÇA NO GRUPO 3 (22-36 kg) SEM ENCOSTO
Para mudar a configuração da cadeira auto do Grupo 1
para os Grupos 2 e 3 é necessário retirar primeiro os cintos,
executando as seguintes operações:
1. Abra o fecho dos cintos da cadeira auto (Fig. 14).
2. Rode e solte as duas placas de fixação dos cintos R situadas
sob o assento (Fig. 20A) fazendo-as sair também pelas
duas aberturas do revestimento (Fig. 20B).
3. Solte as duas pontas dos cintos da placa de fixação
Q (Fig. 21).
4. Rode e solte as duas placas de passagem dos cintos N
do encosto (Fig. 22).
5. Retire pela frente as duas correias do cinto, fazendoas passar pelas duas passagens vermelhas do cinto
diagonal C (Fig. 23).
6. Guarde em local apropriado as duas correias dos cintos
agora retiradas.
7. Passe o fecho e a correia separadora de pernas acolchoada pela abertura própria situada ao centro do assento,
colocando tudo de novo no espaço próprio do assento
(Fig. 24A, 24B e 24C).
Agora a cadeira auto está pronta e configurada para a
instalação nos Grupos 2 e 3.
8. Coloque a cadeira auto no banco no sentido da marcha,
no lugar escolhido para a instalação (Fig. 25).
9. Passe a correia diagonal do cinto do automóvel por trás
do apoio da cabeça e através da passagem vermelha do
cinto C por baixo do próprio apoio da cabeça. Sente a
criança com cuidado, certificando-se de que está bem
encostada ao encosto da cadeira auto (Fig. 26).
10. Prenda o cinto do automóvel ao fecho, de modo a que,
tanto a correia abdominal como a diagonal passem por
baixo do apoio dos braços (Fig. 27).
11. Verifique a altura do apoio da cabeça e, se não estiver
Nos Grupos 1 (9-18 kg) e 2 (15-25 kg), o uso da cadeira
auto é permitido apenas COM o encosto correctamente
montado no assento.
No Grupo 3 (22-36 kg), a cadeira auto permite uma dupla
utilização, opcionalmente COM encosto (escolha sempre mais
segura e, portanto, aconselhável) ou SEM encosto.
Para utilizar sem encosto, é necessário soltar o encosto
do assento:
1. Coloque a cadeira auto num plano horizontal, de forma a
que a parte inferior do assento fique acessível (Fig. 30).
2. Rode as duas patilhas do encosto T na direcção indicada
(Fig. 31).
3. Retire o encosto do assento (Fig. 32).
4. Coloque o assento da cadeira auto de forma a ficar
aderente ao encosto do automóvel (Fig. 33).
5. Sente a criança no assento auto e prenda o cinto do
automóvel no fecho, passando a correia abdominal
por baixo do apoio de braços do assento e a diagonal
por cima (Fig. 34).
6. Estique com cuidado a correia diagonal do cinto, de modo
a passar sobre o ombro da criança (Fig. 35).
ATENÇÃO! Para fixar o encosto ao assento, repita as operações
descritas pela ordem inversa. No final das operações de fixação,
verifique se a parte superior (encosto) e inferior (assento) da
cadeira estão correctamente presas uma à outra.
REGULAÇÃO DA ALTURA DO APOIO DA CABEÇA
É possível regular a altura do apoio da cabeça num
determinado número de posições, para permitir adaptar
25
42).
Para voltar a colocar de novo os componentes do forro
na posição inicial, execute as operações acima descritas,
pela ordem inversa.
melhor a cadeira auto à altura da criança. Uma boa
regulação permite que:
• a cabeça esteja sempre bem amparada e protegida
(Grupos 1-2-3).
• os cintos de segurança da cadeira auto fiquem
sempre colocados correctamente, isto é, à altura
dos ombros (Grupo 1).
• o cinto diagonal do automóvel fique sempre à altura
certa, graças às passagens do cinto integradas no
apoio da cabeça C (Grupos 2-3).
Para fazer a regulação da altura do apoio da cabeça,
rode o botão A situado na parte de cima do encosto
até atingir a posição desejada (Fig. 16).
LIMPEZA DOS COMPONENTES DE PLÁSTICO
E DE METAL
Para a limpeza dos componentes em plástico ou em
metal pintado, utilize apenas um pano húmido. Nunca
utilize detergentes abrasivos ou solventes.
As partes móveis da cadeira auto não devem, de modo
algum, ser lubrificadas.
• CONTROLO DA INTEGRIDADE DOS COMPONENTES
REPOSIÇÃO DOS CINTOS PARA UTILIZAÇÃO NO
GRUPO 1 (9-18 kg)
Para instalar de novo os cintos na cadeira auto, proceda
da seguinte forma:
1. Junte as duas linguetas das duas correias do cinto e
introduza-as no fecho (Fig. 36).
2. Introduza as duas placas de fixação no assento R
através do forro, fazendo-as sair pela parte de baixo
do assento (Fig. 37).
3. Passe as duas placas de fixação das Correias dos
ombros e de passagem dos cintos N, primeiro através
das duas passagens vermelhas do cinto diagonal C e
depois através do encosto (Fig. 38).
4. Prenda as duas pontas dos cintos à placa de fixação
Q (Fig. 39).
É aconselhável verificar regularmente a integridade e o
estado de desgaste dos seguintes componentes:
• Forro: certifique-se de que não estão a desfazer-se
nem a sair para fora do revestimento partes do
acolchoado. Verifique o estado das costuras que
devem estar sempre intactas.
• Cintos: verifique se o material têxtil está a desfazerse e se há uma evidente redução da espessura na
zona da correia de regulação, entre as pernas, nas
correias dos ombros e na zona da placa de regulação
dos cintos.
• Plásticos: verifique o estado de desgaste de todos os componentes em plástico que não devem
apresentar evidentes sinais de deterioração nem
perda de cor.
LIMPEZA E MANUTENÇÃO
LIMPEZA DO FORRO
ATENÇÃO! Se a cadeira auto estiver deformada ou muito
desgastada, deve ser substituída: poderá ter perdido as
características originais de segurança.
O forro da cadeira auto é completamente removível e
lavável à mão ou na máquina a 30°C. Para a lavagem,
siga as instruções constantes na etiqueta do revestimento
que contém os seguintes símbolos de lavagem:
Lavagem na
máquina a
30°C
Lavagem à
mão
Não usar
lixívia
Não limpar
a seco
Não secar na
máquina
• CONSERVAÇÃO DO PRODUTO
Quando não está instalada no automóvel, é aconselhável conservar a cadeira auto num local seco, longe
de fontes de calor e ao abrigo do pó, da humidade e
da luz solar directa.
Não
passar a
ferro
Nunca utilize detergentes abrasivos ou solventes. Não
centrifugue o forro e estenda-o sem o torcer.
Para retirar os vários componentes do forro da estrutura
da cadeira auto, proceda da seguinte forma:
1. Abra os cintos da cadeira auto (Fig. 14).
2. Rode e retire as duas placas de fixação dos cintos R
situadas sob o assento (Fig. 20A) fazendo-as sair pelas
duas aberturas sob o forro (Fig. 20B).
3. Remova o revestimento do apoio da cabeça (Fig.
40).
4. Remova o revestimento do encosto, abrindo todos
os velcros de fixação e tirando as duas correias do
cinto (Fig. 41).
5. Separe o encosto do assento, conforme explicado
no parágrafo “INSTALAÇÃO DA CADEIRA AUTO E
COLOCAÇÃO DA CRIANÇA NO GRUPO 3 (22-36
kg) SEM ENCOSTO” (pontos 1-3).
6. Retire o revestimento do assento abrindo todos os
velcros de fixação e os dois fechos de correr (Fig.
• ELIMINAÇÃO DO PRODUTO
Atingido o limite de utilização previsto para a cadeira
auto, deixe de a usar e coloque-a no lixo. Por respeito
pelo ambiente, separe os diferentes tipos de resíduos de
acordo com a legislação vigente no seu País.
PARA MAIS INFORMAÇÕES:
26
FARSANA PORTUGAL
Serviço Clientes
Rua Humberto Madeira, 9
Queluz de Baixo
2730-097 Barcarena
Tel. Linha Verde 800 20 19 77
www.chicco.com
N
NL
Gebruiksaanwijzing
ZEER BELANGRIJK: METEEN LEZEN
•
•
•
•
•
•
•
•
•
•
•
•
•
•
•
•
•
•
Volg de instructies voor de montage en de installatie van
het product nauwgezet. Laat niemand het artikel gebruiken
zonder eerst de instructies te hebben gelezen.
Bewaar deze handleiding voor eventuele latere raadpleging.
LET OP! Volgens de statistieken over ongelukken is
de achterbank van het voertuig veiliger dan de voorzittingen: daarom wordt aangeraden de autostoel op
de achterbank te installeren. De veiligste zitting is de
middelste achterzitting, als deze is uitgerust met een
driepuntsgordel.
Het wordt aanbevolen alle inzittenden te informeren
over hoe het kind in geval van nood kan worden
losgemaakt.
Als de autostoel op de voorzitting met ingeschakelde
airbag wordt gezet, wordt voor een grotere veiligheid
aangeraden de zitting zover mogelijk naar achteren te
zetten, voor zover de aanwezigheid van andere passagiers
op de achterbank dit toestaat.
Gebruik deze autostoel nooit op zittingen die zijdelings
staan of tegen de rijrichting in.
Plaats deze autostoel alleen op zittingen, die correct
aan de structuur van de auto zijn bevestigd en die in
de rijrichting staan. Kijk goed uit dat inklapbare of
draaiende autozittingen stevig vastzitten, omdat deze
bij een ongeluk een gevaar kunnen inhouden.
Let erop hoe de autostoel in de auto wordt geïnstalleerd
om te voorkomen dat een mobiele zitting of portier
het in de weg zitten.
Bevestig de autostoel nooit op een autozitting uitgerust
met enkel een buikgordel (tweepuntsgordel).
Geen enkele autostoel kan de totale veiligheid van
het kind in geval van een ongeluk garanderen, maar
het gebruik van dit artikel vermindert het gevaar voor
ernstig letsel of de dood.
Het gevaar voor ernstig letsel van het kind, en niet alleen
bij een ongeluk, maar ook in andere omstandigheden
(bijv. bij hard remmen, enz.) wordt groter, als men zich
niet nauwgezet houdt aan de aanwijzingen die in deze
handleiding worden gegeven: controleer altijd dat de
autostoel correct aan de zitting is bevestigd.
Indien de autostoel beschadigd, vervormd of ernstig
versleten mocht zijn, moet hij worden vervangen,
omdat hij de oorspronkelijke veiligheidskenmerken
kan hebben verloren.
Verricht geen wijzigingen aan het artikel en voeg er niets
aan toe zonder toestemming van de fabrikant.
Breng geen niet door de fabrikant geleverde accessoires,
reserveonderdelen of onderdelen aan.
Laat het kind nooit en om geen enkele reden zonder
toezicht in de autostoel achter.
Zet niets dat geen voor het artikel goedgekeurd accessoire is tussen de autozitting en de autostoel, of
tussen de autostoel en het kind: in geval van een
ongeluk kan het dan gebeuren dat de autostoel niet
goed functioneert.
Als het voertuig in de zon heeft gestaan, controleert
u de autostoel zorgvuldig, voordat u het kind erin zet,
door na te gaan of de verschillende delen ervan niet
•
•
•
•
•
•
•
•
•
•
heet zijn geworden: in dit geval laat u ze eerst afkoelen
voordat u het kind laat plaatsnemen, om te voorkomen
dat het zich kan branden.
Ook na een niet ernstig ongeluk kan de autostoel schade
opgelopen hebben, die echter niet altijd met het blote oog
zichtbaar is: hij moet daarom worden vervangen.
Gebruik geen tweedehands autostoelen: deze kunnen
voor het blote oog onzichtbare structurele schade
hebben opgelopen, die zodanig is dat de veiligheid van
het artikel niet langer gewaarborgd wordt.
De firma Artsana wijst elke vorm van aansprakelijkheid
af voor een oneigenlijk gebruik van het product.
De hoes kan uitsluitend worden vervangen met een door
de fabrikant goedgekeurde hoes, omdat deze integraal
deel uitmaakt van de autostoel. De autostoel mag nooit
zonder hoes worden gebruikt, om de veiligheid van het
kind niet in het gedrang te brengen.
Controleer dat de band van de gordel niet verdraaid zit en
voorkom dat deze of een gedeelte van de autostoel tussen
de portieren komt of over scherpe punten wrijft.
De autostoel mag niet meer worden gebruikt als de
gordel gescheurd of gerafeld is.
Als het kind niet wordt vervoerd, moet de autostoel
vast blijven zitten of in de koffer worden gezet. Een niet
vastgezette autostoel kan in geval van een ongeluk of
bij hard remmen namelijk een gevaar inhouden voor
de passagiers.
Controleer dat er geen voorwerpen of bagage, in het
bijzonder op de hoedenplank in het voertuig worden
vervoerd, die niet zijn vastgezet of veilig zijn geplaatst:
bij van een ongeluk of bij hard remmen kunnen deze
de passagiers verwonden.
Controleer dat de hoofdsteun van de zitting de hoofdsteun van de autostoel niet hindert: hij mag hem niet
naar voren duwen. Als dit mocht gebeuren, verwijdert u
de hoofdsteun van de autozitting waarop de autostoel
wordt geïnstalleerd en zorgt u ervoor dat u hem niet
op de hoedenplank legt.
Verzeker u ervan dat alle passagiers van het voertuig
hun eigen veiligheidsgordel gebruiken, zowel voor de
eigen veiligheid, als omdat zij tijdens de reis in geval
van een ongeluk of bij hard remmen het kind kunnen
verwonden.
Stop vaak tijdens lange reizen. Een kind is het al gauw
beu. Haal het kind om geen enkele reden uit de autostoel,
terwijl de auto rijdt. Als het kind aandacht nodig heeft,
moet u een veilige plek zoeken en stoppen.
GEBRUIKSAANWIJZING
INHOUDSOPGAVE
•
•
•
•
•
•
•
•
•
27
Beschrijving van de onderdelen
Kenmerken van het product
Beperkingen en gebruiksvereisten betreffende het
artikel en de autozitting
De autostoel in de auto installeren en het kind van
Gr. 1 (9-18 kg) erin zetten.
De autostoel met rugleuning in de auto installeren en
het kind van Gr. 2-3 (15-36 kg) erin zetten
De autostoel zonder rugleuning in de auto installeren
en het kind van Gr. 3 (22-36 kg) erin zetten
De hoogte van de hoofdsteun afstellen
De gordels afstellen voor gebruik in Gr. 1 (9-18 kg)
Reinigen en onderhoud
BESCHRIJVING VAN DE ONDERDELEN
BEPERKINGEN EN GEBRUIKSVEREISTEN BETREFFENDE HET ARTIKEL EN DE AUTOZITTING
Fig. 1 (voorkant)
A. Verstelknop hoofdsteun en gordels
B. Hoofdsteun
C. Diagonale gordeldoorgangen
D. Schouderbanden
E. Gordels van de autostoel
F. Gesp
G. Bescherming tussenbeenstuk
H. Verstelknop van de gordels
I. Verstelband van de gordels
LET OP! Neem de volgende beperkingen en gebruiksvereisten betreffende het artikel en de autozitting nauwgezet
in acht: anders is de veiligheid niet verzekerd.
• Deze autostoel is enkel goedgekeurd voor gebruik
voor kinderen met een gewicht tussen de 9 en 36
kg (van 1 tot ongeveer 12 jaar).
• De autozitting dient uitgerust te zijn met een vaste
of oprolbare driepuntsgordel, die goedgekeurd is
volgens de Voorschriften UNI/ECE N°16 of andere
gelijkwaardige standaarden (Fig. 5).
• Installeer de autostoel nooit met de tweepuntsgordel
van de auto (Fig. 6).
• De autostoel kan voorin op de passagierszitting worden
aangebracht, of op één van de achterzittingen. Gebruik
deze autostoel nooit op zittingen die zijdelings gekeerd
of tegen de rijrichting in staan (Fig. 7).
• Het product is uitsluitend bestemd om te worden
gebruikt als autostoel en niet voor gebruik in huis.
• Voor een goede installatie zorgt u ervoor dat de
hoofdsteun van de autozitting de rugleuning van de
autostoel op geen enkele manier in de weg zit.
Fig. 2 (zijaanzicht)
J. Rugleuning
K. Zitting
L. Armleuningen
M. Gordeldoorgangen
Fig. 3 (Achterkant)
N. Bevestigingsplaatjes van de schouderbanden en om
de gordels doorheen te halen
O. Gordelbanden
P. Openingen om de autogordels doorheen te halen
(alleen installatie voor Gr. 1)
Q. Bevestigingsplaat van de gordels
DE AUTOSTOEL IN DE AUTO INSTALLEREN EN HET
KIND VAN GR. 1 (9-18 Kg) ERIN ZETTEN
Fig. 4 (Onderkant)
R. Plaatjes om de gordels aan de zitting te bevestigen
S. Plaatje om de gesp aan de zitting te bevestigen
T. Loskoppelhendels om de rugleuning van de zitting
te halen
LET OP! Deze instructies hebben, zowel in de tekst als op
de tekeningen, betrekking op de installatie van de autostoel op de rechter achterzitting. Verricht echter dezelfde
handelingen voor installaties op andere plaatsen.
1. Plaats de autostoel met de rijrichting mee op de
gekozen zitting (Fig. 8).
2. Steek de driepuntsgordel van de auto door de speciaal
hiervoor bestemde opening P in de rugleuning van de
autostoel (Fig. 9A en 9B) en laat hem uit de opening
aan de andere kant van de rugleuning naar buiten
komen (Fig. 9C).
3. Maak de autogordel zodanig aan de gesp vast, dat
zowel de buikgordel als het diagonale gedeelte ervan
onder de armleuning doorlopen (Fig. 10).
4. Span de autogordel zo strak mogelijk en laat de autostoel
goed op de zitting aansluiten (Fig. 11). Ga indien nodig
met een knie op de autostoel zelf zitten.
5. Controleer of de installatie goed is verricht, of de gordel
goed is gespannen en of de autostoel stevig op de
zitting is vastgezet. Als dit niet zo zou zijn, herhaalt u
de hele installatie vanaf het begin (Fig. 12).
KENMERKEN VAN HET PRODUCT
•
•
Deze autostoel is met inachtneming van de Europese
voorschriften ECE R44/04 goedgekeurd voor “Groep
1, 2 en 3”, voor het vervoer van kinderen van 9 tot
36 kg (ongeveer van 1 tot 12 jaar).
De goedkeuring is van het “Universele” type, dus kan
de autostoel in elke model auto worden gebruikt. LET
OP! “Universeel” betekent dat het compatibel is met
de meeste, maar niet met alle autozittingen.
BELANGRIJKE MEDEDELINGEN
1. Dit is een “Universeel” kinderbeveiligingssysteem, dat
goedgekeurd is volgens Voorschrift nr. 44, amendementen serie 04. Het is geschikt voor algemeen gebruik
in voertuigen en compatibel met de meeste, maar niet
alle, autozittingen.
2. De perfecte compatibiliteit is eenvoudiger te verkrijgen
indien de fabrikant van het voertuig in de handleiding ervan
verklaart dat het voertuig geschikt is om er “universele”
kinderbeveiligingssystemen voor kinderen van deze
leeftijdsgroep in te installeren.
3. Dit kinderbeveiligingssysteem is als “Universeel” geclassificeerd volgens goedkeuringscriteria die strenger
zijn ten opzichte van vorige modellen die niet met deze
mededeling zijn uitgerust.
4. Enkel geschikt om te worden gebruikt in voertuigen met
vaste of oprolbare driepuntsgordel, die is goedgekeurd
volgens de Voorschriften UN/ECE N°16 of andere gelijkwaardige standaarden.
5. Neem in geval van twijfel contact op met de fabrikant van
het kinderbeveiligingssysteem of met de verkoper.
LET OP!
• Controleer altijd of de gordel gelijkmatig over alle
punten is verdeeld en niet verdraaid zit.
• Laat de autogordels NOOIT op andere plaatsen
lopen dan de aangeduide.
Als de autostoel is geïnstalleerd, laat u het kind als volgt
erin plaatsnemen:
6. druk op de verstelknop van de gordels H en pak
tegelijkertijd het onderste gedeelte van de gordels
van de autostoel vast en trek ze naar u toe, tot ze
helemaal zijn uitgetrokken (Fig 13).
7. Maak de gordels van de autostoel los, door op de knop van de
gesp te drukken en leg ze aan de zijkanten neer (Fig. 14).
28
13. Controleer of de autostoel goed is bevestigd, zoals
in de afbeelding wordt getoond (Fig. 29).
8. Zet het kind met zorg in de autostoel en pas de gordels
aan zijn lichaam aan, zonder eraan te trekken. Maak
de twee lipjes van de gordel aan elkaar vast (Fig. 15A)
en bevestig ze weer in de gesp (Fig. 15B).
9. Via de speciale verstelknop A op de rugleuning, stelt u
de hoogte van de hoofdsteun van de autostoel zodanig
af, dat de gordels er ter hoogte van de schouders van
het kind uitkomen (Fig. 16).
10. Om de spanning van het gordels van de autostoel
af te stellen en ze aan het lichaam van het kind aan
te passen, trekt u voorzichtig aan verstelband I tot
ze goed gespannen zijn (Fig. 17).
11. Controleer of de autostoel goed is bevestigd, zoals
in de afbeelding wordt getoond (Fig. 18).
Om het kind uit de autostoel te halen, drukt u op de knop
van de gesp en maakt u de gordels los (Fig 19).
LET OP!
• Controleer altijd of de gordel gelijkmatig over alle
punten is verdeeld en niet verdraaid zit.
• Controleer dat de diagonale gordel goed tegen de
schouder van het kind rust en geen druk uitoefent op
de nek. Verstel de hoofdsteun indien nodig.
• Controleer of het oprolsysteem van de autogordel
ten opzichte van de rugleuning van de autozitting
naar achteren staat (of er hooguit op één lijn mee
staat).
Om het kind uit de autostoel van Groep 2 en 3 te nemen:
1. Maak de autogordel uit de gesp los.
2. Haal de autogordel van het lichaam van het kind.
3. Haal het kind met zorg uit de autostoel.
DE AUTOSTOEL MET RUGLEUNING IN DE AUTO
INSTALLEREN EN HET KIND VAN GR. 2 en 3 (15-36
KG) ERIN ZETTEN
LET OP! Als u niet van plan bent de autostoel uit de
auto te nemen, zorgt u ervoor dat de autogordels
weer in de speciale gesp worden vastgemaakt, zodat
ze de autostoel ook zonder kind aan de auto bevestigd
houden. Het kan anders bij hard remmen of een ongeval
gevaarlijk zijn.
Om de configuratie van de autostoel van gr. 1 in gr. 2-3 te
veranderen, moeten eerst de gordels volgens de vervolgens
beschreven handelingen worden verwijderd:
1. Maak de gordels van de autostoel uit de gesp los
(Fig. 14)
2. Draai en maak de twee bevestigingsplaatjes van de
gordels R, die zich onder de zitting bevinden, los (Fig.
20A) en laat ze ook uit de twee gleuven in de stoffen
hoes komen (Fig. 20B).
3. Maak de twee uiteinden van de gordels van het
bevestigingsplaatje Q los (Fig. 21).
4. Draai en maak de twee doorgangsplaatjes van de
gordels N van de rugleuning los (Fig. 22).
5. Haal de twee gedeeltes er aan de voorkant uit en haal
ze door de twee rode doorgangen C voor de diagonale
gordel (Fig. 23).
6. Berg de twee op die manier verwijderde gordelgedeeltes
op de speciaal hiervoor bestemde plaats op.
7. Haal de gesp en het stoffen tussenbeenstuk door de
speciale gleuf in het midden van de zitting en berg ze
in de speciaal hiervoor bestemde ruimte in de zitting
op (Fig. 24A, 24B en 24C).
De autostoel is nu klaar en voor installatie in groep 2
en 3 geconfigureerd.
DE AUTOSTOEL ZONDER RUGLEUNING IN DE
AUTO INSTALLEREN EN HET KIND VAN GR. 3
(22-36 kg) ERIN ZETTEN
De autostoel mag in groep 1 (9-18 kg) en 2 (15-25
kg) alleen worden gebruikt MET de rugleuning
correct op de zitting gemonteerd.
In groep 3 (22-36 kg) kan de autostoel op twee manieren worden gebruikt, zowel MET rugleuning
(in ieder geval altijd de veiligste en dus aanbevolen manier) als ZONDER rugleuning.
Voor het gebruik zonder rugleuning moet de rugleuning van de zitting worden losgemaakt:
1. Zet de autostoel zodanig op een horizontaal
vlak, dat u toegang heeft tot de onderkant van
de zitting (Fig. 30).
2. Draai de twee loskoppelhendels van de rugleuning T in de getoonde richting (Fig. 31).
3. Haal de rugleuning uit de zitting (Fig. 32).
4. Plaats de zitting van de autostoel zodanig dat
hij tegen de rugleuning van de auto aan staat
(Fig. 33).
5. Laat het kind op de autostoel plaatsnemen en
maak de autogordels aan de gesp vast. Laat het
buikgedeelte ervan onder de armleuning van de
autostoel doorlopen en het diagonale er overheen (Fig. 34).
6. Span het diagonale gedeelte van de gordel zorgvuldig en zodanig dat het over de schouder van
het kind loopt (Fig. 35).
8. Plaats de autostoel met de rijrichting mee op de
gekozen zitting (Fig. 25).
9. Laat het diagonale gedeelte van de autogordel achter
de hoofdsteun en door de speciale rode gordeldoorgang C onder de hoofdsteun zelf doorlopen. Laat het
kind met zorg plaatsnemen en verzeker u ervan dat
zijn rug goed tegen de rugleuning van de autostoel
steunt (Fig. 26).
10. Maak de autogordel zodanig aan de gesp vast, dat
zowel de buikgordel als het diagonale gedeelte ervan
onder de armleuning doorlopen (Fig. 27).
11. Controleer de hoogte van de hoofdsteun en stel deze
af als zij niet goed is: zie de paragraaf “DE HOOGTE
VAN DE HOOFDSTEUN AFSTELLEN”.
12. Trek het diagonale gedeelte van de autogordel in de
richting van het oprolsysteem, zodat de hele gordel
gespannen wordt en goed op de borstkas en de benen
van het kind aansluit (Fig. 28).
LET OP! Om de rugleuning aan de zitting te bevestigen, herhaalt u de zojuist beschreven handelingen
in omgekeerde volgorde. Controleer na de bevestigingshandelingen dat het bovenste en onderste gedeelte van de zitting correct aan elkaar zitten.
29
DE HOOGTE VAN DE HOOFDSTEUN AFSTELLEN
De hoogte van de hoofdsteun kan op oneindig veel
standen worden geregeld om de autostoel zo goed
mogelijk aan de lengte van het kind aan te passen.
Bij een optimale afstelling:
•
is het hoofd altijd goed gesteund en beschermd
(Gr. 1-2-3).
•
bevinden de veiligheidsgordels van de autostoel
zich altijd op de goede hoogte, dat wil zeggen,
die van de schouders (Gr. 1).
•
bevindt de diagonale autogordel zich dankzij de
gordeldoorgangen in de hoofdsteun C altijd op
de juiste hoogte (Gr. 2-3).
Om de hoogte van de hoofdsteun af te stellen, draait
u aan knop A op de bovenkant van de rugleuning, tot
de gewenste hoogte wordt bereikt (Fig. 16).
5.
Haal de rugleuning van de zitting, zoals wordt
uitgelegd in de paragraaf “DE AUTOSTOEL
ZONDER RUGLEUNING IN DE AUTO INSTALLEREN EN HET KIND VAN GR. 3 (22-36 kg)
ERIN ZETTEN (punten 1-3).
6. Neem de bekleding van de zitting door alle bevestigingsvelcro’s los te maken en de twee ritssluitingen te openen (Fig. 42).
Om de onderdelen van de hoes weer op hun orig
nele plaats aan te brengen, verricht u de zojuist beschreven handelingen in omgekeerde volgorde.
DE PLASTIC EN METALEN ONDERDELEN REI
NIGEN
Gebruik alleen een vochtige doek om de kunststof of
metalen delen te reinigen. Gebruik nooit schuur- of
oplosmiddelen. De bewegende delen van de autostoel mogen op geen enkele wijze worden gesmeerd.
DE GORDELS WEER AFSTELLEN VOOR GEBRUIK
IN GR. 1 (9-18 Kg)
Om de gordels weer aan het autostoeltje te bevestigen, handelt u als volgt:
1. Maak de twee lipjes van de twee gordelgedeeltes aan elkaar vast, steek ze in en bevestig ze
aan de gesp (Fig. 36).
2. Steek de twee bevestigingsplaatjes door de
hoes in zitting R en laat ze uit het gedeelte onder zitting naar buiten komen (Fig. 37).
3. Haal de twee bevestigingsplaatjes N van de schouderbanden en om de gordels doorheen te halen
eerst door de twee rode diagonale gordeldoorgangen C en vervolgens door de rugleuning (Fig. 38).
4. Maak de twee uiteinden van de gordels aan bevestigingsplaatje Q vast (Fig. 39).
CONTROLE DAT DE ONDERDELEN INTACT ZIJN
Aangeraden wordt de volgende onderdelen regelmatig op beschadiging en slijtage te controleren:
•
Hoes: controleer dat de vulling niet uitpuilt of
dat er geen delen loszitten. Controleer de staat
van de naden die altijd intact moeten zijn.
•
Gordels: controleer dat de stof niet rafelt of duidelijk dun is geworden ter hoogte van de afstelband, het tussenbeenstuk, de schouderbanden
en het gebied van de afstelplaat van de gordels.
•
Kunststof delen: controleer de slijtagestaat van
alle kunststof delen, die geen duidelijke beschadigingen of verkleuring mogen hebben.
LET OP! Indien de autostoel vervormd mocht zijn of
ernstig versleten, moet hij worden vervangen: hij kan
de originele veiligheidskenmerken hebben verloren.
REINIGEN EN ONDERHOUD DE HOES REINIGEN
De hoes van de autostoel is volledig verwijderbaar
en kan met de hand of op 30°C in de wasmachine
worden gewassen. Om ze te wassen, houdt u zich
aan de instructies op het etiket van de bekleding met
de volgende wassymbolen:
Op 30°C in de
wasmachine
wassen
Handwas
Niet bleken
Niet chemisch
laten reinien
Niet in de
droger drogen
HET ARTIKEL OPBERGEN
Als hij niet in de auto geïnstalleerd is, wordt aangeraden de autostoel op een droge plaats, uit de buurt
van warmtebronnen en beschermd tegen stof, vocht
en rechtstreeks zonlicht te bewaren.
HET PRODUCT AFDANKEN
Als de voorziene gebruiksgrens van de autostoel is
bereikt, gebruikt u hem niet meer en zet u hem bij
het afval. Uit respect voor het milieu scheidt u de
verschillende soorten afval volgens wat door de geldende voorschriften in uw land is voorgeschreven.
Niet
strijken
Gebruik nooit schuur- of oplosmiddelen. Centrifugeer de hoes niet en hang ze op zonder ze uit te wringen. Om de verschillende onderdelen van de stoffen
hoes van het frame van de autostoel te verwijderen,
handelt u als volgt:
1. Maak de gordels van de autostoel uit de gesp los
(Fig. 14)
2. Draai en maak de twee bevestigingsplaatjes van
de gordels R, die zich onder de zitting bevinden,
los (Fig. 20A) en laat ze ook uit de twee gleuven
in de stoffen hoes komen (Fig. 20B).
3. Neem de hoes van de hoofdsteun (Fig. 40).
4. Neem de bekleding van de rugleuning door alle
bevestigingsvelcro’s los te maken en de twee
gordeldelen weg te nemen (Fig. 41).
VOOR MEER INFORMATIE:
PHARSANA NV - Klantenservice
Temselaan 5
1853 Strombeek-Bever - België
www.chicco.com
30
G
GR Οδηγίες χρήσης
•
ΕΞΑΙΡΕΤΙΚΑ ΣΗΜΑΝΤΙΚΟ! ΔΙΑΒΑΣΤΕ ΑΜΕΣΩΣ
• Για τη συναρμολόγηση και την εγκατάσταση του
προϊόντος ακολουθείτε πιστά τις οδηγίες. Μην
επιτρέπετε σε κανένα να χρησιμοποιεί το προϊόν
χωρίς πριν να έχει διαβάσει τις οδηγίες
• Κρατήστε αυτό το εγχειρίδιο για μελλοντική
χρήση.
• ΠΡΟΣΟΧΗ! Με βάση τις στατιστικές των
ατυχημάτων, τα πίσω καθίσματα του αυτοκινήτου
είναι γενικότερα πιο ασφαλή από τα μπροστινά:
Για το λόγο αυτό συνιστάται να τοποθετείται
το παιδικό κάθισμα στα πίσω καθίσματα. Πιο
συγκεκριμένα, το πίσω κεντρικό κάθισμα είναι
το πιο ασφαλές αν είναι εξοπλισμένο με ζώνη 3
σημείων.
• Όλοι οι επιβάτες του οχήματος πρέπει να είναι καλά
πληροφορημένοι, για τον τρόπο απελευθέρωσης
του παιδιού, σε περίπτωση έκτακτης ανάγκης.
• Αν το παιδικό κάθισμα τοποθετηθεί επάνω στο
μπροστινό κάθισμα με τον μετωπικό αερόσακο
ενεργοποιημένο, για μεγαλύτερη ασφάλεια,
συνιστάται να τραβήξετε πίσω το κάθισμα, όσο
το δυνατόν περισσότερο, προσεκτικά ώστε να
μην ενοχλούνται οι επιβάτες που βρίσκονται στο
πίσω κάθισμα.
• Μην χρησιμοποιείτε ποτέ αυτό το παιδικό κάθισμα
επάνω σε καθίσματα που είναι στραμμένα στο
πλάι ή προς τα πίσω.
• Τοποθετείτε το παιδικό κάθισμα μόνο επάνω σε
καθίσματα που είναι σωστά στερεωμένα στη
κατασκευή του αυτοκινήτου και στραμμένα
προς τη κατεύθυνση πορείας. Ελέγχετε ότι όλα
τα πτυσσόμενα ή περιστρεφόμενα καθίσματα
του αυτοκινήτου είναι καλά στερεωμένα, γιατί
σε περίπτωση ατυχήματος θα μπορούσαν να
αποτελέσουν κίνδυνο.
• Προσέχετε το πώς τοποθετείτε το παιδικό κάθισμα
στο αυτοκίνητο ούτως ώστε να αποφύγετε τη
παρεμπόδιση κάποιου κινητού καθίσματος ή της
πόρτας σε αυτό.
• Μην δένετε ποτέ το παιδικό κάθισμα επάνω σε
ένα κάθισμα αυτοκινήτου το οποίο έχει μόνο μία
κοιλιακή ζώνη (δύο σημείων).
• Κανένα παιδικό κάθισμα δεν μπορεί να εγγυηθεί
την απόλυτη ασφάλεια του παιδιού σε περίπτωση
ατυχήματος, η χρήση όμως αυτού του προϊόντος
μειώνει τον κίνδυνο σοβαρού τραυματισμού ή
θανάτου.
• Ο κίνδυνος σοβαρού τραυματισμού του παιδιού,
αυξάνεται, όχι μόνο σε περίπτωση ατυχήματος,
αλλά και σε άλλες συνθήκες (π.χ. απότομα
φρεναρίσματα, κλπ.), αν δεν ακολουθείτε πιστά
τις παρούσες οδηγίες χρήσης: Ελέγχετε πάντα ότι
το παιδικό κάθισμα είναι σωστά τοποθετημένο
στο κάθισμα του αυτοκινήτου.
• Στη περίπτωση κατά την οποία το παιδικό
κάθισμα είναι κατεστραμμένο, παραμορφωμένο
ή παρουσιάζει έντονη φθορά, πρέπει να
•
•
•
•
•
•
•
•
•
•
•
•
•
31
αντικαθίσταται, γιατί μπορεί να έχει χάσει τα
αρχικά χαρακτηριστικά ασφαλείας.
Μην κάνετε μετατροπές ή προσθήκες στο προϊόν
χωρίς την έγκριση του κατασκευαστή.
Μην τοποθετείτε αξεσουάρ, ανταλλακτικά και
εξαρτήματα που δεν παρέχει ο κατασκευαστής.
Μην αφήνετε ποτέ, για κανένα λόγο, το παιδί χωρίς
επίβλεψη στο παιδικό κάθισμα.
Μην τοποθετείτε τίποτα που δεν είναι ένα
εγκεκριμένο, για το προϊόν αξεσουάρ, είτε
μεταξύ του καθίσματος αυτοκινήτου και του
παιδικού καθίσματος είτε μεταξύ του παιδικού
καθίσματος και του παιδιού: Σε περίπτωση
ατυχήματος το παιδικό κάθισμα θα μπορούσε να
μην λειτουργήσει σωστά.
Σε περίπτωση που το όχημα μείνει σταθμευμένο
κάτω από τον ήλιο, ελέγξτε προσεκτικά το
παιδικό κάθισμα, πριν τοποθετήσετε το παιδί,
γιατί ορισμένα τμήματά του μπορεί να έχουν
υπερθερμανθεί: Στη περίπτωση αυτή, για να μην
καεί το παιδί, αφήστε τα να κρυώσουν πριν το
βάλετε να καθίσει.
Μετά από ένα έστω και μικρό ατύχημα, το παιδικό
κάθισμα μπορεί να υποστεί ζημιές οι οποίες δεν
είναι πάντα ορατές με γυμνό μάτι: Γι’ αυτό είναι
απαραίτητο να το αντικαταστήσετε.
Μην χρησιμοποιείτε παιδικά καθίσματα από
δεύτερο χέρι: μπορεί να έχουν υποστεί ζημιές
μη ορατές με γυμνό μάτι που μπορούν όμως να
επηρεάσουν την ασφάλεια του προϊόντος.
Η εταιρεία Artsana δεν αναλαμβάνει καμία ευθύνη
για ακατάλληλη χρήση του προϊόντος.
Το ύφασμα μπορεί να αντικατασταθεί
αποκλειστικά με ένα άλλο εγκεκριμένο από τον
κατασκευαστή, γιατί αποτελεί αναπόσπαστο
τμήμα του παιδικού καθίσματος. Το παιδικό
κάθισμα δεν πρέπει να χρησιμοποιηθεί ποτέ
χωρίς το ύφασμά του, για να μην τεθεί σε κίνδυνο
η ασφάλεια του παιδιού.
Ελέγχετε ότι η ταινία της ζώνης δεν προκύπτει
μπερδεμένη και μην επιτρέπετε σε αυτή ή σε
τμήματα του παιδικού καθίσματος να σκαλώνουν
στις πόρτες ή να τρίβονται πάνω σε αιχμηρά
σημεία.
Το παιδικό κάθισμα δεν μπορεί πλέον να
χρησιμοποιηθεί στη περίπτωση που η ζώνη
παρουσιάζει κοψίματα ή ξεφτίσματα.
Όταν δεν μεταφέρετε το παιδί, το παιδικό κάθισμα
πρέπει να παραμένει δεμένο ή να τοποθετείται
στο πορτ-μπαγκάζ. Το μη δεμένο καθισματάκι
μπορεί όντως να αποτελέσει κίνδυνο για τους
επιβάτες σε περίπτωση ατυχήματος ή απότομου
φρεναρίσματος.
Ελέγχετε ότι δεν μεταφέρονται, ιδιαίτερα στο πίσω
εσωτερικό μέρος του αυτοκινήτου, αντικείμενα
ή αποσκευές που δεν έχουν στερεωθεί ή
τοποθετηθεί με ασφαλή τρόπο: σε περίπτωση
ατυχήματος ή απότομου φρεναρίσματος θα
μπορούσαν να τραυματίσουν τους επιβάτες.
Ελέγχετε ότι το μαξιλαράκι του καθίσματος
•
•
δεν παρεμποδίζει το μαξιλαράκι του παιδικού
καθίσματος: δεν πρέπει να το ωθεί προς τα εμπρός.
Στη περίπτωση που αυτό συμβεί, αφαιρέστε το
μαξιλαράκι από το κάθισμα του αυτοκινήτου,
επάνω στο οποίο εγκαθίσταται το παιδικό
κάθισμα, προσέχοντας να μην το τοποθετήσετε
επάνω στη καπελιέρα.
Βεβαιωθείτε ότι όλοι οι επιβάτες του οχήματος
χρησιμοποιούν τη δική τους ζώνη ασφαλείας
είτε για την ασφάλειά τους είτε γιατί κατά τη
διάρκεια του ταξιδιού, σε περίπτωση ατυχήματος
ή απότομου φρεναρίσματος, θα μπορούσαν να
τραυματίσουν το παιδί.
Κατά τη διάρκεια μεγάλων ταξιδιών συνιστάται
να κάνετε συχνές στάσεις. Το παιδί κουράζεται
πολύ εύκολα. Για κανένα λόγο μην βγάζετε το
παιδί από το παιδικό κάθισμα αυτοκινήτου ενώ το
αυτοκίνητο βρίσκεται σε κίνηση. Αν το παιδί έχει
ανάγκη από προσοχή, είναι απαραίτητο να βρείτε
ένα ασφαλές μέρος και να σταθμεύσετε.
N. Κλιπ στερέωσης των λωρίδων ζωνών και
περάσματος των ζωνών
O. Ταινίες ζωνών
P. Κενά για το πέρασμα των ζωνών του αυτοκινήτου
(μόνο εγκατάσταση σε Ομάδα 1)
Q. Κλιπ στερέωσης των ζωνών
Εικ. 4 (Κάτω)
R. Κλιπ στερέωσης των ζωνών στο κάθισμα
S. Κλιπ στερέωσης της αγκράφας στο κάθισμα
T. Μοχλοί ξεγαντζώματος της πλάτης από το
κάθισμα
ΧΑΡΑΚΤΗΡΙΣΤΙΚΑ ΤΟΥ ΠΡΟΪΟΝΤΟΣ
• Αυτό το παιδικό κάθισμα είναι εγκεκριμένο
για την “Ομάδα 1, 2 και 3”, για τη μεταφορά
παιδιών από 9 έως 36 κιλά βάρος (από 1 έως
12 ετών περίπου), σύμφωνα με τον Ευρωπαϊκό
Κανονισμό ECE R44/04.
• Η έγκριση είναι τύπου “Universal” συνεπώς το
παιδικό κάθισμα μπορεί να χρησιμοποιηθεί
επάνω σε οποιοδήποτε μοντέλο αυτοκινήτου.
ΠΡΟΣΟΧΗ! “Universal” σημαίνει ότι είναι
συμβατό με τα περισσότερα, όμως όχι με όλα,
τα καθίσματα αυτοκινήτων.
ΟΔΗΓΙΕΣ ΧΡΗΣΗΣ
ΠΕΡΙΕΧΟΜΕΝΑ
• Περιγραφή εξαρτημάτων
• Χαρακτηριστικά του προϊόντος
• Περιορισμοί και προϋποθέσεις χρήσης
σχετικές με το προϊόν και με το κάθισμα του
αυτοκινήτου
• Εγκατάσταση του παιδικού καθίσματος στο
αυτοκίνητο και τοποθέτηση του παιδιού σε
Ομάδα 1 (9-18 κιλά)
• Εγκατάσταση του παιδικού καθίσματος στο
αυτοκίνητο και τοποθέτηση του παιδιού σε
Ομάδα 2-3 (15-36 κιλά) με πλάτη
• Εγκατάσταση του παιδικού καθίσματος στο
αυτοκίνητο και τοποθέτηση του παιδιού σε
Ομάδα 3 (22-36 κιλά) χωρίς πλάτη
• Ρύθμιση του ύψους του μαξιλαριού
• Επαναφορά των ζωνών για χρήση σε Ομάδα
1 (9-18 κιλά)
• Καθαρισμός και συντήρηση
ΣΗΜΑΝΤΙΚΗ ΕΙΔΟΠΟΙΗΣΗ
1. Αυτό είναι ένα σύστημα μεταφοράς παιδιών
“Universal”, εγκεκριμένο σύμφωνα με τον
Κανονισμό Αριθ. 44, τροποποιήσεις σειρά 04.
Κατάλληλο για χρήση σε οχήματα και συμβατό με
τα περισσότερα, αν και όχι με όλα, τα καθίσματα
οχημάτων.
2. Η τέλεια συμβατότητα αποκτάται πιο εύκολα στις
περιπτώσεις κατά τις οποίες, ο κατασκευαστής
του οχήματος δηλώνει στο εγχειρίδιο του ιδίου,
ότι το όχημα προβλέπει την εγκατάσταση
συστημάτων μεταφοράς παιδιών “Universal”,
για τη συγκεκριμένη ηλικία.
3. Αυτό το σύστημα μεταφοράς έχει καταταχθεί
ως “Universal”, σύμφωνα με τα πιο αυστηρά
κριτήρια έγκρισης, σε σύγκριση με τα
προηγούμενα μοντέλα που δεν διαθέτουν τη
παρούσα ειδοποίηση.
4. Κατάλληλο για χρήση μόνο σε οχήματα
εξοπλισμένα με ζώνη ασφαλείας 3 σημείων,
στατική ή με περιτύλιξη, εγκεκριμένη βάσει
του Κανονισμού UN/ECE Αριθ. 16 ή άλλων
ισοδύναμων προτύπων.
5. Σε περίπτωση αμφιβολίας, επικοινωνήστε με τον
παραγωγό του συστήματος μεταφοράς παιδιών
ή με το κατάστημα πώλησης.
ΠΕΡΙΓΡΑΦΗ ΕΞΑΡΤΗΜΑΤΩΝ
Εικ. 1 (μπροστά)
A. Πόμολο ρύθμισης μαξιλαριού και ζωνών
B. Μαξιλάρι
C. Περάσματα διαγώνιας ζώνης
D. Λωρίδες ζωνών
E. Ζώνες του παιδικού καθίσματος
F. Αγκράφα
G. Προστατευτικό διαχωριστικό για τα πόδια
H. Πλήκτρο ρύθμισης των ζωνών
I. Ταινία ρύθμισης των ζωνών
ΠΕΡΙΟΡΙΣΜΟΙ ΚΑΙ ΠΡΟΫΠΟΘΕΣΕΙΣ ΧΡΗΣΗΣ
ΣΧΕΤΙΚΕΣ ΜΕ ΤΟ ΠΡΟΪΟΝ ΚΑΙ ΜΕ ΤΟ ΚΑΘΙΣΜΑ
ΤΟΥ ΑΥΤΟΚΙΝΗΤΟΥ
ΠΡΟΣΟΧΗ! Τηρήστε σχολαστικά τους ακόλουθους
περιορισμούς και προϋποθέσεις χρήσης σχετικές
με το προϊόν και με το κάθισμα του αυτοκινήτου:
στην αντίθετη περίπτωση η ασφάλεια δεν είναι
Εικ. 2 (Προφίλ)
J. Πλάτη
K. Κάθισμα
L. Βραχίονες
M. Περάσματα ζωνών
Εικ. 3 (Πίσω)
32
εγγυημένη.
•
•
•
•
•
•
•
Αυτό το παιδικό κάθισμα είναι εγκεκριμένο
για χρήση με παιδιά βάρους αποκλειστικά
από 9 έως 36 κιλά βάρος (από 1 έως 12 ετών
περίπου).
Το κάθισμα του αυτοκινήτου πρέπει να είναι
εξοπλισμένο με ζώνη ασφαλείας 3 σημείων,
στατική ή με περιτύλιξη, εγκεκριμένη βάσει
του Κανονισμού UNI/ECE Αριθ. 16 ή άλλων
ισοδύναμων προτύπων (Εικ. 5).
Μην τοποθετείτε ποτέ το παιδικό κάθισμα με
τη ζώνη του αυτοκινήτου που έχει δύο σημεία
αγκίστρωσης (Εικ. 6).
Το παιδικό κάθισμα μπορεί να τοποθετηθεί
επάνω στο κάθισμα του συνοδηγού ή επάνω
σε ένα οποιοδήποτε πίσω κάθισμα. Μην
χρησιμοποιείτε ποτέ αυτό το παιδικό κάθισμα
επάνω σε καθίσματα που είναι στραμμένα στο
πλάι ή προς τα πίσω (Εικ. 7).
Το προϊόν προορίζεται αποκλειστικά για χρήση
ως παιδικό κάθισμα αυτοκινήτου και όχι για
χρήση στο σπίτι.
Για μια σωστή τοποθέτηση, πράξτε έτσι ώστε
το μαξιλαράκι του καθίσματος του αυτοκινήτου
να μην παρεμποδίζει με κανένα τρόπο τη πλάτη
του παιδικού Καθίσματος.
•
Ελέγχετε πάντα ότι η ζώνη είναι ομοιόμορφα
διανεμημένη σε όλα τα σημεία και ότι δεν έχει
μπερδευτεί.
Μην περνάτε ΠΟΤΕ τη ζώνη του αυτοκινήτου
σε θέσεις διαφορετικές από εκείνες που
υποδεικνύονται.
Μετά την ολοκλήρωση της εγκατάστασης του
παιδικού καθίσματος, για να τοποθετήσετε το
παιδί επάνω σε αυτό, συνεχίστε όπως περιγράφεται
ακολούθως:
6. Πιέστε το πλήκτρο ρύθμισης των ζωνών H και
ταυτόχρονα πιάστε και τραβήξτε προς τη πλευρά
σας το κάτω μέρος των ζωνών του παιδικού
καθίσματος, μέχρι να αποκτήσετε τη μέγιστη
επέκταση (Εικ 13).
7. Λύστε τις ζώνες του παιδικού καθίσματος
πιέζοντας το πλήκτρο της αγκράφας και αφήστε
να πέσουν πλάγια (Εικ. 14).
8. Τακτοποιήστε προσεκτικά το παιδί στο παιδικό
κάθισμα, προσαρμόζοντας τις ζώνες γύρω από
το σώμα του χωρίς να τις τραβήξετε, ενώστε τις
δύο γλωσσίτσες της ζώνης (Εικ. 15A) και δέστε
ξανά τις ίδιες στην αγκράφα (Εικ. 15B).
9. Με το ειδικό πόμολο ρύθμισης A που βρίσκεται
στη κορυφή της πλάτης, ρυθμίστε το ύψος του
μαξιλαριού του παιδικού καθίσματος, με τρόπο
ώστε οι ζώνες να βγαίνουν στο ύψος των ώμων
του παιδιού (Εικ. 16).
10. Για να ρυθμίσετε την ένταση των ζωνών του
παιδικού καθίσματος, τις προσαρμόζετε στο
σώμα του παιδιού, τραβάτε προσεκτικά την
ταινία ρύθμισης I μέχρι να αποκτήσετε το σωστό
επίπεδο έντασης (Εικ. 17).
11. Ελέγξτε ότι το παιδικό κάθισμα είναι στερεωμένο
σωστά όπως φαίνεται στην εικόνα (Εικ. 18).
Για να βγάλετε το παιδί από το παιδικό κάθισμα,
πιέστε το πλήκτρο της αγκράφας και λύστε τις
ζώνες (Εικ 19).
ΕΓΚΑΤΑΣΤΑΣΗ ΤΟΥ ΠΑΙΔΙΚΟΥ ΚΑΘΙΣΜΑΤΟΣ ΣΤΟ
ΑΥΤΟΚΙΝΗΤΟ ΚΑΙ ΤΟΠΟΘΕΤΗΣΗ ΤΟΥ ΠΑΙΔΙΟΥ ΣΕ
ΟΜΑΔΑ 1 (9-18 κιλά)
ΠΡΟΣΟΧΗ! Αυτές οι οδηγίες αναφέρονται και στο
κείμενο και στα σχέδια, σε μία τοποθέτηση του
παιδικού καθίσματος επάνω στο πίσω κάθισμα, στη
δεξιά πλευρά. Για τη τοποθέτηση σε άλλες θέσεις
ακολουθήστε την ίδια σειρά ενεργειών.
1. Τοποθετήστε το παιδικό κάθισμα επάνω στο
κάθισμα της επιλογής σας, στραμμένο προς την
κατεύθυνση πορείας του αυτοκινήτου (Εικ. 8).
2. Περάστε τη ζώνη 3 σημείων του αυτοκινήτου
ανάμεσα από το ειδικό κενό P της πλάτης του
παιδικού καθίσματος (Εικ. 9A και 9B), κάνοντας
την να βγει έξω από το αντίθετο κενό της άλλης
πλευράς της πλάτης (Εικ. 9C).
3. Δέστε τη ζώνη του αυτοκινήτου στην αγκράφα
ούτως ώστε το κοιλιακό τμήμα και το διαγώνιο
τμήμα της ίδιας να περάσουν κάτω από τον
βραχίονα (Εικ. 10).
4. Τραβήξτε όσο το δυνατό περισσότερο τη
ζώνη του αυτοκινήτου, εφαρμόζοντας καλά
το καθισματάκι στο κάθισμα του αυτοκινήτου
(Εικ. 11), βάζοντας το ένα γόνατο επάνω στο
καθισματάκι, αν είναι απαραίτητο.
5. Ελέγξτε αν η τοποθέτηση έγινε σωστά, αν η ζώνη
είναι καλά τεντωμένη και αν το παιδικό κάθισμα είναι
σταθερά στερεωμένο και εφαρμοσμένο στο κάθισμα
του αυτοκινήτου. Αν δεν είναι έτσι, επαναλάβετε την
ενέργεια τοποθέτησης από την αρχή (Εικ. 12).
ΠΡΟΣΟΧΗ!
ΕΓΚΑΤΑΣΤΑΣΗ ΤΟΥ ΠΑΙΔΙΚΟΥ ΚΑΘΙΣΜΑΤΟΣ ΣΤΟ
ΑΥΤΟΚΙΝΗΤΟ ΚΑΙ ΤΟΠΟΘΕΤΗΣΗ ΤΟΥ ΠΑΙΔΙΟΥ ΣΕ
ΟΜΑΔΑ 2 ΚΑΙ 3 (15-36 κιλά) ΜΕ ΠΛΑΤΗ
Για να αλλάξετε τη διαμόρφωση του παιδικού
καθίσματος από ομάδα 1 σε ομάδα 2 και 3, είναι
απαραίτητο κατ’ αρχήν να αφαιρέσετε τις ζώνες
σύμφωνα με τις ενέργειες που περιγράφονται
παρακάτω:
1. Λύστε τις ζώνες του παιδικού καθίσματος από
την αγκράφα (Εικ. 14).
2. Γυρίστε και ξεγαντζώστε τα δύο κλιπ στερέωσης
των ζωνών R που βρίσκονται κάτω από το
κάθισμα (Εικ. 20A) κάνοντας να βγουν ακόμη και
από τις δύο σχισμές του υφάσματος (Εικ. 20B).
3. Ξεγαντζώστε τις δύο άκρες των ζωνών από το
κλιπ στερέωσης Q (Εικ. 21).
4. Γυρίστε και ξεγαντζώστε τα δύο κλιπ περάσματος
των ζωνών N από τη πλάτη (Εικ. 22).
5. Βγάλτε από μπροστά τα δύο τμήματα ζώνης
περνώντας τα ανάμεσα από τα δύο κόκκινα
33
περάσματα διαγώνιας ζώνης C (Εικ. 23).
6. Τοποθετήστε και φυλάξτε σε κατάλληλο χώρο τα
δύο τμήματα ζωνών που αφαιρέσατε.
7. Περάστε την αγκράφα και το διαχωριστικό
για τα πόδια από ύφασμα, ανάμεσα από την
ειδική σχισμή που βρίσκεται στο κέντρο του
καθίσματος, επανατοποθετώντας τα στο ειδικό
μέρος του καθίσματος (Εικ. 24A, 24B και 24C).
Τώρα το καθισματάκι είναι έτοιμο και διαμορφωμένο
για την εγκατάσταση σε ομάδα 2 και 3.
8. Τοποθετήστε το παιδικό κάθισμα επάνω στο
κάθισμα της επιλογής σας, στραμμένο προς τη
κατεύθυνση πορείας του αυτοκινήτου (Εικ. 25).
9. Περάστε το διαγώνιο τμήμα της ζώνης του
αυτοκινήτου πίσω από το μαξιλαράκι και
ανάμεσα από το ειδικό κόκκινο πέρασμα ζώνης
C κάτω από το ίδιο μαξιλαράκι. Βάλτε να καθίσει
προσεκτικά το παιδί και βεβαιωθείτε ότι η πλάτη
του είναι καλά εφαρμοσμένη στη πλάτη του
παιδικού καθίσματος. (Εικ. 26).
10. Δέστε τη ζώνη του αυτοκινήτου στην αγκράφα
με τρόπο ώστε το κοιλιακό τμήμα και το
διαγώνιο τμήμα της ίδιας να περνούν κάτω
από τον βραχίονα (Εικ. 27).
11. Ελέγξτε το ύψος του μαξιλαριού και αν δεν είναι
σωστό, το ρυθμίζετε: βλέπετε την παράγραφο
“ΡΥΘΜΙΣΗ ΤΟΥ ΥΨΟΥΣ ΤΟΥ ΜΑΞΙΛΑΡΙΟΥ”.
12. Τραβήξτε το διαγώνιο τμήμα της ζώνης
αυτοκινήτου προς τον μηχανισμό περιτύλιξής
του ούτως ώστε ολόκληρη η ζώνη να προκύπτει
τεντωμένη και καλά εφαρμοσμένη στον θώρακα
και στα πόδια του παιδιού (Εικ. 28).
13. Ελέγξτε ότι το παιδικό κάθισμα είναι στερεωμένο
σωστά όπως φαίνεται στην εικόνα (Εικ. 29).
στην ειδική αγκράφα ούτως ώστε αυτή να
συγκρατεί το καθισματάκι στο αυτοκίνητο ακόμη
και χωρίς το παιδί. Διαφορετικά θα μπορούσε να
αποτελέσει κίνδυνο σε περίπτωση φρεναρίσματος
ή ατυχήματος.
ΕΓΚΑΤΑΣΤΑΣΗ ΤΟΥ ΠΑΙΔΙΚΟΥ ΚΑΘΙΣΜΑΤΟΣ ΣΤΟ
ΑΥΤΟΚΙΝΗΤΟ ΚΑΙ ΤΟΠΟΘΕΤΗΣΗ ΤΟΥ ΠΑΙΔΙΟΥ ΣΕ
ΟΜΑΔΑ 3 (22-36 κιλά) ΧΩΡΙΣ ΠΛΑΤΗ
Σε ομάδα 1 (9-18 κιλά) και 2 (15-25 κιλά), η χρήση
του παιδικού καθίσματος επιτρέπεται μόνο ΜΕ
τη πλάτη συναρμολογημένη σωστά επάνω στο
κάθισμα.
Σε ομάδα 3 (22-36 κιλά), το καθισματάκι παρουσιάζει
τη δυνατότητα διπλής χρήσης, εναλλακτικά ΜΕ
πλάτη (επιλογή πάντα πιο ασφαλής και συνεπώς
συνιστάται) ή ΧΩΡΙΣ πλάτη.
Για τη χρήση χωρίς πλάτη, είναι απαραίτητο να
ξεγαντζώσετε τη πλάτη από το κάθισμα:
1. Τοποθετήστε το καθισματάκι αυτοκινήτου επάνω
σε μια οριζόντια επιφάνεια με τρόπο ώστε να
είναι προσβάσιμο το κάτω μέρος του καθίσματος
(Εικ. 30).
2. Γυρίστε τους δύο μοχλούς ξεγαντζώματος από
τη πλάτη T προς τη κατεύθυνση που ενδείκνυται
(Εικ. 31).
3. Βγάλτε τη πλάτη από το κάθισμα (Εικ. 32).
4. Τοποθετήστε το κάθισμα του παιδικού καθίσματος
με τρόπο ώστε να είναι εφαρμοσμένο στη πλάτη
του αυτοκινήτου (Εικ. 33).
5. Τοποθετήστε το παιδί επάνω στο καθισματάκι
και δέστε τη ζώνη του αυτοκινήτου στην
αγκράφα, περνώντας το κοιλιακό τμήμα κάτω
από τον βραχίονα του παιδικού καθίσματος και
το διαγώνιο τμήμα από πάνω (Εικ. 34).
6. Τεντώστε προσεκτικά το διαγώνιο τμήμα της
ζώνης με τρόπο ώστε να περνάει πάνω από τον
ώμο του παιδιού (Εικ. 35).
ΠΡΟΣΟΧΗ!
• Ελέγχετε πάντα ότι η ζώνη είναι ομοιόμορφα
διανεμημένη σε όλα τα σημεία και ότι δεν έχει
μπερδευτεί.
• Ελέγχετε ότι η διαγώνια ζώνη είναι σωστά
βαλμένη στον ώμο του παιδιού και ότι δεν ασκεί
πίεση στον λαιμό του, κι αν χρειαστεί ρυθμίζετε
το μαξιλαράκι.
• Ελέγχετε ότι ο μηχανισμός περιτύλιξης της
ζώνης του αυτοκινήτου προκύπτει σε πιο πίσω
θέση (ή το μέγιστο σε ευθεία γραμμή) από τη
πλάτη του καθίσματος του αυτοκινήτου.
ΠΡΟΣΟΧΗ! Για να στερεώσετε τη πλάτη στο κάθισμα,
επαναλάβετε αντιθέτως τις ενέργειες που μόλις
περιγράφτηκαν. Μετά την ολοκλήρωση των ενεργειών
στερέωσης, ελέγξτε ότι το πάνω και κάτω μέρος του
καθίσματος είναι σωστά γαντζωμένα μεταξύ τους.
ΡΥΘΜΙΣΗ ΤΟΥ ΥΨΟΥΣ ΤΟΥ ΜΑΞΙΛΑΡΙΟΥ
Μπορείτε να ρυθμίσετε το ύψος του μαξιλαριού σε
αμέτρητες θέσεις, για να επιτρέψετε τη καλύτερη
προσαρμογή του καθίσματος στο ύψος του παιδιού.
Μια τέλεια ρύθμιση επιτρέπει:
• το κεφάλι να είναι πάντα καλά συγκρατημένο
και προστατευμένο (Ομάδα 1-2-3).
• οι ζώνες ασφαλείας του παιδικού καθίσματος να
είναι πάντα στο σωστό ύψος, δηλαδή στο ύψος
των ώμων (Ομάδα 1).
• η διαγώνια ζώνη του αυτοκινήτου να είναι πάντα
στο σωστό ύψος, χάρη στα περάσματα ζώνης
που υπάρχουν στο μαξιλαράκι C (Ομάδα 2-3).
Για να εκτελέσετε τη ρύθμιση του ύψους του
μαξιλαριού, γυρίστε το πόμολο A που βρίσκεται
Για να βγάλετε το παιδί από το παιδικό κάθισμα
σε Ομάδα 2 και 3:
1. Λύστε τη ζώνη του αυτοκινήτου από την
αγκράφα της.
2. Αφαιρέστε τη ζώνη του αυτοκινήτου από το
σώμα του παιδιού.
3. Βγάλτε προσεκτικά το παιδί από το
Καθισματάκι.
ΠΡΟΣΟΧΗ! Στη περίπτωση κατά την οποία δεν
σκοπεύετε να αφαιρέσετε το καθισματάκι από το
αυτοκίνητο, ξαναδέστε τη ζώνη του αυτοκινήτου
34
Πλύσ
πλυ
στο
στη κορυφή της πλάτης, μέχρι να αποκτήσετε το
ύψος που επιθυμείτε (Εικ. 16).
αρχική τους θέση, ακολουθήστε αντιθέτως τις
ενέργειες που μόλις περιγράφτηκαν.
ΕΠΑΝΑΦΟΡΑ ΤΩΝ ΖΩΝΩΝ ΓΙΑ ΧΡΗΣΗ ΣΕ ΟΜΑΔΑ
1 (9-18 κιλά)
Για να συναρμολογήσετε και πάλι τις ζώνες στο
καθισματάκι πράξτε ως ακολούθως:
1. Ενώστε τις δύο γλωσσίτσες των δύο τμημάτων
ζώνης, περάστε και γαντζώστε τις ίδιες στην
αγκράφα (Εικ. 36).
2. Εισάγετε τα δύο κλιπ στερέωσης στο κάθισμα R
ανάμεσα από το ύφασμα κάνοντας να βγουν από
τη κάτω πλευρά του καθίσματος (Εικ. 37).
3. Περάστε τα δύο κλιπ στερέωσης των λωρίδων
ζωνών και περάσματος των ζωνών N πριν
ανάμεσα από τα δύο κόκκινα περάσματα της
διαγώνιας ζώνης C και μετά ανάμεσα από τη
πλάτη (Εικ. 38).
4. Γαντζώστε τις δύο άκρες των ζωνών στο κλιπ
στερέωσης Q (Εικ. 39).
•
ΚΑΘΑΡΙΣΜΟΣ ΤΩΝ ΠΛΑΣΤΙΚΩΝ ΚΑΙ
ΜΕΤΑΛΛΙΚΩΝ ΤΜΗΜΑΤΩΝ
Για τον καθαρισμό των πλαστικών ή των
β ε ρ ν ι κ ω μ έ ν ω ν μ ε τα λ λ ι κ ώ ν τ μ η μ ά τ ω ν,
χρησιμοποιείτε μόνο ένα υγρό πανί. Μην
χρησιμοποιείτε ποτέ απορρυπαντικά που χαράζουν
ή διαλυτικά.
Τα κινητά μέρη του παιδικού καθίσματος δεν
πρέπει, για κανένα λόγο, να λιπαίνονται.
•
ΕΛΕΓ ΧΟΣ ΤΗΣ ΑΚΕΡΑΙΟΤΗΤΑΣ ΤΩΝ
ΕΞΑΡΤΗΜΑΤΩΝ
Συνιστάται να ελέγχετε τακτικά την ακεραιότητα
και τη κατάσταση φθοράς των ακόλουθων
εξαρτημάτων:
• Ύφασμα: Βεβαιωθείτε ότι δεν προεξέχουν ή
βγαίνουν στοιχεία της εσωτερικής γέμισης.
Βεβαιωθείτε για την ακεραιότητα των ραφών.
• Ζώνες: Ελέγξτε ότι δεν έχει ξηλωθεί το ύφασμα
με εμφανή μείωση του πάχους στο ύψος της
ταινίας ρύθμισης, του διαχωριστικού των
ποδιών, στα τμήματα των ώμων και στο σημείο
του κλιπ ρύθμισης των ζωνών.
• Πλαστικά τμήματα: Βεβαιωθείτε για την
ακεραιότητα όλων των πλαστικών τμημάτων
που δεν θα πρέπει να παρουσιάζουν εμφανή
ίχνη ζημιάς ή αποχρωματισμού.
ΚΑΘΑΡΙΣΜΟΣ ΚΑΙ ΣΥΝΤΗΡΗΣΗ
• ΚΑΘΑΡΙΣΜΟΣ ΤΟΥ ΥΦΑΣΜΑΤΟΣ
Η επένδυση του καθίσματος αφαιρείται εντελώς
και πλένεται στο χέρι ή στο πλυντήριο στους 30°C.
Για το πλύσιμο, ακολουθήστε τις οδηγίες που
αναγράφονται στην ετικέτα του υφάσματος, η
οποία φέρει τα ακόλουθα σύμβολα:
Πλύσιμο στο
πλυντήριο
στους 30°C
Πλύσιμο
στο χέρι
Μην χρησιμοποιείτε
λευκαντικά
Μην κάνετε
στεγνό
καθάρισμα
Μην
Μην
στεγνώνετε στο σιδερώνετε
στεγνωτήριο
Μην χρησιμοποιείτε ποτέ σκληρά απορρυπαντικά ή
διαλυτικά. Μην στύβετε το ύφασμα στο πλυντήριο
και απλώστε το χωρίς να το στύψετε με το χέρι.
Για να αφαιρέσετε τα διάφορα μέρη του υφάσματος
από τη κατασκευή του καθίσματος, ενεργήστε
όπως περιγράφεται παρακάτω:
1. Λύστε τις ζώνες του καθίσματος από την
αγκράφα (Εικ. 14).
2. Γυρίστε και ξεγαντζώστε τα δύο κλιπ στερέωσης
των ζωνών R που βρίσκονται κάτω από το
κάθισμα (Εικ. 20A) κάνοντας τα να βγουν ακόμη
και από τις δύο σχισμές του υφάσματος (Εικ.
20B).
3. Βγάλτε την επένδυση του μαξιλαριού (Εικ. 40).
4. Βγάλτε την επένδυση της πλάτης ξεκολλώντας
όλα τα velcro στερέωσης και βγάζοντας τα δύο
τμήματα ζώνης (Εικ. 41).
5. Ξεγαντζώστε τη πλάτη από το κάθισμα όπως
εξηγείται στη παράγραφο “ΕΓΚΑΤΑΣΤΑΣΗ ΤΟΥ
ΠΑΙΔΙΚΟΥ ΚΑΘΙΣΜΑΤΟΣ ΣΤΟ ΑΥΤΟΚΙΝΗΤΟ ΚΑΙ
ΤΟΠΟΘΕΤΗΣΗ ΤΟΥ ΠΑΙΔΙΟΥ ΣΕ ΟΜΑΔΑ 3 (22-36
κιλά) ΧΩΡΙΣ ΠΛΑΤΗ” (σημεία 1-3).
6. Βγάλτε την επένδυση του καθίσματος
ξεκολλώντας όλα τα velcro στερέωσης και
ανοίγοντας τα δύο φερμουάρ (Εικ. 42).
Για να ξαναπεράσετε τα μέρη της επένδυσης στην
ΠΡΟΣΟΧΗ! Σε περίπτωση που το παιδικό κάθισμα
είναι παραμορφωμένο ή πολύ φθαρμένο πρέπει
να αντικατασταθεί: Μπορεί να έχει χάσει τα αρχικά
χαρακτηριστικά ασφαλείας.
• ΔΙΑΤΗΡΗΣΗ ΤΟΥ ΠΡΟΪΟΝΤΟΣ
Όταν δεν είναι τοποθετημένο στο αυτοκίνητο το
παιδικό κάθισμα, συνιστάται να φυλάσσεται σε
χώρο ξηρό, μακριά από πηγές θερμότητας και από
σκόνη, υγρασία και άμεσο ηλιακό φως.
• ΑΠΟΡΡΙΨΗ ΤΟΥ ΠΡΟΪΟΝΤΟΣ
Όταν το παιδικό κάθισμα δεν χρησιμοποιείται πλέον
πρέπει να απορρίπτεται. Για λόγους σεβασμού προς
το περιβάλλον, χρησιμοποιήστε τους ειδικούς
κάδους ανακύκλωσης, σύμφωνα με τους ισχύοντες
κανονισμούς κάθε χώρας.
ΓΙΑ ΠΕΡΙΣΣΟΤΕΡΕΣ ΠΛΗΡΟΦΟΡΙΕΣ:
ARTSANA SPA
Servizio Clienti
Via Saldarini Catelli, 1
22070 Grandate COMO-ITALIA
Tel. N° verde 800.188.898
www.chicco.com
35
RUS Инструкция по
использованию
•
ЧРЕЗВЫЧАЙНО ВАЖНО! ПРОЧИТАТЬ В ПЕРВУЮ
ОЧЕРЕДЬ
• Для монтажа и установки изделия
точно
следуйте
инструкции.
Избегайте использования изделия без
предварительного ознаком ления с
инструкцией.
• Сохраните настоящее руководство для
использования в будущем.
• ВНИМАНИЕ! Согласно статистическим
данным о ДТП задние сиденья автомобиля
являются более безопасными по сравнению
с передними: поэтому рекомендуется
устанавливать автокресло на задние
сиденья. Особенно безопасно центральное
заднее сиденье, если оно снабжено ремнем
безопасности с креплением в трех точках.
• Необходимо проинформировать всех
пассажиров автомобиля о способе отцепки
ребенка в случае аварии.
• Если автокресло установлено на переднее
сиденье с активированной фронтальной
подушкой безопасности, для большей
безопасности рекомендуется максимально
отодвинуть назад это переднее сиденье,
насколько это возможно при наличии других
пассажиров сзади.
• Запрещается использовать настоящее
автокресло на сиденьях, повернутых боком
или стоящих противоположно направлению
движения.
• Устанавливайте автокресло только на
сиденья, правильно прикрепленные к
структуре автомобиля и повернутые в
направлении движения. Следите за тем,
чтобы не оставлять складывающиеся или
откидывающиеся автомобильные сиденья
плохо закрепленными, в случае дорожнотранспортного происшествия это опасно.
• Устанавливайте автокресло в автомобиле
так, чтобы не допустить его столкновений с
подвижным сиденьем или дверью.
• Запрещается устанавливать автокресло на
автомобильное сиденье, снабженное только
одним брюшным ремнем (с креплением в
двух точках).
• Ни одно автокресло не может гарантировать
полную безопасность ребенка в случае
дорожно-транспортного происшествия, но
использование данного изделия уменьшает
риск серьезных травм или смерти.
• Риск серьезных травм ребенку, не
только в случае дорожно-транспортного
происшествия, но также и в других
обстоятельствах (например, резкое
торможение и т.д.), увеличивается при
неточном следовании приведенным в
•
•
•
•
•
•
•
•
•
•
•
•
36
данном руководстве указаний: всегда
проверяйте, чтобы автокресло было
правильно пристегнуто к сиденью.
Поврежденное, деформированное или
сильно изношенное автокресло подлежит
замене, так как не отвечает более исходным
характеристикам безопасности.
Запрещаются модификации или
дополнения к изделию, не утвержденные
производителем.
Запрещается устанавливать аксессуары,
сменные час ти и компоненты, не
поставляемые производителем.
Никогда не оставляйте ребенка без
присмотра в автокресле.
Не вставляйте ничего, что не является
аксессуаром, утвержденным для изделия,
меж ду автомобильным сиденьем и
автокреслом и между автокреслом и
ребенком: в случае дорожно-транспортного
происшествие автокресло может исполнять
свои функции неправильно.
В случае, когда автомобиль долго оставался
под солнцем, тщательно проверьте
автокресло, прежде чем поместить туда
ребенка: они не должны быть перегретыми.
Дайте остыть сильно нагретым частям, чтобы
ребенок не обжегся.
Дорожно-транспортное происшествие, в том
числе легкое, может вызвать повреждения
автокресла, не всегда заметные: поэтому оно
подлежит замене.
Не используйте бывшие в употреблении
автокресла: они могут иметь структурные
повреждения, невидимые не вооруженным
глазом, но отрицательно влияющие на
безопасность изделия.
Компания Artsana снимает с себя какую-либо
ответственность при использовании изделия
не по назначению.
Чехол может быть заменен только по
согласованию с производителем, так как
составляет неотъемлемую часть автокресла.
Во избежание опасности для ребенка
запрещается использовать автокресло без
чехла.
Убедитесь в том, что ленты ремней не
перекручены. Избегайте попадания ремня
или частей автокресла под двери или их
трения с острыми углами.
Автокресло не должно более использоваться,
если на ремнях имеются порезы или места
износа.
Когда ребенок не перевозится, автокресло
должно оставаться пристегнутым или
храниться в багажнике. Непристегнутое
автокрес ло представляет реальную
опасность для пассажиров в случае дорожнотранспортного происшествия или резкого
торможения.
•
•
•
•
Проверьте, чтобы не перевозились, особенно
на задней полке внутри автомобиля, предметы
или багаж, которые не прикреплены или не
установлены безопасным образом: в случае
дорожно-транспортного происшествия или
резкого торможения, они могут нанести
травмы пассажирам.
Убедитесь в том, что подголовник сиденья не
мешает подголовнику автокресла, толкая его
вперед. В этом случае снимите подголовник
с автомобильного сиденья, на которое
установлено автокресло, позаботившись
о том, чтобы не прислонить его к каркасу
подголовника.
Убедитесь в том, что все пассажиры
автомобиля используют собственные
ремни безопасности. Это необходимо для
их собственной безопасности, так и потому,
что во время поездки, в случае дорожнотранспортного происшествия или резкого
торможения, могут быть нанесены ранения
ребенку.
В случае длительных поездок делайте частые
остановки. Ребенок легко утомляется в пути.
Ни в коем случае не вынимайте ребенка из
автокресла, пока автомобиль находится в
движении. Если ребенок требует внимания,
необходимо найти безопасное место и
остановиться.
H. Кнопка для регулировки ремней
I. Лента для регулировки ремней
Рис. 2 (Вид сбоку)
J. Спинка
K. Сиденье
L. Подлокотники
M. Проушины ремней
Рис. 3 (Вид сзади)
N. Накладки для крепления лямок и пропускания
ремней
O. Ленты ремней
P. Отверстия для пропускания автомобильных
ремней (только установка группы 1)
Q. Пластина для крепления ремней
Рис. 4 (Вид снизу)
R. Накладки для крепления ремней к сиденью
S. Пластина для крепления застежки к
сиденью
T. Рычаг для отцепки спинки от сиденья
ХАРАКТЕРИСТИКИ ИЗДЕЛИЯ
• Настоящее автокресло сертифицировано как
“Группа 1, 2 и 3”, для перевозки детей весом
от 9 до 36 кг (от 1 до 12 лет примерно), в
соответствии с европейским стандартом ECE
R44/04.
• Сертификация соответствует типу“Универсал”,
поэтому автокресло может использоваться
н а л ю б ы х м од е л я х а вто м о б и л е й .
ВНИМАНИЕ! “Универсал” означает, что оно
совместимо с большинством, но не со всеми
автомобильными сиденьями.
ИНСТРУКЦИЯ ПО ИСПОЛЬЗОВАНИЮ
СОДЕРЖАНИЕ
• Описание компонентов
• Характеристики изделия
• Ограничения и требования по
использованию, относящиеся к изделию и
автокреслу
• Установка в автомобиль автокресла и
размещение ребенка группы 1 (9-18 кг)
• Установка в автомобиль автокресла и
размещение ребенка групп 2-3 (15-36 кг) со
спинкой
• Установка в автомобиль автокресла и
размещение ребенка группы 3 (22-36 кг) без
спинки
• Регулировка высоты подголовника
• Восстановление ремней для использования
группы 1 (9-18 кг)
• Чистка и уход
ВАЖНОЕ ЗАМЕЧАНИЕ
1. Данное приспособление для сидения
детей “Универсал” сертифицировано
согласно Положению N°44, поправка
серии 04. Предназначено для общего
применения на транспортных средствах и
совместимо с большей частью, но не всеми,
автомобильными сиденьями.
2. Превосходная совместимость легче
достигается в случаях, когда производитель
автомобиля заявляет в руководстве по
эксплуатации автомобиля, что автомобиль
предусматривает установку устройств для
сидения детей “Универсал” той или иной
возрастной категории.
3. Э то приспособление д ля сидения
классифицируется как “Универсальное”
согласно критериям сертификации, более
строгим по сравнению с предыдущими
моделями, в которых данное замечание
отсутствует.
4. П р и с п о с о б л е н и е п р е д н а з н а ч е н о
иск лючительно для применения на
транспортных средствах, снабженных
ОПИСАНИЕ КОМПОНЕНТОВ
Рис. 1 (Вид спереди)
A. Рукоятка для регулировки подголовника и
ремней
B. Подголовник
C. Проушины диагонального ремня
D. Лямки
E. Ремни автокресла
F. Застежка
G. Защита от соскальзывания
37
ремнями безопасности, статическими или со
втягивающим механизмом и с креплением
в трех точках, сертифицированными на
основании Положения UN/ECE N°16 или
других эквивалентных стандартов.
5. В с лу ч а е со м н е н и я с в я ж и те с ь с
производителем приспособления для
сидения или поставщиком.
3. Зас тегните автомобильный ремень
на застежку так, чтобы его брюшная
и диагональная части проходили под
подлокотником (Рис. 10).
4. Натяните, насколько это возможно,
автомобильный ремень так, чтобы он хорошо
прижимал автокресло к сиденью (Рис. 11), при
необходимости прижмите коленом само
автокресло.
5. Проверьте правильность установки,
натяжения ремня, надежное крепление и
прижим автокресла к сиденью. В противном
случае следует повторить все операции с
начала (Рис. 12).
ВНИМАНИЕ!
• Всегда проверяйте, чтобы ремень был
равномерно распределен во всех точках и
не имел перекручиваний.
• НИКОГДА не протягивайте автомобильный
ремень в положениях, отличных от указанных
выше.
О Г РА Н И Ч Е Н И Я И Т Р Е Б О В А Н И Я П О
ИСПОЛЬЗОВАНИЮ, ОТНОСЯЩИЕСЯ К ИЗДЕЛИЮ
И К АВТОКРЕСЛУ
ВНИМАНИЕ! Точно соблюдайте следующие
ограничения и требования по использованию,
относящиеся к изделию и к автокреслу: иначе
безопасность не гарантируется.
•
•
•
•
•
•
Настоящее автокресло сертифицировано
для использования с детьми весом
исключительно от 9 до 36 кг (примерно от 1
до 12 лет).
Автокресло должно быть снабжено
ремнем безопасности с креплением в трех
точках, статическими или с втягивающим
механизмом, сертифицированным на
основании Положения UNI/ECE N°16 или
других эквивалентных стандартов (Рис. 5).
Запрещается устанавливать автокресло с
автомобильным ремнем с креплением в двух
точках (Рис. 6).
Автокресло может быть установлено на
переднее пассажирское сиденье или на
любое одно заднее сиденье. Запрещается
использовать настоящее автокресло
на сиденьях, повернутых боком или
противоположных направлению движения
(Рис. 7).
Изделие предназначено исключительно для
использования в качестве автомобильного
кресла, не предусмотрено его использование
в быту.
Для правильной установки, действуйте так,
чтобы подголовник автомобильного сиденья
не мешал спинке автокресла.
После завершения установки автокресла
усадите в него ребенка, выполняя следующие
операции:
6. Нажмите кнопку регулировки ремней H
и одновременно захватите и потяните к
себе нижнюю часть ремней автокресла, до
максимального растяжения (Рис. 13).
7. Расцепите ремни автокресла, нажав на
кнопку застежки, и расположите их по бокам
(Рис. 14).
8. Осторожно усадите ребенка в автокресло,
подогнав ремни вокруг его тела, избегая их
натягивания, соедините две лапки ремня
(Рис. 15A) и застегните их снова в застежке
(Рис. 15B).
9. С помощью соответствующей рукоятки
для регулировки A, расположенной сверху
спинки, отрегулируйте высоту подголовника
автокресла, так, чтобы ремни вышли на
высоте плеч ребенка (Рис. 16).
10. Чтобы отрегулировать натяжение ремней
автокресла, подгоните их по телу ребенка,
потяните осторожно полосу для регулировки I
до необходимого уровня натяжения (Рис. 17).
11. Убедитесь в том, что автокресло правильно
зафиксировано, как показано на рисунке
(Рис. 18).
Чтобы снять ребенка с автокресла, нажмите
кнопку застежки и расцепите ремни (Рис. 19).
УСТАНОВКА В АВТОМОБИЛЬ АВТОКРЕСЛА И
РАЗМЕЩЕНИЕ РЕБЕНКА ГРУППЫ 1 (9-18 КГ)
ВНИМАНИЕ! Содержание и иллюстрации
данной инструкции относятся к установке
автокресла на правое заднее сиденье. Для
установки в другие положения выполняйте
тот же порядок действий.
УСТАНОВКА В АВТОМОБИЛЬ АВТОКРЕСЛА И
РАЗМЕЩЕНИЕ РЕБЕНКА ГРУПП 2 и 3 (15-36 КГ)
СО СПИНКОЙ
Чтобы изменить конфигурацию автокресла,
перейдя с группы 1 на группы 2-3 необходимо
заранее снять ремни согласно операциям,
описанным ниже:
1. Отцепите ремни автокресла от застежки
1. Установите автокресло на выбранное
сиденье по направлению движения (Рис. 8).
2. Вставьте автомобильный ремень с тремя
точками крепления через соответствующее
отверстие P на спинке автокресла (Рис. 9A и
9B), так, чтобы он вышел из противоположного
отверстия на другой стороне спинки (Рис. 9C).
38
(Рис.14).
2. Поверните и расцепите две накладки для
крепления ремней R, расположенные под
сиденьем (Рис. 20A) так, чтобы они вышли
также из двух прорезей на тканевом чехле
(Рис. 20B).
3. Расцепите два края ремней от пластины для
крепления Q (Рис. 21).
4. Поверните и расцепите две накладки для
пропускания ремней N от спинки (Рис. 22).
5. Выньте две части ремня спереди, так, чтобы
они прошли сквозь две красные проушины
для диагонального ремня C (Рис. 23).
6. Отставьте и сохраните в подходящем месте
две части ремней, снятые таким образом.
7. Протяните застежку и тканевую защиту от
соскальзывания сквозь соответствующую
прорезь в центре сидения, снова вставив
всё в соответствующее отверстие в сиденье
(Рис. 24A, 24B и 24C).
Теперь автокресло готово и сконфигурировано
для установки в группах 2 и 3.
сиденья.
Чтобы снять ребенка с автокресла в Группе 2 и 3:
1. Расстегните застежку автомобильного
ремня.
2. Снимите автомобильный ремень с тела
ребенка.
3. Выньте осторожно ребенка из автокресла.
ВНИМАНИЕ! В случае, если вы не собираетесь
снимать автокресло с автомобиля, снова
пристегните автомобильный ремень к
соответствующей застежке, так чтобы он
удерживал автокресло в автомобиле и без
ребенка; незакрепленное кресло опасно в
случае торможения или дорожно-транспортного
происшествия.
УСТАНОВКА В АВТОМОБИЛЬ АВТОКРЕСЛА И
РАЗМЕЩЕНИЕ РЕБЕНКА ГРУППЫ 3 (22-36 КГ)
БЕЗ СПИНКИ
В группе 1 (9-18 кг) и 2 (15-25 кг), использование
автокресла допускается только CO спинкой,
правильно установленной на сидении.
В группе 3 (22-36 кг) автокресло может
использоваться двумя способами. Альтернативой
использования кресла CO спинкой (более
безопасного и поэтому рекомендуемого)
является использование кресла БЕЗ спинки.
Для использования автокресла без спинки
необходимо отцепить спинку от сиденья:
1. Установите автокресло на горизонтальную
поверхность, так чтобы была доступна
нижняя часть сиденья (Рис. 30).
2. Поверните два рычага отцепки от спинки T в
указанном направлении (Рис. 31).
3. Извлеките спинку из сиденья (Рис. 32).
4. Установите сиденье автокресла так, чтобы
оно прилегало к спинке автомобильного
сидения (Рис. 33).
5. Усадите ребенка в автокресло и пристегните
ремень автомобиля к застежке, протянув
брюшную часть под подлокотником
автокресла, а диагональную часть сверху
(Рис. 34).
6. Аккуратно натяните диагональную часть
ремня так, чтобы она проходила поверх
плеча ребенка (Рис. 35).
8. Установите автокресло на выдранное сиденье
по направлению движения (Рис. 25).
9. Протяните диагональное ответвление
автомобильного ремня сзади подголовника
и сквозь соответствующее красное отверстие
для пропускания ремня C под самим
подголовником. Осторожно усадите ребенка,
убедившись в том, что его спина хорошо
прилегает к спинке автокресла (Рис. 26).
10. Зас тегните автомобильный ремень
на застежку так, чтобы его брюшная
и диагональная части проходили под
подлокотником (Рис. 27).
11. Проверьте высоту подголовника и
отрегулируйте ее в случае необходимости:
см. раздел “РЕГ УЛИРОВКА ВЫСОТЫ
ПОДГОЛОВНИКА”.
12. Потяните диагональную часть ремня
автомобиля к его втягивающему механизму,
так, чтобы весь ремень натянулся и хорошо
прилегал к груди и к ногам ребенка (Рис. 28).
13. Проверьте, чтобы автокресло было
правильно зафиксировано, как показано на
рисунке (Рис. 29).
ВНИМАНИЕ!
• Всегда проверяйте, чтобы ремень был
распределен равномерно во всех точках и
не имел перекручиваний.
• Убедитесь в том, что диагональный ремень
правильно прилегает к плечу ребенка и не
давит на его шею; отрегулируйте подголовник
в случае необходимости.
• Убедитесь в том, что втягивающий механизм
автомобильного ремня находится в заднем
(или максимально выровненном) положении
относительно спинки автомобильного
ВНИМАНИЕ! Чтобы закрепить спинку на
сидении, повторите те же операции в
обратном порядке. По окончании процедуры
крепления проверьте, чтобы верхняя и
нижняя часть сиденья были правильно
сцеплены одна с другой.
РЕГУЛИРОВКА ВЫСОТЫ ПОДГОЛОВНИКА
Можно отрегулировать высоту подголовника
в любом положении для лучшей адаптации
автокресла к росту ребенка. Оптимальная
39
регулировка предполагает:
• что голову всегда удобно держать, и она
защищена (Группа 1-2-3).
• что ремни безопасности автокресла всегда
находятся на правильной высоте, т.е. на
высоте плеч (Группа 1).
• что диагональный ремень автомобиля
всегда находится на правильной высоте,
благодаря проушинам ремня, встроенным
в подголовник C (Группа 2-3).
Для регулировки высоты подголовника вращайте
рукоятку A, расположенную сверху спинки, до
получения желаемой высоты (Рис. 16).
5. Отстегните спинку от сиденья, как
объясняется в разделе “УСТАНОВКА В
АВТОМОБИЛЬ АВТОКРЕСЛА И РАЗМЕЩЕНИЕ
РЕБЕНКА ГРУППЫ 3 (22-36 КГ) БЕЗ СПИНКИ”
(пункты 1-3).
6. Снимите чехол сиденья, отделив все
фиксирующие липучки и открыв две молнии
(Рис. 42).
Дляустановкикомпонентовчехланаместовыполняйте
описанные выше операции в обратном порядке.
ЧИСТКА ПЛАСТМАССОВЫХ И МЕТАЛЛИЧЕСКИХ
ЧАСТЕЙ
Для чистки пластмассовых или металлических
окрашенных частей используйте только влажную
ткань. Запрещается использование абразивных
моющих средств или растворителей.
Запрещается смазывать подвижные части
автокресла.
ВОССТАНОВЛЕНИЕ УСТАНОВКИ РЕМНЕЙ ДЛЯ
ИСПОЛЬЗОВАНИЯ ГРУППОЙ 1 (9-18 КГ)
Чтобы снова установить ремни на автокресло,
действуйте следующим образом:
1. Соедините две лапки обеих частей ремня,
вставьте их и застегните на застежку (Рис.
36).
2. Вставьте две накладки для крепления в
сиденье R сквозь чехол, вынув их из-под
сиденья (Рис. 37).
3. Протяните две накладки для крепления лямок
и для пропускания ремней N вначале сквозь
две красные проушины для диагонального
ремня C и затем сквозь спинку (Рис. 38).
4. Застегните два края ремней к пластине для
крепления Q (Рис. 39).
ПРОВЕРКА ЦЕЛОСТНОСТИ КОМПОНЕНТОВ
Рекомендуетс я рег улярно проверять
целостность и износ следующих компонентов:
• Чехол: проверьте, чтобы набивка или ее части не
выступали наружу. Проверьте целостность швов.
• Ремни: проверьте целостность текстуры,
убедитесь в отсутствии явного истончения
регулировочной полосы, тканевой защиты
от соскальзывания, плечевых частей ремней
и в зоне пластины регулировки ремней.
• Пластмассовые части: проверьте износ всех
пластмассовых частей, которые не должны
иметь явных признаков поломки или
обесцвечивания.
ЧИСТКА И УХОД
ЧИСТКА ОБИВКИ
Чехол автокресла является полностью съемным
и может стираться вручную или в машине при
30°C. Для стирки следуйте указаниям на этикетке
чехла, которая содержит следующие символы:
Машинная
стирка при
30°C
Ручная
стирка
Не отбеливать
Запрещена
химчистка
Не сушить в
сушилке
ВНИМАНИЕ! Деформированное или сильно
изношенное автокресло подлежит замене,
т.к. оно может утратить исходные свойства
безопасности.
ХРАНЕНИЕ ИЗДЕЛИЯ
Если изделие не установлено на автомобиле,
рекомендуется хранить его в сухом прохладном
месте, защищенном от пыли, влажности и
прямых солнечных лучей.
Не гладить
Запрещается использование абразивных
моющих средств или растворителей. Не сушите
чехол в центрифуге и дайте ей высохнуть без
отжимания.
Для снятия различных компонентов тканевого
чехла с корпуса автокресла, действуйте, как
описано ниже:
1. Отцепите ремни автокресла от застежки (Рис.
14).
2. Поверните и расцепите две накладки для
крепления ремней R, расположенные под
сиденьем (Рис. 20A), так, чтобы они вышли
наружу из двух прорезей на тканевом чехле
(Рис. 20B).
3. Снимите чехол с подголовника (Рис. 40).
4. Снимите чехол со спинки, отделив все
фиксирующие липучки и вынув две части
ремня (Рис. 41).
УТИЛИЗАЦИЯ ИЗДЕЛИЯ
По окончании срока службы, предусмотренного
для автокресла, прекратите его использование и
отправьте на утилизацию. Из соображений охраны
окружающей среды разделите различные типы
отходов, согласно законодательству вашей страны.
ДЛЯ ДОПОЛНИТЕЛЬНОЙ ИНФОРМАЦИИ:
ARTSANA SPA - Клиентская Служба
Via Saldarini Catelli, 1
22070 Grandate COMO-ИТАЛИЯ
Тел. 800.188.898
www.chicco.com - αυτοκινήτου.
40
S Bruksanvisning
•
MYCKET VIKTIGT - LÄS GENAST!
• Följ instruktionerna noggrant för montering och
installation av produkten. Låt inte någon använda
produkten utan att ha läst instruktionerna.
• Spara för framtida bruk.
• VARNING! Enligt olycksstatistiken, är bilbarnstolar
säkrare om de sätts i fordonets baksäte än om de
sätts fram: du bör därför montera stolen i baksätet.
Den säkraste platsen är särskilt den mitt i baksätet,
om den har 3-punktsbälte.
• Alla passagerare bör vara informerade om hur
barnstolens säkerhetsbälte hakas loss vid nödfall.
• Om stolen placeras på framsätet med en airbag aktiverad framför, rekommenderar vi att ni för större
säkerhet skjuter bakåt stolen så långt det går med
tanke på andra passagerare i baksätet.
• Använd aldrig den här bilbarnstolen på säten
som står sidledes eller i motsatt riktning mot körriktningen.
• Montera bara stolen på säten som är väl fixerade
vid bilens struktur och vända i körriktningen. Lämna aldrig bilsäten som kan fällas eller roteras i olåst
skick, det kan innebära en stor risk vid olycka.
• Var uppmärksam med hur du monterar barnstolen i bilen så att den inte kommer i kläm med ett
fällbart säte eller en dörr.
• Spänn aldrig fast barnstolen på ett bilsäte som bara
har ett tvåpunktsbälte.
• Ingen barnstol kan garantera total säkerhet för barnet i falla av olycka, men användningen av denna
produkt minskar risken för allvarliga eller dödliga
• Risken för allvarliga skador på barnet, inte bara
vid olycka, utan även i andra förhållanden (t.ex.
plötsliga bromsningar med mera) ökar, om anvisningarna som ges i den här bruksanvisningen inte
följs omsorgsfullt: Kontrollera alltid att barnstolen
hakats fast korrekt vid bilsätet.
• Om stolen är skadad, deformerad eller mycket sliten, ska den bytas ut, eftersom den kan ha förlorat
sina ursprungliga säkerhetsegenskaper.
• Gör inga modifieringar eller tillägg på produkten
utan att ha tillverkarens godkännande.
• Använd inte tillbehör, reservdelar eller komponenter som inte kommer från tillverkaren.
• Lämna aldrig barnet utan tillsyn i stolen.
• Sätt inte in något, som inte är ett tillbehör som godkänts för produkten, mellan bilsätet och stolen eller
mellan stolen och barnet: i fall av olycka kanske
stolen inte skulle fungera korrekt.
• Om bilen skulle lämnas i solen, undersök noga stolen innan barnet sätts in och kontrollera att inga
delar blivit för varma: Låt dem i så fall svalna så att
barnet inte bränner sig.
• Till följd av även den minsta olycka kan stolen undergå skador som inte alltid är synliga för blotta
ögat: den måste därför bytas ut.
• Använd inte bilbarnstolar som du fått i andra hand:
Strukturen kan ha fått skador utan att det syns för
•
•
•
•
•
•
•
•
blotta ögat, men vilka komprometterar produktens säkerhet.
Företaget Artsana avsäger sig allt ansvar för oriktig
användning av produkten.
Fodret kan bara bytas ut med godkännande från
tillverkaren, eftersom det utgör en integrerande
del av bilbarnstolen. Bilbarnstolen får aldrig användas utan fodret för att inte riskera barnets
säkerhet.
Kontrollera att bältbandet inte är snott och undvik
att detta eller delar av bilbarnstolen kläms mellan
dörrar eller skavs mot vassa punkter.
Bilbarnstolen kan inte användas om säkerhetsbältet har skärskador eller fransat sig.
När barnet inte ska förflyttas ska bilbarnstolen
ändå lämnas fastspänd eller läggas i bagageluckan. Om stolen inte är fastspänd kan den utgöra en
fara för passagerarna i fall av olycka eller plötslig
inbromsning.
Kontrollera att inga föremål eller bagage som
inte är fastspända eller placerade på säkert sätt
transporteras, i synnerhet på hyllan bakom baksätet inne i fordonet: i fall av olycka eller plötslig
inbromsning kan passagerarna skadas.
Kontrollera att bilsätets huvudstöd inte kommer
i kontakt med bilbarnstolens huvudstöd: det får
inte skjuta fram bilbarnstolen. Om detta sker, får
du ta av huvudstödet från bilsätet där barnstolen
monterats. Lägg det inte på hatthyllan.
Se till att alla bilpassagerare använder sitt eget
säkerhetsbälte för sin egen säkerhet och därför
att det under resa kan skada barnet, i fall av olycka
eller plötslig inbromsning.
Vid långa resor bör man göra många pauser.
Barnet blir lätt trött. Av inga skäl får barnet tas ur
barnstolen innan bilen stannat. Om barnet behöver uppmärksamhet måste man finna en säker
parkering och stanna till.
BRUKSANVISNING
INNEHÅLL
• Beskrivning av komponenter
• Produktens egenskaper
• Begränsningar och krav för användning av produkten och bilsätet
• Montering av bilbarnstolen i bilen och placering
av barnet i gr. 1 (9-18 kg)
• Montering av bilbarnstolen i bilen och placering
av barnet i gr. 2-3 (15-36 kg) med ryggstöd
• Montering av bilbarnstolen i bilen och placering
av barnet i gr. 3 (22-36 kg) utan ryggstöd
• Höjdreglering av huvudstödet
• Återställning av bälten för användning i gr. 1
(9-18 kg)
• Rengöring och skötsel
BESKRIVNING AV KOMPONENTER
Fig. 1 (fram)
A. Knapp för reglering av huvudstöd och bälten
B. Huvudstöd
41
C. Passage av det diagonala bältet
D. Axelbälten
E. Stolens bälten
F. Bälteslås
G. Benskydd
H. Knapp för reglering av bälten
I. Band för reglering av bälten
BEGRÄNSNINGAR OCH KRAV FÖR ANVÄNDNING
AV PRODUKTEN OCH BILSÄTET
VARNING! Iaktta noggrant följande begränsningar
och krav för användning av produkten och bilsätet:
I annat fall garanteras inte produktens säkerhet.
• Den här bilbarnstolen är typgodkänd bara för
användning med barn från 9 till 36 kg vikt (cirka
9 månader till 12 år).
• Bilens säte måste ha ett säkerhetsbälte med 3
punkter, statiskt eller med upprullning, typgodkänt i enlighet med lagbestämmelse UNI/ECE nr
16 eller andra motsvarande standarder (Fig. 5).
• Montera aldrig bilbarnstolen med bilbälte som
endast har två förankringspunkter (Fig. 6).
• Bilbarnstolen kan monteras på passagerarplatsen i framsätet eller på ett av baksätena.
Använd aldrig den här bilbarnstolen på säten
som står sidledes eller i motsatt riktning mot
körriktningen. (Fig. 7).
• Produkten är bara avsedd att användas som bilbarnstol och inte att användas i hemmet.
• För rätt montering ska du göra så att bilsätets
huvudstöd inte kommer i kontakt med och stör
barnstolens ryggstöd.
Fig. 2 (Profil)
J. Ryggstöd
K. Sits
L. Armstöd
M. Bältenas passage
Fig. 3 (Bak)
N. Låsplattor för axelbälten och bältenas passage
O. Bältesband
P. Utrymme för passage av bilbälten (bara montering i gr. 1)
Q. Bältenas låsplattor
Fig. 4 (Under)
R. Låsplattor till bälten på sitsen
S. Låsplattor till bälteslås på sitsen
T. Avhakningsmekanismer för ryggstödet från sitsen
MONTERING AV BILBARNSTOLEN I BILEN OCH
PLACERING AV BARNET I GR. 1 (9-18 KG)
VARNING! Dessa instruktioner hänför sig både i
text och illustrationer till montering av barnstolen
i baksätets högra del. För montering i andra lägen
utförs emellertid samma operationer.
PRODUKTENS EGENSKAPER
• Den här bilbarnstolen är typgodkänd för “Grupp
1,2, och 3”, för tran sport av barn på 9-36 kg vikt
(från cirka 9 månader till 12 år) i enlighet med
den europeiska lagbestämmelsen ECE R44/04.
• Typgodkännandet är av typen “Universal”, därför kan stolen användas på vilken bilmodell som
helst. VARNING! “Universal” innebär att den är
kompatibel med större delen, men inte med
alla bilsäten.
1. Placera barnstolen på sätet i körriktningen, på
det säte som valts för montering (Fig. 8).
2.Introducera bilens trepunktsbälte genom öppningen P på barnstolens ryggstöd. (Fig. 9A e 9B),
och för ut genom öppningen på andra sidan av
ryggstödet (Fig. 9C).
3. Haka fast bilbältet i bälteslåset på så sätt att både
grenbältet över magen och det diagonala förs
under armstödet (Fig. 10).
4. Sträck så vitt möjligt bilbältet så att stolen spänns
fast väl vid sätet (Fig. 11), sätt ett knä i själva stolen, om så behövs, för att spänna bättre.
5. Se efter om monteringen gjorts korrekt, om bältet är väl spänt och om stolen sitter ordentligt
fastlåst vid bilsätet. Om det inte lycktas, upprepa
monteringsåtgärderna från början (Fig. 12).
VIKTIG INFORMATION
1) Detta är en “Universell” barnsäkerhetsanordning
som är godkänd enligt Standard ECE R44/04 och
kompatibel med de flesta bilsittplatser, men inte
med alla.
2) Det är lättare att få perfekt kompatibilitet när
fordonets tillverkare i sin fordonsmanual försäkrar att fordonet är avsett för barnbilstolarav
typ ”Universal” för fastspänning av barn i gällande ålder.
3) Denna fastspänningsanordning har klassificerats
som ”Universal” enligt kriterier för typgodkännande som är strängare än i föregående modeller som inte har detta meddelande.
4) Endast lämplig för användning i bilar med trepunktsbälten, statiskt eller med upprullare, typgodkänt enligt lagbestämmelse UN/ECE nr. 16
eller andra motsvarande standarder.
5) Kontakta vid tvekan barnbilstolens tillverkare
eller försäljare.
VARNING!
• Kontrollera alltid att bältet sitter slätt överallt
och inte har snott sig.
• Låt ALDRIG bilbältet passera i andra lägen än
de som angetts.
När barnstolen monterats, så att barnet kan sättas
i den, gör du på följande sätt:
6. Tryck på bältesreglerknappen H och ta samtidigt tag i, och dra till dig den nedre delen av
barnstolsbältet, tills det sträckts ut så långt det
42
går (Fig 13).
7. Haka loss barnstolens bälten genom att trycka på
bälteslåsets knapp och lägg åt sidorna (Fig. 14).
8. Sätt omsorgsfullt i barnet i barnstolen och passa
in bältena kring barnets kropp utan att dra för
hårt, sätt ihop de båda flikarna på bältet (Fig. 15A)
och haka fast på nytt i bälteslåset (Fig. 15B).
9. Med regleringsratten A högst upp på ryggstödet
kan du reglera huvudstödets höjd på barnstolen, så att bälten kommer ut i barnets axelhöjd
(Fig. 16).
10. För att reglera bältenas spänning drar du försiktigt i regleringsbandet I medan du passar in
bältena på barnets kropp tills du får rätt spänning (Fig. 17).
11. Kontrollera att barnstolen fästs korrekt, som
på bilden (Fig. 18).
När du ska ta ur barnet ur bilbarnstolen trycker du
på knappen på bälteslåset och hakar loss bältena
(Fig 19).
HUVUDSTÖDET”.
12. Dra bilbältets diagonala del mot upprullningen,
så att hela bältet är spänt och sitter väl åt mot
barnets bröst och ben. (Fig. 28).
13. Kontrollera att barnstolen fästs korrekt, som
på bilden (Fig. 29).
VARNING!
• Kontrollera alltid att bältet sitter slätt överallt
och inte har snott sig.
• Kontrollera att det diagonala bältet stöder korrekt mot barnets axel och inte utöver något
tryck mot halsen, reglera i annat fall huvudstödet.
• Kontrollera att bilbältesuppruppningen är i tillbakadraget läge (eller rätt inriktad) vid bilsätets
ryggstöd.
Ta ur barnet ur Bilbarnstol i grupp 2 och 3 så här:
1. Haka loss bilbältet ur bälteslåset.
2. Lossa bilbältet från barnets kropp.
3. Lyft ur barnet ur bilbarnstolen.
MONTERING AV BILBARNSTOLEN I BILEN OCH
PLACERING AV BARNET I GR. 2 och 3 (15-36 KG)
MED RYGGSTÖD
För att ändra konfigureringen av barnstolen från
gr. 1 till gr. 23 måste du börja med att ta av bältena
enligt de beskrivningar som följer:
1. Haka loss bältena på barnstolen från bälteslåset
(Fig. 14).
2. Vrid och haka loss de båda låsplattorna på bältena R under sitsen (Fig. 20A) och låt passera
genom de båda öppningarna på tygöverdraget
(Fig. 20B).
3. Haka loss bältenas två ändar från låsplattan Q
(Fig. 21).
4. Vrid och haka loss de båda låsplattorna från bältena N från ryggstödet (Fig. 22).
5. Dra ur de båda bältesgrenarna framifrån genom
att låta passera genom de röda hålen C för det
diagonala bältet (Fig. 23).
6. Lägg undan och förvara på säkert ställe de båda
bältesgrenarna som tagits bort.
7. Låt bälteslås och benskydd i tyg passera genom
öppningen mitt på stolen, och lägg allt på rätt
utrymme i sitsen (Fig. 24A, 24B och 24C).
Nu är bilbarnstolen färdig och konfigurerad för
montering i grupp 2 och 3.
VARNING! Om du inte tänker ta ur bilbarnstolen
ur bilen, se till att låsa fast bilbältet igen i bälteslåset, så att barnstolen hålls fast utan barnet i bilen;
detta kan annars utgöra en fara vid bromsning
eller olycka.
MONTERING AV BILBARNSTOLEN I BILEN OCH
PLACERING AV BARNET I GR. 3 (22-36 KG) UTAN
RYGGSTÖD
I grupp 1 (9-18 kg)och 2 (15-25 kg), är användning
av barnstolen endast tillåten MED ryggstödet rätt
monterat på sitsen.
I grupp 3 (22-36 kg) har bilbarnstolen en möjlighet till dubbel användning, förutom MED ryggstöd
(emellertid alltid det säkraste och därmed rekommenderbara valet) och UTAN ryggstöd.
För att användas utan ryggstöd måste ryggstödet
hakas av sitsen:
1. Placera bilbarnstolen på ett horisontellt plan så
att du kommer åt den nedre delen (Fig. 30). Vrid
de båda låshakarna från ryggstödet T i indikerad
riktning (Fig. 31).
2. Dra ut ryggstödet ur sitsen (Fig. 32).
3. Placera bilbarnstolens sits så att den står tätt intill
bilsätets ryggstöd (Fig. 33).
4. Sätt barnet i stolen och haka fast bilbältet i bälteslåset genom att passera grenbältet under
stolens armstöd och det diagonala bältet över
armstödet (Fig. 34).
5. Spänn försiktigt bältets diagonala del så att det
passerar över barnets axel (Fig. 35).
8. Placera barnstolen på sätet i körriktningen, på
det säte som valts för montering (Fig. 25).
9. Låt bilbältets diagonala gren passera bakom
huvudstödet och genom den röda bältespassagen C under själva huvudstödet. Sätt försiktigt i
barnet och se till att ryggen stöder mot stolens
ryggstöd (Fig. 26).
10. Haka fast bilbältet i bälteslåset på så sätt att
både grenbältet över magen och det diagonala
förs under armstödet (Fig. 27).
11. Kontrollera huvudstödets höjd och reglera, om
det inte är rätt: se avsnitt “HÖJDREGLERING AV
VARNING! För att fästa ryggstödet vid sitsen upprepar du de åtgärder som just beskrivits i omvänd
ordning. När stolen låsts fast, kontrollera att sitsens
över- och underdel hakats fast korrekt sinsemellan.
43
HÖJDREGLERING AV HUVUDSTÖDET
Det går att reglera höjden på huvudstödet i många
olika lägen för att bättre anpassa stolen till barnets
höjd. Optimal reglering ger:
• att huvudet alltid är skyddat (gr. 1-2-3).
• att stolens säkerhetsbälten alltid är i rätt höjd,
det vill säga i höjd med axlarna (gr. 1).
• Att bilens diagonala bälte alltid har rätt höjd
tack vare de öppningar för bältet som finns på
huvudstödet C (gr. 2-3).
För att reglera höjden på huvudstödet, vrider du
ratten A högst upp på ryggstödet fram till önskad
höjd (Fig. 16).
För att sätta tillbaka komponenterna i fodret till sitt
ursprungliga läge följer du ovan beskrivna åtgärder
i omvänd ordning.
RENGÖRING AV PLAST- OCH METALLDELAR
För rengöring av plastdelar eller lackerade metalldelar använder du bara en fuktig duk. Använd aldrig slipande rengöringsmedel eller lösningar.
Bilbarnstolens rörliga delar ska inte alls smörjas.
KONTROLL AV KOMPONENTERNAS INTEGRITET
Kontrollera regelbundet att följande komponenter
är hela och inte slitna:
• Foder: Kontrollera att ingen stoppning sticker ut
eller att delar av den inte sitter löst. Kontrollera
att sömmarna alltid är hela.
• Bälten: kontrollera att inga vävnadsfibrer trasats
sönder med tydligt minskad tjocklek i nivå med
reglerbandet, benskyddet, axelbältena och där
bältesregleringsplattan sitter.
• Plastdelar: Kontrollera slitage på alla delar i plast
som inte får uppvisa några tecken på skada eller
missfärgning.
ÅTERINSÄTTNING AV BÄLTEN FÖR ANVÄNDNING
I GR. 1 (9-18 KG)
För att åter montera stolbältena gör du på följande
sätt:
1. Förena de båda flikarna på de båda grenbältena,
sätt i och haka fast i bälteslåset (Fig. 36).
2. Sätt i de båda låsplattorna på sitsen R genom fodret
så att det kommer ut på sitsens undersida (Fig. 37).
3. För plattorna som låser axelband och går genom
bälten N först genom det diagonala bältets röda passagerör C och sedan genom ryggstödet (Fig. 38).
4. Haka fast bältenas två ändar på låsplattan Q (Fig.
39).
VARNING! Om barnbilstolen skulle vara deformerad
eller mycket sliten måste den bytas ut: Den kan ha
förlorat sina ursprungliga säkerhetsegenskaper.
RENGÖRING OCH SKÖTSEL
RENGÖRING AV FODRET
Stolens foder kan tas av helt och tvättas för hand
eller i maskin i 30°C. Följ tvättinstruktionerna på
etiketten som har följande tvättsymboler:
Tvättmaskin
30°C
Handtvätt
Blek inte
Kemtvätta
inte
Torktumla inte
FÖRVARING AV PRODUKTEN
När barnbilstolen inte sitter monterad i bilen bör
den förvaras torrt, på avstånd från värmekällor och
i skydd från damm, fukt och direkt solljus.
KASSERING AV PRODUKTEN
Då bilbarnstolens livslängd uppnåtts, ska den inte
användas mer och kasseras bland annat avfall.
Sortera avfallet i enlighet med landets gällande
miljöskyddslagstiftning.
Stryk inte
Använd aldrig slipande rengöringsmedel eller
lösningar. Centrifugera inte utan låt torka utan
att krama ur.
För att ta av de olika komponenterna på tygfodret
från bilbarnstolen, gör du på följande sätt:
1. Haka loss bältena på barnstolen från bälteslåset
(Fig. 14).
2. Vrid och haka loss de båda låsplattorna på
bältena R under sitsen (Fig. 20A) och låt passera
genom de båda öppningarna på tygöverdraget
(Fig. 20B).
3. Lossa klädseln från huvudstödet (Fig. 40).
4. Ta av klädseln från ryggstödet genom att lossa
alla kardborrband och dra igenom grenbältena
(Fig. 41).
5. Ta av ryggstödet från sitsen efter beskrivningen i
avsnitt “MONTERING AV BARNBILSTOL I BIL OCH
PLACERING AV BARN I GR. 3 (22-36 KG) UTAN
RYGGSTÖD (punkt 1-3).
6. Ta av klädseln från sitsen genom att lossa alla
kardborrband och öppna de två blixtlåsen (Fig.
42).
FÖR YTTERLIGARE INFORMATION:
ARTSANA SPA
Servizio Clienti
Via Saldarini Catelli, 1
22070 Grandate – Como – Italien
Tfn.: 800.188.898
www.chicco.com
44
H
HR Upute za uporabu
VAŽNO ODMAH PROČITATI
• Za monitranje i instaliranje proizvoda je neophodno
pažljivo slijediti uputstva.Izbjegavati uporabu
proizvoda ako prethodno nisu pročitana
uputstva
• Sačuvati ovaj priručnik za buduću uporabu.
• OPREZ! Na osnovi statistika o prometnim
nesrećama,stražnja sjedala u vozilu su uglavnom
sigurnija od prednjih;zato savjetujemo instaliranje
Auto-Sjedalice na stražnje sjedalo. Naročito
je sigurno srednje stražnje sjedalo ukoliko je
opremljeno sa pojasom sa tri uporišne točke.
Preporučuje se da svi putnici u vozilu budu
informisani o načinu otkačenja u slučaju
nezgode
• Ukoliko Auto-Sjedalica bude postavljena na
prednje sjedalo sa akitiviranim frontalnim Azračnim
jastukom, preporuča se radi veće sigurnosti
povući sjedalo što više unatrag.
• Ne koristiti ovu Auto-Sjedalicu okrenutu suprotno
od smjera vožnje ili postavljenu bočno.
• Postaviti Auto-Sjedalicu samo na sjedala korektno
učvršćena na strukturu auta i okrenuta u smjeru
vožnje, pazeći da ne ostanu nakrivljena ili ne
učvršcena rotirajuća sjedala, u slučaju nezgode
predstavljaju opasnost.
• Obratiti pažnju prilikom postavljanja AutoSjedalice da neko od pokretnih sjedala ili vrata
ne smeta.
• Nemojte postaviti Auto-Sjedalicu na sjedalo
koje ima samo abdominalni pojas (sa dvije
uporišne točke)
• Nijedna Auto-Sjedalica ne može potpuno jamčiti
sigurnost dijeteta u slučaju prometne nezgode, ali
uporaba ovog proizvoda smanjuje rizik ozbiljnih
ozljeda ili smrti.
• Rizik ozbiljne štete nanesene dijetetu ne samo
u slučaju prometne nezgode ma i u drugim
okolnostima (npr.naglo kočenje) raste ukoliko ova
uputstva nisu pažljivo izvedena:uvijek provjerite
,da li je Auto-Sjedalica pravilno učvršćena za
sjedalo.
• U slučaju da se Auto-Sjedalica ošteti , deformiše ili
je suviše rabljena treba da bude zamjenjena,
jer postoji mogućnost da je izgubila orginalne
sigurnosne karakteristike.
• Nemojte mijenjati ili dodavati proizvodu ništa
što nije odobreno od konstruktora.
• Nemojte ugradjivati dodatke ili zamjenjive dijelove
dijelove koji nisu isporučeni od konstruktora.
• Nemojte nikada ostaviti dijete u Auto -Sjedalici
bez nadzora ni iz kojeg razloga.
• Nemojte umetati ništa izmedju sjedala i Sjedalice
ni izmedju Sdedalice i dijeteta: u slučaju nezgode
moglo bi se desiti da Auto-Sjedalica ne funkcioniše
pravilno.
• Ukoliko auto bude ostavljen na suncu, pregledajte
pažljivo Auto-Sjedalicu ,prije sjedanja dijeteta,
•
•
•
•
•
•
•
•
•
•
•
da se neki dijelovi nisu pretjerano ugrijali: u tom
slučaju sačekajte prvo da se ohlade, da bi izbjegli
da se dijete oprži.
Nakon promette nezgode je moguće da se
Auto-Sjedalica ošteti iako to nuije vidljivo golim
okom, pa bi je trebalo promijeniti.
Ne koristite već korištene Auto-Sjedalice : moguće
je da imaju strukturalna oštećenja koja nisu
vidljiva golim okom,ali koja dovode u pitanje
sigurnost proizvoda.
U slučaju nepropisnog korištenja poduzeće
Artesiana odriče se svake odgovornosti.
Navlaka može biti zamjenjena samo sa navlakom
odobrenom od konstruktora, obzirom da čini
integralni dio Sjedalice. Sjedalicu ne treba
nikada koristiti bez navlake,to bi dovelo u pitanje
sigurnost dijeteta.
Kontrolišite da vrpca pojasa nije uvijena i da pojas
ili dijelovi Sjedalice ne taru od oštre dijelove ili
da nisu priklješteni vratima.
Auto-Sjedaalicu ne treba koristiti ukoliko se na
pojasu ukažu zarezi ili oštećenja u tkanju.
Kada se ne prevozi dijete Auto-Sjedalica treba
da je pričvršćena ili je spremljena u prtljažnik.
Neučvršćena Auto-Sjedalica predstavlja opasnost za
putnike u slučaju nezgode ili naglog kočenja.
Provjerita da nisu u vozilu a naročito u stražnjem
dijelu , neučvršćeni predmeti ili prtjlag koji nije
dobro pzicioniran jer bi u slučaju incidenta mogli
da povrijede putnike.
Provjerite da naslon za glavu sjedala ne smeta
naslonu za glavu Auto-Sjedalice, ne bi trebao
da ga gura naprijed. Ukoliko se to desi ukloniti
nailon za glavu sjedala na koje je montirana
Auto-Sjedalica pazeći pri tome da ga ne prislonite
na prostor za odlaganje šešira.
Provjerite da svi putnici propisno vežu vlastite
pojaseve , bilo radi njihove lične sigurnosti tokom
vožnje, bilo radi sigunosti dijeteta koje bi moglo
biti povrijedjeno u sluičaju naglog kočenja
U slučaju dugih putovanja često se zaustavljajte.
Dijete se brzo zamori. Nipošto nemojte izvlačiti
dijete iz Auto-Sjedalice dok je auto u pokretu.
Ukoliko dijete ima potrebu za pažnjom,neophodno
je pronaći sigurno mjesto i zaustaviti auto.
UPUTSTVO ZA UPORABU
Sadržaj
• Opis dijelova
• Karakteristike proizvoda
• Ograničenja i preduvjeti za uporabu koji se
odnose na prizvod i na sjedalo vozila.
• Postavljanje u auto Auto-Sjedalice i smještanje
dijeteta u Skupini 1 (9-18 kg)
• Postavljanje u auto Auto-Sjedalice i smještanje
dijeteta u Skupinama 2-3 (15-36 kg) sa
naslonom
• Postavljanje u auto Auto-Sjedalice i smještanje
dijeteta u Skupini 3 (22-36 kg) bez naslona
• Regulisanje visine naslona za glavu
45
• Uspostavljanje pojaseva za uporabu u Skupini
1 (9-18 kg)
• Čišćenje i održavanje
strožijim u odnosu na prethodne modele, na
kojima se ne može naći ova obavijest.
4) Pogodno je za parimjenu samo u vozilima koja
posjeduju sigurnosne pojaseve učvršćene na tri
mesta, statične ili sa obmotavanjem, Priznato
na osnovu Pravilnika UN/CE N°16 ili drugih
odgovarajučih standarda.
5) U slučaju sumnje kontaktirajete proizvodjača
ili prodavača.
OPIS DIJELOVA
Crtež 1 (Prednja strana)
A. Poluga za regulisanje naslona za glavu i pojasa
B. Naslon za glavu
C. Prolaz za dijagonalni pojas
D. Naramenice
E. Pojasevi sjedalice
F. Kopča
G. Zaštita izmedju nogu
H. Prekidač za regulisanje pojasa
I. Traka za regulisanje pojasa
OGRANIČENJA I SREDSTVA ZA UPORABU U ODNOSU
NA PROIZVOD I SJEDALO AUTA
• OPREZ! Poštovati doslijedno slijedeća ograničenja
i sredstva za uporabu u odnosu na proizvod i
na sjedalo auta:u suprotnom nije zajamčena
sigurnost.
• Ova Auto-Sjedalica je priznata za uporabu
isključivo za djecu težine od 9 do 36kg (otprilike
od 9 mjeseci do 12 godina).
• Sjedalo auta treba da je opremljeno sa sigurnosnim
pojasom sa tri uporišne točke, statičnim ili
na obmotavanje, koji je priznat na osnovu
Pravilnika UN/CE N°16 ili drugih odgovarajučih
standarda. (Crtež 5).
• Nemojte nikada postatiti sjedalicu sa pojasom koji
ima samo dvije uporišne točke (Crtež 6).
• Auto-Sjedalica može biti postavljena na prednje
suvozačevo sjedalo ili na bilo koje stražnje
sjedalo. Nikada ne koristiti sjedalicu na sjedištima
okrenutim bočno ili suprotno od smjera vožnje.
(Crtež 7).
• Proizvod je isključivo namjenjen uporabi u autu,
a ne za uporabu u kući.
• Da bi bilo pravilno postavljeno pazite da naslon
za glavu auta ne smeta naslonu Sjedalice.
Crtež 2 (Profil)
J. Naslon
K. Sjedalo
L. Naslon za ruke
M. Prolaz za pojas
Crtež 3 (Poledjina)
N. Pločice za fiksiranje naramenica i prolaza za
pojaseve
O. Trake pojasa
P. Spremnik za prolaz pojasa za auto (samo za
postavljanje u Skupini 1)
Q. Ploča za fiksiranje pojasa
Crtež 4 (Ispod)
R. Pločice za fiksiranje pojaseva za sjedalo
S. Ploča za fiksiranje kopče za sjedalo
T. Poluge za skidanje naslona sjedala
KARAKTERISTIKE PROIZVODA
• Ova Auto-Sjedalica je zvanično priznata kao
odgovarajuča ” Skupine 1,2 i 3” za transport
djece težine od 9 do 36 kg i (od 9 mjeseci do
12 godina),u smislu evropskog pravilnika ECE
R44/04.
• Zvanično priznanje je tipa “Univerzal”, dakle
Auto-Sjedalica može biti rabljena za svaki tip
automobila . OPREZ! “Univerzal” znači da je
odgovarajuča za većinu modela , ali ne za sve
tipove sjedala auta.
UGRADNJA SJEDALICE U AUTO I SMJEŠTANJE DJETETA
U SKUPINI 1(9-18 KG)
PAžNJA! Ova uputstva se odnose na tekst i na
ilustracije, za postavljanja Sjedalice na stražnje desno
sjedalo. Za postavljanje u druge pozicije investi u
svakom slučaju isti slijed operacija.
1) Postaviti Auto- Sjedalicu licem u smjeru vožnje
na izabrano sjedalo. (Crtež 8).
2) Provuči sigurnosni pojas auta sa tri točke,kroz
predvidjeni spremnik P na naslonu Sjedalice
(Crtež 9A e 9B),tako da izadje sa druge strane
naslona (Crtež 9C).
3) Prikopčati pojas auta za kopču tako da i abdominalni
i dijagonalni krak prodju ispod rukohvata (Crtež
10).
4) Zategnuti što više pojas auta tako da Auto-Sjedalica
prione za sjedalo (Crtež 11),ukoliko je potrebno
pritisnuti koljenom Sjedalicu.
5) Provjerite da li je pravilno postavljeno, da je pojas
zategnut i da Auto-Sjedalica prijanja za sjedalo.
Ukoliko nije tako ponovite cijelu operaciju od
početka (Crtež 12).
VAŽNO UPOZORENJE
1) Ovo
je
sredstvo
za
zadržavanje
djece”Univerzal”,zvanično priznato prema Pravilniku
N°44,izdanje serie 4.Prigodno za opću uporabu
u vozilima i odgovarajuće za večinu ,ali ali ne za
sve tipove sjedala auta.
2) Perfektna prilagodjenost se lakše postiže u
slučajevima gdje konstruktor vozila u priručniku
za vozilo izjavljuje da je za to vozilo predvidjeno
postavljane sredstva za zadržavanje djece
”Univerzal”,za predvidjenu dob djece.
3) Ovo sredstvo za zadržavanje je klasificirano
“Univerzal”prema kriterijima za priznavanje
OPREZ!
46
• Provjerite uvijek da se pojas ne uvija i da je
jednako postavljen cijelom dužinom.
• Nemojte nikada provuči pojas auta na drugi
način osim naznačenog.
C ispod naslona za glavu.Pažljivo smjestite dijete
provjeravajući da je dobro naslonjeno na naslon
Sjedalice (Crtež 26).
10. Zakačiti pojas auta za kopču tako da i abdominalni
i dijagonalni krak kopče prolaze ispod rukohvata
(Crtež 27).
11. Provjerite visinu naslona za glavu, ako nije
odgovarajuća regulišite je:pogledajte paragraf
“REGULISANJE VISINE NASLONA ZA GLAVU”
12. Povući diagonalni dio pojasa prema njegovom
obmotavaču , tako da cijeli pojas bude dobro
zategnut i priajnja za grudi i noge dijeteta
(Crtež 28).
13. Provjerite da li je Auto-Sjedalica korektno učvrščena
kao na slici (Crtež 29).
Nakon montiranja Sjedalice, za smještanje dijeteta
proslijedite kako je opisano:
1. Pritisnuti prekidač za regulisanje pojaseva H
i istovremeno povucite prema sebi donji dio
pojaseva Sjedalice da bi se postigla maksimalna
dužina (Crtež 13).
2. Otkačiti pojaseve Sjedalice pritiščući na prekidač
kopče i položiti ih sa strane. (Crtež 14).
3. Smjestiti
pažljivo
dijete
na
Sjedalicu,podešavajučipojaseve oko tijela bez
zatezanja,spojiti dva kraja pojasa (Crtež 15A) i
prikačiti ih ponovo na kopču. (Crtež 15B).
4. Uz pomoć poluge za regulisanje A koja se nalazi
na vrhu naslona regulisati visinu naslona za glavu
Sjedalice tako da pojasevi dodju u visinu ramena
dijeteta. (Crtež 16).
5. Za regulisanje zategnutosti pojaseva Sjedalice
i prilagodjavanje tijelu dijeteta,povući pažljivo
traku za regulisanje I do odgovarajučeg nivoa
zategnutosti. (Crtež 17).
6. Provjerite da li je Auto-Sjedalica pravilno
fiksirana,kao na slici (Crtež 18).
Da bi izvadili dijete iz Auto-Sjedalice pritisnite prekidač
kopče i otkačite pojaseve. (Crtež 19).
OPREZ!
• Provjerite uvijek da se pojas ne uvija i da je
jednako postavljen cijelom dužinom.
• Provjerite da je dijagonalni pojas korektno
prislonjen na rame dijeteta i da ne vrši pritisak
na vrat; ukoliko je potrebno regulišite naslon
za glavu.
• Provjerite da je obmotavač pojasa auta postavljen
iza ( ili ako ništa paralelan) sa naslonom sjedala
auta.
Da bi izvadili dijete iz Sjedalice u Skupini 2 i 3:
1. Otkačiti pojas auta od kopče
2. Skinuti pojas sa dijeteta
3. Podići pažljivo dijete sa sjedalice
UGRADNNJA U AUTO AUTO-SJEDALICE I SMJEŠTANJE
DIJETETA U SKUPINAMA 2 i 3 (15-36KG) SA
NASLONOM
Da bi se promijenio oblik Auto-Sjedalice od gr.1
na oblik 2 ili3 neophodno je prethodno ukloniti
pojaseve slijedeći opisane operacije:
1. Otkopčati pojaseve Auto-Sjedalice (Crtež 14).
2. Okrenuti i otkačiti pločice za fiksiranje pojasa
R koje se Nalaze ispod sjedećeg mjesta(Crtež
20A) tako da izadju iz proreza platnene postave
(Crtež 20B).
3. Otkačiti dvije trake pojasa od ploče za fiksiranje
Q (Crtež 21).
4. Okrenuti i otkačiti pločice za prolaz pojasa N od
naslona (Crtež 22).
5. Izvuči sa prednje strane dva kraka pojasa tako da
prodju preko dva crvena prolaza dijagonalnog
pojasa C (Crtež 23).
6. Skloniti i čuvati na odgovarajućem mjestu dva
kraka pojasa koje ste skinuli.
7. Provucite kopču i platnenu traku izmedju nogu,kroz
odgovarajući prorez na centru sjedala,položite
sve u odgovarajući spremnik sjedala. (Crtež
24A, 24B i 24C).
Auto-Sjedalica je sada sprema za postavljanje u
skupini 2 ili 3.
8. Postatiti Sjedalicu na izabrano sjedalo u smjeru
vožnje (Crtež 25).
9. Provući dijagonalni krak pojasa auta iza naslona
za glavu i kroz predvidjeni prolaz pojasa crveno
OPREZ! Ukoliko želite ostaviti Sjedalicu u autu pazite
da pojas auta ostane zakopčan tako da
pridržava sjedalicu i bez dijeteta; inače bi predstavljala
opasnost u slučaju kočenja ili nezgode.
UGRADNJA AUTO- SJEDALICE U AUTO I SMJEŠTANJE
DIJETETA U SKUPINI 3 (22-36KG) BEZ NASLONA
U skupini 1 (9-18kg) i 2 (15-25kg), uporaba Sjedalice
je dozvoljena isključivo SA naslonom montiranim
na sjedalo.
U skupini 3 (22-36 kg) postoji mogućnost dvostruke
uporabe Sjedalice, na smjenu SA naslonom (mnogo
sigurniji izbor i zbog toga preporučen) ili BEZ
naslona.
Za uporabu bez naslona je neophodno otkačiti
naslon sa sjedala:
1. Postaviti Auto-Sjedalicu na vodoravnu plohu tako
da je pristupačan donji dio ispod sjedala(Crtež
30).
2. Okrenuti dvije poluge za skidanje naslona T u
naznačenom pravcu. (Crtež 31).
3. Izvuči naslon iz sjedala (Crtež 32).
4. Postaviti sjedalo Sjedalice tako da prijanja uz
naslon auta (Crtež 33).
5. Posjesti dijete na Auto-Sjedalicu i zakačiti pojas
auta za kopču tako da abdominalni krak prode
ispod rukohvata Auto-Sjedalice,a dijagonalni
iznad (Crtež 34).
47
3. Svući presvlaku sa naslona za glavu (Crtež 40).
4. Skinuti presvlaku sa naslona odljepljujući čičak
vrpcu i izvlačeći dva kraka pojasa (Crtež 41).
5. Skinuti naslon sa sjedala kako je opisano u
paragrafu: “UGRADNJA AUTO- SJEDALICE U AUTO
I SMJEŠTANJE DIJETETA U SKUPINI 3 (22-36KG)
BEZ NASLONA (točka 1-3)
6. Skinuti presvlaku sa sjedala odljepljujuči čičak vrpcu
i otvarajuči dva patentna zatvarača (Crtež 42).
Za ponovno postavljanje dijelova presvlake u
prethodnu poziciju izvesti u obrnutom redosljedu
sve navedene operacije
6. Pridržati oprezno dijagonalni krak pojasa tako da
da predje preko ramena djeteta (Crtež 35).
OPREZ!Da bi postavili naslon na sjedalo,ponovite
sve opisane operacije unatrag.Nakon što ste
učvrstili,provjerite da su korektno uklopljeni gornji
i donji dio.
REGULISANJE VISINE NASLONA ZA GLAVU
Moguće je regulisati visinu naslona za glavu u
raznim pozicijama da bi stvorila mogučnost za
prilagodjavanje Auto-Sjedaliceprema visini dijeteta.
Optimalno podešavanje dozvoljava da:
• da je glava dijeteta dobro smještena i zaštičena
(skupina 1-2-3).
• da su sigurnosni pojasevi Auto-Sjedalice na
odgovarajyčoj visini ,što znači u razini ramena
(skupina 1)
• da je dijagonalni pojas auta uvijek na pravilnoj
razini zahvaljujuči prolazima za pojas ugradjenim
u naslon za glavu C (skupina 2-3).
Da bi se regulisala visina naslona za glavu okrenuti
polugu A koja se nalazi na vrhu naslona dok se
ne postigne željena visina. (Crtež 16).
ČIŠČENJE PLASTIČNIH ILI METALNIH DIJELOVA
Za čiščenje plastičnih ili metalnih lakiranih dijelova
koristiti samo vlažnu krpu.
Nikada ne koristiti abrazivne deterđente ili
razređivače.
Pomični dijelovi sklopa Auto-Sjedalice nesmiju se
podmazivati.
PROVJERA CJELOVITOSTI SASTAVNIH DIJELOVA
Preporuča se povremena provjera cjelovitosti i stanja
istrošenosti ovih dijelova:
Navlaka rovjeriti da punjenje nije ispalo ili ne viri
kroz šavove navlake.Provjeriti takoodje šavove
:uvijek moraju biti cijeli.
Pojasevi: Provjeriti da li se tkanje istrošilo i da li se vidljivo
stanjila debljina vrpce za podešavanje,medjunožnog
pojasa,ramenih dijelova i u području pločice za
podešavanje pojaseva.
Plastika: provjeriti stanje plastičnih dijelova da slučajno
nisu istrošeni ,oštećeni ili izblijedjeli.
OPREZ! U slučaju da je Auto–Sjedalica izobličena ili
jako istrošena, mora biti zamjenjena novom:moguće
je da je izgubila prvobitne sigurnosne značajke.
PONOVNO POSTAVLJANJE POJASA ZA UPORABU
U SKUPINI 1 (9-18 KG)
Da bi se ponovo postavili pojasevi na Auto-Sjedalicu
uraditi slijedeće:
1. Ujediniti dva jezička od dva kraka pojasa, uvuči
ih i zakačiti za kopču (Crtež 36).
2. Postatiti pločice za učvrščivanje na sjedište R
kroz postavu tako da prodju na donji dio ispod
sjedišta (Crtež 37).
3. Provuči dvije pločice za fiksiranje naramenica
i za prolaz pojasa N prvo kroz dva prolaza
dijagonalnog pojasa crveni C potom preko
naslona. (Crtež 38).
4. Zakačiti dva kraja pojasa za pločicu za fiksiranje
Q (Crtež 39).
ČUVANJE PROIZVODA
Kada Auto-Sjedalica nije ugrađena u vozilo,preporuča
se pohraniti je na suho mesto, daleko od izvora
topline te ju zaštiti odprašine,vlage i od izravnog
sunčevog svijetla.
ČIŠĆENJE I ODRŽAVANJE ČIŠĆENJE NAVLAKE
Navlaka Auto-Sjedalice se može skinuti i oprati ručno ili
u perilici na 30°C. Za pranje slijediti uputstva naznačena
na etiketi koja sadrže slijedeće simbole:
Pranje u perilici
30°C
Ru_no
pranje
Ne koristiti
varikinu
Ne _istiti
kemiski
Ne koristiti
su_ilicu
Ne peglati
Nikada ne koristiti abrazivne deterđente ili razređivače,
nemojte centrifugirati i sušite bez ožimanja.
Za skidanje dijelova navlake sa strukture AutoSjedalice, prosllijediti prema opisu:
1. Otkačiti pojaseve Auto-Sjedalice od kopče
(Crtež 14).
2. Okrenuti i otkačiti dvije pločice za fiksiranje pojasa
R koje su smještene ispod sjedala
(Crtež 20A) tako da izadju kroz proreze na
navlaci (Crtež 20B).
ZBRINJAVANJE PROIZVODA
Nakon isteka razdoblja predviđenog za uporabu
auto-sjedalice,tj. Kada ona više nije u skladu sa
prvobitnim sigurnosnim standardima, prekinuti njenu
uporabu i odložiti je,radi čuvanja okoliša, na mesto
zakonom predviđeno za tu vrstu otpada.
ZA SVE DODATNE INFORMACIJE:
ARTSANA SPA
Servizio Clienti
Via Saldarini Catelli, 1
22070 Grandate COMO-ITALIA
Tel. N° verde 800.188.898
www.chicco.com
48
S
SLO Navodila za uporabo
ZELO POMEMBNO ! PREBERITE TAKOJ !
• Pri montaži in nameščanju izdelka strogo sledite
navodilom. Kdor ni prebral navodil, naj izdelka
ne uporablja.
• Ta priročnik shranite za morebitno kasnejšo
uporabo.
• POZOR! Na osnovi statistik o nesrečah je bilo
ugotovljeno, da so zadnji sedeži načeloma
varnejši od sprednjih, zato vam svetujemo, da
avtosedež namestite na zadnje sedeže. Najbolj
varen je sredinski zadnji sedež, če je opremljen
s tritočkovnim varnostnim pasom.
• Priporočamo vam, da vse potnike poučite, kako
otroka v sili odpeti iz avtosedeža.
• Če avtosedež namestite na prednji sedež z
delujočo prednjo zračno blazino, vam svetujemo,
da sedež zaradi večje varnosti pomaknete kar
se da nazaj, seveda ob upoštevanju prostora,
ki je na voljo v zadnjem predelu kabine, če so
tam prisotni potniki.
• Tega avtosedeža nikoli ne uporabljajte na sedežih,
ki so obrnjeni pravokotno na smer vožnje ali v
nasprotno smer vožnje.
• Avtosedež lahko namestite le na sedeže, ki so
pravilno pritrjeni na strukturo vozila in obrnjeni v
smer vožnje. Pazite, da so vsi upogljivi ali vrtljivi
sedeži vozila dobro pritrjeni, kajti v primeru
nesreče lahko postanejo nevarni.
• Pri nameščanju avtosedeža pazite, da vas premični
sedež ali vrata ne bi ovirali.
• Avtosedeža nikoli ne pritrjujte na sedež z dvotočkovnim varnostnim pasom, ki se pripenja
le prek pasu.
• Ni avtosedeža, ki bi v primeru nesreče lahko zagotovil popolno varnost vašega otroka, kljub temu
pa uporaba tega avtosedeža zmanjša tveganje
hudih poškodb ali smrtnega izida.
• Nevarnost hudih poškodb otroka, ne le v primeru
nesreče, temveč tudi v drugih okoliščinah (npr.
nenadna zaviranja, ipd.) je večja, če strogo ne
sledite navodilom iz tega priročnika: vedno
preverite, ali je avtosedež pravilno pripet na
sedež.
• Če je avtosedež poškodovan, deformiran ali močno
obrabljen, ga je potrebno zamenjati, saj je lahko
izgubil izvorne varnostne lastnosti.
• Brez predhodne odobritve proizvajalca, so na
izdelku prepovedane kakršnekoli spremembe
ali dodatki.
• Na avtosedež ne nameščajte nikakršnih dodatkov,
nadomestnih delov ali sestavnih delov, ki jih ne
priskrbi izdelovalec.
• Nikoli iz nikakršnega razloga otroka ne puščajte
na otroškem avtosedežu brez nadzora.
• Med sedež vozila in otroški avtosedež oziroma
med otroški avtosedež in otroka ne vstavljajte
nobenega dodatka, katerega uporaba za ta avtosedež ne bi bila odobrena, saj avtosedež v primeru
nezgode lahko ne bi deloval pravilno.
• Če pustite vozilo na soncu, skrbno preverite, da
•
•
•
•
•
•
•
•
•
•
•
na avtosedežu ni morebitnih pregretih delov,
preden otroka namestite vanj; če na avtosedežu
opazite pregrete dele, pustite naj se ohladijo,
preden otroka posadite vanj.
Pri nezgodi, tudi lažji, lahko avtosedež utrpi
poškodbe, ki niso vedno vidne s prostim očesom:
zato ga zamenjajte.
Ne uporabljajte rabljenih otroških avtosedežev,
saj lahko imajo strukturne poškodbe, ki niso
vedno vidne s prostim očesom, a lahko okrnijo
varnost vašega otroka.
Podjetje Artsana zavrača vsakršno odgovornost
za neprimerno uporabo izdelka.
Prevleko lahko zamenjate le s tako, ki je odobrena
s strani izdelovalca, saj je prevleka sestavni del
avtosedeža. Avtosedeža nikoli ne uporabljajte
brez prevleke, da ne bi okrnili varnosti vašega
otroka.
Prepričajte se, da pas ni zavozlan in pazite, da
se pas ali deli avtosedeža ne vpnejo med vrata
ali se drgnejo ob ostra mesta.
Če so na pasu ureznine ali razcefrani deli,
avtosedež ni več uporaben.
Če na avtosedežu ne prevažate otroka, ga
lahko pustite pritrjenega v vozilu ali pa ga
shranite v prtljažniku. Nepritrjeni avtosedež je
v primeru nezgode ali nenadnih zaviranj lahko
za potnike nevaren.
Prepričajte se, da so vsi predmeti ali prtljaga
na zadnji polici v vozilu primerno pritrjeni ali
nameščeni, saj lahko v primeru nezgode ali
nenadnega zaviranja poškodujejo potnike.
Prepričajte se, da naslon za glavo na sedežu ne
moti naslona za glavo na otroškem avtosedežu
oziroma da ga ne potiska naprej. V nasprotnem
primeru snemite naslon za glavo s sedeža vozila,
na katerem je nameščen avtosedež in ne odlagajte
ga na zadnjo polico v kabini.
Prepričajte se, da so vsi sopotniki v vozilu pripeti
z varnostnim pasom, tako zaradi njihove lastne
varnosti kot tudi zato, da v primeru nezgode ali
naglega zaviranja ne bi poškodovali otroka.
V primeru daljših potovanj se večkrat ustavite.
Otrok se med vožnjo zelo hitro utrudi. Med
vožnjo otroka nikakor ne snemajte iz otroškega
avtosedeža. Če otrok potrebuje vašo pozornost,
izberite varen prostor za postanek.
NAVODILA ZA UPORABO
KAZALO
• Opis sestavnih delov
• Lastnostni izdelka
• Omejitve in zahteve za uporabo izdelka in
sedeža v vozilu.
• Namestitev avtosedeža v vozilo in namestitev
otroka skupine 1 (9-18 kg)
• Namestitev avtosedeža v vozilo in namestitev
otroka skupine 2-3 (15-36 kg) s hrbtnim
naslonom
• Namestitev avtosedeža v vozilo in namestitev
otroka skupine (22-36 kg) brez hrbtnega
naslona
49
•
•
•
Nastavitev naslona za glavo po višini
Ponovna namestitev pasov za uporabo skupine 1 (9-18 kg)
Čiščenje in vzdrževanje
4. Izdelek je primeren le za uporabo v vozilih s
tritočkovnimi varnostnimi pasovi, statičnimi
ali z navijalom, homologiranimi skladno z
uredbo UN/ECE št. 16 in drugimi enakovrednimi
standardi.
5. V primeru dvomov, se obrnite na proizvajalca
varnostnega mehanizma ali na prodajalca.
OPIS SESTAVNIH DELOV
Slika 1 (od spredaj)
A. Gumb za nastavitev naslona za glavo in pasov
B. Naslon za glavo
C. Reže za prečni pas
D. Ramenska zaščita
E. Pasovi avtosedeža
F. Zaponka
G. Mednožna zaščita
H. Gumb za nastavitev pasov
I. Trak za nastavitev pasov
OMEJITVE IN ZAHTEVE ZA UPORABO IZDELKA IN
SEDEŽA V VOZILU.
POZOR! Strogo upoštevajte naslednje omejitve
in zahteve za uporabo izdelka in sedeža vozila. V
nasproten primeru, varnost ni zagotovljena.
• Ta avtosedež je homologiran samo za uporabo
pri otrocih s težo od 9 do 36 kg (pribl. od 9
mesecev do 12 let starosti).
• Sedež vozila naj bo opremljen s tritočkovnimi
varnostnimi pasovi, statičnimi ali z navijalom,
homologiranimi skladno z uredbo UN/ECE št. 16
in drugimi enakovrednimi standardi (Slika 5).
• Avtosedeža nikoli ne nameščajte z dvotočkovnimi
varnostnimi pasovi vozila (slika 6).
• Avtosedež se lahko namesti na prednjii sedež
na strani sopotnika ali na katerikoli zadnji sedež.
Tega avtosedeža nikoli ne uporabljajte na sedežih,
ki so obrnjeni pravokotno na smer vožnje ali v
nasprotno smer vožnje (Slika 7).
• Izdelek je namenjen le za uporabo kot avtosedež
in ne za domačo uporabo.
• Za pravilno namestitev, pazite, da naslon za
glavo na sedežu vozila nikakor ne moti hrbtnega
naslona avtosedeža.
Slika 2 (od strani)
J. Hrbtni naslon
K. Sedišče
L. Naslona za roke
M. Reže za pasove
Slika 3 (od zadaj)
N. Pritrdilne ploščice za ramenske zaščite in reža
za prehod pasov
O. Trakovi pasov
P. Prostor za prehod varnostnih pasov vozila (samo
namestitev avtosedeža skupine 1 1)
Q. Pritrdilna ploščica za pasove
Slika 4 (Spodaj)
R. Ploščice za pritrditev pasov na sedišče
S. Ploščica za pritrditev zaponke na sedišče
T. Ročice za sprostitev hrbtnega naslona sedišča
PRITRDITEV AVTOSEDEŽA V VOZILO IN NAMESTITEV
OTROKA PRI SKUPINI 1 (9-18 KG)
POZOR! Ta navodila se, tako v slikah kot v besedilu,
nanašajo na pritrditev avtosedeža na zadnji desni
sedež. Za pritrditev na druga mesta, vselej sledite
enakemu postopku.
1. Avtosedež namestite na izbrani sedež tako, da
bo obrnjen v smer vožnje (slika 8).
2. Tritočkovni pas vozila povlecite skozi ustrezni
prostor P na hrbtnem naslonu avtosedeža (sliki 9A
in 9B) in ga izvlecite iz nasproti ležečega prostora
na drugi strani hrbtnega naslona (slika 9C).
3. Pas vozila vpnite v zaponko, tako da trebušni in
prečni pas slednjega potekata pod naslonom
za roko (slika 10).
4. Pas vozila čim bolj napnite, tako da dosežete
dobro prileganje avtosedeža samemu sedežu
vozila (slika 11), pri tem si lahko pomagate tudi
tako, da s kolenom pritisnete na avtosedež.
5. Preverite, ali ste avtosedež pravilno namestili, ali
je pas dobro nategnjen in ali je avtosedež trdno
pritrjen na sedež in ali se slednjemu dobro prilega.
V nasprotnem primeru, postopek ponovite od
začetka (slika 12).
LASTNOSTI IZDELKA
• Ta avtosedež je homologiran za “Skupino 1, 2
in 3”, za prevoz otrok s težo od 9 do 36 kg (od
pribl. 9 mesecev do 12 let starosti), v skladu z
evropsko uredbo ECE-R44/04.
• Homologacija je univerzalne vrste (“Universal”),
torej se avtosedež lahko uporablja na kakršnem
koli modelu vozila. POZOR! “Universal” pomeni,
da je otroški avtosedež skladen z večjim delom
sedežev vozil, ne pa z vsemi.
POMEMBNO OPOZORILO
1. To je »univerzalni« sistem za zaščito otrok, homologiran skladno z uredbo št. 44, in sledečimi
spremembami serije 04. Primeren je za splošno
uporabo v vozilih in je skladen z večino sedežev
vozil, a ne z vsemi.
2. Popolno skladnost se lahko najpreprosteje
preveri v primerih, ko izdelovalec vozila v priročniku izjavi, da za vozilo predvidena namestitev
»univerzalnih« mehanizmov za zaščito otrok
določenega starostnega obdobja.
3. Ta varnostni mehanizem je bil označen kot
»univerzalni« po najstrožjih načelih homologacije, v primerjavi s prejšnjimi modeli, ki nimajo
tega opozorila.
POZOR!
Vedno se prepričajte, da je pas enakomerno
porazdeljen po vseh točkah in da ni zavozlan.
• Pas vozila NE SME NIKOLI potekati drugače,
•
50
kakor je zgoraj navedeno.
režo za prehod pasu C pod samim naslonom za
glavo. Previdno posedite otroka in se pri tem
prepričajte, da se njegov hrbet dobro prilega
hrbtnemu naslonu avtosedeža (slika 26).
10. Pas vozila vpnite v zaponko, tako da trebušni in
prečni del slednjega potekata pod naslonom
za roko (slika 27).
11. Preverite višino naslona za glavo in če je nepravilna, jo nastavite: glejte poglavje “NASTAVITEV
NASLONA ZA GLAVO PO VIŠINI”.
12. Prečni krak varnostnega pasu vozila povlecite
proti njegovemu navijalu, tako da je celoten
pas napet in se dobro prilega prsnemu košu
in nogam otroka (slika 28).
13. Preverite, ali je avtosedež pravilno pritrjen, kakor
prikazuje slika (slika 29).
Po zaključeni pritrditvi avtosedeža, vanj namestite
otroka, pri čemer ravnajte na naslednji način:
6. Pritisnite na gumb za nastavitev pasov H in
istočasno primite spodnja dela pasov avtosedeža
ter ju povlecite proti sebi, dokler ju do konca ne
iztegnete (slika 13).
7. Pasove avtosedeža sprostite tako, da pritisnete
na gumb zaponke in ju odmaknite ob stran
(slika 14).
8. Otroka pazljivo namestite v avtosedež tako,
da pasove prilagodite njegovemu telesu, a
ne da bi jih pri tem vlekli, združite dva jezička
pasu (slika 15A) in zaponko ponovno zaskočite
(slika 15B).
9. S temu namenjenim regulacijskim gumbom
A, nameščenim na vrhu hrbtnega naslona,
nastavite naslon za glavo avtosedeža po višini,
tako da bodo pasovi izhajali na višini ramen
otroka (slika 16).
10. Za nastavitev napetosti pasov avtosedeža in
prilagoditev slednjih telesu otroka, previdno
vlecite regulacijski trak I, vse dokler ne dosežete
prave napetosti (slika 17).
11. Preverite, ali je avtosedež pravilno pritrjen, kakor
prikazuje slika (slika 18).
POZOR!
• Vedno se prepričajte, da je pas enakomerno
porazdeljen po vseh točkah in da ni zavozlan.
• Preverite, ali prečni pas pravilno poteka prek
ramen otroka in se prepričajte, da ne pritiska na
vrat; po potrebi nastavite naslon za glavo.
• Prepričajte se, da je navijalo varnostnega pasu
vozila pomaknjeno nazaj (ali kvečjemu poravnano)
s hrbtnim naslonom sedeža vozila.
Če želite sneti otroka iz avtosedeža skupine 2 in 3:
1. Varnostni pas vozila sprostite iz zaponke.
2. Varnostni pas vozila snemite s telesa otroka.
3. Otroka varno snemite iz avtosedeža.
Če želite otroka vzeti iz avtosedeža, pritisnite na gumb
zaponke in popustite pasove (slika 19).
PRITRDITEV AVTOSEDEŽA V VOZILO IN NAMESTITEV
OTROKA PRI SKUPINAH 2 in 3 (15-36 KG) S HRBTNIM
NASLONOM
Za spremembo konfiguracije avtosedeža s skupine
1 na skupino 2 oz. 3, je potrebno najprej sneti pasove,
kar storite sledeč spodnjemu postopku:
1. Pasove avtosedeža sprostite iz zaponke (slika
14).
2. Zavrtite in snemite pritrdilni ploščici pasov R,
ki se nahajata pod sediščem (slika 20A), tako
da ju povlečete skozi dve odprtini na tekstilni
prevleki (slika 20B).
3. Konca pasov snemite s pritrdilne plošče Q
(slika 21).
4. Obrnite dve pritrdilni ploščici pasov N in ju
snemite s hrbtnega naslona (slika 22).
5. S prednje strani snemite oba kraka pasov, tako
da ju povlečete skozi rdeče obarvani reži za
prehod pasov C (slika 23).
6. Odstranjena pasova pospravite.
7. Zaponko in raznožni sistem iz blaga povlecite
skozi odgovarjajoči režo, ki se nahaja na sredi
sedišča, nato pa vse namestite v odgovarjajoči
prostor na sedišču (slike 24A, 24B in 24C).
Sedaj je avtosedež pripravljen in oblikovan za
namestitev v skupini 2 in 3.
POZOR! Če avtosedeža ne boste odstranili iz vozila,
varnostni pas vozila ponovno pritrdite v zaponko,
tako da slednja zadrži avtosedež na vozilu tudi brez
otroka; v nasprotnem primeru je avtosedež lahko ob
nenadnem zaviranju ali nezgodi nevaren.
PRITRDITEV AVTOSEDEŽA V VOZILO IN NAMESTITEV
OTROKA PRI SKUPINI 3 (22-36 KG) BREZ HRBTNEGA
NASLONA
V skupinah 1 (9-18 kg) in 2 (15-25 kg), je uporaba
sedeža dovoljena le, če je hrbtni naslon ustrezno
pritrjen na sedišče.
V skupini 3 (22-36 kg), lahko avtosedež uporabljate na
dva različna načina, Z (ta izbira je vsekakor varnejša in
bolj priporočena) ali BREZ hrbtnega naslona.
Za uporabo brez hrbtnega naslona, je potrebno
naslon sneti s sedišča:
1. Avtosedež postavite na vodoravno površino, tako
da je spodnji del sedišča dostopen (Slika. 30).
2. Ročici za sprostitev hrbtnega naslona T obrnite
v označeno smer (slika 31).
3. Hrbtni naslon izvlecite iz sedišča (slika 32).
4. Sedišče avtosedeža namestite tako, da se tesno
prilega hrbtnemu naslonu vozila (slika 33).
5. Otroka posedite v avtosedež in varnostni pas
vozila vpnite v zaponko, tako da poteka trebušni
krak pasu pod naslonom za roko avtosedeža,
prečni krak pasu pa nad njim (slika 34).
6. Prečni krak pasu pozorno napnite, tako da poteka
nad ramenom otroka (slika 35).
8. Avtosedež namestite na izbrani sedež tako, da
bo obrnjen v smer vožnje (slika 25).
9. Prečni krak varnostnega pasu vozila povlecite
za naslon za glavo in skozi odgovarjajočo rdečo
51
POZOR! Za pritrditev hrbtnega naslona na sedež,
ponovite zgornji postopek po nasprotnem vrstnem
redu. Po zaključenem postopku pritrditve, preverite,
ali sta zgornji in spodnji del sedišča med seboj
pravilno spojena.
NASTAVITEV NASLONA ZA GLAVO PO VIŠINI
Naslon za glavo ima neskončne možnosti nastavitve
po višini, tako da omogoča kar najboljše prileganje
avtosedeža višini otroka. Optimalna nastavitev
omogoča:
• da je glava vedno dobro zaščitena in zadržana
(skupina 1-2-3).
• da so varnostni pasovi avtosedeža vedno na pravilni višini, to je na višini ramen (skupina 1).
• da je prečni varnostni pas vozila vedno na pravilni
višini, zahvaljujoč vgrajenim režam za potek pasov
v naslonu za glavo C (skupina 2-3).
Za nastavitev naslona za glavo po višini, obračajte
gumb A, ki se nahaja na vrhu hrbtnega naslona, vse
dokler ne dosežete želene višine (slika 16).
odlepite vse pritrdilne ježke in izvlečete dva
kraka pasu (slika 41).
5. Hrbtni naslon ločite od sedišča, kakor je razloženo v poglavju »PRITRDITEV OTROŠKEGA
AVTOSEDEŽA V VOZILO IN NAMESTITEV
OTROKA V SKUPINI 3 (22-36 KG) BREZ HRBTNEGA
NASLONA (točke 1-3).
6. Prevleko snemite s sedeža tako, da odlepite vse
ježke in odprete zadrge (slika 42).
Pri namestitvi sestavnih delov prevleke v izvorni
položaj, izvedite zgornji postopek po nasprotnem
vrstnem redu.
ČIŠČENJE PLASTIČNIH IN KOVINSKIH DELOV
Za čiščenje kovinskih ali plastičnih delov uporabljajte
le vlažno krpo. Prepovedana je uporaba abrazivnih
detergentov ali topil.
Premičnih delov avtosedeža se ne sme mazati.
KONTROLA NEOPOREČNOSTI SESTAVNIH DELOV
Svetujemo vam, da redno preverjate integriteto in
obrabo naslednjih sestavnih delov:
• Prevleka: Prepričajte se, da polnilo nikjer ne
izhaja iz podloge. Prepričajte se, da šivi nikjer
niso poškodovani.
• Pasovi: Prepričajte se, da ni blago nikjer scefrano,
kar bi očitno stanjšalo debelino regulacijskega
traku, v raznožnem sistemu, na ramenskih pasovih
in v predelu ploščice za nastavitev pasov.
• Plastični deli: Preverite obrabljenost plastičnih
delov, na katerih ne sme biti očitnih znakov
poškodbe ali razbarvanosti.
PONOVNA NAMESTITEV PASOV ZA UPORABO V
SKUPINI 1 (9-18 KG)
Če želite pasove ponovno namestiti na avtosedež,
ravnajte na naslednji način:
1. Združite jezička dveh krakov pasu, vstavite ju v
zaponko, da se zaskočita (slika 36).
2. Pritrdilni ploščici vstavite v sedišče R skozi
podlogo, tako da izstopita prek spodnjega dela
sedišča (slika 37).
3. Ploščici za pritrditev ramenskih zaščit in prehoda
pasov N povlecite najprej skozi dve rdeči reži za
prehod prečnih pasov C in nato skozi hrbtni
naslon (slika 38).
4. Spojite konca pasov na pritrdilno ploščico Q
(slika 39).
POZOR! Če je avtosedež deformiran ali močno
obrabljen, ga je potrebno zamenjati, saj bi lahko
izgubil izvorne varnostne lastnosti.
VZDRŽEVANJE IN ČIŠČENJE
ČIŠČENJE PREVLEKE
Prevleka avtosedeža je v celoti snemljiva in pralna
ročno ali v pralnem stroju na 30°C. Za pranje upoštevajte navodila, ki so prikazana na etiketi prevleke
z naslednjimi simboli za pranje:
Pranje v
pralnem stroju
na 30°C
Ročno
pranje
SHRANJEVANJE IZDELKA
Ko ni nameščen v vozilu, vam svetujemo da avtosedež
hranite v suhem prostoru, daleč od toplotnih virov
in ga zaščitite pred prahom, vlago in neposredno
sončno svetlobo.
Prepovedano Prepovedano
Prepovedano Prepovedano
kemično čiščenje
sušenje v
beljenje
likanje
sušilnem stroju
Ne uporabljajte abrazivnih detergentov ali topil.
Prevleke ne ožemajte, temveč pustite naj se posuši,
ne da bi jo oželi.
Za odstranitev različnih sestavnih delov prevleke
iz blaga s strukture avtosedeža, ravnajte na naslednji način:
1. Pasove avtosedeža sprostite iz zaponke (slika
14).
2. Zavrtite pritrdilni ploščici pasov R, ki se nahajata
pod sediščem (slika 20A) in ju snemite, tako
da ju povlečete skozi dve reži na prevleki iz
blaga (slika 20B).
3. Prevleko snemite z naslona za glavo (slika 40).
4. Prevleko snemite s hrbtnega naslona, tako da
ODALAGANJE IZDELKA
Po poteku predvidene življenjske dobe avtosedeža,
ga ne uporabljajte več in ga odložite med odpadki.
Iz okoljevarstvenih razlogov, različne dele razstavite
skladno s tem, kar predvideva veljavna zakonodaja
v vaši državi.
ZA DODATNE INFORMACIJE:
ARTSANA SPA
Služba za stranke
Ul. Saldarini Catelli, 1
22070 Grandate COMO-ITALIJA
Brezplačna tel. številka 800.188.898
www.chicco.com
52
CS Návod k použití
DŮLEŽITÉ! PŘEČTĚTE SI POZORNĚ PŘILOŽENÉ
INSTRUKCE PRO POUŽÍTÍ!
• Při montáži a připevnění výrobku přesně dodržujte
návod k použití. Nedovolte, aby výrobek používaly
osoby, které si návod k použití nepřečetly!
• Uchovejte tento návod pro příští použití.
• POZOR! Podle statistik dopravních nehod jsou
zadní sedadla ve většině případů bezpečnější než
sedadlo přední: doporučuje se proto připevnit
autosedačku na zadní sedadlo. Nejbezpečnější
je prostřední zadní sedadlo, pokud je vybaveno
tříbodovým autopásem.
• Doporučujeme, aby všichni spolucestující byli
informováni o způsobu odepnutí dítěte v případě nutnosti.
• Bude-li autosedačka připevněna na přední sedadlo
s aktivovaným čelním airbagem, doporučuje se
pro větší bezpečnost posunout sedadlo co nejvíce
dozadu, kompatibilně s přítomností ostatních
cestujících na zadním sedadle.
• Nikdy nepoužívejte autosedačku na sedadla
otočená bočně nebo proti směru jízdy.
• Připevněte autosedačku pouze na sedadla
správně upevněná ke konstrukci auta a otočená
po směru jízdy. Velkou pozornost věnujte sklápěcím či otočným sedadlům, zkontrolujte zda jsou
správně ukotvená, v případě nehody by mohla
představovat nebezpečí!
• Věnujte pozornost umístění autosedačky do
auta, aby nepřekážela posuvnému sedadlu
nebo dveřím auta.
• Nikdy nepřipevňujete autosedačku na sedadlo auta vybavené pouze břišním autopásem
(dvoubodovým).
• Žádná autosedačka nemůže zajistit naprostou
bezpečnost dítěte v případě nehody, její použití
však snižuje riziko vážných poranění a smrti.
• Riziko vážného poranění dítěte nejen v případě
nehody, ale i za jiných okolností (např. při prudkém
zabrzdění atd.) je větší, jestliže pokyny uvedené
v tomto návodu nejsou přísně dodržovány: vždy
se ujistěte, že je autosedačka k sedadlu správně
připevněna.
• Je-li autosedačka poškozená, deformovaná nebo
příliš dlouho používaná, musí být vyměněna,
protože mohla pozbýt původní bezpečnostní
vlastnosti.
• Neprovádějte na výrobku úpravy a změny bez
schválení výrobce.
• Neinstalujte doplňky, náhradní díly a součásti,
které nebyly dodané výrobcem.
• Nikdy z žádného důvodu neponechávejte dítě
v autosedačce bez dozoru.
• Nevkládejte nic, co by nebylo schváleným doplňkem pro tento výrobek mezi sedadlo auta a
autosedačku nebo mezi autosedačku a dítě:
v případě nehody by autosedačka nemusela
správně fungovat.
• Stálo-li auto delší dobu na slunci autosedačku
pozorně prohlédněte, než do ní dítě umístíte;
ubezpečte se, že některé části nejsou rozpálené:
•
•
•
•
•
•
•
•
•
•
•
v takovém případě než dítě posadíte do autosedačky ji nechte vychladnout, abyste předešli
popáleninám.
I v případě menší nehody může být autosedačka
poškozena, aniž by tato poškození byla na první
pohled viditelná: je proto nutné ji vyměnit.
Nepoužívejte autosedačky z druhé ruky: mohou mít
strukturální na první pohled neviditelná poškození,
která však ovlivňují bezpečnost výrobku.
Společnost Artsana není zodpovědná v případě
nesprávného používání výrobku.
Potah může být nahrazen pouze potahem
schváleným od výrobce, neboť je nedílnou
součástí výrobku. Autosedačka nesmí být nikdy
používána bez potahu aby nebyla ohrožena
bezpečnost dítěte.
Zkontrolujte, jestli pruh pásu není zkroucený a
zabraňte, aby tento pás nebo části autosedačky
zůstaly přivřené ve dveřích auta nebo se třely
o ostré hrany.
Autosedačka není použitelná, je-li pás pořezaný
nebo roztřepený.
V případě, že autosedačka nepřeváží dítě, musí
zůstat připevněna nebo musí být uložena v zavazadlovém prostoru. Nepřipevněná autosedačka
představuje nebezpečí pro cestující v případě
nehody nebo prudkého zabrzdění.
Vyhněte se přepravování zavazadel či předmětů,
především na zadní přihrádce automobilu, které
nejsou upevněny nebo bezpečně umístěny:
v případě nehody nebo prudkého zabrzdění
by mohly zranit spolucestující.
Ujistěte se, že opěrka hlavy sedadla nepřekáží
opěrce hlavy autosedačky: nesmí ji tlačit dopředu.
Pokud by k tomu došlo, odmontujte opěrku
hlavy ze sedadla auta, na něž je autosedačka
připevněna a neukládejte ji volně na zadní
přihrádku automobilu!
Ujistěte se, že všichni cestující v autě mají zapnutý
bezpečnostní pás, a to nejen pro jejich vlastní bezpečnost ale i proto, že by během jízdy
v případě nehody či prudkého zabrzdění mohli
zranit dítě.
V případě dlouhých cest dělejte časté zastávky.
Dítě se velmi snadno unaví. Z žádného důvodu
nevyndavejte dítě za jízdy z autosedačky. Vyžaduje-li dítě pozornost, je nutné najít bezpečné
místo a zastavit.
NÁVOD K POUŽITÍ
OBSAH
• Popis součástí
• Vlastnosti výrobku
• Omezení a podmínky použití týkající se výrobku
a sedadla automobilu
• Připevnění autosedačky do automobilu a umístění
dítěte ve Skup. 1 (9-18 kg)
• Připevnění autosedačky do automobilu a umístění
dítěte ve Skup. 2-3 (15-36 kg) s opěrkou zad
• Připevnění autosedačky do automobilu a umístění
dítěte ve Skup. 3 (22-36 kg) bez opěrky zad
• Regulace výšky opěrky hlavy
• Zpětné namontování pásů pro použití ve Skup.
53
•
1 (9-18 kg)
Čištění a údržba
Norem UN/ECE č. 16 nebo jiných obdobných
standardů.
5. V případě pochybností kontaktovat výrobce zařízení
na upoutání nebo prodejce.
POPIS SOUČÁSTÍ
Obr. 1 (zepředu)
A. Regulace opěrky hlavy a pásů
B. Opěrka hlavy
C. Průběh šikmého pásu
D. Ramenní pásy
E. Pásy autosedačky
F. Přezka
G. Mezinožní ochrana
H. Tlačítko regulace pásů
I. Regulační popruh pásů
OMEZENÍ A PODMÍNKY POUŽITÍ TÝKAJÍCÍ SE
VÝROBKU A SEDADLA AUTOMOBILU
POZOR! Přísně dodržujte následující omezení a
podmínky týkající se výrobku a sedadla automobilu:
v opačném případě není bezpečnost zaručena!
• Autosedačka je schválena pro použití pro děti
s váhou výlučně od 9 do 36 kg (od 9 měsíců do
zhruba 12 let).
• Sedadlo auta musí být vybaveno tříbodovým
bezpečnostním pásem, statickým nebo se
samočinným navíjením, schváleným podle
Norem UN/ECE č. 16 nebo jiných obdobných
standardů (Obr. 5).
• Nikdy nepřipevňujte autosedačku dvoubodovým
auto-pásem (Obr. 6)!
• Autosedačka může být připevněna na přední
sedadlo na straně spolucestujícího nebo na
kterékoli zadní sedadlo. Nikdy nepoužívejte tuto
autosedačku na sedadla otočená bočně nebo
proti směru jízdy (Obr. 7)!
• Výrobek je určen výhradně pro použití jako
“autosedačka“ a ne pro používání v bytě.
• Připevněte autosedačku správně tak, aby opěrka
hlavy sedadla automobilu nepřekážela nijak
opěradlu zad autosedačky.
Obr. 2 (z profilu)
J. Opěradlo
K. Sedátko
L. Opěrky rukou
M. Průchod pásů
Obr. 3 (zezadu)
N. Svorky pro upevnění ramenních pásů a průchodu pásů
O. Popruhy pásů
P. Místo pro protažení autopásů (pouze instalace
pro skupinu 1)
Q. Svorka pro upevnění pásů
Obr. 4 (zespodu)
R. Svorky pro upevnění pásů k sedátku
S. Svorka pro upevnění přezky k sedátku
T. Páčky pro odepnutí opěradla zad od sedátka
PŘIPEVNĚNÍ AUTOSEDAČKY DO AUTOMOBILU A
UMÍSTĚNÍ DÍTĚTE PRO SKUPINU 1 (9-18 KG)
POZOR! Tento návod se týká, a to jak text tak obrázky,
připevnění autosedačky na zadní sedadlo na pravé
straně. Pro připevnění sedačky na ostatní sedadla je
nutno dodržovat stejný postup.
VLASTNOSTI VÝROBKU
• Autosedačka je homologovaná pro„skupiny 1,2
a 3“ pro přepravu dětí od 9 do 36 kg (zhruba od
9 měsíců do 12 let) a splňuje evropskou normu
ECE R44/04.
• Homologace je typu „univerzální“, autosedačka
tudíž může být používána v jakémkoli modelu
automobilu. POZOR! „Univerzální“ znamená, že
je kompatibilní s většinou, avšak ne se všemi
sedadly automobilů!
1. Umístěte autosedačku po směru jízdy na sedadlo
zvolené pro připevnění (Obr. 8).
2. Provlékněte tříbodový bezpečnostní pás automobilu příslušným místem P opěradla zad autosedačky
(Obr. 9A a 9B), a vytáhnout jej příslušným otvorem
na druhé straně opěradla (Obr. 9C).
3. Upněte bezpečnostní pás automobilu do přezky
tak, aby jak břišní, tak i šikmý popruh tohoto pásu
procházel pod opěrkou paží (Obr. 10).
4. Co nejvíce napněte bezpečnostní pás automobilu
tak, aby autosedačka dobře přilnula k sedadlu
(Obr. 11), je-li to nutné, autosedačku přitlačte
kolenem.
5. Zkontrolujte, zda je připevnění správné, bezpečnostní pás dobře napnutý a jestli je autosedačka
důkladně fixována a na sedadle dobře drží. Jestliže
tomu tak není, zopakujte postup připevnění od
začátku (Obr. 12).
DŮLEŽITÉ UPOZORNĚNÍ
1. Toto zařízení na upoutání dětí je „Univerzální“,
schválené podle normy č. 44, pozměňovací
návrhy série 04. Vhodné k obecnému použití
ve vozidlech a kompatibilní s většinou, ale ne
se všemi sedadly automobilů.
2. Naprostá kompatibilita je snáze dosažitelná
v případech, kdy se v příručce od vozidla nachází
prohlášení konstruktéra automobilu, že vůz je
vybaven„Univerzálními“ zařízeními na upoutání
dětí v tomto věkovém rozmezí.
3. Toto zařízení na upoutání bylo hodnoceno jako
„univerzální“ podle podmínek pro homologace
přísnějších než u předchozích modelů, které
neobsahují toto upozornění.
4. Vhodné pouze pro použití ve vozidlech vybavených tříbodovými autopásy, statickými nebo
se samočinným navíjením, schválenými podle
POZOR!
• Vždy se ujistěte, že je bezpečnostní pás stejnoměrně rozmístěný ve všech bodech a není
zakroucený.
• NIKDY neprotahujte bezpečnostní pás automobilu
jinými místy než je uvedeno!
54
není správná, ji upravte: viz článek „REGULACE
VÝŠKY OPĚRKY HLAVY“.
12. Táhněte šikmou část bezpečnostního pásu automobilu směrem k jeho samočinnému navíjení
tak, aby byl celý pás napjatý a dobře přiléhal
k hrudníku a nohám dítěte (Obr. 28).
13. Ujistěte se, že je autosedačka správně fixovaná tak,
jak je znázorněno na obrázku (Obr. 29).
Pro připevnění dítěte do autosedačky:
6. Stiskněte tlačítko regulace pásu H a zároveň
uchopte a táhněte směrem k sobě spodní část
pásů sedačky, dokud není dosaženo maximálního
možného napnutí (Obr. 13).
7. Odepněte pásy autosedačky stisknutím tlačítka
přezky a položte stranou (Obr. 14).
8. Opatrně posaďte dítě do autosedačky, přizpůsobte
pásy kolem jeho těla aniž byste je natahovali, spojte
oba jazýčky pásu (Obr. 15A) a znovu zapněte do
přezky (Obr. 15B).
9. Pomocí příslušného regulačního mechanismu A
umístěného na vrcholku opěradla zad regulujte
výšku opěrky hlavy autosedačky tak, aby pásy
vycházely ve výši ramen dítěte (Obr. 16).
10. Regulujte natažení pásů autosedačky tak, aby
se přizpůsobily tělu dítěte, opatrně táhněte za
regulační popruh I až dosáhnete správné úrovně
natažení (Obr. 17).
11. Ujistěte se, že je autosedačka správně fixována,
jak je uvedeno na obrázku (Obr. 18).
POZOR!
• Vždy se ujistěte, že je bezpečnostní pás stejnoměrně rozmístěný ve všech bodech a není
zakroucený.
• Ujistěte se, že šikmý pás je správně upevněný
proti ramenu dítěte a netlačí na krk; je-li to nutné,
upravte výšku opěrky hlavy.
• Ujistěte se, že samočinné navíjení bezpečnostního
pásu auta je v poloze vzadu (nebo maximálně
na stejné úrovni) vzhledem k opěradlu sedadla
automobilu.
Pro vyjmutí dítěte z autosedačky pro skupinu 2 a 3:
1. Odepněte bezpečnostní pás automobilu z
přezky.
2. Stáhněte bezpečnostní pás automobilu z těla
dítěte.
3. Opatrně vyjměte dítě z autosedačky.
Pro vyjmutí dítěte z autosedačky stiskněte tlačítko
přezky a odpojte bezpečnostní pásy (Obr. 19).
PŘIPEVNĚNÍ AUTOSEDAČKY DO AUTOMOBILU A
UMÍSTĚNÍ DÍTĚTE PRO SKUPINU 2-3 (15-36 KG)
S OPĚRKOU ZAD
Pro změnu konfigurace autosedačky ze skupiny
1 na skupinu 2-3 je nutné nejprve vyjmout pásy;
postupovat níže popsaným způsobem:
1. Odepněte pásy autosedačky z přezky (Obr. 14).
2. Otočte a odepněte obě svorky pro fixování pásů R
umístěné pod sedátkem (Obr. 20A), vytáhněte je i
z obou otvorů v látkovém potahu (Obr. 20B).
3. Odepněte oba okraje pásů ze svorky pro fixaci
Q (Obr. 21).
4. Otočte a odepněte dvě svorky průběhu pásů N
z opěrky zad (Obr. 22).
5. Čelně vytáhněte oba pruhy pásu, protáhněte je
oběma červenými otvory pro průchod šikmého
pásu C (Obr. 23).
6. Uložte na příslušném místě oba odejmuté
pásy.
7. Protáhněte přezku a mezinožní látkovou ochranu příslušným otvorem umístěným ve středu
sedátka, vše uložte na určené místo v sedátku
(Obr. 24A, 24B e 24C).
Nyní je autosedačka připravena a konfigurována pro
připevnění pro skupinu 2 a 3.
8. Umístěte autosedačku po směru jízdy na sedadlo
zvolené pro připevnění (Obr. 25).
9. Protáhněte šikmou část bezpečnostního pásu
automobilu za opěrkou hlavy a přes příslušný
červený průchod pásu C pod touto opěrkou.
Opatrně dítě posaďte do autosedačky a ujistěte
se, že se zády dobře opírá o opěradlo autosedačky (Obr 26).
10. Připněte bezpečnostní pás automobilu do přezky
tak, aby jak břišní, tak i ramenní popruh pásu
procházel pod opěrkou paží (Obr. 27).
11. Zkontrolujte výšku opěrky hlavy a v případě, že
POZOR! V případě, že nemáte v úmyslu vyndat
autosedačku z auta, nezapomeňte znovu zapnout bezpečnostní pás do příslušné přezky tak, aby tato přezka
fixovala autosedačku k automobilu i bez přítomnosti
dítěte; v opačném případě by mohla představovat
nebezpečí při brzdění nebo při nehodě.
PŘIPEVNĚNÍ AUTOSEDAČKY DO AUTOMOBILU
A UMÍSTĚNÍ DÍTĚTE PRO SKUPINU 3 (22-36 KG)
BEZ OPĚRKY ZAD
Pro skupiny 1 (9-18 kg) a 2 (15-25 kg) je používání
autosedačky povoleno POUZE s opěrkou zad správně
připevněným k sedátku.
Pro skupinu 3 (22-36 kg) je možno autosedačku
používat dvojím způsobem, buďto s opěrkou zad
(volba vždy bezpečnější a tudíž doporučená) nebo
BEZ opěrky zad.
Pro použití bez opěrky zad je nutné odpojit opěrku
zad od sedátka:
1. Umístěte autosedačku do vodorovné polohy
tak, aby byla přístupná spodní část sedátka
(Obr. 30).
2. Otočte dvěma páčkami odpojení od opěradla T
uvedeným směrem (Obr. 31).
3. Vytáhněte opěrku ze sedátka (Obr. 32).
4. Umístěte sedátko autosedačky tak, aby přilnulo
k opěradlu auta (Obr. 33).
5. Umístěte dítě do autosedačky a zapněte bezpečnostní pás automobilu tak, aby břišní popruh
procházel pod pažní opěrkou autosedačky a
šikmý popruh nad ní (Fig. 34).
6. Pečlivě napněte šikmý popruh pásu tak, aby
probíhal po rameni dítěte (Obr. 35).
POZOR! Pro upevnění opěrky zad k sedátku zopakujte
55
BEZ OPĚRKY ZAD” (body 1-3).
6. Stáhněte potah sedátka, rozepněte všechny
připevňovací suché zipy a rozepněte oba zipy
(Obr. 42).
Při vracení všech součástí potahu do původní polohy
postupujte opačným směrem v právě popsaných
operacích.
právě popsaný postup opačným směrem. Po ukončení
připevnění se ujistěte, že horní a spodní části sedátka
jsou mezi sebou správně spojeny.
REGULACE VÝŠKY OPĚRKY HLAVY
Výšku opěrky hlavy je možno nastavit do mnoha poloh
tak, aby se autosedačka co nejlépe přizpůsobila výšce
dítěte. Optimální regulace umožňuje:
• aby hlava byla vždy dobře fixována a chráněna
(Sk. 1-2-3).
• aby bezpečnostní pásy autosedačky byly vždy ve
správné výšce, tedy ve výši ramen (Sk. 1).
• aby šikmý bezpečnostní pás automobilu byl
vždy ve správné výšce díky průchodům pásu
zabudovaným v opěrce hlavy C (Sk. 2-3).
Pro regulaci výšky opěrky hlavy otáčet páčkou A
umístěnou na vrcholku opěradla až do dosažení
požadované výšky (Obr. 16).
ČIŠTĚNÍ PLASTIKOVÝCH A KOVOVÝCH ČÁSTÍ
K čištění plastikových nebo lakovaných kovových
částí používejte pouze vlhkou látku. Nikdy nepoužívat
abrazivní nebo rozpouštěcí čisticí prostředky.
Pohyblivé části autosedačky není třeba nijak
mazat.
KONTROLA NEPORUŠENOSTI DÍLŮ
Doporučujeme pravidelně kontrolovat neporušenost
a stav opotřebování následujících dílů:
• Potah: ujistěte se, že nevypadává vycpávka a že
se její části neuvolňují. Kontrolujte stav švů, které
musí být vždy neporušené.
• Pásy: ujistěte se, že nedochází k nepravidelnému
roztřepení textilní tkaniny s výrazným snížením
tloušťky v blízkosti regulačního pásu, mezinožní
ochrany, na ramenních pásech a v oblasti svorky
pro regulování pásů.
• Plastikové části: kontrolujte stav opotřebení všech
plastikových dílů, na nichž nesmí být viditelná
poškození nebo vyblednutí.
ZPĚTNÉ NAMONTOVÁNÍ PÁSŮ PRO POUŽITÍ VE
SKUP. 1 (9-18 KG)
Pro zpětné namontování pásů k sedačce postupujte
následujícím způsobem:
1. Spojte oba jazýčky popruhů pásu, zasuňte je a
zapněte do přezky (Obr. 36).
2. Zasuňte obě svorky pro fixaci k sedátku R přes
potah a vytáhněte je ze strany pod sedátkem
(Obr. 37).
3. Protáhněte obě svorky upevnění ramen a průchodu
pásů N nejprve přes oba červené průchody šikmých
pásů C a poté opěradlem zad (Obr. 38).
4. Zapněte oba konce pásů do svorky pro upevnění
Q (Obr. 39).
POZOR! V případě, že je autosedačka deformovaná
nebo silně opotřebená, musí být vyměněna: mohla
pozbýt původní bezpečnostní vlastnosti.
ČIŠTĚNÍ A ÚDRŽBA
PRANÍ POTAHU
Potah autosedačky je zcela snímatelný a je možno jej
prát ručně nebo v pračce na 30°C. Při praní se říďte
návodem uvedeným na štítku potahu, obsahujícím
následující symboly pro praní:
Prát ve studené
vodě do 30°C
Prát ručně
Nebělit
Nesmí se
chemicky
čistit
Nelze sušit v
sušičce
SKLADOVÁNÍ VÝROBKU
Není-li autosedačka instalována v autě, doporučujeme ji skladovat na suchém místě daleko od zdrojů
tepla a chránit před prachem, vlhkem a přímým
slunečním zářením.
LIKVIDACE VÝROBKU
Při dosažení předpokládané hranice únosnosti
použití autosedačky ukončit její používání a vyhodit
ji. Z důvodů ochrany životního prostředí rozdělit
různé typy odpadů podle státních norem platných
ve vaší zemi.
Nežehlit
Nikdy nepoužívejte abrazivní nebo rozpouštěcí
čisticí prostředky. Potah neodstřeďovat a nechat
uschnout bez ždímání.
Při sundání různých součástí textilního potahu
ze struktury autosedačky postupujte následovně
popsaným způsobem:
1. Odepněte pásy sedačky z přezky (Obr. 14).
2. Otočte a odepněte obě svorky pro upevnění
pásů R umístěné pod sedátkem (Obr. 20A),
vytáhnout je i z obou otvorů v látkovém potahu
(Obr. 20B).
3. Stáhněte potah z opěrky hlavy (Obr. 40).
4. Stáhněte potah z opěrky zad, rozepnout všechny
připevňovací suché zipy a vytáhnout obě větve
pásu (Obr. 41).
5. Odpojte opěrku od sedátka, jak je popsáno v článku
“ PŘIPEVNĚNÍ AUTOSEDAČKY DO AUTOMOBILU
A UMÍSTĚNÍ DÍTĚTE PRO SKUPINU. 3 (22-36 KG)
PRO DALŠÍ INFORMACE:
ARTSANA SPA
Služba zákazníkům
Via Saldarini Catelli, 1
22070 Grandate COMO-ITALIA
Tel. Zelené číslo 800.188.898
www.chicco.com
Oficiální distributor pro ČR:
PICCOLLO, spol.s.r.o.
Pernerova 35
186 00 Praha 8
56
SK Návod na použitie.
DôLEŽITÉ! PREČÍTAJTE SI OKAMŽITE.
• Pred umiestnením výrobku si pozorne prečítajte
návod na použitie. Je potrebné zabrániť tomu, aby
niekto použil výrobok bez toho, aby si prečítal
návod na použitie.
• Uchovajte si návod pre budúce použitie.
• POZOR! Zo štatistík o dopravných nehodách
vychádza, že zadné sedadlá auta sú vo všeobecnosti
bezpečnejšie ako predné. Je preto vhodnejšie umiestniť autosedačku na zadné sedadlá. Najbezpečnejšie
je zadné sedadlo v strede, ak má bezpečnostný
pás s tromi úchytnými bodmi.
• Odporúča sa, aby všetci spolucestujúci boli
informovaní o spôsobe, akým dieťa odpútať v
prípade nebezpečenstva.
• Ak autosedačku uložíme na predné sedadlo s
aktivovaným čelným airbagom, pre väčšiu bezpečnosť sa odporúča posunúť predné sedadlo čo
najviac dozadu s ohľadom na cestujúcich sediacich
na zadnom sedadle.
• Nikdy neukladajte autosedačku na sedadlá
obrátené nabok alebo sedadlá umiestnené v
protismere jazdy.
• Autosedačku umiestňujte výlučne na sedadlá,
ktoré sú správne upevnené ku konštrukcii auta a
otočené v smere jazdy. Dbajte, aby samosklápajúce a otáčajúce sa sedadlá boli pevne uchytené,
lebo v prípade nehody by mohli predstavovať
nebezpečenstvo.
• Pripevnite autosedačku do auta pozorne, aby
pohyblivé sedadlo alebo dvere nenarážali do
sedačky.
• Nikdy neumiestňujte autosedačku na sedadlo
vybavené brušným bezpečnostným pásom (s
dvoma úchytnými bodmi).
• Žiadna autosedačka nemôže zabezpečiť úplnú
bezpečnosť dieťaťa v prípade dopravnej nehody,
ale použitie tohto výrobku významne znižuje riziko
ťažkého, až smrteľného poranenia.
• Riziko vážneho poranenia dieťaťa stúpa, a to
nielen v prípade dopravnej nehody, ale aj pri
iných okolnostiach (napr. pri prudkom zabrzdení,
atď.), ak nebudete pozorne dodržiavať odporúčania obsiahnuté v tomto návode. Zakaždým
je potrebné preveriť, či je autosedačka správne
prepevnená k sedadlu.
• V prípade, žeby bola autosedačka poškodená,
zdeformovaná alebo zjavne opotrebovaná, odporúča
sa ju nahradiť novou, pretože už možno stratila
pôvodné bezpečnostné parametre.
• Nerobte na výrobku žiadne úpravy bez súhlasu
výrobcu.
• Nevkladajte do výrobku náhradné, prídavné
diely a iné komponenty, ktoré nepochádzajú
od výrobcu.
• Nikdy za žiadnych okolností nenechávajte dieťa
v autosedačke bez vašej prítomnosti.
• Nikdy nevkladajte predmety, ktoré by neodsúhlasil
výrobca, ani medzi autosedačku a sedadlo auta,
ani medzi autosedačku a dieťa. Ak by ste tam
•
•
•
•
•
•
•
•
•
•
•
•
niečo vložili, v prípade nehody by autosedačka
nemusela fungovať správne.
Ak auto pobudne dlhšiu dobu na slnku, skôr než
do autosedačky posadíte dieťa, presvedčte sa, či
niektoré jej časti nie sú rozpálené. Chvíľu počkajte,
kým vychladnú a až potom do autosedačky posaďte
dieťa, inak by sa mohlo popáliť.
Po každej, dokonca i malej dopravnej nehode, je
potrebné sedačku nahradiť novou, aj keď sa nám
voľným okom môže zdať úplne v poriadku.
Nepoužívajte autosedačky z druhej ruky. Hoci by
sa mohli zdať na prvý pohľad v poriadku, materiál
už môže byť poškodený, a autosedačka tak nemusí
spĺnať bezpečnostné kritériá.
Spoločnosť Artsana nezodpovedá za nesprávne
použitie jej výrobku.
Poťah môže byť nahradený iba so súhlasom výrobcu, keďže tvorí nedeliteľnú súčasť autosedačky.
Autosedačka nesmie byť používaná bez poťahu,
aby nebola ohrozená bezpečnosť dieťaťa.
Skontrolujte, či pás nie je pokrútený, či pás alebo
časti autosedačky nie sú zaseknuté vo dverách,
alebo či sa nešúchajú o ostré hrany.
Autosedačka nesmie byť používaná, ak je pás
rozstrapkaný alebo dotrhaný.
Keď neprenášame v autosedačke dieťa, autosedačka
by mala byť jednako pripevnená alebo uložená v
kufri. Neupevnená autosedačka by mohla byť
nebezpečná pre cestujúcich v prípade dopravnej
nehody alebo pri náhlom zabrzdení.
Dbajte na to, aby ste v zadnej časti auta neprevážali
predmety, ktoré by neboli dobre zaistené alebo
bezpečne uložené. V prípade nehody alebo prudkého
zabrzdenia by mohli zraniť cestujúcich.
Presvedčte sa, či operadlo hlavy na sedadle netlačí
na operadlo autosedačky, operadlo hlavy nesmie
vytláčať dopredu operadlo autosedačky. Ak operadlo
hlavy predsa len vytláča operadlo autosedačky
dopredu, dajte operadlo zo sedadla dole a až
potom pripevnite autosedačku, no neodkladajte
operadlo na kryt batožinového priestoru.
Uistite sa, či všetci cestujúci používajú bezpečnostný
pás, jednak kvôli vlastnej bezpečnosti a jednak
aj preto, že v prípade nehody alebo prudkého
zabrzdenia by mohli zraniť dieťa.
Počas dlhých ciest robte časté prestávky. Dieťa sa
veľmi rýchlo unaví. V žiadnom prípade nevyberajte
dieťa z autosedačky, ak je auto ešte v pohybe. Ak
dieťa potrebuje vašu pozornosť, nájdite bezpečné
miesto a zastavte.
NÁVOD NA POUŽITIE
OBSAH
• Opis jednotlivých častí
• Vlastnosti výrobku
• Obmedzenia a požiadavky týkajúce sa výrobku
a sedadla auta
• Pripevnenie autosedačky do auta a uloženie dieťaťa
do sedačky skupiny 1 (9-18 kg)
• Pripevnenie autosedačky do auta a uloženie
dieťaťa do sedačky skupiny 2 -3 (15-36 kg) s
operadlom
57
• Pripevnenie autosedačky do auta a uloženie dieťaťa
do sedačky skupiny 3 (22-36 kg) bez operadla
• Regulovanie výšky operadla
• Opätovné použitie pásov pre sedačku skupiny
1(9-18 kg)
• Čistenie a údržba
ktoré nemajú toto oznámenie.
4. Zariadenie je vhodné pre použitie vo vozidlách s trojbodovým statickým alebo navíjacím bezpečnostným
pásom, homologizovaným podľa Predpisu UN/ECE
N°16 alebo iného ekvivalentného štandardu.
5. V prípade pochybností kontaktujte výrobcu alebo
predajcu zariadenia.
OPIS JEDNOTLIVÝCH ČASTÍ
Obr. 1 (čelná časť)
A. Rukoväť regulujúca operadlo hlavy a pásy
B. Operadlo hlavy
C. Otvory na prevlečenie pásov
D. Polstrovanie ramien
E. Pásy autosedačky
F. Pracka
G. Látkový pás na oddelenie nôh
H. Tlačidlo na regulovanie pásov
I. Pás, pomocou ktorého sa regulujú pásy
OBMEDZENIA A POŽIADAVKY VZŤAHUJÚCE SA
NA VÝROBOK A NA SEDADLO AUTA.
POZOR! Dôsledne rešpektujte obmedzenia a požiadavky vzťahujúce sa na výrobok a na sedadlo auta, v
opačnom prípade nie je zaručená bezpečnosť.
• Táto autosedačka je schválená pre prevoz detí s
hmotnosťou výlučne od 9 a 36 kg (od 9 mesiacov
do 12 rokov circa).
• Sedadlo auta musí byť vybavené bezpečnostnými
pásmi, ktoré sa uchytávajú v troch bodoch, pevné
alebo navíjacie, schválené podľa úprav UNI/ECE
Č°16 alebo iné štandardné pásy. (obr. 5).
• Nikdy neumiestňujte autosedačku na sedadlo s
bezpečnostným pásom s dvomi uchytávajucími
bodmi. (obr. 6).
• Autosedačku môžete umiestniť na predné sedadlo
na strane cestujúceho alebo na ktorékoľvek zadné
sedadlo. Nikdy neumiestňujte autosedačku na
sedadlá obrátené bočne alebo v protismere
jazdy. (obr. 7).
• Výrobok je určený výlučne na použitie ako autosedačka a nie na používanie doma.
• Autosedačka je správne pripevnená, ak sa operadlo
hlavy sedadla nedotýka operadla autosedačky.
Obr. 2 (zboku)
J. Operadlo
K. Sedadlo
L. Operadlá rúk
M. Otvory na prevlečenie pásov
Obr. 3 (vzadu)
N. Doštičky na uchytenie chráničov ramien, cez ktoré
prechádzajú pásy
O. Pásy
P. Otvory na prevlečenie bezpečnostných pásov
auta (iba sedačka skupiny 1)
Q. Doštička na uchytenie pásov
PRIPEVNENIE AUTOSEDAČKY DO AUTA A
ULOŽENIE DIEŤAŤA DO SEDAČKY SKUPINY 1
(9-18 KG)
POZOR! Tento návod sa vzťahuje, tak v texte, ako aj na
obrázku, k umiestneniu autosedačky na zadné sedadlo
na pravej strane. Ak chceme pripevniť autosedačku na
iných miestach, dodržujeme ten istý postup.
1. Umiestnite autosedačku na vybrané sedadlo v
smere jazdy. (obr. 8).
2. Prevlečte bezpečnostný pás s tromi záchytnými
bodmi cez príslušný otvor P na operadle autosedačky.
(obr. 9A e 9B), a vytiahnite ho z opačného otvoru
na druhej strane operadla. (obr. 9C).
3. Zapojte bezpečnostný pás do pracky tak, aby
brušný a takisto priečny pás prechádzali popod
operadlo rúk. (obr. 10).
4. Napnite čo najviac bezpečnostný pás, aby autosedačka čo najtesnejšie priľnula k sedadlu (obr. 11), ak
je to potrebné, pritlačte kolenom sedačku.
5. Overte si, či je autosedačka správne namontovaná, či je bezpečnostný pás riadne napnutý a
či je autosedačka pevne prichytená k sedadlu. V
opačnom prípade opakujte postup pripevnenia
od začiatku. (obr. 12).
Obr. 4 (zospodu)
R. Doštičky na upevnenie pásov k sedadlu
S. Doštička na upevnenie pracky k sedadlu
T. Páka na odopnutie operadla od sedadla
VLASTNOSTI VÝROBKU
• Táto sedačka “Skupina 1, 2 a 3” je schválená pre
prevoz detí s hmotnosťou od 9 do 36 kg (od 9
mesiacov do 12 rokov circa), v zmysle európskych
právnych úprav ECE R44/04.
• Ide o schválenie “Universal”, takže sedačka môže
byť použitá na akomkoľvek type auta. POZOR!
“Universal” znamená, že sa dá použiť s väčšinou
sedadiel, no nie so všetkými automobilovými
sedadlami.
DÔLEŽITÉ OZNÁMENIE
1. Toto je “Univerzálne” zariadenie na upevnenie
detí, homologizované podľa Predpisu ECE R44/04
a kompatibilné s väčšinou, ale nie so všetkými
sedadlami vozidiel.
2. Úplná kompatibilita sa ľahšie dosiahne vtedy, keď
výrobca vozidla v návode na použitie uvedie, že
vozidlo je prispôsobené na inštaláciu “Univerzálneho”
zariadenia pre upevnenie detí daného veku.
3. Toto zariadenie pre upevnenie detí bolo klasifikované
ako “Univerzálne” podľa prísnejších homologizačných
kritérií v porovnaní s modelmi predchádzajúcimi,
POZOR!
• Overte si, či je pás natiahnutý po celej dĺžke a
nie je pokrútený.
• Nikdy neprevliekajte bezpečnostný pás inak, než
58
je uvedené v návode.
• Keď je autosedačka pripevnená, môžete do nej
posadiť dieťa podľa nasledovných bodov:
6. Stlačte tlačidlo na regulovanie pásov H a súčasne
chyťte a potiahnite k sebe spodnú časť pásov sedačky
a čo najviac ich natiahnite. (obr. 13).
7. Stlačením pracky sa odpoja pásy sedačky a tie
potom položte nabok. (obr. 14).
8. Opatrne posaďte dieťa do sedačky, opásajte ho
bez toho, že by ste pásy priveľmi natiahli, spojte
jazýčky pásov (obr. 15A) a zapojte ich opäť do
pracky (obr. 15B).
9. Pomocou príslušnej rukoväte A nachádzajúcej
sa na vrchu operadla, nastavte výšku operadla
hlavy tak, aby pásy vychádzali vo výške ramien
dieťaťa. (obr. 16).
10. Ak nastavujete napätie pásov sedačky, opatrne
potiahnite regulačný pás I, kým nedosiahnete
želané napätie. (obr. 17).
11. Overte, či je sedačka správne upevnená, ako je to
naznačené na obrázku. (obr. 18).
Ak chcete dieťa zo sedačky vybrať, stlačte tlačidlo
na pracke a odpojte pásy. (obr.19).
aby sa pás natiahol a dobre priliehal k hrudníku
a nohám dieťaťa. (obr. 28).
13. Overte si, či je autosedačka správne upevnená, ako
je to naznačené na obrázku. (obr. 29).
POZOR!
• Overte si, či pás je natiahnutý po celej dĺžke a
nie je pokrútený.
• Skontrolujte, či priečny pás sa opiera o rameno
dieťaťa a netlačí ho na krku. Ak je to potrebné,
nastavte operadlo hlavy.
• Overte si, či naviják bezpečnostného pásu sa
nachádza za operadlom sedadla (v najhoršom
prípade rovnobežne s operadlom).
Ak chcete vybrať dieťa z autosedačky skupiny 2 a 3:
1. Odpojte bezpečnostný pás.
2. Odtiahnite bezpečnostný pás od dieťaťa.
3. Opatrne vyberte dieťa zo sedačky.
POZOR! Ak nemáte v úmysle vybrať autosedačku
z auta, pripútajte ju bezpečnostným pásom, aj keď
sa v nej dieťa nevozí. V opačnom prípade by mohla
spôsobiť zranenie v prípade nehody alebo prudkého
zabrzdenia.
NAMONTOVANIE SEDAČKY DO AUTA A ULOŽENIE
DIEŤAŤA DO AUTOSEDAČKY SKUPINY 2 A 3 (15-36
KG) S OPERADLOM
Ak chcete prerobiť autosedačku skupiny 1 na na
skupinu 2,3, je nevyhnutné najskôr odstrániť pásy
podľa nasledovného postupu:
1. Odpojte pásy autosedačky z pracky (obr. 14).
2. Pootočte a odpojte dve doštičky na prichytenie
pásov R nachádzajúce sa pod sedadlom (obr.20A)
a prevlečte ich cez dve medzery na textilnom
poťahu (obr. 20B).
3. Vyvlečte pásy z úchytnej doštičky Q (obr. 21).
4. Pootočte a odpojte doštičky označené písmenom
N z operadla (obr. 22).
5. Prevlečte pásy cez otvory červenej farby označené
písmenom C (obr. 23).
6. Odložte a uchovajte na vhodnom mieste pásy,
ktoré ste práve vytiahli.
7. Prevlečte pracku a látkový pás na oddelenie nôh
cez príslušnú medzeru umiestnenú v strede sedadla
a uložte ich do príslušného otvoru v autosedačke
(obr. 24A, 24B a 24C).
Teraz je autosedačka pripravená na montáž v skupine 2 a 3.
8. Položte autosedačku v smere jazdy na vybrané
sedadlo. (obr. 25).
9. Prevlečte priečny bezpečnostný pás poza operadlo
hlavy cez príslušnú medzeru červenej farby označenú písmenon C. Posaďte dieťa do autosedačky
a presvedčte sa, či jeho chrbát prilieha k operadlu
sedačky. (obr. 26).
10. Pripútajte bezpečnostný pás tak, aby brušný,
ako aj priečny pás prechádzali popod operadlo
ruky (obr. 27).
11. Skontrolujte výšku operadla hlavy, ak nie je vhodná,
upravte ju. Pozri odsek “REGULOVANIE VÝŠKY
OPERADLA HLAVY”.
12. Potiahnite priečny bezpečnostný pás k navijáku tak,
PRIPEVNENIE AUTOSEDAČKY DO AUTA A
ULOŽENIE DIEŤAŤA DO AUTOSEDAČKY SKUPINY
3 (22-36 KG) BEZ OPERADLA
V skupine 1 (9-18 kg) a 2 (15-25 kg), použitie autosedačky je povolené výlučne S operadlom namontovaným na sedadlo.
V skupine 3 (22-36 kg), má autosedačka dve možnosti
použitia, buď S operadlom (predsa len bezpečnejšie
použitie, ktoré odporúčame) alebo BEZ operadla.
Pri použití bez operadla je potrebné odpojiť operadlo
od sedadla:
1. Položte autosedačku na vodorovnú plochu, aby sme
mali prístup k dolnej strane sedadla (obr. 30).
2. Otočte dve páčky určené na odpojenie operadla
označené písmenom T v označenom smere.
(obr. 31).
3. Vyberte operadlo zo sedadla (obr. 32).
4. Položte sedadlo autosedačky tak, aby priliehalo
k operadlu sedadla (obr. 33).
5. Posaďte dieťa do autosedačky a pripútajte ho
bezpečnostným pásom tak, aby brušný pás
prechádzal popod operadlo ruky a priečny pás
ponad operadlo (obr. 34).
6. Natiahnite opatrne priečny pás tak, aby prechádzal
cez rameno dieťaťa (obr. 35).
POZOR! Ak chcete pripevniť operadlo na autosedačku opakujte horeuvedený postup, len v opačnom
poradí. Na konci sa presvedčte, či horná a dolná časť
autosedačky sú správne pripojené.
NASTAVENIE VÝŠKY OPIERKY HLAVY
Výšku opierky hlavy je možné nastaviť do rozličných
polôh, aby sme čo najlepšie prispôsobili sedačku výške
dieťaťa. Optimálne nastavenie umožňuje:
• aby sa hlava nehýbala a aby bola chránená
(skupina 1-2-3).
59
• aby pásy autosedačky boli v správnej výške, to
znamená vo výške ramien (skupina 1).
• Aby sa priečny bezpečnostný pás nachádzal
v správnej výške vďaka medzeriam, ktorými
prechádza a ktoré sú súčasťou opierky hlavy s
označením C (skupina 2-3).
Ak chcete nastaviť výšku opierky hlavy, pokrúťte
rukoväťou označenou A nachádzajúcou sa na vrchole
operadla (obr. 16).
ČISTENIE UMELOHMOTNÝCH
A KOVOVÝCH ČASTÍ
Na čistenie umelohmotných alebo kovových lakovaných častí používajte iba vlhkú handričku.
Nikdy nepoužívajte abrazívne prostriedky alebo
rozpúšťadlá. Pohyblivé časti sedačky sa nemôžu v
žiadnom prípade mazať.
KONTROLA CELISTVOSTI DIELOV
Odporúčame, aby ste pravidelne kontrolovali celistvosť
a stav nasledovných dielov:
• Poťah: Skontrolujte, či nevychádza z poťahu výplň
alebo či ste nezaznamenali jej straty. Skontrolujte
stav šitia, šité časti musia byť neporušené.
• Pásy: overte si, či sa nezačala látka rozstrapkávať
a či sa pás zjavne nezačal stenčovať v mieste
regulačného pásu, látkového pásu na oddelenie
nôh, chráničov ramien a v oblasti doštičky na
regulovanie pásov.
• Umelohmotné časti: overte si, v akom stave sa
nachádzajú všetky umelohmotné časti, ktoré by
nemali mať známky poškodenia alebo strácať
farbu.
OPATOVNÉ POUŽITIE PÁSOV PRE AUTOSEDAČKU
SKUPINY 1 (9-18 KG)
Ak chcete opäť pripevniť pásy k autosedačke, držte
sa týchto krokov:
1. Spojte jazýčky dvoch pásov, vsuňte ich do pracky
a zacvaknite (obr. 36).
2. Vložte dve doštičky na uchytenie pásov v mieste
sedadla s označením R,prevlečte ich cez poťah a vytiahnite ich na spodnej časti sedadla. (obr. 37).
3. Prevlečte dve doštičky na upevnenie chráničov
ramien a ktorými prechádzajú pásy s označením
N, najskôr cez medzeru červenej farby s označením
C a potom cez operadlo (obr. 38).
4. Pripojte dva pásy k úchytnej doštičke s označením
Q (obr. 39).
POZOR! V prípade, že by autosedačka bola zdeformovaná alebo vyzerala veľmi opotrebovane, musíte
ju nahradiť novou, keďže pravdepodobne stratila
pôvodné bezpečnostné vlastnosti.
ČISTENIE A ÚDRŽBA
ČISTENIE POŤAHU
Poťah je možné z autosedačky zobliecť a vyprať v
rukách alebo v práčke na 30°C. Pri praní dodržujte
pokyny, ktoré sú vyznačené na visačke poťahu, ide
o nasledovné symboly pre pranie:
Pranie v pračke
pri 30°C
Pranie v
rukách
nebieliť
Nečistiť
chemicky
Nesušiť v
sušičke
UCHOVÁVANIE VÝROBKU
V prípade, že autosedačka nie je umiestnená v aute,
uchovávajte ju na suchom mieste, ďaleko od tepelných zdrojov, chráňte ju pred prachom, vlhkosťou a
priamym slnečným žiarením.
LIKVIDÁCIA VÝROBKU
Ak už autosedačku prestanete používať, vyhoďte ju.
Za účelom ochrany životného prostredia separujte
rôzne druhy odpadov podľa noriem platných vo
vašej krajine.
nežehliť
Nepoužívajte abrazívne čistiace prostriedky ani
rozpúšťadlá. Poťah nežmýkajte, nechajte voľne
vysušiť.
Ak chcete z autosedačky stiahnuť jednotlivé časti
poťahu, postupujte nasledovne:
1. Odpojte pásy autosedačky z pracky (obr. 14).
2. Pokrúťte a odpojte dve doštičky na uchytenie pásov
s označením R nachádzajúce sa pod sedadlom
(obr. 20A) a prevlečte ich cez otvory na látkovom
poťahu (obr. 20B).
3. Vyzlečte poťah z operadla hlavy (obr. 40).
4. Vyzlečte poťah z operadla a odopnite všetky
pripínačky a vytiahnite obidva pásy (obr. 41).
5. Odpojte operadlo od sedadla podľa vysvetliviek v
odstavci “PRIPEVNENIE AUTOSEDAČKY DO AUTA
A ULOŽENIE DIEŤAŤA DO AUTOSEDAČKY SKUPINY 3 (22-36 KG) BEZ OPERADLA” (body 1-3).
6. Vyzlečte poťah zo sedadla, odopnite všetky
pripínačky a otvorte dva zipsy (obr. 42).
Ak chcete na sedačku opäť navliecť jednotlivé diely
poťahu, postupujte podľa uvedených bodov, ale v
opačnom poradí.
Ďalšie informácie vám poskytne:
ARTSANA SPA
Servizio Clienti
Via Saldarini Catelli, 1
22070 Grandate COMO-ITALIA
Tel. N° verde 800.188.898
www.chicco.com
60
BG инструкции за употреба
•
МНОГО ВАЖНО! ДА СЕ ПРОЧЕТЕ
НЕЗАБАВНО
• При монтиране и инсталиране на продукта да
се съблюдават стриктно инструкциите.
• Да се избегне използването на продукта без
да бъдат прочетени инструкциите.
• Да се съхрани тази инструкция, за да бъде
консултирана и в бъдеще.
• ВНИМАНИЕ! На база на направена статистика
при автомобилни катастрофи, предимно
задните седалки на превозното средство са
се оказали по-сигурни от предната: ето защо
се препоръчва Детската седалка да бъде
монтирана на задните седалки на автомобила.
Най-сигурното място за монтиране на детското
столче е задната централна седалка, снабдена
с колан, фиксиран в три точки.
• Препоръчва се всички пътници, които заемат
места в колата да са информирани за начина
на разкопчаване на детската седалка в случай
на непредвидена критична ситуация.
• Ако Детската седалка се постави на предната
седалка при функционираща фронтална
възушна възглавница, за по-голяма сигурност
се препоръчва да се издърпа седалката възможно в най-задна позиция, съобразявайки
се с наличието на други пътници на задната
седалка.
• Да не се използува никога тази детска седалка
на странични седалки на превозното средство
или на такива , които са обърнати в обратна
на движението посока.
• Детската седалка да се монтира само на
седалки, които са правилно фиксирани на
структурата на колата и насочени в посока
на движение на същата. Да се внимава да не
се оставят сгъваеми седалки или въртящи
се такива без да са добре закрепени, защото
в случай на катастрофа същите могат да се
окажат опасни.
• Да се внимава много при монтажа на детската
седалка в колата като се обръща преди всичко
внимание да се избягва допира до подвижна
седалка или врата на колата.
• Да не се закопчава никога детската седалка
на седалка на колата, която е снабдена с
колан, закопчаващ се само в седалищната
част / в две точки/.
• Никоя Детска седалка не може да гарантира
пълната сигурност на детето в случай на
катастрофа, но използването на този продукт намалява риска от тежки наранявания
или от смърт.
• Риска за сериозни наранявания на детето, не
само в случай на катастрофа, но и при други
обстоятелства / например резки спирания
и т.н./, се увеличава ако посочените в този
наръчник упътвания не бъдат изпълнени
стриктно: уверявайте се винаги, че Детската
седалка е правилно закрепена към седалката
на колата.
•
•
•
•
•
•
•
•
•
•
•
•
•
61
В случай, че детската седалка е повредена,
деформирана или много използвана, трябва
да бъде заменена тъй като може да е загубила
оригиналните характеристики за сигурност.
Да не се правят никакви промени или добавки към продукта без разрешението на
производителя.
Да не се монтират допълнения, резервни
части и компоненти, които не са доставени
от производителя.
Да не се оставя никога детето без надзор в
Детската седалка по никаква причина.
Да не се поставя нищо, което не е част от
спомагателните части, одобрени от производителя на продукта, в допълнение както между
седалката на колата и Детската седалка така и
между детската седалка и детето: в случай на
катастрофа Детската седалка може да откаже
да функционира правилно.
В случай, че колата е била паркирана под
слънцето за по- продължително време, да
бъде проверена Детската седалка за нагрети
части, преди детето да бъде настанено в нея.
В такъв случай оставете седалката да се
охлади преди да сложите детето да седне в
нея, за да се избегне евентуална възможност
то да се изгори.
В случай дори и на леки катастрофи, детската
седалка може да е претърпяла повреди,
които не винаги могат да бъдат забелязани
с просто око: ето защо е необходимо да бъде
подменена Детската седалка.
Да не се използуват Детски седалки от втора
ръка, защото може да са понесли структурни
повреди, които не винаги се забелязват с
просто око, но могат да компроментират
сигурността на продукта.
Фирма Артсана не поема отговорност при
неправилна употреба на продукта.
Тапицерията може да бъде подменена единствено, с такава, която е одобрена от производителя, тъй като представлява интегрална
част от Детската седалка. Детската седалка не
трябва никога да бъде използвана без наличието на тапицерия, за да не се компрометира
сигурността на детето.
Да се проверява лентата на колана да не е
оплетена и да се избягва същата или части
от Детската седалка да са прищипани между
вратите на колата или да се опират в остри,
режещи части по колата.
Детската седалка не може да бъде употребявана
в случай, че по колана има нарези или е с
раздърпани конци.
Когато не се транспортира детето Детската
седалка трябва, независимо от това, да остане
монтирана или да бъде прибрана в багажника.
Нефиксирана Детска седалка оставена свободно
в купето на колата може да се окаже опасна
при катастрофа или при резки спирания на
превозното средство.
Да се провери, че не се транспортират предмети
или багаж, предимно на поставката на задното
•
•
•
стъкло във вътрешността на колата, които да
не са фиксирани или поставени в сигурно
положение. В случай на катастрофа или рязко
спиране могат да наранят пътниците.
Да се провери дали облегалката за глава
на задната седалка на колата не се опира в
облегалката за глава на Детската седалка, за
да не я измества напред. Ако е така, да бъде
премахната облегалката за глава на седалката,
на която се инсталира Детската седалка, като
се препоръчва да не се оставя облегалката
на поставката на задното стъкло.
Да се провери дали всички пътници на превозното средство използват личния колан за
сигурност, както за съблюдаване на собствената
сигурност , така и поради това, че ако по време
на пътуването, в случай на катастрофа или
рязко спиране, могат да наранят детето.
В случай на дълги пътувания се препоръчва
да се спира често. Детето се уморява много
лесно. По никаква причина не вадете детето
от Детската седалка по време на движение на
колата. Ако детето има нужда от внимание
е необходимо да се намери подходящо за
спиране място, да се отклоните от движението
и да спрете.
Й. Облегалка за гръб
К. Седалищна част
Л. Облегалки - странични
М. Пасажи на коланите
Рис. 3 / отзад/
Н. Плочки за фиксиране на раменните накрайници
и на пасажите на коланите
О. Ленти на коланите
П. Канал за промушване на коланите на автомобила/
да се монтират само при Група 1/
Р. Плочка за фиксиране на коланите.
Рис. 4 /отдолу/
С. Плочки за фиксиране на коланите към седалищната част
Т. Плочка за фиксиране на закопчалката към
седалката
У. Ръчка за откачане на облегалката за гърба от
седалищната част.
ХАРАКТЕРИСТИКИ НА ПРОДУКТА
• Тази Детска седалка е хомологирана „Група
1,2 и 3” , за превозване на деца с тегло от 9
до 36 кг / от 1 до 12 годишна възраст приблизително/, съблюдавайки европейски
правилник ЕСЕ R44/04.
• Хомологацията е от тип „Универсал”, тоест
Детската седалка може да бъде използвана
при всеки модел автомобил.
ИНСТРУКЦИИ ЗА УПОТРЕБА
СЪДЪРЖАНИЕ:
• Описание на частите
• Характеристики на продукта
• Ограничения и начини на употреба отнасящи се
до продукта и до седалката на автомобила.
• Монтиране на Детската седалка в колата
и настаняване на детето в нея при Група
1 / 9-18 кг/
• Монтиране на Детската седалка в колата и
настаняване на детето в нея при Група 2-3 /
15-36 кг/ с облегалка за гърба
• Монтиране на Детската седалка в колата и
настаняване на детето в нея при Група 3 /
22-36 кг/ без облегалка за гърба
• Регулиране на височината на облегалката
за глава.
• Настройка на коланите за употреба при
Група 1 / 9-18 кг/
• Почистване и поддръжка
ВАЖНО! „Универсал” означава, че е съобразена
с по-голямата част , но не с всички седалки
на коли.
ВАЖНО ПРЕДУПРЕЖДЕНИЕ
1. Това е„Универсално” устройство за придържане
на деца, хомологирано според Правилник
№44, Допълнения от серия 04. Пригодено
за общо приложение във превозни средства
и приложимо с по-голямата част, но не към
всички седалки на превозни средства.
2. Отличната съвместимост е по-лесно постижима
в случаите, при които Производителя на превозното средство декларира в наръчника за
употреба на същото, че превозното средство
предвижда инсталирането на устройства
за придържане на деца от „Универсален”
тип, отнасящи се до въпросните възрастови
граници.
3. Това устройство за придържане е класифицирано „ Универсално” според най-строги
критерии за хомологиране по отношение на
предходни модели, към които не е приложено
настоящото Предупреждение.
4. Съвместимо е само за употреба с превозни
средства, снабдени с осигурителен колан
закопчаващ се в 3 пункта, статичен и с навиващо устройство, хомологиран на база на
Правилник UN/ECE №16 други еквивалентни
стандарти.
5. В случай на съмнение, се консултирайте с
производителя на устройството или с про-
ОПИСАНИЕ НА ЧАСТИТЕ
НА ДЕТСКАТА СЕДАЛКА
Рис. 1 /отпред/
А. Ръчка за регулиране на облегалката за глава
и на коланите
Б. Облегалка за глава
В. Диагонален пасаж на колана
Г. Раменни накрайници на колана
Д. Колани на Детската седалка
Е. Закопчалка
Ж. Предпазител
З. Бутон за регулиране на коланите
И. Лента за регулиране на коланите
Рис. 2 / в профил/
62
давача на същото.
ОГРАНИЧЕНИЯ И НАЧИНИ НА УПОТРЕБА СВЪРЗАНИ С ПРОДУКТА И СЕДАЛКАТА НА ПРЕВОЗНОТО
СРЕДСТВО
ВАЖНО!Да се съблюдават стриктно следните
ограничения и начини на употреба, свързани с
продукта и със седалката на колата: в противен
случай не е гарантирана неговата сигурност.
• Тази Детска седалка е хомологирана за използване при деца с тегло строго определено
между 9 и 36 кг / при възраст от 1 до 12 години
приблизително/
• Седалката на колата трябва да е снабдена с
осигурителен колан със захващане в 3 пункта,
статичен и снабден с навиващо устройство,
хомологиран на база на Правилник UN/ECE №16
други еквивалентни стандарти /Рис.5/
• Никога не монтирайте Детската седалка при
наличието на колани на колата затварящи се
в два пункта / Рис.6/.
• Детската седалка може да бъде монтирана
на предната седалка на колата от страната
на пътника или на която и да е задна седалка. Детската седалка никога да не бъде
използвана на седалки на колата обърнати
странично или обърнати в посока обратна
на движението/ Рис. 7/.
• Продуктът е предназначен единствено за
употреба като Детска седалка за кола, а не като
столче за употреба в домашни условия.
• За правилното монтиране, се уверете, че
облегалката за глава на седалката на колата
не влияе по никакъв начин на облегалката
на Детската седалка.
МОНТАЖ В АВТОМОБИЛА НА ДЕТСКАТА
СЕДАЛКА И НАСТАНЯВАНЕ НА ДЕТЕТО ПРИ
Група 1 / 9-18 КГ/
ВАЖНО!Тези инструкции се отнасят като текст и
като рисунки за монтажа на Детската седалка на
дясната задна седалка. За монтаж в други позиции
трябва да се придържате към извършване на
монтажа в същия ред.
1. Поставете Детската седалка на предварително
избраната за монтиране седалка на колата, по
посока на движението на колата / Рис.8/.
2. Промушете колана на колата захванат в три
пункта през
специално
създаденото каналче Р на облегалката на
Детската седалка / Рис.9А и 9B/, така, че да
излезе от обратната страна на облегалката /
Рис. 9C/.
3. Закопчайте колана на колата към закопчалката,
създавайки условия така че както хоризонталната част на колана, така и диагоналната
такава, да минават под облегалката за ръце
на Детската седалка / Рис.10/.
4. Опънете по възможност колана на колата,
така че Детската седалка да прилепне добре
до седалката на колата/ Рис.11/, ако е необходимо да се притисне с коляно, за по – добро
прилепване на детската седалка.
5. Проверете дали е монтирана правилно
63
Детската седалка като се уверите, че коланът
е добре опънат и тя е добре прилепнала към
седалката на колата. Ако не е така, да се повтори
монтирането от самото начало /Рис.12/.
ВАЖНО!Проверете дали колана е добре опънат и
разтворен във всички точки и дали няма усуквания.
НИКОГА не промушвайте колана на колата през
точки, различни от указаните.
След като се приключи с монтирането на Детската
седалка, за да се постави детето в нея да се следват
инструкциите тук по-долу:
6. Притиснете бутона за регулиране на коланите
Н и едновременно с това захванете и придърпайте към себе си долната част на коланите
на седалката, за да се постигне максимално
опъване/ Рис.13/.
7. Откопчайте колана на Детската седалка натискайки бутона на закопчалката и закопчайте
отстрани/ Рис.14/.
8. Поставете внимателно детето в седалката,
като се пригодят коланите около неговото
тяло без да се опъват. Свържете двата края
на колана / рис.15А/ и закопчайте отново
със закопчалката./ Рис. 15Б/.
9. Чрез специално създадената ръчка за регулиране А поставена в горната част на
облегалката регулирайте височината на
облегалката за глава на Детската седалка,
така че коланите да излизат на височината
на раменете на детето/ Рис.16/.
10. За да бъде настроена дължината на коланите
на Детската седалка, пригаждайки ги към
тялото на детето, да се издърпа внимателно
лентата за регулиране I докато се достигне
до точното ниво на опън/ Рис.17/.
11. Проверете фиксирано ли е правилно Детското столче както показано на Рисунката/
Рис. 18/.
За да се извади детето от Детската седалка, да
се притисне копчето на закопчалката и да се
разкопчаят коланите/Рис.19/.
МОНТАЖ В АВТОМОБИЛА НА ДЕТСКАТА
СЕДАЛКА И НАСТАНЯВАНЕ НА ДЕТЕТО ПРИ
ГРУПА 2-3 / 15-36 КГ/ С ОБЛЕГАЛКА
За да бъде променена стойката на Детската седалка
за да се използува от група 1 в големина 2-3 е
необходимо да бъдат извадени коланите както
описано тук по-долу:
1. Разкопчайте коланите на седалката от закопчалката/ Рис.14/.
2. Завъртете и откопчайте двете пластини за
фиксиране на коланите R, разположени
под седалката/ Рис. 20А/ изваждайки ги и
от двата процепа в текстилната тапицерия
/ Рис.20B/.
3. Откопчайте двете страни на коланите от
пластината за фиксиране Q / Рис.21/.
4. Отвъртете и откопчайте двете пластини за
преминаване на коланите N от облегалката
/ рис.22/.
5. Изтеглете напред двете рамена на колана и ги
прекарайте през двата червени диагонални
пасажа за колана С / Рис.23/.
6. Приберете за съхранение на определено
място двете части на извадените по този
начин колани.
7. Прокарайте закопчалката и платнения разделител за крака през определената за това
цепнатина, разположена в центъра на седалищната част на седалката, поставяйки всичко
в съответното пространство на седалката /
Рис. 24А, 24В и 24С/.
ВАЖНО! В случай, че нямате намерение да извадите Детската седалка от колата, да се предвиди
закопчаването отново на колана на колата към
съответната закопчалка, така че Детската седалка
да остане прикрепена към колата и без наличието
на детето в нея ; в противен случай Детската седалка
може да се окаже причина за опасност в случай
на рязко спиране или катастрофа.
МОНТАЖ В АВТОМОБИЛА НА ДЕТСКАТА
СЕДАЛКА И НАСТАНЯВАНЕ НА ДЕТЕТО ПРИ
група 2-3 / 15-36 КГ/ БЕЗ ОБЛЕГАЛКА
При Група 1 / 9-18 кг/ и 2/ 15-25 кг/ употребата
на седалката е позволено само ПРИ НАЛИЧИЕ
на облегалка, изправно монтирана на седалката
на колата.
При Група 3/22-36 кг/ Детската седалка дава възможност да бъде употребявана по два начина – с
облегалка /избор, който все пак предлага по-голяма
сигурност и следователно е препоръчителен/
или без облегалка.
При употреба без облегалка е необходимо да се
откачи облегалката на седалката:
1. Поставете Седалката на колата в хоризонтална
позиция, така че да бъде достъпна долната
част на седалката / Рис. 30/.
2. Завъртете двата лоста за откачане на облегалката Т в отбелязаната посока / Рис. 31/.
3. Извадете облегалката от седалката / Рис.32/.
4. Нагласете Детската седалка така, че да прилепне
добре към облегалката на колата /Рис.33/
5. Настанете детето в Детската седалка и закопчайте колана на колата към закопчалката
/Рис. 34/.
6. Опънете внимателно диагоналното рамо от
колана, така че същото да преминава над
рамото на детето/Рис.35/.
Така Детската седалка е готова и пригодена за
монтиране при Група 2 и 3.
8. Нагласете Детската седалка на седалката
на колата, избрана за монтиране на същата,
по посока на движение на автомобила/
Рис.25/.
9. Промушете диагоналната част на колана
на колата под облегалката за глава и през
специално създаденото червено каналче
за колана С намиращо се под облегалката за
глава. Настанете внимателно детето, като се
уверите, че гърба му е добре прилепнал към
облегалката на Детската седалка / рис.26/.
10. Закопчайте колана на колата към закопчалката,
като се внимава за преминаването както на
диагоналната, така и на хоризонталната част
на колана под облегалката за ръце на детската
седалка / Рис.27/.
11. Проверете височината на облегалката за глава
и в случай , че не е правилно нагласена да се
регулира: Да се види параграф„ РЕГУЛИРАНЕ НА
ВИСОЧИНАТА НА ОБЛЕГАЛКАТА ЗА ГЛАВА”.
12. Опънете диагоналната част на колана на колата
към навиващото колана устройство, така че
колана да бъде добре опънат и прилепнал
към торса и към краката на детето / Рис.28/.
13. Проверете за правилното фиксиране на Детската седалка както е показано на рисунката
/ Рис. 29/.
ВАЖНО! За да се прикрепи облегалката към
седалката да се повторят току що описаните
движения в обратен ред. В края на операцията
за прикрепване се уверете, че горната и долната
част са правилно закачени помежду си.
ВАЖНО!
Винаги проверявайте дали колана е правилно
фиксиран във всички точки и не се усуква.
• Проверете диагоналната част на колана да е
правилно положена върху рамото на детето
и да не оказва натиск на врата на детето; ако
е необходимо да се регулира облегалката
за глава.
• Проверете макарата за навиване на колана
на колата да е в задна позиция / или поне да
е приравнена/ по отношение на облегалката
на седалката на колата.
РЕГУЛИРАНЕ НА ВИСОЧИНАТА НА ОБЛЕГАЛКАТА
ЗА ГЛАВА
Възможно е да се регулира височината на облегалката за глава в безброй позиции, за да се
позволи да се адаптира възможно най-добре
Седалката към височината на детето.Едно оптимално регулиране позволява:
• Главата да е добре придържана и предпазена
/ Група 1-2-3/.
• Предпазните колани на Детската седалка да
са винаги на правилна височина, тоест тази
на раменете/ група1/.
• Диагоналният колан на колата да е винаги с
правилна дължина благодарение на водачите
на колана, интегрирани в облегалката за глава
С / Група 2-3/.
За да се извърши регулиране на облегалката за
глава да се завърти ръчката А , намираща се в
горната част на облегалката, докато се достигне
За да се извади детето от Детската седалка в
позиция за група 2-3:
1. Разкопчайте колана на колата от неговата
закопчалка.
2. Извадете колана на колата освобождавайки
детето.
3. Извадете внимателно детето от детската
седалка.
64
П
п
ма
желаната височина / Рис.16/.
За да бъдат поставени частите на подплатата в
изходното им положение да се изпълнят в обратен
ред току що обяснените операции.
НАСТРОЙКА НА КОЛАНИТЕ ЗА УПОТРЕБА ПРИ
Група 1 / 9-18 кг/
За да се монтират отново коланите към Детската
седалка да се действа по следния начин:
1. Свържете двете езичета на двете части на
колана, за да се вмъкнат и да се закопчеят
към закопчалката / Рис.36/.
2. Вмъкнете двете пластини за фиксиране към
седалката R през тапицерията , изваждайки ги
от долната част на седалката / Рис.37/.
3. Прокарайте двете пластини за фиксиране
на раменните части и на преминаването
на коланите N първо през двата червени
пасажа на диагоналния колан С и после
през облегалката /Рис.38/.
4. Закопчайте двете части на коланите към
пластината за фиксиране Q / Рис. 39/.
ПОЧИСТВАНЕ НА ПЛАСТМАСОВИТЕ И МЕТАЛНИ
ЧАСТИ НА СТОЛЧЕТО
За почистването на пластмасовите или метални
лакирани части да се използва само мокра
кърпа.
Да не се използват никога абразивни препарати
или разтворители.
Подвижните части на седалката не бива да бъдат
гресирани в никакъв случай.
КОНТРОЛ ЗА ИНТЕГРАЛНОСТ НА ЧАСТИТЕ
Препоръчва се периодично да се проверява
цялостта и състоянието на износване на следните елементи:
Подплата: да се увери, че не излизат подплънки
или че няма откъсване на парчета от същата. Да се
провери състоянието на шевовете, които трабва
да са винаги здрави.
Колани: Да се провери да няма износване на
основата на колана от плат със последващо и
явно намаляване на дебелината на същия по
отношение на лентата за регулиране, на разделителя за крака, на раменните части на колана и
на колана в мястото на пластината за регулиране
на коланите.
Пластмасови части: Да се провери състоянието
на износване на всички пластмасови части , които
не трабва да показват никакви признаци на щети
по тях и ли на избледняване.
ПОЧИСТВАНЕ И ПОДДРЪЖКА
ПОЧИСТВАНЕ НА ТАПИЦЕРИЯТА
Тапицерията на детската седалка е изцяло
отделяща се и може да се пере на ръка или в
перална машина при 30° С . За прането да се
следват инструкциите, намиращи се на етикета
на тапицерията, съдържаща следните символи
за пране:
Пране в
Пране на ръка
перална
машина на
30°C
Да не се
избелва
Не
химическо
чистене
почистване
Да не се суши в
сушилня
Не
гладене
ВАЖНО! В случай, че детската седалка е деформирана или много износена същота трябва да
бъде подменена: може да е загубила оригиналните
характеристики за сигурност на продукта.
Да не се използват никога абразивни и разтварящи фибрите перилни препарати. Да не се
центрифугира тапицерията и да се остави да се
изсуши без да се изстисква.
За да се извадят различните части на текстилната
подплата да се действа по следния ред описан
тук по-долу:
1. Разкопчайте коланите на Детската седалка
от закопчалките / Рис.14/.
2. Завъртете и откопчайте двете пластини за
фиксиране на коланите R намиращи се под
седалката/ Рис.20А/ като се прокарат така ,
че да излязат и от двете цепки на текстилната
подплата/ рис.20В/.
3. Извадете калъфката на облегалката за глава/
Рис.40/.
4. Извадете калъфката на облегалката като
разкопчаете всички велкро за фиксиране
на същата и извадите двете части на колана
/Рис.41/.
5. Да се раздели облегалката от седалката както
е обяснено в глава
“ МОНТАЖ В АВТОМОБИЛА НА ДЕТСКАТА СЕДАЛКА
И НАСТАНЯВАНЕ НА ДЕТЕТО ПРИ група 3 / 22-36-36
КГ/ БЕЗ ОБЛЕГАЛКА” / ТОЧКИ 1-3/.
6. Извадете калъфа на седалката разделяйки
всички велкро за фиксиране и отваряйки
двата ципа / Рис.42/.
СЪХРАНЯВАНЕ НА ПРОДУКТА
Когато Детската седалка не е монтирана се
препоръчва съхранение на сухо място, далеч от
източници на топлина и покрита за да не се праши,
мокри и излага на пряка слънчева светлина.
ИЗХВЪРЛЯНЕ НА ПРОДУКТА
При достигане на границата за период на употреба предвидени за седалката, да се прекъсне
употребата и да се предаде на сметище. Поради
причини касаещи опазването на околната среда,
да се разделят различните части на седалката
според предвиденото в Нормативните документи в страната.
За допълнителна информация:
АРТСАНА СПА
Офис Клиенти
Ул. Салдарини Катели, 1
22070 Грандате Комо – Италия
Зелен № 800.188.898
www.chicco.com
65
H Használati utasítás
•
NAGYON FONTOS! AZONNAL OLVASSA EL
• A termék összeszereléséhez és felszereléséhez
szigorúan tartsa be a használati utasítást.
• El kell kerülni, hogy a használati utasítás elolvasása nélkül más használja a terméket.
• Megőrizni ezen utasitásokat a jővőbeni
felhasználáshoz.
• FIGYELEM! A balesetekről szóló statisztikák
alapján, általában az autó hátsó űlèsei biztonságosabbak az elől lèvő űlèseknèl: ezèrt
azt javasoljuk, hogy a Gyermekűlèst a hátsó
űlèsre szerelje. Különösen a hátsó közèpső űlès
a legbiztonságosabb, amennyiben 3 pontban
rögzitett biztonsági övvel ellátott.
• Figyelmébe ajánljuk, hogy az autóban lèvő
mindegyik utas informálva legyen a gyermek
kikapcsolási módjáról vèszhelyzet esetèn.
• Amennyiben a Gyermekűlèst az elöl lèvő űlésre
szereli, mellyel szemben az airbag müködèsbe
lèphet, a nagyobb biztonság kedvèèrt javasoljuk
az űlèst minèl hátrább húzni, figyelembe vève
a hátsó űlèsen tartózkodó utasokat.
• Soha ne használja a Gyermekűlèst oldalhelyzetben vagy az utazási iránnyal ellenkező
irányban felszerelve az űlèseken.
• Csak az autó szerkezetèhez jól rögzitett ès a
menetiránnyal megegyező űlésekre szerelje
fel a Gyermekűlèst. Figyeljen arra, hogy ne
maradjanak összecsukható vagy forgó űlèsek
az autóban rögzitetlenül, mert baleset esetèn
veszèlyt jelenthetnek.
• Figyeljen oda, milyen módón szereli fel a
Gyermekűlèst az autóban, hogy elkerülje,
hogy bármilyen mozgó űlès vagy az ajtó
akadályt jelentsenek.
• Soha ne kösse be a Gyermekűlèst olyan
autóűlèsre melynek (csak kèt pontban rögzített)
biztonsági öve van.
• Semmilyen Gyermekűlès nem garantálja a
gyermek teljes biztonságát baleset esetèn,
azonban ennek használata csökkenti a súlyos
sèrűlések vagy haláleset bekövetkezèsèt.
• A gyermeknek okozható súlyos károk veszèlye
fennáll, nem csak baleset esetèn, hanem más
körülmènyek között is (pl. hirtelen fèkezès,
vagy etc.), ès növekedhet, ha ezen használati
utasításban leírott utasításokat szigorúan
nem tarjta be: mindig ellenörizze, hogy a
Gyermekűlés helyesen legyen rögzítve az
autó űlèsèhez.
• Amennyiben a Gyermekűlès sèrült, deformált
vagy erösen elhasznált, ki kell cserèlni, mert
elvesztette az eredeti biztonsági jellemzőit.
• Ne hajtson vègre változtatást vagy kiegèszítèst
a Gyermekűlèsen a gyártó beleegyezèse
nèlkül.
• Ne szereljünk fel kellèkeket, alkatrèszeket ès elemeket, melyeket nem a gyártótól vásárolt.
• Soha ne hagyja a gyereket őrizetlenül a
Gyermekűlèsben semmilyen okból kifo-
•
•
•
•
•
•
•
•
•
•
•
66
lyólag.
Ne helyezzen semmit, csak ha a termèk
rendeltetèsère szánt ès gyártott kellèk, sem
az autóűlès ès a Gyermekűlès közè, sem a
Gyermekűlès ès a gyermek közè: baleset
fennállásakor a Gyermekűlès nem töltené
be felafdatát.
Amennyiben az autót napsütötte helyen hagyja,
alaposan vizsgálja meg a Gyermekűlèst, mèg
mielőtt a gyermeket belehelyezi, nehogy
egyes rèszei túlhevültek legyenek: ilyen
esetben várja meg míg kihülnek mielőtt a
gyermeket beleülteti, hogy elkerülje, hogy
megègesse magát.
Baleset után, akár enyhe is volt, a Gyermekűlès
megsèrülhetett szabad szemmel nem mindig
látható módon: ezèrt szüksèges kicserèlni.
Ne használjon az előzőekben már használt
gyermekülést: szabad szemmel nem
észlelhető károk lehetnek a szerkezetében
ezért a termék biztonsága nem szavatolt.
Az Artsana vállalat minden felelőssèget elhárít,
amennyiben a termèket nem megfelelően
használja.
Az űlèshuzat csak a gyártó által jóváhagyott huzattal helyettesíthető, amennyiben
a Gyermekűlès kiegèszítö rèszèt alkotja.
A Gyermekűlèst soha ne használja huzat
nèlkül, hogy ne veszèlyeztesse a gyermek
biztonságát.
Ellenőrizze, hogy az öv szalagja ne legyen
összetekeredve ès kerülje el, hogy a szalag
vagy a Gyermekűlès rèszei ne csípődjenek be az
ajtóba vagy surlódjanak èles rèszekhez.
A Gyermekűlès használhatatlanná válik, hogyha
az övön vágások vagy szakadások vannak.
Amikor a gyermeket nem szállítja, hagyja a
Gyermekűlèst mindig felszerelve, vagy helyezze el a csomagtartóban. A nem rögzített
Gyermekűlès veszèlyt jelenthet az utasok számára baleset vagy hirtelen fèkezès esetèn.
Ellenőrizze, hogy ne szállítson különösen
az autó kalaptartóján, olyan tárgyakat vagy
poggyászt, melyeket nem helyezett el vagy
nem rögzített biztonságosan: baleset vagy
hirtelen fèkezès esetèn az utasok sèrűlésèt
okozhatják.
Ellenörizze, hogy az autóűlès fejtámlája ne
akadályozza a Gyermekűlès fejtámláját: nem
szabad, hogy előrenyomja. Amennyiben ez
így lenne, vegye le a az autóűlès fejtámláját
melyre a Gyermekűlèst szereli, de vigyázzon,
nehogy a kalaptartóra erősítse. Bizonyosodjon
meg, hogy minden utas az autóban a saját
biztonsági övèt használja mind saját biztonsága
èrdekèben, mind pedig azèrt, mert az utazás
alatt, baleset vagy hirtelen fèkezès esetèn a
gyermeknek sèrűlést okozhatnak.
Hosszú utazás esetèben javasoltak a gyakori
megpihenèsek. A gyermek nagyon hamar
elfárad. Semmilyen esetben se vegye ki
a gyermeket az űlèsből az autó mozgása
közben. Ha gyermeknek figyelemre van
szüksège, találjon egy biztonságos helyet ès
álljon le az útról.
hogy az autók túlnyomó többsègènek űlésèvel
használható, de nem minden autóban.
HASZNÁLATI UTASÍTÁS
TARTALOMJEGYZÉK
• Tartozékok leírása
• A termèk jellemzői
• A termèkre ès az autó űlésére vonatkozó
használati korlátozások ès feltételek
• A Gyermekűlés autóba való beszerelèse ès
a gyermek elhelyezèse az 1 Csoportban
(9-18 kg)
• A Gyermekűlés autóba való beszerelèse ès a
gyermek elhelyezèse a 2-3 Csoportban (15-36
kg) háttámlával
• A Gyermekűlés autóba való beszerelèse ès a
gyermek elhelyezèse a 3 Csoportban (22-36
kg) háttámla nèlkül
• A fejtámla magasságának szabályozása
• A biztonsági övek visszahelyezèse az 1 Csoportban való használatra (9-18 kg)
• Tisztitás ès karbantartás
FONTOS FIGYELMEZTETÉS
1. Ez egy “Univerzális” gyermekrögzítő szerkezet,
mely a N°44 Szabályzat szerint hitelesített,
törvènyjavaslat módosítása 04 sorozat. Az
autókban általános használatra alkalmas, az
autók nagy rèszènek űléseivel összeillő, de
nem mindegyikkel.
2. A tökèletes összhangot akkor lehet könynyebben elèrni, amikor az autó gyártója az
autó kèzikönyvèben leírja, hogy az autóba
beterveztèk a gyermekrögzítő “Univerzális”
szerkezeteket” a szóban forgó korosztály
számára.
3. Ezt a rögzítésre kèszült szerkezetet “Univerzálisnak” osztályozták a legszigorúbb
osztályozási kritèriumok alapján, szemben az
előző modellekkel, melyek nem tartalmazzák
e jelen figyelmeztetèst.
4. Csak olyan autókban használható, melyekben
3 pontban rögzített biztonsági öv van, akár
statikus, akár feltekercselővel, hitelesített a
UN/ECE N°16 Szabályzat alapján vagy más
egyenèrtèkü szabvány alapján.
5. Felmerülő kètsègek esetèben, keresse fel
a gyermekrögzítő szerkezet gyártóját vagy
eladóját.
AZ TARTOZÉKOK LEÍRÁSA
1 Ábra (Elölnézet)
A. A fejtámla ès a biztonsági övek szabályozásának
forgatógombja
B. Fejtámla
C. Átlós övvezető lyukak
D. Vállpántok
E. A Gyermekűlés övei
F. Csat
G. Lábközti vèdő
H. Az övek szabályozógombja
I. Az övek szabályozószalagja
A TERMÈKRE ÈS AZ AUTÓŰLÈSRE VONATKOZÓ
KORLÁTOZÁSOK ÈS FELTÈTELEK
FIGYELEM! Szigorúan be kell tartani a következő
korlátozásokat ès feltèteleket, melyek a termèkre
ès az autó űlésère vonatkoznak: ellenkező esetben
a biztonság nem garantált.
• Ezt a Gyermekűlést kizárólagosan csak 9–töl
36 kg súlyú gyermekek számára hitelesítették
(kb. 1 –töl 12 èves korig ).
• Csak olyan autókban használható, melyekben
3 pontban rögzített biztonsági öv van, akár
statikus, akár feltekercselővel, a UN/ECE
N°16 Szabályzat alapján hitelesített vagy más
egyenèrtèkü szabvány alapján. (5 Ábra).
• Soha ne szereljük fel a Gyermekűlést kèt pontban
rögzített biztnsági övvel (6 Ábra).
• A Gyermekűlés felszerelhető a vezetö melletti
utasűlésre elöl vagy bármelyik hátsó űlésre. Soha
ne használjuk a Gyermekűlést oldalirányban
vagy menetiránnyal ellenkező irányban az
űléseken. (7 Ábra).
• A termèket kizárólagosan csak autóban mint
Gyermekűlést használjuk ès sosem otthoni
használatra.
• A helyes felszerelès èrdekèben, tegyünk úgy,
hogy az autóűlés fejtámlája semmilyen módón
ne gátolja a Gyermekűlés háttámláját.
2 Ábra (Oldalnézet)
J. Háttámla
K. Űlés
L. Kartámaszok
M. Övvezető lyukak
3 Ábra (Hátúlnézet)
N. A vállpántok ès az övvezető lyukak
rögzítőlemezei
O. Övszalagok
P. Az autó biztonsági övbujtatóinak helyei (csak
az 1 Csoportban szerelendő fel))
Q. Az övek rögzítőlemezei
4 Ábra (Alulról)
R. Az öveknek az űléshez való rögzítőlemezei
S. A csatnak az űléshez való rögzítőlemezei
T. A háttámlának az űléstől való kioldó karjai
A TERMÉK JELLEMZŐI
• Ez a Gyermekűlés az “1,2 ès 3 Csoportban”
hitelesített, 9 a 36 kg súlyú közötti gyermekek
szállítására (kb 1–töl 12 èves korig), az ECE
R44/04 európai szabályzatnak megfelelően.
• A hitelesítés “Univerzális” típusú, ezèrt a
Gyermekűlést bármilyen típusú autón lehet
használni. FIGYELEM! “Univerzális” azt jelenti,
A GYERMEKŰLÉS AUTÓBA VALÓ BESZERELÉSE ÉS
A GYERMEK ELHELYEZÉSE AZ
1 CSOPORTBAN (9-18 KG)
FIGYELEM! Ezen utasítások vonatkoznak mind a
szövegben, mind az ábrákon, a Gyermekűlésnek
67
a hátsó jobboldali űlésen való elhelyezèsère. Más
helyekre való beszerelèsnèl kövesse ugyanazokat
a beszerelèsi szabályokat.
1. A kiválasztott űlésen menetiránnyal megegyezően elhelyezni a Gyermekűlést.(8 Ábra)
2. Befűzni az autó 3 pontos övèt az adott P
nyíláson keresztül mely a Gyermekűlés háttámláján található(9A és 9B Ábra), úgy hogy
az ellenkező nyíláson a háttámla másik oldalán
kijöjjön. (9C Ábra).
3. Beakasztani az autó övèt a csatba oly módon,
hogy mind a hasvèdö, mind az átlós ága az
övnek a kartartó alatt legyen (10 Ábra).
4. Az autó övèt feszítsük ki amennyire csak lehet ès
szorítsuk jól az űléshez a Gyermekűlést (11 Ábra),
ha szüksèges tèrdeljünk a Gyermekűlésre.
5. Ellenőrizzük a beszerelès helyessègèt, hogy
az öv jól feszüljön ès hogy a Gyermekűlés
stabilan ès jól legyen elhelyezve az űlésen.
Amennyiben nem így van, ismèteljük meg
előlröl a beszerelèst. (12 Ábra).
Hogy megváltoztassuk a Gyermekűlés
elrendeződèsèt az 1 csoportból a 2 ès 3 csoportba
szüksèges előtte eltávolítani az öveket az alább
leírt lèpèsek szerint:
1. Kapcsoljuk le az űlés öveit a csatról(14
Ábra).
2. Forgó mozdulattal kapcsoljuk le az övek kèt
rögzítő lemezèt R az űlés alatt (20A Ábra)
eltávolítva öket a szövethuzat nyílásain keresztül is. (20B Ábra).
3. Kapcsoljuk le az öv kèt nyelvèt a Q rögzítő
lemezröl (21 Ábra).
4. Forgó mozdulattal kapcsoljuk le az övek kèt
bujtató lemezèt N a háttámláról (22 Ábra).
5. Frontálisan vegyük ki az öv kèt szárát átbújtatva a kèt piros átlós övnyíláson keresztül
C (23 Ábra).
6. Fèlretenni ès megfelelö helyen őrizni az íly
módon eltávolított övszárat.
7. Atbújtatni a csatot ès az anyagból kèszült
lábelválasztót azon a megfelelő nyíláson
mely az űlés közepèn található, elhelyezve
mindent az űlésen található kijelölt helyre (
24A, 24B e 24C Ábra).
Most a Gyermekűlés kèsz es elrendeztük a 2 ès 3
csoportra való felszerelèshez.
8. Helyezzük el a Gyermekűlést menetirányban a
beszerelèshez kiválasztott űlésre (25 Ábra).
9. Az autóöv átlós szárát bújtassuk át a fejtámla
mögött ès a megfelelő piros C övbújtatón
keresztül maga a fejtámla alatt. Ültessük be
óvatosan a gyermeket, ès bizonyosodjunk
meg, hogy a háta jól nekitámaszkodjon a
Gyermekűlés háttámlájának(26 Ábra).
10. Akasszuk be az autóövet a csatba oly módón,
hogy mind a hasvèdö, mind az átlós szalag a
kartámasz alatt legyenek (27 Ábra).
11. Ellenőrizzük a fejtámla magasságát ès, ha nem
helyes, szabályozzuk be: lásd a bekezdèst “A FEJTÁMLA MAGASSÁGÁNAK SZABÁLYOZÁSA”.
12. Húzzuk meg az autóöv átlós rèszèt a feltekercselője felè, oly módón, hogy az egèsz
öv ki legyen feszítve ès tapadjon a gyermek
mellkasához ès lábaihoz. (28 Ábra).
13. Elenőrizzük, hogy a Gyermekűlés helyesen
legyen rögzítve, mint azt az ábra mutatja(29
Ábra).
FIGYELEM!
• Mindig ellenőrizzük, hogy az öv mindenhol
egyenletes legyen ès ne legyen összetekeredve sehol.
• SOHA NE bújtassuk az autó övèt máshol mint
ahol ki van jelölve.
Amikor befejeztük a Gyermekűlés beszerelèsèt,
a gyermek azon való elhelyezèsèhez kövessük a
következö leírást:
6. Nyomjuk meg az övszabályozó gombot H ès
egyidejűleg fogjuk meg ès húzzuk magunk
felè az űlés öveinek alsó rèszèt, addig amíg
teljesen nincsenek kifeszítve. (13 Ábra).
7. Kapcsoljuk ki a Gyermekűlés öveit lenyomva
a csat gombját ès helyezzük őket oldalra.
(14 Ábra).
8. Ültessük a gyermeket körültekintően a
Gyermekűlésbe, elhelyezve a teste körül az
öveket meghúzás nelkül, tegyük össze az öv
kèt nyelvèt ( 15A Ábra) ès újra akasszuk be a
csatba. (15B Ábra).
9. Az ehhez tartozó A szabályozó segítsègèvel,
mely a háttámla szèlèn helyezkedik el, szabályozzuk a Gyermekűlés fejtámlájának magasságát, oly módón, hogy az övek a gyermek
vállmagasságában jöjjenek ki (16Ábra).
10. Hogy szabályozzuk a Gyermekűlés öveinek
megfeszítettsègèt, a gyermek testèhez igazítva,
óvatosan húzzuk meg az I szabályozó szalagot
addig amíg nem feszül meg kellőkèppen az
öv (17 Ábra).
11. Ellenőrizzük, hogy a Gyermekűlés helyesen
legyen rögzítve, mint ahogy az ábra mutatja
(18 Ábra)
Hogy kivegyük a gyermeket az űlésből, nyomjuk
meg a csat gombját ès akasszuk ki az öveket.
(19 Ábra).
FIGYELEM!
Mindig ellenőrizzük, hogy az öv mindenhol
egyenletes legyen ès ne legyen összetekeredve
sehol.
• Ellenőrizzük, hogy az átlós öv helyesen legyen a
gyermek vállára helyezve ès ne nyomja a nyakát;
ha szüksèges szabályozzuk a fejtámlát.
• Ellenőrizzük, hogy az autóöv feltekercselője
visszatekert helyzetben legyen (vagy legalább is egy vonalban legyen) az autóűlés
háttámlájával.
Hogy kivegyük a gyermeket a 2 ès 3 Csoportban:
1. Kapcsoljuk ki az autóövet a csatból.
A GYERMEKŰLÉS AUTÓBA VALÓ BESZERELÉSE ÉS
A GYERMEK ELHELYEZÉSE A
2 ès 3 CSOPORTBAN (15-36 KG) HÁTTÁMLÁVAL
68
2. Vegyük le az autóövet a gyermekről.
3. Vegyük ki a gyermeket óvatosan az űlésből.
HASZNÁLATRA (9-18 KG)
Az öveknek a Gyermekűlésre való visszaszerelèsèhez
kövessük a következöket:
1. Fogjuk össze a kèt övrèsz nyelveit, helyezzük
be ès kapcsoljuk be a csatba (36 Ábra.).
2. Helyezzük be a kèt rögzítőlemezt R az űlésbe
a huzaton keresztül ès bujtassuk át úgy hogy
az űlés alsó felèn jöjjenek ki ( 37 Ábra).
3. Bújtassuk át a vállvèdők kèt rögzítőlemezèt ès
az övek bujtatóját N először a kèt piros átlós
övbujtatón C majd a háttámlán (38 Ábra.).
4. Kapcsoljuk be a kèt övnyelvet a rögzítőlemezbe
Q (39 Ábra.).
FIGYELEM! Abban az esteben, ha nincs
szándèkunkban kivenni az űlést az autóból,
kapcsoljuk vissza az autóövet a csatjába, oly módón,
hogy megtartsa az űlést az autóban a gyermek nèlkül
is; ellenkező esteben akadályt jelenthet baleset
vagy hirtelen fèkezès bekövetkezèsèvel.
A GYERMEKŰLÉS AUTÓBA VALÓ BESZERELÉSE ÉS
A GYERMEK ELHELYEZÉSE A
3 CSOPORTBAN (22-36 KG) HÁTTÁMLA NÉLKÜL
Az 1 csoportban (9-18 kg) ès a 2-ben (15-25
kg), a Gyermekűlést CSAK A HÁTTÁMLÁVAL
lehet használni, mely megfelelően az űlésre
van szerelve.
A 3 csoportban (22-36 kg), a Gyermekűlésnek
kettős használata van, felváltva CSAK háttámlával
(a biztonságosabb választás ès mindig ajánlott)
vagy háttámla NÉLKÜL.
Háttámla nèlküli használatra le kell kapcsolni a
háttámlát az űlésről:
1. A Gyermekűlést egy viszintes lapra helyezzük
oly módón hogy az űlés alsó fele hozzáfèrhető
legyen(30 Ábra).
2. Forgassuk a kèt háttámla kikapcsolót T a
megadott irányba. 31(Ábra).
3. Húzzuk ki a háttámlát az űlésből (32 Ábra).
4. Helyezzük úgy a Gyermekűlést az autó űlésère,
hogy az űléstámlával tökèletesen èrintkezzen
(33 Ábra).
5. Helyezzük a gyermeket a Gyermekűlésbe ès
kapcsoljuk az autóövet a csatba úgy, hogy
a hasvèdő a kartámasz alatt legyen az átlós
pedig felette. ( 34 Ábra).
6. Feszítsük ki az átlós övet úgy, hogy a gyermek
vállán menjen át (35 Ábra).
TISZTÍTÁS ÉS KARBANTARTÁS A HUZAT
TISZTÍTÁSA
A Gyermekűlés huzata teljesen leszedhető ès
kèzzel vagy mosógèpben mosható 30°C fokon.
A mosáshoz kövessük a huzat címkèjèn található
utasításokat, mely a következő mosási jeleket
tartalmazza:
mosógèpben
mosható 30C°
Kèzimosás
Ne fehèrítsük
Ne tisztítsuk
szszárazon
Ne száritsuk
szárítóban
Ne vasaljuk
Soha ne használjunk dörzsanyagot vagy oldószert.
ne centrifugáljuk a huzatot ès hagyjuk megszáradni
csavarás nèlkül.
A textilhuzat egyes rèszeinek eltávolítását az űlés
vázától a következő módón hajtsuk vègre:
1. A Gyermekűlés öveit kapcsoljuk le a csatról
(14 Ábra).
2. Forgassuk ès akasszuk ki az övek kèt
rögzítőlemezèt R melyek az űlés alatt helyezkednek el (20A Ábra) úgy, hogy kijöjjenek a
textilhuzat nyílásain keresztül is (20B Ábra).
3. Húzzuk le a fejtámla huzatját (40 Ábra).
4. Húzzuk le a háttámla huzatját levève az összes
velcro rögzítőszalagot ès ès kibujtatva a kèt
övpántot (41 Ábra).
5. Kapcsoljuk szèt a háttámlát az űléstől mint
ahogy azt a “A GYERMEKŰLÉS AUTÓBA VALÓ
BESZERELÉSE ES A GYERMEK ELHELYEZÉSE A 3
CSOPORTBAN (22-36 KG) HÁTTÁMLA NÉLKÜL”
(pontok 1-3). bekezdès magyarázza.
6. Húzzuk le az űléshuzatot levève az összes velcro
rögzítőszalagot ès kinyitva a kèt zippzárat
(42 Ábra).
Hogy visszategyük a huzatot eredeti helyère a
fent leírt müveleteket ismèteljük meg ellenkező
sorrrendben.
FIGYELEM! A háttámla visszaszerelèsèhez követni
az èppen leírt utasításokat ellenkező sorrendben.
A rögzítès vègeztèvel ellenőrizzük, hogy az űlés
felső és alsó rèsze helyesen legyenek egymáshoz
rögzítve.
A FEJTÁMLA MAGASSÁGÁNAK SZABÁLYOZÁSA
A fejtámla magasságát lehet szabályozni vègtelen
helyzetekbe, hogy a Gyermekűlést jobban lehessen
igazítani a gyermek magasságához. Az optimális
szabályozás lehetővè teszi:
• hogy a fej mindig jól a helyèn legyen ès vèdve
legyen (Csop. 1-2-3).
• hogy a Gyermekűlés övei mindig helyes
helyzetben legyenek azaz a váll magasságában (Csop. 1).
• hogy az átlós autóöv mindig helyes magasságban legyen a fejtámlában lèvő övbujtatóknak
köszönhetően C (Csop. 2-3).
A fejtámla szabályozásához forgassuk az A gombot,
mely a fejtámla szèlèn helyezkedik el, míg el nem
èrjük a kívánt magasságot (16 Ábra.).
A MŰANYAG ÉS FÉMRÉSZEK TISZTÍTÁSA
A műanyag ès festett fèmrèszek tisztításához csak
egy nedves ruhadarabot használjunk. Sose használjunk dörzsölő vagy oldó tisztítóanyagokat.
A Gyermekűlés mozgatható rèszeit semmilyen
módon nem kell kenőanyaggal kezelni.
A TARTOZÉKOK ÉPSÉGÉNEK VIZSGÁLATA
Ajánljuk, hogy rendszeresen ellenőrizzèk a következő
AZ ÖVEK VISSZAÁLLÍTÁSA AZ 1 CSOPORTBANI
69
tartozèkok èpsègèt ès kopási fokát:
• Huzat: ellenőrizzük, hogy ne jöjjenek ki a
bèlèsdarabok vagy hogy ne engedje át a
huzat őket. Ellenőrizzük a varrásokat, hogy
mindig èpek legyenek.
• Övek: ellenőrizzük, hogy a szövetrèsze ne kopjon
ki, ez a vastagság csökkenèsèt okozhatja a szabályozóövön, a lábszètválasztón, a vállrèszeken
ès az övszabályozó lemezek körül.
• Műanyag: ellenőrizzük az összes műanyagrèsz
elhasználódását ne látszódjon rajtuk èlesen
meghibásodás vagy elszíntelenődès.
FIGYELEM! Abban az esteben, ha a Gyermekűlés
deformált lenne vagy erősen elhasznált, ki kell
cserèlni: nem garantálja az eredeti biztonsági
előírásokat.
A TERMÉK TÁROLÁSA
Ha nincs az autóra szerelve, javasoljuk hogy a
Gyermekűlést száraz helyen tárolják, távol hőforrásoktól ès portól, nedvessègtől ès közvetlen
napfènytől vèdve.
A TERMÉK MEGSEMMISÍTÉSE
Amikor a Gyermekűlés elèri az előírt felhasználási
határt, szüntessük meg használatát ès helyezzük
el a hulladèkok között. Környezetvèdelmi szempontokból, válasszuk szèt a különböző típusú
hulladèkot az Országban előírt ès èrvènyben
lèvő szabályzatoknak megfelelően.
TOVÁBBI INFORMÁCIÓÉRT:
ARTSANA SPA
Vevőszolgálat
Via Saldarini Catelli, 1
22070 Grandate COMO-ITALIA
Tel. Zöldszám 800.188.898
www.chicco.com
70
R Instrucţiuni de folosire
•
•
FOARTE IMPORTANT! CITIŢI IMEDIAT
• Citiţi şi respectaţi cu rigurozitate instrucţiunile
de folosire înainte de montarea şi instalarea
produsului. Evitaţi ca persoanele, care nu
au citit instrucţiunile din acest manual, să
folosească produsul.
• Păstraţi acest manual pentru a-l putea folosi
şi în viitor.
• ATENŢIE! Potrivit statisticilor realizate cu privire
la accidentele rutiere, de multe ori locurile din
partea posterioară a unui vehiculului sunt
considerate mult mai sigure decât cele din
partea anterioară: de aceea, vă recomandăm
să instalaţi Scăunelul pe locurile din partea
posterioară. Cel mai sigur loc din maşină
este partea centrală a banchetei posterioare
dacă aceasta este prevăzută cu o centură cu
3 puncte de ancorare.
• Vă recomandă să vă asiguraţi că toţi pasagerii
vehiculului sunt informaţi şi cunosc modalităţile de scoatere ale copilului din scăunel în
cazurile de urgenţă.
• În cazul în care scăunelul este aşezat pe locul
anterior cu airbag-ul frontal activat, pentru
siguranţa copilului, vă recomandăm să poziţionaţi bancheta respectivă cât mai în spate
cu putinţă, fără a-i incomoda însă pe pasagerii
care stau pe scaunele posterioare.
• Nu aşezaţi niciodată acest scăunel pe locurile
cu orientare laterală sau opuse direcţiei de
deplasare.
• Instalaţi scăunelul doar pe banchetele fixate
corect de structura maşinii şi îndreptate în
direcţia de deplasare. Asiguraţi-vă ca scaunele
şi bancheta maşinii (pliabile sau rotative) să
fie corect ancorate, întrucât în cazul unui
accident ar putea constitui pericol.
• În momentul instalării, asiguraţi-vă că nu exista
nici o interpunere între scăunel şi părţile mobile
ale vehiculului sau cu portiera.
• Nu poziţionaţi niciodată scăunelul pe o banchetă
prevăzută doar cu o centură abdominală (cu
două puncte de ancorare).
• Nici un scăunel nu poate garanta o siguranţă
totală pentru copil în cazul producerii unui
accident, dar folosirea acestui produs reduce
riscul unor leziuni grave sau al decesului.
• Riscul producerii de vatamari serioase copilului,
nu numai în cazul unui accident, dar şi în alte
circumstanţe (spre exemplu, la frânări bruşte,
etc.) este mult mai ridicat dacă indicaţiile din
acest manual nu sunt respectate întocmai:
verificaţi întotdeauna ca scăunelul să fie
ancorat corect de locul din maşină.
• În cazul în care scăunelul ar fi defect, deformat sau foarte uzat, trebuie să-l înlocuiţi
întrucât şi-a pierdut caracteristicile originale
de siguranţă.
• Nu efectuaţi modificări sau adăugiri asupra
produsului fără aprobarea constructorului.
•
•
•
•
•
•
•
•
•
•
•
•
71
Nu instalaţi accesorii, piese de schimb şi componente care nu sunt furnizate de constructor.
Nu lăsaţi niciodată copilul nesupravegheat
în scăunel.
Verificaţi să nu existe obiecte, care nu sunt
un accesoriu aprobat pentru produs, între
bancheta auto şi scăunel sau între scăunel şi
copil: în cazul unui accident, există posibilitatea
ca scăunelul să nu funcţioneze corect.
În cazul în care maşina este lăsată sub bătaia directă a razelor de soare, verificaţi cu
rigurozitate scăunelul înainte de a aşeza
copilul pe el; verificaţi ca părţile scăunelului
să nu fie supraîncălzite: în acest caz, înainte
de a aşeza copilul pe scaun, lăsaţi părţile
respective să se răcească pentru a evita
producerea arsurilor.
Scăunelul se poate defecta în cazul producerii
unui accident chiar uşor, nefiind întotdeauna
vizibile cu ochiul liber defectele cauzate: de
aceea este necesar să-l înlocuiţi.
Nu folosiţi scaune cumpărate la mâna a
doua (second-hand): ar putea prezenta defecţiuni structurale, care nu sunt vizibile cu
ochiul liber şi care pot compromite siguranţa
produsului.
Societatea Artsana nu îşi asumă nici o răspundere în cazul unei utilizări incorecte şi
improprii a produsului.
Husa scăunelului poate fi înlocuită exclusiv
doar cu una aprobată de constructor pentru
că este parte integrantă a acestuia. Scăunelul
nu se va folosi niciodată fără husă pentru a nu
pune în pericol siguranţa copilului.
Verificaţi ca banda centurii să nu fie răsucită şi
evitaţi ca aceasta sau părţile scăunelului să fie
prinse între portiere ori să fie dispuse în apropierea unor obiecte ascuţite sau tăioase.
Scăunelul nu se mai poate folosi atunci când
centura prezintă tăieturi sau rupturi.
Când copilul nu este transportat, scăunelul
va rămâne în continuare ancorat sau va fi
pus în portbagaj. Scăunelul care nu este fixat
poate reprezenta un pericol pentru pasagerii
vehiculului în cazul producerii unui accident
sau a unei frânări bruşte.
Asiguraţi-vă de faptul că toate obiectele sau
bagajele transportate, dispuse pe bancheta
posterioară din maşină, sunt fixate corespunzător sau sunt poziţionate într-un mod sigur:
în caz de accident sau frânare bruscă ar putea
răni pasagerii.
Verificaţi ca perna de sprijin pentru cap a
vehiculului să nu interfereze cu perna de
sprijin a Scăunelului: nu trebuie să o împingeţi
înainte. În cazul în care se interfereaza reciproc,
îndepărtaţi tetiera de pe scaunul vehiculului
pe care se instalează scăunelul, având grijă să
nu-l poziţionaţi apoi în spate, sub lunetă.
Asiguraţi-vă de faptul că toţi pasagerii vehiculului folosesc centurile de siguranţă
atât pentru siguranţa lor, cât şi pentru cea
a copilului întrucât în timpul deplasării, în
•
cazul producerii unui accident sau a unei
frânări bruşte, acestea ar putea reprezenta
un pericol pentru copil.
În cazul deplasărilor lungi, vă recomandăm să faceţi cât mai multe opriri. Copilul
oboseşte foarte repede. În timp ce maşina
este în mişcare, nu scoateţi pentru nici un
motiv copilul din scăunel. Dacă are nevoie
de îngrijire, este important să găsiţi un loc
sigur şi să vă opriţi.
•
•
Acest scăunel este omologat pentru „grupele
de vârstă 1, 2 şi 3” pentru transportul copiilor
cu o greutatea cuprinsă între 9 şi 36 kg (de
la circa 1 la 12 ani), respectând regulamentul
european ECE R44/04
Omologarea este de tip „Universal”, ceea ce
înseamnă că scăunelul poate fi utilizat pe
orice tip de automobil. ATENŢIE! „Universal”
înseamnă că este compatibil cu majoritatea,
dar nu cu toate tipurile de scaune auto.
AVERTISMENTE IMPORTANTE
1. Acesta este un scăunel de tip „Universal”,
omologat conform regulamentului nr. 44 şi
amendamentelor din seria 04. Se prestează
la folosirea cu cele mai multe vehicule, fiind
compatibil cu majoritatea, dar nu cu toate
scaunele auto.
2. Compatibilitatea perfectă este mai uşor de
obţinut în cazul în care constructorul vehiculului
declară în manualul de folosire că vehiculul a
fost conceput şi pentru instalarea dispozitivelor
de reţinere a copiilor, de tip „Universal”, pentru
grupa de vârstă respectivă.
3. Acest scăunel a fost clasificat ca fiind „Universal”,
potrivit unor criterii de omologare mai severe
referitoare la modelele anterioare care nu
dispun acest tip de certificare.
4. Se poate folosi numai în vehicule prevăzute
cu centură de siguranţă cu 3 puncte de ancorare, static sau cu rotor, omologat în baza
Regulamentului UN/ECE nr. 16 sau a altor
standarde echivalente.
5. În cazul în care aveţi nelămuriri legate de
aşezarea copilului, va rugăm să contactaţi
producătorul scăunelului sau vânzătorul.
Instrucţiuni de folosire
INDEX
• Descrierea părţilor componente
• Caracteristicile produsului
• Restricţii şi condiţii de folosire referitoare la
produs şi la bancheta vehiculului
• Instalarea scăunelului în maşină şi aşezarea
copilului de gr. de vârstă 1 (9-18 kg)
• Instalarea scăunelului în maşină şi aşezarea
copilului de gr. de vârstă 2 - 3 (15-36 kg),
cu spătar
• Instalarea Scăunelului în maşină şi aşezarea
copilului de gr. de vârstă 3 (22-36 kg), fără
spătar
• Reglarea înălţimii pernei de sprijin
• Înlocuirea centurilor la copii de gr. 1 (9-18
kg)
• Curăţarea şi întreţinerea
DESCRIEREA PĂRŢILOR COMPONENTE
Fig. 1 (partea din faţă)
A. Buton rotativ de reglare pentru perna de
sprijin a capului şi pentru centuri
B. Pernă de sprijin pentru cap
C. Orificii de trecere a centurii diagonale
D. Curele
E. Centurile scăunelului
F. Cataramă
G. Protecţii între picioare
H. Buton de reglare a centurilor
I. Bandă de reglare a centurilor
RESTRICŢII ŞI CONDIŢII DE FOLOSIRE REFERITOARE
LA PRODUS ŞI LA SCAUNUL AUTO
ATENŢIE! Respectaţi cu rigurozitate următoarele
limitări şi condiţii de utilizare referitoare la produs
şi la bancheta vehiculului: în caz contrar nu este
garantată siguranţa.
• Acest Scăunel este omologat pentru copiii
cu o greutate cuprinsă exclusiv între 9 şi 36
kg (de la circa 1 la 12 ani).
• Scaunul (bancheta) vehiculului trebuie să fie
prevăzut(ă) cu centură de siguranţă cu 3 puncte
de ancorare, static sau cu rotor, omologat în
baza Regulamentului UN/ECE nr. 16 sau a altor
standarde echivalente (fig. 5).
• Nu instalaţi niciodată scăunelul dacă centura
vehiculului este prevăzută doar cu două puncte
de ancorare (Fig. 6)
• Scăunelul poate fi instalat pe scaunul anterior
din dreapta pasagerului sau pe oricare scaun
din partea posterioară. Nu poziţionaţi niciodată
scăunelul pe locurile cu orientare laterală sau
opuse direcţiei de deplasare (Fig. 7).
• Produsul este destinat să fie folosit strict ca şi
scăunel pentru vehicul şi nu în alte scopuri.
• Pentru o instalare corectă, tetiera scaunului
auto nu trebuie să interfereze cu spătarul
Fig. 2 (din lateral)
J. Spătar
K. Şezutul scăunelului
L. Cotiere
M. Orificii de trecere a centurilor
Fig. 3 (partea din spate)
N. Plăcuţe de fixare a curelelor şi a centurilor
O. Benzi pentru centuri
P. Locaşuri pentru trecerea centurilor vehiculului (numai pentru instalarea Scăunelului
la copii de gr. 1)
Q. Plăcuţă de fixare a centurilor
Fig. 4 (dedesubt)
R. Plăcuţe de fixare a centurilor de scaun
S. Plăcuţă de fixare a cataramei de scaun
T. Manetă de deblocare a spătarului de scaun
CARACTERISTICILE PRODUSULUI
72
scăunelului.
11. Verificaţi ca scăunelul să fie ancorat corespunzător, aşa cum vă arată figura (Fig. 18).
INSTALAREA SCĂUNELULUI ÎN VEHICUL ŞI
AŞEZAREA COPILULUI DE GR. 1 (9 – 18 KG)
ATENŢIE! Aceste instrucţiuni, de tip text sau
imagine, se referă la instalarea scăunelului pe
bancheta posterioară din partea dreaptă. Pentru
a-l instala în alte poziţii, urmăriţi şi efectuaţi aceeaşi
secvenţă de operaţiuni.
1. Poziţionaţi scăunelul pe bancheta aleasă din
maşină şi orientaţi-l în direcţia de deplasare
(Fig. 8).
2. Treceţi centura cu cele 3 puncte de ancorare
prin locaşul P al spătarului scăunelului (Fig.
9A şi 9B) şi scoateţi-o pe partea cealaltă a
spătarului (Fig. 9C).
3. Fixaţi centura maşinii de cataramă, astfel încât
atât centura abdominală, cât şi cea diagonală,
să fie poziţionate sub cotieră (Fig. 10).
4. Întindeţi cât mai mult cu putinţă centura
vehiculului pentru a fixa cât mai bine scăunelul
de scaunul vehiculului (Fig. 11), iar dacă este
necesar apăsaţi scăunelul cu genunchiul.
5. Verificaţi corectitudinea instalării şi asiguraţivă că centura este întinsă corespunzător, iar
scăunelul este ancorat corect de scaunul
vehiculului. Reluaţi operaţiunile de instalare
de la început (Fig. 12), dacă scaunul nu este
fixat corespunzător.
Pentru a-l scoate pe copil din scăunel, apăsaţi butonul cataramei şi decuplaţi centurile (Fig. 19).
INSTALAREA SCĂUNELULUI ÎN VEHICUL ŞI
AŞEZAREA COPILULUI DE GR. 2 ŞI 3 (15 – 36 KG),
CU SPĂTAR
Pentru a modifica configuraţia Scăunelului de la
gr. 1 la gr. 2 şi 3, este necesar să decuplaţi mai întâi
centurile, respectând următoarele instrucţiuni:
1. Decuplaţi centurile scăunelului de cataramă
(Fig. 14).
2. Rotiţi şi scoateţi cele două plăcuţe de fixare
a centurilor R, dispuse sub scaun (Fig. 20A),
trăgându-le în afară prin cele două orificii ale
husei textile (Fig. 20B).
3. Decuplaţi cele două părţi ale centurilor de pe
plăcuţa de fixare Q (Fig. 21).
4. Rotiţi şi desfaceţi cele două plăcuţe de fixare a
trecerii centurilor N de pe spătar (Fig. 22).
5. Extrageţi cele două părţi ale centurii în partea
din faţă, introducându-le prin cele două orificii
de trecere ale centurii diagonale de culoare
roşie C (Fig. 23).
6. Montaţi şi fixaţi în locul corespunzător cele
două părţi ale centurii.
7. Introduceţi catarama şi partea de susţinere din
stofă a picioarelor prin orificiul din mijlocul
şezutului, aşezându-le în locul corespunzătoare
din şezut (Fig. 24A, 24B şi 24C).
Scăunelul poate fi instalat acum în vehicul pentru
copii din grupele de vârstă 2 şi 3.
8. Aşezaţi şi orientaţi scăunelul pe bancheta
aleasă în direcţia de deplasare (Fig. 25).
9. Introduceţi partea diagonală a centurii vehiculului în spatele pernei de sprijin, iar centura
de culoare roşie C prin orificiul corespunzător
de dedesubtul pernei de sprijin. Aşezaţi copilul
cu grijă, asigurându-vă că spatele acestuia
este poziţionat corespunzător de spătarul
Scăunelului (Fig. 26).
10. Cuplaţi centura maşinii de cataramă, astfel încât
atât partea abdominală, cât şi cea diagonală,
să fie treacuta sub cotieră (Fig. 27).
11. Verificaţi înălţimea pernei de sprijin a capului, iar
dacă nu este corectă, reglaţi-o: citiţi paragraful
„REGLAREA ÎNĂLŢIMII PERNEI DE SPRIJIN”.
12. Întindeţi partea diagonală a centurii vehiculului spre rotor, astfel încât centura să fie bine
întinsă şi aderentă pe toracele şi gambele
copilului (Fig. 28).
13. Verificaţi ca scăunelul să fie fixat corect, aşa
cum vă arată figura (Fig. 29).
ATENŢIE!
• Asiguraţi-vă întotdeauna de distribuţia uniformă
a centurii în toate punctele de ancorarea şi că
aceasta nu este răsucită.
• Nu fixaţi centura în alte poziţii decât cele
indicate.
După ce aţi instalat scăunelul, pentru aşezarea
copilului pe Scăunel respectaţi următoarele
indicaţii:
6. Apăsaţi butonul de reglare a centurilor H şi,
în acelaşi timp, apucaţi şi trageţi cu putere
spre dvs. partea inferioară a centurilor scăunelului, până când veţi obţine alungirea lor
maximă (Fig. 13).
7. Decuplaţi centurile scăunelului, apăsând
butonul cataramei şi aşezaţi-le pe cele două
laturi (Fig. 14).
8. Aşezaţi cu grijă copilul pe scăunel, fixând
centurile în jurul corpului său fără să trageţi
de ele; uniţi cele două limbi ale centurii
(Fig. 15A) şi cuplaţi-le din nou de cataramă
(Fig. 15B).
9. Cu ajutorul butonului rotativ de reglare A, aflat
în vârful spătarului, reglaţi înălţimea pernei
de sprijin a capului de la scăunel, astfel încât
centurile să iasă în exterior în partea superioară,
în spatele copilului (Fig. 16).
10. Pentru a regla presiunea exercitată de centurile scăunelului, adaptându-le la corpul
copilului, trageţi cu grijă banda de reglare I
până când veţi obţine nivelul corespunzător
de strângere (Fig. 17).
ATENŢIE!
• Asiguraţi-vă întotdeauna de distribuţia uniformă
a centurii în toate punctele sale de ancorare
şi că aceasta nu este răsucită.
• Verificaţi ca centura diagonală să fie corect
fixată la spatele copilului şi să nu exercite
presiuni asupra gâtului; dacă este necesar,
73
•
reglaţi perna de sprijin.
Verificaţi ca rotorul centurii să fie în poziţie de
retragere (sau să fie cel mult aşezat într-o poziţie
liniară) la spătarul scaunului din vehicul.
ÎNLOCUIREA CENTURILOR PENTRU UTILIZAREA
LOR LA GR. 1 (9 – 18 KG)
Pentru a remonta centurile la scăunel, procedaţi
după cum urmează:
1. Uniţi cele două limbi ale celor două curele
ale centurii, introduceţi-le şi prindeţi-le de
cataramă (Fig. 36).
2. Introduceţi cele două plăcuţe de fixare la şezutul
R prin husă, făcându-le să iasă pe partea de
dedesubt a şezutului (Fig. 37).
3. Treceţi cele două plăcuţe de fixare ale umerilor
şi de trecere ale centurilor N mai întâi prin cele
două treceri ale centurii diagonale roşii C şi
apoi prin spătar (Fig. 38).
4. Cuplaţi cele două margini ale centurilor de
plăcuţa de fixare Q (Fig. 39).
Pentru a scoate copilul de grupa 2 şi 3 din scăunel:
• Decuplaţi centura vehiculului din catarama
acesteia.
• Scoateţi centura vehiculului de pe corpul
copilului.
• Scoateţi cu grijă copilul din scăunel.
INSTALAREA SCĂUNELULUI ÎN MAŞINĂ ŞI
AŞEZAREA COPILULUI DE GR. 3 (22-36 kg), FĂRĂ
SPĂTAR
Folosirea scăunelului la grupele 1 (9-18 kg) şi 2
(15-25 kg) este permisă NUMAI cu spătarul montat
corect pe şezut.
La grupa 3 (22-36 kg) există posibilitatea unei folosiri
duble a scăunelului, alternativ CU spătarul (este
o alegere mult mai sigură şi, deci, recomandată)
sau FĂRĂ acesta.
Dacă alegeţi folosirea scăunelului fără spătar, este
necesar să desprindeţi spătarul de şezut:
1. Poziţionaţi scăunelul pe un plan orizontal
astfel încât să-i fie accesibilă partea inferioară
a şezutului (Fig. 30).
2. Rotiţi cele două pârghii de desprindere de la
spătarul T în direcţia indicată (Fig. 31).
3. Extrageţi spătarul din şezut (Fig. 32).
4. Poziţionaţi şezutul scăunelului astfel încât să fie
aderent cu spătarul vehiculului (Fig. 33).
5. Aşezaţi copilul pe scăunel şi cuplaţi centura
vehiculului de cataramă, trecând cureaua
abdominală pe sub braţul scăunelului, iar cea
diagonală pe deasupra (Fig. 34).
6. Întindeţi corect cureaua diagonală a centurii,
astfel încât să treacă peste spatele copilului
(Fig. 35).
CURĂŢAREA ŞI ÎNTREŢINEREACURĂŢAREA HUSEI
Husa scaunului se detaşează complet şi se poate
spăla manual sau în maşina de spălat, la 30 °C.
Pentru a o spăla, urmăriţi indicaţiile de pe eticheta husei, care conţine următoarele simboluri
pentru spălare:
Nu folosiţi niciodată detergenţi abrazivi sau
solvenţi. Nu centrifugaţi husa şi lăsaţi-o să se
usuce fără a o stoarce.
Pentru a îndepărta diferitele componente ale
husei textile din structura scăunelului, procedaţi
după cum urmează:
1. Decuplaţi centurile scăunelului din cataramă
(Fig. 14).
2. Rotiţi şi desprindeţi cele două plăcuţe de
fixare ale centurilor R, situate sub şezut (Fig.
20A), trăgându-le în afară prin orificiile husei
textile (Fig. 20B).
3. Scoateţi husa pernei de sprijin (Fig. 40).
4. Scoateţi husa spătarului, desfăcând toţi aricii
de prindere şi desfăcând cele două braţe ale
centurii (Fig. 41).
5. Desprindeţi spătarul de şezut aşa cum a fost explicat în paragraful “INSTALAREA SCĂUNELULUI
ÎN MAŞINĂ ŞI AŞEZAREA COPILULUI DE GR. 3
(22 – 36 KG) FĂRĂ SPĂTAR” (punctele 1-3).
6. Desfaceţi husa şezutului, desfăcând toţi
aricii de prindere şi desfăcând cele două
fermoare (Fig. 42).
Pentru a pune la loc componentele husei în
poziţia iniţială, efectuaţi operaţiile descrise mai
sus în sens invers.
ATENŢIE! Pentru a fixa spătarul de şezut repetaţi
operaţiile descrise mai sus în sens invers. La
terminarea operaţiilor de ancorare, verificaţi ca
partea superioară şi inferioară a şezutului să fie
corect prinse între ele.
REGLAREA ÎNĂLŢIMII PERNEI DE SPRIJIN
Înălţimea pernei de sprijin se poate regla în
infinite poziţii pentru a permite adaptarea cât
mai bună a Scăunelului la înălţimea copilului. O
reglare optimă permite:
• fixarea şi protejarea capului în orice moment
(gr. 1-2-3).
• ca centurile de siguranţă ale Scăunelului să
fie întotdeauna la înălţimea corectă, adică
aceea a spatelui (gr. 1).
• ca centura diagonală a vehiculului să fie
întotdeauna la înălţimea potrivită datorită
trecerii centurii integrate prin perna de sprijin
C (gr. 2-3).
Pentru a regla înălţimea pernei de sprijin, rotiţi
mânerul A, situat pe vârful spătarului, până când
veţi obţine înălţimea dorită (Fig. 16).
CURĂŢAREA PĂRŢILOR DIN PLASTIC ŞI DIN METAL
Pentru curăţarea părţilor din plastic sau din metal
emailat folosiţi doar o cârpă umezită. Nu folosiţi
niciodată detergenţi abrazivi sau solvenţi.
Părţile mobile ale scăunelului nu trebuie în nici
un fel lubrifiate.
VERIFICAREA INTEGRITĂŢII COMPONENTELOR
Se recomandă verificarea periodică a integrităţii şi a
gradului de uzură a următoarelor componente:
74
sp
Spălare în
maşina de
spălat la 30°C
Spălare cu
mâna
A nu se folosi A nu se efectua
înălbitori
curăţire chimică
A nu se usca
în uscător
A nu se călca
• Husă: verificaţi să nu iasă umplutura sau să nu
existe pierderi ale acesteia. Verificaţi starea
cusăturilor care trebuie să fie întotdeauna
integre.
• Centuri: verificaţi să nu existe o slăbire a beteliei
ţesăturii, care nu trebuie să prezinte semne
evidente de reducere a grosimii în regiunea
benzii de reglare, a părţii dintre picioare, la
bifurcaţia de la umeri şi în zona plăcuţei de
reglare a centurilor.
• Plastic: verificaţi gradul de uzură a tuturor părţilor
din plastic, care nu trebuie să prezinte semne
evidente de uzură sau decolorare.
ATENŢIE! În cazul în care Scăunelul este deformat
sau foarte uzat trebuie înlocuit: există posibilitatea să-şi fi pierdut caracteristicile originale
de siguranţă.
PĂSTRAREA PRODUSULUI
Când nu este instalat în vehicul, vă recomandăm să
păstraţi Scăunelul într-un loc uscat, ferit de surse
de căldură şi de depunerile de praf, umiditate şi
expunere directă la razele soarelui.
ÎNLĂTURAREA PRODUSULUI
După ce s-a epuizat durata de utilizare prevăzută
pentru scăunel, întrerupeţi folosirea acestuia
şi depozitaţi-l la resturi. Cu scopul de a proteja
mediul înconjurător, separaţi diferitele tipuri de
resturi în conformitate cu prevederilor legale în
vigoare din ţara dumneavoastră.
PENTRU INFORMAŢII SUPLIMENTARE:
ARTSANA SPA
Serviciul clienţi
Via Saldarini Catelli, 1
22070 Grandate COMO-ITALIA
Telefon număr verde 800.188.898
www.chicco.com
75
PL Instrukcje użytkowania
•
BARDZO WAŻNE! PRZED UŻYCIEM NALEŻY
ZAPOZNAĆ SIĘ Z INSTRUKCJĄ.
• Podczas montażu i instalowania należy szczegółowo przestrzegać niniejszej instrukcji. Produkt
nie powinien być używany przez osoby, które
nie zapoznały się z instrukcją.
• Zachować instrukcję na przyszłość.
• UWAGA! Z badań statystycznych dotyczących
wypadków samochodowych wynika, że z reguły
tylne siedzenia samochodu są bezpieczniejsze
niż przednie: dlatego też zaleca się instalowanie Fotelika z tyłu. Najbezpieczniejszym
miejscem jest tylne, środkowe siedzenie,
jeśli wyposażone jest w 3-punktowy pas
zabezpieczający.
• Przypominamy, że wszyscy pasażerowie muszą być poinformowani o sposobie odpięcia
dziecka w razie zagrożenia.
• Jeżeli Fotelik umieszczany jest na przednim
siedzeniu a czołowa poduszka powietrzna jest
czynna, dla większego bezpieczeństwa zaleca
się je jak najbardziej odsunąć siedzenie, o ile
pozwoli na to obecność innych, siedzących
z tyłu pasażerów.
• Nie należy nigdy instalować Fotelika na
siedzeniach ustawionych w poprzek lub
odwrotnie do kierunku jazdy.
• Należy zainstalować Fotelik tylko na siedzeniach poprawnie przymocowanych do karoserii samochodu i odwróconych w kierunku
jazdy. Należy zwrócić uwagę, czy siedzenia
samochodowe (składane lub obracane) są
dokładnie zamocowane, w razie wypadku
mogą stwarzać zagrożenie.
• Należy zwrócić uwagę na sposób instalowania Fotelika w samochodzie, ruchome
siedzenie lub drzwi samochodowe nie mogą
mu przeszkadzać.
• Nie należy nigdy przypinać Fotelika do siedzenia
samochodowego wyposażonego tylko w pas
biodrowy (dwupunktowy).
• W razie wypadku żaden Fotelik nie może
zagwarantować dziecku całkowitego bezpieczeństwa, ale użycie tego produktu zmniejsza
ryzyko poważnych obrażeń oraz śmierci.
• Ryzyko odniesienia poważnych obrażeń
przez dziecko, nie tylko w razie wypadku,
lecz również w innych okolicznościach (np.
przy gwałtownym hamowaniu, itd.), wzrasta,
jeśli nie przestrzega się dokładnie zaleceń
przytoczonych w niniejszej instrukcji: należy
zawsze sprawdzić czy Fotelik jest poprawnie
przymocowany do siedzenia.
• Nie należy używać Fotelika, jeśli jest on
uszkodzony, zdeformowany lub zbytnio
zużyty, w powyższych przypadkach, musi
być on wymieniony, ponieważ może być
niebezpieczny w użyciu.
• Nie należy wprowadzać poprawek lub dodatków
na wyrobie bez zgody producenta.
•
•
•
•
•
•
•
•
•
•
•
•
•
76
Nie montować na Foteliku akcesoriów, części
zamiennych lub innych elementów, które nie
zostały dostarczone przez Producenta.
Nie należy nigdy i z żadnej przyczyny pozostawiać dziecka bez opieki w Foteliku.
Nie należy używać niczego, za wyjątkiem
akcesoriów zatwierdzonych dla wyrobu, tak
pomiędzy Fotelikiem i siedzeniem samochodowym jak też Fotelikiem i dzieckem:
w razie wypadku mogłoby to spowodować
nieprawidłowe działanie Fotelika.
Jeśli pojazd pozostał na słońcu, przed umieszczeniem dziecka w Foteliku należy dokładnie
sprawdzić czy jego elementy nie są zbytnio
nagrzane: jeśli jest to konieczne, przed posadzeniem w nim dziecka, należy Fotelik
ochłodzić, aby uniknąć poparzeń.
W wyniku nawet niegroźnego wypadku
samochodowego, Fotelik może ulec uszkodzeniom niewidocznym gołym okiem: w takim
przypadku, należy go wymienić.
Nie należy stosować Fotelików używanych:
mogą posiadać uszkodzenia konstrukcyjne
niewidoczne gołym okiem, uniemożliwiające
bezpieczne używanie produktu.
Firma Artsana uchyla się od jakiejkolwiek
odpowiedzialności w razie nieprawidłowego
użycia wyrobu.
Ponieważ obicie stanowi integralną część
Fotelika, może ono być zastąpione wyłącznie
obiciem zatwierdzonym przez Producenta.
Fotelik nigdy nie powinien być używany
bez obicia, może to stwarzać zagrożenie
dla dziecka.
Przed użyciem Sprawdź, czy pas nie jest zaplątany. Zwróć uwagę czy pas i części Fotelika
nie zostały przyciśnięte drzwiami pojazdu lub
nie ocierają się o ostre krawędzie.
Fotelik nie może być używany, jeżeli pas jest
uszkodzony lub zniszczony.
Kiedy dziecko nie jest przewożone, Fotelik
powinien pozostać zaczepiony na siedzeniu
pojazdu, lub też należy umieścić go w bagażniku.
W razie wypadku lub gwałtownego hamowania Fotelik, który nie został zaczepiony może
stanowić zagrożenie dla pasażerów.
Upewnić się, czy przedmioty i bagaże przewożone na tylnej półce wewnątrz pojazdu, nie
zostały nieprawidłowo umocowane lub źle
umieszczone: w razie kolizji lub gwałtownego
hamowania mogą zranić pasażerów.
Upewnić się czy podgłówek siedzenia nie
styka się z podgłówkiem Fotelika: nie może go
popychać do przodu. Jeżeli dojdzie do takiej
sytuacji, należy wyjąć podgłówek siedzenia
pojazdu, na którym jest zamontowany Fotelik
i nie pozostawiać go na tylnej półce.
Upewnić się, czy wszyscy pasażerowie pojazdu
używają swojego pasa zabezpieczającego nie
tylko dla ich bezpieczeństwa, ale też dlatego,
że w trakcie podróży, w razie wypadku lub
gwałtownego hamowania, mogliby zranić
dziecko.
•
W trakcie długich podróży należy często
zatrzymywać się. Dziecko siedząc w Foteliku
bardzo łatwo się męczy. W żadnym wypadku podczas jazdy samochodem nie należy
wyjmować dziecka z Fotelika. Jeżeli dziecko
potrzebuje opieki należy zatrzymać się w
bezpiecznym miejscu.
dzieci o wadze od 9 do 36 kg (od 9 miesięcy do
około 12 lat), zgodnie z europejskim rozporządzeniem ECE R44/04.
• Homologacja kwalifikuje się do rodzaju “Uniwersalnego”, stąd Fotelik może być używany
w jakimkolwiek rodzaju pojazdu. UWAGA! Typ
“Uniwersalny” oznacza, że jest on kompatybilny
z większością, lecz nie wszystkimi siedzeniami
samochodowymi.
INSTRUKCJE UŻYTKOWANIA
SPIS TREŚCI
• Opis elementów składowych
• Cechy wyrobu
• Ograniczenia i wymagania dotyczące użycia
produktu oraz siedzenia samochodowego
• Sposób instalowania Fotelika należącego do
Grupy 1 (9-18 kg) w samochodzie i umieszczenie w nim dziecka
• Sposób instalowania Fotelika z oparciem należącego do Grupy 2-3 (15-36 kg) w samochodzie
i umieszczenie w nim dziecka
• Sposób instalowania Fotelika bez oparcia należącego do Grupy 3 (22-36 kg) w samochodzie
i umieszczenie w nim dziecka
• Regulowanie wysokości podgłówka
• Przywrócenie użytkowania pasów w Grupie
1 (9-18 kg)
• Czyszczenie i konserwacja
WAŻNA INFORMACJA
1. Niniejszy przyrząd zabezpieczająco-przytrzymujący został zakwalifikowany jako
“Uniwersalny”, zgodnie z kryteriami homologacyjnymi Rozporządzenia Nr 44, poprawki
serii 04. Jest przystosowany do użytkowania
w samochodach i jest kompatybilny z większością, lecz nie wszystkimi, siedzeniami
samochodowymi.
2. Dokładne przystosowanie jest łatwo osiągalne wówczas, kiedy producent samochodu
oświadcza w podręczniku pojazdu, że w
samochodzie przewidziane jest instalowanie „Uniwersalne” dziecięcych przyrządów
zabezpieczająco-przytrzymujących dla danej
grupy wiekowej.
3. Niniejsze urządzenie zabezpieczająco-przytrzymujące zostało zakwalifikowane jako „Uniwersalne” zgodnie z kryteriami homologacyjnymi
znacznie bardziej wymagającymi w stosunku
do kryteriów poprzednich modeli, które nie
przytaczają niniejszej informacji.
4. Może on być stosowany tylko w pojazdach wyposażonych w 3-punktowy pas zabezpieczający,
statyczny lub bezwładnościowy, posiadający
homologację zgodnie z Rozporządzeniem
UN/ECE Nr 16 lub innymi równorzędnymi
standardami.
5. W razie wątpliwości należy skontaktować
się z producentem niniejszego urządzenia
zabezpieczająco-przytrzymującego lub z
jego sprzedawcą.
OPIS ELEMENTÓW SKŁADOWYCH
Rys. 1 (z przodu)
A. Gałka regulacji podgłówka i pasów
B. Podgłówek
C. Otwory poprzecznego pasa
D. Podkładki na pasy
E. Pasy Fotelika
F. Klamra
G. Element rozdzielający nogi
H. Przycisk do regulacji pasów
I. Taśma do regulacji pasów
Rys. 2 (Z boku)
J. Oparcie
K. Siedzenie
L. Podłokietniki
M. Otwory przesuwowe pasów
OGRANICZENIA I WYMAGANIA DOTYCZĄCE
UŻYCIA PRODUK TU OR AZ SIEDZENIA
SAMOCHODOWEGO
UWAGA! Należy dokładnie przestrzegać poniższych
ograniczeń i wymagań dotyczących użycia produktu
oraz siedzenia samochodowego: w przeciwnym
wypadku nie gwarantuje się bezpieczeństwa.
• Niniejszy Fotelik posiada homologację na użytkowanie przez dzieci o wadze wyłącznie od 9
do 36 kg (od 9 miesięcy do około 12 lat).
• Siedzenie samochodowe powinno być wyposażone w 3-punktowy pas bezpieczeństwa,
statyczny lub bezwładnościowy, posiadające
homologację zgodnie z Rozporządzeniem
UNI/ECE Nr 16 lub innymi równorzędnymi
standardami (Rys. 5).
• Nie należy nigdy mocować fotelika za pomocą
dwupunktowego pasa samochodowego
(Rys. 6).
• Fotelik może być instalowany na przednim sie-
Rys. 3 (Z tyłu)
N. Płytki mocujące podkładki pasów i przejście
pasów
O. Taśmy pasów
P. Prowadnice przesuwowe pasów pojazdu (tylko
przy instalowaniu w Grupie 1)
Q. Płyta mocująca pasy
Rys. 4 (Od spodu)
R. Płytki mocujące pasy do siedzenia
S. Płyta mocująca klamrę do siedzenia
T. Dźwignie odczepiające oparcie od siedzenia
CECHY WYROBU
• Fotelik ten posiada homologację dla „Grupy 1, 2
i 3”, to znaczy przeznaczony jest on do przewozu
77
dzeniu po stronie pasażera lub na jakimkolwiek
tylnym siedzeniu. Nie należy nigdy używać
tego Fotelika na siedzeniach ustawionych
w poprzek lub w kierunku przeciwnym do
kierunku jazdy (Rys. 7).
• Wyrób przeznaczony jest wyłącznie do użytku
jako Fotelik do samochodu i nie może być
używany w domu.
• Podczas montażu postępować tak, aby w żadnym wypadku podgłówek siedzenia pojazdu
nie opierał się o oparcie Fotelika.
uregulować wysokość podgłówka Fotelika tak,
aby pasy wysuwały się na wysokości ramion
dziecka (Rys. 16).
10. W celu wyregulowania naprężenia pasów
Fotelika i dopasowania ich do ciała dziecka
należy ostrożnie pociągnąć taśmę do regulacji
I aż osiągną odpowiedni stopień naprężenia
(Rys. 17).
11. Sprawdzić, czy Fotelik został poprawnie przymocowany tak, jak zostało to przedstawione
na rysunku (Rys. 18).
SPOSÓB INSTALOWANIA FOTELIKA NALEŻĄCEGO
DO GRUPY 1 (9-18 KG) W SAMOCHODZIE I
UMIESZCZENIE W NIM DZIECKA
UWAGA! Niniejsze instrukcje omawiają zarówno w
tekście jak i rysunkach sposób instalowania Fotelika
na tylnym prawym siedzeniu. Aby zainstalować
fotelik w innej pozycji należy wykonać tą samą
kolejność czynności.
Aby wyjąć dziecko z Fotelika należy nacisnąć
przycisk klamry i odpiąć pasy (Rys. 19).
SPOSÓB INSTALOWANIA FOTELIKA Z OPARCIEM
NALEŻĄCEGO DO GRUPY 2 i 3 (15-36 KG)
W SAMOCHODZIE I UMIESZCZENIE W NIM
DZIECKA
Aby zmienić konfigurację Fotelika z grupy 1 na
grupę 2 i 3 należy wstępnie usunąć pasy postępując
według czynności opisanych poniżej:
1. Odpiąć pasy Fotelika z klamry (Rys. 14).
2. Obrócić i odczepić dwie płytki mocujące
pasy R położone pod siedzeniem (Rys. 20A),
wyciągnąć je również z dwóch otworów w
tekstylnym obiciu (Rys. 20B).
3. Odczepić dwie końcówki pasów z płyty
mocującej Q (Rys. 21).
4. Obrócić i odczepić dwie płytki przesuwowe
pasów N od oparcia (Rys. 22).
5. Wyjąć czołowo dwie części pasów przeciągając
je przez dwa czerwone przejścia poprzecznego
pasa C (Fig. 23).
6. Odłożyć i przechowywać w bezpiecznym
miejscu dwie usunięte końcówki pasów.
7. Przeprowadzić klamrę i element rozdzielający
nogi poprzez specjalny otwór znajdujący
się na środku siedzenia, włożyć wszystkie te
elementy do specjalnej wnęki w siedzeniu
(Rys. 24A, 24B i 24C).
Teraz Fotelik jest gotowy i skonfigurowany do
instalowania w grupie 2 i 3.
8. Umieścić Fotelik na wybranym do instalowania siedzeniu zgodnie z kierunkiem
jazdy (Rys. 25).
9. Przeprowadzić poprzeczny odcinek pasa samochodu z tyłu podgłówka i poprzez specjalne,
czerwone przejście pasa C pod podgłówkiem.
Posadzić dziecko w Foteliku upewniając się czy
jego plecy dokładnie przylegają do oparcia
Fotelika (Rys. 26).
10. Zapiąć pas pojazdu w klamrze tak, aby zarówno
jego odcinek biodrowy jak i poprzeczny przeszedł pod podłokietnikiem (Rys. 27).
11. Sprawdzić wysokość podgłówka, jeśli wysokość
nie jest prawidłowa, należy ją uregulować:
patrz paragraf „REGULOWANIE WYSOKOŚCI
PODGŁÓWKA ”.
12. Pociągnąć poprzeczną część pasa samochodowego w stronę mechanizmu zwijającego
pas tak, aby cały pas był dobrze naprężony i
dokładnie przylegał do klatki piersiowej i do
1. Umieścić Fotelik na wybranym do instalowania siedzeniu zgodnie z kierunkiem
jazdy (Rys. 8).
2. Przeprowadzić trzypunktowy pas pojazdu
przez stosowną prowadnicę P oparcia Fotelika
(Rys. 9A i 9B), wyciągnąć go z drugiej strony
oparcia Fotelika (Rys. 9C).
3. Zapiąć pas pojazdu w klamrze tak, aby zarówno
jego odcinek biodrowy jak i poprzeczny przeszedł pod podłokietnikiem (Rys. 10).
4. Pociągnąć silnie pas pojazdu tak, aby Fotelik
dokładnie przylegał do siedzenia (Rys. 11), jeśli
to konieczne docisnąć go kolanem.
5. Sprawdzić czy Fotelik został poprawnie zainstalowany, czy pas jest odpowiednio naprężony
i czy Fotelik dokładnie przylega do siedzenia.
Jeśli tak nie jest, należy powtórzyć czynności
instalowania Fotelika od początku (Rys. 12).
UWAGA!
• Należy zawsze sprawdzić czy pas jest wszędzie
dobrze naprężony i czy nie jest zaplątany w
żadnym punkcie.
• Nie należy NIGDY przeprowadzać pasa samochodowego w miejscach innych od wskazanych
w instrukcji.
Po zakończeniu instalowania Fotelika, aby umieścić
w nim dziecko należy postępować w następujący
sposób:
6. Należy wcisnąć przycisk do regulacji pasów
H, jednocześnie uchwycić dwa pasy Fotelika
i pociągnąć do siebie ich dolną część tak, aby
je maksymalnie poluzować (Rys 13).
7. Odpiąć pasy Fotelika naciskając przycisk klamry
i rozłożyć je po bokach (Rys. 14).
8. Umieścić dziecko w Foteliku, dopasować pasy
do jego ciała bez ich pociągania, złączyć dwa
języczki pasa (Rys. 15A) i ponownie zapiąć je
w klamrze (Rys. 15B).
9. Za pomocą odpowiedniej gałki do regulacji
(9-18 A) znajdującej się w górnej części oparcia,
78
część siedzenia zostały prawidłowo zaczepione
pomiędzy sobą.
nóg dziecka (Rys. 28).
13. Sprawdzić czy Fotelik został prawidłowo
przymocowany tak jak pokazano na rysunku
(Rys. 29).
REGULOWANIE WYSOKOŚCI PODGŁÓWKA
Wysokość podgłówka może być regulowana na
nieskończonej ilości pozycji pozwalając jak najlepiej przystosować Fotelik do wysokości dziecka.
Optymalna regulacja pozwala na to, że:
• głowa jest zawsze dobrze przytrzymana i
chroniona (Grupa 1-2-3).
• pasy bezpieczeństwa Fotelika znajdują się
zawsze na prawidłowej wysokości, to znaczy
na wysokości ramion (Grupa 1).
• pas poprzeczny samochodu znajduje się
zawsze na odpowiedniej wysokości dzięki
przejściom pasa umieszczonymi w podgłówku
C (Grupa 2-3).
Aby wykonać regulację wysokości podgłówka
należy przekręcić gałkę A położoną w górnej
części podgłówka aż do otrzymania żądanej
wysokości (Rys. 16).
UWAGA!
• Należy zawsze sprawdzić czy pas jest odpowiednio naprężony we wszystkich punktach
i czy nie jest splątany.
• Sprawdzić czy poprzeczny pas prawidłowo
opiera się o ramię dziecka i czy nie uciska szyi; jeśli jest to konieczne uregulować
podgłówek.
• Sprawdzić czy mechanizm zwijający pas
samochodowy znajduje się w pozycji cofniętej
(lub co najwyżej w linii) w stosunku do oparcia
siedzenia samochodu.
Aby wyjąć dziecko z Fotelika należącego do
Grupy 2 i 3:
1. Odpiąć pas samochodowy z klamry.
2. Zdjąć pas samochodowy z ciała dziecka.
3. Wyjąć dziecko z Fotelika.
UWAGA! Jeśli Fotelik nie jest wyjmowany z samochodu, należy ponownie wpiąć pas samochodowy
do specjalnej klamry tak, aby przytrzymywał on
Fotelik również wtedy, gdy jest pusty; w przeciwnym razie może on stwarzać zagrożenie podczas
gwałtownego hamowania lub w razie kolizji.
SPOSÓB INSTALOWANIA FOTELIKA BEZ
OPARCIA NALEŻĄCEGO DO GRUPY 3 (22-36
KG) W SAMOCHODZIE I UMIESZCZENIE W NIM
DZIECKA
W grupie 1 (9-18 kg) i 2 (15-25 kg), używanie Fotelika jest dozwolone tylko z oparciem prawidłowo
zamontowanym do siedzenia.
W grupie 3 (22-36 kg), Fotelik może być używany
w dwojaki sposób, Z oparciem (wybór ten jest
zawsze bezpieczniejszy stąd też zalecany) lub
BEZ oparcia.
Aby używać go bez oparcia należy odczepić
oparcie od siedzenia:
1. Ustawić Fotelik samochodowy na poziomej
płaszczyźnie tak, aby dolna część siedzenia
była dostępna (Rys. 30).
2. Obrócić dwie dźwignie odczepienia oparcia
T we wskazanym kierunku (Rys. 31).
3. Wyjąć oparcie z siedzenia (Rys. 32).
4. Ustawić Fotelik tak, aby dokładnie przylegał
do oparcia samochodu (Rys. 33).
5. Umieścić dziecko w Foteliku i zapiąć pas
samochodowy w klamrze przeprowadzając
odcinek biodrowy pod podłokietnikiem Fotelika
i odcinek poprzeczny powyżej (Rys. 34).
6. Dokładnie naprężyć odcinek poprzeczny
pasa i przeprowadzić go poprzez ramię
dziecka (Rys. 35).
PRZYWRÓCENIE PASÓW DO UŻYWANIA W
GRUPIE 1 (9-18 KG)
Aby ponownie zamontować pasy w Foteliku
należy postąpić w następujący sposób:
1. Złączyć języczki dwóch odcinków pasa, włożyć
je i zapiąć w klamrze (Rys. 36).
2. Przełożyć dwie płytki montujące do siedzenia
R poprzez obicie tak, aby wyszły pod siedzeniem (Rys. 37).
3. Przeprowadzić dwie płytki mocujące podkładki
pasów i przejścia pasów N najpierw przez dwa
czerwone przejścia poprzecznego pasa C a
następnie poprzez oparcie (Rys. 38).
4. Przyczepić dwie końcówki pasa do płyty
mocującej Q (Rys. 39).
CZYSZCZENIE I KONSERWACJA
CZYSZCZENIE OBICIA
Obicie Fotelika jest całkowicie zdejmowane i może
być prane ręcznie lub w pralce w temperaturze
30°C. W praniu należy dostosować się do instrukcji
przytoczonych na wszywce obicia zawierającej
następujące symbole prania:
Pranie w pralce
w temp. 30°C
Pranie
ręczne
Nie wybielać
Nie czyścić
chemicznie
Nie suszyć
mechanicznie
Nie prasować
Nie używać agresywnych detergentów ani rozpuszczalników. Aby wysuszyć obicie nie należy
go odwirowywać ani wyciskać.
Aby usunąć różne elementy obicia z ramy Fotelika
należy postępować w następujący sposób:
1. Odpiąć pasy Fotelika z klamry (Rys. 14).
2. Obrócić i odpiąć dwie płytki mocujące pasy
R położone pod siedzeniem (Rys. 20A) przeprowadzając je również przez otwory w
obiciu (Rys. 20B).
3. Zdjąć obicie z podgłówka (Rys. 40).
4. Zdjąć obicie z oparcia odpinając wszystkie
UWAGA! Aby przymocować oparcie do siedzenia,
należy powtórzyć wyżej opisane czynności w
odwrotnej kolejności. Po zakończeniu czynności
mocowania należy sprawdzić czy górna i dolna
79
rzepy mocujące i wyciągnąć dwa odcinki
pasa (Rys. 41).
Odczepić oparcie od siedzenia postępując
zgodnie z opisem danym w paragrafie „SPOSÓB
INSTALOWANIA FOTELIKA BEZ OPARCIA
NALEŻĄCEGO DO GR. 3 (22-36 KG) W SAMOCHODZIE
I UMIESZCZENIE W NIM DZIECKA” (punkty 1-3).
5. Zdjąć obicie siedzenia odpinając wszystkie rzepy
mocujące i rozpiąć dwa zamki (Rys. 42).
Aby zamontować elementy obicia należy wykonać czynności opisane powyżej w odwrotnej
kolejności.
Ç
•
•
•
CZYSZCZENIE PLASTIKOWYCH ORAZ METALOWYCH
ELEMENTÓW
Do czyszczenia elementów z plastiku lub lakierowanego metalu, należy używać tylko wilgotnej
szmatki. Nie używać agresywnych detergentów
ani rozpuszczalników.
Ruchome części Fotelika absolutnie nie powinny
być naoliwiane.
•
•
KONTROLA STANU ELEMENTÓW SKŁADOWYCH
Zaleca się okresowo sprawdzać stan oraz stopień
zużycia następujących elementów:
• Obicie: sprawdzić czy nie jest przetarte i nie
wychodzi z niego wyściółka. Sprawdzić stan
szwów, które nie powinny być rozprute.
• Pasy: sprawdzić czy tkanina nie jest odwłókniona oraz czy taśma pasów nie przetarła się
zbytnio w pobliżu taśmy regulacyjnej elementu
rozdzielającego nogi, na odcinkach ramion i
w strefie płytki regulacyjnej pasów.
• Elementy plastikowe: sprawdzić stan zużycia
wszystkich elementów plastikowych, które nie
powinny być uszkodzone ani wypłowiałe.
•
•
•
UWAGA! Jeśli Fotelik jest zdeformowany lub silnie
zużyty, powinien być wymieniony: możliwe,
że utracił oryginalne cechy zapewniające jego
bezpieczne użycie.
•
•
KONSERWACJA WYROBU
Kiedy Fotelik nie jest zainstalowany w samochodzie,
należy go przechowywać w suchym miejscu i z
dala od źródeł ciepła oraz chronić przed kurzem,
wilgocią i bezpośrednim działaniem promieni
słonecznych.
•
LIKWIDACJA WYROBU
Po zakończeniu okresu eksploatacji Fotelika, nie
powinien być on używany i należy go wyrzucić. Ze
względu na ochronę środowiska, należy wysegregować różnego rodzaju odpady zgodnie z przepisami
obowiązującymi w Kraju użytkownika.
•
W CELU UZYSKANIA DODATKOWYCH INFORMACJI
PROSIMY KONTAKTOWAĆ SIĘ Z:
ARTSANA SPA
Serwis Obsługi Klienta (Servizio Clienti)
Via Saldarini Catelli, 1
22070 Grandate COMO-ITALIA
Tel. Nr linii grzecznościowej 800.188.898
www.chicco.com
80
•
•
•
TR Kullanım bilgileri
•
ÇOK ÖNEMLİ! HEMEN OKUNMALIDIR
• Ürünün montajı ve kurulması için bilgileri
titizlikle uygulayın. Herhangi bir kişinin kullanım bilgilerini okumadan ürünü kullanmasına
engel olun.
• Bu kılavuzu sonraki kullanımlar için saklayın.
• DİKKAT! Kazalar ile ilgili istatistiklere göre,
araçların arka koltukları ön koltuklardan daha
güvenlidir: Bu nedenle Oto Koltuğu’nun arka
koltuklara takılması önerilir. Özellikle 3 noktalı
kemer ile donatılmış olması halinde arka orta
koltuk en emin koltuktur.
• Araç içindeki bütün yolcuların, acil durum
halinde çocuğu çözme yöntemi hakkında
bilgilendirilmiş olması önerilir.
• Oto Koltuğu’nun etkin ön hava yastığı ile korunan ön koltuğa yerleştirilmesi durumunda,
daha emin olması için arka koltuklarda oturan
başka yolcular ile uyumlu olarak, koltuğun
mümkün olduğunca arkaya itilmesi önerilir.
• Bu Oto Koltuğu’nu asla yana doğru veya gidiş istikametinin aksi yönüne döndürülmüş
koltuklar üstünde kullanmayın.
• Oto Koltuğu’nu sadece araç yapısına doğru
şekilde sabitlenmiş koltuklar üzerinde ve gidiş
yönüne bakacak şekilde kurun. Katlanabilir
veya döndürülebilir araç koltuklarını sağlam
şekilde kenetlenmiş olmadan bırakmamaya
dikkat edin, kaza halinde bir tehlike oluşturabilirler.
• Seyyar bir koltuğun veya kapının Oto
Koltuğu’na müdahale etmesini önleyecek
şekilde, Oto Koltuğu’nun araca nasıl kurulduğuna dikkat edin.
• Oto Koltuğu’nu, sadece karın kemeri (iki noktalı) ile donatılmış bir araç koltuğu üzerine
asla bağlamayın.
• Bir kaza durumunda hiçbir Oto Koltuğu çocuğun tam güvenliğini garanti etmez, ancak
bu ürünün kullanılması ağır yaralanma veya
ölüm riskini azaltır.
• Yalnız bir kaza durumunda değil, başka koşullar altında da (örneğin ani fren, vs.) çocuğun
ciddi şekilde yaralanma tehlikesi, bu kullanım
kılavuzunda belirtilen önerilere titizlikle uyulmaması durumunda artar: Oto Koltuğu’nun,
araç koltuğuna doğru şekilde kenetlendiğini
daima kontrol edin.
• Oto Koltuğu’nun hasar görmüş, deforme olmuş veya aşırı şekilde aşınmış olması halinde
bu, orijinal güvenlik niteliklerini kaybetmiş
olabileceğinden değiştirilmelidir.
• Ürün üzerinde üreticinin onayı olmadan değişiklik veya ilaveler yapmayın.
• Üretici tarafından tedarik edilmemiş aksesuarları, yedek parçaları veya diğer nesneleri
takmayın.
• Çocuğu hiçbir nedenle Oto Koltuğu’nda asla
denetimsiz bırakmayın.
•
•
•
•
•
•
•
•
•
•
•
•
81
Gerek araç koltuğu ve Oto Koltuğu arasına
gerekse Oto Koltuğu ve çocuk arasına ürün
için onaylanmış bir aksesuar dışında hiçbir
şey koymayın: kaza durumunda Oto Koltuğu
düzgün bir şekilde çalışmayabilir.
Aracın uzun süre güneş altında bırakılması
durumunda, çocuğu Oto Koltuğu’na oturtmadan önce değişik kısımların aşırı ısınmadığını kontrol ederek Oto Koltuğu’nu titizlikle
denetleyin: bu durumda çocuğun yanmasını
önlemek için çocuğu oturtmadan önce Oto
Koltuğu’nu soğumaya bırakın.
Hafif de olsa bir kaza sonrasında Oto Koltuğu,
çıplak gözle daima görülemeyecek şekilde
zarara uğramış olabilir: bu nedenle değiştirilmesi gerekir.
İkinci el Oto Koltuğu kullanmayın: çıplak gözle
görülemeyecek ancak ürünün güvenliğini
tehlikeye atabilecek yapısal hasar görmüş
olabilir.
Artsana Firması, ürünün uygun olmayan
amaçla kullanılmasından kaynaklanabilecek
zararlardan sorumlu değildir.
Kılıf, Oto Koltuğu’nun tamamlayıcı kısmını
oluşturduğundan sadece üretici tarafından
uygun görülen bir kılıf ile değiştirilebilir. Oto
Koltuğu, çocuğun güvenliğini tehlikeye sokmamak için asla kılıfsız kullanılmamalıdır.
Kemerin şeridinin kıvrılmamış olduğunu kontrol edin ve şeridin veya Oto Koltuğu’nun
parçalarının araç kapıları arasına sıkışmalarını
veya kesici noktalara karşı sürtünmelerini
önleyin.
Kemerin kesik veya taraz bulundurması halinde Oto Koltuğu bir daha kullanılamaz.
Çocuk taşınmadığı zaman da Oto Koltuğu her
halükarda takılı bırakılmalı veya bagaja koyulmalıdır. Nitekim kenetlenmemiş Oto Koltuğu,
kaza durumunda veya ani fren yapıldığında
yolcular için tehlikeli olabilir.
Özellikle aracın arka camı önünde olmak üzere
araç içinde güvenli bir şekilde sabitlenmemiş
veya yerleştirilmemiş eşya veya bagaj taşınmadığından emin olun: Kaza durumunda
veya ani fren yapılması halinde yolcuların
yaralanmalarına neden olabilir.
Koltuğun baş dayanağının, Oto Koltuğu’nun
baş dayanağını etkilemediğini kontrol edin:
Oto Koltuğu’nun baş dayanağını ileri itmemelidir. Bunun gerçekleşmesi halinde, Oto
Koltuğu’nun üzerine kurulduğu araç koltuğunun baş dayanağını çıkarın ve bunu, arka
cam önüne koymamaya dikkat edin.
Araçtaki bütün yolcuların gerek kendi güvenlikleri açısından gerek yolculuk sırasında, kaza
veya ani fren yapma durumunda çocuğun
yaralanmasına neden olabileceklerinden,
emniyet kemerlerini kullandıklarından emin
olun.
Uzun yolculuklarda sık mola verin. Çocuk
çok kolay yorulur. Araç hareket halindeyken
çocuğu hiçbir nedenle Oto Koltuğu’ndan çıkarmayın. Çocuğun ilgi istemesi halinde, emin
olduğu anlamına gelir.
bir yer bulmak ve yanaşmak gerekir.
KULLANIM BİLGİLERİ
DİZİN
• Oluşturan parçaların tanımı
• Ürünün özellikleri
• Ürün ve araç koltuğuna ilişkin kısıtlama ve
nitelikler
• Oto Koltuğu’nun araca takılması ve Gr.1’deki
çocuğun (9-18 kg) oturtulması
• Oto Koltuğu’nun araca takılması ve Gr.23’teki çocuğun (15-36 kg) sırt dayanağı ile
oturtulması
• Oto Koltuğu’nun araca takılması ve Gr.3’teki
çocuğun (22-36 kg) sırt dayanaksız oturtulması
• Baş dayanağının yükseklik ayarı
• Gr.1 (9-18 kg) kullanımı için kemerlerin düzenlenmesi
• Temizlik ve bakım
ÖNEMLİ UYARI
1. Bu, 44 numaralı Yönetmelik, 04 sayılı seri değişiklikleri uyarınca onaylanmış “Evrensel” bir
çocuk tutma aygıtıdır. Araçlarda genel kullanılmaya uygundur ve araç koltuklarının hepsi ile
değil, büyük çoğunluğu ile uyumludur.
2. Mükemmel uyumluluk, aracın üreticisinin
araç kullanım kılavuzunda söz konusu yaş
kuşağı için “Evrensel” çocuk tutma aygıtlarının araca kurulmasının öngörüldüğünü
belirtmesi durumunda daha kolaylıkla elde
edilebilmektedir.
3. Bu tutma aygıtı, bu uyarıyı taşımayan daha
önceki modellere göre, en katı onaylama
ilkeleri temel alınarak “Evrensel” olarak sınıflandırılmıştır.
4. Sadece 3 noktalı, statik veya sarıcılı, UN/ECE
16 numaralı yönetmeliğe veya eşdeğerli başka
standartlara göre onaylanmış emniyet kemerleri ile donatılmış araçlarda kullanılmaya
uygundur.
5. Tereddüt durumunda tutma aygıtının üreticisi
veya yetkili satıcı ile temas edin.
OLUŞTURAN PARÇALARIN TANIMI
Res. 1 (ön)
A. Baş dayanağı ve kemer ayar düğmesi
B. Baş dayanağı
C. Çapraz kemer geçişleri
D. Omuzluklar
E. Oto Koltuğu kemerleri
F. Toka
G. Bacak arası koruması
H. Kemerlerin ayar düğmesi
I. Kemerlerin ayar şeridi
2
3
4
5
D
•
•
ÜRÜN VE ARAÇ KOLTUĞUNA İLİŞKİN KISITLAMA
VE KULLANIM ÖZELLİKLERİ
DİKKAT! Ürün ve araç koltuğu ile ilgili olarak
aşağıda belirtilen kısıtlama ve kullanım özelliklerine titizlikle uyun: aksi takdirde güvenlik
garanti edilmez.
• Bu Oto Koltuğu sadece 9 ve 36 kg arası ağırlıklı
(yaklaşık 1 ve 12 yaş arası) çocukların kullanması için onaylanmıştır.
• Aracın koltuğu, UN/ECE 16 numaralı yönetmeliğe veya eşdeğerli başka standartlara göre
onaylanmış 3 noktalı, statik veya sarıcılı emniyet kemeri ile donatılmış olmalıdır (Res. 5).
• Oto Koltuğu’nu asla iki ankraj noktalı araç
kemeri ile kurmayın (Res. 6).
• Oto Koltuğu, yolcu yanı ön koltuğun üzerine
veya arka koltuklardan herhangi biri üzerine kurulabilir. Bu Oto Koltuğu’nu asla yana
doğru veya gidiş istikametinin aksi yönüne
döndürülmüş koltuklar üstünde kullanmayın (Res. 7).
• Ürün, sadece araç koltuğu üzerinde kullanılmak üzere tasarlanmıştır ve evde kullanılmaya
uygun değildir.
• Doğru kurma sağlamak için araç koltuğunun baş dayanağının, Oto Koltuğu’nun baş
dayanağını hiçbir şekilde etkilememesini
sağlayın.
Res. 2 (Profil)
J. Sırt dayanağı
K. Oturma yeri
L. Kol dayanakları
M. Kemer geçişleri
Res. 3 (Arka)
N. Omuzlukları sabitleme ve kemerleri geçirme
plakaları
O. Kemer şeritleri
P. Aracın kemerlerini geçirme bölmeleri (sadece
Gr. 1’e takma)
Q. Kemerlerin sabitleme plakası
Res. 4 (Alt)
R. Kemerleri oturma yerine sabitleme plakaları
S. Tokayı oturma yerine sabitleme plakası
T. Sırt dayanağının oturma yerinden çözme
kolları
ÜRÜNÜN ÖZELLİKLERİ
• Bu Oto Koltuğu, ECE R44/04 Avrupa Yönetmeliği uyarınca 9 ve 36 kg arası (yaklaşık 1 ve 12
yaş arası) çocukların taşınması için “Grup 1, 2
ve 3” onaylıdır.
• Onay, “Evrensel” tiptir, bu doğrultuda Oto
Koltuğu her türlü araç modeli üzerinde kullanılabilir. DİKKAT! “Evrensel”, araç koltuklarının
hepsi ile değil, büyük çoğunluğu ile uyumlu
OTO KOLTUĞU’NUN ARACA TAKILMASI VE GR.
1’DEKİ ÇOCUĞUN (9-18 KG) OTURTULMASI
DİKKAT! Bu bilgiler, gerek metin gerekse resim
olarak Oto Koltuğu’nun arka sağ koltuk üzerine
takılmasına ilişkindir. Başka pozisyonlarda takmak
için de yine aynı işlem sırasını uygulayın.
1. Oto Koltuğu’nu, aracın takmak için önceden
82
O
ç
b
6
7
8
9
1
1
Ç
b
O
v
İ
O
seçtiğiniz koltuğu üzerine, gidiş yönünde
yerleştirin (Res. 8).
2. Aracın 3 noktalı kemerini, Oto Koltuğu’nun sırt
dayanağının bölmesi P aracılığı ile geçirin (Res.
9A e 9B) ve sırt dayanağının diğer yanındaki
ters bölmeden dışarı çıkarın (Res. 9C).
3. Gerek karın şeridinin gerekse çapraz şeridin
kol dayanağının altından geçmelerini sağlayarak aracın kemerini tokaya kenetleyin
(Res. 10).
4. Oto Koltuğu’nu, araç koltuğuna iyice oturtarak aracın kemerini olabildiğince gerin (Res.
11), gerekirse Oto Koltuğu’na bir diziniz ile
bastırın.
5. Takılmanın doğruluğunu, kemerin iyice gerilmiş olduğunu ve Oto Koltuğu’nun araç
koltuğuna iyice sabitlenmiş ve oturmuş
olduğunu kontrol edin. Böyle olmaması halinde, takma işlemini baştan itibaren tekrar
edin (Res. 12).
23’e değiştirmek için öncelikle kemerlerin aşağıda
belirtilen işlemler uyarınca çıkarılmaları gerekir:
1. Oto Koltuğu’nun kemerlerini tokadan çözün
(Res. 14).
2. Oturma yerinin altındaki, kemerlerin iki sabitleme plakasını R çevirip çözün (Res. 20A) ve
bunların, kumaş kılıf üzerindeki iki delikten de
dışarı çıkmalarını sağlayın (Res. 20B).
3. Kemerlerin iki ucunu sabitleme plakasından
Q çözün (Res. 21).
4. Kemerlerin iki geçirme plakasını N çevirin ve
sırt dayanağından çözün (Res. 22).
5. İki kemer şeridini, iki kırmızı çapraz kemer geçişinden C geçirerek önden çıkarın (Res. 23).
6. Bu şekilde çıkarılmış iki kemer şeridini özel
bir yere koyup saklayın.
7. Tokayı ve kumaş bacak ayırıcıyı, oturma yerinin ortasındaki özel delik aracılığı ile geçirin ve
bütün bunları oturma yerinin özel bölmesine
yerleştirin (Res. 24A, 24B ve 24C).
Şimdi Oto Koltuğu, grup 2 ve 3’e takılmak için
hazır ve ayarlanmıştır.
8. Oto Koltuğu’nu, aracın takmak için önceden
seçtiğiniz koltuğu üzerine, gidiş yönünde
yerleştirin (Res. 25).
9. Aracın kemerinin çapraz şeridini, baş dayanağının altındaki özel kırmızı kemer geçişi
C aracılığı ile baş dayanağının arkasından
geçirin. Çocuğun sırtının, Oto Koltuğu’nun sırt
dayanağına iyice yaslanmış olduğundan emin
olarak çocuğu özenle oturtun (Res. 26).
10. Gerek karın şeridinin gerekse çapraz şeridin kol
dayanağının altından geçmelerini sağlayarak
aracın kemerini tokaya kenetleyin (Res. 27).
11. Baş dayanağının yüksekliğini kontrol edin ve
doğru olmaması halinde bunu ayarlayın: “BAŞ
DAYANAĞI YÜKSEKLİĞİNİN AYARLANMASI”
paragrafına bakın.
12. Tüm kemer, çocuğun göğsünü ve bacaklarını
iyice saracak ve gergin olacak şekilde araç
kemerinin çapraz kısmını, sarıcısına doğru
çekin (Res. 28).
13. Oto Koltuğu’nun resimde belirtildiği gibi
doğru şekilde sabitlenmiş olduğunu kontrol
edin (Res. 29).
DİKKAT!
• Kemerin, bütün noktalarda eşit şekilde paylaştırılmış olduğunu ve dolanmalar bulundurmadığını daima kontrol edin.
• Aracın kemerini ASLA belirtilenlerden farklı
pozisyonlarda geçirmeyin.
Oto Koltuğu’nun takılması tamamlandıktan sonra,
çocuğu bunun üzerine oturtmak için aşağıda
belirtildiği gibi işlem görün:
6. Kemerlerin ayar düğmesine H basın ve aynı
anda Oto Koltuğu’nun kemerlerinin mümkün
maksimum genişlemesini elde edene kadar,
bunların alt kısmını kavrayıp kendinize doğru
çekin (Res 13).
7. Tokanın düğmesine basarak Oto Koltuğu’nun
kemerlerini açın ve yanlara koyun (Res. 14).
8. Çocuğu özenle Oto Koltuğu’na oturtun, kemerleri çekmeden vücudunun etrafına uyarlayın, kemerin iki dilini birleştirin (Res. 15A) ve
yeniden tokaya kenetleyin (Res. 15B).
9. Sırt dayanağının üzerindeki özel ayar düğmesi
A aracılığı ile Oto Koltuğu’nun baş dayanağının yüksekliğini, kemerler çocuğun omuzlarının yüksekliğinde dışarı çıkacak şekilde
ayarlayın (Res. 16).
10. Oto Koltuğu’nun kemerlerini çocuğun vücuduna uyarlayarak bunların gerginliğini
ayarlamak için, doğru gerginlik seviyesini
elde edene kadar ayar şeridini I dikkatle çekin
(Res. 17).
11. Oto Koltuğu’nun resimde belirtildiği gibi
doğru şekilde sabitlenmiş olduğunu kontrol
edin (Res. 18).
DİKKAT!
• Kemerin, bütün noktalarda eşit şekilde paylaştırılmış olduğunu ve dolanmalar bulundurmadığını daima kontrol edin.
• Çapraz kemerin, çocuğun omzuna karşı doğru
şekilde yaslanmış olduğunu ve boyun üzerine
baskı uygulamadığını kontrol edin; gerekirse
baş dayanağını ayarlayın.
• Aracın kemer sarıcısının, aracın koltuğunun
sırt dayanağına göre geri pozisyonda (veya
en fazla aynı hizada) bulunduğunu kontrol
edin.
Çocuğu, Grup 2 ve 3’teki Oto Koltuğu’ndan çıkarmak için:
1. Aracın kemerini tokasından çözün.
2. Aracın kemerini, çocuğun bedeninden çıkarın.
Çocuğu Oto Koltuğu’ndan çıkarmak için tokanın
butonuna basın ve kemerleri açın (Res 19).
OTO KOLTUĞU’NUN ARACA TAKILMASI VE GR. 2
ve 3’TEKİ ÇOCUĞUN (15-36 KG) SIRT DAYANAĞI
İLE OTURTULMASI
Oto Koltuğu’nun konfigürasyonunu gr. 1’den gr.
83
3. Çocuğu, Oto Koltuğu’ndan özenle çıkarın.
DİKKAT! Oto Koltuğu’nun araçtan çıkarılmak
istenmemesi halinde, aracın kemerini özel tokaya tekrar takın, bu şekilde bu, Oto Koltuğu’nu
çocuk bulunmadığında da tutar; aksi halde fren
yapıldığında veya kaza durumunda bir tehlike
oluşturabilir.
OTO KOLTUĞU’NUN ARACA TAKILMASI VE GR.
3’TEKİ ÇOCUĞUN (22-36 KG) SIRT DAYANAKSIZ
OTURTULMASI
Grup 1 (9-18 kg) ve 2’de (15-25 kg), Oto
Koltuğu’nun sadece oturma yerine doğru şekilde
monte edilmiş sırt dayanağı İLE kullanılmasına
izin verilmiştir.
Grup 3’te (22-36 kg) Oto Koltuğu, sırt dayanağı BULUNARAK (her halükarda daha emin ve dolayısıyla
tavsiye edilebilir seçim) veya BULUNMAYARAK
alternatif olarak bir çift kullanım imkânı sunar.
Sırt dayanaksız kullanım için, sırt dayanağını
oturma yerinden çözmek gerekir:
1. Oto Koltuğu’nu, oturma yerinin alt kısmına
erişilebilecek şekilde yatay bir düzlem üzerine
koyun (Res. 30).
2. İki sırt dayanağından çözme kolunu T belirtilen yöne çevirin (Res. 31).
3. Sırt dayanağını oturma yerinden çıkarın
(Res. 32).
4. Oturma Koltuğu’nun oturma yerini, aracın
sırt dayanağına tam olarak yaslanacak şekilde
konumlandırın (Res. 33).
5. Çocuğu, Oto Koltuğu’na oturtun ve karın
şeridini Oto Koltuğu’nun kol dayanağının
altından ve çapraz şeridi, Oto Koltuğu’nun
kol dayanağının üstünden geçirerek aracın
kemerini tokaya takın (Res. 34).
6. Kemerin çapraz şeridini, çocuğun omzunun
üzerinden geçecek şekilde özenle gerin (Res.
35).
GR. 1 (9-18 KG) KULLANIMI İÇİN KEMERLERİN
DÜZENLENMESİ
Oto Koltuğu’nun kemerlerini takmak aşağıdaki
şekilde işlem görün:
1. İki kemer şeridinin iki dilini birleştirin ve tokaya geçirip kenetleyin (Res. 36).
2. İki sabitleme plakasının R, oturma yerinin
altındaki kısımdan dışarı çıkmasını sağlayarak, bunları kılıf aracılığı ile oturma yerine
sabitleyin (Res. 37).
3. İki omuzluk sabitleme ve kemer geçirme
plakasını N, önce iki kırmızı çapraz kemer
geçişinden C ve sonra sırt dayanağından
geçirin (Res. 38).
4. Kemerlerin iki ucunu sabitleme plakasına Q
kenetleyin (Res. 39).
TEMİZLİK VE BAKIM
KILIFIN TEMİZLİĞİ
Oto Koltuğu’nun kılıfı tamamen sökülebilir ve
elde veya 30°C’de çamaşır makinesinde yıkanabilir. Yıkamak için aşağıdaki yıkama sembollerini
bulunduran, kaplamanın etiketinde belirtilen
bilgilere uyun:
30°C çam. mak.
yıkama
Elde
yıkama
Ağartma
yapılamaz
Kuru temizl.
yapılamaz
Tamburlu
kurutma
yapılamaz
Ütülenemez
Asla abrasif deterjanlar veya solventler kullanmayın. Kılıfa santrifüj uygulamayın ve sıkmadan
kurutun.
Kumaş kılıfın farklı parçalarını Oto Koltuğu’ndan
çıkarmak için aşağıda belirtildiği gibi işlem görün:
1. Oto Koltuğu’nun kemerlerini tokadan çözün
(Res. 14).
2. Oturma yerinin altındaki, kemerlerin iki sabitleme plakasını R çevirip çözün (Res. 20A), ve
bunların, kumaş kılıf üzerindeki iki delikten
dışarı çıkmalarını sağlayın (Res. 20B).
3. Baş dayanağının kaplamasını çıkarın (Res.
40).
4. Bütün sabitleme velkrolarını açarak ve iki
kemer şeridini çıkararak sırt dayanağının
kaplamasını çıkarın (Res. 41).
5. Sırt dayanağını, “OTO KOLTUĞU’NUN ARACA
TAKILMASI VE GR. 3’TEKİ ÇOCUĞUN (22-36 KG)
SIRT DAYANAKSIZ OTURTULMASI” paragrafında (1-3 noktaları) açıklandığı gibi oturma
yerinden ayırın.
6. Bütün sabitleme velkrolarını ve iki fermuarı
açarak oturma yerinin kaplamasını çıkarın
(Res. 42).
Kılıfın parçalarını başlangıç pozisyonunda düzenlemek için yukarıda belirtilen işlemleri tersten
uygulayın.
DİKKAT! Sırt dayanağını, oturma yerine sabitlemek
için, yukarıda belirtilen işlemleri tersten tekrar
edin. Sabitleme işlemlerinin sonunda, oturma
yerinin üst ve alt kısmının kendi aralarında doğru
şekilde takılı olduklarını kontrol edin.
BAŞ DAYANAĞININ YÜKSEKLİK AYARI
Oto Koltuğu’nun çocuğun boyuna en iyi şekilde
uymasını sağlamak için baş dayanağının yüksekliğini sınırsız sayıda pozisyonda ayarlamak mümkündür. Optimal bir ayar, aşağıdakileri sağlar:
• Çocuğunu başının daima iyi tutulmasını ve
korunmasını (Gr. 1-2-3).
• Oto Koltuğu’nun emniyet kemerlerinin daima doğru boyda yani omuzların boyunda
bulunmasını (Gr.1).
• Aracın çapraz şeridinin, baş dayanağına entegre edilmiş kemer geçişleri C sayesinde
daima doğru boyda bulunmasını (Gr.2-3).
Baş dayanağının yükseklik ayarını gerçekleştirmek için, sırt dayanağının üzerindeki düğmeyi
A, arzu edilen yüksekliğe ulaşana kadar çevirin
(Res. 16).
PLASTİK VE METAL KISIMLARIN TEMİZLENMESİ
Plastik veya boyalı metal kısımların temizlenmesinde sadece nemli bir bez kullanın. Asla abrasif
deterjanlar veya solventler kullanmayın.
84
O
y
O
K
A
d
ö
•
•
•
D
d
g
Ü
A
b
r
s
Ü
O
u
r
y
c
D
A
S
V
2
Ü
w
Oto Koltuğu’nun seyyar kısımları, hiçbir şekilde
yağlanmamalıdır.
OLUŞTURAN PARÇALARIN SAĞLAMLIĞININ
KONTROLÜ
Aşağıdaki parçaların sağlamlığının ve aşınma
durumunun düzenli olarak kontrol edilmesi
önerilir:
• Kılıf: Dolgu malzemesinin dikişlerden dışarı
taşmadığını veya dikişlerin durumunu kontrol edin. Dikişlerin daima sağlam olmaları
gerekir.
• Kemerler: Kumaşta anormal bir tarazlanma ve
ayar şeridi, bacak ayırıcı, omuzluklar ve kemer
ayarlama plakası hizasında gözle görülür bir
incelme olmadığını kontrol edin.
• Plastik parçalar: Plastikten oluşan tüm kısımların aşınma durumunu kontrol edin, gözle
görülür hasar veya renkte solma belirtisi
görülmemesi gerekir.
DİKKAT! Oto Koltuğu deforme olmuş veya aşırı
derece yıpranmış ise değiştirilmesi gerekir: Orijinal
güvenlik niteliklerini kaybetmiş olabilir.
mez
ÜRÜNÜN SAKLANMASI
Araca takılmadığı zaman Oto Koltuğu’nun kuru
bir yerde, ısı kaynaklarından uzakta, tozdan,
rutubet ve direkt güneş ışınlarından korunarak
saklanması önerilir.
ÜRÜNÜN BERTARAF EDİLMESİ
Oto Koltuğu için öngörülen kullanım limitine
ulaşıldığında ürünü kullanmayın ve atın. Çevreye saygı nedeniyle ülkenizde yürürlükte olan
yönetmelik hükümleri uyarınca değişik atıkları
cinslerine göre ayırın.
DAHA DETAYLI BİLGİ İÇİN:
ARTSANA SPA
Servizio Clienti (Müşteri Hizmetleri)
Via Saldarini Catelli, 1
22070 Grandate COMO-İTALYA
Ücretsiz tel. no.: 800.188.898
www.chicco.com
85
SA
86
87
88
89
C
90
91
92
93
NOTE
94
NOTE
95
NOTE
96