1
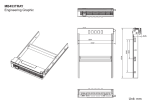
A fidelity engineering
since 1974
Quick Start Manual
Thank you for purchasing the Exposure 2010S2 Integrated Amplifier.
Before you start
Contents:
O = O
Exposure 201052 Integrated Amplifier
|
IO:
Mains cable HS-101 Exposure System remote control
(batteries included)
Ensure your unit 1s switched off and that the volume
control knob Is at its minimum.
Please note that your 201052 Integrated Amplifier
may take up to 48 hours to “run-in” before reaching
its optimal performance. Each subsequent “run-in”
will then take about 30 minutes.
OC
NI /# The Exposure 201052 Integrated Amplifier is fitted
with an over current sensor which will switch off the
speaker output in the event of a speaker wire short
circuit or excessive current. To reset the output,
switch off the Amplifier for 5 minutes.
sl /
fl"
For optimum performance,
use Exposure speaker cables with your Exposure equipment.
| Installation
The Exposure 2010S2 Integrated Amplifier : Front View
exposure
a) Turn volume control
to minimum before
connecting or
disconnecting any
cables.
ey RE TR
кие TZó
2 CD Player/Tuner/Tape/DVD/etc Connections
The Exposure 201052 Integrated Amplifier is fitted with six-line level RCA Phono inputs, suitable for connection of CD players, tuners, recorders,
DVD players and other source components.
The Exposure 201052 Integrated Amplifier: Back View
b) Connect the mains
= c) Connect to the mains
cable to the IEC Ц outlet on the wall.
mains input socket. DO NOT switch on
’ until all input and
output connections
are made.
© © 9 O
a JF Fa |
P= tl
HEC
uan karla 1 om | RR ge pT Tata op Ye
TILE FA)
ER SAALE FARTE p= 1
eRe BENE PES E de FP ee
Ground Terminal
Input
Output
a) Connect RCA Phono cables from source components (CD Player/
Tuner/Tape/DVD/etc) to the respective inputs.
— 90000
o PEL E
Turntable/
Video [—.————— i
Player
b) Ensure left and right channels are connected correctly. (Right channel
Is marked in red)
с) The tape input is labeled TAPE PLAY.
Turntable connection requires the installation of an optional MM or MC
Phono Card. A ground terminal is provided for connection to a turntable
arm grounding wire or RCA ground wire only.
TAPE REC provides line level output signals for recording.
PRE OUT provides left and right channel output signals appropriate
for connection to an Exposure 201052 Power Amplifier
(a future-proof upgrade).
3 Loudspeaker Connections
Right Speaker Left Speaker
Rear of exposure 2010S2 Integrated Amplifier
+ = Preout Left + -
SPK1 SPK2
O + -00+00
o | oe
| 9 - 00-00 |
| | | |
=== | = = = = = mm mm mm mm mm mm mm mm mm mm mm mm mm mm mm md SU |
a) Connect left and right loudspeakers to corresponding left and right
speaker outputs on the amplifier.
b) Connect (+) terminal of loudspeaker to (+) terminal of the amplifier.
c) Connect (-) terminal of loudspeaker to (-) terminal of the amplifier.
Bi-wired connection
Bi-wiring may provide a useful gain in subjective performance. Should you choose
this option, please refer to the “Extended Set-Up" instructions overleaf.
Bi-amping of Loudspeakers
Bi-amping of loudspeakers using a 201052 Integrated and a 201052 Power
Amplifier provides a useful gain in subjective performance. For this operation,
please refer to the “Extended Set-Up” instructions overleaf.
4 Operation
a) Turn amplifier volume control to minimum.
EAT b) Press power switch. The LED power indicator
Will light up. The pre-amplifier output relay will
click after a 6-second delay, together with the
Sieg: other indicator lights on Volume and Input
О Selector Knobs.
с) Without playing any CD/Tape/DVD/etc, turn
the volume control knob slowly clockwise to
around 20%. It is normal to hear a faint hiss.
d) Turn the source selection knob to select a live
source component (Phono Auxl/Tuner/CD/
Aux2/Aux3/ Tape). Audio should now be heard
when the source component is played.
5 Remote Control
The source selection knobs will rotate to match selections made on
remote control.
Grey Buttons
Select the functions of the
Exposure CD player (if any).
“ Red Button A
Mutes the volume output to
minimum. Indicator lights on
VOLUME and INPUT SELECTOR
knobs will be turned off. Press
the red button again or press the
VOL + button to return volume to
its previous level and restore
_ Indicator lights.
Green Buttons
Increase/decrease the volume.
Indicator light on VOLUME knob
Will flash as volume is adjusted.
PLAY STOP PAUSE OPEN
” Black Buttons A
as es a Select input sources. Indicator
ный light on the INPUT SELECTOR
knob will flash as sources are
© selected. i
Installation of a MC or MM Phono Module.
For details, please refer to the “Extended Set-Up” section overleaf or
contact your dealer.
Exposure 2010S2 Integrated Amplifier Extended Set-Up
Bi-wiring
The Exposure 2010S2 Integrated Amplifier is fitted with two sets of 4mm loudspeaker sockets for bi-wired connection. Another pair of speaker wires 15
required for this operation.
Right Speaker Left Speaker
|. Ensure that the links at the speaker terminals between Rear of Exposure 201052 Integrated Amplifier
the high frequency and the low frequency are removed
on both loudspeakers.
2. Follow the diagram on the right for connecting a pair
of loudspeakers in bi-wiring mode.
Please refer to the manufacturer of your loudspeakers
for advice on the practicality and potential benefits of
DI-Wiring.
Connecting a pair of loudspeakers in bi-wiring mode
Bi-amping of Loudspeakers
Bi-amping of suitable loudspeakers using a 201052 Integrated and a 201052 Power Amplifier provides a useful gain in subjective performance. The Integrated
Amplifier is used to drive the treble units and the Power Amplifier is used to drive the bass units through the loudspeakers split crossover with the joining
links removed.
Right Speaker Left Speaker
Rear of Exposure 201052 Integrated Amplifier
|. Check your loudspeaker user manual for the wiring
connections.
2. Follow the diagram on the right for connecting a pair
of loudspeakers in bi-amping mode.
Rear of exposure 201052 Power Amplifier
Although the Exposure 201052 Integrated Amplifier is
able to drive almost any loudspeaker system, the best
results will most likely be achieved with speakers rated
at 8 Ohms.
While the Exposure 2010S2 Integrated Amplifier is
compatible with most types of loudspeaker cables,
the type of cables used can influence the subjective
performance of your system.
Connecting a pair of loudspeakers in bi-wiring mode
Please ask your Exposure dealer for advice on bi-amping, loudspeaker cable compatibility and how to get the best from your Exposure 201052 Integrated
Amplifier.
Note: Exposure 201052 Integrated Amplifier is internally protected against damage from short circuits. However, no such protection is infallible, and damage
may occur if positive and negative speaker cables are inadvertently connected together.
Installation of a MC or MM Phono Module
This is best carried out by your dealer. However, if you wish to attempt installation yourself:
A НИ,
2 Remove the mains lead from 4 Slide the cover back about 2 cm
the wall and the IEC socket. until it is free to move upwards
to reveal the main circuit board.
5 Remove the small jumper board 6 Observe the position of the plug 7 Push the three plastic mounting 8 Replace the cover and screws.
that is fitted on the right hand on the phono module and carefully pillars into the corresponding
side at the back. plug it in, ensuring that all of the holes in the main board.
pins are inserted correctly into
their connectors.


![[SPIP] Guide du webmestre et du bidouilleur](http://vs1.manualzilla.com/store/data/006370857_1-2d30bd0b756250b81d17f66f7d44d911-150x150.png)