1
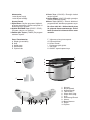
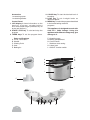
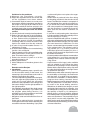
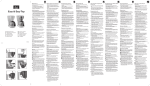
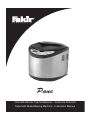
Pane
Otomatik Ekmek Yapma Makinesi - Kullanma K›lavuzu
Automatic Bread Baking Machine - Instruction Manual
KULLANMA TALİMATLARI
Pane Otomatik Ekmek Yapma Makinesi’ni
satın aldığınız için sizi kutlarız!
Satın almış olduğunuz cihaz tam otomatik
ve kolay kullanımlıdır.
GÜVENLİK UYARILARI
Kılavuzdaki tüm uyarıları dikkatlice
okuyunuz ve uygulayınız.
1.Cihazın sıcak yüzeylerine dokunmayınız.
Fırın eldivenlerini kullanınız. Ekmek
makinesi pişirme sonrasında çok sıcak
olacaktır.
2.Cihazı ve kablosunu asla suya veya
başka bir sıvıya daldırmayınız.
3.Çocukların yanında cihazı kullandığınız
zaman cihazı gözetiminizde
bulundurunuz. Cihazı kullanmadığınızda
ve temizleyeceğinizde fişini mutlaka
prizden çekiniz.
4.Cihazı hiçbir zaman hasarlı kablo ile
kullanmayınız. Cihazda herhangi bir
nedenden dolayı hasar ya da arıza
oluşmuş ise cihazı kesinlikle
kullanmayınız. Bu durumda, gerekli olan
bakım veya tamir için Fakir Yetkili
Servisi’ne başvurunuz.
5.Cihazın kendisine ait olmayan aksesuarlar
ile kullanımı hasara neden olabilir. Cihazı
sadece kendi aksesuarları ile kullanınız.
6.Cihazı, hamur yoğurma sırasında
düşmeyecek şekilde sabit bir yere
koyunuz. Bu özellikle, ön program
özelliklerini kullanırken ve cihaz kontrol
edilemediğinde önemlidir. Kaygan
yüzeylerde cihazın sabit kalabilmesi için
altına ince bir plastik parça konulmalıdır.
7.Ekmek makinesi çalışırken etrafındaki
diğer cisimlerden en az 10 cm uzak
d u r m a l ı d ı r. C i h a z a ç ı k h a v a d a
kullanılamaz.
8.Elektrik kablosunun sıcak yüzeylere
temas etmesini, keskin köşelerden
sarkmasını engelleyiniz.
9.Cihazı hiçbir zaman elektrikli ya da gazlı
sıcak bir fırının üzerinde ya da yakınında
kullanmayınız.
10.Cihaza, sıcak marmelat ile dolu iken daha
fazla özen gösteriniz.
11. Cihaz çalışırken pişirme kabını asla
çıkarmayınız.
12.Tarifte yazandan daha fazla miktarda
malzemeyi pişirme kabına koymayınız.
Eğer belirtilen durum olursa, ekmek eşit
olarak pişmez, hamur ise kaptan taşar.
Talimatlara uyunuz.
13.Metal folyo vb. maddeler pişirme sırasında
cihaza konmamalıdır. Bu maddeler kısa
devreye ve yangına neden olmaktadırlar.
14.Cihazı kullanım sırasında kumaş vb.
maddeler ile sarmayınız. Cihazın ürettiği
ısı ve buhar rahatça açığa çıkmalıdır.
Cihazın yanıcı maddeler ya da perdelerle
temas etmesi yangın riski oluşturmaktadır.
15.Ekmek pişirmeden önce, ilk olarak tariflere
uygun miktarda malzeme kullanmaya
çalışınız. Bu şekilde hamurun pişerken
kaptan taşmasını engelleyiniz.
16.Cihazın kasası sıcağa karşı izole
edilmiştir. Ancak metal yüzeyler kullanım
sırasında sıcak olacaktır. Cihazı
kaldırmadan önce soğumasını bekleyiniz.
UYARI:
Cihaz sadece ev kullanımı için
tasarlanmıştır. Cihazı kılavuzda belirtilenin
dışında farklı bir amaç için kullanmayınız.
3
4. Renk Tuşu (COLOR): Ekmeğin kabuk
rengini ayarlar.
5. Hamur Miktarı (LOAF): Ekmeğin gramajını
3 farklı kademede ayarlar.
6.Menu Tuşu (MENU): “Ekmek Makinesi
programlarında” belirtilen programları seçer.
Aksesuarlar;
1 adet ölçme kaşığı
1 adet ölçme bardağı
Kontrol Paneli
1. Dijital Ekran: Seçilen programın bilgilerini,
program numarasını, pişirme seviyesini ve
ekmek ağırlığını gösterir.
2. AÇMA / KAPAMA Tuşu (START / STOP):
Programı çalıştırır ve durdurur.
3. Zaman Ayarı Tuşları: (TIMER) Ön program
zamanını ayarlar.
Bu cihaz 230V AC / 50Hz elektrik akımı
ile çalışmak üzere tasarlanmıştır. Ürünü
farklı bir akım ile kullanmak ürüne zarar
verebilir.
F
G
H
I
J
K
Parça Tanımlamaları
A Kapak (çıkartılabilir)
B Kulp
C Kapak camı
D Hava kanalı
E Pişirme kabı
C
D
G
A
E
Yoğurma ve karıştırma aparatı
Pişirme bölümü
Kontrol Paneli
Paslanmaz çelik gövde
Yan kanal
ON/OFF açma-kapama tuşu
B
H
J
I
L
F
1
4
3 5
2
4
6
1. Normal
2. Beyaz Ekmek
3. Kepek Ekmeği
4. Tatlı Ekmek
5. Süper Hızlı 700g
6. Süper Hızlı 900g
7. Hızlı
8. Kahverengi Ekmek
9. Hamur
10. Bagel Hamuru
11. Reçel
12. Pişirme
KONTROL PANELİ
1.DİJİTAL EKRAN
Cihazın kullanıma hazır olduğunu ekrandan
görebilirsiniz. Ekranda cihazın o anki
programı görülür.“1 3:25”ekranda
görüldüğünde,“1”seçilen program
numarasını “3:25” de programın
uzunluğunu gösterir. İki işaretin yeri kabuk
rengini ve seçilen ağırlığı gösterir. Cihazın
açılıştaki standart ayarı ağır ekmek ve
normal kabuk rengine ayarlanmıştır.
Kullanım sırasında programın durumu,
program ilerledikçe sürenin de azaldığı
ekrandan görülebilir. Cihazın zaman ayarı
(timer), ısıtma, yoğurma, pişirme, sıcak
tutma gibi program özellikleri de ekrandan
görülebilir.
2.AÇMA / KAPAMA TUŞU (START / STOP)
Bu tuş, programları başlatıp durdurmak
içindir. START/STOP tuşuna basıldığında,
programın süresi ekranda yanıp sönmeye
başlayacaktır. Programı durdurmak için
istediğiniz an tuşa basabilirsiniz. Tuşa sesli
uyarıyı duyana kadar basınız. Önceden
belirtilen programının başlangıç noktası
ekranda görülecektir. Eğer farklı bir
program seçmek istiyorsanız, programı
başlatmadan önce seçim tuşuna basınız.
3.ZAMAN AYARI TUŞLARI (TIMER)
Bu tuşlar ile pişirme süresini ayarlayarak
ekmeğin hazır olmasını istediğiniz zamanı
belirleyebilirsiniz. Makineyi çalıştırdığınızda
ekran “1 3:25” görülecektir. Bu süre
ekmeğin 3 saat 25 dakika sonra hazır
olacağı anlamına gelmektedir. TIMER tuşu
ile bu süreyi arttırabilirsiniz. Örneğin saat
22:00 da cihazı kurup sabah 07:00 da
ekmeğin hazır olmasını istiyorsanız süreyi
9 saate ayarlamanız gereklidir. (22:00 + 9
saa t= 07:00 9 saate pişirme süresi
dahildir.) Pişirme programını seçtikten
sonra süreyi ayarlayınız ve Açma/Kapama
düğmesine basınız. 1, 2, 3, 4, 8, 9, 10
numaralı programlarda TIMER özelliği
kullanılabilir. 6 ve 7 numaralı programlarda
ise bu özellik kullanılamaz.
1 saat ısınma süresi de (pişirme
programının bitiminden sonra) pişirme
süresine eklenmelidir. Program süresine
en fazla 12 saat 58 dakika eklenebilir.
4.RENK TUŞU (COLOR)
Ekmeğin kabuk rengi bu tuş ile ayarlanır.
3 kademeli ayar kullanılabilir.
AÇIK (light) - ORTA (medium) KOYU (dark)
5.HAMUR MİKTARI TUŞU (LOAF)
Çeşitli programlardaki hamur miktarını
ayarlar. 3 kademeli ayar kullanılabilir.
I
II
III
500 g’a kadar olan küçük ekmekler
700 g’a kadar olan orta büyüklükteki ekmekler
900 g’a kadar olan büyük ekmekler
6.MENU TUŞU (MENU)
Otomatik Ekmek Yapma Makinesi
programlarında detaylı açıklanan uygun
programlardan bir tanesini çalıştırmak için
bu tuşu kullanınız.
1.NORMAL: Beyaz, buğday ve çavdar
ekmeği için. En çok bu program kullanılır.
2.BEYAZ EKMEK: Özellikle açık beyaz
ekmeğin hazırlanmasında kullanılır.
3.KEPEK EKMEĞİ: Kepek ekmeği
hazırlanmasında kullanılır.
4.TATLI EKMEK: Tatlı hamur hazırlamak
için kullanılır.
5.SUPER HIZLI 700g: 700 gramlık ekmeği
yoğurmak ve pişirmek için kullanılır.
6.SUPER HIZLI 900g: 900 gramlık ekmeği
yoğurmak ve pişirmek için kullanılır.
7.HIZLI: Buğday-çavdar karışık ekmekleri
hızlı hazırlamak için kullanılır.
8.KAHVERENGİ EKMEK: Kahverengi
ekmek hazırlamak için kullanılır.
9.HAMUR: Hamur hazırlanmasında kullanılır.
10. BAGEL HAMURU: Bagel “amerikan
çöreği” hamuru hazırlamak için kullanılır.
5
11.REÇEL: Marmelat ve reçel yapmak için
kullanılır.
12. PİŞİRME: Ekmek ve keklerin pişirilmesinde
kullanılır.
* 5, 6, 7 numaralı programlarda ılık sıvılar
kullanınız.
OTOMATİK EKMEK YAPMA MAKİNESİ
ÖZELLİKLERİ
Sesli Uyarı Özelliği:
Sesli uyarı;
• Bütün program tuşlarına basıldığında,
• Normal, kepek ve tatlı ekmek yapımındaki
ikinci yoğurma sırasında fındık,meyve vb.
malzemelerin ekleneceği zaman,
• Program sona erdiğinde, çalışacaktır.
Pişirmenin sona erdiği sırada sesli uyarı
birkaç defa çalacaktır.
Tekrar özelliği:
Eğer kısa süreli (yaklaşık 5 dakika) bir
elektrik kesintisi olursa, elektrik geldiğinde
cihaz kaldığı yerden devam edecektir. Bunun
için programın yoğurma işlemine gelmiş
olması gerekir. Aksi takdirde, programa
yeniden başlamanız gerekecektir.
Güvenlik özellikleri:
Eğer cihazın sıcaklığı son kullanımdan sonra
tekrar çalıştırmak için çok yüksek ise, START
tuşuna basıldığında ekranda E01 yazacak
ve cihaz sinyal ile uyarı verecektir. Bu
durumda, ekrandaki E01 uyarısı silinene
kadar START/STOP tuşuna basmaya
devam ediniz. E01 ekrandan silindiğinde
temel ayarlar gözükecektir. Cihazı tekrar
çalıştırmak için soğumasını bekleyiniz.
OTOMATİK EKMEK YAPMA MAKİNESİ
PROGRAMI AŞAMALARI
1.Pişirme kabının takılması
Yapışmaz yüzeyli pişirme kabını pişirme
bölümünün tam ortasına yerleştiriniz. Pişirme
kabını yerleştirdikten sonra üstten hafifçe
itip yerine oturtunuz. Geri çıkartmak için
taşıma sapından çekiniz.
DİKKAT:
6
TAŞIMA SAPINI PİŞİRME İŞLEMİNDEN
SONRA ÇOK SICAK OLACAĞINDAN
ÇIPLAK ELLE TUTMAYINIZ. LÜTFEN,
FIRIN ELDİVENİ KULLANINIZ.
2.Malzemelerin eklenmesi
Verilen tarife göre malzemeleri pişirme
kabına ekleyiniz.
3. Program seçimi
Cihazın arka tarafındaki fonksiyon seçme
tuşunu (L) ON konumuna getiriniz. İstediğiniz
programı MENU tuşuna basarak seçiniz.
Seçtiğiniz programa göre hamur miktarını
da ayarlayınız. Ekmeğin kabuk rengini de
seçiniz. Programın süresini TIMER tuşu ile
belirleyiniz. START / STOP düğmesine
basınız.
4. Hamurun karıştırılması ve yoğrulması
Ekmek makinesi hamuru kıvama gelene
kadar otomatik olarak karıştırır ve yoğurur.
5. Hamurun kabarması
Son yoğurmasından sonra, ekmek makinesi
hamurun kabarması için en uygun sıcaklığı
ayarlar.
6. Pişirme
Ekmek makinesi pişirme zamanı ve ısısını
otomatik olarak ayarlar. Eğer pişirme
sonunda ekmek istediğinizden daha açık
bir renkte ise, ekmeğin rengini koyulaştırmak
için pişirme menüsünü kullanınız. Bunu
yapabilmek için, START/STOP tuşuna
basınız, pişirme programını seçiniz (12).
Ekmek istediğiniz seviyeye ulaştığında
pişirmeyi durdurunuz.
7. Sıcak tutma
Pişirme işlemi bitince, cihaz ekmek ya da
spesiyalin hazır olduğunu belirten bir sesli
uyarı verecektir. Bu anda 1 saatlik sıcak
tutma süresi başlar.
8. Program sonu
Program sona erdiğinde, lütfen fonksiyon
seçme tuşunu (L) OFF konumuna getirerek
cihazı kapatınız. Pişirme kabını fırın eldiveni
kullanarak çıkartınız. Kabı ters çeviriniz.
Eğer ekmek kendi kendine düşmez ise,
yoğurma mekanizmasını ekmek düşene
kadar ileri geri oynatınız.
Eğer mekanizma ekmeğin içine takılmış ise
hafifçe yukarı itiniz ve durumu net olarak
görmeye çalışınız.
Bir bıçak yardımı ile takılan parçayı kesiniz
ve yoğurma aparatını çıkartınız. Pişirme
işlemi istenildiği zaman START / STOP tuşu
kullanılarak durdurulabilir. Aynı anda cihaz
bir uyarı sinyali verir ve kontrol lambası
kapanır.
HAMUR KABARTMAK İÇİN CİHAZIN
ISITILMASI
Isıtma sadece oda sıcaklığı 25°C’nin
altında ise çalıştırılmalıdır. Eğer oda
sıcaklığı 25°C’nin üzerinde ise malzemeler
zaten uygun sıcaklıktadır ve ön ısıtmaya
gerek yoktur. İlk ve ikinci kabartmalar için
oda sıcaklığı 25°C’nin üzerinde olmalı veya
ek bir ısıtma olmadan hamurun
kabarabilmesi için yeterli olmalıdır.
TEMİZLİK VE BAKIM
• Cihazı ilk kez kullanmadan önce ekmek
makinesinin pişirme kabını hafif deterjanlı
su ile yıkayınız ve yoğurma aparatını
temizleyiniz. (Suya daldırmayınız)
• İlk kullanımdan önce pişirme kabının
yapışmaz yüzeyini korumak için ısıya
dayanıklı yağ ile 10 dakika boyunca
ısıtılması önerilir. İşlem bitip cihaz
soğuduktan sonra kapta kalan yağı bir bez
yardımı ile temizleyiniz. Bu işlemi zaman
zaman tekrar ediniz.
• Cihazı temizlemek ve saklamak için
mutlaka soğumasını bekleyiniz. Cihazın
soğuması yaklaşık 30 dakika sürer ve bu
süre sonunda cihaz tekrar pişirme ve
yoğurma için hazırdır.
• Temizlik sırasında fişi prizden çekiniz ve
cihazın soğumasını bekleyiniz. Hafif bir
deterjan kullanınız. Asla kimyasal
temizleyiciler, fırın temizleyicileri, gaz veya
kaplamayı çizebilecek deterjanlar
kullanmayınız.
• Kapak, kasa ve pişirme bölümündeki tüm
malzemeleri ve kırıntıları nemli bir bez ile
temizleyiniz.
CİHAZI ASLA SUYA DALDIRMAYINIZ
VE PİŞİRME BÖLÜMÜNÜ SU İLE
DOLDURMAYINIZ!
Daha kolay bir temizlik için cihazın kapağını
dikey konuma getirip çekerek
çıkartabilirsiniz.
• Pişirme kabının dışını nemli bir bez ile
temizleyiniz. Kabın iç kısmının temizliğinde
az miktarda sıvı deterjan kullanılabilir.
• Yoğurma kancası ve dönme milleri
kullanımdan sonra hemen temizlenmelidir.
Eğer yoğurma kancaları kabın içinde
kalırlarsa çıkartılmaları zorlaşacaktır. Böyle
bir durumda kabı sıcak su ile doldurunuz
ve 30 dakika bekleyiniz. Daha sonra
yoğurma kancasını çıkartınız.
• Pişirme kabı yapışmaz kaplamaya sahiptir.
Bu yüzden kabın temizliği sırasında
yüzeyine zarar verebilecek metal cisimler
kullanmayınız. Kaplamanın rengi kullanım
ile birlikte değişecektir. Bu değişiklik kabın
etkinliğini etkilemez.
• Cihazı saklamadan önce soğuduğundan,
temizlendiğinden ve kurulandığından emin
olunuz. Cihazı kapağı kapalı şekilde
saklayınız.
7
PİŞİRME İLE İLGİLİ SORULAR VE
CEVAPLAR
• Ekmek piştikten sonra kaba yapışıyor.
Ekmeğin soğuması için 10 dakika
bekleyiniz. Kabı ters çeviriniz. Eğer gerekli
ise yoğurma kancasını ileri geri oynatınız.
Pişirmeden önce kabı yağlayınız.
• Ekmek içinde yoğurma kancalarından
dolayı boşluklar oluşması nasıl
engellenir?
Hamurun son kez kabarmasından önce
elleriniz ile yoğurma kancasını
çıkartabilirsiniz. Programa bağlı olarak
ekranda bir süre yazacaktır(yaklaşık 1 saat
30 dakika). Eğer bu şekilde yapmak
istemiyorsanız, kancayı piştikten sonra
çıkartabilirsiniz.
• Kabarmaya bırakıldığında hamur kaptan
taşıyor.
Bu durum özellikle tariftekinden daha fazla
buğday unu kullanıldığında ortaya çıkar.
Çözüm;
• Un miktarını azaltınız ve diğer
malzemelerin miktarlarını da ayarlayınız.
Ekmek hazır olduğunda, hacmi yeterince
büyük olacaktır.
• Bir servis kaşığı kadar ısıtılmış sıvı
margarini hamurun üzerine sürünüz.
• Ekmek hala daha kaptan taşıyor,
Eğer ekmeğin ortasında V şeklinde bir
boşluk var ise, unda yeterli miktarda glüten
yok demektir. Bunun anlamı buğday az
miktarda proteine sahiptir ya da un fazla
nemlidir.
Çözüm;
500 g buğday için bir servis kaşığı buğday
glüteni ekleyiniz.
Eğer ekmeğin ortasında yuvarlak şekilli bir
boşluk oluşursa, bunun nedenleri
• Su sıcaklığının çok yüksek olması,
• Çok fazla su kullanılması,
• Unda yeterince glüten olmaması,
• Pişirme sırasında kapağın açılması, olabilir.
8
• Pişirme sırasında ekmek makinesinin
kapağı ne zaman açılabilir?
Genel olarak, yoğurma devam ettiği sürece
kapağı açmak mümkündür. Bu sıralarda
az miktarda un ve sıvı eklenebilir. Yoğurma
işlemi tamamlandıktan sonra kapağı
açmayınız.
• Çavdar unu kullanılırken ne
yapılmalıdır?
Çavdar ununda glüten bulunmamaktadır
ve bu yüzden, ekmek çok az kabarır. Daha
rahat sindirilebilir bir ekmek yapmak için
maya ve kepek unu eklenmelidir.
• Undaki glüten nedir?
Unun tip numarası ne kadar yüksek ise,
un içindeki glüten miktarı o kadar düşük
olacak ve hamur o kadar az kabaracaktır.
• Taze ekmekler nasıl daha kolay
sindirilebilir hale getirilir?
Haşlanmış bir patates una eklenir ve
hamurda yoğrulursa, taze ekmek o kadar
kolay sindirilir.
• Ne kadar maya kullanılmalı?
Maya miktarı için kutu üstünde belirlenmiş
miktarları kullanınız ve kullandığınız un
miktarına göre miktarları ayarlayınız.
• Eğer ekmekten maya tadı alınıyorsa ne
yapılmalı?
- Eğer şeker kullanıyorsanız, şeker miktarını
azaltınız. Ekmek daha hafif olacaktır.
- Küçük ekmekler için 1,5 büyük ekmekler
için 2 yemek kaşığı sirkeyi ekmeğin suyuna
ekleyiniz.
- Su yerine yağlı süt kullanınız. Bu bütün
tarifler için geçerlidir ve ekmeğin tazeliğini
sağlar.
• Neden fırında yapılan ekmek ile ekmek
makinesinde yapılan ekmeklerin tatları
farklıdır?
Bu durum nem farkından kaynaklanır.
Fırında yapılan ekmekler geniş pişirme
alanından dolayı daha kuru pişer. Ancak
ekmek makinesinde ekmekler daha nemli
ortamda piştiklerinden tatlarında farklılıklar
oluşur.
PİŞİRME İLE İLGİLİ SORULAR VE CEVAPLAR
SORUN
NEDEN
Hava kanallarından duman Malzemeler pişirme bölümüne
çıkıyor.
ya da pişirme kabının dışına
yapışıyorlar.
Ekmek ortaya doğru çekiliyor Ekmek, pişirme ve sıcak
tutma işlemlerinden sonra
ve orada nemleniyor.
makine içinde fazla
durmuştur.
Ekmek, pişirme kabından Ekmeğin en alt kısmı yoğurma
çıkmıyor.
kancasına takılıyordur.
Malzemeler iyice karışmıyor Yanlış program seçilmiştir.
ya da ekmek düzgün şekilde
pişmiyor.
Cihaz çalışırken START/STOP
düğmesine basılmıştır.
Cihaz çalışırken kapak birkaç
defa açılmıştır.
Cihaz çalışırken uzun bir
elektrik kesintisi olmuştur.
Yoğurma kancası dönemiyor.
Cihaz çalışmıyor. Zaman Cihaz önceki pişirmeden
sinyali kesiliyor ve ekranda dolayı hala daha sıcaktır.
E01 uyarısı gözüküyor.
“EEE” veya benzer bir sinyal P r o g r a m h a t a s ı
ekranda görülüyor.
elektronik hata
veya
ÇÖZÜM
Fişi prizden çekiniz ve pişirme
kabının dışını ya da pişirme
bölümünü temizleyiniz.
Sıcak tutma süresi bitmeden
önce ekmeği cihazdan
çıkartınız.
Pişirme işleminden sonra
yoğurma
kancasını
temizleyiniz. Eğer gerekli ise,
pişirme kabını sıcak su ile
doldurunuz ve 30 dakika
bekleyiniz. Daha sonra
pişirme kancasını kolayca
yerinden çıkartabilir ve
temizleyebilirsiniz.
Seçilen menüyü ve diğer
ayarları kontrol ediniz.
Malzemeleri kullanmadan
tekrar başlayınız.
Cihazın kapağı yalnızca ekran
üzerindeki süre 1:30 dan fazla
ise açılabilir.(Sadece 1,2,3 ve
4 nolu programlarda
kullanılabilir.) Kapağın iyi
kapatıldığından emin olunuz.
Malzemeleri kullanmadan
tekrar başlayınız.
Yoğurma kancasının hamur
parçaları tarafından
tıkanmadığından emin olunuz.
Bunun için pişirme kabını
çıkartınız ve yoğurma
kancasının dönüp dönmediğini
kontrol ediniz. Eğer durumun
bu değilse, Fakir Yetkili
Servisi’ne başvurunuz.
Normal program başlayana
kadar START/STOP tuşuna
basınız. Fişi prizden çekiniz,
pişirme kabını çıkartınız ve
oda sıcaklığında soğumaya
bırakınız. Daha sonra fişi
takınız ve tekrar başlayınız.
Cihaz testi için fişi prizden
çekiniz ve menü tuşuna basılı
tutarak fişi tekrar prize takınız.
Tuşu bıraktığınızda menü testi
başlayacaktır. Fişi tekrar
çekiniz ve takınız. Ekranda
normal program gözükecektir.
Eğer normal program
gözükmez ise, Fakir Yetkili
Servisi’ne başvurunuz.
9
SORUN
NEDEN
ÇÖZÜM
Ekmek çok hızlı kabarıyor. - Fazla maya ya da fazla un koyulmuş veya
yeterli miktarda tuz yok,
a/b
Ekmek yeterince kabarmıyor. - Ye t e r l i m i k t a r d a m a y a e k l e n m e m i ş ,
- Maya taze olmayabilir,
- Eklenen sıvılar (süt, su, yumurta vb.) çok sıcak,
- Maya ile sıvı birbirleri ile temas etmişler,
- Yanlış veya bayat un eklenmiştir,
- Eklenen sıvı miktarı ya çok az ya da çok fazladır,
- Ye t e r s i z m i k t a r d a ş e k e r e k l e n m i ş t i r,
a/b
e
c
d
e
a/b/g
a/b
Hamur fazla kabarıp kaptan - Eğer su yumuşak ise mayalanma daha iyi
taşıyor.
gerçekleşir ve hamur daha çok kabarır,
- Fazla koyulan süt de daha iyi mayalanmaya
neden olur,
f
Ekmek ortaya doğru çöküyor. - Hamur hacmi pişirme kabından daha büyüktür,
- Mayalanma, suyun veya pişirme bölümünün
aşırı sıcak olmasından yada aşırı nemden dolayı
çok hızlı ve kısa sürmüştür. Sıcak sıvılar hamurun
çabuk kabarmasına neden olur ve hamur
pişirmeden önce kabın ortasına çöker,
- Tuz veya şeker eklenmemiştir,
- Eklenen sıvı miktarı çok fazladır,
a/f
c/h/i
Hamurda topaklanma oluyor. - Çok fazla un ya da az miktarda sıvı eklenmiştir,
- Yeterince maya veya şeker eklenmemiştir,
- Malzemeler fazla konulmuştur,
- Un taze olmayabilir,
a/b/g
a/b
b
e
Ekmeğin içi pişmiyor.
a/b/g
h
g
- Sıvı miktarı ya çok az ya da çok fazla,
- Pişirme bölümü fazla nemlidir,
- Sıvı malzemeli tarifler, örn. Yoğurt,
c
a/b
h
Yarılmış ya da kaba şekil veya - Çok fazla su eklenmiştir,
çok fazla boşluk oluşuyor. - Tuz eklenmemiştir,
- Pişirme bölümünün nemi çok fazla ya da eklenen
su çok sıcaktır,
- Çok fazla sıvı,
g
b
h/i
Mantar şekilli pişmemiş yüzey - Ekmek hacmi pişirme kabı için fazla büyük,
oluşuyor.
- Çok fazla un eklenmiştir,
- Çok fazla maya ya da yetersiz tuz,
- Çok fazla şeker eklenmiştir,
- Şekerden başka tatlı malzemeler de kullanılmıştır.
a / f
f
a/b
a/b
b
Parçalar eşit değil veya ortada - Ekmek yeterince soğumamıştır. (İçindeki buhar
kümelenme oluyor.
henüz çıkmamıştır.
j
Ekmeğin kabuğu üzerinde un - Yoğurma sırasında un yeterince işlenememiştir.
kalıyor.
g/i
10
c
Sorunlar için çözümler
a) Malzemeleri düzgün şekilde ölçünüz.
b) Malzeme ölçülerini ayarlayınız ve tüm
malzemelerin eklendiğinden emin olunuz.
c) Başka bir sıvı kullanınız veya oda
sıcaklığında soğumaya bırakınız. Tarifte
yazan malzemeleri sırasına uygun olarak
ekleyiniz. Unun ortasını açınız ve mayayı
ekleyiniz. Maya ile sıvının temas etmesine
izin vermeyiniz.
d) Sadece taze ve iyi saklanmış malzemeleri
kullanınız.
e) Malzemelerin toplam miktarını azaltınız.
Belirlenen un miktarından daha fazlasını
kullanmayınız. Tüm malzemeleri 1/3
oranında azaltınız.
f) Sıvı miktarını düzeltiniz. Eğer su içeren
malzemeler kullanılırsa, eklenecek sıvı
ölçüsü azaltılmalıdır.
g) Çok nemli havalarda suyu 1-2 kaşık eksik
ekleyiniz.
h) S ı c a k h a v a l a r d a z a m a n a y a r ı n ı
kullanmayınız. Soğuk sıvılar kullanınız.
i) Piştikten sonra ekmeği pişirme kabından
çıkarınız ve kesmeden önce 15 dakika
soğuması için bekleyiniz.
j) Maya ya da tüm malzeme miktarlarını 1/4
oranında azaltınız.
k) Kabı asla yağlamayınız.
l) Hamura 1 kaşık buğday glüteni ekleyiniz.
Ekmeklerinizi hazırlarken kullanılan
sıcak sıvılar (su, süt vb.) mayalanmayı
hızlandırır. Bunun sonucu ekmek
yeterince kabaramamaktadır. Böyle bir
durumda kullandığınız malzemenin oda
sıcaklığında olmasına dikkat ediniz.
Malzemeleri eklerken sıvılar ile mayanın
temas etmesine izin vermeyiniz.
TARİFLER
1. Malzemeler
Malzemeler, yapacağınız ekmeğin tadını ve
şeklini belirleyeceği için, bunların ölçüleri,
hangisinin hangi sırayla ekleneceği oldukça
önemlidir.
- Sıvı, un, tuz, şeker ve maya gibi en önemli
malzemeler hamurun ve ekmeğin
başarısında önemli bir paya sahip
olduklarından, bu malzemelerin kullanımında
doğru ölçülere dikkat etmek gereklidir.
- Eğer hamuru çabuk hazırlamanız
gerekiyorsa, ılık malzeme kullanınız. Eğer
zaman ayarlayıcısını kuracaksanız, soğuk
malzemelerin kullanılması tavsiye edilir.
Böylece mayalanmanın erken başlaması
engellenmiş olur.
- Margarin, yağ ve süt ekmeğin tadını belirler.
- Şeker miktarı % 20 düşürülerek, ekmeğin
tadı bozulmadan kabuğun daha hafif ve
daha ince olması sağlanabilir. Eğer ekmeğin
kabuğunun daha yumuşak ve daha hafif
olmasını istiyorsanız şeker yerine bal
koyunuz.
- Yoğurma sırasında unda oluşan glüten
ekmeğin yapısını belirler. İdeal un %40
kepek unu ve %60 beyaz undan oluşur.
- Eğer az kepekli ya da kepeksiz bir ekmek
yapmak istiyorsanız, hazırlayacağınız
hamuru önceden kendinizin de karıştırması
gerekir.
- Eğer ekmeğinize tahıl parçaları koymak
istiyorsanız, bu tahılları bir gece önceden
suda bekletiniz. Un ve sıvı miktarını 1/5
oranında azaltınız.
- Maya çavdar unu ile mutlaka kullanılmalıdır.
Maya süt ve acetobacteria içerdiğinden
dolayı ekmeği daha hafif yapacaktır.
Konsantre maya tozları verilen tariflerde
kullanılmıştır. Tariflerde verilen talimatları
yerine getiriniz. Eğer belirtilenden daha az
maya kullanılırsa ekmek kolayca
ufalanacaktır.
- Sıvı mayalar da kullanılabilirler. Paket
üzerinde verilen ölçü miktarlarını kullanınız.
Sıvı maya ile ölçme bardağını kullanınız ve
mayayı da tarifte verilen diğer sıvı
malzemeler gibi ekleyiniz.
11
- Kepek mayası kuru olduğundan hamurun
tazeliğini, tadını ve şekil almasını geliştirir.
Çavdar mayasından daha hafiftir.
- Buğday glüteni buğday proteinlerinden
sağlanan doğal bir katkı maddesidir. Ekmeği
daha hafif ve daha hacimli yapar. Ekmek
pişme sırasında daha nadir ortaya doğru
çöker ve sindirilmesi daha kolay olur.
2. Ölçülerin ayarlanması
Eğer ölçülerin arttırılması ya da azaltılması
gerekiyorsa, tarifteki oranların
sağlandığından emin olunuz. En iyi ekmeği
yapabilmek için, ölçülerin ayarlanmasında
aşağıdaki hususlara dikkat edilmelidir:
- Sıvılar / Un: Un çok ince olmamak şartıyla
yumuşak ve kolayca yoğrulabilir olmalıdır.
Yavaş yoğurma ile hamur topları yapılabilir.
Ancak çavdar ve tahıl ekmeklerinde bunlar
yapılamaz. İlk yoğurmadan 5 dakika sonra
ekmeği kontrol ediniz. Eğer hamur çok
nemli ise kıvama gelene kadar un ekleyiniz.
Eğer hamur çok kuru ise yoğurma sırasında
bir kaşık su ilave ediniz.
- Sıvıların değiştirilmesi: Sıvı malzeme
kullandığınızda (yoğurt vb.), gerekli sıvı
miktarı azaltılmalıdır. Yumurta kullanırken
içlerini ölçme bardağına boşaltınız ve diğer
gerekli sıvıları da ekleyip istenilen seviyeye
kadar doldurunuz. Eğer deniz seviyesinden
çok yüksek bir yerde (750m ve daha
yüksek) oturuyorsanız, hamur daha hızlı
kabaracaktır. Bu durumda maya miktarı
1/2 veya 1/4 servis kaşığı oranında
azaltılarak, yarım çay kaşığına indirilmelidir.
Yumuşak suya sahip yerlerde de aynısı
geçerlidir.
3. Malzemelerin eklenmesi, ölçülmesi ve
malzeme miktarları
Her zaman öncelikle sıvıları daha sonra
un ve diğer malzemeleri en son olarak
da mayayı ekleyiniz. Mayanın sıvılar ile
temas etmesine izin vermeyiniz.
- Ölçme için her zaman aynı ölçü kaplarını
12
-
-
4.
kullanınız. Bunun için ya ölçme kaşığını ya
da kendi evinizdeki kaşıklardan birini
kullanınız.
Gram ağırlıkları tam olarak ölçülmelidir.
Mililitre ölçümleri için ölçme bardağını
kullanabilirsiniz. Ölçme bardağının üzerinde
30ml den 300ml’ ye kadar bir ölçek
bulunmaktadır.
Meyve, fındık veya tahıl malzemeler, Eğer
diğer malzemeleri eklemek isterseniz, bunu
sadece sinyali duyduğunuz özel programlar
ile yapabilirsiniz. Eğer malzemeleri önce
eklerseniz, yoğurma sırasında
ezileceklerdir.
Pane Otomatik Ekmek Yapma Makinesi
için tarifler
Aşağıdaki tarifler farklı ölçüdeki ekmekler
içindir. Malzemelerin toplam ağırlığı 900
gramı aşmamalıdır.
Eğer tarifte herhangi bir seviye
belirlenmemiş ise, bu programda daha az
ya da daha çok malzeme kullanılabileceği
anlamına gelir.
5. E k m e k a ğ ı r l ı k l a r ı v e h a c i m l e r i
- Aşağıdaki tariflerde ekmek ağırlığı ile ilgili
kesin rakamlar vardır. Tariflerde beyaz
ekmeğin, kepekli ekmekten daha hafif
olduğunu göreceksiniz. Bu beyaz unun
daha
fazla
kabarmasından
kaynaklanmaktadır ve bu yüzden kabarma
miktarı kontrol edilmelidir.
- Kesin ağırlık rakamlarına rağmen farklılıklar
olabilir. Ekmeğin gerçek ağırlığı hazırlama
sırasındaki odadaki nem miktarına bağlıdır.
- Ağırlıklı olarak buğdaydan oluşan ekmekler,
son kabarmadan sonra büyük bir hacme
ulaşırlar ve pişirme kabının bitiminden
taşabilir ancak dökülmezler. Bu yüzden
hamurun üst kısmının renginin kabın
içindeki kısma göre daha koyu olması
normaldir.
- Tatlı ekmekler hazırlamak için HIZLI ve
SUPER HIZLI programlardan birini
seçtiğinizde malzeme miktarını azaltıp daha
hafif ekmekler hazırlayabilirsiniz.
6. Pişirme sonuçları
- Pişirmenin sonucu birçok faktöre bağlıdır
(su, havadaki nem , yükseklik, vb.). Bu
yüzden, tariflerdeki miktarlar adapte edilebilir
miktarlardır. Tarifi ilk kez hazırlarken
başarısız olursanız, nerede hata yaptığınızı
bulmaya çalışınız ve tekrar deneyiniz.
- Eğer ekmeğiniz pişirme sonunda soluk
olursa, pişirme programını kullanarak rengini
koyulaştırabilirsiniz.
- Zaman ayarını kullanmadan önce ilk olarak
bir tane deneme ekmeği hazırlamanız
önerilir.
EKMEK TARİFLERİ
BEYAZ EKMEK
Malzemeler:
Program 1 / 700 g
• 275 ml su veya süt
• 450 g beyaz un
• 1.5 yemek kaşığı süt tozu
• 1.5-2 çay kaşığı tuz
• 2 çay kaşığı esmer şeker
• 25 g yağ veya tereyağı
• 0.5 çay kaşığı kuru maya
KEPEK EKMEĞİ
Malzemeler:
Program 3 veya 4 / 700 g
• 275 ml su veya süt
• 450 g kepek unu
• 1.5 yemek kaşığı süt tozu
• 1.5-2 çay kaşığı tuz
• 2 çay kaşığı esmer şeker
• 25 g yağ veya tereyağı
• 0.5 çay kaşığı kuru maya
%50 TAM BUĞDAY EKMEĞİ
Malzemeler:
Program 3 veya 4 / 700 g
• 275 ml su veya süt
• 225 g tam buğday unu
• 225 g beyaz un
• 1.5 yemek kaşığı süt tozu
• 1.5-2 çay kaşığı tuz
• 2 çay kaşığı esmer şeker
• 25 g yağ veya tereyağı
• 0.5 çay kaşığı kuru maya istenirse
1 çay kaşığı kepek katılabilir
13
ÇİKOLATALI ÇAVDAR EKMEĞİ
Malzemeler:
• 1/2 su bardağı Söke® Çavdar Unu Karışımı
• 1 adet yumurta
• 1/2 su bardağı süt
• 1,5 çay kaşığı tuz
• 25 g margarin
• 2/3 su bardağı çikolata parçacığı
• 2/3 su bardağı Söke® un
• 1 su bardağı su
• 3 çay kaşığı kakao
• 2 yemek kaşığı toz şeker
• 1,5 çay kaşığı kuru maya
Hazırlanışı:
√ Ekmek makinesinin tavasına, su süt ve yumurtayı dökün.
√ Üzerine Söke® Çavdar Unu Karışımını, Söke® un’u ve kakaoyu ilave edin.
√ Margarini ekleyip, tuz ve şekeri pişirme kabının ayrı köşelerine dökün.
√ Kuru mayayı da ekleyip, makinenizi ‘normal’ konumunda çalıştırın.
√ Makineniz yoğurma işlemini tamamladığında verdiği 'uyarı' sesinden sonra çikolata parçacığının
tamamını ilave edin.
√ Ekmeğiniz pişince, tavadan çıkarmak için bir müddet soğumasını bekleyin.
ÇAVDARLI SANDVİÇ EKMEĞİ
Malzemeler:
• 1 1/2 su bardağı Söke® Çavdar Unu Karışımı
• 1 su bardağı su
• 2 yemek kaşığı pekmez
• 2 su bardağı Söke® un
• 2 yemek kaşığı zeytinyağı
• 2,5 çay kaşığı kuru maya
Hazırlanışı:
√ Ekmek makinesinin tavasına, sıvı malzemelerin tamamını dökün.
√ Söke® Çavdar Unu Karışımını ve Söke® Un’u ilave edin.
√ Karışımın üzerinde küçük bir havuz açarak, mayayı ilave edin.
√ Makinenizi ‘normal’ konumuna ayarlayıp, programı başlatın.
√ Program tamamlanınca bir müddet bekleyip, soğuduğundan emin olunca tavayı ters çevirerek ekmeğinizi
çıkarın.
BALLI KÖY EKMEĞİ
Malzemeler:
• 5 su bardağı Söke® Köy Ekmeği Karışımı
• 1 3/2 su bardağı süt
• 1 çay kaşığı zencefil
• 3,5 yemek kaşığı bal
• 5 yemek kaşığı erimiş margarin
• 1 poşet kuru maya (4 çay kaşığı)
Hazırlanışı:
√ Ekmek makinesinin tavasına, önce tüm sıvı malzemeleri sonrasında, Söke® Köy Buğday Unu
Karışımını, Söke® Un’u ve zencefili dökün.
√ Üzerine küçük bir havuz açarak kuru mayayı ilave edin.
√ Makinenizi ‘normal’ konumuna alıp, programı başlatın.
TAM BUĞDAY UNU EKMEĞİ
Malzemeler:
• 1 su bardağı Söke® Tam Buğday Unu Karışımı
• 3/4 su bardağı süt
• 3 çay kaşığı şeker
• 2,5 çay kaşığı kuru maya
• 3 1/2 su bardağı Söke® un
• 2/3 su bardağı su
• 25 g margarin
Hazırlanışı:
√ Ekmek makinesinin tavasına, önce tüm sıvı malzemeleri sonrasında, Söke® Tam Buğday Unu
Karışımını ve Söke® Un’u dökün.
√ Üzerine küçük bir havuz açarak kuru mayayı ilave edin.
√ Makinenizi ‘normal’ konumuna alıp, programı başlatın.
14
Operating Instructions
Congratulations for having purchased the
Pane Automatic Bread Making Machine.
The appliance is completely automatic
and extremely user-friendly.
Safety Instructions
Read all the instructions in the manual
and follow them carefully!
1.Do not touch any of the appliance’s hot
surfaces, Use oven cloths! The bread
making machine is very hot after baking.
2.Never dip the connection cable or the
appliance in water or any other liquid.
3.Keep your eye on the appliance when
children around! Unplug the appliance if
it is not being used and before cleaning
it. Before removing single parts of the
appliance let it cool down.
4.Never use the appliance with a defective
connection cable, after malfunctions or if
the appliance happen to be damaged in
any way whatsoever! In these cases have
the Customer Service check and repair it
if necessary. Never try to repair it yourself.
The warranty is void in this latter case.
5.The use of accesories not recommended
by the manufacturer can cause damage.
Use the appliance exclusively for the
envisaged purposes.
6.Lay the appliance firmly on the counter to
avoid that it falls off during kneading of a
thick dough. This is especially important
when using the preprogram function and
the appilance is not being watched. In the
case of extremely smooth counters the
appliance should be placed on a thin
rubber mat to avoid any risk of falling.
7.The bread making machine must be kept
at a distance of at least 10 cm from other
objects when it is working. The appliance
can be used only indoors.
8.Make sure that the power cable does not
touch any hot surface and that it does not
hang over a table edge thus avoiding, for
example that children may grab it.
9. Never place the appliance either on or
near a gas or electrical stove top or a
oven.
10.Pay great attention when handling the
appliance especially when it is full of hot
liquids(marmalades)!
11. Never remove the baking tin while the
appliance is still working.
12. Do not fill the baking tin with an amount
of ingredients greater than that required
by the recipe! If this should happen, bread
will not bake evenly or the dough will
overflow. Follow the instructions carefully.
13. Metal foils or other materials must not be
put inside the appliance as these may
cause a fire or a short circuit!
14. Never cover the appliance with towels or
other materials during use! The heat and
steam must be free to escape. Danger of
fire if the appliance is covered with
flammable materials or comes in contact
with curtains, etc.
15. Before trying to bake a given type of bread
overnight, try to recipe first while keeping
an eye on it to make sure that the doses
of ingredients are correct, heat the dough
is not too thick or thin that the quantity is
too much and the hence risk is overflowing.
16. The appliance has a heat-insulated cool
touch housing. The metal part become
hot during use. Leave the appliance to
cool before putting it away.
The manufacturer is not liable if this
appliance is used for commercial
purposes or in any way or manner that
does not comply with the instrucitons
here in provided.
15
4. COLOR key To start the desired level of
browning.
5. LOAF key To set 3 weight levels as
described below.
6. MENU key To select the programs described
in the bread baking machine
programs
Accesories:
1 measuring spoon
1 measuring beaker
Control Panel
1. LCD display it shows information on the
d e s i r e d p r o g r a m n u m b e r, b a k i n g
level and bread weight (indicated by an
arrow and the time.)
2. START/ STOP key To start and stop the
program
3. TIMER keys To set the program timer.
This appliance is designed to work with
230V AC / 50Hz Voltage. Using the
appliance with different voltage may give
damage to it.
F. Kneading pegs
G. Baking compartment
H. Control Panel
I. Stainless steel casing
K. Lateral vent
L. ON/OFF function switch
Parts and Drawings
A. Cover, removable
B. Handle
C. Viewing Point
D. Vent
E. Baking tin.
C
D
G
A
E
B
H
J
I
L
F
1
16
3 5
2
4
6
CONTROL PANEL
1. DISPLAY
This displays signals when the appliance is
ready for use. It corresponds to the normal
program.”1 3:25” appears on the display.
The “1”specifies which program has been
chosen and the “3:25” is the length of the
program. The position of two markings
shows the degree of browning that has been
selected and the weight. The basic setting
after switching the appliance on is “superior
weight” and “medium browning level”.during
operation the course of the program can be
read on the display. As the program
proceeds the digits of the set time will
decrease progressively. Other parts of the
programme such as the timer, heating,
kneading, pause, rising baking, keeping
warm and programme end are also shown
in the display.
2. START / STOP key
To start and stop the program. As soon as
the START/STOP key pressed, the points
of the time value start to blink. Use the
START/STOP key to stop the program in
any moment. Keep the key pressed until a
signal beep is heard. The starting position
of the aforementioned start program appears
on the screen. If you want to use a different
programme, please select this using the
MENU buton before starting the programme.
3. TIMER keys
The following programs can be started with
the timer: NORMAL (1), WHİTE BREAD (2),
SWEET BREAD (4), WHOLEMEAL (3),
DOUGH (9), BROWN BREAD (8) and
BAGEL DOUGH (10), The RAPID (7) and
SUPER RAPID (6) programs can not be
started with the timer. The hours and minutes
after which the preparation should be started
need to be added to the relevant basic time
for the specific program plus 1 hour of
warning time (after the end of the baking
process).The maximum time delay is 12
hours and 58 minutes per programme.
Example:
It is 8.30 p.m. and the bread must be ready
for the next morning by 7.00 a.m., i.e, in 10
hours and 30 minutes.Press the TIME key
until 10.30 appears,that is to say the time
between now (8.30 p.m.) and when the
bread must be ready.
When working with the timing function never
use perishable ingredients such as milk,
eggs, fruit, yogurt, onions, etc. !
4. COLOR key
The desired browning level is set with this
key: LIGHT-MEDIUM-DARK
5. LOAF key
It provides for the following setings in the
various programme(see table):
LEVEL I = for small bread weights up to 500 g
LEVEL II = for medium bread weights up to 700 g
LEVEL III = for large bread weights up to 900 g
6. MENU key
Use this menu key to run one of the available
programs described in detail in the “Bread
Baking Machine Program Phases” table.
Use the programs for the following
specialities.
1. BASIC For white and wheat rye bread This
program is used the most.
2. FRENCH For the preparation of particularly
light white bread.
3. WHOLEWHEAT For wholemeal bread
4. SWEET BREAD for preparing sweet yeast
dough for example
5. SUPER RAPID 700g for the kneading and
baking of bread loafs of up to 700g
6. SUPER RAPID 900g for the kneading and
baking of bread loafs of up to 900g.
7. QUICK for faster preparation of white and
mixed wheat and rye bread
8. BROWN BREAD for praparing brown
bread, pumpernickel etc.
9. DOUGH For the preparation of dough.
10. BAGEL DOUGH for preparing bagel
dough (bagel is an American “roll”)
11. JAM To cook marmelades and jams
12. BAKE To brown bread or cakes
17
Bread Baking Machine Functions
Buzzer function
The buzzer goes off.
- When pressing all the program keys;
- During the second kneading cycle of the
NORMAL, WHOLEMEAL, SWEET
BREAD, programs to signal that the cereals,
fruit, nuts or other ingredients can be added.
- When the end of the program is reached.
in the middle of the base inside the baking
space. When the baking tin is pressed
lightly in the centre the fixing device locks
into place. To remove the baking tin pull
w,th medium force on its carrying handle.
During the warning phase at the end of the
baking procedure the acoustic signal rings
several times.
2. Put the ingredients
The ingredients must be put into the baking
tin, the order specified in the relevant recipe.
3. Select program
Turn the function selector switch (L) on the
back of the device to ON. Select the desired
program with the SELECTİON key. Choose
the level corresponding to the selected
program. Then select the desired degree
of browning. Use the TIME key to set the
time when the program is to be started.
Press the START/STOP key.
4. Mix and knead the dough
The bread baking machine mixes and
kneads the automatically until it reaches
the right consistency.
5. Leave the dough to rise
After the last kneading cycle the bread
baking machine is heated to the optimal
temperature for the rising of the dough.
6. Baking
The bread baking machine sets the baking
temperature and time automatically. If the
bread is too light at the end of the baking
program, use the BAKING program to let
it brown more. To do so, press the
START/STOP key, then select the BAKING
program and start. When the desired
degree of baking has been reached, stop
the process.
7. Warming
Once the baking is over, the buzzer goes
off to signal that the bread can be removed.
The 1 hour warming time starts immediately.
Repeat function
If there is a brief power cut of cup to
approximately five minutes the programme
position is stored and the machine can
continue from this position when power is
restored. This is possible only if the program
was stopped before the kneading phase
was reached.Otherwise you will have to
start from the beginning.
Safety functions
If the temperature of the appliance is stil
too high for a new program after using the
appliance previously, E 01 will appear on
the display when pressing start again and
an acoustic signal is given. If this is the
case, press the START/STOP key until the
E 01 messagee is deleted and the basic
setting appears on the display. Remove
the container and wait until the appliance
has cooled.
The BAKING program can be started
immediately even when the appliance is
stil hot.
BREAD BAKING MACHINE PROGRAM
PHASES
1. Insert the baking tin
Place the non-stick coated baking tin exactly
18
Caution!
The handle is hot after baking. Please
use an oven cloth or similar item.
8. End of the program phases
After the programme has finished, please
switch the device off by turning the function
switch(L) to OFF. Now remove the baking
tin using an oven cloth, turn it over and if
the loaf does not fall out onto the grid
immediately-turn the kneading mechanim
backwards and forwards a few times from
underneath until the breadd falls out. If the
kneading hook becomes stuck in the bread,
move it slightly upwards so that you can
see the position of the propeller. The use
a knife to cut along the propeller. You can
easily remove the kneading hook.
Baking can be stopped at any time by
pressing the START/STOP button. At the
same time a sound is heard and control
lamp goes off.
Heating the appliance to make the dough
rise
The heating is switched only if the room
temperature is lower than 25°C.If the room
temperature is above 25°C the ingredients
are already at the right temperature and
there is no need for pre-heating. For the
first and second rising the room temperature
must be above 25°C or high enough to
make the dough rise without extra heating.
Cleaning and Maintenance
Before using the appliance for the first time
wash the bread making machine’s baking
tin (never dip in the water) with a mild
detergent and clean the kneading parts.
It is highly recommended to coat the new
baking tin and the kneading pegs with heat
resistant Grease before using them for the
first time and let them heat in the oven for
about 10 minutes. Once these have cooled
down clean away (polish) the grease from
the baking tin with a sheet of paper towel.
This operation is to be performed to protect
the non-stick coating.Operation can be
repeated from time to time.
After use always leave the appliance to
cool before cleaning it or putting it away. It
takes about half an hour for the appliance
to cool and to be ready again for baking
and kneading.
Before cleaning pull out the plug and leave
tha appliance to cool. Use a mild detergent.
Never use chemical cleaning agents,
gasoline, oven cleaners or any detergent
that can scratch or ruin the coating.
Remove all the ingredients and crumb from
the lid, casing and baking compartment
with a moist towel. Never dip the appliance
in water nor fill the baking compartment
with water! For easy cleaning the lid can
be removed by positioning it vertically and
pulling it out.
Wipe the out side of the baking tin with a
moist towel. The inside of the tin can be
washed with some detergent liquid. Do not
leave it too long dipped in water.
Both the kneading pegs and drive shaft
needs to be cleaned immediately after use.
If the kneading pegs remain in the tin, it
becomes difficult to remove them
afterwards. In this case fill the container
with warm water and leave it to rest for 30
minutes. Then remove the kneading pegs.
The baking tin has a nonstick coating. Do
not use metal objects that can scratch the
surface when cleaning it. It is normal that
the color of coating changes over the course
of time. This change does not after it
effecitveness in any way whatsoever.
Before putting the appliance away for
storeage, make sure that it is perfectly cool
and dry. Put the appliance away with the
lid closed.
19
Questions & Answers on Baking
The bread sticks to the container after
baking
Leave the bread to cool for about 10 minutees
after baking-turn the container upside down.
If necessary move the kneading peg shaft
back and forth. Grease the kneading pegs
before baking.
How do you avoid forming of holes in
bread owing to the presence of the
kneading pegs
You can remove the kneading pegs with your
fingers coverd with flour before leaving the
dough to rise for the last time. Depending on
the program the display must stil show a total
time of approx. 1:30 hours. If you do not wish
to do so, remove the hook after baking. If
you proceed with caution, you can avoid the
forming of a large hole.
The dough spills over when it is left to rise
This happens in particular when wheat flour
is used owing its greater content of gluten.
Remedy:
a) Reduce the amount of flour and adjust the
amounts of the other ingredients. When the
bread is ready, It will still have a large volume.
b) Spread a tablespoon of heated liquefied
margarine on the flour.
a)
b)
-
The bread rises and spills over anyway
If a V-shaped ditch forms in the middle of the
bread, the flour does not have enough gluten.
This means that the wheat contains too little
protein. It happpens during especially rainy
summers) or that the flour is too moist.
Remedy:
add one tablespoon of wheat gluten for 500g
of wheat.
If the bread has a tunnel shape in the middle,
the possible cause can be one of the
following:
The water temperature was too high;
Too much water used;
The flour was poor in gluten
Draft caused by opening the lid while baking.
When can the lid of the bread baking
machine be opened during the baking?
Generally speaking, it is always possible
while the kneading is underway. During this
phase small quantities of flourr or liquid can
stil be added.
If the bread must have particular aspect after
baking, proceed as follows before the last
20
rising phase (Depending on the program the
display must stil mount to a total timeof
approcimately 1:30 hours.) open the lid with
caution and shortly and carve the bread crust
while it is forming with a sharp pre-heated
knifeiscatter cereals on it or spread a mixture
of potato flour and water on the crust to give
it a glossy finish. This is the last time that the
lid can be opened, otherwise the bread will
go down in the middle.
What must be done when using rye flour?
Rye flour does not contain any gluten and
the bread hardly rises, in order to make it
easily digestible a rye wholemeal bread with
leaven is to be made.
The dough will rise only if one part of white
flour is added four parts of rye flour without
gluten.
What is the gluten in flour?
The higher the type number - the lower the
gluten contents of the flour are and the less
the dough will rise. The highest quantity of
gluten is contained in white flour.
How can fresh bread be made easier to
digest?
İf a mashed boiled potato is added to the
flour and kneaded in the dough the fresh
bread is easier to digest.
What doeses of rising agent should be
used?
For yeast and leaven which must be brought
in different quantities follow the producer’s
instructions on the package and adapt the
quantity to the amount of flour used.
What can be done if the bread tastes of
yeast?
a) Reduce the amount of sugar if sugar is being
used. The bread will be slightly lighter.
b) Add 1,5 tablespoon of vinegar for a small
bread loaf and 2 tablespoons for a large loef
to the water.
c) Use buttermilk or kefir instead of water. This
is possible for all the recipes and it is
recommended for the freshness of the bread.
Why doeas the bread made in an oven
taste different from the bread made with
the bread baking machine?
It depends on the different degree of humidity;
the bread is baked drier in the oven owing
to the larger baking space, while the bread
made in the machine moister.
Questions & Answers On Bread Baking Machines
Problem
Cause
Solution
Smoke comes out of the The ingredients stick to the Pull out the plug and clean
baking compartment or of baking compartment or on the the outside of the baking tin
the vents
outside of the baking tin or the baking compartment.
The bread goes down in the The bread is left too long in Take the bread out off the
middle and is moist on the the tin after baking and baking tin before the warming
bottom.
warming.
function is over.
It is difficult to take the bread The bottom of the total is stuck Clean the kneading peg and
out of the baking tin.
to the kneading peg.
shaft after the baking. If
necessary, fill the baking tin
with warm water for 30
minutes. Then the kneading
pegs can be easily removed
and cleaned.
The ingredients are not mixed Incorrect program setting.
or the bread is not baked
correctly.
The START/STOP key was
touched while the machine
was working.
Check the selected menu and
the other settings.
Do not use the ingredients
and start over again.
The lid opened several timers The lid is to be opened only
while the machine was if the time left on the display
is more than 1:30 hours (only
working.
for proggrammes “1,2,3,4”)
Make sure that lid was closed
well after being opened.
Long blackout while the Do not use the ingredients
m a c h i n e w a s w o r k i n g . and start over again.
The rotation of the kneading Check that the kneading pegs
peg is blocked.
are blocked by grains,etc. Pull
out the baking tin and check
whether the drivers turn. If
this is not the case,send the
appliance to the customer
service.
The appliance does not start. The appliance is stil hot after Press the START/STOP
The time acoustic signal goes t h e p r e v i o u s b a k i n g button until the normal
off. The display shows E 01. procedure.
programme appears. Pull out
the plug. Take out the baking
tin and leave it to cool at room
tempeature.Then insert the
plug and start again.
“EEE” or a similar ssignal Program or electronic error.
appears on the display.
Start the test run by pulling
out the plug, keeping the
menu key pressed and
inserting the plug again.
Release the key. The menu
performs a test run. Unplug
again The normal program
should appear on the display.
If this is not the case, send
the appliance to the Customer
Service.
21
Error with the prescriptions
Problem
Cause
Solution
The bread rises ttoo fast - Too much yeast, too much flour, not enough salt
or several of these causes
a/b
The bread does not rise at all - No yeast at all or too little
or not enough
- Old or stale yeast
- Liquid too hot
- The yeast has come into contact with the liquid.
- Wrong flour type or stale flour
- Too much or not enough liquid
- Not enough sugar
a/b
e
c
d
e
a/b/g
a/b
The dough rises too much - If the water is too soft the yeast ferments more
and spills over the baking tin - Too much milk affects the fermentation of the
yeast
f
c
The bread goes down in the
middle
- The dough volume is larger than the tin and the
bread goes down
- The fermantation is too short or too fast owing
to the excessive temperature of the water or the
baking chamber or to the excessive moistness.
Warm liquids make the dough rise too quickly
and loaf fall in before baking.
- No salt or enough sugar.
- Too much liquid.
a/f
- Not too much flour or not enough liquid
- Not enough yeast or sugar
- Too much fruit, wholemeal or of one of the other
ingredients
- Old or stale flour
a/b/g
a/b
b
The bread is not baked in the - Too much or not enough liquid
center
- Too much humidity
- Recipes with moist ingredients,e.g. yogurt
a/b/g
h
g
Open or coarse structure or
too many holes
- Too much water
- No salt
- Great humidity,water too hot
- Too much liquid
g
b
h/i
c
Mushroom-like, unbaked
surface
- Bread volume too big for the tin
- Too much flour, especially for white bread
- Too much yeast or not enough salt
- Too much sugar
- Sweet ingredients besides the sugar
a / f
f
a/b
a/b
b
Heavy, lumpy structure
c/h/i
a/b
h
e
The slices are uneven or there - Bread not cooled enough (the vapor has not
are clumps in the middle
escaped)
j
Flour deposits on the bread
crust
g/i
22
- The flour was not worked well on the sides
during the kneading
Solutions for the problems
a) Measure the ingredients correctly.
b) Adjust the ingredient doses and check that
all the ingredients have been added.
c) Use another liquid or leave it to cool at room
temperature. Add the ingredients specified in
the recipe in the right order. Make a small
ditch in the middle of the flour and put in the
crumbled yeast or the dry yeast. Avoid letting
the yeast and the liquid come into direct
contact.
d) Use only fresh and correctly stored ingredients.
e) Reduce the total amount of the ingredients,
do not use more than the specified amount
of flour. Reduce all the ingredients by 1/3
f) Contact the amount of liquid. If ingredients
containing water are used, the dose of the
liquid to be added must be duly reduced.
g) in case of very humid weather remove 1- 2
tablespoons of water.
h) In case of warm weather do not use the timing
function. Use cold liquids.
i) Take the bread out of the tin immediately after
baking and leave it on the grid to cool for at
least 15 minutes before cutting it.
j) Reduce the amount of yeast or of all the
ingredient doses by 1/4
k) Never grease the tin!
l) Add a tablespoon of wheather gluten to the
dough.
Remarks on the Recipes
1. Ingredients
Since each ingredients plays a specific role
for the succesful baking of the bread, the
measuring is just as important as the order in
which the ingredients are added.
- The most important ingredients like the liquid,
flour, salt, sugar and yeast (either dr yor fresh
yeast can be used) affect the successful
outcome of the preparation of the dough and
the bread. Always use the right quantities in
the right proportion.
- Use lukewarm ingredients if the dough needs
to be prepared imediately. If you wish to set
the program phase timing function, it is
advisable to use cold ingredients to avoid that
the yeast starts to rise too early.
- Margarine, butter and milk affect the flavor of
the bread.
- Sugar can be reduced by 20% to make the
crust lighter and thinner without affecting the
successful outcome of the baking. If you prefer
-
-
-
-
-
-
-
a softer and lighter crust replace the sugar
with honey.
Gluten which is produced in the flour during
the kneading provides for the structure of the
bread. The ideal flour mixture is composed of
40% wholemeal flour and 60%of white flour.
If you would like to bake wholemeal bread
with a low proportion of wheat gluten it may
also be necessary to knead the bread by
hand. See also the section “Questions on
Baking”.
If you wish to add cereals grains, leave them
to soak overnight. Reduce the quantity of flour
and the liquid.(up to 1/5 less)
Leaven is dispensible with rye flour. It contains
milk anda acetobacteria that make the bread
lighter and ferment thoroughly. You can make
your own leaven but it takes time. For this
reason concentrated leaven powder is used
in the recipes below. The powder is sold in
15g packets (for 1 kg of flour).Follow the
instructions given in the recipes(1/2, 3/4 or 1
packet).If less leaven that requested is used
the bread will crumble.
If leaven powders with a different concentration
(100g packet for 1 kg of flour) are used, the
quantity of flour must be reduced by 80g for
a 1kg of flour.
Liquid leaven sold in bags is also available
and it is suitable for use. Follow the doses
specified on the package. Fill the measuring
beaker with the liquid leaven and top it up with
the other liquid ingredients in the right doses
as specified in the recipe.
Wheat leaven which often comes dry improves
the workability of the dough, the freshnesss
and the taste. It is milder that rye leaven.
Use either the NORMAL or WHOLEMEAL
program when baking leavened bread.
Baking ferment can used to replace the leaven.
The only difference is in the taste. It is fit to
be used in the bread baking machine.
Wheat bran is added to the dough ıf yo want
particularly light bread rich in roughage. Use
on tablespoon for 500g of flour and increase
the quantity of liquid by 1/2 tablespoon.
Wheat gluten is a natural additive obtained
from wheat proteins. It makes the bread lighter
and more voluminous. The bread falls in more
rarely and it is more easily digestible. The
effect can be easily appreciated when baking
wholemeal and other bakery products made
of home-milled flour.
23
2. Adapting the doses.
If the doses need to be increased or reduced,
make sure that the proprtions of the original
recipe are maintained. To obtain a perfect
result, the basic rules below for the adaptingg
of the ingredient doses must be following:
- Liquids / flour: the dough ought to be soft
(not too soft) and easy to knead without
becoming stringy. A ball can be obtained by
kneading it lightly. This is not the case with
heavy doughs like rye wholemeal or cereal
bread. Check the dough five minutes afte the
kneading. If it is to moist, add some four until
the dough has reached the right consistency.
If the dough is tto dry add a spoonful of water
at a time during the kneading.
- Replacing liquids: when using ingredients
containing liquids in a recipe (e.g. curd cheese,
yogurt, etc.), the required amount of liquid
must be reduced. When using egs beat them
in the measurring beaker and fill it with the
other required liquid to the envisaged amount.
If you are living in aplace located at a high
altitude (more than 750m) the dough rises
faster. The yeast can be reduced in these
cases by 1/2 to 1/4 of a teaspoon to
proportionally reduce its rising.The same is
true of places with particularly soft water.
3. Adding and measuring the ingredients and
quanities
- Always put in first the liquid and the yeast
at the end. To avoid that the yeast acts too
fast (in particular when using the timing
function), contact between the yeast and
the liquid must be avoided.
- When measuring use the same measuring
units, that is to say use either the measuring
spoon supplied with the bread baking machine
or a spoon used in your home when the
recipes require doses measured in
tablespoons and teaspoons.
- The measures in grams must be weighed
precisely.
- For the milimeter indications you can use the
supplied measuring beaker which has a
graduated scale of 30 to 300 ml.
- Fruit, nuts or cereal ingredients. If you wish
to add other ingredients, you can do so in
specific programs (see the “Program Phase
Timing” table), when you hear the acqoustic
24
4.
5.
-
-
-
-
6.
-
-
signal. If you add the ingredients too early,they
will be crushed during the kneading.
Recipes for the Pane Automatic Bread
Baking Machine
The following recipes are for various bread
sizes. The total weight of the ingredients should
not exceed 900 grams.
If no levels are specified in the recipe, it means
that they are not envisaged in the proposed
programs and that both small and large
quantities cn be used.
Bread weights and volumes
In the following recipes you will find exact
indications regarding the bread weight. You’ll
see that the weight of pure white bread is less
than that of wholemeal bread. This depends
on the fact that white flour raises more and
hence limits need to be posed.
Despite the precise weight indications there
may be slight differences. The actual bread
weight depends much on the air humidity of
the room at the moment of the preparation.
All breads with a substantial portion of wheat
reach a large volume and exceed the container
edge after the last rising in the case of the
highest weight class. But the bread does not
spill over. The part of the bread outside the
tin is more easilyy browned compared to the
bread in the tin.
When the RAPID or SUPER RAPID program
is suggested for sweetbreads, you can use
the ingredients in smaller quantities also for
the SWEET BREAD program to make a lighter
bread.
Baking results
The result of the baking depends on the on
site conditions (soft water-high air humidityhigh altitude-consistency of the ingredients,
etc.)Therefore, the recipe indications are
reference points which can be adopted. If one
recipe or another does not go straight the first
time, do not let yourself be discouraged. Try
to find thee cause and try it again by varying
the proportions.
If the bread is too pale after baking, you can
leave it to Brown with the baking program.
It is recommended to bake a test bread before
actually setting the timing function for use
ovenight so that you can maket he necessary
change if necessary.
RECIPIES
1-White bread
Water or milk
275ml
White flour 450g
Dried milk powder
1,5 tbsp
Salt 1,5 - 2 tbsp
Caster sugar
2 tsp
Butter 25g
Easy blend dried yeast
0,5 tsp
2-Brown bread
Water or milk
275ml
Strong brown bread flour 450g
Dried milk powder
1,5 tbsp
Salt
1,5tsp
Soft light brown sugar
2 tsp
Butter
25g
Easy blend dried yeast
0,5 tsp
3-50% wholewheat bread
Water or milk
275ml
Strong wholewheat flour
225g
Strong brown bread flour 225g
Dried milk powder
1,5tbsp
Salt
1,5tsp
Soft light brown sugar
2tsp
Butter
25g
Easy blend dried yeast
1tsp
25
GARANT‹ fiARTLARI
1. Garanti süresi, mal›n teslim tarihinden itibaren bafllar ve 2 y›ld›r.
2. Mal›n bütün parçalar dahil olmak üzere tamam› firmam›z›n garantisi kapsam›ndad›r.
3. Mal›n garanti süresi içerisinde ar›zalanmas› durumunda, tamirde geçen süre garanti
süresine eklenir. Mal›n tamir süresi en fazla 30 ifl günüdür. Bu süre, mala iliflkin ar›zan›n
servis istasyonuna, servis istasyonunun olmamas› durumunda mal›n sat›c›s›, bayii,
acentas›, temsilcili¤i, ithalatç›s› veya imalatç›s›-üreticisinden birisine bildirim tarihinden
itibaren bafllar. Mal›n ar›zas›n›n 15 ifl günü içerisinde giderilememesi halinde, imalatç›üretici veya ithalatç›; mal›n tamiri tamamlan›ncaya kadar, benzer özelliklere sahip baflka
bir sanayi mal›n› tüketicinin kullan›m›na tahsis etmek zorundad›r.
4. Mal›n garanti süresi içerisinde, gerek malzeme ve iflçilik, gerekse montaj hatalar›ndan
dolay› ar›zalanmas› halinde, iflçilik masraf›, de¤ifltirilen parça bedeli ya da baflka herhangi
bir ad alt›nda hiçbir ücret talep etmeksizin tamiri yap›lacakt›r.
5. Tüketicinin onar›m hakk›n› kullanmas›na ra¤men mal›n;
- Teslim edildi¤i tarihten itibaren belirlenen garanti süresi içinde kalmak kayd›yla bir y›l
içersinde, ayn› ar›zay› ikiden fazla tekrarlamas› veya farkl› ar›zalar›n dörtten fazla ortaya
ç›kmas› veya belirlenen garanti süresi içerisinde farkl› ar›zalar›n toplam›n›n alt›dan fazla
olas› unsurlar›n›n yan› s›ra, bu ar›zalar›n maldan yararlanamamay› sürekli k›lmas›,
- Tamiri için gereken azami sürenin afl›lmas›,
- Servis istasyonunun mevcut olmamas› halinde s›ras›yla sat›c›s›, bayii, acentas›, temsilcili¤i,
ithalatç›s› veya imalatç›s›-üreticisinden birisinin düzenleyece¤i raporla ar›zan›n tamirinin
mümkün bulunmad›¤›n›n belirlenmesi,
durumlar›nda, tüketici mal›n ücretsiz de¤ifltirilmesini, bedel iadesi veya ay›p oran›nda
bedel indirimi talep edebilir.
6. Mal›n kullanma k›lavuzunda yer alan hususlara ayk›r› kullan›lmas›ndan kaynaklanan
ar›zalar garanti kapsam› d›fl›ndad›r.
7. Garanti Belgesi ile ilgili olarak ç›kabilecek sorunlar için Sanayi ve Ticaret Bakanl›¤›
Tüketicinin ve Rekabetin Korunmas› Genel Müdürlü¤ü’ne baflvurulabilir.