1
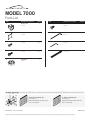
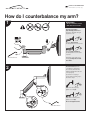
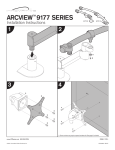
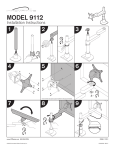
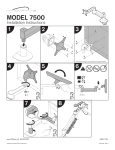
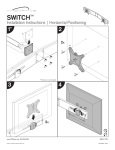
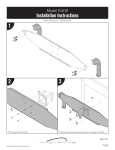
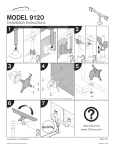
MODEL 7000
Installation Instructions
1
2
3
A
B
D
C
D
C
C
D
C
D
4
* Some monitors may require a spacer hardware kit. See page 2 for details.
5
6
G
G
E
F
7
8
H
www.LCDarms.com 800.524.2744
© 2011 Innovative Office Products, Inc.
I
?
800.524.2744
www.LCDarms.com
PAGE 1 OF 3
P501288 REV F
MODEL 7000
Parts List
ITEM
DESCRIPTION / PART NO.
QUANTITY
ITEM
DESCRIPTION / PART NO.
QUANTITY
A
Monitor Tilter
405397
1
F
10-32 x 3/8" FPhMS w/Lock Patch 1
705198
B
75/100mm VESA ® Adapter Plate 1
105587
G
7/32" Allen Wrench
701127
1
C
10-32 x 3/8" Phillips Pan Head Screw1
(4-pack)
702281
H
3/32" Allen Wrench
700146
1
D
M4 x 12mm Phillips Pan Head Screw 1
(4-pack)
702096
I
Cable Cap
102043-9.5
1
E
Dog Washer
105189
1
OPTIONAL SPACER KITS In some cases, the mounting surface on your monitor may be recessed further than permitted by VESA® standards. As a result, a spacer kit may be required.
.25" Spacer Hardware Kit
.5" Spacer Hardware Kit
Order # P404923-B
Order # P404923-C
(4) .25" Spacers
(4) M4 x 18mm Phillips Pan Head Screws
(4) .5" Spacers
(4) M4 x 25mm Phillips Pan Head Screws
www.LCDarms.com 800.524.2744
This product is protected by one or more of the following U.S. Patent Nos., and other United States and foreign patents applied for: 119,345, 119,346, 1,324,842, 2,470,525, 6,076,785, 6,273,383, 6,409,134, 6,478,274, 6,499,704, 6,505,988, 6,609,691, 619,606,
6,719,253, 6,726,167, 6,736,364, 6,783,105, 6,854,698, 6,915,994, 6,935,883, 6,955,328, 6,983,917, 6,986,489, 7,014,157, 7,017,874, 7,048,242, 7,059,574, 7,063,296, 7,066,433, 7,066,435, 7,389,965, 7,665,699, D435,852, D491,952, D492,893, D570,853, D575,293.
PAGE 2 OF 3
HOW TO COUNTERBALANCE
www.LCDarms.com/video.php
How do I counterbalance my arm?
1
IMPORTANT!
• Monitor must be on arm
• Arm must be in mount
Press the arm down to
approximately parallel with the
desk prior to turning the strength
adjustment screw.
If the arm drifts upward,
turn the adjustment screw clockwise.
If the arm drifts downward,
turn the adjustment screw counterclockwise.
Depending on the weight of your
monitor, you may have to make
15-20 turns.
7/32" Allen Wrench
2
In some instances, further
counterbalance adjustments
are needed to allow the arm’s
instant height adjustment function
to work properly.
If your arm is not staying in
position after performing step 1,
follow these steps:
B
With arm in raised position,
tighten set screw (A).
A
With arm in horizontal position,
tighten set screw (B).
Do not over tighten screws.
3/32" Allen Wrench
www.LCDarms.com 800.524.2744
PAGE 3 OF 3