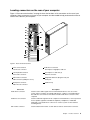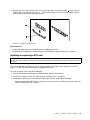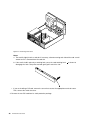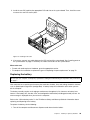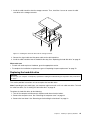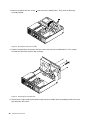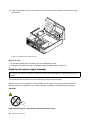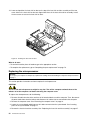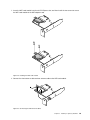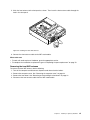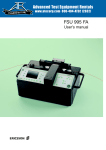
1
ThinkCentre
User Guide
Machine Types: 0900, 0967, 1271, 3578, 3594, 3596, 3598, 3629,
3654, 3660, 3664, 3668, and 3676
Note: Before using this information and the product it supports, be sure to read and understand the
“Important safety information” on page v and Appendix A “Notices” on page 121.
Second Edition (May 2012)
© Copyright Lenovo 2012.
LIMITED AND RESTRICTED RIGHTS NOTICE: If data or software is delivered pursuant a General Services Administration
“GSA” contract, use, reproduction, or disclosure is subject to restrictions set forth in Contract No. GS-35F-05925.
Contents
Important safety information . . . . . . v
Service and upgrades . . . . . .
Static electricity prevention . . . .
Power cords and power adapters .
Extension cords and related devices
Plugs and outlets. . . . . . . .
External devices . . . . . . . .
Heat and product ventilation . . .
Operating environment . . . . .
Modem safety information . . . .
Laser compliance statement . . .
Power supply statement . . . . .
Cleaning and maintenance . . . .
.
.
.
.
.
.
.
.
.
.
.
.
.
.
.
.
.
.
.
.
.
.
.
.
.
.
.
.
.
.
.
.
.
.
.
.
.
.
.
.
.
.
.
.
.
.
.
.
.
.
.
.
.
.
.
.
.
.
.
.
.
.
.
.
.
.
.
.
.
.
.
.
. v
. v
. vi
. vi
vii
vii
vii
viii
viii
. ix
. ix
. ix
Chapter 1. Product overview . . . . . . 1
Features . . . . . . . . . . . . . . . . .
Specifications . . . . . . . . . . . . . . .
Software overview . . . . . . . . . . . . .
Software provided by Lenovo . . . . . . .
Adobe Reader . . . . . . . . . . . . .
Antivirus software. . . . . . . . . . . .
Locations. . . . . . . . . . . . . . . . .
Locating connectors, controls, and indicators
on the front of your computer . . . . . . .
Locating connectors on the rear of your
computer . . . . . . . . . . . . . . .
Locating components . . . . . . . . . .
Locating parts on the system board . . . .
Locating internal drives . . . . . . . . .
Machine type and model label . . . . . . .
Chapter 2. Using your computer . . .
Frequently asked questions . . . . . . .
Using the keyboard . . . . . . . . . . .
Using Windows shortcut keys . . . . .
Using a fingerprint reader . . . . . .
Using the wheel mouse . . . . . . . . .
Adjusting audio . . . . . . . . . . . .
About your computer audio . . . . . .
Setting the volume from the desktop . .
Setting the volume from Control Panel .
Using CDs and DVDs . . . . . . . . . .
Handling and storing CD and DVD media
Playing a CD or DVD . . . . . . . .
Recording a CD or DVD . . . . . . .
1
4
4
4
7
7
7
.
8
.
9
10
11
12
13
15
.
.
.
.
.
.
.
.
.
.
.
.
.
15
15
15
16
16
16
16
17
17
17
18
18
18
Chapter 3. You and your computer . .
21
© Copyright Lenovo 2012
.
.
.
.
.
.
.
.
.
.
.
.
.
.
.
.
.
.
.
.
Accessibility and comfort . . . . . . . .
Arranging your workspace . . . . . .
Comfort . . . . . . . . . . . . .
Glare and lighting . . . . . . . . . .
Air circulation . . . . . . . . . . .
Electrical outlets and cable lengths . . .
Registering your computer . . . . . . . .
Moving your computer to another country or
region . . . . . . . . . . . . . . . .
Voltage-selection switch . . . . . . .
Replacement power cords . . . . . .
.
.
.
.
.
.
.
21
21
21
22
22
22
23
. .
. .
. .
23
23
24
Chapter 4. Security . . . . . . . . . .
25
Security features . . . . . . .
Locking the computer cover . .
Attaching an integrated cable lock
Using passwords. . . . . . .
BIOS passwords . . . . .
Windows passwords . . .
Configuring the fingerprint reader
Using and understanding firewalls
Protecting data against viruses .
.
.
.
.
.
.
.
.
.
.
.
.
.
.
.
.
.
.
.
.
.
.
.
.
.
.
.
.
.
.
.
.
.
.
.
.
.
.
.
.
.
.
.
.
.
.
.
.
.
.
.
.
.
.
.
.
.
.
.
.
.
.
.
.
.
.
.
.
.
.
25
26
27
27
27
28
28
28
28
Chapter 5. Installing or replacing
hardware . . . . . . . . . . . . . . .
31
Handling static-sensitive devices . . . . . . .
Installing or replacing hardware . . . . . . . .
Installing external options . . . . . . . .
Removing the computer cover. . . . . . .
Removing and reinstalling the front bezel . .
Accessing the system board components and
drives . . . . . . . . . . . . . . . .
Installing or replacing a memory module . . .
Installing or replacing a PCI card . . . . . .
Replacing the battery . . . . . . . . . .
Installing the solid state drive . . . . . . .
Replacing the hard disk drive . . . . . . .
Installing or replacing the optical drive . . .
Replacing the heat sink and fan assembly . .
Replacing the power supply assembly . . .
Replacing the microprocessor . . . . . . .
Replacing the front audio and USB
assembly . . . . . . . . . . . . . . .
Replacing the system fan assembly . . . .
Replacing the WiFi units . . . . . . . . .
Installing or removing the rear WiFi antenna .
Installing or removing the front WiFi antenna .
31
31
31
32
32
34
35
37
39
40
41
43
47
50
54
57
58
60
64
66
i
Replacing the keyboard . . . . . . . . .
Replacing the mouse . . . . . . . . . .
Completing the parts replacement . . . . .
68
69
70
Chapter 6. Recovery information . . .
73
Creating and using recovery media . . . . .
Creating recovery media . . . . . . . .
Using recovery media . . . . . . . . .
Performing backup and recovery operations . .
Performing a backup operation . . . . .
Performing a recovery operation . . . . .
Using the Rescue and Recovery workspace . .
Creating and using a rescue medium . . . . .
Creating a rescue medium . . . . . . .
Using a rescue medium . . . . . . . .
Reinstalling preinstalled applications and device
drivers . . . . . . . . . . . . . . . . .
Reinstalling software programs . . . . . . .
Reinstalling device drivers . . . . . . . . .
Solving recovery problems . . . . . . . . .
.
.
.
.
.
.
.
.
.
.
73
73
74
74
74
75
75
76
76
77
.
.
.
.
77
78
79
79
Chapter 7. Using the Setup Utility
program . . . . . . . . . . . . . . . .
Starting the Setup Utility program . . . . . . .
Viewing and changing settings . . . . . . . .
Using passwords. . . . . . . . . . . . . .
Password considerations . . . . . . . . .
Power-On Password . . . . . . . . . .
Administrator Password . . . . . . . . .
Hard Disk Password. . . . . . . . . . .
Setting, changing, and deleting a password .
Erasing lost or forgotten passwords (clearing
CMOS) . . . . . . . . . . . . . . . .
Enabling or disabling a device . . . . . . . .
Selecting a startup device . . . . . . . . . .
Selecting a temporary startup device . . . .
Selecting or changing the startup device
sequence . . . . . . . . . . . . . . .
Enabling ErP compliance mode . . . . . . . .
Exiting from the Setup Utility program . . . . .
Chapter 8. Updating system
programs . . . . . . . . . . . . . . .
Using system programs . . . . . . . . . .
Updating (flashing) the BIOS from a disc . . .
Updating (flashing) the BIOS from your operating
system . . . . . . . . . . . . . . . . .
Recovering from a POST/BIOS update failure .
81
81
81
81
82
82
82
82
82
83
83
84
84
84
84
85
87
.
.
87
87
.
.
88
88
Chapter 9. Preventing problems . . .
91
Keeping your computer current . . . . . . . .
91
ii
ThinkCentre User Guide
Getting the latest device drivers for your
computer . . . . . . . . . . . . .
Updating your operating system . . . .
Using System Update . . . . . . . .
Cleaning and maintenance . . . . . . . .
Basics . . . . . . . . . . . . . .
Cleaning your computer . . . . . . .
Good maintenance practices . . . . .
Moving your computer . . . . . . . . .
.
.
.
.
.
.
.
.
91
91
92
92
92
93
94
94
Chapter 10. Troubleshooting and
diagnostics . . . . . . . . . . . . . .
97
Basic troubleshooting . . . . . . . . .
Troubleshooting procedure . . . . . . .
Troubleshooting . . . . . . . . . . .
Audio problems . . . . . . . . .
CD problems . . . . . . . . . .
DVD problems . . . . . . . . . .
Intermittent problems . . . . . . .
Keyboard, mouse, or pointing device
problems . . . . . . . . . . . .
Monitor problems. . . . . . . . .
Networking problems . . . . . . .
Option problems . . . . . . . . .
Performance and lockup problems . .
Printer problems . . . . . . . . .
Serial port problems. . . . . . . .
Software problems . . . . . . . .
USB problems . . . . . . . . . .
Diagnostic programs . . . . . . . . .
Lenovo Solution Center . . . . . .
Lenovo ThinkVantage Toolbox . . . .
PC-Doctor for DOS . . . . . . . .
.
.
.
.
.
.
.
.
.
.
.
.
.
.
.
.
.
.
.
.
.
.
.
.
.
.
.
.
.
97
98
98
99
100
101
103
.
.
.
.
.
.
.
.
.
.
.
.
.
.
.
.
.
.
.
.
.
.
.
.
.
.
.
.
.
.
.
.
.
.
.
.
.
.
.
103
105
106
109
110
112
113
113
114
114
115
115
115
Chapter 11. Getting information, help,
and service . . . . . . . . . . . . . 117
Information resources . . . . . . . . . .
Lenovo ThinkVantage Tools . . . . . .
Lenovo Welcome . . . . . . . . . .
Help and Support. . . . . . . . . .
Safety and Warranty. . . . . . . . .
Lenovo Web site (http://www.lenovo.com)
Lenovo Support Web site. . . . . . .
Help and service . . . . . . . . . . . .
Using the documentation and diagnostic
programs . . . . . . . . . . . . .
Calling for service. . . . . . . . . .
Using other services . . . . . . . .
Purchasing additional services . . . .
.
.
.
.
.
.
.
.
.
.
.
.
.
.
.
.
117
117
117
117
117
117
118
118
.
.
.
.
.
.
.
.
118
118
119
119
Appendix A. Notices . . . . . . . . .
121
Trademarks . . . . . . . . . . . . . . . .
Appendix B. Regulatory
information . . . . . . . . . . . . .
Export classification notice . . . . . . .
Television output notice . . . . . . . .
Electronic emissions notices . . . . . .
Federal Communications Commission
Declaration of Conformity . . . . .
Additional regulatory information . . . .
123
. . .
. . .
. . .
123
123
123
. . .
. . .
123
125
Appendix C. WEEE and recycling
statements . . . . . . . . . . . . .
Important WEEE Information . . . . . . . . .
Recycling information . . . . . . . . . . . .
Recycling information for Brazil . . . . . . . .
© Copyright Lenovo 2012
122
127
127
127
128
Battery recycling information for Taiwan . . . . .
Battery recycling information for the European
Union . . . . . . . . . . . . . . . . . .
128
129
Appendix D. Restriction of Hazardous
Substances Directive (RoHS) . . . . 131
China RoHS.
Turkish RoHS
Ukraine RoHS
India RoHS .
.
.
.
.
.
.
.
.
.
.
.
.
.
.
.
.
.
.
.
.
.
.
.
.
.
.
.
.
.
.
.
.
.
.
.
.
.
.
.
.
.
.
.
.
.
.
.
.
.
.
.
.
.
.
.
.
.
.
.
.
131
131
131
132
Appendix E. Ek Bilgiler . . . . . . .
133
Appendix F. Servis istasyonlari . . .
135
Index. . . . . . . . . . . . . . . . .
143
iii
iv
ThinkCentre User Guide
Important safety information
CAUTION:
Before using this manual, be sure to read and understand all the related safety information for this
product. Refer to the information in this section and the safety information in the ThinkCentre Safety
and Warranty Guide that you received with this product. Reading and understanding this safety
information reduces the risk of personal injury and damage to your product.
If you no longer have a copy of the ThinkCentre Safety and Warranty Guide, you can obtain a Portable
Document Format (PDF) version from the Lenovo® Support Web site at http://www.lenovo.com/support. The
Lenovo Support Web site also provides the ThinkCentre Safety and Warranty Guide and this ThinkCentre
User Guide in additional languages.
Service and upgrades
Do not attempt to service a product yourself unless instructed to do so by the Customer Support Center or
your documentation. Only use a Service Provider who is approved to repair your particular product.
Note: Some computer parts can be upgraded or replaced by the customer. Upgrades typically are
referred to as options. Replacement parts approved for customer installation are referred to as Customer
Replaceable Units, or CRUs. Lenovo provides documentation with instructions when it is appropriate for
customers to install options or replace CRUs. You must closely follow all instructions when installing or
replacing parts. The Off state of a power indicator does not necessarily mean that voltage levels inside a
product are zero. Before you remove the covers from a product equipped with a power cord, always make
sure that the power is turned off and that the product is unplugged from any power source. For more
information on CRUs, refer to Chapter 5 “Installing or replacing hardware” on page 31. If you have any
questions or concerns, contact the Customer Support Center.
Although there are no moving parts in your computer after the power cord has been disconnected, the
following warnings are required for your safety.
CAUTION:
Hazardous moving parts. Keep fingers and other body parts away.
CAUTION:
Before replacing any CRUs, turn off the computer and wait three to five minutes to let the computer
cool before opening the cover.
Static electricity prevention
Static electricity, although harmless to you, can seriously damage computer components and options.
Improper handling of static-sensitive parts can cause damage to the part. When you unpack an option
© Copyright Lenovo 2012
v
or CRU, do not open the static-protective package containing the part until the instructions direct you
to install it.
When you handle options or CRUs, or perform any work inside the computer, take the following precautions
to avoid static-electricity damage:
• Limit your movement. Movement can cause static electricity to build up around you.
• Always handle components carefully. Handle adapters, memory modules, and other circuit boards by the
edges. Never touch exposed circuitry.
• Prevent others from touching components.
• When you install a static-sensitive option or CRU, touch the static-protective package containing the
part to a metal expansion-slot cover or other unpainted metal surface on the computer for at least two
seconds. This reduces static electricity in the package and your body.
• When possible, remove the static-sensitive part from the static-protective packaging and install the part
without setting it down. When this is not possible, place the static-protective packaging on a smooth,
level surface and place the part on it.
• Do not place the part on the computer cover or other metal surface.
Power cords and power adapters
Use only the power cords and power adapters supplied by the product manufacturer.
The power cords shall be safety approved. For Germany, it shall be H05VV-F, 3G, 0.75 mm2, or better. For
other countries, the suitable types shall be used accordingly.
Never wrap a power cord around a power adapter or other object. Doing so can stress the cord in ways that
can cause the cord to fray, crack, or crimp. This can present a safety hazard.
Always route power cords so that they will not be walked on, tripped over, or pinched by objects.
Protect power cord and power adapters from liquids. For instance, do not leave your power cord or power
adapter near sinks, tubs, toilets, or on floors that are cleaned with liquid cleansers. Liquids can cause a
short circuit, particularly if the power cord or power adapter has been stressed by misuse. Liquids also can
cause gradual corrosion of power cord terminals and/or the connector terminals on a power adapter,
which can eventually result in overheating.
Always connect power cords and signal cables in the correct order and ensure that all power cord
connectors are securely and completely plugged into receptacles.
Do not use any power adapter that shows corrosion at the ac input pins or shows signs of overheating (such
as deformed plastic) at the ac input or anywhere on the power adapter.
Do not use any power cords where the electrical contacts on either end show signs of corrosion or
overheating or where the power cord appears to have been damaged in any way.
Extension cords and related devices
Ensure that extension cords, surge protectors, uninterruptible power supplies, and power strips that you use
are rated to handle the electrical requirements of the product. Never overload these devices. If power strips
are used, the load should not exceed the power strip input rating. Consult an electrician for more information
if you have questions about power loads, power requirements, and input ratings.
vi
ThinkCentre User Guide
Plugs and outlets
If a receptacle (power outlet) that you intend to use with your computer equipment appears to be damaged
or corroded, do not use the outlet until it is replaced by a qualified electrician.
Do not bend or modify the plug. If the plug is damaged, contact the manufacturer to obtain a replacement.
Do not share an electrical outlet with other home or commercial appliances that draw large amounts of
electricity; otherwise, unstable voltage might damage your computer, data, or attached devices.
Some products are equipped with a three-pronged plug. This plug fits only into a grounded electrical outlet.
This is a safety feature. Do not defeat this safety feature by trying to insert it into a non-grounded outlet. If
you cannot insert the plug into the outlet, contact an electrician for an approved outlet adapter or to replace
the outlet with one that enables this safety feature. Never overload an electrical outlet. The overall system
load should not exceed 80 percent of the branch circuit rating. Consult an electrician for more information
if you have questions about power loads and branch circuit ratings.
Be sure that the power outlet you are using is properly wired, easily accessible, and located close to the
equipment. Do not fully extend power cords in a way that will stress the cords.
Be sure that the power outlet provides the correct voltage and current for the product you are installing.
Carefully connect and disconnect the equipment from the electrical outlet.
External devices
Do not connect or disconnect any external device cables other than Universal Serial Bus (USB) and 1394
cables while the computer power is on; otherwise, you might damage your computer. To avoid possible
damage to attached devices, wait at least five seconds after the computer is shut down to disconnect
external devices.
Heat and product ventilation
Computers, power adapters, and many accessories can generate heat when turned on and when batteries
are charging. Always follow these basic precautions:
• Do not leave your computer, power adapter, or accessories in contact with your lap or any part of your
body for an extended period when the products are functioning or when the battery is charging. Your
computer, power adapter, and many accessories produce some heat during normal operation. Extended
contact with the body could cause discomfort or, potentially, a skin burn.
• Do not charge the battery or operate your computer, power adapter, or accessories near flammable
materials or in explosive environments.
• Ventilation slots, fans, and heat sinks are provided with the product for safety, comfort, and reliable
operation. These features might inadvertently become blocked by placing the product on a bed, sofa,
carpet, or other flexible surface. Never block, cover, or disable these features.
Inspect your desktop computer for dust accumulation at least once every three months. Before inspecting
your computer, turn off the power and unplug the computer's power cord from the electrical outlet; then
remove any dust from vents and perforations in the bezel. If you notice external dust accumulation, then
examine and remove dust from the inside of the computer including heat sink inlet fins, power supply vents,
and fans. Always turn off and unplug the computer before opening the cover. If possible, avoid operating
your computer within two feet of high-traffic areas. If you must operate your computer in or near a high-traffic
area, inspect and, if necessary, clean your computer more frequently.
© Copyright Lenovo 2012
vii
For your safety and to maintain optimum computer performance, always follow these basic precautions
with your desktop computer:
• Keep the cover closed whenever the computer is plugged in.
• Regularly inspect the outside of the computer for dust accumulation.
• Remove dust from vents and any perforations in the bezel. More frequent cleanings might be required for
computers in dusty or high-traffic areas.
• Do not restrict or block any ventilation openings.
• Do not store or operate your computer inside furniture, as this might increase the risk of overheating.
• Airflow temperatures into the computer should not exceed 35°C (95°F).
• Do not install air filtration devices. They may interfere with proper cooling.
Operating environment
The optimal environment in which to use your computer is 10°C-35°C (50°F-95°F) with humidity ranging
between 35% and 80%. If your computer is stored or transported in temperatures less than 10°C (50°F),
allow the cold computer to rise slowly to an optimal operating temperature of 10°C-35°C (50°F-95°F) before
use. This process could take two hours in extreme conditions. Failure to allow your computer to rise to an
optimal operating temperature before use could result in irreparable damage to your computer.
If possible, place your computer in a well-ventilated and dry area without direct exposure to sunshine.
Keep electrical appliances such as an electric fan, radio, high-powered speakers, air conditioner, and
microwave oven away from your computer because the strong magnetic fields generated by these
appliances can damage the monitor and data on the hard disk drive.
Do not place any beverages on top of or beside the computer or other attached devices. If liquid is spilled on
or in the computer or an attached device, a short circuit or other damage might occur.
Do not eat or smoke over your keyboard. Particles that fall into your keyboard can cause damage.
Modem safety information
CAUTION:
To reduce the risk of fire, use only No. 26 AWG or larger (for example, No. 24 AWG) telecommunication
line cord listed by Underwriters Laboratories (UL) or certified by the Canadian Standards Association
(CSA).
To reduce the risk of fire, electrical shock, or injury when using telephone equipment, always follow basic
safety precautions, such as:
• Never install telephone wiring during a lightning storm.
• Never install telephone jacks in wet locations unless the jack is specifically designed for wet locations.
• Never touch uninsulated telephone wires or terminals unless the telephone line has been disconnected at
the network interface.
• Use caution when installing or modifying telephone lines.
• Avoid using a telephone (other than a cordless type) during an electrical storm. There may be a remote
risk of electric shock from lightning.
• Do not use the telephone to report a gas leak in the vicinity of the leak.
viii
ThinkCentre User Guide
Laser compliance statement
CAUTION:
When laser products (such as CD-ROMs, DVD drives, fiber optic devices, or transmitters) are
installed, note the following:
• Do not remove the covers. Removing the covers of the laser product could result in exposure to
hazardous laser radiation. There are no serviceable parts inside the device.
• Use of controls or adjustments or performance of procedures other than those specified herein
might result in hazardous radiation exposure.
DANGER
Some laser products contain an embedded Class 3A or Class 3B laser diode. Note the following.
Laser radiation when open. Do not stare into the beam, do not view directly with optical
instruments, and avoid direct exposure to the beam.
Power supply statement
Never remove the cover on a power supply or any part that has the following label attached.
Hazardous voltage, current, and energy levels are present inside any component that has this label attached.
There are no serviceable parts inside these components. If you suspect a problem with one of these parts,
contact a service technician.
Cleaning and maintenance
Keep your computer and workspace clean. Shut down the computer and then disconnect the power
cord before cleaning the computer. Do not spray any liquid detergent directly on the computer or use
any detergent containing flammable material to clean the computer. Spray the detergent on a soft cloth
and then wipe the computer surfaces.
© Copyright Lenovo 2012
ix
x
ThinkCentre User Guide
Chapter 1. Product overview
This chapter provides information about the computer features, specifications, software programs provided
by Lenovo, and locations of connectors, components, parts on the system board, and internal drives.
Features
This section provides information about the computer features. The following information covers a variety of
models. For information about your specific model, use the Setup Utility program. See Chapter 7 “Using
the Setup Utility program” on page 81.
Microprocessor
Your computer comes with one of the following microprocessors (internal cache size varies by model type):
• Intel® Core™ i3 microprocessor
• Intel Core i5 microprocessor
• Intel Core i7 microprocessor
• Intel Celeron® microprocessor
• Intel Pentium® microprocessor
Memory
Your computer supports up to 2 double data rate 3 dual inline memory modules (DDR3 DIMMs).
Internal drives
• Optical drive: DVD-ROM or DVD-R (available in some models)
• Serial Advanced Technology Attachment (SATA) hard disk drive
• SATA solid state drive
Video subsystem
• Integrated graphics for a Video Graphics Array (VGA) connector and a Digital Video Interface (DVI)
connector
• Peripheral Component Interconnect (PCI) Express x16 graphics card slot on the system board for a
discrete graphics card
Audio subsystem
• Integrated high-definition (HD) audio
• Audio line-in connector, audio line-out connector, and microphone connector on the rear panel
• Microphone connector and headphone connector on the front panel
• Internal speaker (available on some models)
Connectivity
• 100/1000 Mbps integrated Ethernet controller
• PCIE x1 Fax modem (some models)
System management features
© Copyright Lenovo 2012
1
• Ability to store power-on self-test (POST) hardware test results
• Desktop Management Interface (DMI)
Desktop Management Interface provides a common path for users to access information about all
aspects of a computer, including processor type, installation date, attached printers and other peripherals,
power sources, and maintenance history.
• ErP compliance mode
The energy-related products directive (ErP) compliance mode reduces the consumption of electricity
when your computer is in standby or off mode. For more information, see “Enabling ErP compliance
mode” on page 84.
• Preboot Execution Environment (PXE)
The Preboot Execution Environment is an environment to start computers using a network interface
independent of data storage devices (such as the hard disk drive) or installed operating systems.
• System Management (SM) Basic Input/Output System (BIOS) and SM software
The SM BIOS specification defines data structures and access methods in a BIOS that allows a user or
application to store and retrieve information specific about the computer in question.
• Wake on LAN
Wake on LAN is an Ethernet computer networking standard that allows a computer to be turned on
or woken up by a network message. The message is usually sent by a program running on another
computer on the same local area network.
• Wake on Ring
Wake on Ring, sometimes referred to as Wake on Modem, is a specification that allows supported
computers and devices to resume from sleep or hibernation mode.
• Windows Management Instrumentation (WMI)
Windows Management Instrumentation is a set of extensions to the Windows Driver Model. It provides an
operating system interface through which instrumented components provide information and notification.
Input/Output (I/O) features
• 9-pin serial port (one standard and one optional)
• Six Universal Serial Bus (USB) connectors (two on the front panel and four on the rear panel)
• One Ethernet connector
• One DVI connector
• One VGA monitor connector
• One Personal System/2 (PS/2) keyboard connector
• One PS/2 mouse connector
• Three audio connectors on the rear panel (audio line-in connector, audio line-out connector, and
microphone connector)
• Two audio connectors on the front panel (microphone connector and headphone connector)
For more information, see “Locating connectors, controls, and indicators on the front of your computer” on
page 8 and “Locating connectors on the rear of your computer” on page 9.
Expansion
• One hard disk drive bay
• One optical drive bay
• Two PCI Express x1 card slots
• One PCI Express x16 graphics card slot
2
ThinkCentre User Guide
Power supply
Your computer comes with 240-watt automatic voltage-sensing power supply.
Security features
• Computrace Agent software embedded in firmware
• Cover presence switch (also called intrusion switch) (available in some models)
• Ability to enable or disable a device
• Ability to enable and disable USB connectors individually
• Keyboard with fingerprint reader (shipped with some models)
• Power-on password (POP), administrator password, and hard disk password to deter unauthorized
use of your computer
• Startup sequence control
• Startup without keyboard or mouse
• Support for an integrated cable lock (Kensington lock)
• Support for a padlock
For more information, see Chapter 4 “Security” on page 25.
Preinstalled software programs
Your computer is preinstalled with software programs to help you work more easily and securely. For more
information, see “Software overview” on page 4.
Preinstalled operating system
Your computer is preinstalled with one of the following operating systems:
• Microsoft® Windows® 7
• Microsoft Windows Vista®
Operating system(s), certified or tested for compatibility1 (varies by model type)
• Linux®
• Microsoft Windows XP Professional SP 3
1.
The operating system(s) listed here are being certified or tested for compatibility at the time this publication goes to
press. Additional operating systems might be identified by Lenovo as compatible with your computer following the
publication of this manual. This list is subject to change. To determine if an operating system has been certified or
tested for compatibility, check the Web site of the operating system vendor.
Chapter 1. Product overview
3
Specifications
This section lists the physical specifications for your computer.
Dimensions
Width: 99 mm (3.9 inches)
Height: 335 mm (13.19 inches)
Depth: 382 mm (15.04 inches)
Weight
Maximum configuration as shipped: 6.26 kg (13.8 lb) (without package)
Maximum configuration as shipped: 8.96 kg (19.75 lb) (with package)
Environment
• Air temperature:
Operating: 10°C to 35°C (50°F to 95°F)
Non-operating: -40°C to 60°C (-40°F to 140°F)
Non-operating: -10°C to 60°C (14°F to 140°F) (without package)
• Humidity:
Operating: 20% to 80% (non-condensing)
Non-operating: 20% to 90% (non-condensing)
• Altitude:
Operating: -50 to 10 000 ft (-15.2 to 3 048 m)
Non-operating: -50 to 35 000 ft (-15.2 to 10 668 m)
Electrical input
• Input voltage:
– Low range:
Minimum: 100 V ac
Maximum: 127 V ac
Input frequency range: 50 to 60 Hz
– High range:
Minimum: 200 V ac
Maximum: 240 V ac
Input frequency range: 50 to 60 Hz
Software overview
The computer comes with a preinstalled operating system and several software programs provided by
Lenovo.
Software provided by Lenovo
The following software programs are provided by Lenovo to help you improve productivity and reduce the
cost associated with maintaining your computer. Software programs provided with your computer might
vary depending on your computer model type and preinstalled operating system.
4
ThinkCentre User Guide
Lenovo ThinkVantage Tools
The Lenovo ThinkVantage® Tools program guides you to a host of information sources and provides easy
access to various tools to help you work more easily and securely.
Note: The Lenovo ThinkVantage Tools program is only available on computers with the Windows 7 operating
system from Lenovo.
To access the Lenovo ThinkVantage Tools program, click Start ➙ All Programs ➙ Lenovo ThinkVantage
Tools.
The following table lists the programs that you can access from the Lenovo ThinkVantage Tools program. To
access a program, double-click the corresponding icon.
Table 1. Program icon names in Lenovo ThinkVantage Tools
Program name
Icon name in Lenovo ThinkVantage Tools
Create Recovery Media
Factory Recovery Disks
Fingerprint Software (available on some models)
Fingerprint Reader (available on some models)
Lenovo Solution Center or Lenovo ThinkVantage Toolbox
System Health and Diagnostics
ThinkVantage Password Manager
Password Vault
ThinkVantage Power Manager
Power Controls
ThinkVantage Rescue and
Recovery®
Enhanced Backup and Restore
ThinkVantage System Update
Update and Drives
View Manager
View Manager
Lenovo Welcome
The Lenovo Welcome program introduces you to some innovative built-in features of Lenovo and guides you
through a few important setup tasks to help you make the most of your computer.
Fingerprint Software
The integrated fingerprint reader provided on some keyboards enables you to enroll your fingerprint and
associate it with your power-on password, hard disk password, and Windows password. As a result,
fingerprint authentication can replace passwords and enable simple and secure user access. A fingerprint
reader keyboard is available with select computers or can be purchased for computers that support this
option.
Lenovo Solution Center
Note: Depending on the date when your computer was manufactured, your computer is preinstalled with
either the Lenovo Solution Center program or the Lenovo ThinkVantage Toolbox program for diagnostic
purposes. For additional information about the Lenovo ThinkVantage Toolbox program, see “Lenovo
ThinkVantage Toolbox” on page 115.
The Lenovo Solution Center program enables you to troubleshoot and resolve computer problems. It
combines diagnostic tests, system information collection, security status, and support information, along
with hints and tips for maximum system performance. See “Lenovo Solution Center” on page 115 for
detailed information.
Lenovo ThinkVantage Toolbox
Note: Depending on the date when your computer was manufactured, your computer is preinstalled with
either the Lenovo Solution Center program or the Lenovo ThinkVantage Toolbox program for diagnostic
purposes. For additional information about the Lenovo Solution Center program, see “Lenovo Solution
Center” on page 115.
Chapter 1. Product overview
5
The Lenovo ThinkVantage Toolbox program helps you maintain your computer, improve computing security,
diagnose computer problems, get familiar with the innovative technologies provided by Lenovo, and get more
information about your computer. See “Lenovo ThinkVantage Toolbox” on page 115 for detailed information.
Product Recovery
The Product Recovery program enables you to restore the contents of the hard disk drive to the factory
default settings.
ThinkVantage Client Security Solution
The ThinkVantage Client Security Solution program is available on select Lenovo computers. It helps protect
your information, including vital security information like passwords, encryption keys, and electronic
credentials, while guarding against unauthorized user access to data.
Note: The ThinkVantage Client Security Solution program is only available on computers with the Windows
Vista operating system from Lenovo.
ThinkVantage Password Manager
The ThinkVantage Password Manager program automatically captures and fills in authentication information
for Windows applications and Web sites.
Notes:
• The ThinkVantage Password Manager program is only available on computers with the Windows 7
operating system from Lenovo.
• If the Password Vault icon in the Lenovo ThinkVantage Tools program is dimmed, it indicates that you
need to install the ThinkVantage Password Manager program manually before enabling its features. To
install the ThinkVantage Password Manager program, do the following:
1. Click Start ➙ All Programs ➙ Lenovo ThinkVantage Tools, and double-click Password Vault.
2. Follow the instructions on the screen.
3. When the installation process completes, the Password Vault icon is activated.
ThinkVantage Power Manager
The ThinkVantage Power Manager program provides convenient, flexible, and complete power management
for your ThinkCentre® computer. By using the ThinkVantage Power Manager program, you can adjust your
power settings to achieve the best balance between system performance and power saving.
ThinkVantage Rescue and Recovery
The ThinkVantage Rescue and Recovery program is a one button recovery and restore solution that includes
a set of self-recovery tools to help you diagnose computer problems, get help, and recover from system
crashes, even if you cannot start the Windows operating system.
Note: If the Enhanced Backup and Restore icon in the Lenovo ThinkVantage Tools program is dimmed, it
indicates that you need to install the ThinkVantage Rescue and Recovery program manually before enabling
its features. To install the ThinkVantage Rescue and Recovery program, do the following:
1. Click Start ➙ All Programs ➙ Lenovo ThinkVantage Tools, and double-click Enhanced Backup
and Restore.
2. Follow the instructions on the screen.
3. When the installation process completes, the Enhanced Backup and Restore icon is activated.
6
ThinkCentre User Guide
ThinkVantage System Update
The ThinkVantage System Update program helps you keep the software on your computer up-to-date by
downloading and installing software packages (ThinkVantage applications, device drivers, BIOS updates,
and other third party applications).
View Manager
The View Manager program enables you to automate window locations. It enhances productivity by
providing the ability to move windows to hot corners and quickly snap them to a predetermined size.
It enables you to work across multiple monitors.
Adobe Reader
The Adobe Reader program is a tool used to view, print, and search PDF documents.
Antivirus software
Your computer comes with antivirus software that you can use to detect and eliminate viruses. Lenovo
provides a full version of antivirus software on your hard disk drive with a free 30-day subscription. After 30
days, you must renew the license to continue receiving the antivirus program updates.
Locations
This section provides information to help you locate the connectors on the front and rear of your computer,
parts on the system board, and components and internal drives in your computer.
Chapter 1. Product overview
7
Locating connectors, controls, and indicators on the front of your
computer
Figure 1 “Front connector, control, and indicator locations” on page 8 shows the locations of the connectors,
controls, and indicators on the front of your computer.
Figure 1. Front connector, control, and indicator locations
8
1 Optical drive eject/close button
5 USB connector (USB port 2)
2 Power switch
6 Microphone connector
3 Hard disk drive activity indicator
7 Headphone connector
4 Power indicator
8 USB connector (USB port 1)
ThinkCentre User Guide
Locating connectors on the rear of your computer
Figure 2 “Rear connector locations” on page 9 shows the locations of the connectors on the rear of your
computer. Some connectors on the rear of your computer are color-coded to help you determine where to
connect the cables on your computer.
Figure 2. Rear connector locations
1 Power cord connector
9 Audio line-in connector
2 PS/2 mouse connector
10 PCI Express x16 graphics card slot
3 PS/2 keyboard connector
11 PCI Express x1 card slots (2)
4 DVI monitor connector
12 Ethernet connector
5 VGA monitor connector
13 Integrated cable lock (Kingston lock) slot
6 USB connectors (USB ports 3 to 6)
14 Serial port
7 Microphone connector
15 Padlock loop
8 Audio line-out connector
Connector
Description
Audio line-in connector
Used to receive audio signals from an external audio device, such as a stereo
system. When you attach an external audio device, a cable is connected between
the audio line-out connector of the device and the audio line-in connector of the
computer.
Audio line-out connector
Used to send audio signals from the computer to external devices, such as powered
stereo speakers (speakers with built-in amplifiers), headphones, multimedia
keyboards, or the audio line-in connector on a stereo system or other external
recording device.
DVI monitor connector
Used to attach a DVI monitor or other devices that use a DVI monitor connector.
Chapter 1. Product overview
9
Connector
Description
Ethernet connector
Used to attach an Ethernet cable for a local area network (LAN).
Note: To operate the computer within FCC Class B limits, use a Category 5 Ethernet
cable.
Microphone connector
Used to attach a microphone to your computer when you want to record sound or if
you use speech-recognition software.
PS/2 keyboard connector
Used to attach a keyboard that uses a PS/2 keyboard connector.
PS/2 mouse connector
Used to attach a mouse, a trackball, or other pointing devices that use a PS/2
mouse connector.
Serial port
Used to attach an external modem, a serial printer, or other devices that use a
9-pin serial port.
USB connector
Used to attach a device that requires a USB connector, such as a USB keyboard, a
USB mouse, a USB scanner, or a USB printer. If you have more than eight USB
devices, you can purchase a USB hub, which you can use to connect additional
USB devices.
VGA monitor connector
Used to attach a VGA monitor or other devices that use a VGA monitor connector.
Locating components
Figure 3 “Component locations” on page 10 shows the locations of the various components in your
computer. To open the computer cover, see “Removing the computer cover” on page 32.
Figure 3. Component locations
1 Heat sink and fan assembly
6 Front bezel
2 Power supply assembly
7 Front fan (system fan) assembly
3 Memory modules
8 Hard disk drive (or solid state drive)
4 Optical drive
9 PCI card (installed in some models)
5 Front audio and USB assembly
10 Heat sink fan duct
10
ThinkCentre User Guide
Locating parts on the system board
Figure 4 “System board part locations” on page 11 shows the locations of the parts on the system board.
Figure 4. System board part locations
1 4-pin power connector
12 SATA connectors (3)
2 Microprocessor
13 Front USB connector 2 (for connecting additional USB
devices)
3 Microprocessor fan connector
14 Clear CMOS (Complementary Metal Oxide Semiconductor)
/Recovery jumper
4 Memory slot 1 (DIMM1)
15 Battery
5 Memory slot 2 (DIMM2)
16 Cover presence switch connector (Intrusion switch
connector)
6 Thermal sensor connector
17 Serial (COM2) connector
7 24-pin power connector
18 Front audio connector
8 Power fan connector
19 Internal speaker connector
9 Parallel connector
20 PCI Express x1 card slots (2)
10 Front panel connector (for connecting LED
indicators and power switch)
21 PCI Express x16 graphics card slot
11 Front USB connector 1 (for connecting USB
ports 1 and 2 on the front bezel)
22 System fan connector
Chapter 1. Product overview
11
Locating internal drives
Internal drives are devices that your computer uses to read and store data. You can add drives to your
computer to increase storage capacity and enable your computer to read other types of media. Internal
drives are installed in bays. In this manual, the bays are referred to as bay 1, bay 2, and so on.
When installing or replacing an internal drive, it is important to note the type and size of the drive that you
can install or replace in each bay and correctly connect the cables to the drive installed. Refer to the
appropriate section in Chapter 5 “Installing or replacing hardware” on page 31 for instructions on how to
install or replace internal drives for your computer.
Figure 5 “Drive bay locations” on page 12 shows the locations of the drive bays.
Figure 5. Drive bay locations
1 Bay 1 - Optical drive bay
2 Bay 2 - Card reader drive bay
3 Bay 3 - SATA hard disk drive bay (for installing a 3.5-inch hard disk drive or a 2.5-inch solid state drive)
12
ThinkCentre User Guide
Machine type and model label
The machine type and model label identifies your computer. When you contact Lenovo for help, the machine
type and model information helps support technicians to identify your computer and provide faster service.
The following is a sample of the machine type and model label.
Figure 6. Machine type and model label
Chapter 1. Product overview
13
14
ThinkCentre User Guide
Chapter 2. Using your computer
This chapter provides information on using some of the computer components.
Frequently asked questions
The following are a few tips that will help you optimize the use of your computer.
Can I get my user guide in another language?
The user guide is available in various languages on the Lenovo Support Web site at:
http://www.lenovo.com/ThinkCentreUserGuides
Where are my recovery discs?
Lenovo provides a program that enables you to create recovery discs. For details about creating recovery
discs, see “Creating recovery media” on page 73.
Additionally, in case of a hard disk failure, you can order Product Recovery discs from the Lenovo Customer
Support Center. For information about contacting the Customer Support Center, see Chapter 11 “Getting
information, help, and service” on page 117. Before using the Product Recovery discs, refer to the
documentation that comes with the discs.
Attention: A Product Recovery disc package might contain multiple discs. Make sure you have all of the
discs ready before starting the recovery process. During the recovery process, you might be prompted
to change discs.
Where can I find help about the Windows operating system?
The Windows Help and Support information system provides you detailed information about using the
Windows operating system to help you get the most of your computer. To access the Windows Help and
Support information system, click Start ➙ Help and Support.
Using the keyboard
Depending on your model, your computer comes with either a standard keyboard or a fingerprint reader
keyboard. The Microsoft Windows shortcut keys are provided on both keyboard types.
This section provides information about the following topics:
•
“Using Windows shortcut keys” on page 15
•
“Using a fingerprint reader” on page 16
Using Windows shortcut keys
Both the standard keyboard and the fingerprint reader keyboard provide three keys you can use with your
Microsoft Windows operating system.
• The two Start menu keys are located beside the Alt key on either side of the spacebar. They feature the
Windows logo. When you press either, the Windows Start menu opens. The style of the Windows logo
varies depending on the keyboard type.
• The context-menu key is located next to the Ctrl key on the right side of the Spacebar. Pressing the
context-menu key opens the context menu for the active program, icon, or object.
© Copyright Lenovo 2012
15
Note: You can use the mouse or the Up and Down arrow keys to highlight menu selections. You can close
the Start menu or the context menu by clicking the mouse or pressing Esc.
Using a fingerprint reader
Some computers might come with a keyboard that has a fingerprint reader. For more information about the
fingerprint reader, see “Fingerprint Software” on page 5.
To open the ThinkVantage Fingerprint Software program and use the fingerprint reader, do one of the
following:
• On the Windows 7 operating system, click Start ➙ All Programs ➙ Lenovo ThinkVantage Tools ➙
Fingerprint Reader.
• On the Windows Vista operating system, click Start ➙ All Programs ➙ ThinkVantage ➙ ThinkVantage
Fingerprint Software.
Follow the instructions on the screen. For additional information, refer to the ThinkVantage Fingerprint
Software help system.
Using the wheel mouse
The wheel mouse has the following controls:
1 Primary mouse button
Use this button to select or start a program or menu item.
2 Wheel
Use the wheel to control the scrolling action of the mouse. The direction in which you
rotate the wheel controls the direction of the scrolling action.
3 Secondary mouse button
Use this button to display a menu for the active program, icon, or object.
You can switch the function of the primary and secondary mouse buttons and change other default behavior
through the mouse properties function in the Windows Control Panel.
Adjusting audio
Sound is an important part of the computer experience. Your computer has a digital audio controller built
into the system board. Some models also have a high-performance audio adapter installed in one of the PCI
card slots.
About your computer audio
If a factory-installed, high-performance audio adapter is installed in your computer, the system-board
audio connectors on the rear of the computer are typically disabled; use the connectors provided on the
audio adapter.
16
ThinkCentre User Guide
Each audio solution provides at least three audio connectors: audio line-in connector, audio line-out
connector, and Microphone connector. On some models, a fourth connector is provided for the attachment
of unpowered stereo speakers (speakers that do not require an ac power source). The audio adapter
provides you with the ability to record and play back sound and music, as well as to enjoy sound with
multimedia applications and work with speech-recognition software.
Optionally, you can connect a set of powered stereo speakers to the audio line-out connector to enjoy
better sound with multimedia applications.
Setting the volume from the desktop
The desktop volume control is accessible through the volume icon in the taskbar, which is located at the
bottom-right corner of the Windows desktop. Click the volume icon and move the slider up or down to
control the volume, or click the Mute icon to turn the audio off. If the volume icon is not in the taskbar, see
“Adding the volume icon to the taskbar” on page 17.
Adding the volume icon to the taskbar
To add the volume icon to the taskbar on the Windows 7 operating system, do the following:
1. From the Windows desktop, click Start ➙ Control Panel ➙ Appearance and Personalization.
2. In the Taskbar and Start Menu topic, click Customize icons on the taskbar.
3. Click Turn system icons on or off and change the volume behaviors from Off to On.
4. Click OK to save the new settings.
To add the volume icon to the taskbar on the Windows Vista operating system, do the following:
1. From the Windows desktop, click Start ➙ Control Panel ➙ Appearance and Personalization.
2. In the Taskbar and Start Menu topic, click Customize icons on the taskbar.
3. On the Notification Area tab, select Volume to allow the icon to display.
4. Click Apply to save the new settings.
Setting the volume from Control Panel
You can set the computer volume from Control Panel. To set the computer volume from Control Panel,
do the following:
1. From the Windows desktop, click Start ➙ Control Panel ➙ Hardware and Sound.
2. In the Sound topic, click Adjust system volume.
3. Move the sliders up or down to raise or lower the volume of your computer.
Using CDs and DVDs
Your computer might have a DVD ROM drive or recordable DVD drive installed. DVD drives use
industry-standard, 12 cm (4.75-inch) CD media or DVD media. If your computer comes with a DVD drive,
the drive can read DVD-ROM discs, DVD-R discs, DVD-RAM discs, DVD-RW discs, and all types of CDs,
such as CD-ROM discs, CD-RW discs, CD-R discs, and audio CDs. If you have a recordable DVD drive,
it can also record on DVD-R discs, DVD-RW discs, type II DVD-RAM discs, CD-RW standard and high
speed discs, and CD-R discs.
Follow these guidelines when using the DVD drive:
• Do not place the computer in a location where the drive is exposed to the following:
– High temperature
– High humidity
Chapter 2. Using your computer
17
– Excessive dust
– Excessive vibration or sudden shock
– An inclined surface
– Direct sunlight
• Do not insert any object other than a CD or DVD into the drive.
• Before moving the computer, remove the CD or DVD from the drive.
Handling and storing CD and DVD media
CD and DVD media are durable and reliable, but they do require some care and special handling. When
handling and storing a CD or DVD, follow these guidelines:
• Hold the disc by its edges. Do not touch the surface of the side that is not labeled.
• To remove dust or fingerprints, wipe the disc with a clean, soft cloth from the center to the outside. Wiping
the disc in a circular direction might cause loss of data.
• Do not write or stick paper on the disc.
• Do not scratch or mark the disc.
• Do not place or store the disc in direct sunlight.
• Do not use benzene, thinners, or other cleaners to clean the disc.
• Do not drop or bend the disc.
• Do not insert damaged discs into the drive. Warped, scratched, or dirty discs can damage the drive.
Playing a CD or DVD
If your computer comes with a DVD drive, you can listen to audio CDs or watch DVD movies. To play a
CD or DVD, do the following:
1. Press the Eject/Load button on the DVD drive to open the tray.
2. With the tray fully extended, insert the CD or DVD into the tray. Some DVD drives have a snap hub in the
center of the tray. If your drive has a snap hub, support the tray with one hand and then push on the
center of the CD or DVD until it snaps into place.
3. Press the Eject/Load button again or gently push the tray forward to close the tray. The CD or DVD
player program starts automatically. For additional information, refer to the CD or DVD player program
help system.
To remove a CD or DVD from the DVD drive, do the following:
1. With the computer on, press the Eject/Load button. When the tray slides out automatically, carefully
remove the disc.
2. Close the tray by pressing the Eject/Load button or by gently pushing the tray forward.
Note: If the tray does not slide out of the drive when you press the Eject/Load button, insert a straightened
paper clip into the emergency-eject hole located on the front of the DVD drive. Be sure the drive is powered
off when using the emergency eject. Use the Eject/Load button instead of the emergency eject except
in an emergency.
Recording a CD or DVD
If your computer comes with a recordable DVD drive, you can use the drive to record CDs or DVDs. To
record a CD or DVD, do the following:
1. Click Start ➙ All Programs ➙ Corel DVD MovieFactory Lenovo Edition.
2. Follow the instructions on the screen.
18
ThinkCentre User Guide
For detailed information about using the Corel DVD MovieFactory program, see the help system for the
program.
You can also use Windows Media Player to record CDs and data DVDs. For more information, see “Help and
Support” on page 117.
Chapter 2. Using your computer
19
20
ThinkCentre User Guide
Chapter 3. You and your computer
This chapter provides information about accessibility, comfort, and relocating your computer to other
countries or regions.
Accessibility and comfort
Good ergonomic practice is important to get the most from your personal computer and to avoid discomfort.
Arrange your workplace and the equipment you use to suit your individual needs and the kind of work
that you perform. In addition, use healthy work habits to maximize your performance and comfort while
using your computer.
The following topics provide information about arranging your work area, setting up your computer
equipment, and establishing healthy work habits:
Lenovo is committed to providing people with disabilities greater access to information and technology.
As a result, the following information provides ways to help users that have hearing, vision, and mobility
limitations get the most out of their computer experience.
Assistive technologies enable users to access information in the most appropriate way. Some of these
technologies are already provided in your operating system, others can be purchased through vendors, or
accessed through the World Wide Web:
http://www.lenovo.com/healthycomputing
Arranging your workspace
To get the most from your computer, arrange both the equipment you use and your work area to suit your
needs and the kind of work you do. Your comfort is of foremost importance, but light sources, air circulation,
and the location of electrical outlets can also affect the way you arrange your workspace.
Comfort
Although no single working position is ideal for everyone, here are a few guidelines to help you find a
position that suits you best.
Sitting in the same position for a long time can cause fatigue. The backrest and seat of your chair should
adjust independently and provide good support. The seat should have a curved front to relieve pressure on
the thighs. Adjust the seat so that your thighs are parallel to the floor and your feet are either flat on the
floor or on a footrest.
When using the keyboard, keep your forearms parallel to the floor and your wrists in a comfortable position.
Use a light touch on the keyboard and your hands and fingers relaxed. Change the angle of the keyboard
for maximum comfort by adjusting the position of the keyboard feet.
© Copyright Lenovo 2012
21
Adjust the monitor so the top of the screen is at, or slightly below, eye level. Place the monitor at a
comfortable viewing distance, usually 51 to 61 cm (20 to 24 inches), and position it so you can view it
without having to twist your body. Also, position other equipment you use regularly, such as the telephone or
a mouse, within easy reach.
Glare and lighting
Position the monitor to minimize glare and reflections from overhead lights, windows, and other light sources.
Reflected light from shiny surfaces can cause annoying reflections on your monitor screen. Place the
monitor at right angles to windows and other light sources, when possible. Reduce overhead lighting, if
necessary, by turning off lights or using lower wattage bulbs. If you install the monitor near a window, use
curtains or blinds to block the sunlight. You can adjust the brightness and contrast controls on the monitor
as the room lighting changes throughout the day.
Where it is impossible to avoid reflections or to adjust the lighting, an antiglare filter placed over the screen
might be helpful. However, these filters might affect the clarity of the image on the screen; try them only after
you have exhausted other methods of reducing glare.
Dust buildup compounds problems associated with glare. Remember to clean your monitor screen
periodically using a soft cloth as directed in your monitor documentation.
Air circulation
Your computer and monitor produce heat. The computer has a fan that pulls in fresh air and forces out hot
air. The monitor lets hot air escape through vents. Blocking the air vents can cause overheating, which might
result in a malfunction or damage. Place the computer and monitor so that nothing blocks the air vents;
usually, 51 mm (2 inches) of air space is sufficient. Also, make sure the vented air is not blowing on people.
Electrical outlets and cable lengths
The location of electrical outlets, the length of power cords and cables that connect to the monitor, printer,
and other devices might determine the final placement of your computer.
When arranging your workspace:
• Avoid the use of extension cords. When possible, plug the computer power cord directly into an electrical
outlet.
• Keep power cords and cables neatly routed away from walkways and other areas where they might
get kicked accidentally.
For more information about power cords, see “Power cords and power adapters” on page vi.
22
ThinkCentre User Guide
Registering your computer
When you register your computer, information is entered into a database, which enables Lenovo to contact
you in case of a recall or other severe problem. After you register your computer with Lenovo, you will receive
quicker service when you call Lenovo for help. In addition, some locations offer extended privileges and
services to registered users.
To register your computer with Lenovo, do one of the following:
• Connect your computer to the Internet and register your computer through the preinstalled Lenovo
Product Registration program. The program launches automatically after you have used your computer
for a time. Follow the instructions on the screen to register your computer.
• Go to http://www.lenovo.com/register and follow the instructions on the screen to register your computer.
Moving your computer to another country or region
When you move your computer to another country or region, you must take local electrical standards into
consideration. This section provides information on the following:
•
“Voltage-selection switch” on page 23
•
“Replacement power cords” on page 24
Voltage-selection switch
Some computers are equipped with a voltage-selection switch located near the power-cord connection
point on the computer and some computers do not have a voltage-selection switch. Before you install
your computer or relocate your computer to another country or region, you must be certain that you have
matched your computer to the voltage available at your electrical outlet.
CAUTION:
You must know the voltage of the electrical connection (outlet) where your computer will be
connected. If you do not know the voltage, contact your local electric company or refer to official
Web sites or other literature for travelers to the country or region where you are located.
If your computer has a voltage-selection switch, you must set the switch to match the voltage available at
your electrical outlet. Setting the voltage-selection switch incorrectly will cause the computer to malfunction
and might cause permanent damage to the computer. Do not connect the computer to an electrical
outlet until you have verified that the voltage-selection switch setting matches the voltage available at the
electrical outlets.
If your computer does not have a voltage-selection switch, inspect the voltage-rating label on the bottom of
the computer and note the following:
• If the voltage-rating label shows a range of either “100-127 V” or “200-240 V,” you must ensure that the
voltage provided at the electrical outlet matches the voltage rating on the computer label. If it does
not match, do not attempt to connect the computer to the electrical outlet, unless an external device
such as a voltage-converting transformer is used.
• If the voltage-rating label shows a dual range of “100-127 V” and “200-240 V,” this signifies that the
computer is suitable for worldwide operation and the computer will automatically adjust to the voltage at
the electrical outlet regardless of the country or region where the computer is being connected.
Chapter 3. You and your computer
23
Replacement power cords
If you relocate your computer to a country or region that uses an electrical outlet style different from the
type you are currently using, you will have to purchase either electrical plug adapters or new power cords.
You can order power cords directly from Lenovo.
For power cord information and part numbers, go to:
http://www.lenovo.com/powercordnotice
24
ThinkCentre User Guide
Chapter 4. Security
This chapter provides information about how to protect your computer from theft and unauthorized use.
Security features
The following security features are available on your computer:
• Computrace Agent software embedded in firmware
The Computrace Agent software is an IT asset management and computer theft recovery solution.
The software detects if changes have been made on the computer, such as hardware, software, or
the computer call-in location.
Note: You might have to purchase a subscription to activate the Computrace Agent software.
• Cover presence switch (also called intrusion switch)
The cover presence switch prevents your computer from logging in to the operating system when the
computer cover is not properly installed or closed. To enable the cover presence switch connector
on the system board, to the following:
1. Start the Setup Utility program. See “Starting the Setup Utility program” on page 81.
2. Set the Administrator Password. See “Setting, changing, and deleting a password” on page 82.
3. From the Security submenu, select Chassis Intrusion Detection ➙ Enabled. The cover presence
switch connector on the system board is enabled.
When the cover presence switch detects that your computer cover is not properly installed or closed
when you turn on the computer, an error message will be displayed. To bypass the error message and
log in to the operating system, do the following:
1. Properly install or close your computer cover. See “Completing the parts replacement” on page 70.
2. Press F1 to enter the Setup Utility program. Then press F10 to save and exit the Setup Utility
program. The error message will not be displayed again.
• Ability to enable and disable devices and USB connectors
For more information, see “Enabling or disabling a device” on page 83.
• Integrated fingerprint reader (available on some models)
Depending on the models of your computer, the keyboard may have an integrated fingerprint reader.
By enrolling your fingerprint and associating it with a Power-on Password, a Hard Disk Password, or
both passwords beforehand, you can start the computer, log on to the system, and enter the Setup
Utility program by swiping your finger over the reader, without typing a password. Thus fingerprint
authentication can replace passwords and enable simple and secure user access.
• Startup sequence control
For more information, see “Selecting or changing the startup device sequence” on page 84.
• Startup without keyboard or mouse
Your computer is able to log in to the operating system without keyboard or mouse connected.
• Trusted Platform Module (TPM)
Trusted Platform Module is a secure cryptoprocessor that can store cryptographic keys that protect
information stored in your computer.
© Copyright Lenovo 2012
25
Locking the computer cover
Locking the computer cover helps prevent unauthorized people from gaining access to the inside of your
computer. Your computer comes with a padlock loop so that the computer cover cannot be removed
when a padlock is installed.
Figure 7. Installing a padlock
26
ThinkCentre User Guide
Attaching an integrated cable lock
An integrated cable lock, sometimes referred to as the Kensington lock, can be used to secure your
computer to a desk, table, or other non-permanent fixture. The cable lock attaches to the integrated cable
lock slot at the rear of your computer and is operated with a key. The cable lock also locks the buttons used
to open the computer cover. This is the same type of lock used with many notebook computers. You can
order an integrated cable lock directly from Lenovo by searching for Kensington at:
http://www.lenovo.com/support
Figure 8. Integrated cable lock
Using passwords
You can set a variety of passwords through the Microsoft Windows operating system and through the BIOS
of your computer to help deter unauthorized use of your computer.
BIOS passwords
You can use the BIOS Setup Utility program to set passwords to prevent unauthorized access to your
computer and data. The following types of passwords are available:
• Power-On Password: When a Power-On Password is set, you are prompted to type a valid password
each time the computer is turned on. The computer cannot be used until the valid password is typed
in. For more information, see “Power-On Password” on page 82.
• Hard Disk Password: Setting a Hard Disk Password prevents unauthorized access to the data on the hard
disk drive. When a Hard Disk Password is set, you are prompted to type a valid password each time you
try to access the hard disk drive. For more information, see “Hard Disk Password” on page 82.
Chapter 4. Security
27
• Administrator Password: Setting an Administrator Password deters unauthorized users from changing
configuration settings. If you are responsible for maintaining the configuration settings of several
computers, you might want to set an Administrator Password. For more information, see “Administrator
Password” on page 82.
You do not have to set any passwords to use your computer. However, using passwords improves
computing security.
Windows passwords
Depending on your version of the Windows operating system, you can use passwords for a variety of
features, including controlling login access, access to shared resources, network access, and individual user
settings. For more information, see “Help and Support” on page 117.
Configuring the fingerprint reader
If your keyboard has a fingerprint reader, you can configure the fingerprint reader in the Setup Utility program.
The Fingerprint Setup submenu under the Security menu of the Setup Utility program provides the
following options:
• Preboot Authentication: enables or disables the fingerprint authentication for accessing the BIOS.
• Erasing Fingerprint Data: clears the fingerprint data stored in a fingerprint reader.
To configure the fingerprint reader, do the following:
1. Start the Setup Utility program.
2. From the Setup Utility program main menu, select Security ➙ Fingerprint Setup, and press Enter.
The Fingerprint Setup window opens.
3. Select Preboot Authentication or Erasing Fingerprint Data as desired, and press Enter.
4. Select the desired settings and press Enter.
5. Press F10 to save changes and exit the Setup Utility program. Press Enter when prompted to confirm
the exit.
Using and understanding firewalls
A firewall can be hardware, software, or a combination of both depending on the level of security required.
Firewalls work on a set of rules to determine which inbound and outbound connections are authorized. If
your computer is preintalled with a firewall program, it helps protect against computer Internet security
threats, unauthorized access, intrusions, and Internet attacks. It also protects your privacy. For more
information about how to use the firewall program, refer to the help system of your firewall program.
The Windows operating system preinstalled on your computer provides the Windows Firewall. For details on
using the Windows Firewall, refer to “Help and Support” on page 117.
Protecting data against viruses
Your computer is preinstalled with an antivirus program to help you guard against, detect, and eliminate
viruses.
Lenovo provides a full version of antivirus software on your computer with a free 30-day subscription. After
30 days, you must renew the license to continue receiving the antivirus software updates.
Note: Virus definition files must be kept up-to-date to guard against new viruses.
28
ThinkCentre User Guide
For more information about how to use your antivirus software, refer to the help system of your antivirus
software.
Chapter 4. Security
29
30
ThinkCentre User Guide
Chapter 5. Installing or replacing hardware
This chapter provides instructions on how to install or replace hardware for your computer.
Handling static-sensitive devices
Do not open the static-protective package containing the new part until the defective part has been removed
from the computer and you are ready to install the new part. Static electricity, although harmless to you, can
seriously damage computer components and parts.
When you handle parts and other computer components, take these precautions to avoid static-electricity
damage:
• Limit your movement. Movement can cause static electricity to build up around you.
• Always handle parts and other computer components carefully. Handle PCI cards, memory modules,
system boards, and microprocessors by the edges. Never touch any exposed circuitry.
• Prevent others from touching the parts and other computer components.
• Before you replace a new part, touch the static-protective package containing the part to a metal
expansion-slot cover or other unpainted metal surface on the computer for at least two seconds. This
reduces static electricity in the package and your body.
• When possible, remove the new part from the static-protective packaging, and install it directly in the
computer without setting the part down. When this is not possible, place the static-protective package
that the part came in on a smooth, level surface and place the part on it.
• Do not place the part on the computer cover or other metal surface.
Installing or replacing hardware
This section provides instructions on how to install or replace hardware for your computer. You can expand
the capabilities of your computer and maintain your computer by installing or replacing hardware.
Attention:
Do not open your computer or attempt any repair before reading and understanding the “Important safety information”
on page v.
Notes:
1. Use only computer parts provided by Lenovo.
2. When installing or replacing an option, use the appropriate instructions in this section along with the
instructions that come with the option.
Installing external options
You can connect external options to your computer, such as external speakers, a printer, or a scanner. For
some external options, you must install additional software in addition to making the physical connection.
When installing an external option, see “Locating connectors, controls, and indicators on the front of your
computer” on page 8 and “Locating connectors on the rear of your computer” on page 9 to identify the
required connector. Then, use the instructions that come with the option to help you make the connection
and install any software or device drivers that are required for the option.
© Copyright Lenovo 2012
31
Removing the computer cover
Attention:
Do not open your computer or attempt any repair before reading and understanding the “Important safety information”
on page v.
This section provides instructions on how to open the computer cover.
CAUTION:
Turn off the computer and wait three to five minutes to let the computer cool before opening the
computer cover.
To open the computer cover, do the following:
1. Remove any media from the drives and turn off all attached devices and the computer.
2. Disconnect all power cords from electrical outlets.
3. Disconnect the power cords, Input/Output cables, and any other cables that are connected to the
computer. See “Locating connectors, controls, and indicators on the front of your computer” on page 8
and “Locating connectors on the rear of your computer” on page 9.
4. Remove any locking device that secures the computer cover, such as an integrated cable lock or
a padlock. See “Attaching an integrated cable lock” on page 27 or “Locking the computer cover”
on page 26.
5. Remove the two screws that secure the computer cover and slide the computer cover to the rear to
remove it.
Figure 9. Removing the computer cover
Removing and reinstalling the front bezel
Attention:
Do not open your computer or attempt any repair before reading and understanding the “Important safety information”
on page v.
This section provides instructions on how to remove and reinstall the front bezel.
To remove and reinstall the front bezel, do the following:
32
ThinkCentre User Guide
1. Remove all media from the drives and turn off all attached devices and the computer. Then, disconnect
all power cords from electrical outlets and disconnect all cables that are connected to the computer.
2. Remove the computer cover. See “Removing the computer cover” on page 32.
3. Remove the front bezel by releasing the three plastic tabs on the top of the front bezel and pivoting
the front bezel outward to remove it from the computer. Carefully lay the front bezel aside without
disconnecting the power switch and light-emitting diode (LED) assembly cable.
Figure 10. Removing the front bezel
4. To reinstall the front bezel, align the other three plastic tabs on the bottom of the front bezel with the
corresponding holes in the chassis, then pivot the front bezel inward until it snaps into position.
Figure 11. Reinstalling the front bezel
What to do next:
• To work with another piece of hardware, go to the appropriate section.
• To complete the installation or replacement, go to “Completing the parts replacement” on page 70.
Chapter 5. Installing or replacing hardware
33
Accessing the system board components and drives
Attention:
Do not open your computer or attempt any repair before reading and understanding the “Important safety information”
on page v.
This section provides instructions on how to access the system board components and drives.
To access the system board components and drives, do the following:
1. Remove all media from the drives and turn off all attached devices and the computer. Then, disconnect
all power cords from electrical outlets and disconnect all cables that are connected to the computer.
2. Remove the computer cover. See “Removing the computer cover” on page 32.
3. Remove the front bezel. See “Removing and reinstalling the front bezel” on page 32.
4. Pivot the drive bay assembly upward to access all the internal drives, cables, and other components.
Figure 12. Pivoting the drive bay assembly upward
34
ThinkCentre User Guide
5. To lower the drive bay assembly, press the drive bay assembly clip 1 inward and pivot the drive bay
assembly downward as shown.
Figure 13. Lowering the drive bay assembly
Installing or replacing a memory module
Attention:
Do not open your computer or attempt any repair before reading and understanding the “Important safety information”
on page v.
This section provides instructions on how to install or replace a memory module.
Your computer has two slots for installing or replacing DDR3 DIMMs that provide up to a maximum of 8 GB
system memory. When installing or replacing a memory module, use 1 GB, 2 GB, or 4 GB DDR3 DIMMs in
any combination up to a maximum of 8 GB.
To install or replace a memory module, do the following:
1. Turn off the computer and disconnect all power cords from electrical outlets.
2. Remove the computer cover. See “Removing the computer cover” on page 32.
3. Lay the computer on its side for easier access to the system board.
4. Remove the heat sink fan duct. See “Replacing the heat sink and fan assembly” on page 47.
5. Locate the memory slots. See “Locating parts on the system board” on page 11.
6. Remove any parts that might prevent access to the memory slots.
7. Depending on whether you are installing or replacing a memory module, do one of the following:
Chapter 5. Installing or replacing hardware
35
• If you are replacing an old memory module, open the retaining clips and gently pull the memory
module out of the memory slot.
Figure 14. Removing a memory module
• If you are installing a memory module, open the retaining clips of the memory slot into which you
want to install the memory module.
Figure 15. Opening the retaining clips
36
ThinkCentre User Guide
8. Position the new memory module over the memory slot. Make sure that the notch 1 on the memory
module aligns correctly with the slot key 2 on the system board. Push the memory module straight
down into the slot until the retaining clips close.
Figure 16. Installing a memory module
What to do next:
• To work with another piece of hardware, go to the appropriate section.
• To complete the installation or replacement, go to “Completing the parts replacement” on page 70.
Installing or replacing a PCI card
Attention:
Do not open your computer or attempt any repair before reading and understanding the “Important safety information”
on page v.
This section provides instructions on how to install or replace a PCI card. Your computer has two PCI
Express x1 card slot and one PCI Express x16 graphics card slot.
To install or replace a PCI card, do the following:
1. Turn off the computer and disconnect all power cords from electrical outlets.
2. Remove the computer cover. See “Removing the computer cover” on page 32.
3. Depending on whether you are installing or replacing a PCI card, do one of the following:
• If you are replacing an old PCI card, remove the screw that secures the old PCI card and release the
old PCI card from the PCI card slot.
Chapter 5. Installing or replacing hardware
37
Figure 17. Removing a PCI card
Notes:
a. The card fits tightly into the card slot. If necessary, alternate moving each side of the card a small
amount until it is removed from the card slot.
b. If the card is held in place by a retaining latch, press the card retaining latch 1 as shown to
disengage the latch. Grasp the card and gently pull it out of the slot.
• If you are installing a PCI card, remove the screw that secures the appropriate metal slot cover.
Then, remove the metal slot cover.
4. Remove the new PCI card from its static-protective package.
38
ThinkCentre User Guide
5. Install the new PCI card into the appropriate PCI card slot on the system board. Then, install the screw
to secure the new PCI card in place.
Figure 18. Installing a PCI card
6. If necessary, connect any cables between the PCI card and the system board. See “Locating parts on
the system board” on page 11 to identify the various connectors on the system board.
What to do next:
• To work with another piece of hardware, go to the appropriate section.
• To complete the installation or replacement, go to “Completing the parts replacement” on page 70.
Replacing the battery
Attention:
Do not open your computer or attempt any repair before reading and understanding the “Important safety information”
on page v.
Your computer has a special type of memory that maintains the date, time, and settings for built-in features,
such as parallel-port assignments (configuration). A battery keeps this information active when you turn
off the computer.
The battery normally requires no charging or maintenance throughout its life; however, no battery lasts
forever. If the battery fails, the date, time, and configuration information (including passwords) are lost. An
error message is displayed when you turn on the computer.
Refer to the “Lithium battery notice” in the ThinkCentre Safety and Warranty Guide for information about
replacing and disposing of the battery.
To replace the battery, do the following:
1. Turn off the computer and disconnect all power cords from electrical outlets.
Chapter 5. Installing or replacing hardware
39
2. Remove the computer cover. See “Removing the computer cover” on page 32.
3. Locate the battery. See “Locating parts on the system board” on page 11.
4. Remove the old battery.
Figure 19. Removing the old battery
5. Install a new battery.
Figure 20. Installing a new battery
6. Reinstall the computer cover and connect the cables. See “Completing the parts replacement” on
page 70.
Note: When the computer is turned on for the first time after replacing the battery, an error message
might be displayed. This is normal after replacing the battery.
7. Turn on the computer and all attached devices.
8. Use the Setup Utility program to set the date, time, and any passwords. See Chapter 7 “Using the Setup
Utility program” on page 81.
What to do next:
• To work with another piece of hardware, go to the appropriate section.
• To complete the installation or replacement, go to “Completing the parts replacement” on page 70.
Installing the solid state drive
Attention:
Do not open your computer or attempt any repair before reading and understanding the “Important safety information”
on page v.
This section provides instructions on how to install the 2.5-inch solid state drive.
To install the solid state drive, do the following:
40
ThinkCentre User Guide
1. Install the solid state drive into the storage converter. Then, install the 4 screws to secure the solid
state drive to the storage converter.
Figure 21. Installing the solid state drive into the storage converter
2. Connect the signal cable and the power cable to the solid state drive.
3. Install the solid state drive into the hard disk drive bay. See “Replacing the hard disk drive” on page 41.
What to do next:
• To work with another piece of hardware, go to the appropriate section.
• To complete the installation or replacement, go to “Completing the parts replacement” on page 70.
Replacing the hard disk drive
Attention:
Do not open your computer or attempt any repair before reading and understanding the “Important safety information”
on page v.
This section provides instructions on how to replace the hard disk drive.
Note: Depending on your model type, your computer might come with a 2.5-inch solid state drive. To install
the solid state drive, see “Installing the solid state drive” on page 40.
To replace the hard disk drive, do the following:
1. Turn off the computer and disconnect all power cords from electrical outlets.
2. Remove the computer cover. See “Removing the computer cover” on page 32.
3. Remove the front bezel. See “Removing and reinstalling the front bezel” on page 32.
Chapter 5. Installing or replacing hardware
41
4. Note the location of the four screws 1 that secure the hard disk drive. Then, pivot the drive bay
assembly upward.
Figure 22. Pivoting the drive bay assembly
5. Hold the hard disk drive and remove the four screws that secure the hard disk drive. Then, remove
the hard disk drive from the drive bay assembly.
Figure 23. Removing the hard disk drive
6. Disconnect the signal cable and the power cable from the hard disk drive to completely remove the hard
disk drive from the chassis.
42
ThinkCentre User Guide
7. Connect one end of the signal cable to the rear of the new hard disk drive and the other end to an
available SATA connector on the system board. See “Locating parts on the system board” on page 11.
Then, locate an available five-wire power connector and connect it to the rear of the new hard disk drive.
Figure 24. Connecting a SATA hard disk drive
8. Position the new hard disk drive into the hard disk drive bay and align the screw holes in the new hard
disk drive with the corresponding holes in the drive bay. Then, install the four screws to secure the
new hard disk drive in place.
Figure 25. Installing the hard disk drive
What to do next:
• To work with another piece of hardware, go to the appropriate section.
• To complete the installation or replacement, go to “Completing the parts replacement” on page 70.
Installing or replacing the optical drive
Attention:
Do not open your computer or attempt any repair before reading and understanding the “Important safety information”
on page v.
Chapter 5. Installing or replacing hardware
43
This section provides instructions on how to install or replace the optical drive.
Note: The optical drive is only available in some models.
To replace the optical drive, do the following:
1. Turn off the computer and disconnect all power cords from electrical outlets.
2. Remove the computer cover. See “Removing the computer cover” on page 32.
3. Remove the front bezel. See “Removing and reinstalling the front bezel” on page 32.
4. Pivot the drive bay assembly upward. See “Accessing the system board components and drives”
on page 34.
5. Disconnect the signal cable and the power cable from the optical drive.
6. Hold the optical drive and remove the two screws that secure the optical drive.
Figure 26. Removing the optical drive screws
44
ThinkCentre User Guide
7. Press the drive bay assembly clip 1 inward and pivot the drive bay assembly downward as shown.
Figure 27. Lowering the drive bay assembly
8. Slide the optical drive out of the front of the computer.
Figure 28. Removing the optical drive
Chapter 5. Installing or replacing hardware
45
9. Slide the new optical drive into the optical drive bay from the front of the computer.
Figure 29. Installing a new optical drive
10. Hold the new optical drive and pivot the drive bay assembly upward. Align the screw holes in the new
optical drive with the corresponding holes in the drive bay. Then, install the two screws to secure
the new optical drive in place.
Figure 30. Installing the optical drive
46
ThinkCentre User Guide
11. Connect one end of the signal cable to the rear of the new optical drive and the other end to an available
SATA connector on the system board. See “Locating parts on the system board” on page 11. Then,
locate an available five-wire power connector and connect it to the rear of the new optical drive.
Figure 31. Connecting a SATA optical drive
What to do next:
• To work with another piece of hardware, go to the appropriate section.
• To complete the installation or replacement, go to “Completing the parts replacement” on page 70.
Replacing the heat sink and fan assembly
Attention:
Do not open your computer or attempt any repair before reading and understanding the “Important safety information”
on page v.
This section provides instructions on how to replace the heat sink and fan assembly.
CAUTION:
The heat sink and fan assembly might be very hot. Turn off the computer and wait three to five
minutes to let the computer cool before removing the computer cover.
To replace the heat sink and fan assembly, do the following:
1. Remove all media from the drives and turn off all attached devices and the computer. Then, disconnect
all power cords from electrical outlets and disconnect all cables that are connected to the computer.
2. Remove the computer cover. See “Removing the computer cover” on page 32.
Chapter 5. Installing or replacing hardware
47
3. Pivot the drive bay assembly upward. Then, pivot the two plastic retaining clips outward to remove
the heat sink fan duct from the failing heat sink and fan assembly.
Figure 32. Removing the heat sink fan duct
4. Disconnect the heat sink and fan assembly cable from the microprocessor fan connector on the system
board. See “Locating parts on the system board” on page 11.
48
ThinkCentre User Guide
5. Follow this sequence to remove the four screws that secure the heat sink and fan assembly to the
system board:
a. Partially remove screw 1 , then fully remove screw 2 , and then fully remove screw 1 .
b. Partially remove screw 3 , then fully remove screw 4 , and then fully remove screw 3 .
Note: Carefully remove the four screws from the system board to avoid any possible damage to the
system board. The four screws cannot be removed from the heat sink and fan assembly.
Figure 33. Removing the heat sink and fan assembly
6. Lift the heat sink and fan assembly off the system board.
Notes:
a. You might have to gently twist the heat sink and fan assembly to free it from the microprocessor.
b. When handling the heat sink and fan assembly, do not touch the thermal grease on the bottom
of the heat sink and fan assembly.
7. Place the new heat sink and fan assembly on the system board so that the four screws are aligned
with the corresponding holes in the system board. Make sure that you properly place the new heat
sink and fan assembly so that you can easily connect the new heat sink and fan assembly cable to the
microprocessor fan connector on the system board.
8. Follow the following sequence to install the four screws to secure the new heat sink and fan assembly.
Do not over-tighten the screws.
a. Partially tighten screw 1 , then fully tighten screw 2 , and then fully tighten screw 1 .
b. Partially tighten screw 3 , then fully tighten screw 4 , and then fully tighten screw 3 .
9. Connect the new heat sink and fan assembly cable to the microprocessor fan connector on the system
board. See “Locating parts on the system board” on page 11.
Chapter 5. Installing or replacing hardware
49
10. Lower and position the heat sink fan duct on the top of the heat sink and fan assembly until it snaps
into position.
Figure 34. Installing the heat sink fan duct
What to do next:
• To work with another piece of hardware, go to the appropriate section.
• To complete the replacement, go to “Completing the parts replacement” on page 70.
Replacing the power supply assembly
Attention:
Do not open your computer or attempt any repair before reading and understanding the “Important safety information”
on page v.
This section provides instructions on how to replace the power supply assembly.
Although there are no moving parts in your computer after the power cord has been disconnected, the
following warnings are required for your safety and proper Underwriters Laboratories (UL) certification.
CAUTION:
Hazardous moving parts. Keep fingers and other body parts away.
50
ThinkCentre User Guide
CAUTION:
Never remove the cover on a power supply or any part that has the following label attached.
Hazardous voltage, current, and energy levels are present inside any component that has this label
attached. There are no serviceable parts inside these components. If you suspect a problem with
one of these parts, contact a service technician.
To replace the power supply assembly, do the following:
1. Remove all media from the drives and turn off all attached devices and the computer. Then, disconnect
all power cords from electrical outlets and disconnect all cables that are connected to the computer.
2. Remove the computer cover. See “Removing the computer cover” on page 32.
3. Remove the front bezel. See “Removing and reinstalling the front bezel” on page 32.
4. Pivot the drive bay assembly upward. Then, pivot the two plastic retaining clips outward to remove
the heat sink fan duct from the failing heat sink and fan assembly.
Figure 35. Removing the heat sink fan duct
5. Disconnect the power supply assembly cables from all drives and from the 24-pin power connector and
4-pin power connector on the system board. See “Locating parts on the system board” on page 11.
Note: You might also need to release the power supply assembly cables from some cable clips or ties
that secure the cables to the chassis. Make sure that you note the cable routing before disconnecting
the cables.
Chapter 5. Installing or replacing hardware
51
6. At the rear of the computer, remove the three screws that secure the power supply assembly. Press the
power supply clip 1 downward to release the power supply assembly and then slide the power supply
assembly to the front of the computer. Lift the power supply assembly out of the computer.
Figure 36. Removing the power supply assembly
7. Make sure that the new power supply assembly is the correct replacement.
52
ThinkCentre User Guide
8. Install the new power supply assembly into the chassis so that the screw holes in the new power supply
assembly are aligned with the corresponding holes in the rear of the chassis. Then, install the three
screws to secure the new power supply assembly in place.
Note: Use only screws provided by Lenovo.
Figure 37. Installing the power supply assembly
9. Connect the new power supply assembly cables to all drives and the system board. See “Locating
parts on the system board” on page 11.
Chapter 5. Installing or replacing hardware
53
10. Lower and position the heat sink fan duct on the top of the heat sink and fan assembly until the two
screw holes in the heat sink fan duct are aligned with those in the heat sink and fan assembly. Install
the two screws to secure the heat sink fan duct.
Figure 38. Installing the heat sink fan duct
What to do next:
• To work with another piece of hardware, go to the appropriate section.
• To complete the replacement, go to “Completing the parts replacement” on page 70.
Replacing the microprocessor
Attention:
Do not open your computer or attempt any repair before reading and understanding the “Important safety information”
on page v.
This section provides instructions on how to replace the microprocessor.
CAUTION:
The heat sink and microprocessor might be very hot. Turn off the computer and wait three to five
minutes to let the computer cool before removing the computer cover.
To replace the microprocessor, do the following:
1. Remove all media from the drives and turn off all attached devices and the computer. Then, disconnect
all power cords from electrical outlets and disconnect all cables that are connected to the computer.
2. Remove the computer cover. See “Removing the computer cover” on page 32.
3. Locate the system board and disconnect all cables connected to the system board. See “Locating
parts on the system board” on page 11.
4. Remove the heat sink and fan assembly. See “Replacing the heat sink and fan assembly” on page 47.
54
ThinkCentre User Guide
Note: Do not let the thermal grease on the bottom of the heat sink and fan assembly get in contact
with anything.
5. Lift the small handle 1 and open the retainer 2 to access the microprocessor 3 .
Figure 39. Accessing the microprocessor
6. Lift the microprocessor straight up and out of the microprocessor socket.
Figure 40. Removing the microprocessor
Notes:
a. Your microprocessor and socket might look different from the one illustrated.
Chapter 5. Installing or replacing hardware
55
b. Note the orientation of the microprocessor in the socket. You can either look for the small triangle 1
on one corner of the microprocessor or note the orientation of the notches 2 on the microprocessor.
This is important when installing the new microprocessor on the system board.
c. Touch only the edges of the microprocessor. Do not touch the gold contacts on the bottom.
d. Do not drop anything onto the microprocessor socket while it is exposed. The socket pins must be
kept as clean as possible.
7. Make sure that the small handle is in the raised position and the microprocessor retainer is fully open.
8. Remove the protective cover that protects the gold contacts of the new microprocessor.
9. Hold the new microprocessor by its sides and align the small triangle on one corner of the new
microprocessor with the corresponding small triangle on one corner of the microprocessor socket.
10. Lower the new microprocessor straight down into the microprocessor socket on the system board.
Figure 41. Installing the microprocessor
11. Close the microprocessor retainer and lock it into position with the small handle to secure the new
microprocessor in the socket.
12. Reinstall the heat sink and fan assembly and the fan duct. See “Replacing the heat sink and fan
assembly” on page 47.
13. Reconnect all cables that were disconnected from the system board.
56
ThinkCentre User Guide
What to do next:
• To work with another piece of hardware, go to the appropriate section.
• To complete the replacement, go to “Completing the parts replacement” on page 70.
Replacing the front audio and USB assembly
Attention:
Do not open your computer or attempt any repair before reading and understanding the “Important safety information”
on page v.
This section provides instructions on how to replace the front audio and USB assembly.
To replace the front audio and USB assembly, do the following:
1. Remove all media from the drives and turn off all attached devices and the computer. Then, disconnect
all power cords from electrical outlets and disconnect all cables that are connected to the computer.
2. Remove the computer cover. See “Removing the computer cover” on page 32.
3. Remove the front bezel. See “Removing and reinstalling the front bezel” on page 32.
4. Pivot the drive bay assembly upward and disconnect the front audio and USB assembly cables from the
system board and note the cables routing. See “Locating parts on the system board” on page 11.
5. Remove the screw that secures the front audio and USB assembly bracket. Then remove the front
audio and USB assembly bracket from the chassis.
Figure 42. Removing the front audio and USB assembly
6. Remove the two screws that secure the front audio and USB assembly to its bracket. Then remove the
failing front audio and USB assembly from the bracket.
7. Install a new front audio and USB assembly into the bracket and install the two screws to secure the
front audio and USB assembly to the bracket.
8. Install the front audio and USB assembly bracket to the chassis and align the screw hole in the bracket
with the corresponding hole in the chassis.
9. Install the screw to secure the front audio and USB assembly bracket to the chassis.
Chapter 5. Installing or replacing hardware
57
10. Pivot the drive bay assembly upward and reconnect the front USB and front audio cables to the system
board. See “Locating parts on the system board” on page 11.
11. Lower the drive bay assembly. See “Accessing the system board components and drives” on page 34.
12. Reinstall the front bezel. See “Removing and reinstalling the front bezel” on page 32.
What to do next:
• To work with another piece of hardware, go to the appropriate section.
• To complete the installation or replacement, go to “Completing the parts replacement” on page 70.
Replacing the system fan assembly
Attention:
Do not open your computer or attempt any repair before reading and understanding the “Important safety information”
on page v.
This section provides instructions on how to replace the system fan assembly.
To replace the system fan assembly, do the following:
1. Remove all media from the drives and turn off all attached devices and the computer. Then, disconnect
all power cords from electrical outlets and disconnect all cables that are connected to the computer.
2. Remove the computer cover. See “Removing the computer cover” on page 32.
3. Remove the front bezel. See “Removing and reinstalling the front bezel” on page 32.
4. Pivot the drive bay assembly upward to gain access to the system fan assembly. See “Accessing the
system board components and drives” on page 34.
5. Remove the hard disk drive for easier access to the system fan assembly. See “Replacing the hard
disk drive” on page 41.
6. Remove the heat sink fan duct. See “Replacing the heat sink and fan assembly” on page 47.
7. Note the cable routing and disconnect the system fan assembly cable from the system fan connector on
the system board. See “Locating parts on the system board” on page 11.
8. The system fan assembly is attached to the chassis by four rubber mounts. Remove the system fan
assembly by cutting the rubber mounts and lifting the system fan assembly out of the chassis.
Note: The new system fan assembly will have four new rubber mounts attached.
58
ThinkCentre User Guide
Figure 43. Removing the system fan assembly
9. Install the new system fan assembly by aligning the new rubber mounts that came with the new system
fan assembly with the corresponding holes in the chassis, and then push the rubber mounts through the
holes. Then, carefully pull on the tips of the rubber mounts from the bottom until the new system fan
assembly is secured in place.
Figure 44. Installing the system fan assembly
Chapter 5. Installing or replacing hardware
59
10. Connect the new system fan assembly cable to the system fan connector on the system board. See
“Locating parts on the system board” on page 11.
11. Reinstall the heat sink fan duct. See “Replacing the heat sink and fan assembly” on page 47.
12. Reinstall the hard disk drive. See “Replacing the hard disk drive” on page 41.
What to do next:
• To work with another piece of hardware, go to the appropriate section.
• To complete the replacement, go to “Completing the parts replacement” on page 70.
Replacing the WiFi units
Attention:
Do not open your computer or attempt any repair before reading and understanding the “Important safety information”
on page v.
This section provides instructions on how to replace the WiFi units. The WiFi units include a WiFi adapter
card, a WiFi card module, and a rear WiFi antenna cable.
Replacing the WiFi units involves the following operations:
•
“Removing the WiFi adapter card” on page 60
•
“Removing the WiFi card module” on page 61
•
“Installing the WiFi units” on page 62
Removing the WiFi adapter card
To remove the WiFi adapter card, do the following:
1. Turn off the computer and disconnect all power cords from electrical outlets.
2. Remove the computer cover. See “Removing the computer cover” on page 32.
3. Remove the screw that secures the WiFi adapter card.
4. Grasp the WiFi adapter card that is currently installed and gently pull it out of the slot.
Figure 45. Removing the WiFi adapter card
Note: The card fits tightly into the card slot. If necessary, alternate moving each side of the card a
small amount until it is removed from the card slot.
60
ThinkCentre User Guide
Removing the WiFi card module
To remove the WiFi card module, do the following:
1. Remove the WiFi adapter card from the computer, and then disconnect the front and rear WiFi antenna
cables from the WiFi card module.
Figure 46. Removing the WiFi antenna cables
2. Remove the two screws that secure the WiFi card module to the WiFi adapter card.
Figure 47. Removing the screws that secure the WiFi card module
Chapter 5. Installing or replacing hardware
61
3. Pull the WiFi card module out of the mini PCI Express slot to remove it from the WiFi adapter card.
Figure 48. Removing the WiFi card module
Installing the WiFi units
To install the WiFi units, do the following:
62
ThinkCentre User Guide
1. Insert the WiFi card module into the mini PCI Express slot, and then install the two screws to secure
the WiFi card module to the WiFi adapter card.
Figure 49. Installing the WiFi card module
2. Connect the front antenna cable and rear antenna cable to the WiFi card module.
Figure 50. Connecting the WiFi antenna cables
Chapter 5. Installing or replacing hardware
63
3. Locate the two PCI Express x1 slots on the system board. See “Locating parts on the system board”
on page 11.
4. Install the WiFi adapter card into one of the two PCI Express x1 slots. Then install the screw to secure
the WiFi adapter card in place.
Figure 51. Installing the WiFi adapter card
What to do next:
• To work with another piece of hardware, go to the appropriate section.
• To complete the installation or replacement, go to “Completing the parts replacement” on page 70.
Installing or removing the rear WiFi antenna
Attention:
Do not open your computer or attempt any repair before reading and understanding the “Important safety information”
on page v.
This section provides instructions on how to install or remove the rear WiFi antenna.
Installing the rear WiFi antenna
To install the rear WiFi antenna, do the following:
1. Turn off the computer and disconnect all power cords from electrical outlets.
2. Install the rear WiFi antenna to the rear WiFi antenna cable connector attached on the rear of the
computer.
64
ThinkCentre User Guide
3. Adjust the angle of the rear antenna to lower the risk of breaking the antenna by accident.
Figure 52. Installing the rear WiFi antenna
What to do next:
• To work with another piece of hardware, go to the appropriate section.
• To complete the installation or replacement, go to “Completing the parts replacement” on page 70.
Removing the rear WiFi antenna
To remove the rear WiFi antenna, do the following:
1. Turn off the computer and disconnect all power cords from electrical outlets.
2. Straighten the rear WiFi antenna so that it can be more easily twisted.
3. Hold the thicker end of the rear WiFi antenna and unscrew the WiFi antenna from the rear of the
computer.
Figure 53. Removing the rear WiFi antenna
What to do next:
• To work with another piece of hardware, go to the appropriate section.
Chapter 5. Installing or replacing hardware
65
• To complete the installation or replacement, go to “Completing the parts replacement” on page 70.
Installing or removing the front WiFi antenna
Attention:
Do not open your computer or attempt any repair before reading and understanding the “Important safety information”
on page v.
This section provides instructions on how to install or remove the front WiFi antenna.
Installing the front WiFi antenna
To install the front WiFi antenna, do the following:
1. Turn off the computer and disconnect all power cords from electrical outlets.
2. Remove the computer cover. See “Removing the computer cover” on page 32.
3. Remove the front bezel. See “Removing and reinstalling the front bezel” on page 32.
4. Peel off the paper that protects the stickers on the front antenna.
Figure 54. Peeling off the paper that protects the stickers
66
ThinkCentre User Guide
5. Stick the front antenna to the front panel as shown. Then insert the front antenna cable through the
hole in the front panel.
Figure 55. Installing the front WiFi antenna
6. Connect the front antenna cable to the WiFi card module.
What to do next:
• To work with another piece of hardware, go to the appropriate section.
• To complete the installation or replacement, go to “Completing the parts replacement” on page 70.
Removing the front WiFi antenna
To remove the front WiFi antenna, do the following:
1. Turn off the computer and disconnect all power cords from electrical outlets.
2. Remove the computer cover. See “Removing the computer cover” on page 32.
3. Remove the front bezel. See “Removing and reinstalling the front bezel” on page 32.
4. Disconnect the front antenna cable from the WiFi card module.
Chapter 5. Installing or replacing hardware
67
5. Remove the front antenna and cable from the front of the computer.
Figure 56. Removing the front WiFi antenna
What to do next:
• To work with another piece of hardware, go to the appropriate section.
• To complete the installation or replacement, go to “Completing the parts replacement” on page 70.
Replacing the keyboard
Attention:
Do not open your computer or attempt any repair before reading and understanding the “Important safety information”
on page v.
This section provides instructions on how to replace the keyboard.
To replace the keyboard, do the following:
1. Remove all media from the drives. Then, turn off all attached devices and the computer.
2. Disconnect all power cords from electrical outlets.
3. Disconnect the old keyboard cable from the computer.
4. Connect a new keyboard to the appropriate connector on the computer. Your keyboard might be
connected to a PS/2 keyboard connector 1 or a USB connector 2 . Depending on where you want
to connect your keyboard, see “Locating connectors, controls, and indicators on the front of your
computer” on page 8 or “Locating connectors on the rear of your computer” on page 9.
68
ThinkCentre User Guide
Figure 57. Keyboard connectors
What to do next:
• To work with another piece of hardware, go to the appropriate section.
• To complete the replacement, go to “Completing the parts replacement” on page 70.
Replacing the mouse
Attention:
Do not open your computer or attempt any repair before reading and understanding the “Important safety information”
on page v.
This section provides instructions on how to replace the mouse.
To replace the mouse, do the following:
1. Remove all media from the drives. Then, turn off all attached devices and the computer.
2. Disconnect all power cords from electrical outlets.
3. Disconnect the old mouse cable from the computer.
4. Connect a new mouse to the appropriate connector on the computer. Your mouse might be connected
to a PS/2 mouse connector 1 or a USB connector 2 . Depending on where you want to connect your
mouse, see “Locating connectors, controls, and indicators on the front of your computer” on page 8
or “Locating connectors on the rear of your computer” on page 9.
Figure 58. Mouse connectors
What to do next:
• To work with another piece of hardware, go to the appropriate section.
• To complete the replacement, go to “Completing the parts replacement” on page 70.
Chapter 5. Installing or replacing hardware
69
Completing the parts replacement
After completing the installation or replacement for all parts, you need to close the computer cover and
reconnect cables. Depending on the parts you installed or replaced, you might need to confirm the updated
information in the Setup Utility program. Refer to Chapter 7 “Using the Setup Utility program” on page 81.
To reinstall the computer cover and reconnect cables to your computer, do the following:
1. Make sure that all components have been reassembled correctly and that no tools or loose screws
are left inside your computer. See “Locating components” on page 10 for the locations of various
components in your computer.
2. Make sure that the cables are routed correctly. Keep cables clear of the hinges and sides of the
computer chassis to avoid interference with closing the computer cover.
3. Lower the drive bay assembly. See “Accessing the system board components and drives” on page 34.
4. If you have removed the front bezel, reinstall it. To reinstall the front bezel, align the three tabs on
the front bezel with the corresponding holes in the chassis and pivot the front bezel inwards until
it snaps into position.
5. Position the computer cover on the chassis so that the rail guides on the computer cover engage the
rails on the chassis. Then, slide the computer cover to the front of the computer until it snaps into
position and is closed. Then, install the two screws to secure the computer cover.
Figure 59. Reinstalling the computer cover
6. If there is a padlock available, lock the computer cover. See “Locking the computer cover” on page 26.
7. If there is an integrated cable lock available, lock the computer. See “Attaching an integrated cable
lock” on page 27.
8. Reconnect the external cables and power cords to the computer. See “Locating connectors on the rear
of your computer” on page 9.
9. To update your configuration, see Chapter 7 “Using the Setup Utility program” on page 81.
Note: In most areas of the world, Lenovo requires the return of the defective Customer Replaceable Unit
(CRU). Information about this will come with the CRU or will come a few days after the CRU arrives.
70
ThinkCentre User Guide
Obtaining device drivers
You can obtain device drivers for operating systems that are not preinstalled at
http://www.lenovo.com/support. Installation instructions are provided in readme files with the device-driver
files.
Chapter 5. Installing or replacing hardware
71
72
ThinkCentre User Guide
Chapter 6. Recovery information
This chapter provides information about the recovery solutions provided by Lenovo.
This chapter contains the following topics:
• Creating and using recovery media
• Performing backup and recovery operations
• Using the Rescue and Recovery workspace
• Creating and using a rescue medium
• Installing or reinstalling device drivers
• Solving recovery problems
Notes:
1. The recovery information in this chapter only applies to the computers that have the Rescue and
Recovery program or the Product Recovery program installed. If the Enhanced Backup and Restore
icon in the Lenovo ThinkVantage Tools program is dimmed, it indicates that you need to install
the Rescue and Recovery program manually before enabling its features. To install the Rescue and
Recovery program, do the following:
a. Click Start ➙ All Programs ➙ Lenovo ThinkVantage Tools, and double-click Enhanced Backup
and Restore.
b. Follow the instructions on the screen.
c. When the installation process completes, the Enhanced Backup and Restore icon is activated.
2. There are a variety of methods to choose from when considering how to recover in the event of a
software- or hardware-related problem. Some methods vary depending on the type of operating system
that is installed.
3. The product on the recovery media may be used only for the following purposes:
• Restore the product preinstalled on your computer
• Reinstall the product
• Modify the product using the Additional Files
Creating and using recovery media
You can use recovery media to restore the hard disk drive to the factory default state. Recovery media are
useful if you transfer the computer to another area, sell the computer, recycle the computer, or put the
computer in an operational state after all other methods of recovery have failed. As a precautionary measure,
it is important to create recovery media as early as possible.
Note: The recovery operations you can perform using recovery media vary depending on the operating
system from which the recovery media were created. The recovery media might contain a boot medium
and a data medium. Your Microsoft Windows license permits you to create only one data medium, so it is
important that you store the recovery media in a safe place after you have made them.
Creating recovery media
This section provides instructions on how to create recovery media on different operating systems.
© Copyright Lenovo 2012
73
Note: On the Windows 7 operating system, you can create recovery media using discs or external USB
storage devices. On the Windows Vista operating system, you can create recovery media using only discs,
so this operation is also called “creating Product Recovery discs.”
• To create recovery media on the Windows 7 operating system, click Start ➙ All Programs ➙ Lenovo
ThinkVantage Tools ➙ Factory Recovery Disks. Then, follow the instructions on the screen.
• To create Product Recovery discs on the Windows Vista operating system, click Start ➙ All Programs ➙
ThinkVantage ➙ Create Product Recovery Media. Then, follow the instructions on the screen.
Using recovery media
This section provides instructions on how to use recovery media on different operating systems.
On the Windows 7 operating system and the Windows Vista operating system, you can use recovery media
to restore the contents of the hard disk drive to the factory default state. Also, you can use recovery media to
put the computer in an operational state after all other methods of hard disk drive recovery have failed.
Attention: When you use recovery media to restore the contents of the hard disk to the factory default state,
all the files currently on the hard disk drive will be deleted and replaced by the factory default files.
To use recovery media on the Windows 7 operating system or the Windows Vista operating system,
do the following:
1. Depending on the type of your recovery media, connect the boot medium (memory key or other USB
storage device) to the computer, or insert the boot disc into the optical drive.
2. Repeatedly press and release the F12 key when turning on the computer. When the Please select
boot device window opens, release the F12 key.
3. Select the desired startup device and press Enter. The restore process begins.
4. Follow the instructions on the screen to complete the operation.
Note: After restoring your computer hard disk drive to the factory default state, you might have to reinstall
device drivers for some devices. See “Reinstalling device drivers” on page 79.
Performing backup and recovery operations
The Rescue and Recovery program enables you to back up all your hard disk drive contents including the
operating system, data files, software programs, and personal settings. You can designate where the
Rescue and Recovery program stores the backup:
• In a protected area of your hard disk drive
• On the secondary hard disk drive if a secondary hard disk drive is installed in your computer
• On an attached external USB hard disk drive
• On a network drive
• On recordable discs (a recordable optical drive is required for this option)
After you have backed up the contents of the hard disk drive, you can restore the complete contents of the
hard disk drive, restore selected files only, or restore the Windows operating system and applications only
while keeping the other data on your hard disk drive.
Performing a backup operation
This section provides instructions on how to perform a backup operation using the Rescue and Recovery
program on different operating systems.
74
ThinkCentre User Guide
• To perform a backup operation using the Rescue and Recovery program on the Windows 7 operating
system, do the following:
1. From the Windows desktop, click Start ➙ All Programs ➙ Lenovo ThinkVantage Tools ➙
Enhanced Backup and Restore. The Rescue and Recovery program opens.
2. In the Rescue and Recovery main window, click the Launch advanced Rescue and Recovery arrow.
3. Click Back up your hard drive and select backup operation options. Then, follow the instructions on
the screen to complete the backup operation.
• To perform a backup operation using the Rescue and Recovery program on the Windows Vista operating
system, do the following:
1. From the Windows desktop, click Start ➙ All Programs ➙ ThinkVantage ➙ Rescue and Recovery.
The Rescue and Recovery program opens.
2. In the Rescue and Recovery main window, click Launch advanced Rescue and Recovery ➙ Back
up your hard drive, and select backup operation options.
3. Follow the instructions on the screen to complete the backup operation.
Performing a recovery operation
This section provides instructions on how to perform a recovery operation using the Rescue and Recovery
program on different operating systems.
• To perform a recovery operation using the Rescue and Recovery program on the Windows 7 operating
system, do the following:
1. From the Windows desktop, click Start ➙ All Programs ➙ Lenovo ThinkVantage Tools ➙
Enhanced Backup and Restore. The Rescue and Recovery program opens.
2. In the Rescue and Recovery main window, click the Launch advanced Rescue and Recovery arrow.
3. Click the Restore your system from a backup icon.
4. Follow the instructions on the screen to complete the recovery operation.
• To perform a recovery operation using the Rescue and Recovery program on the Windows Vista operating
system, do the following:
1. From the Windows desktop, click Start ➙ All Programs ➙ ThinkVantage ➙ Rescue and Recovery.
The Rescue and Recovery program opens.
2. In the Rescue and Recovery main window, click Launch advanced Rescue and Recovery.
3. Click the Restore your system from a backup icon.
4. Follow the instructions on the screen to complete the recovery operation.
For more information about performing a recovery operation from the Rescue and Recovery workspace, see
“Using the Rescue and Recovery workspace” on page 75.
Using the Rescue and Recovery workspace
The Rescue and Recovery workspace resides in a protected, hidden area of your hard disk drive that
operates independently from the Windows operating system. This enables you to perform recovery
operations even if you cannot start the Windows operating system. You can perform the following recovery
operations from the Rescue and Recovery workspace:
• Rescue files from your hard disk drive or from a backup: The Rescue and Recovery workspace enables
you to locate files on your hard disk drive and transfer them to a network drive or other recordable media,
such as a USB device or a disc. This solution is available even if you did not back up your files or if
changes were made to the files since your last backup operation. You can also rescue individual files from
a Rescue and Recovery backup located on your local hard disk drive, a USB device, or a network drive.
Chapter 6. Recovery information
75
• Restore your hard disk drive from a Rescue and Recovery backup: If you have backed up your hard disk
drive using the Rescue and Recovery program, you can restore the hard disk drive from a Rescue and
Recovery backup, even if you cannot start the Windows operating system.
• Restore your hard disk drive to the factory default state: The Rescue and Recovery workspace enables
you to restore the complete contents of your hard disk drive to the factory default state. If you have
multiple partitions on your hard disk drive, you have the option to restore the C: partition and leave the
other partitions intact. Because the Rescue and Recovery workspace operates independently from
the Windows operating system, you can restore the hard disk drive to the factory default state even if
you cannot start the Windows operating system.
Attention: If you restore the hard disk drive from a Rescue and Recovery backup or restore the hard disk
drive to the factory default settings, all files on the primary hard disk drive partition (usually drive C:) will be
deleted in the recovery process. If possible, make copies of important files. If you are unable to start the
Windows operating system, you can use the rescue files feature of the Rescue and Recovery workspace to
copy files from your hard disk drive to other media.
To start the Rescue and Recovery workspace, do the following:
1. Make sure the computer is turned off.
2. Repeatedly press and release the F11 key when turning on the computer. When you hear beeps or
see a logo screen, release the F11 key.
3. If you have set a Rescue and Recovery password, type your password when prompted. The Rescue
and Recovery workspace opens after a short delay.
Note: If the Rescue and Recovery workspace fails to open, see “Solving recovery problems” on page 79.
4. Do one of the following:
• To rescue files from your hard disk drive or from a backup, click Rescue files and follow the
instructions on the screen.
• To restore your hard disk drive from a Rescue and Recovery backup or to restore your hard disk drive
to the factory default settings, click Restore your system and follow the instructions on the screen.
For more information about the features of the Rescue and Recovery workspace, click Help.
Note: After restoring your hard disk drive to the factory default state, you might have to reinstall device
drivers for some devices. See “Reinstalling device drivers” on page 79.
Creating and using a rescue medium
With a rescue medium, such as a disc or a USB hard disk drive, you can recover the computer from failures
that prevent you from gaining access to the Rescue and Recovery workspace on your hard disk drive.
Notes:
1. The recovery operations you can perform using a rescue medium vary depending on the operating
system.
2. The rescue disc can be started in all types of optical drives.
Creating a rescue medium
This section provides instructions on how to create a rescue medium on different operating systems.
• To create a rescue medium on the Windows 7 operating system, do the following:
1. From the Windows desktop, click Start ➙ All Programs ➙ Lenovo ThinkVantage Tools ➙
Enhanced Backup and Restore. The Rescue and Recovery program opens.
2. In the Rescue and Recovery main window, click the Launch advanced Rescue and Recovery arrow.
76
ThinkCentre User Guide
3. Click the Create Rescue Media icon. The Create Rescue and Recovery Media window opens.
4. In the Rescue Media area, select the type of the rescue medium you want to create. You can create
a rescue medium using a disc, a USB hard disk drive, or a secondary internal hard disk drive.
5. Click OK and follow the instructions on the screen to create a rescue medium.
• To create a rescue medium on the Windows Vista operating system, do the following:
1. From the Windows desktop, click Start ➙ All Programs ➙ ThinkVantage ➙ Create Recovery
Media. The Create Rescue and Recovery Media window opens.
2. In the Rescue Media area, select the type of the rescue medium you want to create. You can create
a rescue medium using a disc, a USB hard disk drive, or a secondary internal hard disk drive.
3. Click OK and follow the instructions on the screen to create a rescue medium.
Using a rescue medium
This section provides instructions on how to use the rescue medium you have created.
• If you have created a rescue medium using a disc, use the following instructions to use the rescue medium:
1. Turn off your computer.
2. Repeatedly press and release the F12 key when turning on the computer. When the Please select
boot device window opens, release the F12 key.
3. In the Please select boot device window, select the desired optical drive as the first boot device.
Then, insert the rescue disc into the optical drive and press Enter. The rescue medium starts.
• If you have created a rescue medium using a USB hard disk drive, use the following instructions to
use the rescue medium:
1. Attach the USB hard disk drive to one of the USB connectors on your computer.
2. Repeatedly press and release the F12 key when turning on the computer. When the Please select
boot device window opens, release the F12 key.
3. In the Please select boot device window, select the USB hard disk drive as the first boot device and
press Enter. The rescue medium starts.
When the rescue medium starts, the Rescue and Recovery workspace opens. The help information for
each feature is available from the Rescue and Recovery workspace. Follow the instructions to complete
the recovery process.
Reinstalling preinstalled applications and device drivers
Your computer has provisions that enable you to reinstall selected factory-installed applications and device
drivers.
Reinstalling preinstalled applications
This section provides instructions on how to reinstall preinstalled applications.
To reinstall the selected applications preinstalled on your Lenovo computer, do the following:
1. Turn on the computer.
2. Use Windows Explorer or Computer to display the directory structure of your hard disk drive.
3. Go to the C:\SWTOOLS directory.
4. Open the apps folder. Within the apps folder, there are several subfolders named for various applications
installed in your computer.
5. Open the appropriate application subfolder.
Chapter 6. Recovery information
77
6. In the application subfolder, look for a SETUP.EXE file or other appropriate EXE files for setup.
Double-click the file and follow the instructions on the screen to complete the installation.
Reinstalling preinstalled device drivers
This section provides instructions on how to reinstall preinstalled device drivers.
Attention: When you reinstall device drivers, you are changing the current configuration of your computer.
Reinstall device drivers only when it is necessary to correct a problem with your computer.
To reinstall the device driver for a factory-installed device, do the following:
1. Turn on the computer.
2. Use Windows Explorer or Computer to display the directory structure of your hard disk drive.
3. Go to the C:\SWTOOLS directory.
4. Open the DRIVERS folder. Within the DRIVERS folder, there are several subfolders named for various
devices installed in your computer, such as AUDIO or VIDEO.
5. Open the appropriate device subfolder.
6. Do one of the following:
• In the device subfolder, look for a SETUP.exe file. Double-click the file and follow the instructions on
the screen to complete the installation.
• In the device subfolder, look for a README.txt file or a file with the .txt extension. This file might be
named after the operating system, such as WIN98.txt. The TXT file contains information about how to
install the device driver. Follow the instructions to complete the installation.
• If the device subfolder contains a file with the .inf extension and you want to install the device
driver using the INF file, refer to your Windows Help and Support information system for detailed
information about how to install the device driver.
Note: If you need updated device drivers, see “Getting the latest device drivers for your computer” on
page 91 for more information.
Reinstalling software programs
If a software program you installed on your computer is not working correctly, you might need to remove
and reinstall it. Reinstalling overwrites the existing programs files and usually fixes any problems that
you might have had with that program.
To remove a program in your system, see Microsoft Windows help system for detailed information.
To reinstall the program, do one of the following:
Note: The method of reinstalling a program varies from program to program. Refer to the documentation
provided with the program to see if your program has special installation instructions.
• To reinstall most commercially available programs in your system, see Microsoft Windows help system
for more information.
• To reinstall selected application programs that came preinstalled from Lenovo, do the following:
1. Turn on the computer.
2. Use Windows Explorer or Computer to display the directory structure of your hard disk drive.
3. Go to the C:\SWTOOLS directory.
4. Open the APPS folder. Within the APPS folder, there are several subfolders named for various
applications installed in your computer.
78
ThinkCentre User Guide
5. Open the appropriate application subfolder.
6. In the application subfolder, look for a SETUP.EXE file or other appropriate EXE files for setup.
Double-click the file and follow the instructions on the screen to complete the installation.
Reinstalling device drivers
To reinstall a device driver for an option you installed, refer to the documentation that comes with the option.
When you reinstall device drivers, you are changing the current configuration of your computer. Reinstall
device drivers only when it is necessary to correct a problem with your computer.
For more information about reinstalling device drivers that came with your computer, see “Reinstalling
preinstalled applications and device drivers” on page 77.
Solving recovery problems
If you are unable to access the Rescue and Recovery workspace or the Windows environment, do one
of the following:
• Use a rescue medium to start the Rescue and Recovery workspace. See “Creating and using a rescue
medium” on page 76.
• Use recovery media if all other methods of recovery have failed and you need to restore the hard disk
drive to the factory default settings. See “Creating and using recovery media” on page 73.
Note: If you are unable to access the Rescue and Recovery workspace or the Windows environment from
a rescue medium or recovery media, you might not have the rescue device (an internal hard disk drive, a
disc, a USB hard disk drive, or other external devices) set as the first boot device in the startup device
sequence. You must first make sure that your rescue device is set as the first boot device in the startup
device sequence in the Setup Utility program. See “Selecting a startup device” on page 84 for detailed
information about temporarily or permanently changing the startup device sequence. For more information
about the Setup Utility program, see Chapter 7 “Using the Setup Utility program” on page 81.
It is important to create a rescue medium and a set of recovery media as early as possible and store them
in a safe place for future use.
Chapter 6. Recovery information
79
80
ThinkCentre User Guide
Chapter 7. Using the Setup Utility program
The Setup Utility program is used to view and change the configuration settings of your computer, regardless
of which operating system you are using. However, the operating system settings might override any similar
settings in the Setup Utility program.
Starting the Setup Utility program
To start the Setup Utility program, do the following:
1. Make sure your computer is turned off.
2. Repeatedly press and release the F1 key when turning on the computer. When you hear multiple
beeps or see a logo screen, release the F1 key.
Note: If a Power-On Password or an Administrator Password has been set, the Setup Utility program
menu will not be displayed until you type the correct password. For more information, see “Using
passwords” on page 81.
When the POST detects that the hard disk drive has been removed from your computer or the memory
module size has decreased, an error message will be displayed when you start the computer and you will be
prompted to do one of the following:
• Press F1 to enter the Setup Utility program.
Note: After you enter the Setup Utility program, select Save Changes and Exit at the bottom of the
screen. The error message will not be displayed again.
• Press F2 to bypass the error message and log in to the operating system.
Viewing and changing settings
The Setup Utility program menu lists various items about the system configuration. To view or change
settings, start the Setup Utility program. See “Starting the Setup Utility program” on page 81. Then, follow
the instructions on the screen.
You can use either the keyboard or the mouse to navigate through BIOS menu choices. The keys used to
perform various tasks are displayed at the bottom of each screen.
Using passwords
By using the Setup Utility program, you can set passwords to prevent unauthorized access to your computer
and data. The following types of passwords are available:
• Power-On Password
• Administrator Password
• Hard Disk Password
You do not have to set any passwords to use your computer. However, using passwords improves
computing security. If you decide to set any passwords, read the following sections.
© Copyright Lenovo 2012
81
Password considerations
A password can be any combination of up to 64 alphabetic and numeric characters. For security reasons, it
is recommended to use a strong password that cannot be easily compromised. To set a strong password,
use the following guidelines:
• Have at least eight characters in length
• Contain at least one alphabetic character and one numeric character
• Setup Utility program and hard disk passwords are not case sensitive
• Not be your name or your user name
• Not be a common word or a common name
• Be significantly different from your previous passwords
Power-On Password
When a Power-On Password is set, you are prompted to type a valid password each time the computer is
turned on. The computer cannot be used until the valid password is typed in.
Administrator Password
Setting an Administrator Password deters unauthorized users from changing configuration settings. If you
are responsible for maintaining the configuration settings of several computers, you might want to set an
Administrator Password.
When an Administrator Password is set, you are prompted to type a valid password each time you try to
access the Setup Utility program. The Setup Utility program cannot be accessed until a valid password
is typed in.
If both the Power-On Password and Administrator Password are set, you can type either password. However,
you must use your Administrator Password to change any configuration settings.
Hard Disk Password
Setting a Hard Disk Password prevents unauthorized access to the data on the hard disk drive. When a
Hard Disk Password is set, you are prompted to type a valid password each time you try to access the
hard disk drive.
Notes:
• After you set a Hard Disk Password, your data on the hard disk drive is protected even if the hard disk
drive is removed from one computer and installed in another.
• If the Hard Disk Password is forgotten, there is no way to reset the password or recover data from the
hard disk drive.
Setting, changing, and deleting a password
To set, change, or delete a password, do the following:
1. Start the Setup Utility program. See “Starting the Setup Utility program” on page 81.
2. From the Setup Utility program main menu, select Security.
3. Depending on the password type, select Set Power-On Password, Set Administrator Password, or
Hard Disk Password.
4. Follow the instructions on the right side of the screen to set, change, or delete a password.
82
ThinkCentre User Guide
Note: A password can be any combination of up to 64 alphabetic and numeric characters. For more
information, see “Password considerations” on page 82.
Erasing lost or forgotten passwords (clearing CMOS)
This section provides instructions on how to erase lost or forgotten passwords, such as a user password.
To erase a lost or forgotten password, do the following:
1. Remove all media from the drives and turn off all attached devices and the computer. Then, disconnect
all power cords from electrical outlets and disconnect all cables that are connected to the computer.
2. Open the computer cover. See “Removing the computer cover” on page 32.
3. Locate the Clear CMOS /Recovery jumper on the system board. See “Locating parts on the system
board” on page 11.
4. Move the jumper from the standard position (pin 1 and pin 2) to the maintenance position (pin 2 and
pin 3).
5. Close the computer cover and connect the power cord. See “Completing the parts replacement”
on page 70.
6. Turn on the computer and leave it on for approximately 10 seconds. Then, turn off the computer by
holding the power switch for approximately five seconds.
7. Repeat step 1 through step 3.
8. Move the Clear CMOS /Recovery jumper back to the standard position (pin 1 and pin 2).
9. Close the computer cover and connect the power cord. See “Completing the parts replacement”
on page 70.
Enabling or disabling a device
This section provides information on how to enable or disable user access to the following devices:
USB Setup
Use this option to enable or disable a USB connector. When a USB connector is
disabled, the device connected to the USB connector cannot be used.
SATA Controller
When this feature is set to Disable, all devices connected to the SATA connectors
(such as hard disk drives or the optical drive) are disabled and cannot be accessed.
External SATA Port
When this option is set to Disable, the device connected to the External SATA
connector cannot be accessed.
To enable or disable a device, do the following:
1. Start the Setup Utility program. See “Starting the Setup Utility program” on page 81.
2. From the Setup Utility program main menu, select Devices.
3. Depending on the device you want to enable or disable, do one of the following:
• Select USB Setup to enable or disable a USB device.
• Select ATA Drive Setup to enable or disable an internal or external SATA device.
4. Select the desired settings and press Enter.
5. Press F10 to save and exit the Setup Utility program. See “Exiting from the Setup Utility program”
on page 85.
Chapter 7. Using the Setup Utility program
83
Selecting a startup device
If your computer does not start up from a device such as the disc or hard disk drive as expected, do one of
the following to select the startup device you want.
Selecting a temporary startup device
Use this procedure to select a temporary startup device.
Note: Not all discs and hard disk drives are bootable.
1. Turn off your computer.
2. Repeatedly press and release the F12 key when turning on the computer. When the Please select
boot device window displays, release the F12 key.
3. Select the desired startup device and press Enter. The computer will start up from the device you
selected.
Note: Selecting a startup device from the Please select boot device window does not permanently change
the startup sequence.
Selecting or changing the startup device sequence
To view or permanently change the configured startup device sequence, do the following:
1. Start the Setup Utility program. See “Starting the Setup Utility program” on page 81.
2. From the Setup Utility program main menu, select Startup.
3. Select the devices for the Primary Startup Sequence, the Automatic Startup Sequence, and the Error
Startup Sequence. Read the information displayed on the right side of the screen.
4. Press F10 to save and exit the Setup Utility program. See “Exiting from the Setup Utility program”
on page 85.
Enabling ErP compliance mode
You can enable the energy-related products directive (ErP) compliance mode through the Power menu in the
Setup Utility program to reduce the consumption of electricity when your computer is in standby or off mode.
To enable ErP compliance mode in the Setup Utility program, do the following:
1. Make sure your computer is turned off.
2. Repeatedly press and release the F1 key when turning on the computer. When you hear multiple beeps
or see a logo screen, release the F1 key. The Setup Utility program starts.
Note: If a Power-On Password or an Administrator Password has been set, the Setup Utility program
main menu will not be displayed until you type the correct password.
3. From the Setup Utility program main menu, select Power ➙ Enhanced Power Saving Mode, and
press Enter.
4. Select Enabled and press Enter.
5. From the Power menu, select Automatic Power On and press Enter.
6. Select Wake on Lan and press Enter.
7. Select Disabled and press Enter.
8. Press F10 to save changes and exit the Setup Utility program. Press Enter when prompted to confirm
the exit.
Note: When ErP compliance mode is enabled, you can wake up your computer by doing one of the following:
84
ThinkCentre User Guide
• Pressing the power switch
• Enabling the wake up on alarm feature
The wake up on alarm feature enables your computer to wake up at a set time. To enable the wake
up on alarm feature, do the following:
1. Start the Setup Utility program.
2. From the Setup Utility program main menu, select Power ➙ Automatic Power On, and press Enter.
3. Select Wake Up on Alarm and press Enter. Then follow the instructions on the screen.
4. Press F10 to save changes and exit the Setup Utility program. Press Enter when prompted to
confirm the exit.
• Enabling the after power loss feature
The after power loss feature enables your computer to wake up when the power supply resumes after a
sudden loss of electricity. To enable the after power loss feature, do the following:
1. Start the Setup Utility program.
2. From the Setup Utility program main menu, select Power ➙ After Power Loss, and press Enter.
3. Select Power On and press Enter.
4. Press F10 to save changes and exit the Setup Utility program. Press Enter when prompted to
confirm the exit.
Exiting from the Setup Utility program
After you finish viewing or changing settings, press Esc to return to the Setup Utility program main menu.
You might have to press Esc several times. Do one of the following:
• If you want to save the new settings, press F10 to save and exit the Setup Utility program.
• If you do not want to save the settings, select Exit ➙ Discard Changes and Exit.
• If you want to return to the default settings, press F9 to load the default settings.
Chapter 7. Using the Setup Utility program
85
86
ThinkCentre User Guide
Chapter 8. Updating system programs
This chapter provides information about updating the POST and BIOS, and how to recover from a POST
and BIOS update failure.
Using system programs
System programs are the basic layer of software built into your computer. System programs include the
POST, the BIOS, and the Setup Utility program. The POST is a set of tests and procedures that are
performed each time you turn on your computer. The BIOS is a layer of software that translates instructions
from other layers of software into electrical signals that the computer hardware can execute. You can use
the Setup Utility program to view or change the configuration settings of your computer. See Chapter 7
“Using the Setup Utility program” on page 81 for detailed information.
Your computer system board has a module called electrically erasable programmable read-only memory
(EEPROM, also referred to as flash memory). You can easily update the POST, the BIOS, and the Setup
Utility program by starting your computer with a system-program-update disc or running a special update
program from your operating system.
Lenovo might make changes and enhancements to the POST and BIOS. When updates are released, they
are available as downloadable files on the Lenovo Web site at http://www.lenovo.com. Instructions for using
the POST and BIOS updates are available in a TXT file that is included with the update files. For most
models, you can download either an update program to create a system-program-update disc or an update
program that can be run from the operating system.
Updating (flashing) the BIOS from a disc
This section provides instructions on how to update (flash) the BIOS from a disc.
Note: You can download a self-starting bootable disc image (known as an ISO image) with the system
program updates to create a system-program-update disc. Go to:
http://www.lenovo.com/support
To update (flash) the BIOS from a disc, do the following:
1. Turn off your computer.
2. Repeatedly press and release the F12 key when turning on the computer. When the Startup Device
Menu opens, release the F12 key.
3. On the Startup Device Menu, select the desired optical drive as the startup device. Then, insert the
disc into this optical drive and press Enter. The update begins.
4. When prompted to change the serial number, it is suggested that you do not make this change by
pressing N. However, if you do want to change the serial number, press Y, then type in the serial number
and press Enter.
5. When prompted to change the machine type and model, it is suggested that you do not make this
change by pressing N. However, if you do want to change the machine type and model, press Y, then
type in the machine type and model and press Enter.
6. Follow the instructions on the screen to complete the update. After the update is completed, remove the
disc from the optical drive.
© Copyright Lenovo 2012
87
Updating (flashing) the BIOS from your operating system
Note: Because Lenovo makes constant improvements to its Web sites, the Web page contents are subject
to change without notice, including the contents referenced in the following procedure.
To update (flash) the BIOS from your operating system, do the following:
1. Go to http://www.lenovo.com/support.
2. Do the following to locate the downloadable files for your machine type:
a. Click Download & Drivers.
b. In the left pane, click Downloads and drivers.
c. From the Brand drop-down list box, select Desktops.
d. From the Family drop-down list box, select the family name.
e. Click Continue.
f. From the Refine results drop-down list box, select BIOS.
g. Click the BIOS update link.
3. Click the TXT file that contains the instructions for updating (flashing) the BIOS from your operating
system.
4. Print these instructions. This is very important because these instructions will not be displayed on
the screen after the download begins.
5. Follow the printed instructions to download, extract, and install the update.
Recovering from a POST/BIOS update failure
If the power to your computer is interrupted while the POST and BIOS is being updated, your computer
might not restart correctly. If this happens, perform the following procedure to recover from the POST and
BIOS update failure. This procedure is commonly called Boot-block Recovery.
1. Remove all media from the drives and turn off all attached devices and the computer. Then, disconnect
all power cords from electrical outlets and disconnect all cables that are connected to the computer.
2. Open the computer cover. See “Removing the computer cover” on page 32.
3. Locate the Clear CMOS /Recovery jumper on the system board. See “Locating parts on the system
board” on page 11.
4. Remove any cables that impede access to the Clear CMOS /Recovery jumper.
5. Move the jumper from the standard position (pin 1 and pin 2) to the maintenance position (pin 2 and
pin 3).
6. Reconnect any cables that were disconnected and reinstall the PCI card if removed.
7. Close the computer cover and reconnect the power cords for the computer and monitor to electrical
outlets. See “Completing the parts replacement” on page 70.
8. Turn on the computer and then insert the POST and BIOS update (flash update) disc into the optical
drive. Wait a few minutes. Then, the recovery session begins. The recovery session will take two to
three minutes. During this time, a warning message will be displayed and no action is needed from you.
9. After the recovery session is completed, there will be no video, and your computer will automatically
turn off.
10. Repeat step 1 through step 4.
11. Move the Clear CMOS /Recovery jumper back to the standard position (pin 1 and pin 2).
12. Reconnect any cables that were disconnected and reinstall the PCI card if removed.
13. Close the computer cover and reconnect any cables that were disconnected.
88
ThinkCentre User Guide
14. Turn on the computer to restart the operating system.
Chapter 8. Updating system programs
89
90
ThinkCentre User Guide
Chapter 9. Preventing problems
This chapter provides information that can help you avoid common problems and keep your computer
running smoothly.
Keeping your computer current
In some situations you may find it necessary to have the most current software programs, device drivers, or
operating system. This section explains how to get the latest updates for your computer.
Select any of the following topics:
•
“Getting the latest device drivers for your computer” on page 91
•
“Updating your operating system” on page 91
•
“Using System Update” on page 92
Getting the latest device drivers for your computer
Note: Because Lenovo makes constant improvements to its Web sites, the Web page contents are subject
to change without notice, including the contents referenced in the following procedure.
You can download and install updated device drivers from the Lenovo Web site by doing the following:
Attention: Do not download updated device drivers from the Windows Update Web site. The device
drivers provided on the Windows Web site have not been tested by Lenovo and using them might cause
unexpected problems. Obtain updated device drivers from Lenovo.
1. Go to http://www.lenovo.com/support.
2. Click Downloads and drivers.
3. Select the machine type of your computer from the machine type list.
4. Click the category of device for which you need the device driver.
5. Click the appropriate device driver.
6. Download and install the device driver.
Updating your operating system
Microsoft makes updates available for the various Windows operating systems through the Microsoft
Windows Update Web site. The Web site automatically determines what Windows updates are available for
your specific computer and lists those updates only. Updates could include security fixes, new versions of
Windows components (such as Media Player), fixes to other portions of the Windows operating system,
or enhancements.
Attention: Do not download updated device drivers from the Windows Web site. The device drivers
provided on the Windows Web site have not been tested by Lenovo and using them might cause unexpected
problems. Obtain updated device drivers from Lenovo. See “Getting the latest device drivers for your
computer” on page 91 for more information.
To access the Microsoft Windows Update site, do the following:
1. Go to http://windowsupdate.microsoft.com/.
2. Follow the instructions on the screen.
© Copyright Lenovo 2012
91
Using System Update
The System Update program helps you keep the software on your computer up-to-date. Update packages
are stored on Lenovo servers and can be downloaded from the Lenovo Support Web site. Update packages
can contain applications, device drivers, BIOS flashes, or software updates. When the System Update
program connects to the Lenovo Support Web site, the System Update program automatically recognizes
the machine type and model of your computer, the installed operating system, and the language of the
operating system to determine what updates are available for your computer. The System Update program
then displays a list of update packages and categorizes each update as critical, recommended, and
optional to help you understand the importance. You have complete control of which updates to download
and install. After you select the update packages you want, the System Update program automatically
downloads and installs the updates without any further intervention from you.
The System Update program is preinstalled on most Lenovo computers and is ready to run. The only
prerequisite is an active Internet connection. You can start the program manually, or you can use the
schedule feature to enable the program to search for updates automatically at specified intervals. You also
can predefine scheduled updates to search by severity (critical updates, critical and recommended updates,
or all updates) so the list you choose from contains only those update types that are of interest to you.
If the System Update program came with your computer, you can open it by completing the following
procedure:
On the Windows Vista operating system, do the following:
1. Click Start ➙ All Programs ➙ ThinkVantage.
2. Click System Update.
On the Windows 7 operating system, do the following:
1. Click Start ➙ Lenovo ThinkVantage Tools.
2. Double-click Update and Drivers.
If the System Update program is not currently installed on your computer, you can download it from the
Lenovo Support Web site at http://www.lenovo.com/support.
Cleaning and maintenance
With appropriate care and maintenance your computer will serve you reliably. The following topics offer
information to help you keep your computer in top working order.
•
“Basics” on page 92
•
“Cleaning your computer” on page 93
•
–
“Computer” on page 93
–
“Keyboard” on page 93
–
“Optical mouse” on page 93
–
“Display screen” on page 94
“Good maintenance practices” on page 94
Basics
Here are some basic points about keeping your computer functioning properly:
• Keep your computer in a clean, dry environment. Make sure it rests on a flat, steady surface.
92
ThinkCentre User Guide
• Do not place items on top of the monitor or cover any of the vents in the monitor or computer. These
vents provide airflow to keep your computer from overheating.
• Keep food and drinks away from all parts of your computer. Food particles and spills might make the
keyboard and mouse stick and unusable.
• Do not get the power switches or other controls wet. Moisture can damage these parts and cause an
electrical hazard.
• Always disconnect a power cord by grasping the plug, but not the cord.
Cleaning your computer
It is a good practice to clean your computer periodically to protect the surfaces and ensure trouble-free
operation.
CAUTION:
Be sure to turn off the computer and monitor power switches before cleaning the computer and
monitor screen.
Computer
Use only mild cleaning solutions and a damp cloth to clean the painted surfaces of the computer.
Keyboard
To clean your computer keyboard, do the following:
1. Apply some isopropyl rubbing alcohol to a soft, dust-free cloth.
2. Wipe each keytop surface with the cloth. Wipe the keys one by one; if you wipe several keys at a time,
the cloth may hook onto an adjacent key and possibly damage it. Make sure that no liquid drips onto
or between the keys.
3. To remove any crumbs or dust from beneath the keys, you can use a camera blower with a brush
or cool air from a hair dryer.
Note: Avoid spraying cleaner directly onto the display or the keyboard.
Optical mouse
This section provides instructions on how to clean an optical mouse.
An optical mouse uses a light-emitting diode (LED) and an optical sensor to navigate the pointer. If the
pointer on the screen does not move smoothly with the optical mouse, you might need to clean the mouse.
To clean an optical mouse, do the following:
1. Turn off your computer.
2. Disconnect the mouse cable from the computer.
3. Turn the mouse upside down to check the lens.
a. If there is a smudge on the lens, gently clean the area with a plain cotton-tipped swab.
b. If there is debris in the lens, gently blow the debris away from the area.
4. Check the surface on which you are using the mouse. If you have a very intricate picture or pattern
beneath the mouse, it may be difficult for the digital signal processor (DSP) to determine changes
in the mouse position.
5. Reconnect the mouse cable to the computer.
6. Turn your computer back on.
Chapter 9. Preventing problems
93
Display screen
Dust buildup compounds problems associated with glare. Remember to clean your monitor screen
periodically. See “Cleaning a flat-panel monitor surface” on page 94 or “Cleaning a glass-screen surface”
on page 94.
Cleaning a flat-panel monitor surface
If you have a flat-panel computer display that has a flexible film surface, do the following to clean the special
surface. Wipe it gently with a soft, dry cloth, or blow on the screen to remove grit and other loose particles.
Then moisten a cloth with LCD cleaner and wipe the screen surface.
Many computer supply stores carry the special cleaning fluids for displays. Use cleaning fluids developed for
LCD displays only. First apply the fluid to a lint-free, soft cloth, then clean the LCD display. Some computer
supply stores carry pre-moistened towelettes for LCD maintenance.
Cleaning a glass-screen surface
To clean a glass-screen surface, wipe it gently with a soft, dry cloth, or blow on the screen to remove grit and
other loose particles. Then use a soft cloth moistened with a nonabrasive liquid glass cleaner.
Good maintenance practices
By performing a few good maintenance practices, you can maintain good computer performance, protect
your data, and be prepared in case of a computer failure.
• Empty your recycle bin on a regular basis.
• Run the Windows Disk Defragmenter program occasionally to prevent performance problems caused by
an excessive number of fragmented files.
• Clean out your Inbox, Sent Items, and Deleted Items folders in your e-mail application on a regular basis.
• Make backup copies of critical data on removable media memory at regular intervals and store the
removable media in a safe location. The frequency of making backup copies depends on how critical the
data is to you or your business. Lenovo makes a number of removable-media storage devices available
as options, such as CD-RW drives and recordable DVD drives.
• Back up your entire hard disk drive on a regular basis.
• If you are using the Windows Vista operating system, use or schedule System Restore to take a system
snapshot periodically.
Note: Always take a snapshot before installing new device drivers, updating software, or installing
new software.
• Keep your computer software up-to-date. See “Keeping your computer current ” on page 91 for more
information.
• Keep a log book. Entries might include major software or hardware changes, device-driver updates,
intermittent problems and what you did to resolve them, and any minor issues you might have
experienced. A log book can help you or a Lenovo technician determine if a problem is related to change
in hardware, change in software, or some other action that might have taken place.
• Create Product Recovery discs. See “Creating and using recovery media” on page 73 for more information
about using Product Recovery discs to restore the hard disk drive to the factory default settings.
• Create rescue media. See “Creating and using a rescue medium” on page 76 for more information about
using a Rescue medium such as a CD or DVD to recover from failures that prevent you from gaining
access to the Windows environment or the Rescue and Recovery workspace on your hard disk drive.
Moving your computer
Take the following precautions before moving your computer.
94
ThinkCentre User Guide
1. Back up all files and data from the hard disk drive. There are a variety of backup programs available
commercially. Your operating system also might have a backup program that you can use. Lenovo
provides the Rescue and Recovery program to help you back up and restore data. See “Performing
backup and recovery operations” on page 74 for more information.
2. Remove all media (diskettes, compact discs, tapes, and so on) from the drives.
3. Turn off the computer and all attached devices. Your hard disk drive automatically parks the read/write
head in a nondata area. This prevents damage to the hard disk drive.
4. Unplug the power cords from electrical outlets.
5. Disconnect communication cables, such as modem or network cables, from the outlets first, and then
disconnect the other ends from the computer.
6. Note where any remaining cables are attached to the computer; then, remove them.
7. If you saved the original shipping cartons and packing materials, use them to pack the units. If you are
using different cartons, cushion the units to avoid damage.
Chapter 9. Preventing problems
95
96
ThinkCentre User Guide
Chapter 10. Troubleshooting and diagnostics
This chapter describes some basic troubleshooting and diagnostic programs. If your computer problem
is not described here, see Chapter 11 “Getting information, help, and service” on page 117 for additional
troubleshooting resources.
Basic troubleshooting
The following table provides information to help you troubleshoot your computer problems.
Note: If you cannot correct the problem, have the computer serviced. For a list of service and support
telephone numbers, refer to the ThinkCentre Safety and Warranty Guide that comes with your computer or
go to the Lenovo Support Web site at http://www.lenovo.com/support/phone.
Symptom
The computer does not start
when you press the power
switch.
Action
Verify that:
• The power cord is correctly connected to the rear of the computer and to a
working electrical outlet.
• If your computer has a secondary power switch on the rear of the computer,
make sure that it is switched on.
• The power indicator on the front of the computer is on.
• The computer voltage matches the voltage available at the electrical outlet for
your country or region.
The monitor screen is blank.
Verify that:
• The monitor signal cable is correctly connected to the monitor and to the
appropriate monitor connector on the computer.
• The monitor power cord is correctly connected to the monitor and to a working
electrical outlet.
• The monitor is turned on and the brightness and contrast controls are set
correctly.
• The computer voltage matches the voltage available at the electrical outlet for
your country or region.
• If your computer has two monitor connectors, be sure to use the connector
on the graphics card.
The keyboard does not work.
Verify that:
• The computer is turned on.
• The keyboard is securely connected to a USB connector on the computer.
• No keys are stuck.
The mouse does not work.
Verify that:
• The computer is turned on.
• The mouse is securely connected to a USB connector on the computer.
• The mouse is clean. Refer to “Optical mouse” on page 93 for further information.
© Copyright Lenovo 2012
97
Symptom
Action
The operating system does not
start.
Verify that:
The computer beeps multiple
times before the operating
system starts.
Verify that no keys are stuck.
• The startup sequence includes the device where the operating system resides.
Usually, the operating system is on the hard disk drive. For more information,
see “Selecting a startup device” on page 84.
Troubleshooting procedure
Use the following procedure as a starting point for diagnosing problems you are experiencing with your
computer:
1. Verify that the cables for all attached devices are connected correctly and securely.
2. Verify that all attached devices that require ac power are connected to properly grounded, functioning
electrical outlets.
3. Verify that all attached devices are enabled in the BIOS settings of your computer. For more information
about accessing and changing the BIOS settings, refer to your Chapter 7 “Using the Setup Utility
program” on page 81.
4. Go to the “Troubleshooting” on page 98 and follow the instructions for the type of problem you are
experiencing. If the Troubleshooting information does not help you resolve a problem, continue with the
next step.
5. Try using a previously captured configuration to see if a recent change to hardware or software settings
has caused a problem. Before restoring a previous configuration, capture your current configuration in
case the older configuration settings do not solve the problem or have adverse affects. To restore a
captured configuration, do the following:
• On the Windows Vista operating system, click Start ➙ Control Panel ➙ System and Maintenance
➙ System ➙ System Protection ➙ System Restore.
• On the Windows 7 operating system, click Start ➙ Control Panel ➙ System and Security ➙
System ➙ System Protection ➙ System Restore.
If this does not correct the problem, continue with the next step.
6. Run the diagnostic programs. See “Diagnostic programs” on page 114 for more information.
• If the diagnostic programs detect a hardware failure, contact the Lenovo Customer Support Center.
See Chapter 11 “Getting information, help, and service” on page 117 for more information.
• If you are unable to run the diagnostic programs, contact the Lenovo Customer Support Center. See
Chapter 11 “Getting information, help, and service” on page 117 for more information.
• If the diagnostic programs do not detect a hardware failure, continue with the next step.
7. Use an antivirus program to see if your computer has been infected by a virus. If the program detects a
virus, remove the virus.
8. If none of these actions solve the problem, seek technical assistance. See Chapter 11 “Getting
information, help, and service” on page 117 for more information.
Troubleshooting
Use the troubleshooting information to find solutions to problems that have definite symptoms.
If the symptom your computer is experiencing occurred immediately after you installed a new hardware
option or new software, do the following before referring to the troubleshooting information:
98
ThinkCentre User Guide
1. Remove the new hardware option or software. If you must remove the computer cover to remove a
hardware option, make sure you review and follow the electrical safety information provided with your
computer. For your safety, do not operate the computer with the cover removed.
2. Run the diagnostic programs to ensure your computer is operating correctly.
3. Reinstall the new hardware option or software following the manufacturer's instructions.
Select the problem your computer is experiencing from the following list:
•
“Audio problems” on page 99
•
“CD problems” on page 100
•
“DVD problems” on page 101
•
“Intermittent problems” on page 103
•
“Keyboard, mouse, or pointing device problems” on page 103
•
“Monitor problems” on page 105
•
“Networking problems” on page 106
•
“Option problems” on page 109
•
“Performance and lockup problems” on page 110
•
“Printer problems” on page 112
•
“Serial port problems” on page 113
•
“Software problems” on page 113
•
“USB problems” on page 114
Audio problems
Select your symptom from the following list:
•
•
“No audio in Windows” on page 99
“An audio disc or AutoPlay-enabled disc does not automatically play when it is inserted into a drive”
on page 100
•
“Sound comes from one external speaker only” on page 100
•
“No audio in DOS applications or games” on page 100
No audio in Windows
Symptom: No audio in Windows
Actions:
• If you are using powered external speakers that have an On/Off control, verify that the On/Off control is
set to the On position and the speaker power cable is connected to a properly grounded, functional ac
electrical outlet.
• If your external speakers have a volume control, verify that the volume control is not set too low.
• Double-click the speaker icon in the Windows notification area. A master volume-control window opens.
Verify that the Mute settings are not checked and none of the volume settings is set too low.
• Some models have a front audio panel you can use to adjust volume. If you have a front audio panel,
verify that the volume is not set too low.
• Verify that your external speakers (and headphones, if used) are connected to the correct audio connector
on the computer. Most speaker cables are color-coded to match the connector.
Chapter 10. Troubleshooting and diagnostics
99
Note: When external-speaker or headphone cables are attached to the audio connector, the internal
speaker, if present, is disabled. In most cases, if an audio adapter is installed in one of the expansion slots,
the audio function built into the system board is disabled; use the audio jacks on the adapter.
• Make sure that the program you are running is designed for use in the Microsoft Windows operating
system. If the program is designed to run in DOS, the program does not use the Windows sound feature
and must be configured to use SoundBlaster Pro or SoundBlaster emulation.
• Verify that the audio device drivers are correctly installed. See Microsoft Windows help system for more
information.
If these actions do not correct the problem, run the diagnostic programs (see “Diagnostic programs” on
page 114 for instructions). If you need technical assistance, see Chapter 11 “Getting information, help, and
service” on page 117.
An audio disc or AutoPlay-enabled disc does not automatically play when it is
inserted into a drive
Symptom: An audio disc or AutoPlay-enabled disc does not automatically play when it is inserted into a drive
Action: See “CD problems” on page 100.
Sound comes from one external speaker only
Symptom: Sound comes from one external speaker only.
Actions:
• Ensure that the speaker cable is inserted completely into the connector on the computer.
• Make sure the cable that attaches the left speaker to the right speaker is securely connected.
• Double-click the speaker icon in the Windows notification area. A master volume-control window opens.
Verify that the Balance settings are set correctly.
If these actions do not correct the problem, you might have a failing speaker. Have the speaker serviced. If
you need technical assistance, see Chapter 11 “Getting information, help, and service” on page 117.
No audio in DOS applications or games
Symptom: No audio in DOS applications or games
Actions:
• Make sure the DOS application or game is configured to use SoundBlaster Pro or SoundBlaster
emulation. Refer to the documentation that comes with the application or game for instructions on
setting sound-card settings.
• If these actions do not correct the problem, run the diagnostic programs (see “Diagnostic programs” on
page 114 for instructions). If you need technical assistance, see Chapter 11 “Getting information, help,
and service” on page 117.
CD problems
Select your symptom from the following list:
•
•
•
“An audio disc or AutoPlay-enabled disc does not automatically play when it is inserted into a CD
drive” on page 101
“A CD or DVD does not work” on page 101
“Unable to use a startable (bootable) recovery medium, such as the Product Recovery CD, to start
your computer” on page 101
100
ThinkCentre User Guide
An audio disc or AutoPlay-enabled disc does not automatically play when it is
inserted into a CD drive
Symptom: An audio disc or AutoPlay-enabled disc does not automatically play when it is inserted into
a CD drive.
Actions:
• If you have multiple CD or DVD drives installed (or a combination of CD and DVD drives), try inserting the
disc into the other drive. In some cases, only one of the drives is connected to the audio subsystem.
• If you are using the Windows Vista or the Windows 7 operating system, follow the action for “A CD
or DVD does not work” on page 101.
If this does not correct the problem, follow the action for “A CD or DVD does not work” on page 101.
A CD or DVD does not work
Symptom: A CD or DVD does not work.
Actions:
• Verify that the disc is inserted correctly, with its label up.
• Make sure that the disc you are using is clean. To remove dust or fingerprints, wipe the disc clean with a
soft cloth from the center to the outside. Wiping a disc in a circular motion might cause loss of data.
• Verify that the disc you are using is not scratched or damaged. Try inserting another disc that you know
is good. If you cannot read from a known-good disc, you might have a problem with your CD or DVD
drive or the cabling to your CD or DVD drive. Make sure that the power cable and signal cable are
securely connected to the drive.
Unable to use a startable (bootable) recovery medium, such as the Product Recovery
CD, to start your computer
Symptom: Unable to use a startable (bootable) recovery medium, such as the Product Recovery CD,
to start your computer.
Action: Make sure that the CD or DVD drive is in the startup sequence before the hard disk drive. Refer
to your “Selecting or changing the startup device sequence” on page 84 for information on viewing and
changing the startup sequence. Note that on some models the startup sequence is permanently set and
cannot be changed.
If these actions do not correct the problem, run the diagnostic programs (see “Diagnostic programs” on
page 114 for instructions). If you need technical assistance, see Chapter 11 “Getting information, help, and
service” on page 117.
DVD problems
Select your symptom from the following list:
•
“Black screen instead of DVD video” on page 101
•
“DVD movie will not play” on page 102
•
“No audio or intermittent audio while playing DVD movie” on page 102
•
“Playback is very slow or choppy” on page 102
•
“Invalid disc or no disc found message” on page 102
Black screen instead of DVD video
Symptom: Black screen instead of DVD video
Chapter 10. Troubleshooting and diagnostics
101
Actions:
• Restart the DVD player program.
• Close any open files, turn off the computer, and then restart the computer.
• Try a lower screen resolution or color depth.
If these actions do not correct the problem, run the diagnostic programs (see “Diagnostic programs” on
page 114 for instructions). If you need technical assistance, see Chapter 11 “Getting information, help, and
service” on page 117.
DVD movie will not play
Symptom: DVD movie will not play.
Actions:
• Make sure that the disc surface is clean and not scratched.
• Check the disc or package for regional coding. You might need to purchase a disc with coding for
the region where you are using your computer.
If these actions do not correct the problem, run the diagnostic programs (see “Diagnostic programs” on
page 114 for instructions). If you need technical assistance, see Chapter 11 “Getting information, help, and
service” on page 117.
No audio or intermittent audio while playing DVD movie
Symptom: No audio or intermittent audio while playing DVD movie.
Actions:
• Check the volume control settings on your computer and on your speakers.
• Make sure that the disc surface is clean and not scratched.
• Check all cable connections to and from the speakers.
• Use the DVD menu for the video to select a different audio track.
If these actions do not correct the problem, run the diagnostic programs (see “Diagnostic programs” on
page 114 for instructions). If you need technical assistance, see Chapter 11 “Getting information, help, and
service” on page 117.
Playback is very slow or choppy
Symptom: Playback is very slow or choppy.
Actions:
• Disable any background programs, such as AntiVirus or Desktop Themes.
• Ensure that video resolution is set to less than 1152 x 864.
If these actions do not correct the problem, run the diagnostic programs (see “Diagnostic programs” on
page 114 for instructions). If you need technical assistance, see Chapter 11 “Getting information, help, and
service” on page 117.
Invalid disc or no disc found message
Symptom: Invalid disc or no disc found message
Actions:
102
ThinkCentre User Guide
• Ensure that a DVD disc is in the drive with the shiny side of the disc facing down.
• Ensure that video resolution is set to less than 1152 x 864.
• On computers that have a CD-ROM or CD-RW drive in addition to a DVD-ROM drive, make sure that the
DVD disc is in the drive labeled “DVD”.
If these actions do not correct the problem, run the diagnostic programs (see “Diagnostic programs” on
page 114 for instructions). If you need technical assistance, see Chapter 11 “Getting information, help, and
service” on page 117.
Intermittent problems
Symptom: A problem occurs only occasionally and is difficult to repeat.
Actions:
• Verify that all cables and cords are securely connected to the computer and attached devices.
• Verify that when the computer is on, the fan grill is not blocked (there is air flow around the grill), and the
fans are working. If airflow is blocked or the fans are not working, the computer might overheat.
• If SCSI devices are installed, verify that the last external device in each SCSI chain is terminated correctly.
(See your SCSI documentation.)
If these actions do not correct the problem, run the diagnostic programs (see “Diagnostic programs” on
page 114 for instructions). If you need technical assistance, see Chapter 11 “Getting information, help, and
service” on page 117.
Keyboard, mouse, or pointing device problems
Select your symptom from the following list:
•
“All or some keys on the keyboard do not work” on page 103
•
“The mouse or pointing device does not work” on page 104
•
“The pointer on the screen does not move smoothly with the mouse” on page 104
•
“The fingerprint reader does not work” on page 104
•
“The wireless keyboard does not work” on page 104
All or some keys on the keyboard do not work
Symptom: All or some keys on the keyboard do not work.
Actions:
• Verify that the keyboard cable is securely connected to the correct connector on the computer.
• If you are using an Enhanced Performance USB keyboard and one or more of the Rapid Access buttons
are the only keys that are not working, these buttons might have been disabled or have not been assigned
to a function. Use the help system in the Enhanced Performance Customization Keyboard program to
help diagnose problems with the Rapid Access buttons.
• On the Windows Vista operating system, do the following:
1. Click Start ➙ Control Panel.
2. Click Hardware and Sound.
3. In the Keyboard topic, click Check keyboard status.
4. Click Properties for keyboard details and to see if the keyboard is working properly or not.
• On the Windows 7 operating system, do the following:
Chapter 10. Troubleshooting and diagnostics
103
1. Click Start ➙ Control Panel.
2. Click Hardware and Sound.
3. Click Devices and Printers.
4. Double-click USB Enhanced Performance Keyboard. The USB Enhanced Performance Keyboard
Customization program starts.
If these actions do not correct the problem, have the computer and keyboard serviced. See Chapter 11
“Getting information, help, and service” on page 117 for details.
The mouse or pointing device does not work
Symptom: The mouse or pointing device does not work.
Actions:
• Verify that the mouse or pointing-device cable is securely attached to the correct connector on the
computer. Depending on the type of mouse you have, the mouse cable will connect to either the
mouse, serial, or USB connector. Some keyboards have integrated USB connectors that can be used
for a USB mouse or pointing device.
• Verify that the device drivers for the mouse or pointing device are installed correctly.
• If you are using a USB keyboard or mouse, verify that the USB connectors are enabled in the BIOS
settings. See “Enabling or disabling a device” on page 83.
If these actions do not correct the problem, run the diagnostic programs (see “Diagnostic programs” on
page 114 for instructions). If you need technical assistance, see Chapter 11 “Getting information, help, and
service” on page 117.
The pointer on the screen does not move smoothly with the mouse
Symptom: The pointer on the screen does not move smoothly with the mouse.
Action: Erratic movement of the mouse pointer is generally caused by a buildup of dirt, oils, and other
contaminants on the ball inside the mouse. Clean the mouse. See “Optical mouse” on page 93 for
instructions.
The fingerprint reader does not work
Symptom: The fingerprint reader does not work.
Action: The following could cause the fingerprint reader not to operate properly:
• Not enrolling your fingerprint correctly.
• Scratching the surface of the reader with a hard, pointed object.
• Scraping the surface of the reader with your nail or anything hard.
• Using or touching the reader with a dirty finger.
• The surface of your finger is very different from when you enrolled your fingerprint.
The wireless keyboard does not work
Symptom: The wireless keyboard does not work.
Action: If the Transceiver Communications LED is on and the wireless Keyboard does not work, restart your
computer. If restarting your computer does not solve the problem, verify that the following conditions are met:
• The batteries are properly installed.
• The batteries still retain their current.
104
ThinkCentre User Guide
• The wireless Keyboard is located less than ten meters away from the transceiver.
• The transceiver is fully installed.
Action: If the Transceiver Communications LED is not on, reconnect the transceiver and the keyboard.
Monitor problems
Note: Many monitors have status-indicator lights and built-in controls for adjusting brightness, contrast,
width, height, and other picture adjustments. However, the controls vary from monitor type to monitor type.
For information about the status lights and using the controls, refer to the documentation that comes
with your monitor.
Select your symptom from the following list:
•
“Wrong characters appear on the screen” on page 105
•
“The monitor works when you turn on the computer, but goes blank after some period of computer
inactivity” on page 105
•
“The monitor works when you turn on the computer, but goes blank when you start some application
programs” on page 105
•
“The image appears to be flickering” on page 106
•
“The image is discolored” on page 106
Wrong characters appear on the screen
Symptom: Wrong characters appear on the screen.
Action: Have the computer serviced. For details, see Chapter 11 “Getting information, help, and service” on
page 117.
The monitor works when you turn on the computer, but goes blank after some period
of computer inactivity
Symptom: The monitor works when you turn on the computer, but goes blank after some period of computer
inactivity.
Action: The computer is probably set for energy savings with the power-management feature. If the
power-management feature is enabled, disabling it or changing the settings might solve the problem.
If these actions do not correct the problem, run the diagnostic programs (see “Diagnostic programs” on
page 114 for instructions). If you need technical assistance, see Chapter 11 “Getting information, help, and
service” on page 117.
The monitor works when you turn on the computer, but goes blank when you start
some application programs
Symptom: The monitor works when you turn on the computer, but goes blank when you start some
application programs.
Actions:
• Make sure the monitor signal cable is securely connected to the monitor and the monitor connector on
the computer. A loose cable can cause intermittent problems.
• Verify that the necessary device drivers for the application programs are installed. Refer to the
documentation for the affected application program to see if device drivers are required.
Chapter 10. Troubleshooting and diagnostics
105
If these actions do not correct the problem, run the diagnostic programs (see “Diagnostic programs” on
page 114 for instructions). If you need technical assistance, see Chapter 11 “Getting information, help, and
service” on page 117.
The image appears to be flickering
Symptom: The image appears to be flickering.
Actions:
• The monitor might be operating in a low-refresh rate display mode. Set the monitor to the highest,
noninterlaced refresh rate supported by your monitor and the video controller in your computer.
Attention: Using a resolution or refresh rate that is not supported by your monitor might damage it. Check
the documentation that comes with your monitor to verify the supported refresh rates.
• The monitor might be affected by interference from nearby equipment. Magnetic fields around other
devices, such as transformers, appliances, fluorescent lights, and other monitors might be causing the
problem. Move fluorescent desk lighting or any equipment that produces magnetic fields farther away
from the monitor. If this does not correct the problem, do the following:
1. Turn off the monitor. (Moving a color monitor while it is turned on might cause screen discoloration.)
2. Adjust the placement of the monitor and other devices so that they are at least 305 mm (12 inches)
apart.
3. Turn on the monitor.
• You can reset the refresh rate through your operating system Control Panel:
On the Windows 7 operating system, click Start ➙ Control Panel ➙ Hardware and Sound ➙ Adjust
screen resolution ➙ Advanced Settings. Then click the Monitor tab and select a new refresh rate.
• See your operating system documentation or help for further information on monitor settings.
If these actions do not correct the problem, your monitor might need service. See Chapter 11 “Getting
information, help, and service” on page 117 for details.
The image is discolored
Symptom: The image is discolored.
Action: The monitor might be affected by interference from nearby equipment. Magnetic fields around other
devices, such as transformers, appliances, fluorescent lights, and other monitors might be causing the
problem. Move fluorescent desk lighting or any equipment that produces magnetic fields further away from
the monitor. If this does not correct the problem, do the following:
1. Turn off the monitor. (Moving a color monitor while it is turned on might cause screen discoloration.)
2. Adjust the placement of the monitor and other devices so that they are at least 305 mm (12 inches) apart.
3. Turn on the monitor.
If these actions do not correct the problem, your monitor might need service. See Chapter 11 “Getting
information, help, and service” on page 117 for details.
Networking problems
The following are the most common networking problems. Select your networking problem from the
following list:
•
“Ethernet problems” on page 107
•
“A wireless LAN problem” on page 108
•
“A wireless WAN problem” on page 108
106
ThinkCentre User Guide
•
“Bluetooth problems” on page 108
For more information, see “Help and Support” on page 117.
Ethernet problems
For Ethernet problems, select your symptom from the following list:
•
“Your computer cannot connect to the network” on page 107
•
“The adapter stops working for no apparent reason” on page 107
•
“If your computer is a Gigabit Ethernet model and you use a speed of 1000 Mbps, the connection fails
or errors occur” on page 108
•
“If your computer is a Gigabit Ethernet model, it cannot connect to the network at 1000 Mbps. Instead, it
connects at 100 Mbps” on page 108
Your computer cannot connect to the network
Symptom: Your computer cannot connect to the network.
Actions: Make sure that:
• The cable is installed properly.
The network cable must be securely connected to both the Ethernet connector of your computer and
the RJ45 connector of the hub. The maximum allowable distance from the computer to hub is 100
meters. If the cable is connected and the distance is within acceptable limits but the problem persists, try
a different cable.
• The cable is installed properly.
• You are using the correct device driver.
On the Windows 7 operating system and the Windows Vista operating system , do the following:
1. Click Start ➙ Control Panel.
2. Click Hardware and Sound.
3. Click Device Manager. If you are prompted for an administrator password or confirmation, type the
password or provide confirmation.
4. If an exclamation mark is displayed next to an adapter name under Network adapters, you might not
use the correct driver or the driver is not enabled. To update the driver, right-click the highlighted
adapter.
5. Click Update Driver Software, and then follow the instructions on the screen.
• The switch port and the adapter have the same duplex setting.
If you configured the adapter for full duplex, make sure the switch port is also configured for full duplex.
Setting the wrong duplex mode can degrade performance, cause data loss, or result in lost connections.
• You have installed all networking software that is necessary for your network environment.
Check with your LAN administrator for the necessary networking software.
The adapter stops working for no apparent reason
Symptom: The adapter stops working for no apparent reason.
Action: The network driver files may be corrupt or missing. Update the driver by referring to the “Solution”
description for the procedure to make sure that the correct device driver is installed.
The Wake on LAN feature is not working
Symptom: The Wake on LAN (WOL) feature is not working.
Chapter 10. Troubleshooting and diagnostics
107
Actions:
• Make sure that WOL is enabled in the BIOS Setup Utility program.
• If it is, check with your LAN administrator for the necessary settings.
If your computer is a Gigabit Ethernet model and you use a speed of 1000 Mbps, the connection
fails or errors occur
Symptom: If your computer is a Gigabit Ethernet model and you use a speed of 1000 Mbps, the connection
fails or errors occur.
Actions:
• Use Category 5 wiring and make sure that the network cable is securely connected.
• Connect to a 1000 BASE-T hub/switch (not 1000 BASE-X).
If your computer is a Gigabit Ethernet model, it cannot connect to the network at 1000 Mbps. Instead,
it connects at 100 Mbps
Symptom: If your computer is a Gigabit Ethernet model, it cannot connect to the network at 1000 Mbps.
Instead, it connects at 100 Mbps.
Actions:
• Try another cable.
• Make sure that the link partner is set to auto-negotiate.
• Make sure that the switch is 802.3ab-compliant (gigabit over copper).
A wireless LAN problem
Symptom: You cannot connect using the built-in wireless networking card.
Actions:
• Make sure that your wireless LAN driver is the latest version. Check the Web site and verify the driver
version supported by Access Connections is the latest documented in the readme file.
• Make sure that your computer is within range of a wireless access point.
• Make sure that the wireless radio is enabled by double-clicking the Access Connections icon in the
Windows notification area.
Note: If your computer is preinstalled with the Windows 7 operating system, click Show hidden icons in
the Windows notification area. The Access Connections icon is displayed. For more information about
the icon, see the Help in Access Connections.
• Check Network Name (SSID), and your encryption information. Use Access Connections to verify this
case-sensitive information.
A wireless WAN problem
Message: Unauthorized WAN card is plugged in - Power off and remove the WAN card.
Action: The WAN card is not supported on this computer. Remove it.
Note: Some computer models do not have a wireless WAN.
Bluetooth problems
For Bluetooth problems, select your symptom from the following list:
•
“Sound does not come from the Bluetooth headphone” on page 109
108
ThinkCentre User Guide
•
“PIM items sent from the Windows 7 or the Windows Vista operating system cannot be received
correctly” on page 109
Sound does not come from the Bluetooth headphone
Symptom: Sound does not come from the Bluetooth headset/headphone but comes from the local speaker
even though the headset/headphone is connected using Headset profile or AV profile.
Action: Do the following:
1. Exit the application that uses the sound device (for example, Windows Media Player).
2. Open the Control Panel by clicking Start ➙ Control Panel.
3. Click Hardware and Sound ➙ Sound.
4. Select the Playback tab.
5. If you are using Headset profile, select Bluetooth Hands-free Audio and click the Set Default button. If
you are using AV profile, select Stereo Audio and click the Set Default button.
6. Click OK to close the Sound window.
PIM items sent from the Windows 7 or the Windows Vista operating system cannot be received
correctly
Symptom: Personal Information Manager (PIM) items sent from the Windows 7 or the Windows Vista
operating system cannot be received correctly into the address book of any other Bluetooth-enabled device.
Action: The Windows 7 operating system and the Windows Vista operating system send PIM items in XML
format, but most Bluetooth-enabled devices handle PIM items in vCard format. If another Bluetooth-enabled
device can receive a file through Bluetooth, a PIM item sent from the Windows 7 operating system and the
Windows Vista operating system might be saved as a file with the extension .contact.
Option problems
Use this information to diagnose problems with Lenovo hardware options that do not have their own
troubleshooting information.
Select your symptom from the following list:
•
“An option that was just installed does not work” on page 109
•
“An option that previously worked does not work now” on page 110
An option that was just installed does not work
Symptom: An option that was just installed does not work.
Action: Verify that:
• The option is designed for your computer.
• You followed the installation instructions supplied with the option and the installation instructions provided
with your computer, and all option files (such as device drivers, if required) are installed correctly.
• You have not loosened other installed options or cables.
• If the option is an adapter, you have provided enough hardware resources for the adapter to function
correctly. See the documentation supplied with the adapter (as well as the documentation for any other
installed adapters) to determine the resources required for each adapter.
If these actions do not correct the problem, run the diagnostic programs (see “Diagnostic programs” on
page 114 for instructions). If you need technical assistance, see Chapter 11 “Getting information, help, and
service” on page 117.
Chapter 10. Troubleshooting and diagnostics
109
An option that previously worked does not work now
Symptom: An option that previously worked does not work now.
Actions:
• Verify that all option hardware and cable connections are secure.
• If the option comes with its own test instructions, use those instructions to test the option.
• If the failing option is a SCSI option, verify that:
– The cables for all external SCSI options are connected correctly.
– The last option in each SCSI chain, or the end of the SCSI cable, is terminated correctly.
– All external SCSI options are turned on. External SCSI options must be turned on before the computer
is turned on. For more information, see your SCSI documentation.
• Verify that the option and any required device drivers are installed correctly.
If these actions do not correct the problem, run the diagnostic programs (see “Diagnostic programs” on
page 114 for instructions). If you need technical assistance, see Chapter 11 “Getting information, help, and
service” on page 117.
Performance and lockup problems
Poor performance and lockup problems can be a result of any of the following:
•
“Insufficient free hard disk drive space” on page 110
•
“Excessive number of fragmented files” on page 111
•
“Insufficient memory” on page 112
Make a selection from the above list to find out more about the corrective actions you can take.
Insufficient free hard disk drive space
Symptom: Insufficient free hard disk drive space
The Windows operating system will slow down and might produce errors if the hard disk drive gets too full.
To check the amount of free space on the Windows Vista operating system and the Windows 7 operating
system, do the following:
1. Click Start ➙ Computer.
2. Right-click your C drive entry and then click Properties. The amount of free disk space is displayed.
Actions to free up disk space:
• On the Windows Vista operating system, do one or all of the following:
–
1. Click Start ➙ Computer.
2. Right-click your C drive entry and then click Properties.
3. Click Disk Cleanup.
4. Choose My Files or Files from all users on this computer.
5. A list of unnecessary file categories is displayed. Select each file category you want to delete, and
then click OK.
6. Click Delete Files.
110
ThinkCentre User Guide
–
1. Click Start ➙ Control Panel.
2. Click Programs.
3. Click Turn Windows features on or off.
4. A list of optional Windows components is displayed. Follow the instructions on the screen.
–
1. Click Start ➙ Computer.
2. Right-click your C drive entry and then click Properties.
3. Click Disk Cleanup.
4. Select Files from all users on this computer.
5. Click Continue.
6. Click the More Options tab.
7. In the Programs and Features area, click the Clean up button.
8. A list of installed applications is displayed. Select the application you want to remove. Click
Uninstall/Change and then click Continue.
• On the Windows 7 operating system, do one or all of the following:
–
1. Click Start ➙ Computer.
2. Right-click your C drive entry and then click Properties.
3. Click Disk Cleanup.
4. A list of unnecessary file categories is displayed. Select each file category you want to delete, and
then click OK.
–
1. Click Start ➙ Control Panel.
2. Click Programs.
3. Click Turn Windows features on or off.
4. A list of optional Windows components is displayed. Follow the instructions on the screen.
–
1. Click Start ➙ Computer.
2. Right-click your C drive entry and then click Properties.
3. Click Disk Cleanup.
4. Click Clean up system files.
5. Click the More Options tab.
6. In the Programs and Features area, click the Clean up button.
7. A list of installed applications is displayed. Select the application you want to remove. Click
Uninstall/Change.
• Clean out your Inbox, Sent Items, and Deleted Items folders from your e-mail application. The folder
names and procedures vary depending on your e-mail application. If you need assistance, see the
help system for your e-mail application.
Excessive number of fragmented files
Symptom: Excessive number of fragmented files
Chapter 10. Troubleshooting and diagnostics
111
Action: Run the Windows Disk Defragmenter program.
Note: Depending on the size of the hard disk drive and amount of data currently stored on the hard disk
drive, the disk defragmentation process might take up to several hours to complete.
• On the Windows Vista operating system, do the following:
1. Close any programs that are currently running and close any open windows.
2. Click Start ➙ Computer.
3. Right-click your C drive entry and then click Properties.
4. Click the Tools tab.
5. Click Analyze disk to determine if a disk-defragmentation process is necessary. Click Defragment
disk to start a disk-defragmentation process.
• On the Windows 7 operating system, do the following:
1. Close any programs that are currently running and close any open windows.
2. Click Start ➙ Computer.
3. Right-click your C drive entry and then click Properties.
4. Click the Tools tab.
5. Click Defragment Now, then click Continue.
6. Click Defragment Now again to start a disk-defragmentation process.
Insufficient memory
Symptom: Insufficient memory
In general, the more memory that is installed, the better the Windows operating system runs.
Action: Install additional memory. For information about purchasing memory, see Chapter 11 “Getting
information, help, and service” on page 117. For step-by-step instructions on installing memory, see
“Installing or replacing a memory module” on page 35.
If these actions do not correct the problem, run the diagnostic programs (see “Diagnostic programs” on
page 114 for instructions). If you need technical assistance, see Chapter 11 “Getting information, help, and
service” on page 117.
Printer problems
Symptom: The printer does not work.
Actions: Verify that:
1. The printer is turned on and is online.
2. Paper is loaded correctly.
3. The printer signal cable is securely connected to the correct parallel, serial, or USB connector on the
computer.
Note: Non-IEEE-approved printer signal cables might cause unpredictable problems.
1. Any device drivers and other software that came with the printer are correctly installed.
2. You have assigned the printer port correctly in your operating system, application program, or BIOS
settings. For more information about BIOS settings, see Chapter 7 “Using the Setup Utility program”
on page 81.
112
ThinkCentre User Guide
If the problem persists, run the tests described in the documentation that comes with your printer. If you
cannot correct the problem, have the computer serviced. See Chapter 11 “Getting information, help, and
service” on page 117.
Serial port problems
Use this information to troubleshoot the serial port and devices attached to the serial port.
Symptom: Serial port cannot be accessed.
Actions:
• Make sure the serial cable is securely connected to the serial port on the computer and to the serial device.
If the serial device has its own power cord, make sure it is attached to a properly grounded electrical outlet.
• If the serial device has its own On/Off switch, make sure it is in the On position.
• If the serial device has an Online switch, make sure it is in the Online position.
• If the serial device is a printer, make sure paper is loaded correctly.
• Verify that any software supplied with the serial device is correctly installed. Refer to the documentation
for the serial-device option.
• Make sure that the serial-port adapter, if you added one, is properly installed and firmly seated.
If these actions do not correct the problem, run the diagnostic programs (see “Diagnostic programs” on
page 114 for instructions). If you need technical assistance, see Chapter 11 “Getting information, help, and
service” on page 117.
Software problems
Select your symptom from the following list:
•
“When using a sort feature, dates do not sort in the correct order” on page 113
•
“Software does not work as expected” on page 113
When using a sort feature, dates do not sort in the correct order
Symptom: When using a sort feature, dates do not sort in the correct order.
Action: Some software developed before the year 2000 used only the last two digits of a year to sort
dates, always assuming the first two digits were 19. Consequently, these programs sort dates out of order.
Check with your software manufacturer to see if any updates are available. Many software manufacturers
make updates available from the World Wide Web.
Software does not work as expected
Symptom: Software does not work as expected.
Actions:
• Most software programs have built-in help systems that provide instructions for most tasks. If you are
having difficulty performing a specific task within a software program, refer to the help system for that
program. Help systems are typically accessible from a menu or button in the program, and frequently
from the F1 key.
• If you are having difficulty with the Windows operating system or one of its components, refer to the
Windows help system. It is accessible from the Windows Start menu.
• To determine if problems are caused by newly installed software, verify that:
Chapter 10. Troubleshooting and diagnostics
113
– Your computer has the minimum memory requirements needed to use the software. See the
information supplied with the software to verify memory requirements. (If you just installed an adapter
or memory, you might have a memory-address conflict.)
– The software is designed to operate on your computer.
– Other software works on your computer.
– The software you are using works correctly on another computer.
• If you received any error messages while using the software program, see the printed documentation
supplied with the software or the help system for that software for a description of the messages and
solutions to the problem.
• Check with your software manufacturer to see if any updates are available. Many software manufacturers
make updates available from the World Wide Web.
• If the software program used to work correctly, but does not work correctly now, do the following:
– On the Windows Vista operating system, click Start ➙ Control Panel ➙ System and Maintenance ➙
System ➙ System Protection ➙ System Restore.
– On the Windows 7 operating system, click Start ➙ Control Panel ➙ System and Security ➙ System
➙ System Protection ➙ System Restore.
• If you are unable to resolve the problem through other methods, uninstall the software program and
reinstall it.
If these actions do not correct the problem, you might need technical assistance. Contact your software
manufacturer or see Chapter 11 “Getting information, help, and service” on page 117 for details.
USB problems
Symptom: The USB connectors cannot be accessed.
Actions:
• Make sure the USB cable is securely connected to the USB connector and to the USB device. If the USB
device has its own power cord, make sure it is attached to a properly grounded electrical outlet.
• If the USB device has its own On/Off switch, make sure it is in the On position.
• If the USB device has an Online switch, make sure it is in the Online position.
• If the USB device is a printer, make sure paper is loaded correctly.
• Make sure any device drivers or other software supplied with the USB device is correctly installed.
Refer to the documentation for the USB device.
• Reset the device by detaching and reattaching the USB connector.
If these actions do not correct the problem, run the diagnostic programs to test the USB connector (see
“Diagnostic programs” on page 114 for instructions). If the USB device came with its own diagnostics, run
those diagnostics against the USB device. If you need technical assistance, see Chapter 11 “Getting
information, help, and service” on page 117.
Diagnostic programs
Diagnostic programs are used to test hardware components of your computer. Diagnostic programs can
also report operating-system-controlled settings that interfere with the correct operation of your computer.
You can use the preinstalled diagnostic program to diagnose computer problems, if your computer is
running the Windows operating system.
Notes:
114
ThinkCentre User Guide
1. Depending on the date when your computer was manufactured, your computer is preinstalled with
either the Lenovo Solution Center program or the Lenovo ThinkVantage Toolbox program for diagnostic
purposes. For more information about the Lenovo ThinkVantage Toolbox program, see “Lenovo
ThinkVantage Toolbox” on page 115. For more information about the Lenovo Solution Center program,
see “Lenovo Solution Center” on page 115.
2. You can also download the PC-Doctor for DOS diagnostic program from http://www.lenovo.com/support.
See “PC-Doctor for DOS” on page 115 for detailed information.
3. If you are unable to isolate and repair the problem yourself after running the programs, save and print
the log files created by the programs. You will need the log files when you speak to a Lenovo technical
support representative.
Lenovo Solution Center
The Lenovo Solution Center program enables you to troubleshoot and resolve computer problems. It
combines diagnostic tests, system information collection, security status, and support information, along
with hints and tips for maximum system performance.
Notes:
• The Lenovo Solution Center program is available only on models preinstalled with the Windows 7
operating system. If your Windows 7 model is not preinstalled with the program, you can download it
from http://www.lenovo.com/diagnose.
• If you are using the Windows Vista or Windows XP operating system, go to
http://www.lenovo.com/diagnose for the latest information on diagnostics for your
computer.
To run the Lenovo Solution Center program on the Windows 7 operating system, click Start ➙ All Programs
➙ Lenovo ThinkVantage Tools ➙ System Health and Diagnostics. Follow the instructions on the screen.
For additional information, refer to the Lenovo Solution Center help system.
Note: If you are unable to isolate and repair the problem yourself after running the program, save and print
the log files created by the program. You will need the log files when you speak to a Lenovo technical
support representative.
Lenovo ThinkVantage Toolbox
The Lenovo ThinkVantage Toolbox program helps you maintain your computer, improve computing security,
diagnose computer problems, get familiar with the innovative technologies provided by Lenovo, and get
more information about your computer. You can use the diagnostics feature of the Lenovo ThinkVantage
Toolbox program to test devices, diagnose computer problems, create bootable diagnostic media, update
system drivers, and view system information.
• To run the Lenovo ThinkVantage Toolbox program on the Windows 7 operating system, click Start ➙ All
Programs ➙ Lenovo ThinkVantage Tools ➙ System Health and Diagnostics. Follow the instructions
on the screen.
• To run the Lenovo ThinkVantage Toolbox program on the Windows Vista operating system, click Start ➙
All Programs ➙ ThinkVantage ➙ Lenovo ThinkVantage Toolbox. Follow the instructions on the screen.
Follow the instructions on the screen. For additional information, refer to the Lenovo ThinkVantage Toolbox
help system.
PC-Doctor for DOS
You can also download the latest version of the PC-Doctor for DOS diagnostic program from
http://www.lenovo.com/support. The PC-Doctor for DOS diagnostic program runs independently of the
Chapter 10. Troubleshooting and diagnostics
115
Windows operating system. Use the PC-Doctor for DOS diagnostic program if you are unable to start the
Windows operating system or if the two diagnostic programs preinstalled on your computer have not
been successful in isolating a possible problem. You can run the PC-Doctor for DOS diagnostic program
from a diagnostic disc that you created.
Creating a diagnostic disc
This section provides instructions on how to create a diagnostic disc.
To create a diagnostic disc, do the following:
1. Download a self-starting bootable CD/DVD image (known as an ISO image) of the diagnostic program
from:
http://www.lenovo.com/support
2. Use any CD/DVD burning software to create a diagnostic disc with the ISO image.
Running the diagnostic program from a diagnostic disc
This section provides instructions on how to run the diagnostic program from a diagnostic disc that you
created.
To run the diagnostic program from a diagnostic disc that you created, do the following:
1. Make sure the optical drive you want to use is set as the first boot device in the startup device sequence.
See “Selecting or changing the startup device sequence” on page 84.
2. Make sure the computer is turned on and then insert the disc into the optical drive. The diagnostic
program opens.
Note: You can insert the disc into the optical drive when you are setting the startup device sequence.
However, if you insert the disc into the optical drive when you have already entered the operating
system, you need to restart the computer to access the diagnostic program.
3. Follow the instructions on the screen to select the diagnostic test you want to run.
Note: For additional help, press the F1 key.
4. Remove the diagnostic disc from the optical drive when you complete the diagnostic process.
116
ThinkCentre User Guide
Chapter 11. Getting information, help, and service
This chapter contains information about help, service, and technical assistance for products manufactured
by Lenovo.
Information resources
You can use the information in this section to access useful resources relating to your computing needs.
Lenovo ThinkVantage Tools
The Lenovo ThinkVantage Tools program guides you to a host of information sources and provides easy
access to various tools to help you work more easily and securely.
Note: The Lenovo ThinkVantage Tools program is only available on computers preinstalled with the Windows
7 operating system from Lenovo.
To access the Lenovo ThinkVantage Tools program, click Start ➙ All Programs ➙ Lenovo ThinkVantage
Tools.
Lenovo Welcome
The Lenovo Welcome program introduces you to some innovative built-in features of Lenovo and guides you
through a few important setup tasks to help you make the most of your computer.
Help and Support
The Windows Help and Support information system guides you to various help and support information
from Lenovo and Microsoft, such as updating drivers, accessing ThinkVantage Technologies, and accessing
user manuals.
To access the Windows Help and Support information system, click Start ➙ Help and Support.
Safety and Warranty
The ThinkCentre Safety and Warranty Guide that is provided with your computer contains information on
safety, setup, warranty, and notices. Read and understand all safety information before using this product.
Lenovo Web site (http://www.lenovo.com)
The Lenovo Web site provides up-to-date information and services to help you buy, upgrade, and maintain
your computer. You can also do the following:
• Shop for desktop and notebook computers, monitors, projectors, upgrades and accessories for your
computer, and special offers.
• Purchase additional services, such as support for hardware, operating systems, application programs,
network setup and configuration, and custom installations.
• Purchase upgrades and extended hardware repair services.
• Download the latest device drivers and software updates for your computer model.
• Access the online manuals for your products.
• Access the Lenovo Limited Warranty.
© Copyright Lenovo 2012
117
• Access troubleshooting and support information for your computer model and other supported products.
• Find the service and support phone numbers for your country or region.
• Find a Service Provider located near you.
Lenovo Support Web site
Technical support information is available on the Lenovo Support Web site at:
http://www.lenovo.com/support
This Web site is updated with the latest support information such as the following:
• Drivers and software
• Diagnostic solutions
• Product and service warranty
• Product and parts details
• User guides and manuals
• Knowledge base and frequently asked questions
Help and service
This section contains information about obtaining help and service.
Using the documentation and diagnostic programs
If you experience a problem with your computer, see Chapter 10 “Troubleshooting and diagnostics” on
page 97. For information on additional resources to help you troubleshoot your computer problem, see
“Information resources” on page 117.
If you suspect a software problem, see the documentation that comes with the operating system or software
program, including readme files and online help.
Most computers come with a set of diagnostic programs that help you identify hardware problems. For
instructions on using the diagnostic programs, see “Diagnostic programs” on page 114.
You can also get the latest technical information and download device drivers and updates from Lenovo
Support Web site at:
http://www.lenovo.com/support
Calling for service
During the warranty period, you can get help and information by telephone through the Customer Support
Center.
The following services are available during the warranty period:
• Problem determination - Trained service personnel are available to assist you with determining a
hardware problem and deciding what action is necessary to fix the problem.
• Hardware repair - If the problem is caused by hardware under warranty, trained service personnel are
available to provide the applicable level of service.
• Engineering Change management - There might be changes that are required after a product has
been sold. Lenovo or your reseller will make selected Engineering Changes (ECs) that apply to your
hardware available.
118
ThinkCentre User Guide
These items are not covered by the warranty:
• Replacement or use of parts not manufactured for or by Lenovo or non-warranted Lenovo parts
• Identification of software problem sources
• Configuration of BIOS as part of an installation or upgrade
• Changes, modifications, or upgrades to device drivers
• Installation and maintenance of network operating systems (NOS)
• Installation and maintenance of application programs
Refer to the ThinkCentre Safety and Warranty Guide that comes with your computer for information about
your warranty type and duration. You must retain your proof of purchase to obtain warranty service.
For a list of the Lenovo Support phone numbers for your country or region, go to
http://www.lenovo.com/support/phone or refer to the ThinkCentre Safety and Warranty Guide that comes
with your computer.
Note: Phone numbers are subject to change without notice. If the number for your country or region is not
provided, contact your Lenovo reseller or Lenovo marketing representative.
If possible, be at your computer when you call. Have the following information available:
• Machine type and model
• Serial numbers of your hardware products
• Description of the problem
• Exact wording of any error messages
• Hardware and software configuration information
Using other services
If you travel with your computer or relocate it to a country where your desktop or notebook computer
machine type is sold, your computer might be eligible for International Warranty Service, which automatically
entitles you to obtain warranty service throughout the warranty period. Service will be performed by service
providers authorized to perform warranty service.
Service methods and procedures vary by country, and some services might not be available in all countries.
International Warranty Service is delivered through the method of service (such as depot, carry-in, or
on-site service) that is provided in the servicing country. Service centers in certain countries might not be
able to service all models of a particular machine type. In some countries, fees and restrictions might
apply at the time of service.
To determine whether your computer is eligible for International Warranty Service and to view a list of the
countries where service is available, go to http://www.lenovo.com/support, click Warranty, and follow
the instructions on the screen.
For technical assistance with the installation of or questions related to Service Packs for your
preinstalled Microsoft Windows product, refer to the Microsoft Product Support Services Web site at
http://support.microsoft.com/directory or you can contact the Customer Support Center. Some fees might
apply.
Purchasing additional services
During and after the warranty period, you can purchase additional services, such as support for hardware,
operating systems, and application programs; network setup and configuration; upgraded or extended
hardware repair services; and custom installations. Service availability and service name might vary by
country or region. For more information about these services, go to the Lenovo Web site at:
http://www.lenovo.com
Chapter 11. Getting information, help, and service
119
120
ThinkCentre User Guide
Appendix A. Notices
Lenovo may not offer the products, services, or features discussed in this document in all countries. Consult
your local Lenovo representative for information on the products and services currently available in your
area. Any reference to a Lenovo product, program, or service is not intended to state or imply that only that
Lenovo product, program, or service may be used. Any functionally equivalent product, program, or service
that does not infringe any Lenovo intellectual property right may be used instead. However, it is the user's
responsibility to evaluate and verify the operation of any other product, program, or service.
Lenovo may have patents or pending patent applications covering subject matter described in this
document. The furnishing of this document does not give you any license to these patents. You can send
license inquiries, in writing, to:
Lenovo (United States), Inc.
1009 Think Place - Building One
Morrisville, NC 27560
U.S.A.
Attention: Lenovo Director of Licensing
LENOVO PROVIDES THIS PUBLICATION “AS IS” WITHOUT WARRANTY OF ANY KIND, EITHER EXPRESS
OR IMPLIED, INCLUDING, BUT NOT LIMITED TO, THE IMPLIED WARRANTIES OF NON-INFRINGEMENT,
MERCHANTABILITY OR FITNESS FOR A PARTICULAR PURPOSE. Some jurisdictions do not allow
disclaimer of express or implied warranties in certain transactions, therefore, this statement may not apply
to you.
This information could include technical inaccuracies or typographical errors. Changes are periodically
made to the information herein; these changes will be incorporated in new editions of the publication.
Lenovo may make improvements and/or changes in the product(s) and/or the program(s) described in this
publication at any time without notice.
The products described in this document are not intended for use in implantation or other life support
applications where malfunction may result in injury or death to persons. The information contained in this
document does not affect or change Lenovo product specifications or warranties. Nothing in this document
shall operate as an express or implied license or indemnity under the intellectual property rights of Lenovo
or third parties. All information contained in this document was obtained in specific environments and is
presented as an illustration. The result obtained in other operating environments may vary.
Lenovo may use or distribute any of the information you supply in any way it believes appropriate without
incurring any obligation to you.
Any references in this publication to non-Lenovo Web sites are provided for convenience only and do not in
any manner serve as an endorsement of those Web sites. The materials at those Web sites are not part of
the materials for this Lenovo product, and use of those Web sites is at your own risk.
Any performance data contained herein was determined in a controlled environment. Therefore, the result
obtained in other operating environments may vary significantly. Some measurements may have been
made on development-level systems and there is no guarantee that these measurements will be the same
on generally available systems. Furthermore, some measurements may have been estimated through
extrapolation. Actual results may vary. Users of this document should verify the applicable data for their
specific environment.
© Copyright Lenovo 2012
121
Trademarks
The following terms are trademarks of Lenovo in the United States, other countries, or both:
Lenovo
The Lenovo logo
Rescue and Recovery
ThinkCentre
ThinkVantage
Microsoft, Windows, and Windows Vista are trademarks of the Microsoft group of companies.
Intel, Intel Core, Celeron, and Pentium are trademarks of Intel Corporation in the United States, other
countries, or both.
Linux is a trademark of Linus Torvalds in the United States, other countries, or both.
Other company, product, or service names may be trademarks or service marks of others.
122
ThinkCentre User Guide
Appendix B. Regulatory information
Export classification notice
This product is subject to the United States Export Administration Regulations (EAR) and has an Export
Classification Control Number (ECCN) of 4A994.b. It can be re-exported except to any of the embargoed
countries in the EAR E1 country list.
Television output notice
The following notice applies to models that have the factory-installed television-output feature.
This product incorporates copyright protection technology that is protected by method claims of certain U.S.
patents and other intellectual property rights owned by Macrovision Corporation and other rights owners.
Use of this copyright protection technology must be authorized by Macrovision Corporation, and is intended
for home and other limited viewing uses only unless otherwise authorized by Macrovision Corporation.
Reverse engineering or disassembly is prohibited.
Electronic emissions notices
The following information refers to Lenovo personal computer machine types 0900, 0967, 1271, 3578, 3594,
3596, 3598, 3629, 3654, 3660, 3664, 3668, and 3676.
Federal Communications Commission Declaration of Conformity
This equipment has been tested and found to comply with the limits for a Class B digital device, pursuant
to Part 15 of the FCC Rules. These limits are designed to provide reasonable protection against harmful
interference in a residential installation. This equipment generates, uses, and can radiate radio frequency
energy and, if not installed and used in accordance with the instructions, may cause harmful interference
to radio communications. However, there is no guarantee that interference will not occur in a particular
installation. If this equipment does cause harmful interference to radio or television reception, which can be
determined by turning the equipment off and on, the user is encouraged to try to correct the interference by
one or more of the following measures:
• Reorient or relocate the receiving antenna.
• Increase the separation between the equipment and receiver.
• Connect the equipment into an outlet on a circuit different from that to which the receiver is connected.
• Consult an authorized dealer or service representative for help.
Lenovo is not responsible for any radio or television interference caused by using other than specified or
recommended cables and connectors or by unauthorized changes or modifications to this equipment.
Unauthorized changes or modifications could void the user's authority to operate the equipment.
This device complies with Part 15 of the FCC Rules. Operation is subject to the following two conditions: (1)
this device may not cause harmful interference, and (2) this device must accept any interference received,
including interference that may cause undesired operation.
Responsible Party:
Lenovo (United States) Incorporated
1009 Think Place - Building One
Morrisville, NC 27560
Phone Number: 919-294-5900
© Copyright Lenovo 2012
123
Industry Canada Class B emission compliance statement
This Class B digital apparatus complies with Canadian ICES-003.
Cet appareil numérique de la classe B est conforme à la norme NMB-003 du Canada.
European Union - Compliance to the Electromagnetic Compatibility Directive
This product is in conformity with the protection requirements of EU Council Directive 2004/108/EC on the
approximation of the laws of the Member States relating to electromagnetic compatibility. Lenovo cannot
accept responsibility for any failure to satisfy the protection requirements resulting from a non-recommended
modification of the product, including the installation of option cards from other manufacturers.
This product has been tested and found to comply with the limits for Class B Information Technology
Equipment according to European Standard EN 55022. The limits for Class B equipment were derived
for typical residential environments to provide reasonable protection against interference with licensed
communication devices.
German Class B compliance statement
Deutschsprachiger EU Hinweis:
Hinweis für Geräte der Klasse B EU-Richtlinie zur Elektromagnetischen Verträglichkeit
Dieses Produkt entspricht den Schutzanforderungen der EU-Richtlinie 2004/108/EG (früher 89/336/EWG) zur
Angleichung der Rechtsvorschriften über die elektromagnetische Verträglichkeit in den EU-Mitgliedsstaaten
und hält die Grenzwerte der EN 55022 Klasse B ein.
Um dieses sicherzustellen, sind die Geräte wie in den Handbüchern beschrieben zu installieren und zu
betreiben. Des Weiteren dürfen auch nur von der Lenovo empfohlene Kabel angeschlossen werden.
Lenovo übernimmt keine Verantwortung für die Einhaltung der Schutzanforderungen, wenn das Produkt
ohne Zustimmung der Lenovo verändert bzw. wenn Erweiterungskomponenten von Fremdherstellern ohne
Empfehlung der Lenovo gesteckt/eingebaut werden.
Deutschland:
Einhaltung des Gesetzes über die elektromagnetische Verträglichkeit von Betriebsmitteln
Dieses Produkt entspricht dem „Gesetz über die elektromagnetische Verträglichkeit von Betriebsmitteln“
EMVG (früher „Gesetz über die elektromagnetische Verträglichkeit von Geräten“). Dies ist die Umsetzung der
EU-Richtlinie 2004/108/EG (früher 89/336/EWG) in der Bundesrepublik Deutschland.
Zulassungsbescheinigung laut dem Deutschen Gesetz über die elektromagnetische Verträglichkeit
von Betriebsmitteln, EMVG vom 20. Juli 2007 (früher Gesetz über die elektromagnetische
Verträglichkeit von Geräten), bzw. der EMV EG Richtlinie 2004/108/EC (früher 89/336/EWG), für
Geräte der Klasse B.
Dieses Gerät ist berechtigt, in Übereinstimmung mit dem Deutschen EMVG das EG-Konformitätszeichen
- CE - zu führen. Verantwortlich für die Konformitätserklärung nach Paragraf 5 des EMVG ist die Lenovo
(Deutschland) GmbH, Gropiusplatz 10, D-70563 Stuttgart.
124
ThinkCentre User Guide
Informationen in Hinsicht EMVG Paragraf 4 Abs. (1) 4:
Das Gerät erfüllt die Schutzanforderungen nach EN 55024 und EN 55022 Klasse B.
Korea Class B compliance statement
Japanese VCCI Class B statement
Japan compliance statement for products which connect to the power mains with rated current
less than or equal to 20 A per phase
Lenovo product service information for Taiwan
Keyboard and mouse compliance statement for Taiwan
Additional regulatory information
For additional regulatory information, refer to the ThinkCentre Regulatory Notice shipped with your computer.
Depending on the configuration of your computer and the country or region where the computer was
purchased, you might have received additional printed regulatory notices. All regulatory notices are available
on the Lenovo Support Web site in electronic format. To access electronic copies of the documentation, go
to http://www.lenovo.com/support and click User Guides and Manuals.
Appendix B. Regulatory information
125
126
ThinkCentre User Guide
Appendix C. WEEE and recycling statements
Important WEEE Information
The WEEE marking on Lenovo products applies to countries with WEEE and e-waste regulations (for example,
European Directive 2002/96/EC, India E-Waste Management & Handling Rules, 2011). Appliances are
labeled in accordance with local regulations concerning waste electrical and electronic equipment (WEEE).
These regulations determine the framework for the return and recycling of used appliances as applicable
within each geography. This label is applied to various products to indicate that the product is not to be
thrown away, but rather put in the established collective systems for reclaiming these end of life products.
Users of electrical and electronic equipment (EEE) with the WEEE marking must not dispose of end of
life EEE as unsorted municipal waste, but use the collection framework available to them for the return,
recycle, and recovery of WEEE and to minimize any potential effects of EEE on the environment and
human health due to the presence of hazardous substances. For additional WEEE information go to:
http://www.lenovo.com/recycling
Recycling information
Lenovo encourages owners of information technology (IT) equipment to responsibly recycle their equipment
when it is no longer needed. Lenovo offers a variety of programs and services to assist equipment owners in
recycling their IT products. For information on recycling Lenovo products, go to:
http://www.lenovo.com/recycling
© Copyright Lenovo 2012
127
Collecting and recycling a disused Lenovo computer or monitor
If you are a company employee and need to dispose of a Lenovo computer or monitor that is the property
of the company, you must do so in accordance with the Law for Promotion of Effective Utilization of
Resources. Computers and monitors are categorized as industrial waste and should be properly disposed
of by an industrial waste disposal contractor certified by a local government. In accordance with the Law
for Promotion of Effective Utilization of Resources, Lenovo Japan provides, through its PC Collecting
and Recycling Services, for the collecting, reuse, and recycling of disused computers and monitors. For
details, visit the Lenovo Web site at http://www.lenovo.com/recycling/japan. Pursuant to the Law for
Promotion of Effective Utilization of Resources, the collecting and recycling of home-used computers
and monitors by the manufacturer was begun on October 1, 2003. This service is provided free of
charge for home-used computers sold after October 1, 2003. For details, visit the Lenovo Web site at
http://www.lenovo.com/recycling/japan.
Disposing of Lenovo computer components
Some Lenovo computer products sold in Japan may have components that contain heavy metals or other
environmental sensitive substances. To properly dispose of disused components, such as a printed circuit
board or drive, use the methods described above for collecting and recycling a disused computer or monitor.
Disposing of disused lithium batteries from Lenovo computers
A button-shaped lithium battery is installed on the system board of your Lenovo computer to provide power
to the computer clock while the computer is off or disconnected from the main power source. If you want to
replace it with a new one, contact your place of purchase or ask for a repair service provided by Lenovo. If
you have replaced it by yourself and want to dispose of the disused lithium battery, insulate it with vinyl tape,
contact your place of purchase, and follow their instructions. If you use a Lenovo computer at home and
need to dispose of a lithium battery, you must comply with local ordinances and regulations.
Recycling information for Brazil
Declarações de Reciclagem no Brasil
Descarte de um Produto Lenovo Fora de Uso
Equipamentos elétricos e eletrônicos não devem ser descartados em lixo comum, mas enviados à pontos de
coleta, autorizados pelo fabricante do produto para que sejam encaminhados e processados por empresas
especializadas no manuseio de resíduos industriais, devidamente certificadas pelos orgãos ambientais, de
acordo com a legislação local.
A Lenovo possui um canal específico para auxiliá-lo no descarte desses produtos. Caso você possua
um produto Lenovo em situação de descarte, ligue para o nosso SAC ou encaminhe um e-mail para:
[email protected], informando o modelo, número de série e cidade, a fim de enviarmos as instruções
para o correto descarte do seu produto Lenovo.
Battery recycling information for Taiwan
128
ThinkCentre User Guide
Battery recycling information for the European Union
Notice: This mark applies only to countries within the European Union (EU).
Batteries or packaging for batteries are labeled in accordance with European Directive 2006/66/EC
concerning batteries and accumulators and waste batteries and accumulators. The Directive determines the
framework for the return and recycling of used batteries and accumulators as applicable throughout the
European Union. This label is applied to various batteries to indicate that the battery is not to be thrown
away, but rather reclaimed upon end of life per this Directive.
In accordance with the European Directive 2006/66/EC, batteries and accumulators are labeled to indicate
that they are to be collected separately and recycled at end of life. The label on the battery may also
include a chemical symbol for the metal concerned in the battery (Pb for lead, Hg for mercury, and Cd for
cadmium). Users of batteries and accumulators must not dispose of batteries and accumulators as unsorted
municipal waste, but use the collection framework available to customers for the return, recycling, and
treatment of batteries and accumulators. Customer participation is important to minimize any potential
effects of batteries and accumulators on the environment and human health due to the potential presence of
hazardous substances. For proper collection and treatment, go to:
http://www.lenovo.com/lenovo/environment
Appendix C. WEEE and recycling statements
129
130
ThinkCentre User Guide
Appendix D. Restriction of Hazardous Substances Directive
(RoHS)
China RoHS
Turkish RoHS
The Lenovo product meets the requirements of the Republic of Turkey Directive on the Restriction of the Use
of Certain Hazardous Substances in Electrical and Electronic Equipment (EEE).
Ukraine RoHS
© Copyright Lenovo 2012
131
India RoHS
RoHS compliant as per E-Waste (Management & Handling) Rules, 2011.
132
ThinkCentre User Guide
Appendix E. Ek Bilgiler
1. İmalatçı ya da ithalatçı firmaya ilişkin bilgiler:
Ürünün ithalatçı firması, Lenovo Technology B.V. Merkezi Hollanda Türkiye İstanbul Şubesi’dir. Adresi ve
telefonu şöyledir:
Uner Plaza Eski Üsküdar Yolu
Erkut Sokak. No: 4 / 1 Kat: 3
Kozyatağı
Kadıkoy, İSTANBUL, Türkiye
Tel: 90 216 570 01 00 - 99
Faks: 90 216 577 01 00
2. Bakım, onarım ve kullanımda uyulması gereken kurallar:
Elektronik cihazlar için gösterilmesi gereken standart özeni göstermeniz yeterlidir. Cihaz çalışır durumda
iken temizlik yapmayınız. Islak bezle, köpürtülmüş deterjanlarla, sulu süngerlerle temizlik yapmayınız.
Son kullanıcılar onarım konusunda yetkili değildir. Arıza söz konusu olduğuna inanıyorsanız telefonla
danışabilir ya da ürünü bu kitapta yer alan servis istasyonlarından birine götürebilirsiniz.
3. Taşıma ve nakliye sırasında dikkat edilecek hususlar:
Ürününüzü ve bağlı olduğu aygıtı taşırken ya da nakliye sırasında dikkat etmeniz gereken birkaç nokta
vardır. Aygıtı taşımadan önce tüm bağlı ortamların çıkartılmış olması, bağlı aygıtların çözülmesi ve
kabloların sökülmüş olması gerekir. Bu aygıtın zarar görmemesi için gereklidir. Ayrıca aygıtınızı taşırken
uygun koruma sağlayan bir taşıma kutusu kullanılmasına dikkat edin. Bakıma ilişkin diğer ek bilgiler
için kitabın ilgili bölümünden (eğer sağlanmışsa) yararlanabilirsiniz.
4. Aygıta ilişkin bakım, onarım ya da temizliğe ilişkin bilgiler:
Aygıta ilişkin kullanıcının yapabileceği bir bakım ya da onarım yoktur. Bakım ya da onarıma gereksinim
duyarsanız bir Çözüm Ortağı’ndan destek alabilirsiniz. Ayrıca servis istasyonlarına ilişkin bilgileri
kitabınızın eklerinde bulabilirsiniz.
5. Kullanım sırasında insan ya da çevre sağlığına zararlı olabilecek durumlar:
Bu tür durumlar söz konusu olduğunda ürüne özel olarak bu kitabın ilgili bölümünde detaylı olarak ele
alınmıştır. Kitabınızda bu tür bir uyarı yoksa, kullanmakta olduğunuz ürün için böyle bir durum söz
konusu değildir.
6. Kullanım hatalarına ilişkin bilgiler:
Burada belirtilenler ile sınırlı olmamak kaydı ile bu bölümde bazı kullanıcı hatalarına ilişkin örnekler
sunulmuştur. Bu ve benzeri konulara özen göstermeniz yeterlidir. Kılavuz içinde daha ayrıntılı bilgiler
verilebilir.
Örnekler:
• Kabloların zorla ait olmadıklara yuvalara takılması
• Kumanda butonlarına gereğinden yüksek kuvvet uygulanması
• Aleti çalışır durumda taşımak, temizlemek vb. eylemler
• Alet üzerine katı ya da sıvı gıda maddesi dökülmesi
• Aletin taşıma sırasında korunmaması ve darbe alması
7. Ürünün özelliklerine ilişkin tanıtıcı ve temel bilgiler:
Ürününüze ilişkin tanıtıcı ve temel bilgileri kitabınızın ilgili bölümlerinde bulabilirsiniz.
8. Periyodik bakıma ilişkin bilgiler:
Ürün bir uzmanın yapması gereken periodik bakımı içermez.
© Copyright Lenovo 2012
133
9. Bağlantı ve montaja ilişkin bilgiler:
Aksamınızı çalışır hale getirebilmeniz için gerekli bağlantı ve montaj bilgileri bu kılavuzda yer almaktadır.
Kuruluş işlemini kendiniz yapmak istemiyorsanız satıcınızdan ya da bir Servis İstasyonu’ndan ücret
karşılığı destek alabilirsiniz.
10. Bakanlıkça tespit ve ilan edilen kullanım ömrü:
Bakanlıkça tespit ve ilan edilen kullanım ömrü 7 yıldır.
11. Enerji tüketen mallarda, malın enerji tüketimi açısından verimli kullanımına ilişkin bilgiler:
Ürüne ait kullanma kılavuzunda belirtilmiştir.
12. Servis istasyonlarına ilişkin bilgiler:
Bunlar kitabınızın aynı başlıklı bölümünde belirtilmiştir. Herhangi bir onarım ya da yedek parça ihtiyacı
durumda bu istasyonlardan birine başvurabilirsiniz.
13. İthal edilmiş mallarda, yurt dışındaki üretici firmanın unvanı ve açık adresi ile diğer erişim bilgileri (telefon,
telefaks ve e-posta vb.):
Lenovo (Singapore) Pte. Ltd.
151 Lorong Chuan No: 02-01 New Tech Park
Singapore, 556741
Tel: 65-6827-1000 Faks: 65-6827-1100
134
ThinkCentre User Guide
Appendix F. Servis istasyonlari
Garanti süresi içerisinde müşteri arızalı ürünü aşağıda belirtilen merkezlere teslim ederek garanti hizmetinden
yararlanır. Ürün yerinde garanti hizmeti içeriyorsa, bu merkezlerden birine telefon edebilirsiniz.
Garanti Hizmetinin Alınabileceği Merkezler
ADANA
BSD Bilgisayar San. ve Tic. Ltd. Şti.
Adres: Cemal Paşa Mah. 7.Sokak No:7
Mualla Berrin Gökşen Apt. Zemin Kat Seyhan/Adana
Web Adresi: http://www.bsd.com.tr/
Telefon: 322 458 25 10 / 322 458 92 80/81
Faks no: 322 458 47 83
IBM Türk Ltd. Şti.
Adresi: Yeni Baraj Mah. 1.Sok.
Gülek Plaza A Blok Asma Kat Seyhan/Adana
Web Adresi: http://www.tr.ibm.com/
Telefon: 322 227 52 33
Faks no: 322 227 49 97
ANKARA
Arion Bilişim Sistemleri Tic. A.Ş.
Adresi: Hereke Sok. 8/2
Çankaya Ankara Posta Kodu: 06700
Web Adresi: http://www.arion.com.tr/
Telefon: 312 447 13 95
Faks no: 312 447 58 36
Destek Bilgisayar ve İletişim Hizmetleri Tic. A.Ş.
Adresi: Cinnah Caddesi, No:51/4
Çankaya Ankara
Posta kodu: 06680
Web Adresi: http://www.destek.as/
Telefon: 312 442 19 21
Faks no: 312 441 97 89
IBM Türk Ltd. Şti.
Adresi: Cinnah Cad. No: 3
Kavaklıdere Ankara
Web Adresi: http://www.tr.ibm.com/
Telefon: 312 455 48 00
Faks no: 312 426 72 30
Meteksan Sistem ve Bilgisayar Teknolojileri A.Ş.
Adresi: Oğuzlar Mah. 34 Sokak No: 14
Balgat Ankara
Posta kodu: 06520
Web Adresi: http://www.destek.as/
Telefon: 312 295 21 28
Faks no: 312 295 21 20
© Copyright Lenovo 2012
135
Probil Bilgi İşlem Destek ve Dan.San. ve Tic. A.Ş.
Adresi: Teknoloji Geliştirme Bölgesi, ODTÜ Ofis Bina, Batı Cephe A-1
ODTÜ / Ankara
Posta kodu: 06531
Web Adresi: http://www.probil.com.tr/
Telefon: 312 210 18 08
Faks no: 312 210 18 05
ANTALYA
Bilser Bilgi İşlem Tic. Ltd. Şti.
Adresi: Güllük Cad., 146. Sok., Gökhan Apt. No:1/3,6,7 Antalya
Posta kodu: 07050
Web Adresi: http://www.bilser.net/
Telefon: 242 247 75 28
Faks no: 242 241 10 68
BOLU
Ercoşkun Bilgisayar Yaz.Don.ve Dan.Hiz. Ltd. Şti.
Adresi: Tabaklar Mah., Cumhuriyet Cad., No:35 Bolu
Posta kodu: 14200
Web Adresi: http://www.ercoskun.com.tr/
Telefon: 374 212 58 46
Faks no: 374 212 70 98
BURSA
Monitor Digital Bilgisayar Ltd. Şti.
Adresi: Mudanya Yolu, Şehit Mümin Mutlu Sokak, No:2 Bolu
Posta kodu: 16160
Web Adresi: http://www.monitordigital.com/
Telefon: 224 242 43 10
Faks no: 224 242 40 22
DENİZLİ
ALM Bilgisayar San. Tic. Ltd.Şti.
Adresi: 2. Ticari Yol, Kazım Kaynak İş Merkezi, No:65 Kat:3 Denizli
Posta kodu: 20100
Web Adresi: http://www.almbilgisayar.com.tr/
Telefon: 258 264 28 55
Faks no: 258 265 74 77
DİYARBAKIR
Metro Bilgisayar Eğitim Tic. ve San.Ltd. Şti.
Adresi: Ali Emiri 5. Sokak, Kaçmaz Apartmanı, No:4/1 Diyarbakır
Posta kodu: 21100
Web Adresi: http://www.metrobilgisayar.com.tr/
Telefon: 412 223 94 36
Faks no: 422 224 55 07
136
ThinkCentre User Guide
ERZİNCAN
Erzincan Bigisayar
Adresi: Hükümet Caddesi, No:33/1 Erzincan
Web Adresi: http://www.erzincanbilgisayar.com/
Telefon: 446 223 89 87
Faks no: 446 224 24 34
ERZURUM
Şark Bilgisayar Elektronik San. ve Tic. Ltd. Şti.
Adresi: Yukarı Mumcu Caddesi, No:9 Erzurum
Posta kodu: 25100
Web Adresi: http://www.sarkbil.com.tr/
Telefon: 442 234 21 02 / 04
Faks no: 442 218 21 07
IBM Türk Ltd. Şti.
Adresi: Yukarı Mumcu Cad. Elpaş İş Hanı
Kat:2 No:3 Erzurum
Web Adresi: http://www.tr.ibm.com/
Telefon: 442 234 15 21
Faks no: 442 234 15 21
ESKİŞEHİR
Eğitim Tanıtım ve Müşavirlik A.Ş. (ETAM)
Adresi: Kızılcıklı Mahmut Pehlivan Caddesi, Abacı Apartmanı, No:34 Eskişehir
Posta kodu: 26020
Web Adresi: http://www.etammacshop.com/
Telefon: 222 220 50 55
Faks no: 222 221 69 91
IBM Türk Ltd. Şti.
Adresi: Akarbaşı Mah. Atatürk Bulvarı
No: 77/A Eskişehir
Web Adresi: http://www.tr.ibm.com/
Telefon: 222 234 24 13
Faks no: 222 221 11 51
GAZİANTEP
IBM Türk Ltd. Şti.
Adresi: İncilipınar Mah. Nailbilen Cad.
5 Nolu Sok. T. Metropol İş Mrk 3/12 Gaziantep
Web Adresi: http://www.tr.ibm.com/
Telefon: 342 215 05 31
Faks no: 342 215 05 31
Kalender Bilgisayar İnşaat Tekstil San. ve Tic. Ltd. Şti.
Adresi: Gazimuhtarpaşa Bulvarı No:23 Gaziantep
Web Adresi: http://www.kalendertr.com/
Telefon: 342 215 18 18
Faks no: 342 215 18 22
Appendix F. Servis istasyonlari
137
IĞDIR
Ebru Elektronik ve Bilgisayar Sistemleri
Adresi: Atatürk Caddesi, No:261 Iğdır
Posta kodu: 76000
Web Adresi: http://www.ebruelektronik.com/
Telefon: 476 227 76 66 / 476 227 08 43 / 476 227 08 44
Faks no: 476 227 76 66
İSTANBUL
Bilgi Birikim Sistemleri Elktr. ve Bilg.
Endüstrisi Müh. Hiz. Ltd. Şti.
Adresi: Kocayol Caddesi, Kozyatağı Sokak, No: 3/B Kat:3
Kozyatağı İstanbul
Web Adresi: http://www.bilgibirikim.com/
Telefon: 216 373 98 00
Faks no: 216 373 99 33
Destek Bilgisayar ve İletişim Hizmetleri Tic. A.Ş.
Adresi: Çınar Sokak, No:17
4. Levent İstanbul
Posta kodu: 80620
Web Adresi: http://www.destek.as/
Telefon: 212 282 44 30
Faks no: 212 264 46 45
Deta Bilgisayar Hizmetleri Ltd. Şti.
Adresi: Vatan Cad. Ortadoğu İş Merkezi 2/1
Çağlayan İstanbul
Web Adresi: http://www.deta.com.tr/
Telefon: 212 296 47 00
Faks no: 212 296 47 06
IBM Türk Ltd. Şti.
Adresi: Büyükdere Cad. 4. Levent / İstanbul
Web Adresi: http://www.tr.ibm.com/
Telefon: 212 317 10 00
Faks no: 212 278 04 37
Koç Sistem Bilgi İletişim Hizmetleri A.Ş.
Adresi: Aydınevler Mah. Dumlupınar Cad. No:24
Küçükyalı İstanbul
Posta kodu: 34840
Web Adresi: http://www.kocsistem.com.tr/
Telefon: 216 556 11 00
Faks no: 216 556 11 88
Netservis Bilgisayar Sistemleri San. ve Tic. Ltd. Şti.
Adresi: Kısıklı Caddesi, Türksoy Sokak, No: 1 Altunizade / İstanbul
Web Adresi: http://netservis.com.tr/
Telefon: 216 554 64 00
138
ThinkCentre User Guide
Novatek Bilgisayar Sistemleri San.ve Tic.Ltd. Şti.
Adresi: Raşit Rıza Sokak, Yıldırım İş Hanı, No: 1 Kat: 1
Mecidiyeköy İstanbul
Posta Kodu: 80300
Web Adresi: http://www.novateknoloji.com/
Telefon: 212 356 75 77
Faks no: 212 356 75 88
Peritus Bilgisayar Sist. Dış Tic.San.Ltd. Şti.
Adresi: Ziverbey Eğitim Mahallesi, Poyraz Sokak,
Sadıkoğlu İş Merkezi 1, D:15 Ziverbey
Kadıköy İstanbul
Posta kodu: 81040
Web Adresi: http://www.pbs.biz.tr/
Telefon: 216 345 08 00
Faks no: 216 349 09 92
Probil Bilgi İşlem Destek ve Dan.San. ve Tic. A.Ş.
Adresi: Eski Büyükdere Caddesi, Dilaver Sokak, No:4 Otosanayi
4. Levent İstanbul
Posta kodu: 80660
Web Adresi: http://www.probil.com.tr/
Telefon: 212 317 61 00
Faks no: 212 325 42 04
Tepum Teknoloji Prog. ve Uygulama Merkezi A.Ş.
Adresi: Emniyet Evleri Mah. Yeniçeri Sok. Emir Han. K:2 No:6
4.Levent İstanbul
Posta kodu: 34416
Web Adresi: http://www.tepum.com.tr/
Telefon: 0 212 324 60 10
Faks no: 0 212 284 52 40
Turkuaz Bilgisayar Danışmanlık ve Yazılım Ltd. Şti.
Adresi: Doğanbey Caddesi, Çetinkaya Sokak, No:2, Kat:5
İçerenköy İstanbul
Posta kodu: 81120
Web Adresi: http://www.turkuaz.net/
Telefon: 216 575 58 32
Faks no: 216 575 01 08
İZMİR
Adapa Bilgi Sistemleri A.Ş.
Adresi: Ankara Asfaltı, No:26/3, Rod-Kar 2 İş Merkezi, No: 305-309
Bornova İzmir
Posta kodu: 35110
Web Adresi: http://www.biltas.com.tr/
Telefon: 232 462 67 80
Faks no: 232 462 59 60
Egebimtes Ltd. Şti.
Adresi: 1370 Sokak, No:42, Kat:4, Blok:403, Yalay İş Merkezi
Montrö İzmir
Web Adresi: http://www.egebimtes.com.tr/
Telefon: 232 489 00 60
Faks no: 232 489 99 08
Appendix F. Servis istasyonlari
139
IBM Türk Ltd. Şti.
Adresi: Ankara Asfaltı No: 7
Bayraklı İzmir
Web Adresi: http://www.tr.ibm.com/
Telefon: 232 462 27 00
Faks no: 232 486 69 23
Probil Bilgi İşlem Destek ve Dan.San. ve Tic. A.Ş.
Adresi: Şair Eşref Bulvarı, Huzur İşhanı, No:27/2 Kat:2
Alsancak İzmir
Posta kodu: 35210
Web Adresi: http://www.probil.com.tr/
Telefon: 232 445 33 33
Faks no: 232 441 40 40
KAYSERİ
Netcom Bilişim Hizmetleri ve Tic. Ltd. Şti.
Adresi: Serçeönü Mahallesi Sivas Caddesi Birkan Sokak No:7
Kocasinan Kayseri
Web Adresi: http://www.netcom.com.tr/
Telefon: 352 207 10 00
Faks no: 352 222 07 07
KONYA
Alamaç Bilgisayar Tic. Ltd. Şti.
Adresi: Babalık Mahallesi, Keyhüsrev Sokak, No:11/B Konya
Posta kodu: 42060
Web Adresi: http://www.alamac.com.tr/
Telefon: 332 320 65 20
Faks no: 332 320 65 19
MALATYA
Probil Bilgi İşlem Destek ve Dan.San. ve Tic. A.Ş.
Adresi: İsmetiye Mahallesi, Yiğitcan İş Merkezi, No:10/6 Malatya
Posta kodu: 44100
Web Adresi: http://www.probil.com.tr/
Telefon: 422 325 35 07
Faks no: 422 326 27 02
MUĞLA
Bosis Bilgi ve İletisim Sistemleri Tic. Ltd. Sti.
Adresi: Nafız Özsoy Caddesi, No:8, Bodrum Muğla
Web Adresi: http://www.bosis.com.tr/
Telefon: 252 316 05 32
Faks no: 252 313 83 04
SAMSUN
VIP Bilgi İşlem Ltd. Şti.
Adresi: İstiklal Caddesi, No:159/13 Samsun
Posta kodu: 55060
Web Adresi: http://www.vipbilgiislem.com.tr
Telefon: 362 230 88 52
Faks no: 362 234 77 22
140
ThinkCentre User Guide
ŞANLIURFA
Bilban Bilgisayar Eğitim Tic. San. Ltd. Şti.
Adresi: Kızılay İşhanı, Kat:1-2 Şanlıurfa
Web Adresi: http://www.bilban.com.tr/
Telefon: 414 215 05 52
Faks no: 414 212 22 12
TRABZON
IBM Türk Ltd. Şti.
Adresi: Kahramanmaraş Cad. İpekyolu İş Merk. Kat:4 No: 7 Trabzon
Web Adresi: http://www.tr.ibm.com/
Telefon: 362 230 88 52
Faks no: 362 230 88 52
Somdata Bilgisayar Paz. ve Tic. Ltd. Şti.
Adresi: Kemerkaya Mahallesi, Gazipaşa Caddesi,
13/15 Saruhan İş Merkezi, No:6 Trabzon
Posta kodu: 61100
Web Adresi: http://www.somdata.com.tr/
Telefon: 462 321 31 15
Faks no: 462 326 56 07
Appendix F. Servis istasyonlari
141
142
ThinkCentre User Guide
Index
A
a rescue medium, creating and using 76
accessing
system board components and drives 34
Administrator, password 82
antivirus software 7
audio line-in connector 9
audio line-out connector 9
audio subsystem 1
B
backup and recovery operations
basic troubleshooting 97
battery, replacing 39
boot-block recovery 88
drives
bays 12
specifications
12
E
environment, operating 4
Ethernet 1
Ethernet connector 10
exiting, Setup Utility 85
expansion 2
external options, installing 31
74
C
cable lock, security 27
cables, connecting 70
changing
password 82
startup device sequence 84
cleaning an optical mouse 93
CMOS, clearing 83
components, internal 10
computer cover
opening 32
connector 9
connectors
rear 9
connectors, controls, indicators
front 8
considerations, passwords 82
creating
and using a rescue medium 76
creating and using
recovery media 73
CRU
completing the installation 70
customer support center 118
F
failure, recovering from POST/BIOS 88
features 1
flashing the BIOS 87
front
connectors, controls, indicators 8
front audio and USB assembly, replacing 57
front bezel
removing, reinstalling 32
front WiFi antenna, installing, removing 66
G
getting
help 117
information 117
service 117
H
hard disk drive, replacing 41
heat sink and fan assembly
replacing 47
help
and service 118
getting 117
Help and Support 117
D
I
deleting a password 82
Description 9
device drivers 71
devices, handling static-sensitive 31
diagnostics programs, using 118
diagnostics, troubleshooting 97
DisplayPort connector 9
documentation, using 118
drivers, device 71
important safety information v
information
getting 117
important safety v
resources 117
safety 117
warranty 117
Input/Output (I/O) features 2
installing
© Copyright Lenovo 2012
143
solid state drive
installing options
memory module
PCI card 37
internal drives 1
40
power
features 3
power supply assembly
replacing 50
power-on self-test (POST) 87
Power-On, Password 82
programs, updating system 87
purchasing additional services 119
35
K
keyboard
replacing 68
keyboard connector
R
10
L
Lenovo Solution Center 115
Lenovo ThinkVantage Toolbox 115
Lenovo ThinkVantage Tools 117
Lenovo Welcome 5, 117
locating components 10
M
media, creating and using recovery media
memory module
installing, replacing 35
system board 35
Microphone connector 10
microprocessor
replacing 54
mouse
replacing 69
mouse connector 10
N
notices
121
73
rear connectors 9
rear WiFi antenna, installing, removing 64
recovering
from a POST/BIOS update failure 88
software 73
recovery
boot-block 88
operations, backup and 74
problems, solving 79
recovery media, creating and using 73
removing, reinstalling
front bezel 32
replacing
battery 39
hard disk drive 41
heat sink and fan assembly 47
keyboard 68
microprocessor 54
mouse 69
power supply assembly 50
system fan assembly 58
Rescue and Recovery 73
workspace, Rescue and Recovery 75
Rescue and Recovery workspace 75
resources, information 117
O
S
opening computer cover 32
operations, backup and recovery 74
optical drive, installing or replacing 43
optical mouse
cleaning 93
safety v
safety information 117
security
cable lock 27
enabling or disabling 83
features 3
selecting
startup device 84
temporary startup device 84
serial port 10
service
and help 118
customer support center 118
getting 117
services
other 119
purchasing additional 119
setting
password 82
settings
changing 81
P
parts replacement, completing 70
password
Administrator 82
considerations 82
Power-On Password 82
setting, changing, deleting 82
passwords
erasing 83
lost or forgotten 83
passwords, using 81
PCI card 37
installing, replacing 37
physical specifications 4
144
ThinkCentre User Guide
viewing 81
Setup Utility 81
Setup Utility program, starting 81
Setup Utility, exiting 85
software
recovering 73
solid state drive, installing 40
solving recovery problems 79
starting the Setup Utility program 81
startup device 84
sequence, changing 84
temporary, selecting 84
static-sensitive devices, handling 31
system
management 1
programs 87
system board
connectors 11
locating parts 11
locations 11
memory module 35
system board components and drives
accessing 34
system fan assembly
replacing 58
workspace, backup and recovery
75
T
temporary startup device 84
the BIOS, updating (flashing) 87–88
trademarks 122
troubleshooting, basic 97
troubleshooting, diagnostics 97
U
updating
(flashing) the BIOS 87
system programs 87
updating (flashing) the BIOS 88
USB connector 10
using
a rescue medium, creating and
diagnostic programs 118
documentation 118
other services 119
passwords 81
Setup Utility 81
76
V
VGA monitor connector 10
video subsystem 1
viewing and changing settings
81
W
warranty information 117
WiFi units, WiFi adapter card, WiFi card module, WiFi
antenna cable, replacing 60
© Copyright Lenovo 2012
145
146
ThinkCentre User Guide