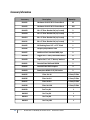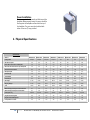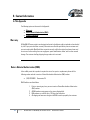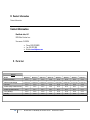
1
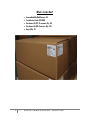
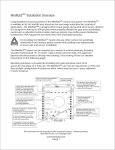
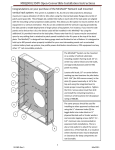
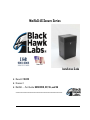
MiniRaQ 4G Secure Series Installation Guide Manual #: 90-091 Revision: 1 MiniRaQ --- Part Number MRQ3X1S10, S12, S14, and S16 ________________________________________ MiniRaQ 4G Secure Series · Installation Guide Copyright © Black Hawk Labs, LLC. All rights reserved. No part of this document may be copied, reproduced or translated. It shall not otherwise be recorded, transmitted or stored in a retrieval system without the prior written consent of Black Hawk Labs. Notice Black Hawk Labs (BHL) provides this manual “as is” without warranty of any kind, expressed or implied, including but not limited to the implied warranties or merchantability and fitness for a particular purpose. BHL may make improvements and/or changes to the product(s) and/or the program(s) described in this publication at any time without notice. This publication could contain technical inaccuracies or typographical errors. Changes are periodically made to the information in this publication; these changes are incorporated in new editions of this publication. Guarantee BHL provides a guarantee relating to perfect manufacturing as part of the legally stipulated terms of guarantee. On receipt, the purchaser must immediately inspect all delivered goods for damage incurred during transport, as well as for material and manufacturing faults BHL must be informed immediately in writing of any complaints. The customer must comply with the environmental conditions as well as the servicing and maintenance regulations specified in this manual. Trademarks Brand and product names mentioned in this manual may be trademarks, registered trademarks or copyrights of their respective holders. All brand and product names mentioned in this manual serve as comments or examples and are not to be understood as advertising for the products or their manufacturers. Company Address Black Hawk Labs, LLC 829-B West Stadium Lane Sacramento, CA 95834 Phone: (916) 923-0800 Fax: (916) 923-2851 Website: www.bhlpower.com 2 ‐‐‐‐‐‐‐‐‐ 90‐091 Rev. 1 MiniRaQ 4G Secure Series ∙ Installation Guide Operators Safety Summary The general safety information is designed for installation and operating personnel. Safety and Handling Use all proper safety and handling practices when installing and operating this product. Grounding the Product A dedicated ground stud is provided at the left of the product, near the bottom. To ensure safety to all installation and operational personnel, connect a ground wire from this stud to earth ground using a minimum 14AWG. Equipment Marking and Safety Terms WARNING Highlights an operating procedure, practice, condition, statement, etc., which, if not strictly observed, could result in injury to or death of personnel, or is intended to alert the user to the presence of important operating and maintenance (servicing) instructions in the literature accompanying the appliance. ____________________________________________________________ Change History The table below lists the changes to the MiniRaQ 4G Secure Installation Guide. Table 0-1 Change History 3 Rev Date DOC# 1 5/31/11 90‐091 MiniRaQ 4G Secure Description Approved By TAW ‐‐‐‐‐‐‐‐‐ 90‐091 Rev. 1 MiniRaQ 4G Secure Series ∙ Installation Guide What’s In the Box? 4 Assembled MiniRaQ Secure 4G Installation Guide (90-091) Hardware Kit (12-24 screws, Qty. 15) Hardware Kit (18-8 screws. Qty. 10) Keys (Qty. 2) ‐‐‐‐‐‐‐‐‐ 90‐091 Rev. 1 MiniRaQ 4G Secure Series ∙ Installation Guide Table of Contents Chapter 1 Introduction………………………………………………..…………………………………6 How to Use This Guide……………………………………………………………………………...6 Navigating………………………………………………………………………………………………….6 About the MiniRaQ 4G Secure……………………………………………………………………………………...6 Overview…………………………………………………………………………………………………...6 Features…………………………………………………………………………………………………...7 Chapter 2 Hardware Orientation…………………………………………………………………..8 MiniRaQ 4G Secure Description………………………………………………………………………………….8 Product Overview……………………………………………………………………………………………………….10 Chapter 3 Installation………………………………………………………………………………….11 Safety Precautions…………………………………………………………………………………………………….11 Unpacking and Inspection………………………………………………………………………………………….11 Accessory Information………………………………………………………………………………………………12 Installation and Setup………………………………………………………………………………………………..13 Appendix A Physical Specifications………………………………………………………………16 Appendix B Contact Information…………………………………………………………………...17 In This Appendix………………………………………………………………………………………………………….17 Warranty…………………………………………………………………………………………………………………….17 Return Material Authorization (RMA)………………………………………………………………………..17 Contact Information…………………………………………………………………………………………………..18 Appendix C Parts List……………………………………………………………………………………18 Limited Factory Warranty………….………………………………………………………………………………………….19 5 ‐‐‐‐‐‐‐‐‐ 90‐091 Rev. 1 MiniRaQ 4G Secure Series ∙ Installation Guide 1. Introduction How to Use This Guide How to Use This Guide This section provides important tips for locating this Installation Guide in its electronic “PDF” form. Navigating To navigate to the desired location, go to our website, www.bhlpower.com. Therein, the MiniRaQ 4G Secure Installation Guide may be found in two ways: ‐ ‐ Click on the hyperlink of the specific MiniRaQ 4G Secure product you are researching. Follow through to the Documentation tab. There you will find a hyperlink to the “90-091 Rev.1” Installation Guide. Simply type “90-091” in the search field and you will immediately be taken to the hyperlink to the 90-091 Rev. 1 Installation Guide. About the MiniRaQ 4G Secure Overview The MiniRaQ 4G Secure from Black Hawk Labs literally stands alone as the ultimate enclosure solution for installing wall-mount or rack-mount equipment in a telecom closet, classroom, IDF, or remote datacom equipment room. This vertical mounting system allows for all shapes and sizes of IT equipment to be safely deployed in areas previously considered impossible for placement. One person can safely perform the installation without assistance or complications. The cabinet design is capable of supporting up to 400 pounds. It offers a rigid architecture that supports numerous components in a vertical fashion. Within the cabinet, venting is provided for a full complement of rack-mounted equipment. For increased airflow and ventilation, an optional fan tray accessory may be added (see page 12). 6 ‐‐‐‐‐‐‐‐‐ 90‐091 Rev. 1 MiniRaQ 4G Secure Series ∙ Installation Guide 1. Introduction About the MiniRaQ 4G Secure Please note: To ensure trouble-free installation of your MiniRaQ 4G Secure, please review the following sections: o Chapter 2, “Hardware Orientation” on page 8. o Chapter 3, “Installation” on page 11. Should you have any questions regarding the installation of the MiniRaQ 4G Secure, please consult with the factory. Refer to Appendix B, “Contact Information” on page 17 for details. Features Major features of the MiniRaQ 4G Secure system are listed below: 7 Modular construction allows for single tech installation. Equipment mounts vertically to allow placement in relatively tight quarters. Supports 4U of dedicated space for patch panel or other shallow rack-mounted equipment in the backplate. Supports 2U of equipment in the backplate. Supports an additional 4U to 10U of equipment mounted on the side panels (included). Provides a dedicated ground stud. Locking cover to ensure your equipment remains secure. Six removable access plates for cable entry and communication management options. Integrated level to facilitate installation. Customizable with an array of optional accessories (see page 12). Ventilated top and bottom design to dissipate heat. Please note: for proper ventilation and air flow, using either the vent tray or optional fan tray, do not block bottom of unit. (See below) ‐‐‐‐‐‐‐‐‐ 90‐091 Rev. 1 MiniRaQ 4G Secure Series ∙ Installation Guide 2. Hardware Orientation MiniRaQ 4G Secure Description MiniRaQ 4G Secure Description The figure below illustrates the MiniRaQ 4G Secure’s external features: 1 2 1) Six removable Access Panels (2 top, 2 bottom, and 2 lower sides), for cable entry and communication management options. 2) Locking cover allows for maximum security, even in an unsecure environment. 8 ‐‐‐‐‐‐‐‐‐ 90‐091 Rev. 1 MiniRaQ 4G Secure Series ∙ Installation Guide 1. Hardware Orientation MiniRaQ 4G Secure Description The figure below illustrates the MiniRaQ 4G Secures’ internal features: 1) 2) 3) 4) 5) 9 4U of dedicated horizontal space for patch panel or other shallow rack-mounted equipment. Bonus 2U internal-to backplate vertical equipment space. 4U to 10U side panel vertical equipment space. Integrated level to facilitate installation. Integrated bridge lances for wire management. ‐‐‐‐‐‐‐‐‐ 90‐091 Rev. 1 MiniRaQ 4G Secure Series ∙ Installation Guide 2. Hardware Orientation MiniRaQ 4G Secure Description Product Overview This vertical rack system is available with 4U, 6U, 8U, and 10U side panels allowing a maximum U space utilization of 10U to 16U when using the internal 2U equipment flanges and 4U patch panel space. The internal 2U combines with the U spacing provided with the side panels to enable deployment of deeper rack-mounted equipment. The MiniRaQ 4G Secure is designed from heavy gauge steel and finished to last a lifetime. It is designed to hold up to 400 pounds when properly installed, for your most demanding needs such as: extended runtime battery backup systems, low profile power distribution transformers, POE equipment and any other 19” rack mountable products. The backplate is equipped with 6 removable access panels which can be used for routing solid or metal flexible conduit or data and fiber in the most optimized placement for your configuration. Optional panels include brush strip assemblies and RJ45 and DB9 data couplers. The MiniRaQ 4G Secure can be mounted on a variety of vertical substrates including: wooden framing studs (16” on center), solid or block concrete walls, and approved plywood used for NEC panel mounting. An integrated level is incorporated to facilitate installation. 10 ‐‐‐‐‐‐‐‐‐ 90‐091 Rev. 1 MiniRaQ 4G Secure Series ∙ Installation Guide 3. Installation Safety Precautions Safety Precautions For all MiniRaQ 4G Secure installation procedures, observe the following safety and handling rule to avoid damage to yourself and the equipment: Important A dedicated ground stud is provided at the bottom left of the backplate. To ensure safety to all installation and operational personnel, connect a ground wire from this stud to earth ground using a minimum 14AWG in size. Cabinets must be mounted and wired per applicable sections of the National Electrical Code (NEC). ___________________________________________________________________________________________________ Unpacking and Inspection 1. 2. 3. 4. 5. 11 Inspect the shipping box for damage. If you find any damage, notify the shipping carrier immediately for all claims adjustments. Once you have removed the unit from the box, disassemble all the components, as per the Quick Reference Guide, and compare these components to the parts list in Appendix C (page 18). Visually inspect all parts to ensure there was no damage during shipping. If there is damage, notify the shipping carrier immediately for all claims adjustments. If you find any shortages, contact your Black Hawk Labs sales representative. Save the box and foam inserts in the event the unit must be returned. ‐‐‐‐‐‐‐‐‐ 90‐091 Rev. 1 MiniRaQ 4G Secure Series ∙ Installation Guide Accessory Information Accessory 12 Description Quantity BH1001 Hardware Kit #12‐24 PH Screw Black 25 BH1002 Hardware Kit #12‐24 PH Screw Black 100 BH1003 1U x 3” Riser Bracket Set (w/ screws) 2 BH1004 1U x 6” Riser Bracket Set (w/ screws) 2 BH1010 2U x 3” Riser Bracket Set (w/ screws) 2 BH1011 2U x 6” Riser Bracket Set (w/ screws) 2 BH1005 1U Blanking Panel 19” x 1.75” Black 1 BH1006 Uniquely Keyed Barrel Lock 1 BH1007 Additional Pair Standard MRQ Keys 2 BH1008 Toggler Set ¼”‐20 w/ bolt and washers 8 BH1009 TapCon Set ¼” x 2 ¼” Hex w/ washers 10 BH2001 Console Plate RJ45 and DB9M 2 BH2002 Console Plate RJ45 Couplers 4 BH2003 Powerplate NEMA 5‐15/20 Outlets 2 BH2025 Filter Set 4U 1 Front/2 Side BH2026 Filter Set 6U 1 Front/2 Side BH2027 Filter Set 8U 1 Front/2 Side BH2028 Filter Set 10U 1 Front/2 Side BH2029 Fan Tray 4U 1 BH2030 Fan Tray 6U 1 BH2031 Fan Tray 8U 1 BH2032 Fan Tray 10U 1 ‐‐‐‐‐‐‐‐‐ 90‐091 Rev. 1 MiniRaQ 4G Secure Series ∙ Installation Guide BH2019 16” x 16” x ¾” Plywood Insert 1 BH2020 Brush Cover Access Plate 2 BH2021 Backplate Pouch w/ Shelf 1 3. Installation Installation and Setup Be sure to follow hardware manufacturer’s recommended procedures for installing equipment in the MiniRaQ 4G Secure. Backplate Installation For Stud Mount Locate solid studs, 16” on center, before marking top two locations for pilot holes. Drill .156” holes for #10 coarse screws (supplied) into the backplate slots, spaced nominally at 16” at the top. Use the integrated level to locate proper mounting pattern. When level, tighten the first two screws, and then drill the remaining locations; a minimum of 10 locations for full payload rating of 400 pounds. For Other Approved Surfaces The same process should be used for installing to other approved surfaces, using the ½” clearance holes for toggle bolts into a ¾” plywood-backed wall or fender washers and concrete tapping screws (3/16” x 2-1/4” minimum) into cinder block. 2 Post Rack Mount Designed for use in communication data centers and telecommunication rooms, 2-Post Open Frame Racks satisfy basic functional requirements for structuring cable. The MiniRaQ 4G Secure is integrated with a 2 post rack-mount hole-pattern, which matches industry standards for ease of installation. 13 ‐‐‐‐‐‐‐‐‐ 90‐091 Rev. 1 MiniRaQ 4G Secure Series ∙ Installation Guide Side Panel Installation After ensuring the backplate has been properly and completely fastened to the wall, install the side panels by inserting the side panel hooks into the rectangular cutouts in the backplate. The smooth surface of the side panels are to face away from each other. All hooks must be engaged for proper assembly; apply downward pressure as required to seat panels fully. When the side panels are fully seated, the top surface will be flush with the internal 2U flanges in the backplate and the bottom of the side panels will be flush with the bottom of the backplate. Two holes for each side panel will align. Use four (4) of the supplied #12-24 screws for the two holes in each of the left and right side panels. Ensure screws are installed before continuing installation. Vent Tray Installation Slide vent tray into the lower channel of the side panels. The right angle flanges of the vent tray should be oriented upward, toward the interior of the cabinet. Temporarily install front panel (see “Equipment Installation” on next page). 14 ‐‐‐‐‐‐‐‐‐ 90‐091 Rev. 1 MiniRaQ 4G Secure Series ∙ Installation Guide Equipment Installation Your equipment can now be installed and configured. Screws used to mount your hardware should not be tightened until either the vented panel (supplied) or fan tray (optional accessory) has been installed and the front panel temporarily slid in place. This allows uniform spacing of the side panels and will insure proper seating of the locking cover. Also this allows for easy removal of the front panel and vent tray during any servicing of your equipment. Follow these guidelines: After side panels are installed, slide vent/fan tray in position and temporarily install front cover. This procedure squares and aligns the cabinet. The first piece of equipment may be installed and screws tightened. Remove front panel and vent/fan tray as necessary, install all remaining equipment and tighten all screws. Front Panel Installation Insert the front panel hooks into the rectangular cutouts in the side panels. All hooks must be engaged for proper assembly; apply downward pressure as required to seat panel fully. 15 ‐‐‐‐‐‐‐‐‐ 90‐091 Rev. 1 MiniRaQ 4G Secure Series ∙ Installation Guide Cover Installation Place cover onto the side panels and slide toward the backplate. When properly seated, the cover should be flush against the backplate and level with the top of the backplate. The cover may then be locked with either of the two (2) keys provided. A. Physical Specifications Specifications Model # MRQ351S10 MRQ351S12 MRQ351S14 MRQ351S16 MRQ301S10 MRQ301S12 MRQ301S14 MRQ301S16 Compact Compact Compact Compact Tall Tall Tall Tall Side Panel U Space 4U 6U 8U 10U 4U 6U 8U 10U Bonus Rack Units Internal to Backplate 2U 2U 2U 2U 2U 2U 2U 2U Rack Units for Patch Panel at Top of Backplate 4U 4U 4U 4U 4U 4U 4U 4U Total Rack Units Available 10U 12U 14U 16U 10U 12U 14U 16U Backplate Depth 4.5" 4.5" 4.5" 4.5" 4.5" 4.5" 4.5" 4.5" Overall Height 31.0" 31.0" 31.0" 31.0" 38.1" 38.1" 38.1" 38.1" Overall Width 19.6" 19.6" 19.6" 19.6" 19.6" 19.6" 19.6" 19.6" Overall Depth 12.7" 16.2" 19.7" 23.2" 12.7" 16.2" 19.7" 23.2" Net Weight 47 lbs. 55 lbs. 60 lbs. 66 lbs. 54 lbs. 63 lbs. 69 lbs. 76 lbs. Shipping Weight 54 lbs. 62 lbs. 67 lbs. 73 lbs. 63 lbs. 72 lbs. 78 lbs. 85 lbs. Color Black Black Black Black Black Black Black Black Maximum Equipment Depth without Standoffs 22" 22" 22" 22" 29" 29" 29" 29" Maximum Equipment Depth with Standoffs 28" 28" 28" 28" 35" 35" 35" 35" Optional Optional Optional Optional Optional Optional Optional Optional Integrated Grounding Stud Yes Yes Yes Yes Yes Yes Yes Yes Integrated Cable Management Yes Yes Yes Yes Yes Yes Yes Yes Proudly Made in the USA Yes Yes Yes Yes Yes Yes Yes Yes Configuration Cooling Fan Tray 16 ‐‐‐‐‐‐‐‐‐ 90‐091 Rev. 1 MiniRaQ 4G Secure Series ∙ Installation Guide B. Contact Information In This Appendix The following topics are discussed in this Appendix: Warranty Return Material Authorization (RMA) Contact Information Warranty All MiniRaQ 4G Secure products are designed and tested to the highest quality standards and are backed by a full 5-year parts and labor warranty. Warranties are effective upon delivery date to customer and are non-transferrable. Black Hawk Labs warranties are only valid to the original purchaser/owner and do not cover faults resulting from user negligence, special modifications, abuse, and/or other unusual damage. The customer shall pay shipping charges when unit is returned. Return Material Authorization (RMA) In the unlikely event that a product is required to return for repair or replacement, please call the following number and ask to receive a Return Merchandise Authorization (RMA) number. (916) 923-0800 Sacramento, CA RMA Conditions are listed below: 1. Prior to returning any item, you must receive a Return Merchandise Authorization (RMA) number. 2. All RMA numbers must appear on the return shipping label. 3. RMA numbers are valid for thirty (30) days from issue date. 4. All shipping and insurance charges on all RMA’s must be prepaid by the customer. 17 ‐‐‐‐‐‐‐‐‐ 90‐091 Rev. 1 MiniRaQ 4G Secure Series ∙ Installation Guide B. Contact Information Contact Information Contact Information Black Hawk Labs, LLC. 829-B West Stadium Lane Sacramento, CA 95834 Phone: (916) 923-0800 Fax: (916) 923-2851 Website: www.bhlpower.com C. Parts List Parts List Model # Backplate (Assembly) Side Panels (Left and Right) Front Panel MRQ351S10 MRQ351S12 MRQ351S14 MRQ351S16 MRQ301S10 MRQ301S12 MRQ301S14 MRQ301S16 20-232 20-232 20-232 20-232 20-255 20-255 20-255 20-255 20-224/20-225 20-226/20-227 20-228/20-229 20-230-20-231 20-247/20-248 20-249/20-250 20-251-20-252 20-253/20-254 20-233 20-233 20-233 20-233 20-256 20-256 20-256 20-256 Hardware (2 Keys / 15 #12-24 Screws) 64-007 64-007 64-007 64-007 64-007 64-007 64-007 64-007 Hardware (10 #18-8 SS Screws) 64-017 64-017 64-017 64-017 64-017 64-017 64-017 64-017 Cover (Assembly) 20-234 20-235 20-236 20-237 20-234 20-235 20-236 20-237 Vent Tray 20-202 20-203 20-204 20-205 20-202 20-203 20-204 20-205 18 ‐‐‐‐‐‐‐‐‐ 90‐091 Rev. 1 MiniRaQ 4G Secure Series ∙ Installation Guide Limited Factory Warranty BlackHawk Labs, LLC Limited Factory Warranty: The limited warranty provided by BlackHawk Labs, LLC (BHL) in this Statement of Limited Factory Warranty applies only to Products purchased for commercial or industrial use in the ordinary course of your business. Terms of Warranty: BHL warrants its products to be free from defects in materials and workmanship for a period of five years (two years in Japan) from the date of purchase. Its obligation under this warranty is limited to repairing or replacing, at its sole discretion, any such defective products. This warranty does not apply to equipment that has been damaged by accident, negligence, or misapplication or has been altered or modified in any way. Repair or replacement of a defective product or part thereof does not extend the original warranty period. Any parts furnished under this warranty may be new or factory‐ reconditioned. Non‐transferable Warranty: This warranty applies only to the original purchaser who must have properly registered the product. Product may be registered at http://www.bhpower.com/support. Exclusions: BHL shall not be liable under the warranty if its testing and examination disclose that the alleged defect in the product does not exist or was caused by end user’s or any third person’s misuse, negligence or improper installation. Further BHL shall not be liable under the warranty for unauthorized attempts to repair or modify inappropriate on‐site operating conditions, corrosive atmosphere, installation, a change in location or operating use, exposure to the elements, acts of God, fire, theft, or installation contrary to BHL recommendations or specifications or in any event if the BHL serial number has been altered, defaced, or removed, or any other cause beyond the range of the intended use. THERE ARE NO WARRANTIES, EXPRESS OR IMPLIED, BY OPERATION OF LAW OR OTHERWISE, OF PRODUCTS SOLD, SERVICED OR FURNISHED UNDER THIS AGREEMENT OR IN CONNECTION HEREWITH. BHL DISCLAIMS ALL IMPLIED WARRANTIES OF MERCHANTABILITY, SATISFACTION AND FITNESS FOR A PARTICULAR PURPOSE. BHL EXPRESS WARRANTIES WILL NOT BE ENLARGED, DIMINISHED, OR AFFECTED BY AND NO OBLIGATION OR LIABILITY WILL ARISE OUT OF, BHL RENDERING OF TECHNICAL OR OTHER ADVICE OR SERVICE IN CONNECTION WITH THE PRODUCTS. THE FOREGOING WARRANTIES AND REMEDIES ARE EXCLUSIVE AND IN LIEU OF ALL OTHER WARRANTIES AND REMEDIES. THE WARRANTIES SET FORTH ABOVE CONSTITUTE BHL SOLE LIABILITY AND PURCHASER’S EXCLUSIVE REMEDY FOR ANY BREACH OF SUCH WARRANTIES. BHL WARRANTIES RUN ONLY TO PURCHASER AND ARE NOT EXTENDED TO ANY THIRD PARTIES. BHL WILL IN NO WAY BE LIABLE FOR ANY FORM OF INDIRECT, SPECIAL, CONSEQUENTIAL OR PUNITIVE DAMAGES, ARISING OUT OF THE USE, SERVICE OR INSTALLATION, OF THE PRODUCTS, WHETHER SUCH 19 ‐‐‐‐‐‐‐‐‐ 90‐091 Rev. 1 MiniRaQ 4G Secure Series ∙ Installation Guide DAMAGES ARISE IN CONTRACT OR TORT, IRRESPECTIVE OF FAULT, NEGLIGENCE OR STRICT LIABILITY OR WHETHER BHL HAS BEEN ADVISED IN ADVANCE OF THE POSSIBLY OF SUCH DAMAGES. SPECIFICALLY, BHL IS NOT LIABLE FOR ANY COSTS, SUCH AS LOST PROFITS OR REVENUE, LOSS OF EQUIPMENT, LOSS OF USE OF EQUIPMENT, LOSS OF SOFTWARE, LOSS OF DATA, COSTS OF SUBSTITUTES, CLAIMS BY THIRD PARTIES, OR OTHERWISE. NO SALESMAN, EMPLOYEE OR AGENT OF BHL IS AUTHORIZED TO ADD TO OR VARY THE TERMS OF THIS WARRANTY: WARRANTY TERMS MAY BE MODIFIED, IF AT ALL, ONLY IN WRITING SIGNED BY A BHL OFFICER AND LEGAL DEPARTMENT. Warranty Claims: Customers with warranty claims issues may access the BHL worldwide customer support network by visiting http://www.bhlpower.com/support. BHL Customer Support: Customer support for this or any other BHL product is available at no charge in any of the following ways: • Visit http://www.MiniRaQ.com Web site to access documents and to submit customer support requests. • www.bhlpower.com (Corporate Headquarters) Customer Support Line: (1)(877)427‐9419 (toll free) BHL Headquarters USA BlackHawk Labs, LLC 829‐B West Stadium Ln. Sacramento, CA 95834 Please recycle packaging materials Entire contents copyright 2007, 2011 BlackHawk Labs, LLC. All rights reserved. Reproduction in whole or in part without permission is prohibited. BHL, the BHL logo, and MiniRaQ are trademarks of BlackHawk Labs, LLC. All other trademarks, product names, and corporate names are the property of their respective owners and are used for informational purposes only. ` 20 ‐‐‐‐‐‐‐‐‐ 90‐091 Rev. 1 MiniRaQ 4G Secure Series ∙ Installation Guide