1
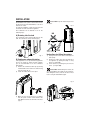
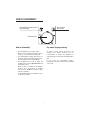
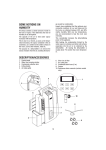
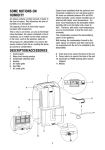
5714810131/05.08
Dehumidifier
Experts have established that the optimum
environmental conditions for our well being and
for the home are obtained between 40% and 60%
relative humidity. With very low temperatures,
you are recommended to heat the room even
minimally.
This considerably increases the dehumidifying
power of the appliance.
With heating, the condensation formed by the
water vapour on windows and other cold surfaces
evaporates into the air to be collected by the
dehumidifier. Air leaving the dehumidifier is
usually about 1°C warmer than room
temperature.
SOME NOTIONS ON
HUMIDITY
Air always contains a certain amount of water in
the form of vapour. This determines the level of
humidity in an atmosphere.
The capacity of the air to hold water vapour
increases with temperature.
This is why in our homes, as soon as the
temperature decreases, the vapour contained in
the air condenses, as is evident on the colder
surfaces in the room, such as the windows, walls
etc.
The purpose of a dehumidifier is to remove the
excess moisture from the air, avoiding the
damage caused by condensation.
4. Lifting handle
DESCRIPTION/ACCESSORIES
5. Air intake grille
1. Control panel
6. Silver ion air filter
2. Water level viewing window
7. Air outlet grille
3. Condensate collection tank
8. Condensate drain hose (2 m)
9. Castors
4
5
1
6
8
7
2
3
9
3
INTRODUCTION
SAFETY
Thank you for choosing this De’Longhi
dehumidifier. To get the best results, please read
these instructions carefully before use.
Fundamental safety warnings
Danger! This is an electrical appliance, it
is therefore important to respect the following
safety warnings:
• Do not touch the appliance with wet hands.
This may cause damage.
• Do not touch the plug with wet hands.
• Make sure the mains socket used is always
accessible, enabling you to unplug the
appliance when necessary.
• Always unplug the appliance using the plug
itself.
Never pull the cable as this may cause damage.
• To disconnect the appliance completely from
the electricity supply, you must unplug it from
the mains socket.
• If the appliance malfunctions, do not attempt
to repair it.
Turn the appliance off, unplug from the mains
socket and contact a Service Centre.
• Do not move the appliance by pulling the
power cable.
• It is dangerous to modify or alter the
characteristics of the appliance in any way.
• If the power cable is damaged, it must be
replaced by the manufacturer or an authorised
technical service centre in order to avoid all
risk.
• Do not use extension leads.
• The appliance must be installed in accordance
with the rules on household appliances in
force in the country concerned.
• The appliance must be connected to an
efficient earth installation.
Have your electrical circuit checked by a
qualified electrician.
Symbols used in these instructions
These symbols draw your attention to important
warnings.
It is vital to respect these warnings.
Failure to do so may result in electric shock,
serious injury, burns, fire or damage to the
appliance.
Danger!
Failure to observe the warning may result in life
threatening injury by electric shock.
Important!
Failure to observe the warning may result in injury
or damage to the appliance.
Please Note
This symbol draws your attention to important
recommendations and information.
Problems and repairs
In the event of problems, first try and resolve
them by reading the information given in the
"Troubleshooting" section on page 10.
If the appliance requires repair, always contact a
Service Centre authorised by the manufacturer.
Always insist on original spare parts. Repairs
carried out by unauthorised personnel may be
dangerous and can invalidate the guarantee.
Danger! Keep packaging materials
(plastic bags, polystyrene foam) out of reach of
children.
Danger! The appliance is not intended for
use by persons (including children) with reduced
physical, sensory or mental capabilities, or lack of
experience and knowledge, unless they have been
given supervision or instruction concerning use of
the appliance by a person responsible for their
safety. Always supervise children. Make sure they
do not play with the appliance.
4
Appropriate use
Instructions
The appliance is designed and produced for
domestic use only.
Use this appliance only as described in this
instruction manual.
As with all electrical equipment, whilst the
instructions aim to cover as many eventualities as
possible.
Caution and common sense should be applied
when operating and installing this appliance.
Read these instructions carefully before installing
and/or using the appliance.
• Keep these instructions carefully.
If the appliance is transferred to other owners,
they should also be given these instructions.
• Failure to respect the instructions may result
in injury or damage to the appliance.
The manufacturer is not liable for damage
deriving from failure to follow these
instructions.
• Keep the list of Service Centres and identify
the Centre nearest you.
General safeguards
•
•
•
•
•
•
•
•
•
•
Do not install the appliance in rooms
containing gas, oil or sulphur. Do not install
near sources of heat.
Do not use the appliance on sloping surfaces.
Keep the appliance at least 50 cm away from
flammable substances (alcohol etc) or
pressurised containers (e.g. aerosol cans).
Do not rest heavy or hot objects on top of the
appliance.
Always transport the appliance upright or
resting on one side.
Remember to drain the condensate tank
before moving the appliance.
Wait at least 1 hour after transporting the
appliance before starting it
R134a refrigerant complies with European
environmental standards. However, you
should avoid perforating the refrigerant
circuit.
At the end of its working life, consign the
appliance to a specialist collection centre.
ENVIRONMENTAL INFORMATION:
This unit contains fluorinated greenhouse
gases covered by the Kyoto Protocol.
Maintenance and disposal must be carried out
by qualified personnel only (R134a,
GWP=1300).
The materials used for packaging can be
recycled.
You are therefore recommended to dispose of
them in special differentiated waste collection
containers.
Do not use the appliance outdoors.
Do not obstruct the air intake or outlet.
Do not use the appliance in laundry rooms.
Electrical connections
After moving the appliance, wait at least an hour
before turning it on again.
Before plugging the appliance into the mains
socket, check that:
• The mains power supply corresponds to the
working voltage indicated on the rating plate.
• The power socket and electrical circuit are
adequate for the appliance.
• The power socket matches the plug. If this is
not the case, have the plug replaced by a
qualified electrician;
• The mains socket is adequately earthed.
Important information for correct disposal of the product in accordance with EC
Directive 2002/96/EC.
At the end of its working life, the product
must not be disposed of as urban waste.
It must be taken to a special local authority differentiated
waste collection centre or to a dealer providing this service.
Disposing of a household appliance separately avoids
possible negative consequences for the environment
and health deriving from inappropriate disposal and
enables the constituent materials to be recovered to
obtain significant savings in energy and resources.As a
reminder of the need to dispose of household appliances separately, the product is marked with a crossed-out
wheeled dustbin.
5
INSTALLATION
Position the appliance in the room to be
dehumidified. A free space of at least 50 cm must
be left at the front of the dehumidifier, so as not to
block the air outlet.
For efficient ventilation a space of about 5-10 cm
should be left at the back of the appliance.
The condensate can be drained in one of the
following ways:
Please Note: Keep the rubber bung to close
the spout.
fig. 3
NO
A) Draining into the tank
The condensate can be drained directly into the
tank. The tank can be easily removed (fig.1).
NO
YES
Instructions for fitting the castors
fig. 1
1) Unplug from the mains socket and empty the
tank (if full).
2) Remove the rubber caps from the bottom of
the appliance by pulling forcefully or using
pliers (see figure 4/1).
3) Fit the castors by inserting the pins into the
holes. (see figure 4/2)
B) Continuous external draining
If the appliance is to be operated for long periods
but you are unable to empty the tank regularly,
you are recommended to use the continuous
drain facility.
1) Remove the continuous drain cap by turning
it anticlockwise then remove the rubber bung
from the spout (fig. 2).
2) Fasten the rubber hose to the spout.
Please Note: While fitting the castors, do
not tilt the appliance at an angle of more than 45°.
After fitting the castors, wait for at least an hour
before using the dehumidifier again.
fig. 4
1
2
fig. 2
3) Make sure the end of the hose is no higher
than the spout or water could remain in the
tank. Make sure there are no kinks in the hose
(fig. 3).
6
HOW TO DEHUMIDIFY
Tank full/tank
absent light
Dehumidifying standby/freeze
protection light
Humidistat dial
How to dehumidify
Dry mode (drying washing)
•
Plug the appliance into a mains socket.
•
Make sure the "tank full/tank missing" light is
off. If it is on, position the tank correctly.
•
The dehumidifying standby light comes on
during the first three minutes (safety device),
then the appliance starts dehumidifying.
To remove a large amount of moisture (for
example when drying washing), you are
recommended to operate the appliance at
maximum power by turning the humidistat dial to
DRY.
•
The humidistat dial is used to adjust the
humidity level as desired (MIN/MED/MAX and
intermediate levels).
In this mode, the dehumidifier operates
continuously, irrespective of the level of humidity
in the room.
When the dial is on MIN, the dehumidifier
removes only a small amount of humidity
from the room. On MAX, it removes a large
amount of humidity.
To dehumidify, adjust the humidistat to one of
the positions available.
7
INDICATOR LIGHTS
Dehumidifying standby/low-temperature operation light
Tank control system light
The light comes on:
This dehumidifier has a special device to control
correct operation.
A red indicator light on the control panel comes
on to warn the user when:
1) To indicate the appliance is in standby for
about three minutes before start-up. This
device protects the compressor from starting
and stopping too often.
2) To indicate low temperature operation. When
the temperature in the room is too low, the
low temperature operation electronic device
trips.This operates the appliance with
alternate cycles of dehumidifying and fan only
to avoid the formation of ice.
1. the tank is full: empty the tank
2. the tank is missing: reposition the tank
3. the tank is incorrectly positioned: position the
tank correctly
4. with continuous drain:
the hose is blocked or sloping upwards (water
is still draining into the tank)
remove the obstruction
For frequent use in particularly cold rooms,
you are recommended to raise room
temperature, even if only slightly.
When the cause has been removed, the light goes
off and the appliance resumes operation.
This ensures that the dehumidifier is
operating under suitable conditions,
improving its performance and accelerating
dehumidification.
8
CLEANING AND
MAINTENANCE
particles, but also has an efficient antibacterial
action. It also greatly reduces concentrations
of irritants such as pollen and spores.
The filter is treated with small particles of
silver (on the scale of millionths of a
millimetre) which are able to block the
multiplication of and destroy any bacteria or
spores coming into contact with them.
Always unplug the appliance from the power
socket before performing any cleaning or
maintenance operations.
For safety reasons, never wash the dehumidifier
using a jet of water.
If the appliance is not used for long
periods
Cleaning the cabinet
•
•
•
Clean the appliance using a damp cloth then
dry with a dry cloth.
Do not use petrol, alcohol or solvents to clean
the appliance.
Do not spray liquid insecticide or similar
products as they may deform the plastic.
•
•
•
After unplugging the appliance from the
power socket, empty the tank.
Clean and reposition the filter.
Cover the appliance with a plastic bag to
protect it from dust.
Cleaning the silver ion air filter
TECHNICAL SPECIFICATIONS
If the filter is dirty, air circulation is compromised
and the efficiency of the dehumidifying and air
purifying functions decreases.
It is therefore good practice to clean the filter at
regular intervals. The frequency depends on the
duration and conditions of operation.
If the unit is used constantly or systematically,
you are recommended to clean the filter once a
week.
• Remove the air filter by pulling sideways (Fig.
5).
Power supply voltage
Absorbed power
Maximum power input
Freeze protection device
Hygrometer
Fan speeds
Air filter
Dimensions HxLxD
Tank capacity
Operating limits:
Temperature
Relative humidity
fig. 5
•
Use a vacuum cleaner to remove dust accumulations from the filter.
If the filter is very dirty, rinse well in warm
water.
The temperature of the water must not exceed
40°C.
After washing the filter, allow it to dry completely before repositioning it.
The silver ion filter not just retains dust
9
See rating plate
“
“
Yes
Yes
1
Yes
485x375x190
3 litres
2°C - 32°C
30 - 90%
TROUBLESHOOTING
Check the following points before calling your local authorised Service Centre.
PROBLEMS
The appliance is operating in
dehumidifying mode, but the
humidity does not decrease.
CAUSE
SOLUTION
The filter is blocked.
Clean the filter.
The temperature or humidity
in the room is too low.
In certain conditions, it is normal for the appliance not to
dehumidify (in certain cases,
it is recommended to heat the
environment).
The room is too big for the
dehumidifying power of the
appliance.
Too many sources of humidity
in the room (pots of boiling
water, etc.).
The humidy set point is too
high.
Decrease the humidity set
point.
The appliance does not
work for 3 minutes after
start-up.
The safety device has tripped.
Wait for 3 minutes to pass.
The appliance does not
work.
• The appliance is not plugged in
• Plug into the mains
• There is no current
• Check the power supply
• The humidistat is on MIN
• Turn the humidistat to the
max position
• The tank is full of water
(red light on)
• Empty the tank
• The tank is not in the correct
position (red light on)
• Gently place the tank in the
correct position
• The tank is missing
(red light on)
• Reposition tank
• Continuous drain:
The hose is blocked or sloping upwards (water is still
draining into the tank).
• Remove the obstruction
10