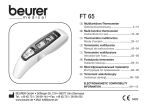
1
SFT 65 D Multifunktions–Thermometer Gebrauchsanweisung.................(1 – 16) G Multi-function thermometer Instructions for use...................(17 – 30) F Thermomètre multifonction Mode d’emploi...........................(31 – 44) I Termometro multifunzione Istruzioni per l’uso.....................(45 – 58) r Многофункциональный термометр Инструкция по применению..(59 – 73) Service-Adresse: Hans Dinslage GmbH, Riedlinger Str. 28, 88524 Uttenweiler, GERMANY Tel.: +49 (0) 73 74 / 91 57 66, Fax: +49 (0) 73 74 / 92 07 23 E-mail: [email protected] Deutsch Inhalt 1 Zeichenerklärung............................................ 2 2 Hinweise......................................................... 3 3 Gerätebeschreibung....................................... 5 4 Inbetriebnahme............................................... 6 5 Einstellung...................................................... 6 6 Was Sie vor dem Messen wissen sollten....... 7 7 Messen........................................................... 8 8 9 10 11 12 13 Batteriewechsel.............................................. 11 Aufbewahrung und Pflege.............................. 12 Entsorgen....................................................... 13 Technische Daten .......................................... 14 Fehlerbehebung.............................................. 15 Garantie und Service...................................... 16 Lieferumfang • Thermometer • 2 x 1,5 V Batterien AAA, LR03 • Diese Gebrauchsanweisung Bitte lesen Sie diese Gebrauchsanweisung aufmerksam durch, bewahren Sie sie für den späteren Gebrauch auf, machen Sie sie anderen Benutzern zugänglich und beachten Sie die Hinweise. 1 Zeichenerklärung Folgende Symbole werden in der Gebrauchsanweisung verwendet. 2 Warnung Warnhinweis auf Verletzungsgefahren oder Gefahren für Ihre Gesundheit Achtung Sicherheitshinweis auf mögliche Schäden am Gerät/Zubehör Hinweis Hinweis auf wichtige Informationen 2 Hinweise Sicherheitshinweise Warnung: • Führen Sie bei Messungen im Ohr die Sensorspitze des Thermometers vorsichtig ein. • Die Anwendung des Thermometers an verschiedenen Personen kann bei bestimmten akuten, infektiösen Erkrankungen aufgrund einer möglichen Keimverschleppung trotz der durchzuführenden Reinigung und Wischdesinfektion unzweckmäßig sein. Fragen Sie im Einzelfall Ihren behandelnden Arzt. Hinweise zum Umgang mit Batterien Warnung: • Batterien können bei Verschlucken lebensgefährlich sein. Bewahren Sie Batterien für Kleinkinder unerreichbar auf. Wurde eine Batterie verschluckt, nehmen Sie sofort medizinische Hilfe in Anspruch. • Batterien dürfen nicht geladen oder mit anderen Mitteln reaktiviert, nicht auseinandergenommen, in Feuer geworfen oder kurzgeschlossen werden. • Batterien können Giftstoffe enthalten, die die Gesundheit und die Umwelt schädigen. Entsorgen Sie die Batterien deshalb unbedingt entsprechend der geltenden gesetzlichen Bestimmungen. Werfen Sie die Batterien niemals in den normalen Hausmüll. Achtung: • Wechseln Sie schwächer werdende Batterien rechtzeitig aus. • Auslaufende Batterien können Beschädigungen am Gerät verursachen. Wenn Sie das Gerät längere Zeit nicht benutzen, nehmen Sie die Batterien aus dem Batteriefach. • Wenn eine Batterie ausgelaufen ist, ziehen Sie Schutzhandschuhe an und reinigen Sie das Batteriefach mit einem trockenen Tuch. 3 Allgemeine Hinweise • Bitte lesen Sie diese G ebrauchsanweisung aufmerksam durch, bewahren Sie sie für den späteren Gebrauch auf, machen Sie sie anderen Benutzern zugänglich und beachten Sie die Hinweise. • Dieses Thermometer ist ein empfindliches elektronisches Gerät. Behandeln Sie es sorgfältig und setzen Sie es keinen mechanischen Stößen aus. • Setzen Sie das Gerät nicht direkter Sonneneinstrahlung aus. • Prüfen Sie vor jeder Anwendung, ob die Linse beschädigt ist. Falls diese beschädigt ist, wenden Sie sich bitte an die Händler- oder Service-Adresse. • Das Thermometer ist NICHT wasserdicht. Aus diesem Grund ist direkter Kontakt mit Wasser oder anderen Flüssigkeiten zu vermeiden. • Das Gerät ist nicht für den medizinischen oder kommerziellen Gebrauch vorgesehen. • Das Gerät ist nur für den in dieser Gebrauchsanweisung angegebenen Zweck bestimmt. • Die Messspitze nach jedem Gebrauch mit einem weichen, mit Desinfektionsmittel angefeuchteten Tuch reinigen. • Das Thermometer wurde für den praktischen Einsatz konstruiert, kann aber nicht den Arztbesuch ersetzen. • Prüfen Sie vor jeder Reklamation zuerst die Batterien und wechseln Sie diese ggf. aus. • Reparaturen dürfen nur von autorisierten Servicestellen vorgenommen werden. Ansonsten erlischt der Garantieanspruch. • Dieses Gerät entspricht der EU-Richtlinie 93/42 EWG. • Dieses Gerät entspricht der Norm EN 12470 - 5 und ASTM E 1965 - 98. • Sollten Sie noch Fragen zur Anwendung unserer Geräte haben, so wenden Sie sich bitte an Ihren Händler oder an den Kundenservice. 4 3 Gerätebeschreibung Übersicht 1 2 3 4 5 6 7 8 9 10 1 1 2 3 4 5 Stirn-/Abdeckkappe Stirnthermometer-Modus-Taste Ohrthermometer-Modus-/Ein-Taste LED (rot) (Fieberalarm) LED (grün) 11 12 13 14 15 16 17 18 Datum Uhrzeit Messmodus („Ohr“, „Stirn“, „Objekt“) Symbol „Batteriewarnung“ Anzeige Messergebnis Symbol „Speicher“ und Speicherplatznummer Symbol „Messung läuft“ Einheit des Messergebnisses (°C oder °F) / 6 7 8 9 10 LCD Sensorspitze mit Linse (Abdeckkappe entfernt) Memory-Taste Set-Taste Batteriefachdeckel 11 12 5-15 7:20 13 14 368 15 18 17 8 16 5 4 Inbetriebnahme Die Batterien sind beim neuen Gerät bereits eingelegt. Ziehen Sie vor der ersten Anwendung den herausstehenden Batterieschutzstreifen aus dem Batteriefach. Das Thermometer schaltet sich dabei anschließend automatisch ein. 5 Einstellung Einheit der Temperaturanzeige, Datum und Uhrzeit einstellen 1-1 00:00 888 8 Drücken Sie 1 Sekunde lang die Taste , um das Thermometer einzuschalten. Das Gerät durchläuft einen kurzen Selbsttest, im Display werden alle Segmente ca. 1 Sekunde lang angezeigt. Nach erfolgreichem Selbsttest ertönen zwei kurze Pieptöne, es werden im Stand-by-Modus Datum und Uhrzeit angezeigt und die Anzeige „--“ erscheint. Bei der erstmaligen Benutzung des Thermometers und nach jedem Wechsel der Batterien werden (nach dem Selbsttest) Datum und Uhrzeit in der Grundeinstellung angezeigt (1-1 00:00). Stellen Sie nun die Einheit der Temperaturanzeige, das Datum und die Uhrzeit ein. Bei der Einstellung gehen Sie in mehreren Schritten vor: Einheit – Jahr – Monat – Tag – Stunden – Minuten. , um in den Set-Modus zu gelangen. • Drücken Sie ca. 3 Sekunden lang die Taste Es blinkt der jeweils zu ändernde Teilbereich. • Drücken Sie die Taste , um diese Einstellung zu speichern, oder • drücken Sie die Taste , um die Einstellung zu ändern. • Drücken Sie anschließend die Taste , um diese Einstellung zu speichern. Nach diesem Vorgang zeigt das Thermometer im Display OFF an und schaltet sich automatisch aus. 6 6 Was Sie vor dem Messen wissen sollten Es gibt verschiedene Thermometer zur Messung an unterschiedlichen Körperstellen: • Ohr-/Stirn-Thermometer (dieses Thermometer, zur Messung im Ohr oder an der Stirnregion) • Stab-Thermometer (zur rektalen (im After), axialen (unter der Achsel) oder oralen Messung (im Mund)) Die Temperaturmessung liefert einen Messwert, der Auskunft gibt über die aktuelle Körpertemperatur eines Menschen. Sollten Sie unsicher sein in der Interpretation der Ergebnisse oder treten abnormale Werte auf, sollten Sie sich an Ihren behandelnden Arzt wenden. Dies gilt auch bei geringeren Temperaturveränderungen, wenn weitere Krankheitssymptome dazukommen, wie z. B. Unruhe, starkes Schwitzen, Hautrötung, hohe Pulsfrequenz, Kollapsneigung etc. Mit unterschiedlichen Thermometern gemessene Temperaturen können nicht miteinander verglichen werden. Geben Sie deshalb Ihrem Arzt an (bzw. berücksichtigen Sie bei einer Selbstdiagnose), mit welchem Thermometer Sie die Körpertemperatur an welcher Körperstelle gemessen haben. Die Temperatur eines gesunden Menschen wird von verschiedenen Faktoren beeinflusst: dem individuellen, personenabhängigen Stoffwechsel, dem Alter (die Körpertemperatur ist bei Säuglingen und Kleinkindern höher und sinkt mit zunehmendem Alter. Bei Kindern treten höhere Temperaturschwankungen schneller und häufiger auf, z. B. bedingt durch Wachtumsschübe), von der Kleidung, von der Außentemperatur, von der Tageszeit (morgens ist die Körpertemperatur niedriger und steigt im Laufe des Tages zum Abend hin an), von der vorausgegangenen körperlichen und, mit geringerem Einfluss, auch mentalen Aktivität. Der Temperaturwert schwankt je nach Körperstelle, an der er gemessen wird. Die Abweichung kann bei Gesunden zwischen 0,2°C (0,4°F) - 1°C (1,8°F) liegen. So liegt der normale Temperaturbereich bei • der Stirnmessung: 35,8°C (96,4°F) - 37,6°C (99,7°F), mit einem Stirnthermometer • der Ohrmessung: 36,0°C (96,8°F) - 37,8°C (100°F), mit einem Ohrthermometer • rektal gemessener Temperatur: 36,3°C (97,3°F) - 37,8°C (100°F), mit einem konventionellen Thermometer • oral gemessener Temperatur: 36,0°C (96,8°F) - 37,4°C (99,3°F), mit einem konventionellen Thermometer Um den Temperaturverlauf verfolgen zu können, messen Sie immer an derselben Körperstelle. 7 7 Messen Bitte prüfen Sie vor jeder Anwendung, ob die Linse beschädigt ist. Falls diese beschädigt ist, wenden Sie sich bitte an die Händler- oder Service-Adresse. Berücksichtigen Sie, dass sich das Thermometer mindestens 30 Minuten in dem Raum befinden muss, in dem die Messung vorgenommen wird. Messen der Körpertemperatur im Ohr • Es gibt Personen, die unterschiedliche Messwerte im linken und rechten Ohr haben. Um Temperaturveränderungen zu erfassen, messen Sie bei derselben Person immer im selben Ohr. • Das Ohrthermometer darf von Kindern nur unter Aufsicht von Erwachsenen benutzt werden. In der Regel ist eine Messung ab einem Lebensalter von 6 Monaten möglich. Bei Kleinkindern unter 6 Monaten ist der Gehörgang noch sehr eng, sodass häufig die Temperatur des Trommelfells nicht erfasst werden kann und vermehrt zu niedrige Messergebnisse angezeigt werden. • Die Messung darf nicht an einem Ohr durchgeführt werden mit entzündlichen Erkrankungen (z. B. Eiterfluss, Sekretabgang), nach möglichen Ohrverletzungen (z. B. Trommelfellschaden) oder in der Heilungsphase nach operativen Eingriffen. In all diesen Fällen sprechen Sie bitte mit Ihrem behandelnden Arzt. • Die Anwendung des Thermometers an verschiedenen Personen kann bei bestimmten akuten, infektiösen Erkrankungen auf Grund einer möglichen Keimverschleppung trotz der durchzuführenden Reinigung und Wischdesinfektion unzweckmäßig sein. Sprechen Sie dazu im Einzelfall mit Ihren behandelnden Arzt. • Dieses Thermometer darf nur ohne Einweg-Schutzhülle verwendet werden. • Wenn Sie längere Zeit auf einem Ohr gelegen sind, ist die Temperatur leicht erhöht. Warten Sie einige Zeit oder messen Sie im anderen Ohr. • Ohrenschmalz kann die Messung beeinflussen, reinigen Sie deshalb ggf. das Ohr vor der Messung. 8 • Drücken Sie 1 Sekunde lang die Taste , um das Thermometer einzuschalten. Nach erfolgreichem Selbsttest ertönen zwei kurze Pieptöne. • Nehmen Sie die Kappe ab, indem Sie sie leicht nach oben drücken (1) und dann nach vorne abziehen (2). 2 1 Vergewissern Sie sich, dass die Sensorspitze und auch der Gehörgang sauber sind. Da der Gehörgang leicht gekrümmt ist, müssen Sie vor dem Einführen der Sensorspitze das Ohr leicht nach hinten oben ziehen, damit die Sensorspitze direkt auf das Trommelfell ausgerichtet werden kann. • Führen Sie die Sensorspitze vorsichtig ein und drücken Sie 1 Sekunde lang die Taste . • Lassen Sie die Taste los. Das Ende der Messung wird mit einem kurzen Piepton signalisiert, der gemessene Wert erscheint auf dem Display. Liegt der gemessene Wert innerhalb des Normbereiches (< 38 °C/100,4°F), leuchtet die grüne LED für 3 Sekunden. Liegt der gemessene Wert höher (≥ 38°C/100,4°F, Fieber), leuchtet die rote LED. 9 Messen der körpertemperatur an der Stirn Beachten Sie, dass die Stirn/Schläfe frei von Schweiß und Kosmetika sein muss und dass bei der Stirnmessung die Einnahme von gefäßverengenden Medikamenten und Hautirritationen das Messergebnis verfälschen können. • Drücken Sie 1 Sekunde lang die Taste , um das Thermometer einzuschalten. Nach erfolgreichem Selbsttest ertönen zwei kurze Pieptöne. • Setzen Sie den Messkopf mit aufgesetzter Stirn-/Abdeckkappe an der Schläfe an, halten Sie die Taste gedrückt und führen Sie das Thermometer gleichmäßig über die Stirn zur anderen Schläfe. • Lassen Sie dann die Taste los. Das Ende der Messung wird mit einem kurzen Piepton signalisiert, der gemessene Wert erscheint auf dem Display. Liegt der gemessene Wert innerhalb des Normbereiches (< 38 °C/100,4°F), leuchtet die grüne LED für 3 Sekunden. Liegt der gemessene Wert höher (≥ 38°C/100,4°F, Fieber), leuchtet die rote LED. Messen der oberflächentemperatur • Drücken Sie 1 Sekunde lang die Taste , um das Thermometer einzuschalten. Nach erfolgreichem Selbsttest ertönen zwei kurze Pieptöne. und , um in den Objekttemperatur• Drücken Sie dann gleichzeitig 3 Sekunden lang die Tasten Modus zu wechseln. Im Display erscheint die Anzeige . • Drücken Sie die Taste oder und richten Sie die Sensorspitze bei gedrückter Taste mit 3 cm Abstand auf den zu messenden Gegenstand oder die Flüssigkeit (keinesfalls in Flüssigkeiten tauchen). • Lassen Sie die Taste oder los. Das Ende der Messung wird mit einem kurzen Piepton signalisiert, der gemessene Wert erscheint auf dem Display. Beachten Sie, dass die angezeigte Temperatur die ermittelte und nicht die angepasste Oberflächentemperatur ist. Sie lässt sich nicht mit der Stirn-/Ohrtemperatur vergleichen. Um wieder in den Ohr-/Stirnthermometer-Modus zu wechseln, drücken Sie gleichzeitig 3 Sekunden lang die Tasten und , bis die Anzeige erlischt und ein kurzer Piepton ertönt. Durch Aus- und wieder Anschalten des Thermometers wird der Objekttemperatur-Modus automatisch verlassen. 10 Der zuletzt ermittelte Messwert, d. h. nur der letzte Wert einer Messreihe, wird automatisch abgespeichert, sobald das Thermometer sich ausschaltet oder ausgeschaltet wird. Dazu stehen 10 Speicherplätze zur Verfügung. und Um das Thermometer auszuschalten, drücken Sie gleichzeitig ca. 3 Sekunden lang die Tasten Nehmen Sie keine weiteren Eingaben vor, schaltet das Thermometer nach der Anzeige des gemessenen Wertes nach ca. einer Minute automatisch ab. . . Um die gespeicherten Werte abzufragen, schalten Sie das Thermometer ein und drücken die Taste Es werden jeweils das Datum, die Uhrzeit, die Speicherplatznummer und das Symbol des Messmodus sowie die Temperatur angezeigt. Blättern Sie durch wiederholtes Drücken der Taste durch die MessergebnisSpeicherplätze. 8 Batteriewechsel Wenn die Batterien schwach werden, erscheint das Batteriewarnsymbol . Temperaturmessungen sind noch möglich, die Batterien müssen ersetzt werden. Wenn das Batteriewarnsymbol blinkt und Lo im Display erscheint, müssen die Batterien ausgetauscht werden. Falls die Batterien zu schwach sind, schaltet sich das Thermometer automatisch aus. Hinweis: • Verwenden Sie bei jedem Batteriewechsel Batterien gleichen Typs, gleicher Marke und gleicher Kapazität. • Wechseln Sie alle Batterien immer gleichzeitig. • Verwenden Sie keine wiederaufladbaren Akkus. • Verwenden Sie schwermetallfreie Batterien. 11 1. Lösen Sie die Schraube im Batteriefachdeckel und ziehen Sie den Deckel nach hinten ab. 2. Entnehmen Sie die verbrauchten Batterien und legen Sie zwei neue Batterien in der angezeigten Richtung ein. 3. Schließen Sie den Batteriefachdeckel und schrauben Sie ihn wieder zu. Entsorgen Sie verbrauchte Batterien entsprechend der geltenden gesetzlichen Bestimmungen. Werfen Sie Batterien niemals in den normalen Hausmüll. 9 Aufbewahrung und Pflege • Reinigen Sie nach jedem Gebrauch die Sensorspitze. Verwenden Sie dazu ein weiches Tuch oder ein Wattestäbchen, welches mit Desinfektionsmittel, Alkohol oder warmem Wasser angefeuchtet werden kann. • Zur Reinigung des gesamten Gerätes verwenden Sie bitte ein weiches, leicht mit Seifenlauge angefeuchtetes Tuch. • Verwenden Sie keine aggressiven Reinigungsmittel. • Lagern Sie das Thermometer immer mit aufgesteckter Stirn-/Abdeckkappe. • Bei beabsichtigter längerer Lagerung entfernen Sie bitte die Batterie. • Das Gerät darf nicht bei zu hoher oder niedriger Temperatur oder Luftfeuchtigkeit (siehe techn. Daten) im Sonnenlicht, in Verbindung mit elektr. Strom oder an staubigen Orten gelagert oder auch benutzt werden. Ansonsten kann es zu Messungenauigkeiten kommen. • Das Gerät muss nach 2 Jahren messtechnisch überprüft (kalibriert) werden. Bitte schicken Sie das das Gerät vollständig an die Händler- oder Service-Adresse. 12 10 Entsorgen Batterien und Akkus sowie elektronische Geräte gehören nicht in den Hausmüll. Als Verbraucher sind Sie gesetzlich verpflichtet, gebrauchte Batterien zurückzugeben. Sie können Ihre alten Batterien bei den öffentlichen Sammelstellen Ihrer Gemeinde oder überall dort abgeben, wo Batterien der betreffenden Art verkauft werden. Befolgen Sie die örtlichen Vorschriften bei der Entsorgung der Materialien. Hinweis: Diese Zeichen finden Sie auf schadstoffhaltigen Batterien: Pb = Batterie enthält Blei, Cd = Batterie enthält Cadmium, Hg = Batterie enthält Quecksilber. Entsorgen Sie das Gerät gemäß der Elektro- und Elektronik-Altgeräte EG-Richtlinie 2002/96/EC – WEEE (Waste Electrical and Electronic Equipment). Bei Rückfragen wenden Sie sich an die für die Entsorgung zuständige kommunale Behörde. 13 11 Technische Daten Hinweis: Bei Verwendung des Gerätes außerhalb der Spezifikation ist eine einwandfreie Funktion nicht gewährleistet! Technische Änderungen zur Verbesserung und Weiterentwicklung des Produktes behalten wir uns vor. Dieses Gerät entspricht der europäischen Norm EN 60601-1-2 und unterliegt besonderen Vorsichtsmaßnahmen hinsichtlich der elektromagnetischen Verträglichkeit. Bitte beachten Sie dabei, dass tragbare und mobile HF-Kommunikationseinrichtungen dieses Gerät beeinflussen können. Genauere Angaben können Sie unter der angegebenen Kundenservice-Adresse anfordern. Name und Modell SFT65 Messbereich Ohr-/Stirnthermometer-Modus: 34 °C – 43 °C (93,2 °F – 109,4 °F) Objekttemperatur-Modus: 0 °C – 100 °C (32 °F – 212 °F) Labor-Messgenauigkeit Ohrthermometer-Modus: ±0,2 °C (±0,4 °F) von 35,5 °C – 42 °C (95,9 °F – 107,6 °F), außerhalb dieses Messbereiches ±0,3 °C (±0,5 °F) Stirnthermometer-Modus: ±0,3 °C (±0,5 °F) von 22 °C – 40 °C (71,6 °F – 104 °F) Objekttemperatur-Modus: ±1,5 °C (±2,7 °F) bei < 30 °C (86 °F); ±5% bei ≥ 30 °C (86 °F) Mindestens 5 Sekunden Zeitabstand zwischen zwei Messungen Klinische Wiederholpräzision Maßeinheiten Betriebsbedingungen 14 Ohr: Kinder, 1 – 5 Jahre: ±0,08 °C (±0,14 °F) Erwachsene: ±0,07 °C (±0,13 °F) Stirn: Kinder, 1 – 5 Jahre: ±0,07 °C (±0,13 °F) Erwachsene: ±0,08 °C (±0,14 °F) °Celsius (°C) oder °Fahrenheit (°F) 16 °C bis 35 °C (60,8 °F – 95 °F) bei einer relativen Luftfeuchtigkeit bis 85% (nicht kondensierend) Aufbewahrungs umgebung Abmessungen -25 °C bis 55 °C (-13 °F – 131 °F) bei einer relativen Luftfeuchtigkeit bis 85% (nicht kondensierend) 38,2 x 138 x 46,5 mm Gewicht Batterie 90 g einschließlich Batterie 2x AAA, LR 03 Speicher Für 10 Messungen Zeichenerklärung 12 Geräteklassifikation Typ BF Bitte lesen Sie die Gebrauchsanleitung! Fehlerbehebung Anzeige Ursache Die ermittelte Temperatur ist höher als 1) Ohr-/Stirnthermometer-Modus: 43 °C (109,4°F) 2) Objekttemperatur-Modus: 100 °C (212 °F) Die ermittelte Temperatur ist niedriger als 1) Ohr-/Stirnthermometer-Modus: 34 °C (93,2 °F) 2) Objekttemperatur-Modus: 0 °C (32 °F) Die Betriebstemperatur liegt nicht im Bereich von 16 °C bis 35 °C (60,8 – 95 °F) Behebung Betreiben Sie das Thermometer nur innerhalb der angegebenen Temperaturbereiche. Säubern Sie ggf. die Sensorspitze. Bei wiederholter Fehleranzeige an Fachhändler oder Kundenservice wenden. Betreiben Sie das Thermometer nur innerhalb der angegebenen Temperaturbereiche. 15 13 Garantie und Service Sie erhalten 2 Jahre Garantie ab Kaufdatum auf Material- und Fabrikationsfehler des Produktes. Die Garantie gilt nicht: • • • • im Falle von Schäden, die auf unsachgemäßer Bedienung beruhen für Verschleißteile (z.B. Batterien) für Mängel, die dem Kunden bereits bei Kauf bekannt waren bei Eigenverschulden des Kunden Die gesetzlichen Gewährleistungen des Kunden bleiben durch die Garantie unberührt. Für G eltendmachung eines Garantiefalles innerhalb der Garantiezeit ist durch den Kunden der Nachweis des Kaufes zu führen. Die Garantie ist innerhalb eines Zeitraumes von 2 Jahren ab Kaufdatum gegenüber der Hans Dinslage GmbH Riedlinger Straße 28 88524 Uttenweiler Germany geltend zu machen. Der Kunde hat im Garantiefall das Recht zur Reparatur der Ware bei u nseren eigenen oder bei von uns autorisierten Werkstätten. Weitergehende Rechte werden dem Kunden (aufgrund der Garantie) nicht eingeräumt. 16 English Contents 1 Signs and symbols......................................... 17 2 Tips................................................................. 18 3 Device description.......................................... 20 4 Getting started................................................ 21 5 Setting the device........................................... 21 6 What you should know about using this thermometer................................................... 22 7 8 9 10 11 12 Measuring....................................................... 23 Replacing the battery..................................... 26 Storage and maintenance............................... 27 Disposal.......................................................... 28 Technical data ............................................... 29 Trouble-shooting............................................. 30 Included in delivery • Thermometer • 2 x 1.5 V AAA batteries, LR03 • These Instructions for Use Please read through these Instructions for Use carefully and retain them for future reference; make them available to other users and observe the information they contain. 1 Signs and symbols The following symbols appear in these instructions. Warning Warning instruction indicating a risk of injury or damage to health. Warning Safety note indicating possible damage to the unit/accessory. Note Note on important information. 17 2 Tips Safety tips Warning: • To measure temperature, insert the sensor tip of the thermometer carefully into the ear. • Use of the thermometer on different persons can be inappropriate in the event of certain acute infectious diseases because of the possible spread of germs despite cleaning and disinfection. If you have any doubts, please consult your doctor. Notes on handling batteries Warning: • Batteries can be extremely dangerous if swallowed. Keep batteries out of the reach of small children. Should a battery be swallowed, seek medical assistance immediately. • Batteries must not be recharged or reactivated by any other means, taken apart, thrown into an open fire or short circuited. • Batteries can contain toxins that are harmful to health and the environment. Always dispose of batteries in accordance with applicable legal regulations. Do not dispose of batteries with the normal household waste. Warning: • Replace weak batteries before they discharge completely. • Leaking batteries can damage the device. If you do not use the device for an extended period of time, remove the batteries from the battery compartment. • Leaking batteries may damage the device. If you do not intend to use the device for longer periods, remove the batteries from the battery compartment. 18 General advice  • Please read through these Instructions for Use carefully and retain them for future reference; make them available to other users and observe the information they contain. • This thermometer is a sensitive electronic device. Handle it with care and do not subject it to any mechanical impacts. • Do not expose the device to direct sunlight. • Check before each use that the lens is intact. If it is damaged, please contact your retailer or the service address. • The thermometer is NOT waterproof. For this reason, direct contact with water or other liquids should be avoided. • The device is not intended for medical or commercial use. • The device is only intended for the purpose stated in these Instructions for Use. • After each use, clean the measuring tip with a soft cloth moistened with disinfectant. • The thermometer has been designed for practical use, but is not a substitute for a visit to the doctor. • Before each repair query, first check the batteries and replace them if necessary. • Repairs must only be carried out by authorised service centres, otherwise the guarantee is invalidated. • This device complies with the EU Directive 93/42 EEC. • This device complies with the standard EN 12470-5 and ASTM E 1965-98. • If you should have any questions about using our devices, please contact either your retailer or Customer Services. 19 3 Device description overview 1 2 3 4 5 6 7 8 9 1 Forehead/cover cap 2 Forehead thermometer mode button (forehead) 3 Ear thermometer mode/On button 4 LED (red) (high temperature alarm) 5 LED (green) 11 12 13 14 15 16 17 18 20 (ear)/ Date Time Measurement mode (“Ear”, “Forehead”, “Object”) Battery warning symbol Measurement display “Memory” symbol and storage space number “Measurement in progress” symbol Unit of measurement (°C or °F) 6 7 8 9 10 10 LCD Sensor tip with lens (cover cap removed) Memory button Set button Battery compartment lid 11 12 5-15 7:20 13 14 368 15 18 17 8 16 4 Getting started The batteries are already inserted in all new devices. Before first use, remove the protruding plastic insulating strip from the battery compartment. The thermometer will then switch on automatically. 5 Setting the device Set the unit in which the temperature will be displayed, the date and the time 1-1 00:00 888 8 Press the button for 1 second to switch the thermometer on. The device performs a brief self test: all elements of the display are shown for approx. 1 second. Following a successful self test, the device emits two short beeps. In Standby mode, the date and time are shown and “--” is displayed. When the thermometer is used for the first time, and each time the batteries are changed, the date and time are displayed in the format 1-1 00:00 during the basic set-up (after the self test). Now set the unit in which the temperature will be displayed, the date and the time. To set the device, proceed in stages: unit – year – month – day – hours – minutes. button for approx. 3 second to access the Set mode. • Press the The setting to be changed will flash in turn. • Press the button again to save the setting or • press the button to change the setting. • Then press the button to save the setting. After this process, the thermometer shows the word “OFF” in the display and switches off automatically. 21 6 What you should know about using this thermometer There are different thermometers for taking temperature measurements in different parts of the body: • Ear/forehead thermometer (this thermometer, for measuring in the ear or on the forehead area) • Rod thermometer (for rectal (in the back passage), axillary (under the arm) or oral measurement (in the mouth))  Taking the temperature gives a measurement that provides information about a person’s current body temperature. If you are uncertain about interpreting the results or if the value is abnormal, please consult your doctor. This also applies in the case of slight temperature changes if there are other symptoms of illness such as agitation, severe sweating, flushed skin, fast pulse rate, tendency to collapse etc. Temperatures measured with different thermometers cannot be compared with one another. You should therefore tell your doctor (or bear in mind if you are diagnosing yourself) what thermometer you used to take your temperature and in what part of the body. The temperature of a healthy person is affected by various factors: the person's individual metabolism, their age (body temperature is higher in babies and toddlers and decreases with age. Greater temperature fluctuations occur faster and more often in children, e.g. due to growth spurts), their clothing, the ambient temperature, the time of day (body temperature is lower in the morning and increases throughout the day towards evening), the preceding physical and, to a lesser extent, mental activity. The temperature varies depending on the part of the body where the measurement is taken. The difference can be between 0.4°F (0,2°F) and 1.8°F (1°C) for a healthy body. The normal temperature ranges are as follows: • On the forehead: 96.4°F - 99.7°F (35.8°C - 37.6°C), measured with a forehead thermometer • In the ear: 96.8°F - 100°F (36.0°C - 37.8°C), measured with an ear thermometer • In the back passage: 97.3°F - 100°F (36.3°C - 37.8°C), measured with a conventional thermometer • In the mouth: 96.8°F - 99.3°F (36.0°C - 37.4°C), measured with a conventional thermometer In order to track temperature change, always take the measurements in the same part of the body. 22 7 Measuring Before each use, please check that the lens is intact. If it is damaged, please contact your retailer or the service address. Bear in mind that the thermometer needs to have been in the room in which the measurement is taken for at least 30 minutes before use. Measuring body temperature in the ear  • Some people produce different readings in their left and right ear. In order to record temperature changes, always measure a person's temperature in the same ear. • The ear thermometer may be used by children only under adult supervision. Measurement is usually possible over the age of 6 months. In infants under 6 months, the ear canal is still very narrow so the temperature of the eardrum often cannot be recorded and the result displayed is often too low. • The measurement must not be taken in an ear affected by inflammatory diseases (e.g. discharging pus or secretion), after possible ear injuries (e.g. eardrum damage) or in the healing period after operative procedures. In all of these cases, please consult your doctor. • Use of the thermometer on different persons can be inappropriate in the event of certain acute infectious diseases because of the possible spread of germs despite cleaning and disinfection. If you have any doubts, please consult your doctor. • This thermometer may only be used without a disposable protective cover. • If you have been lying on one ear for some time, the temperature is slightly raised. Wait a little while or measure in the other ear. • As ear wax can affect the measurement, you should clean the ear before measuring if necessary. 23 • Press the button for 1 second to switch the thermometer on. Following a successful self test, the device emits two short beeps. • Remove the cap by gently pushing it up (1) and then pulling it off forwards (2). 2 1 Make sure that the sensor tip and also the ear canal are clean. As the ear canal is slightly curved, you have to pull the ear slightly up and backwards before inserting the sensor tip. This is important so that the sensor tip can be pointed directly at the eardrum. • Insert the sensor tip carefully and press the button for 1 second. • Release the button. The end of the measuring time is signalled with a short beep and the measured value appears on the display. If the measured value is within the normal range (< 100.4°F/38°C), the green LED lights up for 3 seconds. If the measured value is higher (≥ 100.4°F/38°C, high temperature), the red LED is illuminated. 24 Measuring body temperature on the forehead Please note that the forehead/temples must be free from sweat and cosmetics and that taking vasoconstrictive medication and skin irritations can distort the result when measuring temperature on the forehead. • Press the button for 1 second to switch the thermometer on. Following a successful self test, the device emits two short beeps. • Place the measuring head with the forehead/cover cap fitted on the temples, hold down the button and move the thermometer smoothly over the forehead to the other temple. • Then release the button. The end of the measuring time is signalled with a short beep and the measured value appears on the display. If the measured value is within the normal range (< 100.4°F/38°C), the green LED lights up for 3 seconds. If the measured value is higher (≥ 100.4°F/38°C, high temperature), the red LED is illuminated. Measuring surface temperature • Press the button for 1 second to switch the thermometer on. Following a successful self test, the device emits two short beeps. and buttons simultaneously for 3 seconds to switch to the Object temperature • Then press the mode. The symbol appears in the display. • Press and hold the or button and point the sensor tip towards to the object or liquid to be measured (never immerse in liquids), maintaining a distance of 3 cm. • Release the or button. The end of the measuring time is signalled with a short beep and the measured value appears on the display. Please note that the displayed temperature is the measured and not the adapted surface temperature. It is not the same as the forehead/ear temperature. To switch back to the Ear/Forehead thermometer mode, press the and buttons simultaneously for 3 seconds until the symbol disappears and there is a short beep. By switching the thermometer off and on again, it automatically exits the Object temperature mode. 25 The temperature last measured, i.e. only the last value of a series of measurements, is automatically stored as soon as the thermometer switches itself off or is switched off. There are 10 memory spaces available for this. and buttons simultaneously for approx. 3 seconds. To switch the thermometer off, press the If you do not press any other buttons, the thermometer automatically switches off approx. one minute after displaying the measured value. button. To call up the saved values, switch the thermometer on and press the The date, time, storage space number, the measurement mode symbol and the temperature are displayed in turn. Browse through the stored measurements by pressing the button repeatedly. 8 Replacing the battery When the batteries get weak, the battery warning symbol appears . It is still possible to measure temperature. The batteries must be replaced. When the battery symbol flashes and Lo appears in the display, the batteries must be replaced. If the batteries are too flat, then the thermometer will switch off automatically.  26 Note: • When changing the batteries, use batteries of the same type, make and capacity. • Always replace all batteries at the same time. • Do not use rechargeable batteries. • Use batteries free from heavy metals. 1. Loosen the screw on the battery compartment lid and pull the lid off downwards. 2. Remove the used batteries and insert two new batteries in the direction indicated. 3. Place the battery compartment lid back on and screw it closed. Dispose of used batteries in accordance with the applicable legal regulations. Never dispose of batteries in the normal household waste. 9 Storage and maintenance • Clean the sensor tip after each use. Use a clean cloth or cotton bud that can be moistened with disinfectant, alcohol or warm water. • To clean the entire device, please use a soft cloth slightly moistened with a mild soapy solution. • Do not use any harsh cleaning products. • Always store the thermometer with the forehead/cover cap on. • If prolonged storage is intended, you should remove the battery. • The device must not be stored or used at an excessively high or low temperature or humidity (see technical data), in sunlight, in association with an electrical current or in dusty locations. Otherwise inaccuracies can occur. • The device must be tested for accuracy (calibrated) after 2 years. Please send the complete device to the retailer's or service address.. 27 10 Disposal Batteries should not be placed in the normal household waste. As a consumer, you are required by law to recycle used batteries. You can recycle your old batteries at public collection points in your community or wherever the same batteries are sold. Observe the local regulations for material disposal.  Note: The codes below are printed on batteries containing harmful substances: Pb = Battery contains lead, Cd = Battery contains cadmium, Hg = Battery contains mercury. Dispose of the unit in accordance with EC Directive 2002/96/EC – WEEE (Waste Electrical and Electronic Equipment). If you have any questions, please contact the local authorities responsible for waste disposal. 28 11 Technical data Tip: If the device is used other than in accordance with the specifications, perfect functioning cannot be guaranteed. We reserve the right to make technical changes to improve and develop the product. This device complies with European Standard EN60601-1-2 and is subject to particular precautions with regard to electromagnetic compatibility. Please note that portable and mobile HF communication systems may interfere with this device. For more details, please contact Customer Services at the address indicated. Name and model SFT65 Measurement range Ear/Forehead thermometer mode: 93.2°F – 109.4°F (34°C - 43°C) Object temperature mode: 32°F – 212°F (0°C - 100°C) Laboratory measurement precision Ear thermometer mode: ±0.4°F (±0.2°C) from 95.9°F - 107.6°F (35.5°C - 42°C), outside of this measurement range ±0.5°F (±0.3°C) Forehead thermometer mode: ±0.5°F (±0.3°C) from 71.6°F - 104°F (22°C - 40°C) Object temperature mode: ±2.7°F (±1.5°C) at < 86°F (<30°C); ±5% at ≥ 86°F (≥ 30°C) At least 5 seconds Interval between 2 measurements Clinical repeat precision Measurement units Ambient operating conditions Storage conditions Ear: Children, 1 – 5 years: ±0.14°F (±0.08°C) Adults: ±0.13°F (±0.07°C) Forehead: Children, 1 – 5 years: ±0.13 °F (±0.07°C) Adults: ±0.14°F (±0.08°C) °Celsius (°C) or °Fahrenheit (°F) 60.8°F - 95°F (16°C - 35°C) with a relative humidity of up to 85% (non-condensing) -13°F to 131°F (-25°C - 55°C) with a relative humidity of up to 85% (non-condensing) 29 Dimensions 38.2 x 138 x 46.5 mm Weight Battery 90 g including battery 2x AAA, LR 03 Memory For 10 measurements Symbol key 12 Device classification type BF Please read the instructions for use. Trouble-shooting Display Cause The temperature measured is higher than 1) Ear/Forehead thermometer mode: 109.4°F (43°C) 2) Object temperature mode: 212°F (100°C) The temperature measured is lower than 1) Ear/Forehead thermometer mode: 93.2°F (34°C) 2) Object temperature mode: 32°F (0°C) The operating temperature is not in the range from 60.8°F - 95°F (16°C - 35°C) 30 Solution Operate the thermometer only between the specified temperature ranges. If necessary, clean the sensor tip. In the event of a repeated error message, contact your retailer or Customer Services. Operate the thermometer only between the specified temperature ranges. Français Sommaire 1 Symboles utilisés............................................ 31 2 Remarques..................................................... 32 3 Description de l’appareil................................. 34 4 Mise en service............................................... 35 5 Réglage........................................................... 35 6 Ce que vous devez savoir avant la mesure.... 36 7 8 9 10 11 12 Mesurer........................................................... 37 Changer les piles............................................ 40 Rangement et entretien.................................. 41 Elimination...................................................... 42 Données techniques . .................................... 43 Résolution des erreurs.................................... 44 Livraison • Thermomètre • 2 piles AAA LR03 de 1,5 V • Le présent mode d’emploi Veuillez lire attentivement ce mode d’emploi, conservez-le pour une utilisation ultérieure, mettez-le à la disposition des autres utilisateurs et suivez ses conseils. 1 Symboles utilisés Voici les symboles utilisés dans la notice d’utilisation : Avertissement Ce symbole vous avertit des risques de blessures ou des dangers pour votre santé. Attention Remarque Ce symbole vous avertit des éventuels dommages au niveau de l’appareil ou d’un accessoire. Ce symbole indique des informations importantes. 31 2 Remarques Avis de sécurité Avertissement : • Lors des mesures, insérez avec précaution la pointe du capteur du thermomètre dans l’oreille. • Dans le cas de certaines maladies infectieuses aiguës, l’utilisation du thermomètre sur plusieurs personnes peut être inappropriée en raison d’une éventuelle transmission de germes malgré le nettoyage et la désinfection nécessaires. Le cas échéant, consultez votre médecin traitant. Remarques relatives aux piles Avertissement : • Les piles sont extrêmement dangereuses si elles sont avalées. Conservez les piles hors de portée des petits enfants. En cas d’accident, consultez immédiatement un médecin ! • Les piles ne doivent être ni rechargées, ni réactivées par d’autres méthodes, ni démontées, ni jetées au feu, ni court-circuitées. • Les piles peuvent contenir des substances toxiques nocives pour la santé et l’environnement. Eliminez les piles conformément aux dispositions légales en vigueur. Ne jetez jamais les piles avec les ordures ménagères. Attention : • Remplacez à temps les piles usagées. • Des piles qui fuient peuvent endommager l’appareil. Si vous n’utilisez pas l’appareil pendant une période prolongée, retirez les piles du compartiment à piles. • En cas de fuite, enfilez des gants protecteurs et nettoyez le compartiment à piles avec un chiffon sec. 32 Recommandations générales  • Lisez attentivement cette notice, conservez-la pour un usage ultérieur, mettez-la à la disposition des autres utilisateurs et suivez les consignes qui y figurent. • Ce thermomètre est un appareil électronique sensible. Manipulez-le avec précautions et ne le soumettez à aucun coup mécanique. • Ne placez pas l’appareil à la lumière directe du soleil. • Avant chaque utilisation, vérifiez que la lentille n’est pas endommagée. Si elle l’est, veuillez utiliser l’adresse du vendeur ou du service après vente. • Le thermomètre n’est PAS étanche. C’est pourquoi il faut éviter un contact direct avec de l’eau ou d’autres liquides. • L’appareil n’est pas conçu pour une utilisation médicale ou commerciale. • L’appareil est conçu pour l’utilisation décrite dans ce mode d’emploi. • Nettoyez la pointe de mesure après chaque utilisation avec un chiffon doux humidifié avec du désinfectant. • Le thermomètre a été conçu pour une utilisation pratique mais ne remplace pas une visite chez le médecin. • Avant toute réclamation, vérifiez d’abord l’état des batteries et changez-les le cas échéant. • Les réparations ne peuvent être effectuées que par les centres de service autorisés. Dans le cas contraire, la garantie est annulée. • Cet appareil est conforme à la directive européenne 93/42 CE. • Cet appareil est conforme aux normes EN 12470 - 5 et ASTM E 1965 - 98. • Pour toute question concernant l’utilisation de nos appareils, adressez-vous à votre revendeur ou à notre service clients. 33 3 Description de l’appareil Aperçu 1 2 3 4 5 6 7 8 9 1 Embout frontal/de protection 2 Touche de mode thermomètre frontal 3 Touche de mise en marche/de mode thermomètre auriculaire / 4 LED (rouge) (alarme de fièvre) 5 LED (verte) 11 12 13 14 15 16 17 18 34 Date Heure Mode de mesure (« oreille », « front », « objet ») Symbole « Avertissement batterie » Affichage du résultat de mesure Symbole « Mémoire » et numéro de mémoire Symbole « Mesure en cours » Unité du résultat de mesure (°C ou °F) 10 6 LCD 7 Pointe de capteur avec lentille (retirer l’embout de protection) 8 Touche mémoire 9 Touche de réglage 10 Couvercle du compartiment à piles 11 12 5-15 7:20 13 14 368 15 18 17 8 16 4 Mise en service Les piles sont déjà insérées dans l’appareil neuf. Avant la première utilisation, retirez la bande de protection des piles qui dépasse du compartiment à pile. Le thermomètre s’allume alors automatiquement. 5 Réglage Réglage de l’unité de l’affichage de la température, la date et l’heure 1-1 00:00 888 8 Appuyez 1 seconde sur la touche pour allumer le thermomètre. L’appareil effectue un bref auto-test, tous les segments sont affichés à l’écran pendant env. 1 seconde. Après un auto-test réussi, deux bips courts retentissent, la date et l’heure sont affichés en mode Stand-By et l’affichage « -- » apparaît. Lors de la première utilisation du thermomètre et après chaque changement des piles, la date et l’heure sont affichées (après l’auto-test) dans le réglage de base. Réglez à présent l’unité de l’affichage de la température, la date et l’heure. Vous effectuez plusieurs étapes lors du réglage : unité – année – mois – jour – heures – minutes. pour accéder au mode Réglage. • Appuyez env. 3 secondes sur la touche La partie à modifier clignote. • appuyez sur la touche pour enregistrer ce réglage, ou • appuyez sur la touche pour modifier ce réglage, • appuyez ensuite sur la touche pour enregistrer ce réglage. Après ce processus, le thermomètre affiche OFF et s’éteint automatiquement. 35 6 Ce que vous devez savoir avant la mesure Il existe différents thermomètres pour des mesures à divers endroits du corps : • Thermomètre auriculaire/frontal (le présent thermomètre, pour une mesure dans l’oreille ou sur le front) • Thermomètre bâton (pour la mesure rectale (dans l’anus), axiale (sous l’aisselle) ou orale (dans la bouche)  La mesure de la température donne une valeur de mesure indiquant la température corporelle actuelle d’une personne. Si vous n’êtes pas certain de l’interprétation des résultats ou obtenez des valeurs anormales, consultez votre médecin traitant. Ceci s’applique aussi en cas de légères variations de température lorsque d’autres symptômes de maladie s’y ajoutent, p. ex. agitation, forte transpiration, rougeurs, fréquence cardiaque élevée, collapsus cardio-vasculaire, etc. Les températures mesurées avec des thermomètres différents ne peuvent pas être comparées. Indiquez donc à votre médecin (ou tenez-en compte en cas d’auto-diagnostic) avec quel thermomètre vous avez mesuré la température corporelle et à quel endroit du corps. La température d’une personne en bonne santé est influencée par plusieurs facteurs : le métabolisme individuel propre à chaque personne, l’âge (la température du corps est plus élevée chez les nourrissons et les petits enfants et baisse avec l’âge. Chez les enfants, des variations de température plus importantes se produisent plus rapidement et fréquemment, par exemple en fonction des poussées de croissance), les vêtements, la température extérieure, le moment de la journée (le matin, la température corporelle est plus basse et monte au cours de la journée jusqu’au soir), l’activité physique précédente et dans une moindre mesure, l’activité cérébrale. La valeur de la température varie en fonction de l’endroit du corps où elle est mesurée. La variation peut se situer entre 0,2°C (0,4°F) - 1°C (1,8°F) chez les personnes en bonne santé. Ainsi, la plage de température normale est de : • mesure frontale : 35,8°C (96,4°F) - 37,6°C (99,7°F) avec un thermomètre frontal • mesure auriculaire : 36,0°C (96,8°F) - 37,8°C (100°F) avec un thermomètre auriculaire • température rectale : 36,3°C (97,3°F) - 37,8°C (100°F) avec un thermomètre ordinaire • température orale : 36,0°C (96,8°F) - 37,4°C (99,3°F) avec un thermomètre ordinaire Pour pouvoir suivre la progression de la température, mesurez toujours au même endroit du corps. 36 7 Mesurer Avant chaque utilisation, vérifiez que la lentille n’est pas endommagée. Si elle l’est, veuillez utiliser l’adresse du vendeur ou du service après vente. Tenez compte du fait que le thermomètre doit se trouver au moins 30 minutes dans la pièce dans laquelle la mesure est effectuée. Mesure de la température corporelle dans l’oreille  • Certaines personnes ont des valeurs de mesure différentes dans l’oreille gauche et l’oreille droite. Pour évaluer les changements de température, mesurez toujours dans la même oreille pour une même personne. • Les enfants ne peuvent utiliser le thermomètre auriculaire que sous la surveillance d’un adulte. En général, une mesure est possible à partir de l’âge de 6 mois. Chez les petits enfants de moins de 6 moins, le conduit auditif est encore très étroit. Ainsi, la température du tympan ne peut souvent pas être évaluée et des résultats de mesure trop bas peuvent être affichés. • La mesure ne doit pas être effectuée dans une oreille atteinte de maladies inflammatoires (p. ex. pyorrhée, sécrétions), après d’éventuelles blessures des oreilles (p. ex. blessures du tympan) ou lors de la phase de guérison après une intervention chirurgicale. Dans tous ces cas, veuillez consulter votre médecin traitant. • Dans le cas de certaines maladies infectieuses aiguës, l’utilisation du thermomètre sur plusieurs personnes peut être inappropriée en raison d’une éventuelle transmission de germes malgré le nettoyage et la désinfection nécessaires. Le cas échéant, consultez votre médecin traitant. • Ce thermomètre ne peut être utilisé que sans protection à usage unique. • Si vous restez dans une oreille pendant un temps prolongé, la température augmente légèrement. Attendez un peu ou mesurez dans l’autre oreille. • Le cérumen peut influencer la mesure, veuillez donc nettoyer l’oreille avant la mesure le cas échéant. 37 • Appuyez 1 seconde sur la touche pour allumer le thermomètre. Deux bips brefs retentissent après un auto-test réussi. • Retirez l’embout en poussant légèrement vers le haut (1) puis en tirant vers l’avant (2). 2 1 Assurez-vous que la pointe du capteur et le conduit auditif sont propres. Comme le conduit auditif est légèrement incurvé, vous devez tirer légèrement l’oreille vers le haut et l’arrière avant d’introduire la pointe du capteur afin que celle-ci puisse être dirigée directement sur le tympan. • Introduisez la pointe du capteur avec précautions et appuyez 1 seconde sur la touche . • Relâchez la touche . La fin de la mesure est signalée par un bip court, la valeur mesurée s’affiche à l’écran. Si la valeur mesurée est dans la plage normale (< 38 °C/100,4°F), la LED verte s’allume pendant 3 secondes. Si la valeur mesurée est supérieure (≥ 38 °C/100,4°F, fièvre), la LED rouge s’allume. 38 Mesure de la température corporelle au front Notez que le front ou la tempe doivent être exempts de sueur et de cosmétiques et que dans le cas d’une mesure frontale, la prise de médicaments vasoconstricteurs et les irritations cutanées peuvent fausser le résultat de la mesure. pour allumer le thermomètre. Deux bips • Appuyez 1 seconde sur la touche courts retentissent après un auto-test réussi. • Posez la tête de mesure avec embout frontal/de protection sur la tempe, maintenez la touche enfoncée et passez le thermomètre de manière régulière sur le front jusqu’à l’autre tempe. • Relâchez ensuite la touche . La fin de la mesure est signalée avec un court bip, la valeur mesurée s’affiche à l’écran. Si la valeur mesurée est dans la plage normale (< 38 °C/100,4°F), la LED verte s’allume pendant 3 secondes. Si la valeur mesurée est supérieure (≥ 38 °C/100,4°F, fièvre), la LED rouge s’allume. Mesure de la température superficielle • Appuyez 1 seconde sur la touche pour allumer le thermomètre. Deux bips courts retentissent après un auto-test réussi. et pour passer au mode Température • Appuyez ensuite simultanément 3 secondes sur les touches d’objet. L’affichage apparaît à l’écran. • Appuyez sur la touche ou et dirigez la pointe du capteur en appuyant sur la touche à 3 cm de distance vers l’objet ou le liquide à mesurer (ne le plongez en aucun cas dans le liquide). • Relâchez la touche ou . La fin de la mesure est signalée par un bip court, la valeur mesurée s’affiche à l’écran. Notez que la température affichée est la température superficielle établie et non celle supposée. Elle n’est pas comparable à la température frontale/auriculaire. Afin de repasser au mode thermomètre auriculaire/frontal, appuyez simultanément 3 secondes sur les touches et jusqu’à ce que l’affichage s’éteigne et qu’un court bip retentisse. Vous quittez automatiquement le mode Température d’objet en éteignant et en rallumant le thermomètre. 39 La dernière valeur de mesure établie, c’est-à-dire uniquement la dernière valeur d’une plage de mesure, est automatiquement enregistrée dès que le thermomètre s’éteint ou est éteint. 10 emplacements d’enregistrement sont à disposition pour ceci. et . Pour éteindre le thermomètre, appuyez env. 3 secondes simultanément sur les touches Si vous n’effectuez aucune saisie supplémentaire, le thermomètre s’éteint automatiquement après une minute suivant l’affichage de la valeur mesurée. . Pour récupérer les valeurs enregistrées, allumez le thermomètre et appuyez sur la touche La date, l’heure, le numéro de mémoire et le symbole du mode de mesure ainsi que la température sont affichés. Parcourez les emplacements d’enregistrement des résultats de mesure en appuyant de manière répétée sur la touche . 8 Changer les piles Lorsque les piles faiblissent, le symbole d’avertissement batterie s’affiche. Les mesures de température sont encore possibles, les piles doivent être changées. Lorsque le symbole d’avertissement batterie clignote et Lo s’affiche à l’écran, les piles doivent être changées. Lorsque les batteries sont trop faibles, le thermomètre s’éteint automatiquement.  40 Remarque : • Lors de chaque changement de batterie, utilisez des piles de même type, marque et capacité. • Changez toujours toutes les piles en même temps. • N’utilisez pas d’accus rechargeables. • Utilisez des piles sans métaux lourds. 1. Desserrez la vis du couvercle du compartiment à piles et retirez le couvercle en le tirant vers l’arrière. 2. Retirez les piles usées et insérez deux nouvelles piles dans la direction indiquée. 3. Fermez le couvercle du compartiment à piles et refermez-le en le vissant. Veuillez jeter les piles usées conformément aux règlementations en vigueur. Ne jetez jamais les piles avec les ordures ménagères. 9 rangement et entretien • Nettoyez la pointe du capteur après chaque utilisation. Pour cela, utilisez un chiffon doux ou un bâtonnet ouaté qui peut être humidifié avec du désinfectant, de l’alcool ou de l’eau chaude. • Pour nettoyer l’appareil entier, veuillez utiliser un chiffon doux légèrement humidifié avec de la lessive. • N’utilisez pas de produits nettoyants agressifs. • Stockez toujours le thermomètre avec un embout frontal/de protection posé dessus. • Si vous prévoyez un stockage prolongé, retirez les piles. • L’appareil ne doit pas être stocké ou utilisé à des températures et avec une humidité de l’air trop élevées ou trop basses (voir données techniques), à la lumière du soleil, connecté au courant électrique ou dans des endroits poussiéreux. Sinon, cela pourrait entraîner des mesures imprécises. • Après 2 ans, l’appareil doit subir un contrôle technique des mesures (être calibré). Veuillez envoyer l’appareil complet à l’adresse du vendeur ou du service après vente. 41 10 Elimination Les piles et accus ainsi que les appareils électroniques ne doivent pas être jetés avec les ordures ménagères. En tant qu’utilisateur, vous êtes légalement obligé de rendre les piles usagées. Vous pouvez remettre vos piles usagées dans les points de dépôt publics de votre commune ou partout où des piles du même type sont vendues. Respectez les réglementations locales en matière d’élimination de matériaux.  Remarque : Ce pictogramme se trouve sur les piles à substances nocives : Pb = pile contenant du plomb, Cd = pile contenant du cadmium, Hg = pile contenant du mercure. Eliminez l’appareil conformément à la directive européenne 2002/96/EC – WEEE (Waste Electrical and Electronic Equipment) relative aux appareils électriques et électroniques usagés. Pour toute question, adressez-vous aux collectivités locales responsables de l’élimination et du recyclage de ces produits. 42 11 Données techniques Remarque : en cas d’utilisation de l’appareil en dehors des spécifications, un fonctionnement irréprochable ne peut pas être garanti ! Nous nous réservons le droit d’effectuer des modifications techniques pour améliorer et faire évoluer le produit. Cet appareil est conforme à la norme européenne EN 60601-1-2 et est soumis à des mesures de précautions particulières concernant la tolérance électromagnétique. Veuillez noter que les équipements de communication HF portables et mobiles peuvent influencer cet appareil. Vous pouvez demander des informations plus précises à l’adresse du service clients indiquée. Nom et modèle SFT65 Plage de mesure Mode thermomètre auriculaire/frontal : 34 °C – 43 °C (93,2 °F – 109,4 °F) Mode température d’objet : 0 °C – 100 °C (32 °F – 212 °F) Précision de mesure de laboratoire Mode thermomètre auriculaire : ± 0,2 °C (± 0,4 °F) de 35,5 °C – 42 °C (95,9 °F – 107,6 °F), en dehors de cette plage de mesure ± 0,3 °C (± 0,5 °F) Mode thermomètre frontal : ± 0,3 °C (± 0,5 °F) de 22 °C – 40 °C (71,6 °F – 104 °F) Mode température d’objet : ± 1,5 °C (± 2,7 °F) pour < 30 °C (86 °F) ; ± 5 % pour ≥ 30 °C (86 °F) Au moins 5 secondes Intervalle entre deux mesures Précision de répétition clinique Unités de mesure Conditions d’utilisation Oreille : enfants, 1 – 5 ans : ± 0,08 °C (± 0,14 °F) adultes : ± 0,07 °C (± 0,13 °F) Front : e nfants, 1 – 5 ans : ± 0,07 °C (± 0,13 °F) adultes : ± 0,08 °C (± 0,14 °F) °Celsius (°C) ou °Fahrenheit (°F) 16 °C à 35 °C (60,8 °F – 95 °F) avec une humidité de l’air relative jusqu’à 85 % (sans condensation) 43 Environnement de conservation Dimensions - 25 °C à 55 °C (- 13 °F – 131 °F) avec une humidité de l’air relative jusqu’à 85 % (sans condensation) 38,2 x 138 x 46,5 mm Poids Piles 90 g piles comprises 2x AAA, LR 03 Mémoire Pour 10 mesures Explication des symboles 12 Classification d’appareil type BF Veuillez lire le mode d’emploi ! Résolution des erreurs Affichage Cause La température établie est supérieure à 1) Mode thermomètre auriculaire/frontal : 43 °C (109,4 °F) 2) Mode température d’objet : 100 °C (212 °F) La température établie est supérieure à 1) Mode thermomètre auriculaire/frontal : 34 °C (93,2 °F) 2) Mode température d’objet : 0 °C (32 °F) La température d’utilisation n’est pas dans la plage de 16 °C à 35 °C (60,8 – 95 °F) 44 Solution Utilisez le thermomètre uniquement dans les plages de température indiquées. Le cas échéant, nettoyez la pointe du capteur. En cas d’affichages d’erreur répétés, consultez le revendeur ou le service client. Utilisez le thermomètre uniquement dans les plages de température indiquées. Italiano Indice 1 Spiegazione dei simboli.................................. 45 2 Avvertenze...................................................... 46 3 Descrizione dell‘apparecchio......................... 48 4 Messa in funzione........................................... 49 5 Impostazione.................................................. 49 6 Informazioni utili per la misurazione............... 50 7 8 9 10 11 12 Misurazione.................................................... 51 Sostituzione delle batterie.............................. 54 Pulizia e cura.................................................. 55 Smaltimento................................................... 56 Dati tecnici . ................................................... 57 Soluzione dei guasti....................................... 58 Fornitura • Termometro • 2 batterie AAA da 1,5 V, LR03 • Le presenti istruzioni per l'uso Leggere attentamente le presenti istruzioni d'uso, conservarle per impieghi futuri, renderle accessibili ad altri utilizzatori e attenersi alle indicazioni. 1 Spiegazione dei simboli Nelle istruzioni per l'uso sono utilizzati i seguenti simboli. Pericolo Segnalazione di rischi di lesioni o pericoli per la salute. Attenzione Segnalazione di rischi di possibili danni all'apparecchio. Avvertenza Indicazione di importanti informazioni. 45 2 Avvertenze Indicazioni di sicurezza Pericolo: • In caso di misurazioni auricolari inserire con cautela il sensore del termometro nell'orecchio. • In presenza di determinate patologie acute e infettive, l'utilizzo del termometro su più persone, nonostante la pulizia e la disinfezione, è da sconsigliare a causa del possibile scambio di germi. Per casi particolari rivolgersi al proprio medico curante. Avvertenze sull'uso delle batterie Pericolo: • Se ingoiate, le batterie rappresentano un pericolo mortale. Tenerle lontane dalla portata dei bambini. In caso di ingestione di una batteria, richiedere immediatamente assistenza medica. • Le batterie non devono essere ricaricate o riattivate con altri mezzi; inoltre non devono essere aperte, gettate nel fuoco o cortocircuitate. • Le batterie possono contenere sostanze nocive per la salute e l'ambiente. Quindi devono essere smaltite correttamente, nel rispetto delle norme di legge vigenti. Non gettare mai le batterie nei normali rifiuti domestici. Avvertenza: • Sostituire in tempo utile le batterie quasi scariche. • La fuoriuscita di liquido dalle batterie può danneggiare l'apparecchio. Se l'apparecchio non venisse utilizzato per lunghi periodi, togliere le batterie dall'apposito scomparto. • Se una batteria presenta una perdita di liquido, indossare guanti protettivi e pulire lo scomparto con un panno asciutto. 46 Indicazioni generali  • Leggere attentamente le presenti istruzioni per l'uso, conservarle per impieghi futuri, renderle accessibili ad altri utilizzatori e attenersi alle indicazioni. • Questo termometro è un apparecchio elettronico sensibile e va trattato con cautela, evitando possibili urti. • Non esporre l'apparecchio alla luce diretta del sole. • Prima di ogni utilizzo, verificare che la lente non sia danneggiata. In caso di danni rivolgersi al proprio rivenditore o al Servizio clienti. • Il termometro NON è impermeabile. Evitare pertanto il contatto diretto con l'acqua o con altri liquidi. • Non è previsto un uso medico o commerciale dell'apparecchio. • L'apparecchio è concepito solo per l'uso descritto nelle presenti istruzioni. • Dopo ogni utilizzo pulire il sensore del termometro con un panno morbido inumidito con del disinfettante. • Il termometro è stato concepito per l'utilizzo pratico ma non può essere considerato come un sostitutivo di una visita medica. • Prima di inoltrare eventuali reclami, testare le batterie e se necessario sostituirle. • Le riparazioni possono essere effettuate esclusivamente dai centri di assistenza autorizzati, diversamente decade ogni diritto di garanzia. • Questo apparecchio è conforme alla direttiva CEE 93/42. • Questo apparecchio è conforme alla norma EN 12470 - 5 e agli standard ASTM E 1965 - 98. • Per ulteriori domande sull'utilizzo delle apparecchiature Beurer, rivolgersi al proprio rivenditore o al Servizio clienti. 47 3 Descrizione dell'apparecchio Panoramica 1 2 3 4 5 6 7 8 9 1 2 3 4 5 Cappuccio protettivo/per misurazione frontale Pulsante per modalità frontale Pulsante per modalità auricolare / LED (rosso) (allarme febbre) LED (verde) 11 Data 12 Ora 13 Modalità di misurazione ("orecchio", "fronte", "oggetto") 14 Icona "Batteria scarica" 15 Misurazione rilevata 16 Icona "Memoria" e relativo numero di posizione 17 Icona "Misurazione in corso" 18 Unità di misurazione (°C o °F) 48 6 7 8 9 10 10 LCD Sensore con lente (senza cappuccio protettivo) Pulsante Memoria Pulsante Set Coperchio vano batterie 11 12 5-15 7:20 13 14 368 15 18 17 8 16 4 Messa in funzione Le batterie sono già presenti sugli apparecchi nuovi. Prima del primo impiego rimuovere la linguetta protettiva dal vano batterie. Il termometro si accende automaticamente. 5 Impostazione Impostazione dell'unità di misura della temperatura, della data e dell'ora 1-1 00:00 888 8 Premere il pulsante per 1 secondo per accendere il termometro. Viene eseguito un breve autotest, sul display vengono visualizzati tutti i segmenti per circa 1 secondo. Al termine dell'autotest vengono emessi due brevi segnali acustici, in modalità standby vengono visualizzate data e ora e compare la scritta "--". La prima volta che viene utilizzato il termometro e ogni volta che vengono sostituite le batterie (al termine dell'autotest) vengono visualizzate la data e l'ora nell'impostazione di base (1-1 00:00). È in questo momento che vanno impostate l'unità di misura della temperatura, la data e l'ora. Per procedere all'impostazione, attenersi alla seguente sequenza: Unità – Anno – Mese – Giorno – Ore – Minuti. per ca. 3 secondi per passare alla modalità Set. • Premere il pulsante Viene visualizzata la parte da modificare di volta in volta. • Premere il pulsante per memorizzare l'impostazione o • il pulsante per modificarla. • Premere infine il pulsante per memorizzare l'impostazione. Al termine della procedura sul display compare la scritta OFF e il termometro si spegne automaticamente. 49 6 Informazioni utili per la misurazione Esistono diversi termometri che prevedono la misurazione della temperatura in punti del corpo differenti: • Termometro auricolare/frontale (termometro per la misurazione nell'orecchio o sulla fronte) • Termometro tradizionale (per la misurazione rettale, ascellare o orale)  La misurazione della temperatura fornisce un valore che indica la temperatura corporea attuale di un soggetto. Se non si è sicuri dell'interpretazione dei risultati o se risultano dei valori anomali, è consigliabile rivolgersi al proprio medico curante. Lo stesso dicasi in caso di lievi oscillazioni della temperatura in presenza di altri sintomi quali agitazione, intensa sudorazione, arrossamento della pelle, elevata frequenza cardiaca, svenimenti, ecc. Non è possibile confrontare temperature misurate con tipi di termometro diversi. È pertanto necessario riferire al proprio medico (o tenerne conto in caso di autodiagnosi) il tipo di termometro utilizzato per la misurazione e il punto del corpo in cui la misurazione è stata effettuata. La temperatura di un soggetto sano è influenzata da diversi fattori, quali il metabolismo (soggettivo e diverso da persona a persona), l'età (la temperatura corporea risulta più alta nei neonati e nei bambini per poi abbassarsi gradualmente con l'età; nei bambini gli sbalzi di temperatura sono rapidi e frequenti a causa ad esempio dei picchi di crescita), l'abbigliamento, l'ora della giornata (al mattino la temperatura corporea è più bassa e si alza nel corso della giornata), l'attività fisica intrapresa e, in minima parte, l'attività mentale. La temperatura varia a seconda del punto del corpo in cui viene misurata. Nei soggetti sani si parla di uno scostamento compreso tra 0,2°C (0,4°F) - 1°C (1,8°F). È pertanto possibile definire normali i seguenti intervalli di temperatura: • Misurazione sulla fronte: da 35,8°C (96,4°F) - 37,6°C (99,7°F) con termometro frontale • Misurazione nell'orecchio: da 36,0°C (96,8°F) - 37,8°C (100°F) con termometro auricolare • Misurazione rettale: da 36,3°C (97,3°F) - 37,8°C (100°F) con termometro tradizionale • Misurazione orale: da 36,0°C (96,8°F) - 37,4°C (99,3°F) con termometro tradizionale Per valutare l'andamento della temperatura, misurarla sempre nello stesso punto. 50 7 Misurazione Prima di ogni utilizzo, verificare che la lente non sia danneggiata. In caso di danni rivolgersi al proprio rivenditore o al Servizio clienti. Accertarsi che il termometro si trovi nelle stesse condizioni ambientali per almeno 30 minuti prima di eseguire la misurazione. Misurazione della temperatura auricolare  • Alcune persone presentano valori diversi nell'orecchio sinistro e nell'orecchio destro. Per poter valutare l'andamento della temperatura, misurarla sempre nello stesso orecchio. • Il termometro auricolare deve essere utilizzato dai bambini solo sotto sorveglianza degli adulti. Generalmente è possibile procedere a una misurazione nell'orecchio dopo i 6 mesi di vita. Nei bambini di età inferiore il canale auricolare è ancora molto stretto e spesso non è possibile rilevare la temperatura del timpano, dando luogo a valori di misurazione troppo bassi. • Non effettuare la misurazione nell'orecchio in presenza di patologie infiammatorie (ad es., fuoriuscita di pus, secrezione) e possibili lesioni (ad es., lesioni al timpano) o durante la convalescenza in seguito a interventi chirurgici. In tutti questi casi si consiglia di consultare il proprio medico curante. • In presenza di determinate patologie acute e infettive, l'utilizzo del termometro su più persone, nonostante la pulizia e la disinfezione, è da sconsigliare a causa del possibile scambio di germi. Per casi particolari rivolgersi al proprio medico curante. • Questo termometro può essere utilizzato esclusivamente senza involucro protettivo. • Se si lascia il termometro inserito nell'orecchio per troppo tempo, la temperatura risulta leggermente più alta. Attendere qualche minuto o procedere alla misurazione nell'altro orecchio. • La presenza di cerume può influire sulla misurazione: pulire pertanto l'orecchio prima di misurare la temperatura. 51 • Premere il pulsante per 1 secondo per accendere il termometro. Al termine dell'autotest vengono emessi due brevi segnali acustici. • Rimuovere il cappuccio protettivo premendolo leggermente verso l'alto (1) quindi in avanti (2). 2 1 Accertarsi che il sensore e il canale auricolare siano puliti. Poiché il canale auricolare è leggermente curvo, prima di introdurre il sensore nell'orecchio sollevare leggermente il padiglione verso l'alto per consentire al sensore di entrare direttamente in contatto con il timpano. • Introdurre con cautela il sensore nell'orecchio e premere il pulsante per 1 secondo. • Rilasciare il pulsante . Al termine della misurazione viene emesso un breve segnale acustico e il valore misurato compare sul display. Se il valore misurato è compreso nell’intervallo standard (< 38 °C/100,4°F), il LED verde si accende per 3 secondi. Se il valore misurato è superiore all’intervallo standard (≥ 38°C/100,4°F), si accende il LED rosso. 52 Misurazione della temperatura frontale Assicurarsi che la fronte e le tempie non siano coperte da sudore o trucco e tenere presente che la misurazione frontale può essere falsata dall'assunzione di medicinali vasocostrittori e da irritazioni cutanee. per 1 secondo per accendere il termometro. Al termine • Premere il pulsante dell'autotest vengono emessi due brevi segnali acustici. • Appoggiare la punta del termometro alla tempia lasciando inserito il cappuccio protettivo/per misurazione frontale, tenere premuto il pulsante e spostare il termometro sull'altra tempia mantenendo una pressione costante sulla fronte. • Rilasciare il pulsante . Al termine della misurazione viene emesso un breve segnale acustico e il valore misurato compare sul display. Se il valore misurato è compreso nell’intervallo standard (< 38 °C/100,4°F), il LED verde si accende per 3 secondi. Se il valore misurato è superiore all’intervallo standard (≥ 38°C/100,4°F), si accende il LED rosso. Misurazione della temperatura superficiale • Premere il pulsante per 1 secondo per accendere il termometro. Al termine dell'autotest vengono emessi due brevi segnali acustici. e , per passare alla modalità di misurazio• Premere contemporaneamente per 3 secondi i pulsanti ne superficiale degli oggetti. Sul display compare l'icona . • Tenere premuto il pulsante o il pulsante e, mantenendo una distanza di 3 cm, rivolgere il sensore verso l'oggetto o il liquido da misurare (non immergere mai il termometro nei liquidi). • Rilasciare il pulsante o il pulsante . Al termine della misurazione viene emesso un breve segnale acustico e il valore misurato compare sul display. Tenere presente che il valore indicato non rappresenta la temperatura superficiale adattata, bensì quella rilevata e non può pertanto essere paragonato con la temperatura frontale o auricolare. Per passare nuovamente alla modalità di misurazione auricolare/frontale, premere contemporaneamente per 3 secondi i pulsanti e finché l'icona si spegne e viene emesso un breve segnale acustico. Per uscire automaticamente dalla modalità di misurazione superficiale, spegnere e riaccendere il termometro. 53 L'ultimo valore di misurazione rilevato, ovvero solo l'ultimo valore di una serie di misurazioni, viene memorizzato automaticamente non appena il termometro si spegne o viene spento. Sono disponibili 10 posizioni di memoria. e . Per spegnere il termometro, premere contemporaneamente per circa 3 secondi i pulsanti Se non si effettuano ulteriori misurazioni, il termometro si spegne automaticamente dopo circa 1 minuto dalla visualizzazione dell'ultimo valore. . Per interrogare i valori memorizzati, accendere il termometro e premere il pulsante Vengono visualizzati la data, l'ora, il numero di posizione, l'icona della modalità di misurazione e la temperatura. Premere ripetutamente il pulsante per sfogliare le posizioni di memoria delle misurazioni. 8 Sostituzione delle batterie Quando le batterie stanno per scaricarsi, compare l'icona di batteria scarica . È ancora possibile effettuare misurazioni ma è necessario sostituire a breve le batterie. Quando il simbolo di batteria scarica lampeggia e sul display compare la scritta "Lo", le batterie devono essere sostituite. Quando le batterie sono troppo scariche, il termometro si spegne automaticamente.  54 Avvertenza: • Ad ogni sostituzione delle batterie, utilizzare batterie ricaricabili dello stesso tipo, della stessa marca e della stessa capacità. • Sostituire sempre tutte le batterie contemporaneamente. • Non utilizzare batterie ricaricabili. • Utilizzare preferibilmente batterie prive di metalli pesanti. 1. Svitare il coperchio del vano batterie e rimuoverlo facendolo scivolare verso il basso. 2. Rimuovere le batterie esauste e inserirne due nuove nella direzione indicata. 3. Chiudere il coperchio del vano batterie e riavvitarlo. Smaltire le batterie esauste nel rispetto delle vigenti normative di legge. Non gettare mai le batterie nei normali rifiuti domestici. 9 Pulizia e cura • Pulire il sensore dopo ogni utilizzo. A tale scopo utilizzare un panno morbido o un cotton fioc imbevuto di disinfettante, alcol o acqua calda. • Per la pulizia dell'intero apparecchio utilizzare un panno morbido leggermente inumidito con acqua e sapone. • Non utilizzare detergenti aggressivi. • Riporre sempre il termometro lasciando inserito il cappuccio protettivo/per misurazione frontale. • Se si prevede di non utilizzare l'apparecchio per un lungo periodo, rimuovere le batterie. • Non utilizzare né riporre l'apparecchio in luoghi esposti a temperature troppo alte o troppo basse, all'umidità (vedere Dati tecnici), alla luce solare, alla corrente elettrica o alla polvere; diversamente le misurazioni potrebbero non essere corrette. • Far sottoporre l'apparecchio a controlli tecnici (calibrazione) dopo due anni. Inviare l'apparecchio completo al proprio rivenditore o al Servizio clienti. 55 10 Smaltimento Le batterie ricaricabili, le pile e gli apparecchi elettronici non sono rifiuti domestici. Gli utilizzatori sono tenuti per legge a restituire le batterie esauste. È possibile consegnare le batterie esauste presso i punti di raccolta del vostro comune o presso i rivenditori di batterie del tipo utilizzato. Seguire le norme locali vigenti per lo smaltimento.  Avvertenza: Sulle batterie contenenti sostanze tossiche si trovano questi simboli. Pb = batteria contenente piombo Cd = batteria contenente cadmio Hg = batteria contenente mercurio Smaltire l’apparecchio rispettando le norme previste dalla Direttiva CE sui rifiuti di apparecchi elettrici ed elettronici 2002/96/CE – WEEE (Waste Electrical and Electronic Equipment). Per eventuali chiarimenti, rivolgersi alle autorità comunali competenti per lo smaltimento. 56 11 Dati tecnici Avvertenza: in caso di utilizzo dell'apparecchio al di fuori di quanto specificato nelle presenti istruzioni non è possibile garantire un funzionamento corretto. Beurer si riserva il diritto di apportare modifiche tecniche al fine del miglioramento e del continuo sviluppo del prodotto. L'apparecchio è conforme alla norma europea EN 60601-1-2 e necessita di precauzioni d'impiego particolari per quanto riguarda la compatibilità elettromagnetica. Considerare che gli apparecchi per la comunicazione portatili e mobili ad alta frequenza possono influire sul funzionamento di questo apparecchio. Per maggiori informazioni, contattare il Servizio clienti all'indirizzo indicato. Nome e modello SFT65 Range di misurazione Modalità auricolare/frontale: 34 °C - 43 °C (93,2 °F - 109,4 °F) Modalità di misurazione superficiale: 0 °C - 100 °C (32 °F - 212 °F) Precisione di misurazione da laboratorio Modalità auricolare: ±0,2 °C (±0,4 °F) da 35,5 °C a 42 °C (da 95,9 °F a 107,6 °F), al di fuori di questo intervallo ±0,3 °C (±0,5 °F) Modalità frontale: ±0,3 °C (±0,5 °F) da 22 °C a 40 °C (da 71,6 °F a 104 °F) Temperatura superficiale: ±1,5 °C (±2,7 °F) con temperatura < 30 °C (86 °F); ±5% con temperatura ≥ 30 °C (86 °F) Almeno 5 secondi Tempo di attesa tra due misurazioni Precisione di ripetizione clinica Unità di misura Condizioni di funzionamento Orecchio: bambini di età compresa tra 1 e 5 anni: ±0,08 °C (±0,14 °F) adulti: ±0,07 °C (±0,13 °F) Fronte: b ambini di età compresa tra 1 e 5 anni: ±0,07 °C (±0,13 °F) adulti: ±0,08 °C (±0,14 °F) °Celsius (°C) o °Fahrenheit (°F) da 16 °C a 35 °C (da 60,8 °F a 95 °F) con umidità relativa massima di 85% (senza condensa) 57 Condizioni di conservazione Ingombro da -25 °C a 55 °C (da -13 °F a 131 °F) con umidità relativa massima di 85% (senza condensa) 38,2 x 138 x 46,5 mm Peso Batterie 90 g comprese le batterie 2 x AAA, LR 03 Memoria Per 10 misurazioni Spiegazione dei simboli 12 Soluzione dei guasti Messaggio di errore 58 Apparecchio classificato come tipo BF Leggere le istruzioni per l'uso! Causa Soluzione La temperatura rilevata è superiore a 1) Modalità auricolare/frontale: 43 °C (109,4°F) 2) Modalità superficiale: 100 °C (212 °F) La temperatura rilevata è superiore a 1) Modalità auricolare/frontale: 34 °C (93,2 °F) 2) Modalità superficiale: 0 °C (32 °F) La temperatura di funzionamento non è compresa nell'intervallo 16 °C - 35 °C (60,8 - 95 °F) Utilizzare il termometro esclusivamente entro gli intervalli di temperatura indicati. Se necessario, pulire il sensore. Se il messaggio di errore persiste, rivolgersi al rivenditore o al Servizio clienti. Utilizzare il termometro esclusivamente entro gli intervalli di temperatura indicati. Русский Оглавление 1 Пояснения к символам................................. 59 2 Указания........................................................ 60 3 Описание прибора........................................ 62 4 Ввод в эксплуатацию.................................... 63 5 Настройка...................................................... 63 6 Что необходимо знать перед измерением. 64 7 Измерения..................................................... 65 8 9 10 11 12 13 Замена батареек........................................... 68 Хранение и уход............................................ 69 Утилизация.................................................... 70 Технические характеристики ...................... 70 Устранение неисправностей........................ 72 Гарантия......................................................... 73 Объем поставки • Термометр • 2 х 1,5 В батарейки AAA, LR03 • Данная инструкция по применению Внимательно прочтите данную инструкцию по применению, сохраните ее для последующего использования, храните ее в месте, доступном для других пользователей, и следуйте ее указаниям. 1 Пояснения к символам В инструкции по применению используются следующие символы. Предостережение Предупреждает об опасности травмирования или ущерба для здоровья. Внимание Указывает на возможные повреждения прибора/принадлежностей. Указание Отмечает важную информацию. 59 2 Указания Указания по технике безопасности Предостережение: • При измерении температуры в ухе осторожно вводите сенсорный наконечник. • При определенных острых инфекционных заболеваниях не следует применять термометр для нескольких людей, т. к. возможно занесение инфекции несмотря на проведение очистки и влажной дезинфекции. В отдельных случаях необходима консультация лечащего врача. Обращение с элементами питания Предостережение: • Батарейки содержат вредные при попадании внутрь организма вещества. Храните их в недоступном для детей месте. Если кто-либо проглотит батарейку, следует немедленно обратиться к врачу. • Батарейки нельзя перезаряжать или реактивировать с помощью различных средств, не разбирайте их, не бросайте в огонь и не замыкайте накоротко. • Батарейки могут содержать ядовитые вещества, которые могут нанести вред здоровью и окружающей среде. В связи с этим утилизируйте их обязательно в соответствии с действующими законодательными предписаниями. Ни в коем случае не выбрасывайте отработавшие батарейки в обычный мусор. Внимание: • Регулярно заменяйте элементы питания. • Разряженные батарейки могут стать причиной неисправности прибора. При длительном перерыве в использовании прибора выньте батарейки из отделения для батарейки. • Если одна из батареек разрядилась, наденьте защитные перчатки и почистите отделение для батарейки сухой салфеткой. 60 Общие указания  • Внимательно прочтите данную инструкцию по применению, сохраните ее для последующего использования, храните ее в месте, доступном для других пользователей, и следуйте ее указаниям. • Данный термометр является чувствительным электронным прибором. Обращайтесь с ним, соблюдая осторожность и не подвергая его механическим ударам. • Не допускайте воздействия прямых солнечных лучей на прибор. • Перед каждым применением проверяйте, не повреждена ли линза. В случае ее повреждения обратитесь к поставщику или в сервисный центр. • Термометр НЕ является водонепроницаемым. По этой причине следует избегать прямого контакта с водой или другими жидкостями. • Прибор не предусмотрен для использования в медицинских или коммерческих целях. • Прибор должен использоваться только в целях, описываемых в данной инструкции по применению. • Измерительный наконечник после каждого применения необходимо очищать мягкой салфеткой, смоченной дезинфекционным средством. • Термометр сконструирован для практического применения, но не может заменить визита к врачу. • Перед заявлением претензий сначала проверьте и при необходимости замените батарейки. • Ремонт должен производиться только в авторизованных сервисных центрах. В противном случае гарантия теряет свою силу. • Данный прибор соответствует директиве ЕС 93/42 EWG. • Данный прибор соответствует стандарту EN 12470 - 5 и ASTM E 1965 - 98. • Если у Вас есть еще вопросы по применению наших приборов, обратитесь, к своему торговому представителю или в сервисную службу. 61 3 описание прибора обзор 1 2 3 4 5 6 7 8 9 1 2 3 4 Колпачок Кнопка режима лобного термометра Кнопка режима ушного термометра/Вкл Светодиод (красный) (сигнал повышенной температуры) 5 Светодиод (зеленый) 11 12 13 14 15 16 17 18 62 Дата Время Режим измерения («Ухо», «Лоб», «Объект») Символ «Заряд батарейки» Индикатор результата измерения Символ «Память» и номер в памяти Символ «Производится измерение» Единица измерения (°C или °F) / 10 6 ЖК-дисплей 7 Сенсорный наконечник с линзой (колпачок снят) 8 Кнопка памяти 9 Кнопка настройки 10 Крышка отделения для батарейки 11 12 5-15 7:20 13 14 368 15 18 17 8 16 4 Ввод в эксплуатацию Новый прибор поставляется уже со вставленными батарейками. Перед первым применением удалите выступающую защитную пленку с батареек в отделении для батареек. Термометр при этом автоматически включится. 5 Настройка Настройка единицы индикации температуры, даты и времени 1-1 00:00 888 8 Нажимайте в течение 1 секунды кнопку , чтобы включить термометр. Прибор проводит короткую самопроверку, на дисплее в течение примерно 1 секунды отображаются все сегменты. После успешной самопроверки раздаются два коротких звуковых сигнала, в режиме ожидания готовности отображаются дата и время и появляется индикация «--». При первом применении термометра и после каждой замены батареек отображается (после самопроверки) основная настройка даты и времени (1-1 00:00). Задайте единицу индикации температуры, дату и время. При настройке пройдите несколько этапов: Единица – Год – Месяц – День – Часы – Минуты. • Для перехода в режим настроек нажимайте примерно в течение 3 секунд кнопку Будет мигать область, которая подлежит изменению. • Нажмите кнопку , чтобы сохранить эту настройку или • нажмите кнопку , чтобы изменить настройку. • Затем нажмите кнопку , чтобы сохранить эту настройку. . После этой операции на дисплее отобразится OFF, и термометр автоматически выключится. 63 6 Что необходимо знать перед измерением Существуют различные термометры для измерения на различных частях тела: • ушные/лобные термометры (данный термометр, для измерения в ухе или в области лба) • стержневые термометры (для ректального (в прямой кишке), аксиального (в подмышечной впадине) или орального измерения (во рту))  64 В результате измерения температуры получают значение, которое информирует о температуре тела человека на момент измерения. Если возникли сомнения в толковании результатов измерения или имеют место необычные значения, обратитесь к лечащему врачу. Это относится также к незначительным изменениям температуры, когда к ним добавляются дополнительные симптомы заболевания, например, беспокойство, сильное потоотделение, покраснение кожных покровов, высокая частота пульса, склонность к коллапсам и т.д. Значения температуры, полученные с помощью различных термометров, не подлежат сравнению друг с другом. Поэтому сообщайте вашему врачу (или учитывайте при самодиагностике), каким термометром на какой части тела измерялась температура. На температуру здорового человека влияют различные факторы: индивидуальный обмен веществ, возраст (температура тела у младенцев и маленьких детей выше и падает с возрастом; у детей быстрее и чаще возникают более высокие колебания температуры, вызванные, например, ростовыми скачками), одежда, температура окружающей среды, время суток (утром температура ниже и растет в течение дня до вечера), предшествующая физическая и, в меньшей степени, также умственная деятельность. Значение температуры зависит также от части, тела, на которой она измеряется. Различия у здорового человека могут составлять от 0,2°C (0,4°F) до 1°C (1,8°F). Нормальным диапазоном температуры считается: • при лобном измерении: от 35,8°C (96,4°F) до 37,6°C (99,7°F), с помощью лобного термометра • при ушном измерении: от 36,0°C (96,8°F) до 37,8°C (100°F), с помощью ушного термометра • при ректальном измерении: от 36,3°C (97,3°F) до 37,8°C (100°F), с помощью обычного термометра • при оральном измерении: от 36,0°C (96,8°F) до 37,4°C (99,3°F), с помощью обычного термометра Для возможности отслеживания изменения температуры всегда выполняйте измерения на одной и той же части тела. 7 Измерения Перед каждым применением проверяйте, не повреждена ли линза. В случае ее повреждения обратитесь к поставщику или в сервисный центр. Учитывайте, что термометр должен находиться в помещении, в котором выполняется измерение, в течение не более 30 минут. Измерение температуры в ухе  • Существуют люди, имеющие разную температуру в левом и правом ухе. Для отслеживания изменений температуры всегда измеряйте температуру у одного и того же человека в одном и том же ухе. • Ушной термометр должен применяться у детей только под присмотром взрослых. Как правило, измерение температуры у детей возможно с 6 месяцев. У младенцев до 6 месяцев ушной проход еще очень мал, поэтому часто температуру барабанной перепонки измерить невозможно, в связи с чем часто имеют место заниженные результаты измерения. • Запрещается проводить измерение температуры в ухе с воспалительными заболеваниями (например, выделение гноя, секрета), после возможных ушных травм (например, при поврежденной барабанной перепонке) или в стадии выздоровления после оперативного вмешательства. Во всех подобных случаях необходима консультация с лечащим врачом. • При определенных острых инфекционных заболеваниях не следует применять термометр для нескольких людей, т. к. возможно занесение инфекции несмотря на проведение очистки и влажной дезинфекции. В отдельных случаях необходима консультация лечащего врача. • Данный термометр должен использоваться только без одноразовой защитной оболочки. • Если вы длительное время лежали на одном ухе, температура в нем будет слегка повышена. Подождите немного или измерьте температуру в другом ухе. • Ушная сера может повлиять на результаты измерения, поэтому очистите при необходимости ухо перед измерением. 65 • Нажимайте в течение 1 секунды кнопку , чтобы включить термометр. После успешной самопроверки раздадутся два коротких звукового сигнала. • Снимите колпачок, слегка нажав вверх (1) и потянув его вперед (2). 2 1 Убедитесь в чистоте сенсорного наконечника и слухового прохода. Поскольку слуховой проход слегка изогнут, перед введением сенсорного наконечника ухо следует слегка потянуть назад и вверх, чтобы сенсорный наконечник можно было направить непосредственно на барабанную перепонку. • Осторожно введите сенсорный наконечник и в течение 1 секунды нажимайте кнопку . • Отпустите кнопку . По окончании измерения раздастся короткий звуковой сигнал, измеренное значение появится на дисплее. Если измеренное значение находится в пределах нормальной температуры (< 38 °C/100,4°F), на 3 секунды загорится зеленый светодиод. При более высоком измеренном значении (≥ 38°C/100,4°F, жар) загорится красный светодиод. 66 измерение температуры тела на лбу Обратите внимание, что на лбу/виске не должно быть пота или косметики и что при лобном измерении на результате могут сказаться прием сосудосужающих медикаментов и раздражение кожи. • Нажимайте в течение 1 секунды кнопку , чтобы включить термометр. После успешной самопроверки раздадутся два коротких звукового сигнала. • Приставьте измерительную головку с надетым колпачком к виску, держите нажатой кнопку и плавно проведите термометром по лбу в направлении другого виска. • Затем отпустите кнопку . По окончании измерения раздастся короткий звуковой сигнал, измеренное значение появится на дисплее. Если измеренное значение находится в пределах нормальной температуры (< 38 °C/100,4°F), на 3 секунды загорится зеленый светодиод. При более высоком измеренном значении (≥ 38°C/100,4°F, жар) загорится красный светодиод. измерение температуры поверхности • Нажимайте в течение 1 секунды кнопку , чтобы включить термометр. После успешной самопроверки раздадутся два коротких звукового сигнала. • Затем в течение 3 секунд нажимайте одновременно кнопки и , чтобы перейти в режим измерения температуры объекта. На дисплее появится изображение . • Нажмите кнопку или и, удерживая кнопку нажатой, направьте сенсорный наконечник на расстоянии 3 см до измеряемого предмета или жидкости (ни в коем случае не погружайте в жидкость). • Отпустите кнопку или . По окончании измерения раздастся короткий звуковой сигнал, измеренное значение появится на дисплее. Обратите внимание, что отображаемая температура является установленной температурой поверхности, а не согласованной. Ее нельзя сравнивать с температурой лба или уха. Чтобы снова перейти в режим ушного/лобного термометра, в течение 3 секунд нажимайте одновре67 менно кнопки и , пока не погаснет индикация и не раздастся короткий звуковой сигнал. При выключении или включении термометра выполняется автоматический выход из режима измерения температуры объекта. При отключении термометра автоматически сохраняется значение, измеренное последним, то есть только последнее значение ряда измерений. Для этого имеются 10 ячеек памяти. и . Чтобы выключить термометр, в течение примерно 3 секунд нажимайте кнопки Если больше не последует ввода каких-либо значений, термометр после отображения измеренного значения примерно через одну минуту автоматически отключится. . Для запроса сохраненных значений включите термометр и нажмите кнопку Отобразятся дата, время, номер памяти и символ режима измерения, а также температура. Перемещение по результатам измерений, сохраненным в памяти, осуществляется повторным нажатием кнопки . 8 Замена батареек При разрядке батареек появляется символ индикации смены батарейки . Измерение температуры еще возможно, но батарейки следует заменить. Если мигает символ индикации смены батарейки и на дисплее появился Lo, батарейки необходимо заменить. При недостаточной зарядке батареек термометр автоматически выключается.  68 Указание: • При замене батареек используйте батарейки того же типа, той же марки и такой же емкости. • Всегда меняйте все батарейки одновременно. • Не используйте повторно заряжаемые аккумуляторы. • Используйте батарейки, не содержащие тяжелых металлов. 1. Выкрутите винт в крышке отделения для батарейки и снимите крышку, потянув ее вниз. 2. Извлеките старые батарейки и установите две новые в соответствующем направлении. 3. Закройте крышку отделения для батарейки и снова закрутите винты на крышке. Утилизируйте использованные батарейки в соответствии с действующими законодательными предписаниями. Никогда не бросайте батарейки в бытовые отходы. 9 Хранение и уход • Производите чистку сенсорного наконечника после каждого применения. Используйте для этого мягкую салфетку или ватную палочку, смоченную дезинфекционным средством, спиртом или теплой водой. • Для очистки всего прибора используйте мягкую салфетку, слегка смоченную мыльным раствором. • Не используйте агрессивных чистящих средств. • Храните термометр всегда с надетым колпачком. • При намеренном длительном хранении извлеките батарейки. • Запрещается хранить прибор или использовать его при слишком высокой или низкой температуре или влажности воздуха (см. технические данные) на ярком солнечном свете, в сочетании с электрическим током или в пыльных местах. В противном случае возможны неточности при измерении. • Через 2 года прибор требует измерительно-технической проверки (калибровки). Рекомендуем направить прибор в сборе в сервисный центр. 69 10 Утилизация Батарейки и аккумуляторы, а также электронные приборы не относятся к бытовым отходам. Как потребитель, по закону Вы обязаны вернуть использованные батарейки. Старые батарейки можно сдать в общественных пунктах сбора или повсюду там, где продаются батарейки соответствующего вида. Соблюдайте местные законодательные нормы по утилизации отходов.  Указание: Эти знаки предупреждают о наличии в батарейках следующих токсичных веществ: Pb = свинец, Cd = кадмий, Hg = ртуть. Прибор следует утилизировать согласно Директиве ЕС по отходам электрического и электронного оборудования 2002/96/EC – WEEE (Waste Electrical and Electronic Equipment). В случае вопросов обращайтесь в местную коммунальную службу, ответственную за утилизацию отходов. 11 Технические характеристики Примечание: В случае применения прибора вне рамок спецификации безупречное функционирование не гарантируется! Мы оставляем за собой право на технические изменения в связи с модернизацией и усовершенствованием продукта. Этот прибор соответствует европейскому стандарту EN 60601-1-2 и подлежит особым мерам предо70 сторожности касательно электромагнитной совместимости. Следует учесть, что переносные и мобильные высокочастотные коммуникационные устройства могут повлиять на данный прибор. Точные данные можно запросить по указанному адресу сервисной службы. Название и модель SFT65 Диапазон измерений Режим ушного/лобного термометра: 34 °C до 43 °C (93,2 °F до 109,4 °F) Режим измерения температуры объекта: 0 °C до 100 °C (32 °F до 212 °F) Лабораторная точность измерений Режим ушного термометра: ±0,2 °C (±0,4 °F) от 35,5 °C до 42 °C (95,9 °F до 107,6 °F), вне этого диапазона измерений ±0,3 °C (±0,5 °F) Режим лобного термометра: ±0,3 °C (±0,5 °F) от 22 °C до 40 °C (71,6 °F до 104 °F) Режим измерения температуры объекта: ±1,5 °C (±2,7 °F) при < 30 °C (86 °F); ±5% при ≥ 30 °C (86 °F) Минимум 5 секунд Временной интервал между двумя измерениями Клиническая точность воспроизведения результатов Ухо: дети, 1–5 лет: ±0,08 °C (±0,14 °F) взрослые: ±0,07 °C (±0,13 °F) Окружающие условия при хранении Размеры Лоб: дети, 1–5 лет: ±0,07 °C (±0,13 °F) взрослые: ±0,08 °C (±0,14 °F) °Цельсия (°C) или °Фаренгейта (°F) От 16 °C до 35 °C (60,8 °F до 95 °F) при относительной влажности воздуха до 85% (без образования конденсата) От -25 °C до 55 °C (-13 °F до 131 °F) при относительной влажности воздуха до 85% (без образования конденсата) 38,2 x 138 x 46,5 мм Вес 90 г, включая батарейки Единицы измерения Условия эксплуатации 71 Батарейка 2x AAA, LR 03 Память Для 10 измерений Пояснения к символам 12 Классификация приборов тип BF Прочтите инструкцию по применению! Устранение неисправностей Индикатор Причина Мера по устранению Определяемая температура превышает 1) Режим ушного/лобного термометра: 43 °C (109,4°F) 2) Режим измерения температуры объекта: 100 °C (212 °F) Определяемая температура ниже 1) Режим ушного/лобного термометра: 34 °C (93,2 °F) 2) Режим измерения температуры объекта: 0 °C (32 °F) Используйте термометр только для измерений в пределах указанного диапазона температур. При необходимости очистите сенсорный наконечник. При повторной индикации неисправности обратитесь к специализированному дилеру или в службу сервиса. Используйте термометр только для измерений в пределах указанного диапазона температур. Температура эксплуатации находится вне диапазона 16 °C - 35 °C (60,8 – 95 °F) 72 13 Гарантия Мы предоставляем гарантию на дефекты материалов и изготовления этого прибора на срок 12 месяцев со дня продажи через розничную сеть. Гарантия не распространяется: – на случаи ущерба, вызванного неправильным использованием, – на быстроизнашивающиеся части (батарейки), – на дефекты, о которых покупатель знал в момент покупки, – на случаи собственной вины покупателя. Срок эксплуатации изделия: минимум 3 года Товар не подлежит сертификации . Импортер : ООО Бойрер ,г. Москва Фирма изготовитель: Бойрер Гмбх, Софлингер штрассе 218,89077-УЛМ, Германия для фирмы Ханс Динслаге ЛТд88524 Уттенвайлер, Германия Сервисный центр:109451 г. Москва, ул. Перерва, 62,корп.2 Тел(факс) 495– 658 54 90 Дата продажи Подпись продавца Штамп магазина Подпись покупателя 73 74 75 76 753.643 - 1110 Irrtum und Änderungen vorbehalten