1
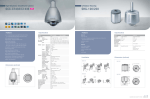
Thermal Night Vision Camera SCB-9050/9051
User Guide
Before installing and operating this product,
please read this manual thoroughly.
ENGLISH
The lightning flash with an arrowhead symbol, within an equilateral triangle is
intended to alert the user to the presence of uninsulated “dangerous voltage”
within the product's enclosure that may be of sufficient magnitude to constitute
a risk of electric shock to persons.
The exclamation point within an equilateral triangle is intended to alert the user
to the presence of important operating and maintenance (servicing) instructions
in the literature accompanying the appliance.
This equipment has been tested and found to comply with limits for a Class A
digital device, pursuant to part 15 of the FCC Rules. These limits are designed
to provide reasonable protection against harmful interference when the
equipment is operated in a commercial environment. This equipment
generates, uses, and can radiate radio frequency energy and, if not installed
and used in accordance with the instruction manual, may cause harmful
interference to radio communications.
Operation of this equipment in a residential area is likely to cause harmful
interference in which case the user will be required to correct the interference
at his own expense.
WARNING - C hanges or modifications not expressly approved by the
manufacturer could void the user’s authority to operate the
equipment.
WARNING - To prevent electric shock and risk of fire hazards:
◆ Do NOT use power sources other than that specified.
◆ Do NOT expose this appliance to rain or moisture.
This installation should be made by a qualified service person and
should conform to all local codes.
Contents
Features
Features…………………………………………………………………………… 5
Warnings & Cautions… ……………………………………………………… 6
Warnings…………………………………………………………………………… 7
Cautions…………………………………………………………………………… 8
Overview…………………………………………………………………………… 9
• External Part Names…………………………………………………………… 10
•
•
•
•
•
■ Names of external camera parts……………………………………………………………
■ Names of internal camera parts……………………………………………………………
■ Assembly/Adjustment Methods……………………………………………………………
• Installing the Camera…………………………………………………………
■ Inputting Power………………………………………………………………………………
■ Startup…………………………………………………………………………………………
■ Calibration (NUC)……………………………………………………………………………
■ Monitor/Communications Connection… …………………………………………………
■ Monitoring Guidelines… ……………………………………………………………………
■ Storage…………………………………………………………………………………………
• Interface……………………………………………………………………………
• Operating the Camera…………………………………………………………
■ Function Menu Configuration………………………………………………………………
■ Main Menu……………………………………………………………………………………
■ Function Settings Methods…………………………………………………………………
10…
10…
11
The SCB-9050/9051 Thermal Night Vision Camera is a contactless monitoring device
capable of measuring the surface temperatures of all target areas, and displaying the
resulting data via temperature distribution images (thermal images).
Because the SCB-9050/9051 is equipped with a two-dimensional uncooled thermal
sensor (microbolometer) incorporating the latest technology, neither sensor cooling
nor sensor maintenance are required. In addition, its sensor boasts long wavelength
sensitivity (detecting infrared radiation with wavelengths between 8-14 μm from
targets and background), allowing it to produce high resolution thermal images with
minimal impact from sunlight, even during outdoor daytime monitoring in clear
weather.
12
12…
12…
13…
13…
14…
15
15
18
Samsung Techwin cares for the environment at all product manufacturing
stages to preserve the environment, and is taking a number of steps to provide
customers with more environment-friendly products. The Eco mark represents
Samsung Techwin's will to create environment-friendly products, and indicates
that the product satisfies the EU RoHS Directive.
18
19…
20
• BRIGHTNESS… ……………………………………………………………………… 21…
• CONTRAST…………………………………………………………………………… 21…
• RANGE…………………………………………………………………………………
• NUC (Calibration)………………………………………………………………………
• NUC MODE (Calibration Mode)………………………………………………………
• IMAGE ADJ……………………………………………………………………………
• SPECIAL (Environment Settings Mode)… …………………………………………
• SAVE……………………………………………………………………………………
• EXIT (Close Menu)……………………………………………………………………
22…
22
23…
24…
25…
27…
28
• Specifications………………………………………………………………… 29
• Troubleshooting……………………………………………………………… 30
• Dimension… ……………………………………………………………………… 31
Thermal Night Vision Camera
4
User Guide
Thermal Night Vision Camera
5
User Guide
Warnings
Warnings & Cautions
The following points are presented in order to promote customer safety and prevent
property damage. After reading this information, be sure to use the product in the correct
manner.
* Please direct any product inquiries towards the merchandiser from which the device was purchased. Be aware that
if service is carried out, customers are responsible for any costs pertaining to the use of expensive ladders or other
equipment.
* Ensure that the power plug is disconnected around times in which electrical storms are experienced. (This prevents
fire and product failure)
* This product is an auxiliary device that is used as part of a monitoring system. Samsung Techwin will not be held
liable in cases when personal or property damage is caused due to theft, fire, or other unavoidable occurrences.
Explanation of Warnings/Cautions/Displays
There is a risk of death or serious injury if the designated instructions are not
adhered to.
Refrain from installing the product
yourself.
Both technical expertise and experience are required in order
to install the product. A fire or electric shock could result if a
customer installs the product by themselves. Contact your
sales agent for all matters pertaining to installation.
Stop using the product if smoke is emitted from the
camera or an abnormal amount of heat is produced.
Failure to obey this warning could result in a fire.
Always install a lightning rod when setting
the product up independently outdoors.
Do not install the product in an
insecure mounting location.
The action is forbidden.
Disassembly is forbidden.
There is a risk of personal injury or property damage if the designated
instructions are not adhered to.
Failure to obey this warning could result in product
failure, electric shock, or fire.
6
User Guide
Do not disassemble the product or
insert foreign objects.
Do not touch the power plug with wet
hands.
Failure to obey this warning could result in an electric
shock.
Thermal Night Vision Camera
Failure to obey this warning could result in the
product falling off.
Thermal Night Vision Camera
Failure to obey this warning could result in a product
failure or fire.
7
User Guide
Cautions
Overview
Position the camera so that it is not facing
towards the sun or any other bright light source.
Do not install the product in very hot
or very cold locations.
❶
2
4
3
1/4"-20 UNC (20 THREAD)
L:4.5mm±0.2mm (ISO standard), or 0.197" (ASA
standard)
5
Using the product in an area with very hot (55°C or higher) or
cold (-30°C or lower) temperatures could result in product
failure, or a reduction in image quality. Ensure proper ventilation
when installing the product in particularly hot locations.
Do not touch the camera lens with
your hands or fingers.
Do not drop the product, or subject it
to strong impacts or vibrations.
Failure to obey this caution could result in product
failure.
Thermal Night Vision Camera
6
Failure to obey this caution could result in the
microbolometer being damaged beyond repair.
8
1
2
3
4
5
6
CB-9050/9051, camera sun shield
S
Screws for fastening camera (4×M3XL12)
L-type hexagon wrenches (3: 1.5 mm/2.5 mm/3.0 mm)
Bolts for fastening camera (2)
Lens cap
User Guide
The lens is the most important part of the camera.
Ensure the lens is kept free of fingerprints, etc.
User Guide
Thermal Night Vision Camera
9
User Guide
External Part Names
Assembly/Adjustment Methods
104
Names of external camera parts
352
123
Ø104
❶
1
2
3
4
2
SCB-9050
V ideo signal/communications (RS485) cable
Power cable (AC 24 V, 50/60 Hz)
Lens (14 mm)
Support platform for fastening camera
104
1
2
3
4
Ø104
367
Front
123
Names of internal camera parts
Rear
2
❶
2
SCB-9051
❶ A screw to fix the focus is located on the bottom of the lens.
Notes
3
1
1
2
3
4
L ens (14 mm)
Key SW
Key SW terminal block
IF terminal block
Thermal Night Vision Camera
4
• Do not adjust the focus after purchasing this product, because it will have been set to the
optimum position. Incorrectly adjusting the focus will hinder the camera’s performance.
2 A sun shield is provided with this camera to allow for outdoor installation.
Using the bolts and hexagon wrenches included in this package, fasten the camera unit
and sun shield firmly in place. (Do not use excessive force during assembly.)
10 User Guide
Thermal Night Vision Camera
11 User Guide
Installing the Camera
Inputting Power
Calibration (NUC MODE)
1. Remove the lens cap.
2. Engage the power. (Use the adapter provided with this product.)
3. The rated input voltage for this product is AC 24 V, 50/60 Hz.
• This device is not fitted with a power switch. The device
must be provided with power to turn it
• After checking the label on the cable on the right side of
the camera, connect the output cable of the provided
adapter.
This device will perform a calibration necessary for imaging (NUC) after the internal shutter
closes.
During NUC, the screen will freeze momentarily. Please note that this is not a malfunction.
Monitor/Communications Connection
■Connecting the Monitor
Connect the video output terminal on the rear of this product to the monitor.
When the resistance value of copper wire is at [20°C(68°F)]
Copper wire size (AWG)
IR camera
#24(0.222)
#22(0.332)
#20(0.522)
#18(0.832)
Resistance (Ω/m)
0.078
0.050
0.030
0.018
Voltage Drop (V/m)
0.028
0.018
0.011
0.006
Monitor
* Deviations may occur depending on the type of power cable shown in the chart above, and on the
wiring manufacturer.
Notes
• A 22-18 gauge power wire is recommended for this camera.
• Voltage reinforcement will occur based on the length of the power wire. If the adapter
output wire is too long, camera performance may suffer.
Startup
1. The START screen will appear after the power has been turned on.
2. After completion of initialization, thermal images will be displayed. (approx. ten seconds
after engaging the power)
• Refer to the owner’s manual for each device. Connection methods employed may differ
depending on the monitors and peripheral devices used.
• Before connecting devices, ensure their power is turned off.
• Adjust the 75Ω/Hi-Z conversion switch for each device based on the following
illustration. Select “Hi-Z” for intermediate video receivers and “75Ω” for end equipment.
IR camera
Intermediate video receiver
The sensor will not operate properly immediately after the power is turned on, or when switching
between HIGH and LOW ranges. As a result, thermal images will not display consistently for several
seconds. Menu controls can be used to save values to be applied at subsequent start-up of the
SCB-9050/9051. (If values are not saved, then the last saved settings will be applied.)
Thermal Night Vision Camera
12 User Guide
Thermal Night Vision Camera
13 User Guide
End equipment
Installing the Camera
■RS485 Communications Controls
Using RS485 communications, function settings menus can be adjusted using the Samsung
Techwin DVR or System controller.
(1) Controlling menus using a PC
Using an RS485 converter, connect the camera's RS485 control terminal to a serial cable.
Example) PC serial board (COM1) → serial cable → RS485 converter → camera RS485 control
terminal
(2) Controlling menus using a DVR system controller
3. Always carry out an NUC whenever sunlight or high temperature objects are within the
field of view.
4. When the camera is used continuously for a long period of time, pay attention to the
buildup of dirt on the lens. A dirty lens may result in phenomena such as shortened
detection distances.
5. Even if the same item is being monitored, changes in environmental conditions such as
rain and fog will affect detection distance. While operating the camera be aware of how
such changes may influence detection distance.
Connect an RS485 cable (TRX+, TRX-) to an RS485 control board connection terminal capable of
connecting to the DVR system controller.
External communications cable
(+) CONNECTION TERMINAL (TRX+)
(-) CONNECTION TERMINAL (TRX-)
RS485 control terminal
485+
485-
Notes
Communications Settings Default Values (camera default values at the time of shipment)
• P lease use Samsung Techwin Protocol or Pelco-D Protocol when controlling the camera
with a separate controller.
Monitoring Guidelines
After thermal images appear, the camera will begin to monitor its range of coverage.
1. Do not adjust the focus if there is no particular point of focus to monitor.
2. For an in-depth explanation of the controls used with the SCB-9050/9051, refer to the
section detailing how the camera is operated on page 16.
During monitoring, the SCB-9050/9051 will capture heat sources and display the resulting
images on the monitor.
1. If the subject environment experiences a dramatic change in temperature during
monitoring, be sure to set NUC MODE to either an INTERVAL of 10 MIN or less, or an AMB
of 1.0°C or lower .
2. P lease be aware that because this is an infrared camera, reflections not visible to the
naked eye may still be displayed. Images reflected off glass or mirrors located in front of
the camera may become visible.
Thermal Night Vision Camera
14 User Guide
Storage
Attach the lens cap before storing this device.
Ensure that the storage area is kept within the allowable temperature range listed in this
device’s product specifications. Do not place this device in a location where condensation
may occur.
Interface
Interface
A user interface terminal block is attached to the inside of this device.
After making adjustments to the internal terminal block, ensure that the back cover is
properly attached.
Notes
• Leakage may occur if the back cover is not properly attached.
Thermal Night Vision Camera
15 User Guide
Interface
■Rear Terminal Placement
■Connector specifications and signals
①
④
②
<Function Chart>
Function
③
⑤
RS485 I/F
(R+/-, D-/+)
① POWER LED
• Power ON : Lit
• Abnormality/Warning : Flashing
② Terminal Block A
PIN
1
2
3
4
5
Name
R+
RDD+
G
6
Video
7
8
9
G
POW+
POW-
Explanation
RS485+ Communications Non-inverting input/output
RS485- Communications Inverting input/output
RS485- Communications Inverting input/output
RS485+ Transmission Non-inverting input/output
Ground
Composite video signal
Impedance : 75 Ω
Ground
Power input AC +24 V
Power input DC AC -24 V
Video output
(Video)
Power supply
Provides power.
(POW+/-)
KEY contact
output
③ RS485 Terminator SW
• Terminator ON : 1-2
• Terminator OFF : 2-3
④ Multi Direction S/W : same connector as Terminal Block B
⑤ Terminal Block B
PIN
1
2
3
4
5
6
7
Name
*UP
*DOWN
*LEFT
*RIGHT
*SET
GND
MD
Explanation
KEY UP contact input (Active LOW)
KEY DOWN contact input (Active LOW)
KEY LEFT contact input (Active LOW)
KEY RIGHT contact input (Active LOW)
KEY SET contact input (Active LOW)
GND
Terminal used when product is shipped from the factory.
Thermal Night Vision Camera
16 User Guide
Explanation
Operates the RS485 I/F.
Because full-duplex communication
is supported, this function is used
to update F/W.
Standard users should utilize the
same cables as those employed at
the time of shipment.
Shipment status : R+,D+ => TRX+
R-,D- => TRXActs as a composite video signal
output.
LED
KEY controls
Notes
Communication terminator
settings:
- Default value: ON
- If multiple cameras are installed :
Turn only the camera measuring
the furthest distance ON, and the
remaining cameras OFF.
Switch between NTSC/PAL using
the menu.
AC 24 V, 50/60 Hz
Operates menu controls.
(Has the same connection as the
circuit board KEY.)
Notifies users using the LED
display whether the power is ON/
OFF, and whether a device
abnormality or warning has
occurred.
Enables operation of the menu
controls.
This output is provided for
adjustment purposes. For that
reason, please refrain from
extending the controls to several
meters or longer.
(For remote control operation, use
RS485 I/F.)
Power ON : Lighting
Device Abnormality/Warning :
Flashing
Used to make adjustments.
Notes
• Before supplying a terminal block with power, verify that the wiring has been properly
connected.
Thermal Night Vision Camera
17 User Guide
Operating the Camera
Function Menu Configuration
Function
Main Menu
Explanation
BRIGHTNESS AUTO
MANUAL
AUTO / MANUAL (level ranging from 1-10)
CONTRAST
AUTO
MANUAL
AUTO / L/H
RANGE
NUC
AUTO
LOW
NUC MODE
INTERVAL
IMAGE ADJ
3D-DNR
SHARPNESS
D-ZOOM
POLARITY
COLOR
BRIGHTNESS
AUTO / MANUAL (level ranging from 1-10)
CONTRAST
RANGE
NUC
NUC
NUC MODE
INTERVAL / AMB / MANUAL
INTERVAL
0H 1MIN-24H 0MIN
AMB
0.1°C-10.0°C
IMAGE ADJ
3D-DNR
SHARPNESS
ZOOM
POLARITY
COLOR
ISOTHERM
SPECIAL
OFF/L/M/H
0-5
OFF/X2/X4
BW/WB
MONO/COLOR1/COLOR2
ON/OFF
L_RANGE
-40°C~+150°C
R_RANGE
0°C~+560°C
TV SYSTEM
NTSC/PAL
LANGUAGE
ENGLISH / KOREAN / JAPANESE
COMM ADJ
CAMERA ID 0-255
BAUD RATE 4800/9600/19,200/38,400
UART MODE BIT/PARITY/STOPBIT
8-O-1
8-N-1
8-E-1
RET PKT
ON/OFF
CAMERA ID ON/OFF
TEMP ADJ
TEMP DISP ON/OFF
TEMP UNIT C/F
RESET
SAVE
SAVE
EXIT
EXIT
Thermal Night Vision Camera
ISOTHERM
MAIN
SETUP
RETURN
TV SYSTEM
LANGUAGE
SPECIAL
SETUP
COMM ADJ
TEMP ADJ
H MIN
RETURN
L
0-5
×2
BW
MONO
ON
L RANGE TH
H RANGE TH
LEVEL
RETURN
LEVEL
RETURN
HIGH
AMB
M
×4
WB
COLOR1
NTSC
PAL
ENGLISH
CAMERA ID
BAUDRATE
UART MODE
RET PKT
DISPLAY ID
RETURN
TEMP DISP
TEMP UNIT
RESET
RETURN
SAVE
EXIT
18 User Guide
Thermal Night Vision Camera
19 User Guide
AMB
RETURN
H
OFF
COLOR2
OFF
MANUAL
OFF
Operating the Camera
Function Settings Methods
BRIGHTNESS
Function settings may be adjusted using the internal switches after removing the rear
cover. (Refer to “5. Interface” for directions on how to remove the rear cover.)
UP button : Move the menu cursor up.
RIGHT button: Increase (+) the settings value of the selected item.
DOWN Key : Move the menu cursor down.
LEFT button : Decrease (-) the settings value of the selected item.
SET button : If a “ ” icon is displayed: Move to a screen where you can select settings
values (move down a level)
If a “ ” icon is not displayed: Execute or adjust the selected item
UP
SET (Push)
RIGHT
< Control buttons >
1. Press the SET button while the cursor is aligned with “1.
BRIGHTNESS” to display the BRIGHTNESS sub menu shown
below. Press the LEFT button or RIGHT button while the cursor is
aligned with “AUTO” to switch the BRIGHTNESS AUTO ADJUST
setting from : ON ⇒ OFF ⇒ ON.
Press the LEFT button or RIGHT button while the cursor is aligned
with “MANUAL” to adjust the BRIGHTNESS over ten different
levels: 1 ⇒ 2 ⇒ 3 ⇒ 4 ⇒ 5 ⇒ 6 ⇒ 7 ⇒ 8 ⇒ 9 ⇒ 10 ⇒
1. Select “2. RETURN” to confirm the current setting and go
back to the MAIN SETUP menu screen. (Default value : AUTO ON)
BRIGHTNESS
▶1.MANUAL
2.RETURN 6
CONTRAST
Press the SET button to display the MAIN SETUP menu screen. The MAIN SETUP menu
uses a tree structure. When you select a function, a sub menu will appear.
AUTO
MANUAL
DOWN
LEFT
Use the UP button or DOWN
button to select the item you
would like to set.
MAIN SETUP
1. BRIGHTNESS
2. CONTRAST
1.
2.
3.
4.
5.
6.
7.
8.
9.
MAIN SETUP
BRIGHTNESS
CONTRAST
RANGE NUC
NUC MOOE
IMAGE ADJ
SPECIAL
SAVE
EXIT
Thermal Night Vision Camera
AUTO
MANUAL
AUTO
INTERVAL
20 User Guide
Use the RIGHT button or LEFT
button to change the status of
the corresponding setting.
MAIN SETUP
1. BRIGHTNESS
2. CONTRAST
3. RANGE AUTO
MANUAL
AUTO
2. P ress the SET button while the cursor is aligned with “2.
CONTRAST” to display the following sub menu. Press the LEFT
button or RIGHT button while the cursor is aligned with “AUTO”
to switch the CONTRAST AUTO ADJUST setting from : ON ⇒
OFF ⇒ ON.
Thermal Night Vision Camera
21 User Guide
CONTRAST
▶1.MANUAL
2.RETURN 5
Operating the Camera
Press the LEFT button or RIGHT button while the cursor is aligned with “MANUAL” to adjust the
CONTRAST over ten different levels: 1 ⇒ 2 ⇒ 3 ⇒ 4 ⇒ 5 ⇒ 6 ⇒ 7 ⇒ 8 ⇒ 9 ⇒ 10 ⇒1. Select
“2. RETURN” to confirm the current setting and go back to the MAIN SETUP menu screen. (Default
value: 6)
* In order for the CONTRAST AUTO setting to be enabled, the BRIGHTNESS AUTO setting must already be
turned on.
Accordingly, if AUTO cannot be set to “ON”, enable the BRIGHTNESS AUTO setting and then turn on the
CONTRAST AUTO setting.
NUC MODE (Calibration Mode)
NUC(Non-uniformity Correction) is a menu calibrating all pixel's characteristics to get better image.
Select an NUC operation mode. If you choose “MANUAL”, the user is to perform NUC manually,
instead of having the device conduct calibration automatically.
RANGE
Use this option to switch between an L Range and H Range settings. Select “AUTO” to allow the
settings to automatically change between L Range and H Range based on the surrounding
temperature. Choose “L” to keep the temperature range at L Range regardless of the surrounding
temperature. In the same way, select “H” to always have the temperature range set at H Range.
3. Press the LEFT button or RIGHT button while the cursor is aligned with “3. RANGE” to switch the
RANGE setting from : AUTO ⇒ L ⇒ H ⇒ AUTO. (Default value: AUTO)
1.
2.
3.
4.
MAIN SETUP
BRIGHTNESS
CONTRAST
RANGE NUC
AUTO
MANUAL
AUTO
1.
2.
3.
4.
5.
6.
MAIN SETUP
BRIGHTNESS
CONTRAST
RANGE NUC
NUC MOOE
IMAGE ADJ
AUTO
MANUAL
AUTO
INTERVAL
5. Press the SET button while the cursor is aligned with “5. NUC MODE” to display the following
NUC MODE sub menu. Press the LEFT button or RIGHT button while the cursor is aligned with
“5.NUC MODE” to switch from: INTERVAL ⇒ AMB ⇒ MANUAL ⇒ INTERVAL. Press the SET button
again to adjust the sub menu. Select “2. RETURN” to confirm the current setting and go back to
the MAIN SETUP menu screen. (Default value: INTERVAL)
· INTERVAL : An NUC will be performed at the specified INTERVAL.
· AMB
: An NUC will only be performed when a temperature change meeting the set
temperature (0.1°C-10.0°C) is detected by the internal temperature sensor.
· MANUAL : An NUC will not be performed.
IMAGE ADJ
NUC (Calibration)
4. Press the SET button while the cursor is aligned with “4. NUC” to calibrate. Screen operations will
then be temporarily suspended.
1.
2.
3.
4.
5.
MAIN SETUP
BRIGHTNESS
CONTRAST
RANGE NUC
NUC MOOE
Thermal Night Vision Camera
AUTO
MANUAL
AUTO
INTERVAL
22 User Guide
Use this menu to adjust images. After you select this option, the following sub menu will appear.
1.
2.
3.
4.
5.
6.
7.
MAIN SETUP
BRIGHTNESS
CONTRAST
RANGE NUC
NUC MOOE
IMAGE ADJ
SPECIAL
Thermal Night Vision Camera
AUTO
MANUAL
AUTO
INTERVAL
23 User Guide
Operating the Camera
3D-DNR (Noise Reduction) :
Press the LEFT button or the RIGHT button to limit the
amount of noise produced. (Default value: M)
SHARPNESS (Edge Emphasis) :
Use this option to use image processing to emphasize
edges. Press the LEFT button or RIGHT button while the
cursor is aligned with “2. SHARPNESS” to switch the
SHARPNESS setting from 0-5. Select “5. RETURN” to
confirm the current setting and go back to the MAIN SETUP
menu screen. (Default value: 4)
ZOOM (Digital Zoom Settings) :
Press the LEFT button or RIGHT button while the cursor is
aligned with “3. D-ZOOM” to switch the zoom setting from:
OFF ⇒ X2 (times two) ⇒ X4 (times four) ⇒ OFF. Select “5.
RETURN” to confirm the current setting and go back to the
MAIN SETUP menu screen. (Default value: OFF)
COLOR :
Use this option to set the color of images. When "COLOR1" is selected, high temperature
areas will be shown in red, while low temperature areas will be displayed in blue. If COLOR2
chosen, high temperature areas will be shown in yellow, while low temperature areas will be
displayed in blue. When "MONO" is selected, high temperature areas will be shown in white,
while low temperature areas will be displayed in black.
ISOTHERM :
ISOTHERM can apply colors to the area whose temperature range over "L RANGE TH" or "L RANGE TH" in the screen.
L RANGE TH : Minimum temperature in the ISOTHERM's area when RANGE is L.
H RANGE TH : Minimum temperature in the ISOTHERM's area when RANGE is H.
RETURN Confirm the current setting and go back to the IMAGE ADJ sub menu screen.
IMAGE ADJ
OFF
▶1.3D-DNR OFF
2.SHARPNESS
3.D-ZOOM
X2
BW
4.POLARITY 5.COLOR
COLOR1
6.ISOTHERM OFF
6.RETURN
IMAGE ADJ
1.3D-DNR OFF
▶2.SHARPNESS
OFF
3.D-ZOOM
X2
BW
4.POLARITY 5.COLOR
COLOR1
6.ISOTHERM OFF
6.RETURN
IMAGE ADJ
1.3D-DNR OFF
OFF
2.SHARPNESS
▶3.D-ZOOM
X2
BW
4.POLARITY 5.COLOR
COLOR1
6.ISOTHERM OFF
6.RETURN
SPECIAL (Environment Settings Mode)
POLARITY :
IMAGE ADJ
Use this option to set the black/white properties of images.
1.3D-DNR OFF
OFF
2.SHARPNESS
When “BW” is selected, high temperature areas will be
3.D-ZOOM
X2
shown in white, while low temperature areas will be
▶4.POLARITY BW
5.COLOR
COLOR1
displayed in black. If “WB” is chosen, black and white will
6.ISOTHERM OFF
be displayed in the opposite way as BW. Press the LEFT
6.RETURN
button or RIGHT button while the cursor is aligned with “4.
POLARITY” to switch the black/white inversion setting from: BW ⇒ WB ⇒ BW. Select “5.
RETURN” to confirm the current setting and go back to the MAIN SETUP menu screen.
(Default value: BW)
Thermal Night Vision Camera
24 User Guide
Use this menu to adjust environment settings items related to areas such as screen display, video
output, and communications. Press the SET button while the cursor is aligned with “7.SPECIAL” to
display the following sub menu.
1.
2.
3.
4.
5.
6.
7.
8.
MAIN SETUP
BRIGHTNESS
CONTRAST
RANGE NUC
NUC MOOE
IMAGE ADJ
SPECIAL
SAVE
Thermal Night Vision Camera
AUTO
MANUAL
AUTO
INTERVAL
25 User Guide
Operating the Camera
TV SYSTEM (Video Output Setting) :
SPECLAL SETUP
Use this option to adjust the video output setting.
PAL
▶1.TV SYCTEM
P ress the LEFT button or RIGHT button while the cursor is
2.LANGUAGE
ENGLISH
aligned with “1. TV SYSTEM” to switch the TV SYSTEM
3.COMM ADJ
setting from: NTSC ⇒ PAL ⇒ NTSC. Select “5. RETURN”
4.RESET
5.RETURN
to confirm the current setting and go back to the MAIN
SETUP menu screen. (Default value: NTSC)
COMM ADJ (Communication Settings mode) :
COMM ADJ
Use this menu to adjust communication settings.
1
1.CAMERA ID
4800
▶2.BOUDRATE
Press the SET button while the cursor is aligned with “3.
3.URAT MODE 8-E-1
COMM ADJ” in the SPECIAL SETUP menu to display the
ON
4.RET PKT
5.DISPLAY CAM ID OFF
following sub menu.
6.RETURN
- CAMERA ID (Camera ID Settings) :
Use this option to adjust CAMERA ID settings.
Press the LEFT button or RIGHT button while the cursor is aligned with “1. CAMERA ID” to
adjust the CAMERA ID setting to a value from 0-255. The adjusted value will become valid
when the setting is saved. Select “6. RETURN” to go back to the SPECIAL SETUP menu
screen. (Default value: 0)
- BAUD RATE (Communications Speed Settings Mode) :
Use this option to change the BAUD RATE to one of four settings: 38,400 bps, 19,200 bps, 9600 bps, 4800 bps. Press the LEFT button or RIGHT button while the cursor is aligned with “2. BAUD RATE” to switch the BAUD RATE setting from: 4800 ⇒ 9600 ⇒ 19,200 ⇒ 38,400 ⇒ 4800. Select “6. RETURN” to confirm the current setting and go back to the SPECIAL SETUP menu screen. (Default value: 9600 bps)
- UART MODE (Parity Settings Mode) :
Use this option to adjust parity settings.
Press the LEFT button or RIGHT button while the cursor is aligned with “3. UART MODE” to switch the UART MODE setting from: 8-E-1 ⇒ 8-O-1 ⇒ 8-N-1 ⇒ 8-E-1. Please note that both the bit length (8) and the stop bit (1) are fixed. Select “6. RETURN” to confirm the current setting and go back to the SPECIAL SETUP menu screen. (Default value: 8-E-1)
- RET PKT (Return Packet Setting) :
Use this option to adjust the return packet (returned using the same status as the data
entered) setting.
Press the LEFT button or RIGHT button while the cursor is aligned with “4. RET PKT” to
switch the RET PKT setting from: ON ⇒ OFF ⇒ ON. Select “6. RETURN” to confirm the
current setting and go back to the SPECIAL SETUP menu screen. (Default value: ON)
Thermal Night Vision Camera
26 User Guide
- Camera ID(ID Display Setting) :
Use
this option to adjust the display setting of the currently set Camera ID (appears on the
top left of the screen).
Press the LEFT button or RIGHT button while the cursor is aligned with “5. DISPLAY ID” to
switch the CAMERA ID display setting from: ON ⇒ OFF ⇒ ON. Select “6. RETURN” to confirm
the current setting and go back to the SPECIAL SETUP menu screen. (Default value: OFF)
TEMP ADJ :
Use this option to change the temperature unit. Press the button while the cursor is aligned with "4.TEMP ADJ" to change temperature display on/off and temperature unit C/F.
Notes
• Don't use SCB-9050/9051 to detect anything. Measurement error is ±15°C for objects
that have 0~100°C
RESET (Reset) :
Use this option to restore each item to its default setting.
Press the SET button while the cursor is aligned with “5. RESET” to restore each item to its
factory default setting. Please note, however, that neither TV SYSTEM nor COMM ADJ can be
changed. Select “6. RETURN” to go back to the SPECIAL SETUP menu screen.
SAVE
Use this option to save device settings and establish the basic settings which will be used the next
time you start up the device. Press the SET button while the cursor is aligned with “8. SAVE” to
record your current settings to the internal memory. If you exit without saving, the MAIN SETUP
menu will close without any values being updated.
1.
2.
3.
4.
5.
6.
7.
8.
9.
MAIN SETUP
BRIGHTNESS
CONTRAST
RANGE NUC
NUC MOOE
IMAGE ADJ
SPECIAL
SAVE
EXIT
Thermal Night Vision Camera
AUTO
MANUAL
AUTO
INTERVAL
27 User Guide
Specifications
Operating the Camera
Notes
• Do not disengage the power while settings are being saved.
* Although the infrared sensor has been built using high-precision technology, please understand that there
may be times when pixels may be lost, or remain stuck/flashing. Also, be aware that continuously monitoring
a high temperature object beyond a certain period of time may produce an afterimage.
* In cases where the product installation site experiences a sudden change in temperature (dropping by 15°C
or more), the camera’s focus will become blurred with regards to subjects located within three meters.
① After switching BRIGHTNESS and/or CONTRAST to MANUAL and saving your changes, images
may not be displayed the next time you restart the device. To render images in such a case, set
BRIGHTNESS and/or CONTRAST to “AUTO” or readjust the MANUAL setting.
② If you save after changing the RS485 communications CAMERA ID, the ID will then be set/stored.
If the CAMERA ID was set incorrectly, exit without saving.
EXIT (Close Menu)
Press the SET button while the cursor is aligned with “9. EXIT” to close the MAIN SETUP menu.
1.
2.
3.
4.
5.
6.
7.
8.
9.
MAIN SETUP
BRIGHTNESS
CONTRAST
RANGE NUC
NUC MOOE
IMAGE ADJ
SPECIAL
SAVE
EXIT
Thermal Night Vision Camera
AUTO
MANUAL
AUTO
INTERVAL
28 User Guide
Item
SCB-9050
SCB-9051
Detector
320(H)x240(H) Uncooled VOX Microbolometer
Sensor Pitch
23.5μm × 23.5μm
Measured wavelength range
8 ~ 14um
Video ratio (Sensor)
NTSC : 30 fps / PAL : 25 fps
Video output
VBS : 1.0VP-P, 57Ω composite
Lens
F1.4, f=14mm
F1.4, f=50mm
Focus Range
0.5m ~ ∞
(Factory default : 3m~∞,Pan Focus )
27m ~ ∞, Pan Focus
Viewing angle(H x V)
30˚ x 22.8˚
9.2˚x 6.9˚
IFOV (Instantaneous field of view)
1.68mrad
0.47 mrad
Digital zoom
2x ~ 4x
Noise reduction function
3D-DNR (4step : Low/Midium/High/Off)
Polarity function
BW(Black & White) / WB(White & Black)
Detecting temperature
Auto / Manual(2step)
Low(-40~150), High(0~540)
Communications specifications
RS-485
Protocol
Samsung Techwin, Pelco-D
Dustproof/waterproof
protection rating
IP66
Operating temperature
-30˚ ~ 55˚
Storage temperature
-40˚ ~ 70˚
Input voltage
24V AC, 50/60Hz
Electricity consumption
10.5W (Operating Heater 22W)
Outer diameter size
104(W)×123(H)×352(D) mm
Weight (Camera)
2.2Kg
Image Processing
AGC & DDE
NETD
80mK
Thermal Night Vision Camera
104(W)×123(H)×367(D) mm
Low range : 80mK,
High range : 300mK
29 User Guide
Troubleshooting
Ø104
352
SCB-9050
104
• If nothing can be seen onscreen :
- Verify that the power source is connected properly, and that the device is receiving power.
- Verify that the video signal wire is connected properly.
• If screen images do not appear clearly :
- Wipe the lens with a clean cloth or brush to remove any dust that may be present.
- Adjust the status of the monitor.
- Change the position or angle of the camera if a large amount of bright light is displayed onscreen.
• If the screen is too dark :
- Adjust the status of the monitor.
- Verify that intermediate processing can be performed properly between systems.
• If the camera is operating abnormally, or its surface is very hot, causing black lines to appear
onscreen :
- Verify that the power voltage received by the camera conforms to the proper rating. Also, confirm
whether performance is affected by the time of day.
• If RS485 communications cannot be carried out :
- Verify the polarity of the RS485 communications terminal and the arrangement of the cables.
- Verify the RS485 communications settings.
123
Check the points listed below if the product appears to be malfunctioning. If the problem
continues, please contact the sales agent from whom the product was purchased.
104
Dimension
* RS485 Communication Settings Default Values
Camera No.
Communications
Speed
Communications
Mode
Data Reception
Default Value
1
9600
8-EVEN -1
In use
Ø104
367
123
Item
SCB-9051
Thermal Night Vision Camera
30 User Guide
Thermal Night Vision Camera
31 User Guide
DECLARATION OF CONFORMITY
Application of Council Directive(s)
2004 / 108 / EC
Manufacturer's Name SAMSUNG TECHWIN CO., LTD
Manufacturer's Address
SAMSUNG TECHWIN CO., LTD
42, SUNGJU-DONG CHANGWON-CITY,
KYUNGNAM, KOREA, 641-716
MEMO
European Representative Name
European Representative Address
Equipment Type/Environment Thermal Night Vision Camera
Model Name SCB-9050/9051
Beginning Serial NO. C5BY6V3Z300001X
Year of Manufacture 2010.03.23
Conformance to EN 55022 : 2006
EN 50130-4 : 2003
We, the undersigned, hereby declare that the equipment specified above conforms
to the above Directive(s).
Manufacturer SAMSUNG TECHWIN CO., LTD Legal Representative in Europe
Signature Signature
Full Name BONJENG GU
Full Name
Position QUALITY CONTROL MANAGER Position Place CHANGWON, KOREA
Place
Date 2010. 03. 23
Date
Thermal Night Vision Camera
32 User Guide
Thermal Night Vision Camera
33 User Guide
MEMO
Thermal Night Vision Camera
34 User Guide
MEMO
Thermal Night Vision Camera
35 User Guide
SALES NETWORK
•
AMSUNG TECHWIN CO., LTD.
S
145-3, Sangdaewon 1-dong, Jungwon-gu, Seongnam-si Gyeonggi-do, Korea, 462-703
TEL : +82-31-740-8151~8 FAX : +82-31-740-8145
•
AMSUNG TECHWIN AMERICA Inc.
S
1480 Charles Willard St, Carson, CA 90746, UNITED STATES
Tol Free : +1-877-213-1222 FAX : +1-310-632-2195
www.samsungcctvusa.com
•
AMSUNG TECHWIN EUROPE LTD.
S
Samsung House, 1000 Hillswood Drive, Hillswood Business
Park Chertsey, Surrey, UNITED KINGDOM KT16 OPS
TEL : +44-1932-45-5300 FAX : +44-1932-45-5325
www.samsungtechwin.com
www.samsungsecurity.com
P/No. : Z6806096101B
VAN 10. 03