1
Technical description and operating instructions
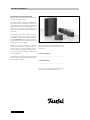
Motiv 10
Hometheater system
5.1 Cinema Set · 5.1 Concert Set
About this document
The information in this document is subject to
change without warning. Lautsprecher Teufel
GmbH is in no way bound by the information provided herein.
No section of this document may be reproduced or copied by any electronic or mechanical means, including photocopying and
recording, without prior written consent
from Lautsprecher Teufel GmbH.
© Lautsprecher Teufel GmbH
Version 1.2
March 2009
Original packaging
We recommend that you hold on to the packaging
of all your new Teufel products, as we only accept
loudspeakers back within the initial eight-week
return period if they are shipped in their ORIGINAL PACKAGING. We do not provide packaging
boxes separately.
Complaint
In case of complaint we require the following data
to process it:
1. Invoice number
You can find it in the proof of purchase (enclosed
to the product) or in the order confirmation sent
to you as a pdf document, e.g. 4322543
2. Serial number and batch number
You can find it on the back of the device,
e.g. Lot No.: MO 04007480121A
Thank you for your co-operation!
Contact
If you have any questions, suggestions or criticisms, please contact our support team:
Lautsprecher Teufel GmbH
Gewerbehof Bülowbogen · Bülowstr. 66
D-10783 Berlin (Germany)
Phone: +49 30 300 9 300
Fax: +49 30 300 9 30 30
www.teufel.eu
Terms of warranty
Lautsprecher Teufel GmbH provides a twelveyear warranty for loudspeakers and a twoyear warranty for amplifiers and electrical
components, starting at the purchase date. The
warranty covers all materials and time needed.
The warranty does not cover devices damaged as
a result of improper use or electrical/mechanical
overloading. The original Teufel invoice is your
proof of warranty. This warranty applies exclusively
to loudspeakers, amplifiers and electronic
components purchased by consumers from
Teufel for private usage. The warranty does not
apply to loudspeakers, amplifiers and electronic
components sold to consumers through thirdparty dealers. For third-party products supplied
together with the Teufel system, the terms of
warranty of the manufacturer in question apply.
When Teufel products are resold privately, the
warranty may be transferred to the new owner.
For this, the new owner requires the original
Teufel invoice.
Returns policy
For all products purchased directly from Teufel and from www.teufel.eu, Teufel provides an
eight-week right of return with a money-back
guarantee. You will not have to pay any additional
shipping costs for returning Teufel goods. Teufel
covers the freight for transporting the goods
back to the factory, and we will promptly refund
the purchase price to your account once we have
verified the condition of the goods.
You may only return individual components from
a set if Teufel offers these components for sale
separately. If you return one or more individual
components from a set, this voids the discount
that Teufel provides on the sale of components
as a set. This means that for individually returned components from a set, you will be refunded
the difference between the set price and the sum
purchase price of the individual components you
decide to keep, i.e., we will deduct the discount
that applies to set purchases.
If you decide to return any or all of the purchased
goods, please always contact us first.
Note that we can only process and accept returned
goods if you have telephoned us in advance and discussed the required returns procedure.
Technical specifications
For technical specifications of the products
described herein, please refer to our website
www.teufel.eu.
2
· Motiv 10
Contents
Table of contents . . . . . . . . . . . . . . . . . . . . . . . . . . . . . . . . . . . . . . . . . . . . . . . . . . . . . . . . . . . . . Page
3
Introduction . . . . . . . . . . . . . . . . . . . . . . . . . . . . . . . . . . . . . . . . . . . . . . . . . . . . . . . . . . . . . . . . . Page
4
Unpacking · Scope of delivery . . . . . . . . . . . . . . . . . . . . . . . . . . . . . . . . . . . . . . . . . . . . . . . . . . Page
5
Accessories (optional) . . . . . . . . . . . . . . . . . . . . . . . . . . . . . . . . . . . . . . . . . . . . . . . . . . . . . . . . . Page
6
Installation of the 5.1 configuration . . . . . . . . . . . . . . . . . . . . . . . . . . . . . . . . . . . . . . . . . . . . . Page
7
Connection . . . . . . . . . . . . . . . . . . . . . . . . . . . . . . . . . . . . . . . . . . . . . . . . . . . . . . . . . . . . . . . . . . Page
9
Mounting · Settings . . . . . . . . . . . . . . . . . . . . . . . . . . . . . . . . . . . . . . . . . . . . . . . . . . . . . . . . . . . Page 10
Control elements (subwoofer) . . . . . . . . . . . . . . . . . . . . . . . . . . . . . . . . . . . . . . . . . . . . . . . . . . Page
11
Problems and solutions · Cleaning · Technical data . . . . . . . . . . . . . . . . . . . . . . . . . . . . . . . . . Page 12
Manual version 1.2
· Motiv 10
3
Introduction Motiv 10
Technical description and operating instructions
Dear customer of Lautsprecher Teufel,
Thank you for purchasing the loudspeakers of the
company Lautsprecher Teufel.
You have purchased a powerful loudspeaker system because Teufel Lautsprecher systems are
produced very accurately and equipped with high
quality components. We recommend Motiv 10 to
rooms up to 35 m2. Please read the whole manual
before set-up and keep it for future reference in
a safe place.
Our engineers are at your disposal for further
information, phone +49 30 300 9 300. You can
also contact us via the email contact form on our
website www.teufel.eu. Please have your invoice
number ready so that we can allocate you promptly and provide optimum support.
BEFORE you consult us in case of a question
please read the excerpt "Problems and Solutions" on page 12 of these operating instructions and visit our web page www.teufel.eu, here
you can find answers to many questions in the
area »FAQ/Support«.
Please write down the serial number located on
the label of the box together with the invoice
number here:
Please also note our safety instructions contained
in this package and start using loudspeakers only
after having read this page.
....................................................................................
My INVOICE NUMBER is:
My SERIAL NUMBER is:
....................................................................................
These serial and invoice numbers help us to process your request directly during service.
4
· Motiv 10
Technical description
Unpacking
• Scope of delivery
and operating instructions
Unpacking
Turn the flaps on the upper side of the box backwards, remove the styrofoam parts and carefully
take the loudspeaker out of the box. If necessary,
insert the enclosed grids into the front of the
loudspeaker.
First check the system for
completeness
We strongly recommend you not to dispose of
the boxes. If any reparation is needed in future,
the original packaging will protect your valuable
loudspeaker during transportation in the best
way. We cannot be held liable for damages resulting from defective packaging.
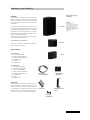
The Motiv 10 set is delivered as a complete system
in two different configurations:
3A 1000 SW
Attention:
At least during the
eight weeks before the deadline
for returning, you should keep
the packaging box because
ONLY if returned in the delivered
ORIGINAL PACKAGING the whole
purchase price can be
refunded!
5.1 Concert Set · 5.1 Cinema Set
3MO 10 FCR
These sets consist of three different component
types in different numbers:
Scope of delivery
5.1 Concert Set:
4 1 x A 1000 SW subwoofer
4 5 x MO 10 FCR loudspeaker
4 1 x Mains cable for subwoofer
4 20 x Rubber pads
4 5 x Dowels
4 5 x Dowel screws
5.1 Cinema Set:
1 x A 1000 SW subwoofer
4 3 x MO 10 FCR loudspeakers
4 2 x MO 10 D loudspeakers
4 1 x Mains cable for subwoofer
4 2 x Wall brackets for MO 10 D
4 20 x Rubber pads
4 9 x Dowels
4 9 x Dowel screws
3MO 10 D
4
Accessories
Connection cable and stands are not included in
the set because of diverse requirements of customers. However, you receive a suitable cable for
the loudspeaker, a subwoofer cable and stands
directly from us. You can find all accessories options for the Motiv 10 set on the following page.
Mains cable for
Rubber pads for
A 1000 SW subwoofer
loudspeakers
Dowels and
Wall brackets for the
dowel screws
MO 10 D
Screws for
wall-mounting
· Motiv 10
5
Accessories (optional)
Technical description and operating instructions
Optional accessories for
Motiv 10 set
Y-adapter
1 x socket for a 2 x plug.
Enables stereo line-in RCA
inputs on the subwoofer
which increase its loudness.
Here you can find an overview of suitable
Accessories for your Motiv 10 set:
Teufel cable for loudspeakers 2 x 2.5 mm2
Extremely flexible copper
strand (650 wires) with
transparent coating and
marking for right polarity.
The 2 x 2.5 mm2 cable can
be used for a distance of up to 15 m, for longer
distances we recommend a thicker 2 x 4 mm2 cable. We have adjusted our cable according to multiple customers' requests to practice-oriented
pre-assembled length.
If required, you can easily
order all optional accessories e.g. via internet on our
homepage: www.teufel.eu
Teufel cable for loudspeakers 2 x 4 mm2
This cable consists of hundreds of fine wires made of
oxygen-deficient copper.
It transmits the signals of
the amplifier to the loudspeakers clearly and interference-free. Transparent thick but still flexible plastic coating protects
the wires and bears almost everything.
Teufel NF mono RCA cable
Optimal connection between the active subwoofers
and AV receiver/amplifier by
means of screening to protect from interferences by
other sources. Stable gold-plated plugs provide
a safe contact. The cable exists in graduated
lengths from 2.5 up to 15 m; thus, the subwoofer
can be placed really everywhere.
6
· Motiv 10
Stand M 10 P
A newly developed stand
exclusively for the Motiv 10
Set. Safe fastening thanks
to proven Teufel construction principle (mounting
on the bottom of the box
by means of a screw). Suitable for the model MO 10
FCR (not for MO 10 D!) - because the dipoles require
wall-mounting!
Teufel banana plug
These high quality allround plugs by Teufel enable a low-cost as well as
safe connection of your
loudspeakers to the amplifier or receiver. A stable
screw terminal keeps all
cables with a diameter up to 6 mm firmly fixed.
Elastic spring contacts and a real gold plating
guarantees plug connections with extremely low
resistance. Delivered in pairs - one plug is marked
red and one plug black. The Motiv 10 set requires
10 pieces.
Teufel subwoofer spikes
These four massive cones
provide an effective isolation from the floor and
thus streamlining of the
low-frequency rendering.
Besides there are small
washers to protect the
parquet.
Installation of the 5.1 configuration
General Notes on Installation
Due to its unobtrusive design it is easy to integrate Teufel Motiv 10 set into your living room.
However, especially for home theatres you should
observe some criteria for installation to achieve
the optimum sound of the Teufel loudspeaker
set.
For home theatre systems it is recommended to
concentrate on the actually used area, i.e. room
(area) where the TV and the seats are located.
It can be helpful to position the display or the
screen in the center relative to the position of
the listener.
The installation instructions given (on the following pages) represent the optimal solution for
perfect multi-channel sound in your house. The
space, partner or furnishing do not always allow
such an optimal positioning. Try to conform with
the guidelines as much as possible. Modern AV
receivers offer various possibilities to compensate electronically any concessions made during
installation. In general the rule is:
You can always test on the basis of our recommendations what works acoustically and optically best
for your space. Let your ears (and eyes) decide!
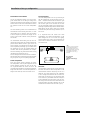
Center loudspeakers
Since the Center renders dialogues of actors,
this loudspeaker must be placed opposite to the
central listening position as close to the centre as possible under the screen or over it. We
recommend to bend MO 10 FCR slightly towards or
away from the listener if it has been placed at a
height of less than 40 cm or more than 1.20 m.
Front loudspeaker
The front loudspeakers are set up according to
the old tradition for stereo (distance to the listener = distance between the left and the right
box) near the screen at the same distance on
the left and right side or fastened on the wall.
The use of optional stands M 10 P provides automatically an optimal height of the satellite boxes.
When placing on the wall or shelf it is essential
to choose the placement height between 40 cm
and 1.20 m.
It is important that the Center and Front
loudspeakers are placed approximately in the
same straight line or in a circular arc slightly
curved towards the screen. The homogeneity of
sound can be otherwise distorted due to runtime differences.
2/3
1 /3
SW
Front
Center
Front
* Tip
To achieve good bass rendering
it has been proven helpful to
place the subwoofer in a 1/3 to
2/3 proportion, thus, not exactly
in the middle of the front or
side wall but closer to one of
the walls.
We recommend
to place the
subwoofer in the the grey
area.
Subwoofer
The subwoofer location can be chosen arbitrarily
and does not influence other loudspeakers if the
recommended crossover frequency of 120 Hz is
observed. The ideal position for the subwoofer
is on a straight line between the two front satellites*. But you can also try out any other place
in the room. It is preferable when the front part
of the subwoofer (with the front grid) can radiate freely in the direction of the room and is not
directed towards the wall (if however this is the
case: Minimum distance from the wall: 0.50 m).
· Motiv 10
7
Installation of the 5.1 configuration
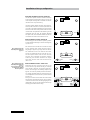
Rear (side) installation version A: Cinema set
The MO 10 D dipoles should be mounted laterally
to the listener at the height of 1.40 to 2.10 m. The
Teufel dipoles already have a suitable wall mount
included in the scope of delivery.
SW
Then the dipoles radiate with their front side forwards (in the direction of TV/screen) and with the
rear side of the boxes backwards (in the direction
of the rear side of the room) so that no direct sound
is heard from the position of the listener just the
reflections from the wall. The distance between
the dipole side, which radiates backwards, and the
rear wall of the room must be at least 10 cm.
Rear installation version B: Cinema set
Alternatively you can install the dipoles by means
of a wall bracket behind your seat at the height of
1.40 to 2.10 m.
We recommend to place the
Rear loudspeakers in the rear
grey area.
We recommend to place the
Rear loudspeakers in the rear
grey area.
Choose position A, B or C. The
arrow shows the radiation
direction of the box.
8
· Motiv 10
Front
Rear
Rear
SW
Center
Front
Front
We recommend to install MO 10 D with the help
of the intended wall mount and then align it
diagonally at approx. 45° angle with one side of
the membrane to the rear wall and the other
side of the membrane to the side wall. As a result the dipoles reflect from the rear and side
wall and, thus, generate the needed acoustic
scattering. The distance between the dipole
front side and the room side wall must be at
least 10 cm.
Rear installation version C: Concert set
Both boxes for the rear space must be set up
on the left and right either laterally or reversely
from listener's position. The optimal position is
on the left and right side laterally displaced by
approx. 20° from the parallel position to listener.
It is always advisable that the distance from the
rear loudspeaker to the listener's position should
exceeds 1 m.
But if you sit closer ensure that the front side of
the box does not point directly at you but that it
is rather directed to the wall using angling of the
loudspeakers. Or you can increase the distance by
setting up the boxes farther away.
Center
Front
Rear
Rear
SW
Center
Front
Front
B
A
C
B
Rear
left
Rear
right
A
C
Technical description and operating instructions
Connection
Front, Center and Rear loudspeakers
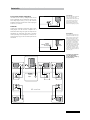
The Motiv 10 set in the 5.1 configuration with an
active subwoofer can be connected to any common Dolby Digital /DTS-/5.1-/6.1-/7.1-AV receiver/
amplifier. Do not occupy the rear renter input jack
of the 6.1/7.1 receiver.
AV receiver
Front LS
Center LS
Rear LS
Subwoofer
Connect the subwoofer output (Sub Out) of your
Dolby Digital /DTS AV receiver / amplifier via a
mono RCA cable using the right line input of the
subwoofer. The left input (line input L) remains
unoccupied. Only if the Y-adapter is used (see Accessories page 6), you can use both inputs of the
subwoofer.
AV receiver
MO 10 SW
Pre Out
Subwoofer Output
RCA output
Input R
RCA input
Load capacity
Please note that the information
on the load capacity of the
satellite loudspeakers refers only
to use with AV receiver which
protects the satellites using
internal filtering from a more
intensive load by woofer signals.
Plus and Minus
Please make sure that the loudspeaker is wired with correct polarity - as shown on the picture.
Almost all loudspeaker cables
are marked to make it easier for
you. Mostly the insulation of one
of the cables is serrated while
the other one is smooth. Some
manufacturers also colour-code
both cables. Note that the marking in your installation always
has the same meaning, i.e. the
cable with the serrated coating
must be consistently connected
to the plus pole.
Connection of the loudspeakers to the AV surround
receiver using the example of
the 5.1 Cinema Set.
MO 10 FCR
left
MO 10 SW
R
MO 10 FCR
Center
MO 10 FCR
right
Center
Front right
Input
Pre Out
Subwoofer
Output
Front left
Rear left
MO 10 D
left
AV receiver
Rear right
MO 10 D
right
· Motiv 10
9
Mounting • Settings Technical description and operating instructions
* Load capacity
Please note that the information
on the load capacity of the
satellite loudspeakers refers only
to the use with AV receiver which
protects the satellites with the
help of internal filtering against
a more intense load by low
frequency signals.
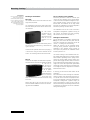
Mounting of the Satellites
MO 10 FCR
The satellites MO 10 FCR can be located in three
ways: shelf, wall, stand.
For installation on the shelf please fasten four
enclosed rubber pads on the corners of the satellite enclosure.
For wall mounting please use the
reverse holding
clamp that can be
fixed on a screw
fastened on the
wall.
Besides you should bond two small rubber pads to
the rear side of the enclosure, e.g. on the left and
right of the rear.
Fixation on the optional stand M 10 P (see page 7)
is carried out using the screws enclosed to the
stand - see mounting instructions of the stand.
MO 10 D
In order for the dipoles to unfold their full potential, fasten them on the wall. Preferably at a height
of 1.40–2.10 m
(see also page 10
of these operating instructions).
To do so please
use the enclosed
wall bracket which
can be mounted
on the wall using
three screws and fastened to the enclosure using
one screw.
Please note that in this case the box must be
mounted UPSIDE DOWN. This means: the connecting panel faces UPWARDS!
10
· Motiv 10
Set-up of the AV receiver / amplifier
Select the parameters “small” or “normal” (not
“large”) for the satellites of your system Motiv
10 set in the bass/loudspeaker management program (“Speaker Setup”) of the AV receiver. This
ensures that the satellites can be fully loaded
and that the subwoofer and Front loudspeakers
harmonise perfectly with each other.*
The subwoofer must be set to “On” in the bass/
loudspeaker management (“Speaker Setup”) of
the receiver. The suitable cross-over frequency
that has to be set is 120 Hz for Motiv 10.
Settings for the subwoofer
Set the subwoofer to "Full-Range" operation (see
➎ page 11). This means that the phase and the
cross-over frequency are determined by the AV
receiver - its settings are commanding.
Modern AV receivers set the subwoofer phase
correctly during automatic adjustment of the
subwoofer in the "Speaker Setup" program. In
this respect, the phase of the subwoofer should
be left in position "0°".
The volume setting of the subwoofer will deviate slightly when playing music compared to the
home theatre depending on the quality of the
record and mixing. While massive woofer part
prevails with highly efficient DVDs, the desired
level cannot be heard when playing music (especially if the set has been preset for optimal DVD
rendering). In this situation your personal taste
is deciding for the best compromise correlation
between both sources.
In this way you can find the best volume of the
subwoofer:
We recommend to avoid choosing the automatic
setting by means of an integrated measuring device (if the receiver has such an option) but rather to set the subwoofer in the bass management/
loudspeaker management ("speaker setup") at
higher value between +4 and +12 dB, in order to
ensure functioning of the Standby mode and then
to determine the optimal level of the subwoofer
through listening tests.
Technicalelements
Control
description
of the
andsubwoofer
operating instructions
➊Input
(High-level input)
Here you can connect
your mono RCA cable
(possibly with an additional Y-adapter) of
the subwoofer output
("Subwoofer Out") of
your AV receiver or
amplifier.
➋Output
(High-level output)
Here you can connect
further subwoofers
in order to increase
subwoofer level or
to equalise the room
resonance.
➌Volume
(Level controller)
With the help of this
controller you can
regulate the volume
of the subwoofer. Set
the preliminary level
in the bass management of your  AV receiver or  amplifier to
a high value between
+4 and +12 dB. Set
the level controller
of the subwoofer at
one fourth of the
control range. Turn
it slowly to set the
desired volume while
the noise generator
of the AV receiver is
working.
➍Off–Auto–On (Switch-on automatic)
In OFF position the subwoofer is switched off, in
ON position it is switched on. If you set the switch
to AUTO, the subwoofer switches on automatically
if it gets a sound signal from the AV receiver. It is
switched off without a signal after 20 minutes. We
recommend the AUTO mode.
Please note: To disconnect the subwoofer completely from power supply you have to set the
switch to ➓ OFF.
➎Low Pass – Full Range
(Low-pass filter - full range)
The implemented control options such as phase
➐ and frequency ➏ are active in the LOW PASS
position. The AV receiver or the amplifier takes
over control in the FULL RANGE position (recommended).
➏Frequency (diplexer)
Select the frequency at which the subwoofer
stops its rendering and the satellite loudspeakers
of the set start rendering. This controller is activated only if you set the switch ➎ to LOW PASS. We
recommend this constellation only if you use the
subwoofer from a source without a diplexer, e.g.
from a pre-amplifier output (Pre Out) of a stereo
amplifier. When using an AV receiver or amplifier
we recommend you to set the switch ➎ to FULL
RANGE. In this case the frequency controller is
not important.
➐Phase
Set the phase of the subwoofer relatively to your
Front and Center loudspeakers. If the installation
site is located in the grey area of the drawing on
page 9, set the phase to 0°, otherwise to 180°. This
controller is activated only if you set the switch
➎ to LOW PASS.
➑Fuse
Under the socket for the mains cable you can find
the mains fuse of the subwoofer.
➒Mains voltage switch
This switch serves as an adapter for the subwoofer and the local power supply voltage. It is ABSOLUTELY necessary that the selected voltage value
matches the local one. In Germany for example
the position 220–240V is correct.
➓Power (main switch)
In OFF position the subwoofer is switched off and
completely disconnected from the power supply, if
it is in ON position, it is switched on. Please also
observe the explanations regarding the switch ➍.
Operational LED on the front side
If the power switch ➓ is in OFF position, the operational LED on the front side is not lit. If the subwoofer is switched on by the power switch ➓, the
operational switch lights up red or blue, depending on the position of the Off-Auto-On sliding
switch➍. If the subwoofer is switched on in continuous operation (switch ➍ at ON), the operational LED lights up blue. If the subwoofer is in standby mode (switch ➍ at AUTO), then the operational
LED lights up red at first. As soon as the subwoofer
gets the audio signal, it is switched on and the LED
lights up blue. If the subwoofer switches off after
20 minutes because it has not received any signal,
the LED lights up red. If the power function ➍ is
OFF, the LED lights up red.
Symbols
The lightning symbol with an
arrowhead in an equilateral triangle indicates for the user that
there is a not isolated dangerous
electrical voltage within the
system housing so that there is a
risk of electric shocks.
The exclamation mark in an
equilateral triangle as it is
shown on the device is supposed
to draw user's attention to
important operation and service
instructions.
This product is conform to the
Directives of the Council of the
European Community 2004/108/
EC and 2006/95/EC.
The garbage bin symbol on the
rating plates or output stages
of our products implies that
Lautsprecher Teufel guarantees
disposal of these loudspeakers
and subwoofer according to regulations, i.e. according to Electrical
and Electronic Equipment Act.
This product complies with DIN
EN 61140 (VDE 0140-1) and IEC
60417 of protection class II. It
only requires a two-pin round
plug (included) and not an
earthed plug. The plug has a
reinforced or double-shielded
casing to prevent electrical
shock.
Attention:
The separating equipment of
this equipment is the mains
plug, this separating equipment
must be usable without
difficulties.
· Motiv 10
11
Problems and solutions
Technical
• Cleaning
description
• Technical
anddata
operating instructions
The subwoofer does not work
If, after switching on, the
power lamp on the front
side of the device is not lit,
please replace the fuse (see
page 11, position ➑).
If the power lamp is lit, turn
down the subwoofer level
("Level") to "Min", disconnectthe subwoofer RCA
cable at the amplifier, carefully rise the level
("Level") and touch the internal salient contact
of the RCA plug with the finger. If any humming
or clicking noise can be heard, then either the
amplifier is defective or it hasincorrect settings. If
the subwoofer remains silent in both cases, contact
our service.
The subwoofer hums
This humming noise can be caused by connected
devices or interferences in the mains. In most
cases, the excessive humming is caused by the
following:
1. The woofer is connected to another electri
cal circuit than the rest of the system. Ensure
that all interconnected devices (including PC)
are connected to the same electrical circuit or
socket.
more, you need a so called sheath current filter
which is available in electronic device shops. It is
plugged in between antenna socket and TV device or receiver.
3.It may be helpful to buy an additional mains
filter in order to eliminate the humming noise
by connecting it to all used devices. Please
agree upon the right of return for the filter in
case it does not lead to any positive results.
4.Occasionally the use of a multiple socket
has been proved to generate humming interferences. Test not to use such a multiple socket and
connect the plug of the subwoofer directly to
the wall socket.
5.You can also try turning the plug around
once and plugging it into the wall socket upside down.
6.To locate the humming precisely check if the
subwoofer is hum-free with another power
supply in another room (e.g. by means of an
extension cable). Furthermore you can try
disconnecting the RCA connection between
subwoofer and receiver in order to eliminate
possible influence of connected components.
2.The antenna connected to the system or TV
has a different earth potential than the socket.
To test just pull out all the antenna cables from
the wall socket. If there is no humming noise anyCleaning
To enjoy the product of Lautsprecher Teufel the
longest observe following tips:
Do not expose the enclosure to direct sunshine.
Avoid extreme temperature differences and preserve your loudspeakers from humidity. To clean
the loudspeakers use only a lightly moistened or
dry cloth. Avoid using alcohol-containing or
abrasive cleaning agents. Collect dust from the
diaphragm with a dry cloth very carefully. Pull out
the mains plug from the socket of the device before cleaning.
Technical data
You can find technical data in the product description on our homepage www.teufel.de
For questions, comments or critic, please contact our service:
Lautsprecher Teufel GmbH
Gewerbehof Bülowbogen · Bülowstr. 66
D-10783 Berlin (Germany)
12
· Motiv 10
Phone: +49 30 30 09 30 0
Fax: +49 30 30 09 30 30
www.teufel.eu
This information is without guarantee. Technical changes, typing errors
and mistakes are reserved.