1
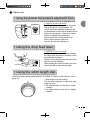
SP20 Series
HOME-USE SEWING MACHINE
INSTRUCTION
MANUAL
• Read this manual carefully before use and always follow the
instructions.
• Keep the manual in a convenient place for easy reference.
• If you give the sewing machine to someone else, also give
them this instruction manual.
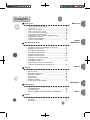
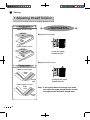
Contents
Before use
•
•
•
•
•
•
•
•
•
•
•
Important safety instructions ....................................................... 4
How to change the power plug .................................................... 6
Part names .................................................................................. 8
How to use handwheel .............................................................. 10
How to use presser foot lever .................................................... 10
How to use reverse sewing lever ............................................... 10
How to remove extension table ................................................. 10
Using the presser foot pressure adjustment knob ..................... 11
Using the drop feed lever .......................................................... 11
Using the stitch length dial ........................................................ 11
How to use quick adviser .......................................................... 12
Sewing preparations
•
•
•
•
•
•
•
•
•
•
•
Before use
Sewing
preparations
Connecting the power ............................................................... 13
Installation of battery for winding the lower thread ..................... 14
Winding the lower thread .......................................................... 15
Threading the lower thread ....................................................... 17
Threading the upper thread....................................................... 18
Using the needle threader ......................................................... 20
Pulling up the lower thread ........................................................ 22
Application of each stitch pattern .............................................. 23
Changing the presser foot ......................................................... 25
Changing the needle ................................................................. 27
Relationship between the needle, thread
and fabric, and adjusting the thread tension ............................. 28
Sewing
Sewing
•
•
•
•
•
•
•
•
Straight stitching and reverse sewing ........................................ 29
Zigzag sewing ........................................................................... 33
Adjusting thread tension............................................................ 34
Buttonhole sewing ..................................................................... 35
Overcasting ............................................................................... 38
Zipper insertion ......................................................................... 39
Blind hem stitching .................................................................... 41
Stretch & Decoration stitching ................................................... 44
Maintenance
Maintenance
•
•
•
•
Feed dog and hook maintenance .............................................. 45
Changing light bulb ................................................................... 47
Troubleshooting ......................................................................... 48
Servicing double-insulated products (230V-240V) ........... 50
Others
•
•
•
Safety precaution about the battery .......................................... 50
Recycling .................................................................................. 51
Specifications ............................................................................ 51
Others
Before use
•
Be sure to read this section before use
Important safety instructions
These safety instructions are designed to prevent danger or damage arising from the
incorrect operation of the machine. Read carefully and always follow the instructions.
Explanation of “
Warning” and “
Caution”
Warning
An incorrect operation could result in death or serious injury.
Caution
An incorrect operation could result in an injury or damage to the
machine.
Symbol explanation
Do not touch.
Prohibited actions
Required actions
Remove the power plug
from the outlet.
Warning
Use an AC 220 to 240 V power source.
Not doing so could cause an electric shock or a fire.
Do not damage the power cord,
modify it, bend it excessively,
jerk it or twist it.
Doing so could cause an electric shock or a fire.
If the power cord is damaged, it must be replaced by a
special cord or assembly available from the manufacturer
or its service agent.
Do not use outdoors.
Doing so could cause an electric shock or a fire.
Do not operate where aerosol ( spray ) products are being
used or where oxygen is being administered.
Doing so could cause a fire.
Caution
4
When the machine is not in use it should be stored safely,
not on the floor as protruding parts could cause injury if a
person fell on the machine.
Not doing so could cause an injury.
Caution
Before replacing the needle or presser foot or when
threading the upper or lower thread, remove the power
plug from the outlet.
Do not look away from the needle while
operating the sewing machine.
If the needle breaks it could cause an injury.
Do not touch moving parts such as the
needle, take-up lever or handwheel.
Doing so could cause an injury.
Children should only use the machine under
the supervision of a parent or guardian.
Otherwise they could injure themselves.
Do not use when young children are near the
machine.
They could touch the needle and be injured.
Before leaving the sewing machine after using it, remove
the power plug from the outlet.
Before using the sewing machine make sure that the
presser foot holder clamp screw, needle clamp screw
and needle plate screw are firmly tightened, and that the
presser foot is properly set in the presser foot holder.
Not doing so could cause an injury.
Do not perform the
following actions.
Doing so could cause
an injury.
•
•
•
•
•
Sewing without lowering the presser foot.
Sewing while the needle is incorrectly installed.
Using a bent needle.
Sewing while jerking the fabric.
Moving the pattern selection dial while sewing.
Do not operate on an unstable surface such as a sofa or a bed.
If the sewing machine falls down, it could cause an injury or
damages to the machine.
Do not drop or insert any foreign objects into any
openings such as opening space when you remove the
face cover and / or the outer casing space of bobbin case.
Doing so could cause an injury or damages to the machine.
Do not repair, disassemble or modify except what is
mentioned in the instruction manual.
Doing so could cause an electric shock, a fire or an injury.
5
Before use
UK ONLY
•
IMPORTANT
PLEASE READ CAREFULLY
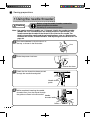
How to change the power plug
Warning
When you change the power plug or cord, do not repair,
disassemble or modify except at the authorised dealer or
service centre.
Doing so could cause an electric shock or a fire
If for any reason the power plug for this product is removed
it should be immediately disposed of safety and not stored
anywhere where it could be inadvertently used again.
Doing so could cause an electric shock or a fire
The wires in this mains lead are coloured in accordance with the following code:
BLUE-NEUTRAL BROWN-LIVE ( OR ACTIVE )
As the colours of the mains lead of this appliance may not correspond with the coloured
markings identifying the terminals in your plug - PROCEED AS FOLLOWS:
The earth plug pin is unnecessary. As the machine is designed under double insulation
structure, the earth wire is removed from the machine. The wire coloured BROWN must
be connected to the terminal marked L or A or coloured RED. The wire coloured BLUE
must be connected to the terminal marked N or coloured BLACK. Neither core is to be
connected to the earth terminal of a three-pin plug.
6
•
Memo
7
Before use
•
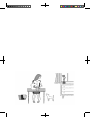
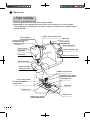
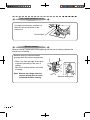
Part names
• External appearance may differ from model to model.
Ú Depending on the sewing machine you have, some functions may not be applied.
The model name is indicated on the label, located on the back of the sewing machine
(model SPXXX).
Upper thread tension dial
Thread guide
Spool pin
Presser foot pressure
adjustment knob
Quick adviser
Ú Equipped only with
model XXX34
Stitch length dial
Take-up lever
Pattern selection dial
Light bulb
Face cover
Reverse sewing lever
Needle threader
Extension table
(Accessory Box)
Needle clamp screw
Needle thread guide
Presser foot holder
Presser foot holder
clamp screw
Needle plate
Feed dog
Presser foot
Bobbin case cover
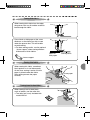
8
Bobbin case
Thread winding spindle
Thread winding
switch
Hollow for carrying
(
Insert your hand in the hollow
when carrying sewing machine
)
Presser foot lever
Handwheel
Thread cutter
Battery
holder
Terminal box
Drop feed lever
Ú Equipped only with
model XXX34
Buttonhole
adjustment screw
Model label
Foot controller
9
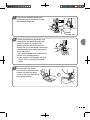
Before use
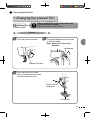
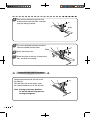
• How to use handwheel
Handwheel
Always turn the handwheel towards yourself.
(in the direction of the arrow, forwards)
Note: If you turn it in the reverse
direction it could tangle the thread.
• How to use presser foot lever
• When sewing, lower the presser foot lever to
lower the presser foot. (Position 1)
• When inserting fabric, lift up the presser foot
lever to raise the presser foot. (Position 2)
• When inserting very thick fabric under the
presser foot, the lift height can be increased
by holding the presser foot lever at this
position. (Position 3)
• How to use reverse sewing lever
• To sew in reverse, press down on the
reverse sewing lever.
• To return to sewing in the forward direction,
release the reverse sewing lever.
• How to remove extension table
Pull out the extension table (accessory box)
in the direction of the arrow.
Extension table
10
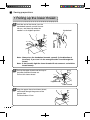
Before use
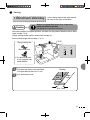
• Using the presser foot pressure adjustment knob
Ú Equipped only with model XXX34
By turning the presser foot pressure adjustment
knob at the top of the sewing machine, the
amount of pressure applied by the presser foot
can be adjusted. Turning the presser foot pressure
adjustment knob toward “–” reduces the amount
of pressure applied by the presser foot.
For best results when sewing stretch or thin
fabrics, slightly reduce the pressure.
Normally, sew with the knob set to “3”.
• Using the drop feed lever
Ú Equipped only with model XXX34
The feed dog can be lowered when feeding
the fabric freely by hand, for example, when
embroidering or quilting.
During normal sewing, move the lever to the
right to raise the feed dog.
When feeding the fabric manually, move the
lever to the left to lower the feed dog.
• Using the stitch length dial
(Used also when sewing stretch stitches. For details on sewing stretch stitches, refer to
page 42.)
• Stitch length dial (0 through 4)
Turn the stitch length dial to adjust the stitch
length amount.
1. For shorter stitch, turn the dial to a lower
number.
2. For longer stitch, turn the dial to a higher
number.
11
Before use
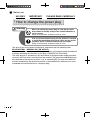
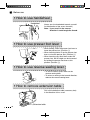
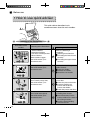
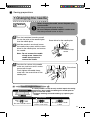
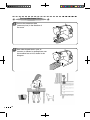
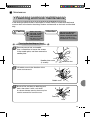
• How to use quick adviser
This quick adviser describes basic
countermeasures about the main troubles.
Meaning of the illustrations
Illustrations of the
troubles
Countermeasures illustrations
Meaning of the illustrations
• Jammed stitches
• Unbalanced stitches
• The fabric wrinkles/puckers
• Missed stitches
Above troubles happen,
refer to illustration A for
countermeasures.
Meaning of the illustrations.
A
When needle is broken,
refer to illustration B for
countermeasures.
B
When you want to know
how to attach presser foot,
refer to illustration C for
countermeasures.
When you want to know
how to wind lower thread,
refer to illustration D for
countermeasures.
12
Shows the following 3
procedures.
1 Adjusting thread tension.
2 Threading the lower thread
correctly.
3 Threading the upper thread
correctly.
Describes how to change
needle correctly.
1 Raise the needle.
2 Remove the needle.
3 Attach the new needle.
C
Describes how to attach
presser foot.
1 Raise the presser foot lever.
2 Correctly position the
presser foot under the
presser foot holder.
3 Lower the presser foot lever.
D
Describes how to install battery
for winding lower thread.
1 Insert the battery into the
battery holder on the back of
the sewing machine.
2 Push the thread winding
switch to the left.
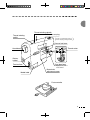
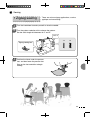
Sewing preparations
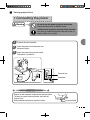
• Connecting the power
Warning
Do not touch the power plug with wet hands.
Doing so could cause an electric shock.
Hold the power plug when removing it from the outlet.
Not doing so could damage the cord and cause an
electric shock, fire or injury.
1
Prepare the foot controller.
2
Insert the power cord connector into
the terminal box.
3
Insert the power plug into the outlet.
The power is turned on.
Power plug
Foot controller
Terminal box
Connector
How to operate foot controller
Step on the foot controller to operate the sewing machine.
The more you press the foot controller, the faster the
machine runs.
Release the foot controller to stop the machine.
Foot controller
13
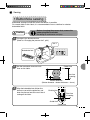
Sewing preparations
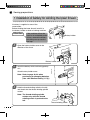
• Installation of battery for winding the lower thread
A battery is supplied as one of the
accessories.
Before winding the lower thread, install it in
the battery holder on back of sewing machine.
Attention
1
If the machine will not be
used for an extended period
of time, remove the battery.
Not doing so may result in
damage.
Battery holder
Open the battery holder cover in the
direction of the arrow.
Battery holder cover
2
Install the battery while confirming polarity
of it.
Attach battery holder cover.
Note: Refer to page 48, 49 when
purchasing or changing batteries.
(Use a AA alkaline battery (1.5 V).)
3
Hold the thread winding switch to the left,
and check that the thread winding spindle
rotates.
Note: The thread winding spindle
rotates only while the thread
winding switch is pushed to the
left.
Thread winding switch
14
Sewing preparations
• Winding the lower thread
The exclusive motor driven by a battery winds the lower thread.
Caution
Before winding the lower thread, remove the power
plug from the outlet.
Doing so could cause an injury.
Do not touch the lower thread winding spindle
when winding the lower thread.
Doing so could cause an injury.
Attention
Use a TOYOTA-exclusive bobbin.
3
1
Pull up the spool pin.
2
Insert the felt, the thread spool and
the spool cap on the spool pin.
1 2
4 5 6 7 8 9 10 11
Spool cap
Note: The felt is already inserted
on the spool pin.
Felt
Spool pin
3
Pull the thread from the thread spool.
Support the thread on the sewing
machine with one hand, using the other
hand pass the thread around the thread
guide as shown in the diagram.
Thread guide
15
4
5
From the inside, pass the thread
end through the hole in the
bobbin, as shown.
Place the bobbin on to the
thread winding spindle so the
groove will meet the shaft
projection.
Thread
Bobbin
Groove
Hole
Thread winding
spindle
6
Hold the thread end, and push the thread
winding switch to the left to start winding.
7
After winding a little, release the thread
winding switch so that it returns to the right
and stops winding.
Shaft projection
Note: The thread is wound only while the
thread winding switch is pushed to
the left.
8
Cut extra thread above the bobbin hole.
9
Push the thread winding switch to the
left again.
Wind the thread to the amount you need.
10
To stop winding the thread, release the
thread winding switch.
Attention
11
16
Do not wind excessively,
it causes sewing
malfunction.
Cut the thread.
Remove the bobbin from the spindle.
Attention
If the thread tail remains
from the bobbin hole, please
cut it, otherwise sewing will
not be performed correctly.
right
wrong
Sewing preparations
• Threading the lower thread
Caution
1
Before inserting the bobbin, remove the power plug
from the outlet.
Not doing so could cause an injury.
Take off the bobbin case cover by sliding
it towards yourself.
Pull bobbin case cover forward and lift to
remove.
Bobbin case cover
2
Insert the bobbin into the bobbin case
so that the bobbin rotates counter
clockwise when thread is fed off.
Note: Inserting the bobbin in the
wrong direction causes
irregular thread tension.
3
Pull the end of thread through
the cut-out guide a to guide b
of the bobbin case and pull out in
direction of arrow.
a
Bobbin case
4
b
Groove
Pull back end of thread about 15 cm,
long.
Insert the tabs on the bobbin case
cover into the race retainer grooves,
and then push the bobbin case cover
closed.
Tab
Groove
Tab
Bobbin case cover
17
Sewing preparations
• Threading the upper thread
Caution
1
Before threading the upper thread, remove the
power plug from the outlet.
Not doing so could cause an injury.
Take-up lever
Turn the handwheel toward
you to raise the take-up
lever to its highest position.
Line
The line on the handwheel
should be at the top, as
shown.
2
Raise presser foot lever.
Note: If the presser foot lever is not
raised, the upper thread cannot
be threaded correctly.
Presser foot lever
3
4
Pull up the spool pin.
Spool pin
Insert the felt, the thread spool and the
spool cap on the spool pin.
Felt
Note: The felt is already inserted on
the spool pin.
5
18
Pull the thread from the thread spool,
and then press the thread against the
sewing machine with one hand while
passing the thread around the thread
guide with the other hand, as shown in
the diagram.
Thread guide
6
Pass the thread between the
thread guide plate and the
upper thread tension dial.
Upper thread
tension dial
Thread guide plate
7
Pass the thread along the groove of
the thread guide plate, as the arrow
in the diagram.
Pass the thread through the take-up
lever.
8
Pass the thread through the right side needle thread
guide.
Check that the thread is threaded correctly.
Ú Correct threading
• When the presser foot is raised, the upper thread
should feed smoothly when it is pulled toward you.
• When the presser foot is lowered, there should be
some resistance when the upper thread is pulled
toward you. The thread is correctly threaded if it is
difficult to pull it.
9
Take-up-lever
Needle thread
guide
From the front, pass the thread through
the eye of the needle.
Ú The needle can easily be threaded
when the needle threader is used.
Front
15cm
19
Sewing preparations
• Using the needle threader
Caution
Before using the needle threader, remove the
power plug from the outlet.
Not doing so could cause an injury.
Note: Use sewing machine needles no. 11 through 16 with the needle threader.
(Needle no. 14 is included when the sewing machine is purchased.) The
needle cannot be threaded if the thread is too thick for the needle. For
details of possible needle and thread combinations, refer to “Relationship
between the needle, thread and fabric, and adjusting the thread tension” on
page 26.
1
2
Turn the handwheel so that the line is at
the top, as shown in the illustration.
Line
Raise the presser foot lever.
Presser foot lever
3
Check that the thread has been passed
through the needle thread guide.
Needle thread
guide
4
While completely lowering the needle
threader lever, pass the thread through
the guide as shown in the illustration.
Needle
threader lever
Guide
20
5
Fully turn the needle threader lever
backward and pull the thread through
the needle threader slot.
Needle
threader slot
6
7
Loosen the tension on the thread, and
slowly return the needle threader lever
forward as much as possible. After
checking that the thread has passed
through the eye of the needle, release the
needle threader lever while releasing the
end of the thread.
(The needle threader lever automatically
returns to its storage position.)
Ú If the needle is not threaded, return to
step 3, and try threading the needle
again.
Pull the loop in the thread
that formed at the back of the
needle, and then pull about
15 cm of thread to the back of
the sewing machine.
15cm
21
Sewing preparations
• Pulling up the lower thread
1
Hold the end of the thread, turn the
handwheel towards yourself for one
full turn, and then stop when the
needle is at its highest position.
Handwheel
Note: Always turn the handwheel towards yourself (in the direction of
the arrow). If you turn it in the wrong direction it could tangle the
thread.
Note: If the thread is tight the lower thread will not come out, so hold the
thread loosely.
2
Pull up the upper thread and the loop of
the lower thread will come out.
Pull out this lower thread.
Upper thread
Lower thread
3
Align the upper thread and lower thread,
and thread through the groove of the
presser foot.
Pull back about 15 cm.
15cm
22
Sewing preparations
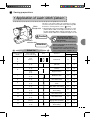
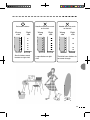
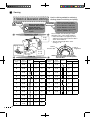
• Application of each stitch pattern
Stitch
length dial
The stitch is selected according to the combination of settings
selected on the pattern selection dial and the Stitch length dial.
For details on selecting stitches, refer to “
Sewing”.
Ú Stitch length for the stitch number 1 through 15 on the
pattern selection dial can be adjusted from 0 to 4 mm
by stitch length dial. Stitch settings A through S on the
pattern selection dial have a fixed stitch length of 3 mm.
Caution
Pattern
selection dial
Attention
• Stitches L through S can be sewn only
with model XXX34.
• The model name is indicated beside
“MODEL” in the model label on the back
of the sewing machine. (MODEL SP **)
Stitch list
Pattern selection
dial No.
Stitch length dial
(recommend setting)
Do not turn the pattern
selection dial or stitch
length dial while operating
the machine.
Doing so could cause injuries.
Stitch
Application
MODEL
model 34
model 26
Buttonhole
{
{
0-4
(1~4)
Straight stitch
(left side)
{
{
0-4
(1~4)
Straight stitch
(center)
{
{
0-4
(2~4)
Zipper insertion
{
{
7
0-4
(1~2)
Blind hem stitch
{
{
8
0-4
(1~4)
Decorative stitch
{
{
9
0-4
(1~2)
Stretch fabric blind hem
stitch
{
{
10
0-4
(1~2)
Mending stitch
Thin fabric overcasting
{
{
11
0-4
(1~2)
Decorative stitch
Overcasting
{
{
12
0-4
(1~2)
Decorative stitch
{
{
13
0-4
(1~2)
Decorative stitch
{
{
14
0-4
(0.5~2)
Zigzag stitch (medium)
{
{
15
0-4
(1~4)
Zigzag stitch (large)
Overcasting
{
{
1
1
2
3
4
0-4
(0.4~1)
5
6
2
3
4
23
24
Pattern selection
dial No.
Stitch length dial
A
A-K
B
Stitch
Application
MODEL
model 34
model 26
Reinforced straight stitch
(left side)
{
{
A-K
Reinforced straight stitch
(center)
{
{
C
A-K
Decorative stitch
Double overlock
{
{
D
A-K
Decorative stitch
{
{
E
A-K
Decorative stitch
{
{
F
A-K
Decorative stitch
{
{
G
A-K
Decorative stitch
Overlock
{
{
H
A-K
Decorative stitch
Overlock
{
{
I
A-K
Decorative stitch
{
{
J
A-K
Reinforced zigzag stitch
(medium)
{
{
K
A-K
Reinforced zigzag stitch
(large)
{
{
L
L-S
Decorative stitch
{
-
M
L-S
Decorative stitch
{
-
N
L-S
Fagoting
{
-
O
L-S
Appliqué
{
-
P
L-S
Appliqué
{
-
Q
L-S
Decorative stitch
{
-
R
L-S
Decorative stitch
{
-
S
L-S
Decorative stitch
{
-
Sewing preparations
• Changing the presser foot
Before changing the presser foot, remove the
power plug from the outlet.
Not doing so could cause an injury.
Caution
Removal
1
Raise the presser foot lever.
2
Turn the handwheel towards yourself
to raise the needle.
Note: Never turn in the wrong
direction.
Handwheel
Presser foot lever
3
Press the presser foot holder
lever in the direction of the arrow
to release the presser foot.
Presser foot
holder lever
Presser foot
25
Installation
1
Position the presser foot pin
directly below the groove in the
presser foot holder.
Presser foot
holder
Groove
2
26
Lower the presser foot lever to
attach the presser foot.
Presser
foot pin
Presser foot lever
Sewing preparations
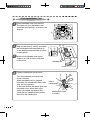
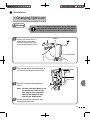
• Changing the needle
Before changing the needle, remove the power plug
from the outlet.
Not doing so could cause an injury.
Caution
Be sure to dispose of broken needle in a safe manner.
Not doing so could cause an injury.
1
2
Turn the handwheel towards yourself
to raise the point of the needle higher
than the needle plate.
Screw driver for the needle plate
Hold the needle in one hand, loosen
the needle clamp screw with the screw
driver for the needle plate, and remove
the needle.
Needle clamp
screw
Note: Do not remove the needle
clamp screw. Loosen the
needle clamp screw to
remove the needle.
3
Face the flat surface of the needle
to the rear and insert until it makes
contact with the pin.
Firmly tighten the needle clamp
screw with the screw driver for the
needle plate.
Flat surface
Pin
Correct needle selection
Good needle
If a faulty needle is used, not only could it impair the sewing
performance, but it could also damage the needle plate or
hook, or break the needle.
Incorrect stitching or thread breaking, try replacing the
needle.
∗
Faulty needle
The entire needle is bent
The point of the needle
is blunt / worn away
The point of the needle
is bent
27
Sewing preparations
•
Relationship between the needle, thread
and fabric, and adjusting the thread tension
Adjusting the thread
tension
Relationship between the needle,
thread and fabric
The quality of the sewing finish will improve if the needle and thread are changed to
match the type of fabric. Follow the directions in the table below.
Sewing thin fabric
Sewing normal fabric
Sewing thick fabric
No. 75/11
No. 90/14
No. 100/16
Needle
Thread
Fabric
Thread
tension
Polyester No. 50 to No. 60 Polyester No. 30 to No. 50
Polyester No. 90
Cotton No. 40 to No. 50
Cotton No. 80 to No. 120 Cotton No. 60 to No. 80
Silk No. 50 to No. 80
Silk No. 50
Silk No. 80
Lining
Quipler
Georgette
Lawn
Lace, etc.
Broad
Soft denim
Satin
Pile
Gingham, etc.
-3
-1
Curtains
Denim
Quilting
Fleece
Tweed
Felt, etc.
+1
+2
-2
-1
-1 ~ -3
+1
+3
+2
+4
+1 ~ +3
• Use a ball point needle for the sewing alignment of stretch fabric.
• Please purchase any needles not included as accessories, after checking they are
specified as home-use sewing machine needles.
• Use the same kind of threads for upper/lower thread.
• The higher the needle number is, the needle gets thicker. The higher the thread
number is, the thread gets thinner.
28
Sewing
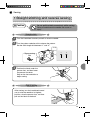
• Straight stitching and reverse sewing
Caution
Do not pull the fabric excessively while sewing.
Doing so could break the needle and cause an
injury.
Straight stitch
1
Turn the handwheel towards yourself to raise the needle.
2
Turn the pattern selection dial to choose the pattern.
Set the stitch length dial between “1” and “4”.
1~4
Zigzag sewing
foot
3
5
6
Position the fabric under the
presser foot, and then lower
the presser foot lever.
Step on the foot controller to
begin sewing.
End of sewing
After sewing, turn the handwheel toward
you to raise the needle to its highest
position, raise the presser foot, and then
pull out the fabric to the back.
29
Thread cutter on the presser bar
Line up the two threads, and then cut
them with the thread cutter on the
presser bar.
Thread cutter
Reverse sewing
Reverse sewing is performed at the beginning and the end of sewing to prevent the
thread from unraveling.
Reverse sewing is performed while
pressing down the reverse sewing lever.
• Stitch 1 cm from the edge of the fabric
to prevent unraveling at the start of
sewing.
• Sew 3 to 4 reverse stitches at the end
of sewing.
Note: Remove your finger from the
reverse sewing lever to return
to forward direction sewing.
30
Reverse sewing lever
Sewing thick fabric
When sewing thick fabric from the edge,
the presser foot may tilt and be unable to
feed through the fabric.
Place fabric or thick paper of the same
thickness as the fabric you wish to sew
under the presser foot. This will enable
smooth sewing.
Ú For best sewing results, use the optional
“Jeans support” when sewing different
thicknesses of thick fabrics.
Fabric or
thick paper
Sewing fabric
Jeans support
Sewing thin fabric
When sewing thin fabric, sometimes
fabric puckers or is not fed correctly.
At that time, sewing is easier if tissue
paper is placed under the fabric.
After sewing remove the paper
carefully.
Tissue paper
Sewing hard-to-feed fabric
When sewing hard-to-feed fabric,
such as leather, use the roller foot.
Ú The roller foot is only included with
model XXX34.
31
Sewing tube-shaped fabrics
32
1
Pull out the extension table
(accessory box) in the direction of
the arrow.
2
Sew tube-shaped fabrics such as
trousers or sleeves, by pulling them over
the machine free arm as shown in the
diragram.
Sewing
• Zigzag sewing
There are various zigzag applications, such as
applique and overcasting.
1
Turn the handwheel towards yourself to raise the needle.
2
Turn the pattern selection dial to choose the pattern.
Set the stitch length dial between “0.5” and “4”.
0.5~4
Zigzag sewing foot
3
14
15
Position the fabric under the presser
foot, and then lower the presser foot.
Step on the foot controller to begin
sewing.
33
Sewing
• Adjusting thread tension
Straight stitch
Upper thread is tight
Wrong
side
Adjustment method
for upper thread tension
zUpper thread is tight
Right
side
Upper thread is loose
Wrong
side
Lower the upper
thread tension.
Right
side
zUpper thread is loose
Zigzag sewing
Upper thread is tight
Right
side
Wrong
side
Increase the upper
thread tension.
Upper thread is loose
Right
side
Note: If the tension does not change even when
you adjust the upper thread tension, thread
the upper thread and lower thread again.
Wrong
side
34
Sewing
• Buttonhole sewing
Buttonhole sewing to match the size of the button is possible.
For stretch fabric or thin fabric, it is recommended to use a stabilizer for a better
buttonhole finish.
Caution
1
Before changing the presser foot, remove the
power plug from the outlet.
Not doing so could cause an injury.
Change to the buttonhole foot.
(Refer to “Changing the presser foot”, p23.)
0.4~1
1
Buttonhole foot
3
4
Center line
Set the buttonhole size and mark
lines on the fabric.
3 mm
Buttonhole
size
2
2
Start line
of sewing
Button thickness
(Button diameter + button thickness + 3 mm)
3
Align the buttonhole foot division line
closest to you with the guide line, and
lower the presser foot to the start line of
sewing on the fabric.
Division line
Start line
of sewing
Guide line
Center line
35
36
4
Raise the needle to the highest position,
set the pattern dial to “1”, sew the left
side and stop at the line marked on the
fabric.
Set the stitch length dial between “0.4”
and “1”.
5
Raise the needle to the highest position,
set the pattern dial to “2”, and sew 5 to
6 bar-tack stitches. “2” and “4” on the
pattern selection dial use the same dial
position.
6
Raise the needle to the highest position,
set the pattern dial to “3”, sew the right
side and stop at the line marked on the
fabric.
7
Raise the needle to the highest position,
set the pattern dial to “4”, and sew 5 to 6
bar-tack stitches.
Caution
8
When using the buttonhole cutter to cut the
buttonholes, do not hold the fabric in front of the cutter.
Doing so could cause an injury to your hand.
Use the buttonhole cutter to cut the center,
making sure not to cut the stitches.
Note: If a marking pin is put in the
bar-tack area it helps to prevent
cutting the bar-tack with the
buttonhole cutter.
Buttonhole
cutter
Adjustment of buttonhole balance
• Use the buttonhole adjustment screw
to adjust the balance between the
stitches (rear side).
• Adjust by turning with the - screw
driver of your own.
• Don’t turn the screw more than 90°.
Note: The original position of buttonhole
adjustment screw may vary
according to the model of machine.
Buttonhole
adjustment
screw
If the stitches are loose on the right side
of the buttonhole, turn slightly in the “-”
direction.
If the stitches are loose on the left side
of the buttonhole, turn slightly in the “+”
direction.
37
Sewing
• Overcasting
Caution
1
This is a sewing method that prevents unraveling at the
edge of the fabric.
Before changing the presser foot, remove the
power plug from the outlet.
Not doing so could cause an injury.
Raise the needle to its highest position, and then turn the pattern selection dial to
select stitch number 10 or 15.
Note: Select pattern No.10 when sewing thin fabric.
Set the stitch length dial between “1” and “4”.
1~4
Zigzag sewing foot
10
15
Overcasting foot
Ú The overcasting foot is only
included with model XXX34.
• When using the zigzag sewing foot
2
Position the fabric so that the
needle extends slightly off the
edge of the fabric when the
needle moves to the right.
Right needle entry point
• When using the overcasting foot
2
Attach the overcasting foot.
(Refer to “Changing the presser
foot” on page 23.)
Sew with the edge of the fabric
against the guide on the foot.
Caution
38
Do not use stitch number 10.
Doing so may cause the needle to
hit the presser foot and break or
cause injuries.
Guide
Sewing
• Zipper insertion
Caution
Before changing the presser foot, remove the
power plug from the outlet.
Not doing so could cause an injury.
Attach the zipper foot. (Refer to “Changing the presser foot” on page 23.)
Raise the needle to its highest position, and then turn the pattern selection dial to select
stitch number 6.
Set the stitch length dial between “2” and “4”.
2~4
First, sew the left side of the zipper.
6
Zipper foot
Sewing the left side of the zipper
1
2
Set the right side pin of the zipper
foot to the presser foot holder.
Align the zipper and the fabric, and tack.
Ú Lay down the slider tab toward you.
Left side pin
Tack
Slider
3
Right side pin
Zipper
Slider tab
Position the fabric so that the zipper is on the
right side of the presser foot.
Zipper
39
4
Sew until just before the presser foot
makes contact with the slider, and then
stop the sewing machine.
Slider
5
6
7
Turn the handwheel towards yourself to
lower the needle into the fabric.
Slider
Raise the presser foot.
Move the slider to the rear of the presser
foot, and finish the sewing.
Sewing the right side of the zipper
Release the presser foot and set to the
left side pin.
Sew the right side of the zipper using
the same procedures as for the left side.
Note: Sewing in the same direction
as the left side will help prevent
sewing misaligment.
40
Sewing
• Blind hem stitching
Caution
In this sewing method the stitch cannot
be seen on the front of the fabric.
Before changing the presser foot, remove the
power plug from the outlet.
Not doing so could cause an injury.
Raise the needle to its highest position, and then turn the pattern selection dial to select
stitch number 7 or 9.
(When sewing stretch fabrics, select stitch number 9.)
Set the stitch length dial to setting “1” or “2”.
Zigzag sewing foot
1~2
7
9
Blind stitch foot
Ú The blind stitch foot
is only included with
model XXX34.
1
Fold back the cloth so that the folded
area protrudes by about 5 to 7 mm.
2
Iron and tack by hand.
Tacking
Wrong
side
Right
side
5 to 7 mm
41
• When using the zigzag sewing foot
3
4
5
Position the fabric so that the
needle slightly catches the fold
when the needle moves to the left.
Inside fold
Lower the presser foot and start
sewing. The part of the stitch that
catches the fold will be visible from
the right side of the fabric. Sew the
stitch evenly so that the part of the
stitch that catches the fold is not
too large or too small.
Fold
Wrong
side
Wrong
side
Right side
After sewing, pull out the tacking,
open out the fabric.
• When using the blind stitch foot
3
Attach the blind stitch foot.
(Refer to “Changing the presser
foot” on page 23.) Position the
fabric so that the needle slightly
catches the fold when the
needle moves to the left.
4
Lower the presser foot, adjust
the screw so that the fold aligns
with the guide, and then sew
with the fold against the guide.
5
After sewing, pull out the
tacking, open out the fabric.
Adjusting screw
Inside fold
Fold
Wrong
side
Guide
42
Wrong
side
Balanced stitches
Wrong
side
Right
side
Small stitches evenly
located on right side.
Needle catches too much
on the fold
Wrong
side
Right
side
Large stitches on right
side.
Needle does not catch
on the fold
Wrong
side
Right
side
The blind hem stitches do
not come through
43
Sewing
Use this stitching method for reinforcing
stitching, decorative stitching and quilting.
• Stretch & Decoration stitching
Caution
Do not turn the pattern
selection dial or stitch
length dial while
operating the machine.
Doing so could cause
injuries.
Attention
Selecting a stitch
As an example, the following procedure
describes how to select stitch number F.
• Raise the needle to its highest position,
and then turn the pattern selection dial to
select stitch number F.
• Turn the stitch length dial to select
setting “A – K”.
A-K,
L-S
Zigzag sewing
foot
• Stitches L through S can be
sewn only with model XXX34.
• The model name is indicated
beside “MODEL” in the model
label on the back of the sewing
machine. (MODEL SP **)
Pattern
selection dial
Stitch
length dial
A~K
L~S
Note: Select the same setting on the
stitch length dial and the pattern
selection dial.
Stitch list
Pattern selection
Stitch
dial No.
length dial
44
Stitch
MODEL
model 34 model 26
Pattern selection
Stitch
dial No.
length dial
Stitch
MODEL
model 34 model 26
A
A-K
{
{
L
L-S
{
-
B
A-K
{
{
M
L-S
{
-
C
A-K
{
{
N
L-S
{
-
D
A-K
{
{
O
L-S
{
-
E
A-K
{
{
P
L-S
{
-
F
A-K
{
{
Q
L-S
{
-
G
A-K
{
{
R
L-S
{
-
H
A-K
{
{
S
L-S
{
-
I
A-K
{
{
J
A-K
{
{
K
A-K
{
{
Maintenance
• Feed dog and hook maintenance
If the sewing machine makes a loud noise or rotates slowly, or there could be thread
waste or dust in the hook or feed dog. Perform maintenance on the hook and the feed
dog.
Caution
Before cleaning
the hook, remove
the power plug
from the outlet.
Not doing so could
cause an injury.
Attention
Do not use detergent,
bleach, benzine, or
thinner chemical cloths.
Doing so could cause
discoloration or cracking.
Cleaning the feed dog and hook
1
Remove presser foot and needle.
Use a screwdriver to loosen the screws
in the needle plate, and then remove the
needle plate.
Needle plate screw
(2 screws)
2
Presser foot
Lift bobbin case in the direction of the
arrow and remove it.
Bobbin case
3
Brush off lint and dust on feed dog and
hook, then clean it with a soft cloth.
A vacuum cleaner wand or hose may be
used to remove lint from this area.
Feed dog
Hook
45
Attaching the Bobbin Case
1
Insert the bobbin case from the front.
The red mark a on the bobbin case
should be in the position, as shown in the
diagram.
a
2
Align the red mark a and b, and attach
the needle plate with the projection c
on the bobbin case positioned as shown
in the diagram.
3
Make sure that bobbin case moves
slightly from side to side as indicated
by the arrow.
b a
b
a
Needle plate
c
4
Tighten needle plate clamp screws.
Turn the handwheel and see if hook
moves smoothly.
When the bobbin case is attached
incorrectly, the handwheel is heavy and
does not turn smoothly.
At that time remove the needle plate and
the bobbin case, attach them again.
Attach the needle and presser foot.
Check that the needle correctly enters
the hole in the needle plate.
46
Hole in
needle plate
Needle plate screw
(2 screws)
Maintenance
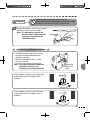
• Changing light bulb
Warning
1
Before changing the light bulb, remove the power
plug from the outlet and wait until the bulb cools.
Not doing so could cause a burn or electric shock.
Loosen the screw with a “+”
screw driver of your own,
and take off the face cover
in the direction of the arrow.
Screw
Face cover
2
Turn the light bulb counterclockwise as
the arrow in the diagram and remove.
3
Turn the new light bulb clockwise to
install.
Note: Contact your distributor or the
service center listed on the
last page of this Instruction
Manual to purchase a light
bulb for the SP20 series.
4
Always reinstall the face cover after
replacing the light bulb.
47
Maintenance
• Troubleshooting
Trouble
Does not
rotate
Does not work
Loud noise
Slow rotation
Broken needle
Upper thread
breakage
Lower thread
breakage
Fabric is not
fed through
48
What is the problem? Check the following
possibilities before contacting the service
center for repair.
Cause
Countermeasure
Page
The power plug is not inserted
Connect the power plug correctly
11
Thread is tangled in the hook,
or there is a broken needle in
the hook
Clean the hook
43
There is thread waste or dust
in the hook or feed dog
Remove thread waste or dust
43
The needle is incorrectly
installed
Install the needle correctly
25
The needle clamp screw is
loose
Firmly tighten the screw
25
The needle is too fine for the
cloth
Use a needle appropriate to the
fabric
26
The tension of the upper
thread is too tight
Adjust the thread tension
32
The fabric is being pulled too
strongly
Do not pull the fabric strongly
27
The bobbin case is not in the
correct position
Put the bobbin case in the correct
position
44
The upper and lower thread
are not correctly threaded
Thread the upper and lower thread
correctly
15, 16
The thread is tangled in the
bobbin case or hook
Remove thread waste from the
feed dog and hook
43
The tension of the upper
thread is too tight
Adjust the thread tension
32
The needle is bent
The point of the needle is burred
Replace with a good needle
25
The needle, thread and fabric
combination is inappropriate
Use an appropriate needle, thread
and fabric combination
26
The lower thread is incorrectly
threaded
Thread the lower thread correctly
15
There is thread waste in the
feed dog
Remove thread waste from the
feed dog and hook
43
The feed dog is lowered
Raise the feed dog
9
The stitch length dial is set to
“0”
Adjust the stitch length dial
9
The stitch length amount is too
small
Adjust the stitch length dial to an
appropriate setting
9
The pressure applied by the
presser foot is too light
Adjust the pressure applied by the
presser foot to an appropriate setting
9
Trouble
Missed
stitches
The fabric
wrinkles /
puckers
Too much
lower thread
showing on
right side of
the fabric
Too much
upper thread
showing on
wrong side of
the fabric
Stretch
stitches cannot
be sewn
The needle
cannot be
threaded with
the needle
threader
Cause
Countermeasure
Page
The needle is incorrectly installed
Install the needle correctly
25
The needle is bent
Use a straight needle
25
The needle and thread are not
appropriate for the fabric
Sew with a needle and thread
appropriate to the fabric
26
The upper thread is not
correctly threaded
Thread the upper thread correctly
16
The tension of the upper
thread is too tight
Adjust the thread tension
32
The upper and lower thread
are not correctly threaded
Thread the upper and lower thread
again
The needle is too thick for the cloth
Use a needle appropriate to the fabric
26
The needle is burred
Replace with a good needle
25
The lower thread is incorrectly threaded
Thread the lower thread correctly
15
The tension of the upper
thread is too tight
Adjust the thread tension
32
The bobbin is not correctly
inserted in the bobbin case
Insert the bobbin in the bobbin
case correctly
15
The upper thread is not
correctly threaded
Thread the upper thread correctly
16
The tension of the upper
thread is too loose
Adjust the thread tension
32
The upper thread is not correctly
threaded (not threaded through
the thread guide)
Thread the upper thread correctly
16
The stitch length dial is not set
to setting “A – K” or “L – S”
Set the stitch length dial to the
appropriate setting
42
The stitch length dial and the
pattern selection dial are set to
different settings
Select the same setting on the
stitch length dial and the pattern
selection dial
42
The needle position is too low
Turn the handwheel so that the
line is at the top
18
Needle no.9 is being used
Use needle no. 11 through 16
26
The needle is incorrectly installed
Install the needle correctly
25
The needle is bent
Use a straight needle
25
The thread has not been
correctly passed through the
needle bar thread guide
Pass the thread through the
needle bar thread guide correctly
18
If the above treatments do not solve the problem, contact
the service center as described in your warranty.
When calling for service, please note the MODEL and
SERIES that are inscribed on the back of your sewing
machine.
15, 16
SP20 SERIES / SERIE MODEL / MODELE SP
Manufacturer/ : ZHEJIANG AISIN ELITE
Fabricant
MACHINERY & ELECTRIC
CO., LTD.P.R.C.
220-240V
Total 85W
50Hz
max 15W
Importer/
:
Importateur
EUROPE S. A.
Designed and engineered by
AISIN SEIKI JAPAN
MADE IN P. R. C. / FABRIQUE A P.R.C.
49
Maintenance / Others
•
Servicing double-insulated products
(230V-240V)
In a double-insulated product, two systems of insulation are provided instead of
grounding. No grounding means are provided on a double-insulated product nor should
a means for grounding be added to the product. Servicing a double-insulated product
requires extreme care and should only be done by qualified service personnel with
knowledge of the system under his or her responsibility. Replacement parts for a doubleinsulated product must be identical to those parts in the product. The symbol is marked
on the double-insulated product.
Others
• Safety precaution about the battery
Warning
If the alkaline solution from the battery get in the eyes or come into
contact with the skin or clothes, rinse with a large quantity of clean
water and consult a doctor immediately.
Not doing so could cause an injury.
Caution
1. Do not short-circuit, disassemble, heat, recharge, deform, dispose of
in fire.
2. Do not insert batteries in reverse polarity.
3. Do not expose batteries to strong impact by dropping or throwing the
batteries.
Doing so could cause a leakage of alkaline solution.
50
Others
• Recycling
DO NOT THROW AWAY!
EU ONLY
We are committed to the protection of the environment. We strive to minimize the environmental impact of
our products by continuously improving product design and our manufacturing methods.
At end of life, please dispose of this product in an environmentally responsible way.
The crossed-out wheelie bin symbol featured above and on the product’s data-plate means that this
product falls under the scope of the E.U. “Waste Electrical and Electronic Equipment” (WEEE) directive and
“Restriction of the Use of Certain Hazardous Substances in Electrical and Electronic Equipment” (ROHS)
directive and should not be disposed of with your household waste. At end of life, you must ensure that this
product is disposed of in accordance with national and local legislation and that it is sorted as Category 2
“Small Domestic Appliances” WEEE. You may be liable under local and national laws for improper disposal
of this product. Please consult the web, or a competent national or local body, for the return and collections
systems available to you and the locations of your nearest recycling points. If you purchase a new product
direct from us, we will take your old product back, irrespective of the brand, if it is a like for like sale.
As an individual, you can make a positive impact on reuse, recycling and other forms of recovery of WEEE.
This will reduce use of landfill and minimize the environmental impact of the products you use.
Hazardous substances in electronic and electrical products can have a harmful impact on human health and
on the environment.
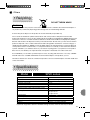
• Specifications
Model
Hook type
Needle
Bobbin
Maximum stitch length
Maximum stitch width
Straight stitch needle position
Sewing machine weight (sewing machine and foot
controller)
Sewing machine size
Rated voltage
Rated frequency
Rated power consumption
Light bulb
Battery
SP20 series
Horizontal
Home-use sewing machine needle (HA-1)
TOYOTA-exclusive plastic bobbin
4 mm
5 mm
Center needle position, left needle position
6.3 kg
Width: 412 mm
Depth: 192 mm
Height: 292 mm
220 - 240 V
50 Hz
85 W
15 W
Alkaline 1.5 V, Mignon/AA/LR6
If you have any queries about this TOYOTA sewing machine, check the warranty for details.
51
EU ONLY
Imported by / Importé par :
Head Office
Web: www.home-sewing.com
Avenue de l’Industrie 21, Parc Industriel, 1420 Braine-L’Alleud BELGIUM
TEL: +32 (0) 2 387 0707 FAX: +32 (0) 2 387 1995
UK Branch
Unit 4, Swan Business Park, Sandpit Road, Dartford, Kent, DA1 5ED UK.
TEL: +44 (0) 1322 291137 FAX: +44 (0) 1322 279214
France Branch
Bât. Le Minnesota, allée Rosa Luxembourg, B.P.70294, 95615 Cergy Pontoise Cedex, FRANCE
TEL: +33 (0) 1 34 30 25 00 FAX: +33 (0) 1 34 30 25 01
Germany Branch Odenwaldstrasse. 3, D-63263 Neu-lsenburg, GERMANY
TEL: +49 (0) 61 02-3 67 89-0 FAX: +49 (0) 61 02-3 67 89-13
Holland Branch Energieweg 14, 2382 NJ Zoeterwoude (Rijndijk), THE NETHERLANDS
TEL: +31 (0) 71 5410251 FAX: +31 (0) 71 5413707
Austria Branch Donaufelderstrasse 101/5/1, A-1210 Wien, AUSTRIA
TEL: +43 (0) 1 812 06 33 FAX: +43 (0) 1 812 06 33-11
679111-DEA10-B