1
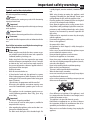
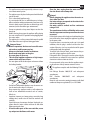
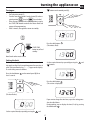
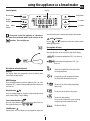
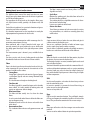
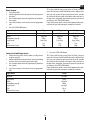
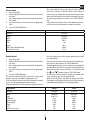
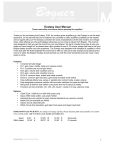
description en
A C
D
E
B
F
P
I
Q
R
H
L M
N
I
Description of appliance
N Wire rack
O Drip pan
P Door
Q “Bread maker” control panel
R Oven/bread maker mode selector
A Top heating element
B Pivoting bottom heating element
C Bread pan connector cover
D Internal light
E Bread pan connector
F “Oven” control panel
G Main switch
H Measuring spoon (if present)
I Measuring cup (if present)
L Paddle
M Bread pan
Technical specification
Voltage: 220-240 V ~ 50/60Hz max 16A
Absorbed power: 1400 W
Dimensions LxHxW: 512 x 295 x 400
Weight: 12,1 kg
34
O
G
important safety warnings en
Symbols used in these instructions
is visibly chipped, scored or scratched, it should be replaced.
While using, cleaning or moving the appliance, avoid
slamming or knocking the door violently. Do not pour
cold liquid onto the glass while the appliance is hot.
• Place the appliance on a horizontal surface at a height of
at least 85 cm and out of reach of children.
• Never allow the appliance to be used by persons (including children) with psychological, physical or sensory impairments or with insufficient knowledge, unless closely
supervised and instructed by someone responsible for
their safety.
Children must be supervised to ensure they do not play
with the appliance.
• Do not move the appliance while in use.
• Never use the appliance if:
- the power cable is faulty
- the appliance has been dropped, is visibly damaged, or
malfunctioning.
In these cases, to avoid all risk take the appliance to your
nearest authorised customer services.
• Never position the appliance near heat sources.
• Do not use the appliance as a heat source.
• Never place paper, cardboard or plastic inside the oven
and never rest anything on top of the appliance (utensils,
wire racks, other objects).
• Never insert anything into the ventilation openings.
Make sure they are unobstructed.
• This oven is not designed for built-in installation.
• When the door is open, remember:
- never exert excessive pressure with overly heavy objects
or pull the handle downwards;
- never rest heavy containers or boiling saucepans just out
of the oven on the open door.
Important warnings are identified by these symbols.
It is vital to respect these warnings.
Danger!
Failure to observe the warning may result in life threatening
injury by electric shock.
Important!
Failure to observe the warning could result in injury or damage
to the appliance.
Danger of burns!
Failure to observe the warning could result in scalds or burns.
Please note:
This symbol identifies important advice or information for the
user.
Read all the instructions carefully before using the appliance. Keep these instructions
•
•
•
•
•
•
•
Please note:
Before using the oven for the first time, remove any paper and other material inside the oven such as protective
cardboard, booklets, plastic bags, etc.
Before using for the first time, operate the oven empty
with the thermostat at maximum for at least 15 minutes
to eliminate the “new” smell and any smoke caused by
the presence of protective substances applied to the heating elements before transport.
Ventilate the room.
Wash all accessories before use.
In “bread maker” mode only, the appliance has a power
failure backup programme which memorises the bread
making cycle in the event of a power failure lasting up to
about 15 minutes.
After this time, the programme could be cancelled.
When using the appliance at maximum capacity, never
exceed the recommended quantities given in the recipes.
If the appliance is used at maximum capacity, never exceed the following quantities: flour: 750 g, yeast: 40 g,
water: 500 g.
•
Important!
This oven is designed to cook food.
It must never be used for other purposes, modified or
tampered with in any way.
After unpacking the appliance, make sure the door is undamaged and working correctly.
The door is made from glass and is therefore fragile. If it
•
•
35
Given differences in legislation, if the appliance is used
in a country other than that where it was bought, have it
checked by customer services.
This appliance is designed for domestic use only.
Professional or inappropriate use, or failure to observe
the instructions absolves the manufacturer from all responsibility and invalidates the guarantee.
When not in use and before cleaning, always unplug the
appliance.
en
•
•
•
•
•
•
This appliance must not be operated by a timer or a separate remote control system.
The appliance must be placed and operated with the back
next to the wall.
This is a household appliance only.
It is not intended for use: in staff kitchen areas in shops,
offices and other working environments; farm houses; by
clients in hotels, motels and other residential type environments; bed and breakfast type environments.
Do not use pointed or sharp metal objects to clean the
bread pan.
Before cleaning, always turn the appliance off by placing
the main switch in the “0” position and unplugging from
the mains socket.
The appliance has a safety system which stops the paddle
if the door of the oven is opened during operation.
Danger!
Before plugging the appliance into the mains socket, make sure that:
- the mains voltage corresponds to the value indicated on the rating plate.
- the mains socket is earthed and has a minimum
rating of 16A.
The manufacturer declines all liability in the event
that this important accident-prevention rule is not
respected.
• Do not let the power cable dangle and avoid touching hot
parts of the oven. Never unplug the appliance by pulling
on the power cable.
• If you intend to use an extension, make sure it is in good
condition, that the plug is earthed and that the cross
section of the wires is at least equal to that of the power
cable provided with the appliance.
• To avoid all risk of electric shock, never immerse the power cable, plug or appliance itself in water.
- If the power cable is damaged, it must be replaced by the
manufacturer, an authorised service centre or a qualified
electrician in order to eliminate all risk.
• For your personal safety, never take the appliance to pieces on your own. Always contact customer services.
•
Danger of burns!
When in operation, the door and accessible external surfaces could become very hot.
Always use the knobs, handles and buttons.
Never touch metal parts or the glass.
Use oven gloves if necessary.
• This electrical appliance operates at high temperatures which could cause burns.
• Use oven gloves to lift the bread pan and remove it from
the baking chamber.
•
•
•
•
•
•
•
•
Close the door, unplug from the mains and smother the flames with a damp cloth.
Do not leave inflammable products near the oven or under the work surface where it is located.
Never operate the appliance under a wall cupboard or
shelf or near inflammable materials such as curtains,
blinds, etc.
Important: incorrect use (wrong recipe, excessively long
cooking times) could cause the bread to overheat and
catch fire.
Should this occur, do not open the door. Unplug the appliance from the mains socket and leave to cool down
before opening the door.
If food or other parts of the oven catch fire, never
try and put out the flames with water.
36
The appliance complies with the following EC directives:
Low Voltage Directive 2006/95/EC and subsequent
amendments;
EMC Directive 2004/108/EC and subsequent
amendments
Materials and accessories coming into contact with food
conform to European regulation (EC) no. 1935/2004.
turning the appliance on en
Turning on
buttons on the control panel (Q).
•
•
Plug into the mains socket.
Press the main switch (G).
•
Turn the “oven/bread maker” mode selector (R) to the required position:
(oven) or
(bread maker).
•
If the selector is already in the required position, just press
the START/STOP button to activate the chosen mode and
prepare it for programming.
•
After 3 minutes, the appliance returns to standby.
Press the clock button
(The minutes flash).
START/STOP
button on, off and
standby
.
Oven/bread maker mode selector
Setting the clock
Set the required minutes by repeatedly pressing the
buttons.
The first time the appliance is connected to the mains electricity supply or after it has been without power for some time, it
emits a beep and four dashes (“-- : --”) appear on the display.
To set the time, proceed as follows:
Press the clock button
least 3 seconds.
and
on the control panel (Q) for at
Press the clock button .
(The set time is displayed).
(The hour flashes).
If you want to change the time later, repeat the setting procedure described above.
During cooking, you can display the time (if set) by pressing
the clock button .
Set the required hour by repeatedly pressing the
and
37
using the appliance as an oven en
Description of control panel
Thermostat dial
Timer dial
Mode selector
START/STOP button on, off and standby
Oven/bread maker mode selector
Please note: to use the appliance as an oven, turn
the oven/bread maker mode selector to the
position. The icon lights up.
38
Summary table
Programme
Defrosting
Delicate cooking
Mode selector
position
Thermostat dial
position
any
any
Keeping food warm
Fan oven cooking
100°C - 220°C
3
2
1
Wire rack position
3
3
2
2
1
1
3
3
2
2
3
1
1
2
1
3
2
3
1
2
1
3
3
2
1
2
1
3
2
1
3
Traditional oven
cooking
Grilling and browning
100°C - 220°C
any
2
1
3
2
1
3
2
3
1
3
2
2
1
1
3
2
1
39
en
Notes/Tips
-
-
-
Ideal for lasagne, meat,
pizza, pies, cakes, bread and all foods which
must have a brown or
crisp surface.
To use the accessories
see the tips in the table
on page 41.
Ideal for cooking stuffed vegetables, fish
and pound cake.
To use the accessories
see the tips in the table
on page 42.
Ideal for toasting bread
(position 3) and browning food (position 2)
(see page 42).
en
Using the controls
Using the oven
Thermostat dial
General tips
Select the required temperature as follows:
• To keep food warm: thermostat dial in
position.
• For fan or traditional oven cooking: thermostat dial
between 100°C and 220°C.
For best results when cooking with the fan oven, preheat for 5
minutes until the oven reaches the set temperature.
The cooking times depend on the quality of the products, temperature of the food and personal tastes.
The times indicated in the table are purely indicative and
subject to variation and do not include the time required to
preheat the oven.
To cook frozen foods refer to the recommended times on the
product packaging.
Timer dial
To programme the length of cooking, turn the dial to the time
required (max. 120 minutes). The cooking time appears on
the display. At the end of the set time, the oven emits a beep,
is displayed and the oven goes off automatically. Defrosting
Mode selector
For quick efficient defrosting:
• Turn the mode selector to the
position.
• Turn the timer dial to the required time.
• Place a low rimmed plate containing the food to be defrosted on the wire rack in the bottom position and close the
door.
Example of defrosting: 1 kg of meat 80-90 minutes without turning.
This selects the types of cooking available:
Defrosting
(fan only in operation)
Delicate cooking
(bottom heating element only in operation)
Delicate cooking
Traditional oven cooking, keep warm function
(top heating element and bottom heating element in
operation)
Grill
(top heating element only in operation at maximum
power)
Fan oven cooking
(top heating element, bottom heating element and fan
in operation)
Ideal for confectionery and iced cakes.
Also excellent for completing cooking of food at the bottom, or
for types of cooking requiring mainly bottom heat.
• Rest the pan on the wire rack in the bottom position as
shown in the figure on page 39.
• Turn the mode selector to the position.
• Turn the timer dial to the required time.
At the end of the set time, the oven emits a beep. If the
food is sufficiently cooked before the end of the set time,
press the START/STOP button for 3 seconds.
Keeping food warm
•
Internal light
•
•
•
Turn the thermostat dial to the
position.
Turn the mode selector to the
position.
Turn the timer dial to the required time.
Place the plate containing the food on the wire rack in the
bottom position.
You should not leave food in the oven for too long as it may
become dry.
When the oven is on, the internal light is always on.
To replace the bulb, proceed as follows: unplug the appliance
from the mains socket, unscrew the protective glass and replace the blown bulb with one of the same type (resistant to high
temperatures), then replace the protective glass.
40
en
Fan oven cooking
•
•
•
This mode is ideal for excellent pizza, lasagne, au gratin dishes,
all types of meat-based dish, roast potatoes, cakes and pies in
general.
Proceed as follows:
• Place the wire rack in the position given in the table.
•
•
Turn the timer dial to the required time.
Press the START/STOP button.
Preheat the oven for 5 minutes, then insert the food.
Turn the mode selector to the
position.
Select the required temperature by turning the thermostat dial.
Programme
Thermostat
dial
Times
Wire rack
position
Savoury pies and
quiches
170°
35 min.
1
Use the drip pan.
Chicken 1 kg
200°
70-80 min.
“
Use the drip pan, turn the chicken after about 50
min.
Roast pork 1000 g
200°
70 min.
“
Use the drip pan, turn the meat after about 50
min.
Meat loaf 650 g
200°
55 min.
“
Use the drip pan, turn the meat after about 30
min.
Roast potatoes 750 g
200°
60 min.
“
Use the drip pan with greaseproof paper, mix
twice.
Jam tart 700 g
170°
35 min.
“
Use the drip pan.
Strudel 1 kg
170°
35 min.
“
Use the drip pan.
Torta margherita 700 g
160°
30-35 min.
“
Use a cake tin.
Biscuits (shortbread)
100 g
170°
14 min.
2
Use the drip pan.
41
Notes/Tips
en
Traditional oven cooking
•
This mode is ideal for all types of fish, stuffed vegetables, confectionery and desserts using beaten egg white or requiring
long cooking times (more than 60 minutes).
Proceed as follows:
• Place the wire rack in the position given in the table.
•
Turn the mode selector to the
Programme
•
•
•
Select the required temperature by turning the thermostat dial.
Turn the timer dial to the required time.
Press the START/STOP button.
Preheat the oven for 5 minutes, then insert the food.
position.
Thermostat
dial
Times
Wire rack
position
Macaroni cheese 1 kg
200°
35 min.
1
Use an ovenproof dish.
Lasagne 1.5 kg
200°
35 min.
“
Use an ovenproof dish.
Trout 500 g
190°
35 min.
“
Use the drip pan.
Stuffed squid 450 g 190°
30 min.
“
Use an ovenproof dish, turn halfway through cooking.
Cauliflower cheese 550 g
200°
30 min.
“
Use an ovenproof dish.
Stuffed courgettes 750 g
190°
40 min.
“
Use the drip pan.
Pound cake 1 kg
150°
100 min.
“
Use a loaf tin
Sponge cake
160°
35 min.
“
Use a cake tin.
Cooking with the grill
•
This mode is ideal for toasting slices of bread and can also be
used to brown foods such as Roman-style gnocchi, au gratin
vegetables, etc.
• Place the flat wire rack in guide 2 or 3.
•
•
Turn the mode selector to the
position.
Turn the timer dial to the required time.
42
Notes/Tips
Press the START/STOP button.
Control panel
using the appliance as a bread maker en
Display
Menu button
Clock button
Weight
button Kg
(+) button
(-) button
Crust colour
button
want the bread to be ready using the delay bake function.
Please note: to use the appliance as a bread maker, turn the oven/bread maker mode selector to the
and
position. The icon lights up.
buttons
Use the
and
buttons to set the time and the various
cooking programmes.
Description of icons
The baking progress indicator displays all stages of the baking cycle by means of an arrow at the side of the display.
An automatic programme (AU...) has been set
A semiautomatic programme (SE...) has been set
Description of control panel
Display
Shows the length of the entire cycle of the selected programme.
The display shows the programme selected, cooking time,
crust colour and loaf weight.
MENU button
Press the MENU button to select an automatic (AU...) or semiautomatic (SE...) recipe or during cooking to check which cycle
has been set.
Can only be used for automatic functions.
The Delay Bake function has been set.
The bread is in the kneading or punching down stage
Weight button
Kg
Press the weight button to select the weight of the bread you
want to bake: 500 g, 750 g or 1000 g.
The bread is in one of the rising stages.
Crust colour button
Press the crust colour button to select the required crust colour: Light, Medium, Dark
.
The bread is being baked.
This is the final stage of the cycle requiring a high temperature to bake the bread.
The bread is baked.
Clock button
Displays local time and allows you to programme when you
43
en
Baking bread: an art and a science
Baking bread is both an art and a science.
The appliance does most of the work, but there are some
things you need to know about each of the basic ingredients
and the bread baking process.
The ingredients of classic bread are the simplest: flour, sugar,
salt, liquid (water or milk), possibly a fat (butter or oil) and
yeast.
Each of these ingredients has a particular function and gives a
particular taste to the end product.
It is therefore important to use the ingredients in exactly the
right proportions to guarantee the best results.
•
•
The flour is more granular and straw yellow. It is easily
digestible and tasty.
Spelt flour:
Obtained by grinding spelt, the oldest form of cereal in
the bread-making tradition.
The resulting bread has a high fibre content and is therefore laxative and refreshing.
It tastes very similar to white bread.
Gluten-free flour:
These flours are mixtures of such raw materials as maize,
rice, potato flakes, etc. which are naturally gluten-free,
unlike wheat.
Sugar
Yeast
Sugar sweetens the bread, makes the crust darker and gives it
a softer texture by feeding the yeast.
You can use equivalent quantities of white or brown sugar,
treacle, maple syrup, honey or other sweetener.
You can also use equivalent quantities of artificial sweeteners,
but the taste and texture of the bread will be different.
Yeast is an active microorganism which encourages the fermentation process known as rising.
Once moistened with a liquid, nourished with sugar and
correctly warmed, the yeast produces the gases which make
the dough grow when kept at the right temperature (about
25°C).
The most common yeast is brewer’s yeast, available fresh or
dried.
For cakes, pastries and desserts, baking powder made from
bicarbonate of soda and cream of tartar is more suitable.
Liquids
When the liquids are mixed with the flour protein, they form
the gluten, necessary to make the bread rise.
The majority of recipes use water, but other liquids can be used
such as milk or fruit juice.
You should therefore experiment with the amount of these liquids needed to obtain optimum results as a recipe containing
excessive liquid may cause the bread to collapse during baking, while too little liquid prevents it from rising. Use liquids
at room temperature.
Flour
Flour is the basic ingredient used to make bread and it is therefore important for you to know the characteristics of the
products available on the market.
• Strong flour:
Strong flour is gluten-rich and consists of general purpose plain flour (type 0) and extra strong “Manitoba” high
protein flour.
It is ideal for coarser doughs and making bread.
• Fine flour 00:
Fine flour (type 00) is ground for longer and is therefore
more refined. It is more suitable for making cakes and
pastries or other more delicate doughs.
• Wholemeal flour:
This fibre-rich flour usually rises less than the above
flours.
It can be mixed with other flours to dilute the fibre content and improve rising.
Wholemeal bread tends to be denser and smaller than
white bread.
• Durum wheat flour:
This is obtained from wheat usually grown on more arid
soils.
Salt
Used in small quantities, salt makes the bread tasty and controls the action of the yeast.
In excessive quantities, it prevents the bread from rising, so
make sure you use the right amount.
You can use any table salt.
Eggs
Eggs are used in some bread recipes. They add liquid, stimulate rising and improve the nutritional qualities and taste of the
bread. They are therefore contained in the sweeter recipes.
Fats
Many types of bread use fats for a stronger taste and to retain
moisture.
You can use oil or softened butter in equivalent quantities.
44
Stage 4 Select crust colour
If you do not add fat, the taste and texture of the bread may
be different.
en
Press the crust colour
button to select the required crust colour (not possible in all recipes). You can choose
between a light, medium or dark crust colour.
If you do not choose a specific crust colour, the default colour
will be used.
Programming
The following instructions are designed to guide beginners
through all stages of the baking process.
Please note: for optimum results, weigh all ingredients.
If included with your oven, use the measuring cup (I) and measuring spoon (H) following the instructions below:
1 measuring cup = 150 g flour
1 measuring spoon (large) = 12 g sugar
1 measuring spoon (small) = 5 g salt
1 measuring spoon (small) = 3.5 g powdered yeast
1 measuring spoon (large) = 12 g/ml oil
1 measuring spoon (small) = 4 g/ml oil
Stage 5 Select the weight of the loaf
Press the weight button
Kg to select the required weight:
500 g, 750 g or 1000 g. If you do not choose a specific weight,
the default weight will be used.
Stage 6 Press START/STOP
Please note: if you have not changed the settings, the appliance will use a default of Menu AU1, 750 g and a medium crust
colour.
Press the START/STOP button to begin baking.
The length of the baking cycle is displayed.
Stage 1 Add the ingredients
Add the ingredients to the bread pan in the following order:
1. Liquid ingredients
2. Dry ingredients
3. Yeast
For good results, it is important to weigh the ingredients precisely.
Before placing the non-stick bread pan in the oven, remember
to mix the ingredients with a wooden spoon to facilitate kneading (if you are using the delay bake function, the ingredients
must NOT be mixed).
Now remove the cover from the bread pan connector and position the pan in the oven.
Stage 7
At the end of the baking cycle, the appliance emits a beep,
the baking progress indicator shows
and “00:00”
flashes on the display. To increase the baking time, use the
and
buttons and press the START/STOP button.
If no operations are performed, the appliance goes off after 3
minutes and
is displayed.
Use oven gloves to lift the bread pan and remove it from the
baking chamber.
Stage 2 Select the menu setting
Press the MENU button to select the required category (AU...
automatic and SE... semiautomatic).
Stage 3
Use the
and
buttons to select the required recipe
(e. g. AU 10).
After 3 seconds, the recipe is automatically selected and the
exact time at which cooking will end is displayed (if the time
has been set previously).
If the time has not been set, the total length of the baking
cycle will be displayed and the baking progress indicator will
display
.
If the selected recipe is not the one you want, press the MENU
button again and use the
and
buttons to select a
new recipe.
Leave the bread to cool in the non-stick bread pan for 10 minutes before removing. Turn the bread pan upside down and
shake until the bread comes out.
If necessary use a plastic spatula to detach the bread from the
sides of the bread pan. If the paddle remains stuck in the bread, remove it taking care to avoid burns.
Place the bread to cool on a wire rack.
For optimum texture and easy slicing, you should leave the
bread to cool for 15 minutes.
45
en
How to use the delay bake function. Automatic
programmes (AU...) only
The moisture content of the ingredients affects the recipes
which may therefore need to be modified. For example, the
weight of the flour changes when it absorbs moisture from
the air. Our recipes can therefore be modified slightly in order
to improve the results. Always note the quantities you use in
order to modify the recipes as you wish.
You can delay baking for up to 12 hours, enabling you to wake
up in the morning to the fragrance of freshly baked bread.
It is important to make a small hollow in the top of the dry mixture for the yeast. This will make sure it becomes active when
it comes in contact with the liquid and sugar during kneading.
Do not mix the ingredients with a wooden spoon.
List of programmes
AU1: DURUM WHEAT BREAD
AU2: SOFT WHEAT BREAD
AU3: FRENCH BREAD
AU4: WHOLEMEAL BREAD
AU5: COUNTRY LOAF
AU6: PAIN DE CAMPAGNE
AU7: VOLLKORNBROT
AU8: RYE BREAD
AU9: PUMPKIN BREAD
AU10: VEGETABLE BREAD
AU11: GLUTEN-FREE BREAD
AU12: QUICK BREAD
AU13: SWEET BREADS
AU14: BRIOCHE BREAD
AU15: CAKES AND DESSERTS
AU16: SWEET FOCACCIA
AU17: KOUGLOF
AU18: JAMS/MARMALADES
AU19: VIENNA BREAD
AU20: RICE PUDDING
Please note: do not use the Delay Bake function if the
recipe contains perishable ingredients such as milk, eggs or
cheese as they could deteriorate.
1. Follow stages 1, 2, 3, 4 and 5 on page 44 to select the
required programme.
2. Press the
button and use the
and
buttons
to set the number of hours and minutes between the present time and the time you want the bread to be ready. If
local time has been set, the time at which baking will end
will be displayed.
3. Press the START/STOP button. If set previously, the time
is displayed. When the time for the process to begin is
reached, a countdown of the time left is displayed.
The bread will be baked and ready at the end of the number of hours and minutes displayed. If the
button
is pressed during the process, the time the bread will be
ready will be displayed for 2 seconds.
Please note: in the event of error or to reset the time,
press the START/STOP button.
Power failure backup
SE1: BIGA STARTER
SE2: TRADITIONAL WHITE BREAD with manual dough shaping and division.
SE3: BREADSTICKS
SE4: CLASSIC BAGUETTE
SE5: COUNTRY LOAF with manual dough shaping and division
SE6: VEGETABLE BREAD with manual dough shaping and
division.
SE7: PIZZE
SE8: FOCACCIA
SE9: SWEET BREADS with manual dough shaping and division.
SE10: MIXING
SE11: RISING
The appliance has a power failure backup which retains the
cycle in the memory in the event of power failure or voltage
surge. This means that if there is a power failure while the
bread is baking, the appliance will retain the memory for at
least 15 minutes and will continue the baking process when
the electricity comes back on. This option is active during the
kneading, baking, rising or delay bake cycles.
Without this feature, the appliance would reset and the bread
baking cycle would stop.
If the power failure lasts more than 15 minutes, you may have
to throw away the ingredients and start again.
After using the appliance
Allow the appliance to cool down for 30 minutes before running another programme (bread maker mode only).
If the appliance is reused before it is completely cool, it may
emit a beep and “cool” is displayed, indicating that it is not
cool enough. Wait until “cool” disappears from the display.
46
recipes en
Index
Pizze-focacce
Pizza margherita/Calzone ........................................... page 56
Focaccia . ..................................................................... page 57
White bread
Pugliese bread . ........................................................... page 47
Ciabatta bread rolls...................................................... page 48
Breadsticks .................................................................. page 49
Classic baguette........................................................... page 49
Boule de pain .............................................................. page 50
Country loaf with biga starter...................................... page 50
Quick bread.................................................................. page 51
Sweet breads
Chocolate/milk/honey/walnut bread......................page 57/58
Vienna bread ............................................................... page 59
Brioche bread .............................................................. page 59
Cakes and desserts
Torta Margherita/chocolate/yoghurt cake.................... page 60
Rice pudding................................................................ page 61
Torta veneziana ........................................................... page 61
Kouglof........................................................................ page 62
Wholemeal bread
Wholemeal bread . ...................................................... page 51
Rustic Italian baguette................................................. page 51
Pan de campagne . ...................................................... page 52
Vollkornbrot ................................................................ page 53
Rye bread .................................................................... page 53
Jams and marmalades
Orange/strawberry.................................................page 62/63
Vegetable breads
Biga starter ............................................................ page 63
Olive/onion/sweet pepper bread............................page 54/55
Pumpkin bread............................................................ page 55
Mixing only ............................................................ page 63
Gluten-free bread
Rising only. ............................................................. page 63
Classic gluten-free bread.........................................page 55/56
Gluten-free bread with buckwheat.............................. page 56
Discover all the recipes and much more besides at:
www.pangourmet.delonghi.com
White bread
5. Press the START/STOP button.
TIP: at the end of rising (after 1h 45min with durum wheat
flour and 1h 25min with soft wheat flour), the oven emits a
beep and pauses for 5 minutes. The time flashes on the display. If you wish, you can remove the bread pan from the
oven, sprinkle the surface of the bread with sieved flour, make
some cuts in the top with a sharp knife, then put the pan back
(you do not need to press the START/STOP button). If you decide not to do this, the oven will automatically continue with
the cycle after pausing in standby for 5 minutes.
Durum and soft wheat Pugliese bread
1. Insert the paddle.
2. Add the ingredients to the bread pan in the order given in
the recipe.
3. Use a wooden spoon to mix the ingredients by hand for a
few seconds.
4. Insert the bread pan in the oven and select programme
AU1 (durum wheat bread) or AU2 (soft wheat bread).
47
en
Ingredients for durum wheat bread
500 gr
750 gr
1000 gr
Ready in…
2h 30min
2h 40min
2h 50min
Water
Durum wheat flour
Salt
Fresh brewer’s yeast
210 gr/ml
300 gr
6 gr
10 gr
315 gr/ml
450 gr
9 gr
15 gr
420 gr/ml
600 gr
12 gr
20 gr
500 gr
750 gr
1000 gr
2h
2h 10min
2h 20min
210 gr/ml
350 gr
15 gr
4 gr (3 gr)
6 gr
10 gr
300 gr/ml
500 gr
22 gr
6 gr (4 gr)
9 gr
15 gr
400 gr/ml
650 gr
30 gr
8 gr (5 gr)
12 gr
20 gr
Ingredients for soft wheat bread
Ready in…
Water
Strong flour (type 0)
Oil
Sugar (malt)
Salt
Fresh brewer’s yeast
Ciabatta bread rolls
7. At the end of the second rising stage (about 40 minutes),
the oven will pause again. Remove the bowl from the
oven and press the START/STOP button. The oven begins
the preheating stage. Turn the dough out onto a floured
surface and also flour the surface of the dough (it has a
high moisture content and is therefore very sticky), then
shape into a 3 cm high square.
Divide the dough up with a sharp spatula and place in the
drip pan previously lined with greaseproof paper.
8. Insert the drip pan in the oven on the wire rack in the
bottom position and press the START/STOP button.
9. When the first batch is ready, if there is a second batch,
place this in the oven, set a time of 20 minutes and press
START/STOP. Repeat until all batches have been baked.
1. Prepare the biga starter the day before (see biga starter
recipe on page 63).
2. Add the ingredients to the bread pan (already containing
the biga starter) in the order given in the recipe.
3. Use a wooden spoon to mix the ingredients by hand for a
few seconds.
4. Insert the bread pan in the oven and select programme
SE2.
5. Press the START/STOP button.
6. At the end of mixing (about 25 minutes), the oven emits
a beep and pauses. The time flashes on the display. Remove the dough from the bread pan, shape it into a ball
and place in an oiled bowl. Place the bowl in the oven and
press the START/STOP button.
Ingredients
500 gr
750 gr
Ready in…
1h 22min
1h 42min
Biga starter
Water
Strong flour (type 0)
Sugar (malt)
Salt
Fresh brewer’s yeast
1/2
80 gr/ml
70 gr
5 gr (3 gr)
6 gr
3 gr
1
120 gr/ml
100 gr
7 gr (5 gr)
10 gr
5 gr
48
en
Breadsticks
the breadsticks by hand, place in the drip pan previously
lined with greaseproof paper (6 breadsticks per pan) and
insert the pan in the oven on the wire rack in the bottom
position.
6. Press the START/STOP button.
7. When the first batch is ready, if there is a second batch,
place this in the oven, set a time of 25 minutes and press
START/STOP. Repeat until all batches have been baked.
TIP: for tastier breadsticks, once shaped, dip in a bowl of lightly
salted water and coat with soybean seeds or similar. To make
them crunchier, try preparing the breadsticks the day before.
1. Add the ingredients to the bread pan in the order given in
the recipe.
2. Use a wooden spoon to mix the ingredients by hand for a
few seconds.
3. Insert the bread pan in the oven and select programme
SE3.
4. Press the START/STOP button.
5. At the end of the first rising stage (about 45 minutes), the
oven emits a beep and pauses.
The time flashes on the display.
Turn the dough out onto a lightly floured surface, shape
Ingredients
500 gr
Ready in…
2h
Water
Strong flour (type 0)
Durum wheat flour
Sugar (malt)
Salt
Fresh brewer’s yeast
150 gr/ml
300 gr
15 gr
5 gr (3 gr)
6 gr
10 gr
Classic baguette
Place in the drip pan previously lined with greaseproof
paper and insert in the oven on the wire rack in the bottom position.
6. Press the START/STOP button.
7. At the end of the second rising stage (a further 40 minutes), the oven pauses for 5 minutes and the time flashes
on the display. Make three slanting cuts on the top of the
baguettes and put back in the oven.
8. When the first batch is ready, if there is a second batch,
place this in the oven, set a time of 35 minutes and press
the START/STOP button.
1. Add the ingredients to the bread pan in the order given in
the recipe.
2. Use a wooden spoon to mix the ingredients by hand for a
few seconds.
3. Insert the bread pan in the oven and select programme
SE4.
4. Press the START/STOP button.
5. At the end of the first rising stage (about 50 minutes),
the oven pauses and the time flashes on the display. Turn
the dough out onto a lightly floured surface and shape
the baguettes by hand.
Ingredients
500 gr
750 gr
Ready in…
2h 10min
2h 45min
Water
Flour (type 0)
Oil
Sugar (malt)
Salt
Fresh brewer’s yeast
200 gr/ml
250 gr
50 gr
3 gr (2 gr)
6 gr
9 gr
400 gr/ml
500 gr
100 gr
6 gr (4 gr)
12 gr
18 gr
49
en
Boule de pain
TIP: at the end of the rising stage (after 1h 25min), the oven
pauses for 5 minutes and the time flashes on the display. If you
wish, you can remove the bread pan from the oven, sprinkle
the surface of the bread with sieved flour, make some cuts in
the top with a sharp knife, then put the pan back (you do not
need to press the START/STOP button).
If you decide not to do this, the oven will automatically continue with the cycle after pausing in standby for 5 minutes.
1. Insert the paddle.
2. Add the ingredients to the bread pan in the order given in
the recipe.
3. Use a wooden spoon to mix the ingredients by hand for a
few seconds.
4. Insert the bread pan in the oven and select programme
AU3.
5. Press the START/STOP button.
Ingredients for durum wheat bread
Ready in…
Water
Strong flour (type 0)
Sugar (malt)
Salt
Fresh brewer’s yeast
500 gr
750 gr
1000 gr
2h
2h 5min
2h 10min
210 gr/ml
350 gr
10 gr (5 gr)
6 gr
10 gr
290 gr/ml
450 gr
17 gr (9 gr)
9 gr
13 gr
420 gr/ml
650 gr
20 gr (10 gr)
13 gr
20 gr
Country loaf with biga starter
5. Press the START/STOP button.
TIP: at the end of the rising stage (after 1h 25min), the oven
pauses for 5 minutes and the time flashes on the display. If you
wish, you can remove the bread pan from the oven, sprinkle
the surface of the bread with sieved flour, make some cuts in
the top with a sharp knife, then put the pan back (you do not
need to press the START/STOP button).
If you decide not to do this, the oven will automatically continue with the cycle after pausing in standby for 5 minutes.
1. Prepare the biga starter the day before (see biga starter
recipe on page 63).
2. Add the ingredients to the bread pan (already containing
the biga starter) in the order given in the recipe.
3. Use a wooden spoon to mix the ingredients by hand for a
few seconds.
4. Insert the bread pan in the oven and select programme
AU5.
Ingredients
750 gr
Ready in…
2h 15min
Biga starter
Water
Strong flour (type 0)
Sugar (malt)
Salt
Fresh brewer’s yeast
1 dose
120 gr/ml
100 gr
6 gr (4 gr)
10 gr
5 gr
50
en
Quick bread
4. Press the START/STOP button.
TIP: at the end of the rising stage (after 35min), the oven pauses for 5 minutes and the time flashes on the display. If you
wish, you can remove the bread pan from the oven, sprinkle
the surface of the bread with sieved flour, make some cuts in
the top with a sharp knife, then put the pan back (you do not
need to press the START/STOP button).
If you decide not to do this, the oven will automatically continue with the cycle after pausing in standby for 5 minutes.
Note: This programme allows you to make bread in an hour.
The quick bake setting has shorter rising times. The bread will
therefore be denser and less voluminous.
1. Add the ingredients to the bread pan in the order given in
the recipe.
2. Use a wooden spoon to mix the ingredients by hand for a
few seconds.
3. Insert the bread pan in the oven and select programme
AU12.
Ingredients
750 gr
Ready in…
1h
Water at 37°C
Strong flour (type 0)
Salt
Sugar
Fresh brewer’s yeast
240 gr/ml
400 gr
8 gr
15 gr
25 gr
Wholemeal bread
AU4.
5. Press the START/STOP button.
TIP: at the end of the rising stage (after 1h 15min), the oven
pauses for 5 minutes and the time flashes on the display. If you
wish, you can remove the bread pan from the oven, sprinkle
the surface of the bread with sieved flour, make some cuts in
the top with a sharp knife, then put the pan back (you do not
need to press the START/STOP button).
If you decide not to do this, the oven will automatically continue with the cycle after pausing in standby for 5 minutes.
Wholemeal bread
1. Insert the paddle.
2. Add the ingredients to the bread pan in the order given in
the recipe.
3. Use a wooden spoon to mix the ingredients by hand for a
few seconds.
4. Insert the bread pan in the oven and select programme
Ingredients
750 gr
1000 gr
Ready in…
2h 10min
2h 15min
Water
Wholemeal flour
Sugar (malt)
Salt
Fresh brewer’s yeast
375 gr/ml
570 gr
15 gr (8 gr)
11 gr
30 gr
500 gr/ml
750 gr
19 gr (10 gr)
15 gr
40 gr
Rustic Italian baguette
SE5.
5. Press the START/STOP button.
6. After 70 minutes the oven will pause.
Remove the dough from the bread pan, shape a sort of
“ball” (or two depending on the quantity) and place in
the drip pan previously lined with greaseproof paper.
Insert the drip pan in the oven on the wire rack in the
1. Insert the paddle.
2. Add the ingredients to the bread pan in the order given in
the recipe.
3. Use a wooden spoon to mix the ingredients by hand for a
few seconds.
4. Insert the bread pan in the oven and select programme
51
en
bottom position and press the START/STOP button.
7. After rising for about 20 minutes, the oven will pause
again. Remove the bread, shape the baguette (or 2 depending on the quantity, if 2, divide between two pans)
by hand, place back in the oven and press the START/STOP
button.
8. When the first batch is ready, if there is a second batch,
place this in the oven, set a time of 40 minutes and press
the START/STOP button.
TIP: at the end of the rising stage (after 2h 15min), the oven
pauses for 5 minutes and the time flashes on the display. If you
wish, you can make cuts in the top of the bread with a sharp
knife, then put the pan back in the oven (you do not need to
press the START/STOP button). If you decide not to do this, the
oven will automatically continue with the cycle after pausing
in standby for 5 minutes.
Ingredients
1 baguette
2 baguettes
Ready in…
2h 40min
3h 20min
Water
Oil
Strong flour (type 0)
Durum wheat flour
Wholemeal flour
Salt
Sugar (malt)
Fresh brewer’s yeast
18 gr/ml
150 gr
150 gr
100 gr
50 gr
6 gr
4 gr (2 gr)
12 gr
35 gr/ml
300 gr
300 gr
200 gr
100 gr
12 gr
5 gr (3 gr)
25 gr
Pain de campagne
few seconds.
5. Insert the bread pan in the oven and select programme
AU6.
6. Press the START/STOP button.
TIP: at the end of the rising stage (after 1h 55min), the oven
pauses for 5 minutes and the time flashes on the display. If you
wish, you can remove the bread pan from the oven, sprinkle
the surface of the bread with sieved flour, make some cuts in
the top with a sharp knife, then put the pan back (you do not
need to press the START/STOP button).
If you decide not to do this, the oven will automatically continue with the cycle after pausing in standby for 5 minutes.
1. Prepare the biga starter the day before. Add the ingredients to the bread pan and mix for a few seconds by
hand. Place in the oven and select programme SE1. Press
the START/STOP button.
2. At the end of kneading, the biga starter will not be smooth and silky, but rough and slightly crumbly.
Leave to rest in the oven for 10-15 hours.
3. At the end of the rising stage, add the ingredients to the
bread pan (already containing the biga starter) in the order given in the recipe.
4. Use a wooden spoon to mix the ingredients by hand for a
Ingredients
750 gr
Ready in…
3h 5min
Biga starter for pain de campagne
Water
Strong flour (type 0)
Honey
Fresh brewer’s yeast
Add after 15 hours
Water
Flour (type 00)
Rye flour
Salt
Fresh brewer’s yeast
125 gr/ml
280 gr
10 gr
5 gr
175 gr/ml
270 gr
50 gr
13 gr
5 gr
52
en
Vollkornbrot
1. Add the ingredients to the bread pan in the order given in
the recipe.
2. Use a wooden spoon to mix the ingredients by hand for a
few seconds.
3. Insert the bread pan in the oven and select programme
AU7.
4. Press the START/STOP button.
5. After about 50 minutes, the oven pauses. Remove the
Ingredients
bread pan from the oven, turn the dough out onto a floured surface, grease the bread pan with butter (you can
remove the paddle) and cover with a mixture of soybean
and sunflower seeds.
Shape the loaf by hand and place in the centre of the pan.
Insert the bread pan in the oven and press the START/
STOP button again.
Important: the oven remains in standby for a maximum
of 30 minutes, then goes off.
1000 gr
Ready in…
2h 15min
Hot water (37°C)
Wholemeal spelt flour
Flour (type 0)
Flax seeds
Sesame seeds
Pumpkin seeds
Sunflower seeds
Honey
Salt
Fresh brewer’s yeast
400 gr/ml
500 gr
50 gr
50 gr
40 gr
35 gr
50 gr
30 gr
11 gr
25 gr
Rye bread (Roggenmischbrot)
few seconds.
5. Insert the bread pan in the oven and select programme
AU8.
6. Press the START/STOP button.
TIP: at the end of the rising stage (after 1h 50min), the oven
pauses for 5 minutes and the time flashes on the display. If
you wish, you can sprinkle the surface of the bread with sieved
flour and place the pan back in the oven (you do not need to
press the START/STOP button).
If you decide not to do this, the oven will automatically continue with the cycle after pausing in standby for 5 minutes.
1. Prepare the biga starter the day before. Add the ingredients to the bread pan and mix for a few seconds by
hand. Place in the oven and select programme SE1. Press
the START/STOP button.
2. At the end of kneading, the biga starter will not be smooth and silky, but rough and slightly crumbly.
Leave to rest in the oven for 10 hours.
3. At the end of the rising stage, add the ingredients to the
bread pan (already containing the biga starter) in the order given in the recipe.
4. Use a wooden spoon to mix the ingredients by hand for a
Ingredients
750 gr
Ready in…
2h 50min
Biga starter for rye bread
Water
Strong flour (type 0)
Rye flour
Fresh brewer’s yeast
Add after 15 hours
Water
Rye flour
150 gr/ml
250 gr
50 gr
5 gr
120 gr/ml
100 gr
53
en
Strong flour (type 0)
Spelt flour
Sugar
Salt
Fresh brewer’s yeast
Herbs and spices (fennel, coriander, anise, cumin)
60 gr
60 gr
4 gr
12 gr
10 gr
20 gr
Vegetable breads
At the end of the first rising stage (after 47 minutes), the oven
pauses. Remove the dough from the bread pan and place on a
floured board. Shape the rolls by hand (750 g of dough make
two batches of bread) and place them in the drip pan previously lined with greaseproof paper.
Insert the pan in the oven on the wire rack in the bottom position, close the door and press the START/STOP button.
The oven automatically starts the second rising stage followed
by baking. When this batch is ready, place the remaining bread
(left to rise outside the oven) in the oven, set 40 minutes with
the
and
buttons and press START/STOP again.
Olive/onion/sweet pepper bread
1. Add the ingredients to the bread pan in the order given in
the recipe.
2. Use a wooden spoon to mix the ingredients by hand for a
few seconds.
3. Insert the bread pan in the oven and select programme
AU10.
4. Press the START/STOP button.
TIP: to make bread rolls (rather than a round loaf), select the
semiautomatic programme SE6).
Ingredients for olive bread
750 gr
1000 gr
Ready in…
2h 40min
2h 45min
Water
Strong flour (type 0)
Durum wheat flour
Sugar (malt)
Salt
Fresh brewer’s yeast
Olives
220 gr/ml
200 gr
200 gr
5 gr (3 gr)
8 gr
10 gr
170 gr
300 gr/ml
270 gr
270 gr
7 gr (5 gr)
10 gr
13 gr
250 gr
750 gr
1000 gr
Ingredients for onion bread
Ready in…
2h 40min
2h 45min
Water
Strong flour (type 0)
Sugar (malt)
Salt
Fresh brewer’s yeast
1 chopped onion
225 gr/ml
500 gr
5 gr (3 gr)
8 gr
10 gr
150 gr
300 gr/ml
675 gr
8 gr (5 gr)
12 gr
15 gr
200 gr
54
en
Ingredients for sweet pepper bread
750 gr
1000 gr
Ready in…
2h 40min
2h 45min
Water
Strong flour (type 0)
Sugar (malt)
Salt
Fresh brewer’s yeast
Sweet peppers
220 gr/ml
400 gr
5 gr (3 gr)
8 gr
10 gr
250 gr
300 gr/ml
540 gr
7 gr (5 gr)
10 gr
13 gr
350 gr
Pumpkin bread
TIP: to make bread rolls (rather than a round loaf), select the
semiautomatic programme SE6).
At the end of the first rising stage (after 47 minutes), the oven
pauses. Remove the dough from the bread pan and place on a
floured board. Shape the rolls by hand (750 g of dough make
two batches of bread) and place them in the drip pan previously lined with greaseproof paper.
Insert the pan in the oven on the wire rack in the bottom position, close the door and press the START/STOP button.
The oven automatically starts the second rising stage followed
by baking.
When this batch is ready, place the remaining bread (left to
rise outside the oven) in the oven, set 40 minutes with the
and
buttons and press START/STOP again.
1. First cut the pumpkin into pieces, remove the seeds and
place in the drip pan previously lined with greaseproof
paper.
Insert in the oven on the wire rack in the bottom position,
select fan cooking at 180°C and cook for about 45 minutes. At the end of this time, remove the skin and liquidise
the pulp with a food processor.
2. Add the ingredients to the bread pan in the order given in
the recipe.
3. Use a wooden spoon to mix the ingredients by hand for a
few seconds.
4. Insert the bread pan in the oven and select programme
AU9.
5. Press the START/STOP button.
Ingredients
750 gr
1000 gr
Ready in…
2h 13min
2h 15min
Water
Strong flour (type 0)
Cooked chopped pumpkin
Sugar
Soft butter
Salt
Fresh brewer’s yeast
Pumpkin seeds
37 gr/ml
375 gr
225 gr
8 gr
22 gr
8 gr
15 gr
75
50 gr/ml
500 gr
300 gr
10 gr
30 gr
10 gr
20 gr
100 gr
Gluten-free bread
4. Press the START/STOP button.
5. These flours are very different from wheat flour. If after
10 minutes there are still lumps of flour not blended in,
place the oven in standby by pressing the START/STOP
button, remove the bread pan and mix thoroughly with
a wooden spoon. Put the bread pan back in the oven and
press the START/STOP button.
TIP: always mix the basic flour with other gluten-free flours
(buckwheat, corn flour, etc.).
Gluten-free bread
1. Add the ingredients to the bread pan in the order given in
the recipe.
2. Use a wooden spoon to mix the ingredients by hand for a
few seconds.
3. Insert the bread pan in the oven and select programme
AU11.
55
en
Ingredients for classic recipe
750 gr
Ready in…
1h 50min
Water
Oil
Special flour for celiacs
Salt
Fresh brewer’s yeast
300 gr/ml
25 gr
400 gr
10 gr
25 gr
Ingredients (buckwheat variation)
750 gr
Ready in…
1h 50min
Water
Oil
Special flour for celiacs
Buckwheat flour
Salt
Fresh brewer’s yeast
290 gr/ml
40 gr
350 gr
150 gr
10 gr
25 gr
Pizza and focaccia
Place the pizza in the drip pan previously lined with greaseproof paper. Garnish with tomato sauce/purée, salt and
oregano, place on the wire rack in the bottom position
and press the START/STOP button.
6. Ten minutes before the end of cooking time, add diced
mozzarella cheese.
7. When the first batch is ready, place the second batch in
the oven, set 20 minutes and press the START/STOP button (the mozzarella should always be added 10 minutes
before the end of the cooking time).
MAKING THE CALZONE: spread the dough out into a circle, then
place the ingredients on half of the base in the following order:
ham, mozzarella, mushrooms, tomato.
Fold the dough over on itself and press with the fingers to close
the calzone perfectly.
Pizza margherita and calzone
1. Add the ingredients to the bread pan in the order given in
the recipe.
2. Use a wooden spoon to mix the ingredients by hand for a
few seconds.
3. Insert the bread pan in the oven and select programme
SE7.
4. Press the START/STOP button.
5. At the end of the rising stage (about 80 minutes), the
oven will pause. Remove the bread pan from the oven
and press the START/STOP button. The oven begins the
preheating stage. Turn the dough out onto a floured surface and spread it out by pressing with the fingertips.
Ingredients
1 batch
2 batches
Ready in…
1h 50min
2h 10min
Water
Oil
Flour (type 00)
Salt
Fresh brewer’s yeast
140 gr/ml
25 gr
250 gr
5 gr
13 gr
275 gr/ml
50 gr
500 gr
10 gr
25 gr
56
en
Focaccia
in the oven on the wire rack in the bottom position.
6. Press the START/STOP button.
7. At the end of the second rising stage (after a further
25min), the oven pauses again. Remove the drip pan
from the oven, with oiled fingers space the focaccia out
in the pan and cover with the brine prepared previously.
Garnish to taste (olives, rosemary, etc).
Put back in the oven and press the START/STOP button.
8. When the first batch is ready, place the second batch in
the oven, set a time of 25 minutes and press the START/
STOP button.
1. Add the ingredients to the bread pan in the order given in
the recipe.
2. Use a wooden spoon to mix the ingredients by hand for a
few seconds.
3. Insert the bread pan in the oven and select programme
SE8.
4. Press the START/STOP button.
5. At the end of the first rising stage (about 35 minutes),
the oven pauses and the time flashes on the display. Turn
the dough out onto a lightly floured surface, shape the
focaccia, place it in the oiled drip pan and insert the pan
Ingredients
1 batch
2 batches
Ready in…
2h 05min
2h 30min
Water
Oil
Strong flour (type 0)
Sugar
Salt
Fresh brewer’s yeast
Brine:
Water
Oil
Salt
140 gr/ml
25 gr
250 gr
5 gr
5 gr
10 gr
275 gr/ml
40 gr
500 gr
10 gr
10 gr
20 gr
25 gr/ml
30 gr
2 gr
50 gr/ml
60 gr
4 gr
Sweet breads
Shape the rolls by hand (750 g of dough make two batches of
bread) and place them in the drip pan previously lined with greaseproof paper. Insert the pan in the oven on the wire rack in the
bottom position, close the door and press the START/STOP button.
The oven automatically starts the second rising stage followed by
baking. When this batch is ready, place the remaining bread (left
to rise outside the oven) in the oven, set 25 minutes with the
and
buttons and press START/STOP again.
To make the bread more attractive, prepare an emulsion with 1
egg, a pinch of sugar and a teaspoon of milk.
At the end of the rising stage when the display and START/STOP
button start flashing, brush the bread with the mixture (about 50
minutes before the end of the programme).
Chocolate/milk/honey/walnut bread
1. Insert the paddle.
2. Add the ingredients to the bread pan in the order given in
the recipe.
3. Use a wooden spoon to mix the ingredients by hand for a
few seconds.
4. Insert the bread pan in the oven and select programme
AU13.
5. Press the START/STOP button.
TIP: to make bread rolls (rather than a round loaf), select the
semiautomatic programme SE9). At the end of the first rising stage (after 50 minutes), the oven pauses. Remove the dough from
the bread pan and place on a floured board.
57
en
Ingredients for chocolate bread
500 gr
750 gr
1000 gr
Ready in…
2h 05min
2h 10min
2h 15min
Milk
Eggs
Butter at room temperature
Strong flour (type 0)
Sugar
Salt
Fresh brewer’s yeast
Chocolate drops
125 gr/ml
60 gr (1)
10 gr
300 gr
25 gr
3 gr
12 gr
90 gr
190 gr/ml
90 gr (1/2)
15 gr
400 gr
38 gr
4 gr
18 gr
125 gr
250 gr/ml
120 gr (2)
20 gr
500 gr
50 gr
5 gr
25 gr
180 gr
500 gr
750 gr
1000 gr
Ingredients for milk bread
Ready in…
2h 05min
2h 10min
2h 15min
Milk
Butter at room temperature
Flour (type 0)
Sugar
Salt
Fresh brewer’s yeast
170 gr/ml
15 gr
300 gr
8 gr
5 gr
8 gr
280 gr/ml
30 gr
470 gr
13 gr
9 gr
13 gr
375 gr/ml
40 gr
620 gr
18 gr
12 gr
18 gr
500 gr
750 gr
1000 gr
Ingredients for honey bread
Ready in…
2h 05min
2h 10min
2h 15min
Milk
Butter at room temperature
Honey
Strong flour (type 0)
Sugar
Salt
Fresh brewer’s yeast
130 gr/ml
18 gr
23 gr
250 gr
10 gr
5 gr
13 gr
200 gr/ml
26 gr
35 gr
375 gr
15 gr
7 gr
19 gr
260 gr/ml
35 gr
45 gr
500 gr
20 gr
9 gr
25 gr
500 gr
750 gr
1000 gr
Ingredients for walnut bread
Ready in…
2h 05min
2h 10min
2h 15min
Water
Butter at room temperature
Strong flour (type 0)
Sugar
Salt
Fresh brewer’s yeast
Walnuts
140 gr/ml
15 gr
250 gr
5 gr
5 gr
8 gr
50 gr
230 gr/ml
22 gr
375 gr
8 gr
8 gr
12 gr
75 gr
310 gr/ml
30 gr
500 gr
10 gr
10 gr
15 gr
100 gr
58
en
Vienna bread
TIP: at the end of the rising stage (after 2h 15min), the oven
pauses for 5 minutes and the time flashes on the display. If
you wish, you can remove the bread pan from the oven, make
some cuts in the top of the bread with a sharp knife, then put
the pan back (you do not need to press the START/STOP button).
If you decide not to do this, the oven will automatically continue with the cycle after pausing in standby for 5 minutes.
1. Insert the paddle.
2. Add the ingredients to the bread pan in the order given in
the recipe.
3. Use a wooden spoon to mix the ingredients by hand for a
few seconds.
4. Insert the bread pan in the oven and select programme
AU19.
5. Press the START/STOP button.
Ingredients
750 gr
Ready in…
2h 55min
Water
Milk
Butter
Salt
Sugar
Extra strong “Manitoba” flour
Fresh brewer’s yeast
120 gr/ml
160 gr/ml
60 gr
7 gr
50 gr
450 gr
15 gr
Brioche bread
bread) and place them in the drip pan previously lined with
greaseproof paper.
Insert the pan in the oven on the wire rack in the bottom position, close the door and press the START/STOP button.
The oven automatically starts the second rising stage followed
by baking. When this batch is ready, place the remaining bread
(left to rise outside the oven) in the oven, set 25 minutes with
the
and
buttons and press START/STOP again.
To make the bread more attractive, prepare an emulsion with
1 egg, a pinch of sugar and a teaspoon of milk.
At the end of the rising stage when the display and START/
STOP button start flashing, brush the bread with the mixture
(about 40 minutes before the end of the programme).
1. Insert the paddle.
2. Add the ingredients to the bread pan in the order given in
the recipe.
3. Use a wooden spoon to mix the ingredients by hand for a
few seconds.
4. Insert the bread pan in the oven and select programme
AU14.
5. Press the START/STOP button.
TIP: to make individual brioches (rather than a large round
brioche), select the semiautomatic programme SE9).
At the end of the first rising stage (after 50 minutes), the oven
pauses. Turn the dough out onto a floured surface.
Shape the rolls by hand (750 g of dough make two batches of
Ingredients
500 gr
750 gr
Ready in…
2h 30min
2h 35min
Milk
Eggs
Soft butter
Flour (type 00)
Flour (type 0)
Sugar
Salt
Fresh brewer’s yeast
100 gr/ml
80 gr (1/2)
35 gr
150 gr
150 gr
10 gr
2 gr
6 gr
150 gr/ml
120 gr (2)
50 gr
200 gr
200 gr
15 gr
5 gr
10 gr
59
en
Cakes and desserts
thoroughly by hand to obtain a smooth dough.
4. Insert the bread pan in the oven and select programme
AU15.
5. Press the START/STOP button.
TIP: when the cake has cooled, dust with icing sugar.
Torta Margherita/chocolate/yoghurt cake
1. Insert the paddle.
2. Add the ingredients to the bread pan in the order given in
the recipe.
3. With the help of a wooden spoon, mix the ingredients
Ingredients Torta Margherita
1000 gr
Ready in…
1h 7min
Milk
Melted butter
Eggs
Flour (type 00)
Potato flour
Sugar
Salt
Vanillin or equivalent
Baking powder
100 gr/ml
180 gr
180 gr (3)
275 gr
100 gr
200 gr
a pinch
1 sachet
16 gr
Ingredients chocolate cake
1000 gr
Ready in…
1h 7min
Milk
Melted butter
Eggs
Flour (type 00)
Hazelnut flour
Potato flour
Sugar
Salt
Vanillin or equivalent
Baking powder
Melted chocolate
100 gr/ml
180 gr
180 gr (3)
235 gr
40 gr
200 gr
100 gr
a pinch
1 sachet
16 gr
30 gr
Ingredients for yoghurt cake
1000 gr
Ready in…
1h 7min
Milk
Eggs
Melted butter
Yoghurt
Flour (type 00)
Potato flour
Sugar
Almond flour
Salt
Baking powder
Variation:
Cocoa powder
100 gr/ml
180 gr (3)
180 gr
250 gr
200 gr
100 gr
190 gr
70 gr
a pinch
16 gr
20 gr
60
en
Rice pudding
4. Press the START/STOP button.
TIP: pour the mixture into individual bowls and cool in the
refrigerator.
Sprinkle with ground cinnamon before serving.
1. Insert the paddle.
2. Add the ingredients to the bread pan in the order given in
the recipe.
3. Insert the bread pan in the oven and select programme
AU20.
Ingredients
500 gr
Ready in…
40min
Milk
Sugar
Rice (Vialone Nano risotto rice)
Sachet of vanillin or equivalent
500 gr/ml
50 gr
50 gr
1
Torta veneziana
6. At the end of the rising stage, the oven pauses.
One hour ten minutes before the end of cooking (shown
on the display), remove the bread pan from the oven, cover the dough with icing then sprinkle with granulated
sugar.
Insert the bread pan in the oven (you do not need to press
the START/STOP button).
PREPARING THE ICING: beat the egg white with the almond
flour and sugar and mix well.
1. Insert the paddle.
2. Add the ingredients to the bread pan in the order given in
the recipe.
3. Use a wooden spoon to mix the ingredients by hand for a
few seconds.
4. Insert the bread pan in the oven and select programme
AU16.
5. Press the START/STOP button.
Ingredients
1000 gr
Ready in…
3h 15min
Milk
Butter at room temperature
Eggs
Strong flour (type 0)
Sugar
Salt
Fresh brewer’s yeast
For the icing (at the end of rising, before baking)
Almond flour
Sugar
Egg white
Granulated sugar
80 gr/ml
150 gr
200 gr (3/4)
580 gr
100 gr
6 gr
15 gr
100 gr
100 gr
2
as necessary
61
en
Kouglof
5. Press the START/STOP button.
TIP: to make the bread more attractive, prepare an emulsion with
1 egg, a pinch of sugar and a teaspoon of milk.
At the end of the rising stage when the display and START/STOP
button start flashing, brush the bread with the mixture (about 40
minutes before the end of the programme).
1. Insert the paddle.
2. Add the ingredients to the bread pan in the order given in
the recipe.
3. With the help of a wooden spoon, mix the ingredients
thoroughly by hand to obtain a smooth dough.
4. Insert the bread pan in the oven and select programme
AU17.
Ingredients
750 gr
Ready in…
2h 15min
Milk
Eggs
Extra strong “Manitoba” flour
Sugar
Salt
Butter at room temperature
Fresh brewer’s yeast
Raisins
Candied orange
170 gr/ml
60 gr (1)
350 gr
60 gr
5 gr
100 gr
25 gr
80 gr
45 gr
Jams and marmalades
AU18.
4. Press the START/STOP button. Pour the hot marmalade or
jam into sterilised jars (see notes below), leaving a space
of about 2 cm at the top. Seal the jar immediately.
STERILISING THE JARS: place the jars on a tray and insert in the
oven at 100°C for 20-25 minutes. Remove from the oven using
oven gloves and fill immediately with the hot marmalade or
jam. Sterilising jars will destroy the germs and kill the bacteria which would otherwise cause the jam to deteriorate. You
can therefore enjoy homemade jam and marmalade all year
round.
Orange marmalade/strawberry jam
Orange marmalade: peel the oranges, cut into pieces
and liquidise in a food processor (for chunky marmalade
with peel, cut one orange peel into thin strips).
Strawberry jam: wash the strawberries thoroughly, cut
into pieces and liquidise in a food processor.
1. Insert the paddle.
2. Add the ingredients to the bread pan in the order given in
the recipe.
3. Insert the bread pan in the oven and select programme
Ingredients orange marmalade
750 gr
1000 gr
Ready in…
50min
50min
Oranges
Sugar
Lemon
Thickener
500 gr
250 gr
1/2
17 gr
650 gr
325 gr
1/2
20 gr
62
en
Ingredients strawberry jam
750 gr
1000 gr
Ready in…
50min
50min
Strawberries
Sugar
Lemon
Thickener
500 gr
250 gr
1/2
20 gr
650 gr
325 gr
1/2
25 gr
Biga starter
3. Use a wooden spoon to mix the ingredients by hand for a
few seconds.
4. Insert the bread pan in the oven and select programme
SE1.
5. Press the START/STOP button.
1. Insert the paddle.
2. Add the ingredients to the bread pan in the order given in
the recipe.
Ingredients
1/2
Ready in…
Water
Strong flour (type 0)
Fresh brewer’s yeast
Mixing only (SE10)/Rising only (SE11)
These 2 programmes can be used to customise kneading (max.
25 minutes) and rising (max. 2 hours) stages to obtain the
bread you want.
Kneaded risen bread can also be cooked in the fan oven at the
required temperature (preheat the oven before inserting the
bread pan containing the risen bread).
63
1
15min
15min
100 gr/ml
200 gr
3 gr
200 gr/ml
400 gr
5 gr
Information on the display en
The display indicates any problems with the appliance.
The appliance must be installed indoors in a room without
draughts and away from sources of heat and direct sunlight.
display
problem
solution
“cool” flashing
Oven too hot to start another baking Wait for the appliance to cool down to
cycle in bread maker mode.
room temperature.
When the message has disappeared, insert the bread pan in the oven and select
the programme.
“err” flashing
The appliance has failed to regulate the Take the appliance to De’Longhi Custotemperature.
mer Services.
cleaning and maintenance
Frequent cleaning prevents the formation of smoke and bad
odours during cooking.
Do not let fat accumulate inside the appliance.
Before any maintenance or cleaning operation, unplug the
oven and wait for it to cool down.
Clean the door, inside walls and external surfaces of the oven
with a solution of detergent and water solution. Dry thoroughly.
Do not use abrasives or aggressive household cleaning products to clean the inside of the oven, bread pan or drip pan as
they could damage the non-stick surface.
Wash gently with water and washing up liquid using a soft
cloth.
Please note: to clean the bread pan more efficiently, remove
the inside paddle.
Do not use metal implements to remove the ingredients or the
bread as they could damage the non-stick surface.
To clean the outside surface always use a damp sponge.
Avoid using abrasive products that may damage the paintwork.
Make sure water or liquid soap does not seep into the slits on
the top of the oven.
Never immerse the appliance in water, never wash under running water.
To make it easier to clean the bottom surface of the oven, lift
the pivoting bottom heating element (B) as shown in the figure.
After cleaning, put the heating element back in position.
Recommendations for the correct disposal of the product in compliance with the 2002/96/CE European Directive
The product must not be disposed of as urban waste at the end of its working life. It must be taken
to appropriate local authority separate waste collection centres or to dealers providing this service.
Disposing of a household appliance separately
avoids possible negative consequences for the environment
and health deriving from unsuitable disposal and allows to
recover the materials of which it is made in order to make
significant savings in energy and resources. The product has
the crossed-out wheeled bin mark as a reminder of the obligation to dispose of household appliances separately. The illegal
disposal of the product by the user entails the application of
administrative sanctions envisioned by the Standard in force.
64