1
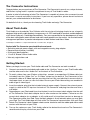
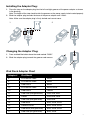
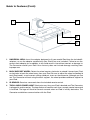
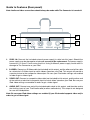
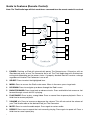
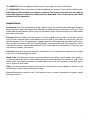
OWNER’S MANUAL
The Connector
™
1
Important Safety Instructions
1. Read these instructions.
2. Keep these instructions.
3. Heed all warnings.
4. Follow all instructions.
5. Do not use this apparatus near water. For example, do not use near a bathtub, in a wet basement,
near a swimming pool, and the like. WARNING – To reduce the risk of fire or electric shock, do
not expose this apparatus to rain or moisture.
6. Clean only with a dry cloth.
7. Do not block any ventilation openings. Install in accordance with the manufacturer’s instructions.
8. Do not install near any heat sources such as radiators, heat registers, stoves, or other apparatus
(including amplifiers) that produce heat.
9. Do not defeat the safety purpose of the polarized or grounding-type plug. A polarized plug has
two blades with one wider than the other. A grounding type plug has two blades and a third
grounding prong. The wide blade or the third prong are provided for your safety. If the provided
plug does not fit into your outlet, consult an electrician for replacement of the obsolete outlet.
10. Protect the power cord from being walked on or pinched particularly at plugs, convenience
receptacles, and the point where they exit from the apparatus.
11. Only use attachments/accessories specified by the manufacturer.
12. Use only with the cart, stand, tripod, bracket, or table specified by the
manufacturer, or sold with the apparatus. When a cart is used, use caution
when moving the cart/apparatus combination to avoid injury from tip-over.
13. Unplug this apparatus during lightning storms or when unused for long periods of time.
2
14. Refer all servicing to qualified service personnel. Servicing is required when the apparatus
has been damaged in any way, such as power-supply cord or plug is damaged, liquid has
been spilled or objects have fallen into the apparatus, the apparatus has been exposed to
rain or moisture, does not operate normally, or has been dropped.
15. This product has been tested and found to comply with the limits for Part 15 of the FCC rules.
This device complies with Part 15 of the FCC Rules. Operation is subject to the condition
that this device does not cause harmful interference. However, there is no guarantee that
interference will not occur in a particular installation. If this equipment does cause harmful
interference to radio or television reception, which can be determined by turning the product
on and off, the user is encouraged to try to correct the interference by one or more of the
following measures:
• Reorient or relocate the receiving antennas.
• Increase the separation between the equipment and the receiver.
• Connect the equipment to an outlet on a circuit different from that to which
the receiver is connected.
16. For added protection for this product during a lightning storm, or when it is left unattended and unused for long periods of time, unplug it from the wall outlet. This will prevent damage to
the product to lightning and power-line surges.
17. Operate this product only from the type of power source indicated on the rear panel.
For products using an external power supply, use an exact replacement if lost or damaged. For products operating from battery power, refer to the user manual.
18. Unplug this product from the wall outlet and refer servicing to qualified service personnel
under the following conditions:
a.
When the power supply cord or plug is damaged.
b.
If liquid has been spilled or objects have fallen into the product.
c.
If the product has been exposed to water or rain.
d.
If the product does not operate normally by following the operating instructions.
e.
If the product has been dropped or damaged in any way.
f.
When the product exhibits a distinctive change in performance.
19. Keep this product a safe distance away from naked flame, such as a lit candle.
20. Apparatus shall not be exposed to dripping or splashing and no objects filled with liquids, such
as vases, shall be placed on the apparatus.
21. The recommended operating temperature range is 41˚ F to 104˚ F (5˚ C to 40˚ C).
22. As the main plug is used to disconnect the system from the mains, connect the system to an
easily accessible AC outlet.
23. The system is not disconnected from the mains as long as it is connected to the AC outlet,
even if the system itself has been turned off.
3
The Connector Instructions
Congratulations on your purchase of The Connector. The Connector’s ease of use, unique features,
and distinct styling make it a perfect compliment to any of Tivoli Audio’s radios.
In order to take full advantage of what The Connector is capable of, please take a moment to read
this owner’s manual and safety instructions. If you have any questions, please do not hesitate to
contact your authorized dealer or distributor.
On behalf of all of us, thank you for choosing Tivoli Audio and enjoy The Connector.
About Tivoli Audio
Tivoli Audio was founded by Tom DeVesto with the mission of bringing simple to use, elegantly
designed, high quality audio products to consumers. As CEO and head of research and development
at his former company, Cambridge SoundWorks, Tom was responsible for the development of many
of the best selling home entertainment and multi-media products on the market. He also held senior
management positions in product development at both Advent and Kloss Video.
*Cambridge SoundWorks is a registered trademark of Creative Labs, Singapore.
Packed with The Connector you should find one of each:
•Switching external power supply with exchangeable country plug adapter
•Remote control (battery installed)
•9 Universal dock adapters
•1.1m/3'8" Stereo 3.5mm Audio cable
•Warranty registration card
Getting Started:
Before you begin, be sure your Tivoli Audio radio and The Connector are both turned off.
1. Connect one end of the included audio cable to the “Auxiliary” input on your Tivoli Audio radio,
and the other end to the “Audio Out” on the back of The Connector.
2. To watch videos from your iPod on a television, connect a composite or S-Video cable (not
included) from the “Video Out” or “S-Video” output on the back of The Connector to the
composite video or S-Video input on your television set. Set your television’s source switch to
the proper input so you can view the video. Be sure your iPod video settings are enabled in
order to get a video signal.
3. Insert the adapter plug into the included external power supply. Connect the external power
supply’s cable to the DC input on the back of The Connector and plug the other end into a
wall outlet.
4. Depending on your iPod model (see chart below); insert the correct dock adapter into the well
of The Connector. Each dock adapter has its own number on the bottom. Failure to use the
correct dock adapter (or no adapter at all) could result in intermittent contact or damage to
The Connector and/or your iPod. Once the dock adapter is firmly locked in place you may dock
your iPod. The Tivoli Audio logo will flash while The Connector communicates with your iPod.
5. Rotate The Connector’s back support wheel counter clockwise until the rubber pad makes solid
contact with the back of your iPod.
6. Turn up the volume on your Tivoli Audio radio to the desired level and use The Connector’s
remote control to play music from your iPod.
4
Installing the Adapter Plug:
1. Place the step on the adapter plug into the left and right grooves of the power adapter as shown
in the drawing.
Note: The length of the step should match the grooves on the power supply to be inserted properly.
PUSH
2. Slide the adapter plug towards the base of the power adapter until it locks.
Note: Make sure the adapter plug is firmly locked and cannot move.
1
PUSH
2
PUSH
PUSH
PUSH
Changing the Adapter Plug:
1. Press and hold the button above the word marked “PUSH”.
2. Slide the adapter plug towards the grooves and remove.
PUSH
PUSH
PUSH
iPod Dock Adapter Chart
Adapter #
iPod Model
9
5G iPod with video
30GB
9
U2 iPod with video
30GB
9
iPod classic
80GB
10
5G iPod with video
60GB, 80GB
10
iPod classic
160GB
11
iPod nano (2nd generation)
2GB, 4GB, 8GB
12
iPhone
4GB, 8GB,16GB
13
iPod nano (3rd generation)
4GB, 8GB
14
iPod touch
8GB, 16GB, 32GB
15
iPhone 3G/3GS
8GB, 16GB, 32GB
16
iPod touch (2nd generation)
8GB, 16GB, 32GB
17
iPod nano (4th generation)
8GB, 16GB
PUSH
5
Guide to Features (Front):
1
2
3
4
1. UNIVERSAL WELL: Insert the adapter designed to fit your model iPod from the included 9
adapters, or use the adapter supplied with your iPod if one was included. Failure to use the
correct dock adapter (or no adapter at all) could result in intermittent contact or damage to
The Connector and/or your iPod. Your warranty does not include damage resulting from
improper use.
2. BACK SUPPORT WHEEL: Rotate the wheel counter clockwise to extend it toward your iPod,
or clockwise to back the wheel away from your iPod. Be sure to adjust the wheel according to
each iPod model, as an incorrect setting could put stress on the connector. Although you can
use The Connector without using the back support, the wheel provides additional support to
your iPod.
3. IR SENSOR: Receives commands from the included remote control.
4. TIVOLI AUDIO POWER LIGHT: Illuminates any time your iPod is docked and The Connector
is plugged in and turned on. The logo flashes to confirm each time a remote control command
is received. The logo will flash for several seconds when an iPod is initially docked as The
Connector establishes communication with the iPod.
6
Guide to Features (Rear panel):
Note: Audio and video connections should always be made while The Connector is turned off.
2
3
1
4
1. 5VDC 1A: Connect the included external power supply’s cable into this input. Should the
power supply ever be damaged or misplaced, use only a like replacement. The power supply’s
connector is 5.5mm/2.1mm center positive. Using a different power supply could result in
damage to The Connector or your iPod.
2. S-VIDEO: Connect an S-Video cable (not included) to this output, and the other end of the cable
to a television’s S-Video input to watch videos stored on your iPod. This output will provide a
superior picture to the composite video output. Be sure your iPod video settings are enabled
in order to get a video signal.
3. VIDEO OUT: Connect a composite video cable (not included) to this output, and the other end
of the cable to a television’s composite input to watch videos stored on your iPod. Be sure your
iPod video settings are enabled in order to get a video signal.
4. AUDIO OUT: Connect one end of the included audio cable to this output, and the other end to
the Auxiliary input of your Tivoli Audio radio (or other audio device). This output is not designed
for use with headphones.
Note: Be sure your iPod video settings are enabled (if your iPod model supports video out) in
order to get a video signal.
7
Guide to Features (Remote Control):
Note: The Tivoli Audio logo will flash each time a command from the remote control is received.
1
2
MENU
SELECT
3
4
5
6
9
7
8
10
11
MUTE
The Connector
1. POWER: Docking an iPod will automatically power The Connector on. Otherwise, with an
iPod docked, press to turn The Connector on or off. The Tivoli Audio logo with illuminate or
extinguish depending on the power status. A properly docked iPod will receive a charge
regardless of whether The Connector is on or off.
2. SELECT: Press to select the highlighted item.
3. MENU: Press to access the iPod’s main menu. When in the menu, press to go back.
4. UP/DOWN: Press to navigate up or down through the iPod’s menu.
5. BACK/FORWARD: Press to go back or advance tracks. Press and hold to fast reverse or fast
forward through a track while it is playing.
6. PLAY/PAUSE: Press to play a song/video. Press a second time to pause playback. Press a
third time to resume playback.
7. VOLUME +/-: Press to increase or decrease the volume. This will not control the volume of
your Tivoli Audio radio or the docked iPod, just The Connector.
8. MUTE: Press to mute the audio output. Press again to restore audio.
9. REPEAT: Press once to repeat the track currently playing. Press again to repeat all. Press a
third time to cancel repeat play.
8
10. SHUFFLE: Press to randomly shuffle tracks. Press again to cancel shuffle play.
11. BACKLIGHT: Press to activate the iPod’s backlight for the amount of time set in the iPod’s menu.
Note: Different iPod models have different software. The above commands may not work on
some iPod models or may behave differently than described. This is a function of your iPod’s
software, not The Connector.
Helpful Hints:
Positioning: Place The Connector on a flat, stable surface. Do not leave the audio cable or power
cord where they might be tripped over. Should you experience any interference with your Tivoli
Audio radio (or other device) while using The Connector, move The Connector or the radio further
apart from each other.
Docking: When inserting your iPod, be sure it is firmly seated all the way down in the well. Also be
sure you are using the correct dock adapter for your iPod. If your iPod has a skin/case, you may
need to remove it since it could prevent a good connection. When docking your iPod, certain functions will be unavailable while the iPod establishes communication with The Connector. Please
wait until the link has been established (the Tivoli Audio logo will stop flashing). Otherwise, you
may need to re-dock your device.
Cleaning: Never use any harsh cleansers or solvents on The Connector’s wood veneer or other
parts, as this could damage the finish.
Wood color: The Connector’s base uses a real wood veneer. Since natural wood varies greatly, it
is not possible to achieve an exact wood color/grain match between The Connector and a Tivoli
Audio radio. You might also notice the wood darken over time with exposure to sunlight. Again,
this is normal for real wood.
iPod: If you have questions about how to use your iPod, please contact Apple Inc directly, or the
establishment where you purchased your iPod.
Re-set: Should you need to re-set The Connector for any reason, disconnect the power supply
and plug it back in.
9
Limited Warranty:
Tivoli Audio manufactures its products to very high standards and we are confident our products
will perform well. Accordingly, we provide a limited warranty on this product against manufacturing
defects in material and workmanship to the original owner, for a period of one year from the original
date of purchase. This warranty is non-transferable.
This Limited Warranty covers the functionality of the product for its normal, intended use as
specified in this Owner’s Manual. It does not cover a malfunction or damage that has resulted
from improper or unreasonable use or installation, faulty ancillary equipment, modifications,
unauthorized repair, shipping damage or loss, abuse, accidents, use on improper voltage/current,
power surges, lightning or other acts of God, excess moisture, normal wear and tear, commercial
use, or purchase from unauthorized dealers. Proof of purchase as evidence the unit was purchased from an authorized dealer may be required for warranty service. Please contact the
dealer of purchase or local distributor for warranty service or repair.
Returns of any model purchased directly from Tivoli Audio via our website, telephone, mail, or
fax: must have a Return Authorization (RA) number clearly indicated on the outside of the package. An RA number can be obtained by phoning Tivoli Audio customer service (1.877.297.9479)
with the product’s model name, serial number, approximate date of purchase, and detailed
description of the problem, or by filling out the RA form on our web site (www.tivoliaudio.com).
PRODUCTS RETURNED TO TIVOLI AUDIO WITHOUT A VALID RA # WILL BE RETURNED
UNOPENED TO THE SENDER.
Please refrain from opening this product or taking it apart as doing so will void this Limited
Warranty. There are no user serviceable parts inside. Tivoli Audio will not pay for costs incurred
due to correction of reception problems, elimination of externally generated static/noise, loss of
time, inconvenience, loss of use of product, or damage caused by improper use of this product.
In the event the product is returned during the warranty term and is eligible for service under this
Limited Warranty, we will repair or replace any defective parts within a reasonable period of time
and free of charge.
THIS LIMITED WARRANTY GIVES YOU SPECIFIC LEGAL RIGHTS SUBJECT TO SPECIFIED
CONDITIONS. YOU MAY ALSO HAVE OTHER LEGAL RIGHTS WHICH APPLY TO THE PRODUCT
YOU HAVE ACQUIRED. SOME PLACES DO NOT ALLOW THE EXCLUSION, RESTRICTION,OR
MODIFICATION OF CERTAIN IMPLIED RIGHTS OR THEIR EFFECT. IN THOSE SITUATIONS THIS
LIMITED WARRANTY WILL ONLY APPLY TO THE EXTENT THAT THE APPLICABLE LAW ALLOWS.
The provisions of the Limited Warranty are in lieu of any other warranties or conditions, except
those provided by law. This Limited Warranty does not affect any legal rights provided to you by
law and does not preclude any remedy you may have under law.
In states where liability limits are not precluded by statute, the maximum liability of Tivoli Audio
shall not exceed the purchase price paid by you for the product. In states where limitations of
liability are precluded by law, Tivoli Audio shall be liable for no more than the direct damages for
bodily injury, and/or real or personal property arising from the negligence of Tivoli Audio.
Where not prohibited by law, Tivoli Audio shall not be liable for special, incidental, consequential,
or indirect damages. Some places do not allow limitations on the exclusion or limitation of relief,
special, incidental, consequential or indirect damages, or the limitation of liability to specified
amounts, so the above limitations or exclusions may not apply to you.
10
This Limited Warranty is void if the label bearing the serial number has been removed or defaced.
For service outside the USA, please contact your local distributor.
If you purchased an extended service contract from your dealer and service is required after the
term of this Limited Warranty has expired, please contact your extended service contract provider
to obtain service.
For your convenience, you may register your product for warranty service online at our website,
www.tivoliaudio.com. There is no legal obligation for you to provide personal information. However,
such information allows us to maintain a record of the Tivoli Audio products acquired by you and
better understand the purchasers of our products. The information collected will be used for
marketing purposes by Tivoli Audio and, where permitted, to contact you in relation to the products
you have acquired or other products which might be of interest to you from Tivoli Audio or other
companies. The information that you provide may be processed in another country.
Please visit the Tivoli Audio FAQ section at http://www.tivoliaudio.com prior to any request
for warranty service as information available there may answer your questions or concerns.
You may email questions to us at [email protected]
Specifications:
Model:
The Connector™
Dimensions:
3.52" W x 2.24" H x 3.11" D (89.5mm W x 57mm H x 79mm D)
Weight:
4.5 oz. (0.128 kg)
All specifications subject to change without notice.
Tivoli Audio reserves the right to make product changes without notice.
Tivoli Audio, the Tivoli Audio logo, and The Connector are registered trademarks of Tivoli Audio, LLC. Patent Pending.
iPod, iPod classic, iPod nano, and iPod touch are trademarks of Apple Inc., registered in the U.S. and other countries.
Made for:
iPod nano (1st, 2nd, 3rd, 4th, and 5th generation)
iPod touch (2nd and 3rd generation)
iPod classic
iPod with video
iPod with color display
iPod with Click Wheel
11
This manual was written by Peter Skiera and cannot be
reproduced in whole or in part without the permission
of Tivoli Audio. The information included within this
owner’s manual was accurate at the time of printing.
Tivoli Audio shall not be held liable for operational,
technical, or editorial errors/omissions. Visit our website
for the latest version of the owner’s manual.
http://www.tivoliaudio.com
For more information about other exciting products
from Tivoli Audio, please visit our website or contact
us directly (in English):
Tivoli Audio, LLC
Seaport Center
70 Fargo Street, Suite 900
Boston, MA 02210 USA
1.877.297.9479
www.tivoliaudio.com
[email protected]
TCNA072011