1
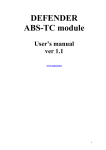
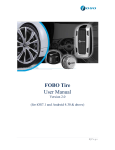
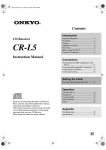
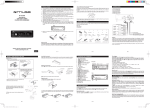
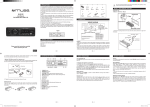
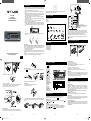
LINEOUT
M-1010 MR
User Manual
CAR RADIO CD/MP3
PLAYER WITH USB & SD
3
2
* Don’t store discs in places with high temperatures or high humidity, they can become
warped. After playing, store the disc in its case.
5
1
3
5
7
2
4
6
8
1
3
5
7
2
4
6
8
FUSE holder (15 A)
PRECAUTIONS
1. Do not attempt to modify the unit, modifying the unit may cause an accident.
2. Installation or servicing of the unit by persons without training and experience in
electronic equipment and automotive accessories may be dangerous and could
expose you to the risk of electric shock or other hazards.
3. Stop the vehicle before carrying out any operation that could interfere with your
driving.
4. Keep the volume at a level which you could hear sounds from outside the vehicle.
5. Do not work in extremely high or low temperature. Be sure the temperature inside
the vehicle is between +60°C and -10°C before turning on your unit.
6. When replacing the fuse(s), the replacement must be of the same amperage as
shown on the fuse holder.
7. Do not block vents or radiator panels. Blocking them will cause heat to build up
inside and may result in fire.
8. Using this unit without running the engine can result in battery drainage.
9. Use only in cars with a 12 volt negative ground.
10. After completing the installation and beginning to play the unit(including replacing
the battery), please remove the front panel at first, and then press RESET button
on the base with pointed object (such as ball-point pen) to set the unit to initial status.
PartB
6
PartA
1
4
UNPACK YOUR UNIT
When you unpack your new car radio, make sure that you have removed all the accessories and information papers:
Main unit
User manual
Accessories:
1
7
11. Before you install the unit, remove absolutely the two transportation screws on top
of the unit.
2
3
4
8
5
9
10
6
11
4-SPEAKERSYSTEM
- - (GREEN/BLACK)
RearLeft
(GREEN)
+ +
Speaker
FrontLeft
Speaker
FrontRight
Speaker
RearRight
Speaker
(WHITE/BLACK)
-
-
+
+
(WHITE)
-
-
(GRAY/BLACK)
+
+
(GRAY)
-
-
(VIOLET/BLACK)
+
+
(VIOLET)
GroundWire (Black)
+12V Accessory/Switch (Red)
Power Antenna/Amplifier Turn on (Blue)
+12V Constant Power Supply (Yellow)
Caution!
- Make sure to connect the color coded leads according to the diagram. Incorrect connections may cause the unit to malfunction or damage the vehicle’s electrical system.
- Make sure to connect the speaker (-) leads to the speaker (-) terminal. Never connect
the left and right channel speaker cables each other or to the vehicle body.
- Make sure all the connections are completely correct before turning on your unit.
Do not connect the ignition wire (red) and the battery wire (yellow), it may cause a short circuit,
even result in fire.
INSTALL AND REMOVE THE UNIT
CONNECTION
Notice on disc
Use such discs may cause malfunction or breakdown of the internal mechanism:
with large scratches; with irregular shape; cracked; with any cellophane tape or other
glue on it or with peeling off marks; with protection sheet; equipped with stabilizers, etc.
* Do not attempt to load more than one disc.
* Only 12cm discs are compatible.
* New discs may have some roughness around the edges. Before load such disc into
the player, use a ball-point pen or the like to remove any roughness from the edge of
the disc.
* If there is a scratch, dirt or fingerprints on the disc, it may cause tracking error. Before
playing, clean the disc with a clean cloth. Wipe the disc from the center out.
Please read the instruction carefully
before operating the unit.
English
1. Antenna socket
2. Line out Right (red)
3. Line out Left (white)
4. Output plug (male)
5. Output plug (female)
6. FUSE holder (15 A)
.
GB - 1
GB - 2
GB - 3
Information display
- In case a RDS station is received.
In radio mode: CT -> FREQ ->PTY ->PS
In CD (MP3 / WMA) mode: CD (MP3/WMA) -> CT -> FREQ -> PTY ->PS
- In case received station is not RDS.
In radio mode: CT -> FREQ -> NO PTY -> NO PS
In CD mode: CD -> CT -> FREQ -> NO PTY -> NO PS
LOCATION OF CONTROLS
M5 X 21
M5 X 21
Remove the Front Panel
Press
button in the upper left corner, and then the front panel will be folded down.
- Method 2 DIN Rear-mount (For Japanese car)
Note: Never put any objects into the front panel.
1. Remove the outer trim frame.
2. Select a position where the screw holes of the mounting bracket supplied with the
car and the screw holes of the main unit become aligned (are fitted).
3. Tighten the screws. And then fasten them to the car.
Install the unit
- Method 1: DIN Front-Mount
Remove the unit
1. Detach the front panel. (please refer to upper part)
2. Take out the outer trim frame.
1.
2.
3.
4.
5.
6.
7.
8.
9.
10.
11.
12.
13.
14.
15.
16.
17.
18.
19.
20.
21.
22.
23.
24.
25.
26.
AF button
(release button)
PWR button
7/MOD button
disc slot
SEL/VOL knob
9/
button
8/
button
LCD display
(eject button)
USB Port
AUX IN jack
6/DIR+ button
5/DIR- button
4/RDM button
3/RPT button
2/INT button
1/PAU button
BAND/LOUD button
0/DSP button
EQ button
TA button
PTY button
SCH/AMS button
RESET button
SD/SDHC/MMC slot
NOTE: It will return to normal play mode if no key is pressed within 5 seconds.
Reset the unit
Operating the unit for the first time or after replacing the car battery, you must reset
the unit. To set the unit to initial status, press RESET button located on the base with
a pointed object. When some errors occur in display, you can also reset the unit, but it
will erase the clock setting and some memorized functions.
SOUND FEATURES
Volume adjusting:
To increase or decrease the sound level, rotate SEL/VOL knob clockwise or anticlockwise.
25
26
BASIC OPERATION
3. Insert the keys supplied to the unit at the both sides of the unit (shown as illustrated)
until they click. Pulling the keys and makes them to remove the unit from the dashboard.
GB - 4
AR-3108 IB MUSE 001 REV0 GB.indd1
1
Turning on/off the unit
Press PWR button to turn on the unit. Press this button again to turn off the unit.
Note: When the unit is off, press any key except
to turn on the unit.
Preset equalizer
When you are listening to pop music, classic music or rock music, use the equalizer to
adjust the sound quality. Repeatedly press EQ button to select different equalizer mode
in following order: FLAT->POP->ROCK->CLASS -> EQ off.
Selecting the mode
After the unit is on, press 7/MOD button to select different sourcing mode: Radio
CD
USB
SD/MMC
AUX
Switching Loudness On/off
Press and hold BAND/LOUD button until “LOUD ON” shows on display to activate
LOUDNESS function. By this function, you can increase the low frequency, which can
improve sound sensitivity. Press and hold this button again until “LOUD OFF” to cancel
LOUDNESS function.
Time display
Press 0/DSP button to show the current time on display.
Adjust time: Long press 0/DSP until clock time with flashing hour digits appears.
Then Press
and
button to adjust the hour value and press 0/DSP to confirm.
Then minute digits flash. Press
and
button to adjust the minute value and
press 0/DSP to confirm.
Install the front panel
Insert the panel into the housing and make sure the panel is properly installed.
Otherwise, abnormality occurs on the display or some keys will not function properly.
GB - 5
Setting the Sound:
Repeatedly press SEL/VOL knob to select the desired mode in the following order :
“BAS” (Bass) -> “TRE” (Treble) -> “BAL” (Balance) -> “FAD“ (Fader) ->“BEEP“ (BEEP
ON/OFF) -> “TA VOL“ (TA volume) ->”LOC” (local) ->”STEREO” -> “EON” (EON ON/
OFF) -> “VOL” (Volume). After selecting the desired mode, you can adjust the current
level by rotating the SEL/ VOL knob.
- BEEP: In Beep mode, rotate SEL/VOL to select “BEEP ON” or “BEEP OFF”, for corresponding BEEP status.
- EON: please refer to RDS operation.
Note: The unit will return to the previous mode after 5 seconds without key press.
GB - 6
GB - 7
2011-8-23
10:09:35
LISTENING TO THE RADIO
Selecting band
In tuner mode, repeatedly press BAND/ LOUD button to select bands in following order: FM1->FM2->FM3.
Manual/automatic tuning
- Manual Tuning
Press and hold button
or
until “MANUAL” shows on display, then press button
or
continuously to select a station upward or downward. Press and hold button
or
to tune the station with a faster speed.
- Automatic Tuning
Press
or
once, the radio automatically searches a station upward or downward
respectively and plays when it finds a station. Press
or
once to stop scanning.
Scanning/memorizing stations automatically
- By SCH/AMS button
In tuner mode, press and hold SCH/AMS button for 3 seconds to start scanning for stations and store them automatically in memory.
Press SCH/AMS button, the radio plays each preset station for a few seconds. Press
SCH/AMS again or numeric buttons 1-6 to listen to corresponding station.
- By number button 1-6
1. Tune to a station by
or
button.
2. Press and hold one of the 1- 6 Number buttons for 2 seconds until LCD shows the
corresponding number, which indicates that station is stored in the corresponding number button.
3. Under radio mode, press 1- 6 Number buttons to listen to stored stations.
4. When you are listening to a station stored on a number button, press and hold another number button for more than 2 seconds to store the station on this number button.
Note: The unit can be stored up to 6 stations for each band.
-- RDS (Radio Data System) Operations -This unit has a built-in RDS decoder system that supports broadcast stations transmitting RDS data. This system can display the name of the broadcast station being received and can automatically switch to the broadcast station with the best reception as
you travel on long distances (AF switching). A traffic announcement broadcast from a
RDS station, no matter what mode you are. Additionally, if EON information is received,
enables automatic switching of other preset stations on the same network and interruption of the station being received with traffic information. This function is not available
in some areas.
Alternative frequency (AF)
The AF function switches to a different frequency on the same network in order to
maintain optimum reception. In FM mode, press AF button, certain program will be
automatically searched and received. If the reception of the current broadcast station
deteriorates, “AF” appears in the display and the radio searches for the same program
on another frequency. Press AF button again to cancel this function.
When reception is bad, the “AF” icon will blink.
Press and hold AF button for 3 seconds, the unit will be under “REG ON” or “REG
OFF” mode:
REG ON: Should be selected to list the local broadcast of the current station, even
if there is a national broadcast of this station.
REG OFF: Should be selected to listen to the national broadcast of the current station.
Traffic alarm (TA)
In the TA standby mode, when a traffic announcement broadcast starts, the traffic announcement broadcast is received as top priority regardless of the function mode so
you can listen to it. Traffic programme (TP) automatic tuning is also possible.
Press TA button, when LCD shows “TA”, traffic program will be automatically searched
and saved, when LCD shows “TP”, this means that the RDS broadcast station being
received has traffic announcement programmes.
If you press TA button while a traffic announcement broadcast is being received, the
traffic announcement broadcast reception is cancelled and the unit goes into the TA
standby mode.
If a TP station is not received, the unit continues searching.
Press TA button again to stop searching, “TA” goes off.
ALARM
“ALARM”will be displayed when an emergency broadcasting is received; meanwhile
sound output level will be adjusted to the preset output level automatically when the
volume control is set at minimum.
EON: (Enhanced Other Networks Information)
Press and rotating SEL/VOL to select EON mode, EON ON. When receive the EON
information, the EON indication is on. With EON facility, it offers the ability for local
stations to ”break into” a national station’s broadcast for the duration of a Traffic Announcement.
Program type selecting (PTY)
When PTY is selected, the radio starts to search corresponding PTY information, and
stops when the corresponding PTY information is detected.
If corresponding PTY information does not exist any more, PTY is automatically
stopped to normal mode.
When PTY mode is engaged. The PTY switch is shared as follows:
PTY SPEECH group
GB - 8
Note
* Do not use CDs with irregular shape (for example octagonal or heart-shaped).
* Notes: CD-Rs or CD-RWs playback capability of this player may vary depending on
quality media, CD-Burner, burning speed and application software.
* There are many USB devices or SD/SDHC/MMC card on the market. We cannot
guarantee to support all different models. Please try another USB device or SD/SDHC/
MMC card if your device is not supported.
* The unit might not support all the multimedia files stored in SD/SDHC/MMC card or
USB because it includes some special playback procedure which might not be compatible with the procedure of this unit.
PTY MUSIC group
PTY off
According to above 2 groups, the preset number is used for PTY selection as follows:
MUSIC group
1. POP M, ROCK M
2. EASY M, LIGHT M
3. CLASSICS, OTHER M
4. JAZZ, COUNTRY
5. NATION M, OLDIES
6. FOLK M
1. Connect your auxiliary source (e.g. mp3 player) to the AUX IN jack.
2. Press PWR button to turn the unit on.
3. Press 7/MOD to select AUX mode.
4. Start playback from your auxiliary source.
5. Adjust the volume to desired level.
6. Disconnect your auxiliary source from the Aux in jack, press 7/MOD button to select
other source.
MAINTENANCE
Precaution
- Clean the front panel with a soft cloth, or damp chamois leather. Never use solvents.
- Handling the Detachable Front Panel: Do not expose to rain or water.
- Do not drop or apply shock.
- Make sure that you keep your set away from high temperatures.
- The use of apparatus in moderate climates.
- Do not be exposed to dripping or splashing, and that no object filled with liquids, such
as vases, shall be placed on the apparatus.
- No naked flame sources such as lighted candles should be placed on the apparatus.
Cleaning the Connector
If the connector between the main unit and the front panel is dirty, may result in abnormal working condition. To avoid such problems, please detach the front panel, and
clean the connector with an alcohol swab. Gently clean and avoid damaging the connector.
(1/PAU)
(2/INT)
(4/RDM)
(5/DIR -)
(6/DIR +)
,6
7/MOD
8/
LISTENING TO DISC/USB/SD
9/
Load/Remove a disc
Insert the disc into the DISC SLOT with the printed side facing up. The player will play
the disc automatically. If a disc was inserted, press 7/MOD button to start playing.
To remove the disc, press
button.
To insert a USB devices (not included)
Open the front panel, connect your USB device to the USB port, it will switch to “USB”
mode automatically. If USB has been inserted, press 7/MOD button to switch to USB
mode.
To insert an SD/SDHC/MMC card (not included)
Press button
to fold down the front panel first. Insert your SD/SDHC/MMC card
in card receptacle. Close the front panel and it will automatically start playing. If SD/
SDHC/MMC card has been inserted, press 7/MOD button to switch to card mode.
Basic player functions
Play/pause: press 1/PAU to suspend momentarily the playing track. Press 1/PAU
again to resume playing.
Skip/fast search: press button
to skip forward to next track and
to skip backward to previous track. Press and hold
or
to search quickly within a track.
Intro scan: press 2/INT button when it show “INT ON”, then the player will play the first
10 seconds of each track in the disc, press again to cancel this function when it show
“INT OFF”.
Repeat : Press 3/RPT button once to repeat your desired track. Press again to repeat
all.
Random playback: Press 4/RDM button, all tracks will play randomly.
Directory selection: Press DIR-button or DIR + button to select directory downward or
upward. If the MP3 disc does not contain any directory, there is no function of pressing
DIR- button or DIR + button.
0/DSP
(rotate)
- Search by track number:
1. Press SCH/AMS button once, LCD shows “NUM SCH” and “NUM ***”, press the
keys standing for corresponding numbers (refer to upper list).
2. Press SEL/VOL knob to start playing.
- Search by letter:
1. Press SCH/AMS button twice, LCD shows “FILE SCH” and “*- - - -”, press the keys
standing for corresponding letters (refer to upper list).
2. Repeat this procedure until you finish the file name.
3. Press SEL/VOL knob to start searching.
4. Rotate SEL/VOL knob to select the file you want. Then press to start playing.
- Search by folder:
1. Press SCH/AMS button thrice, LCD shows “DIR SCH” then the total directories and
available directories name.
2. Rotate the SEL/VOL knob to search your desired folder, press SEL/VOL knob to
enter the selected directories.
3. Rotate the SEL/VOL knob to select your desired track, press SEL/VOL button to
start playing.
Exit disc/USB/SD card mode
1. Press
to eject the disc. If the disc is not taken out within 10 seconds, it will be automatically reloaded.
2. To exit USB mode, disconnect your USB device from the unit, it will switch to tuner
mode automatically.
3. To exit card mode, take out your SD/SDHC/MMC card from the unit, it will switch to
tuner mode automatically.
GB - 10
GB - 11
WARNINGS
SPECIFICATIONS
General
Power Requirement
Load Impedance
Max. Power Output
Tone Controls
LISTENING TO AUXILIARY SOURCE
KEY
/VOL(press)
(3/RPT)
SPEECH group
1. NEWS, AFFAIRS, INFO
2. SPORT, EDUCATE, DRAMA
3. CULTURE, SCIENCE, VARIED
4. WEATHER, FINANCE, CHILDREN
5. SOCIAL, RELIGION, PHONE IN
6. TRAVEL, LEISURE, DOCUMENT
GB - 9
TROUBLE SHOOTING GUIDE
Searching a track in MP3-CD/USB/SD:
Use the keys for corresponding number or letter when you search a music file:
12V DC (11-16 V allowable)
4ohms
40W x4
±10 dB
Bass at 100 Hz
Treble at 10 kHz
Dimensions
Mounting Dimensions
Weight Approx.
Approx. 188 x 188 x 59 mm (d / w / h)
Approx. 169 x 182 x 53 mm (d / w / h)
Approx. 1.2 kg
FM Section
Tuning Range
IF Range
Usable Sensitivity (-30dB)
Signal-to-noise Ratio
Stereo Separation
87.5-108 (MHz)
10.7 MHz
15 dBuV
50 dB
25 dB
CD player Section
Signal-to-noise Ratio
Separation
Distortion
Frequency Response
60 dB
50 dB
0.1%
20 - 20000Hz
ATTENTION: To reduce the risk of electric shock, do not remove
the cover. There are no user serviceable parts inside the unit. Refer all servicing to qualified personnel.
The lightening flash with arrowhead symbol within the triangle is a warning
sign alerting the user of “dangerous voltage” inside the unit.
The exclamation point within the triangle is a warning sign alerting the user of
important instructions accompanying the product.
CAUTION: Invisible laser radiation when open and interlocks defeated. Avoid
exposure to beam.
WARNING - To reduce the risk of fire or electric shock, do not expose this appliance to
rain or moisture.
If at any time in the future you should need to dispose of this product please
note that Waste electrical products should not be disposed of with household
waste. Please recycle where facilities exist. Check with your Local Authority
or retailer for recycling advice.(Waste Electrical and Electronic Equipment
Directive)
Note:
Due to continuous product improvement, specifications and design are subject to
change without prior notice.
CAUTION! This set uses a laser beam. To prevent any accident due to this type of
beam, the set should only be opened by properly trained personnel. The unit conforms
to the international safety specifications and to guide lines of the European community
and also complies with current standards concerning electrical safety and electromagnetic compatibility EMC.
Notes:
For the sake of safety, always shut down the engine and take out the ignition key before cleaning. Never keep your finger or any metal device on the connector directly.
Replacing the Fuse
Make sure the amperage matches the specified value when replacing the fuses. If the
fuse is blown, check the power connection and replace with a new one. If the same
problem occurs, it would be subjected to the malfunction in-house. In such cases,
please consult the nearest service dealer.
GB - 12
AR-3108 IB MUSE 001 REV0 GB.indd2
2
GB - 13
GB - 14
GB - 15
2011-8-23
10:09:38