1
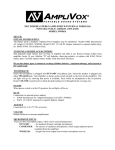
HALF-MILE HAILER w/Internal Wireless
PORTABLE PUBLIC ADDRESS SYSTEM
MODEL SW610A
INCLUDES:
•
•
•
•
Multimedia Stereo Amplifier w/Internal Wireless Receiver
Special gripper handle and shoulder strap
Headset Microphone and Wireless Transmitter
Lapel Microphone
SET UP:
INSTALL POWER SUPPLY
The Battery pack is standard. Optional Power Supplies may be substituted. Model S1460,
International AC Adapter/Recharger (110/220V, 50/60Hz). Model S1462, 12 Volt DC adapter
(automotive cigarette lighter plug-in). S1465, NiCad Battery Pack.
TO INSTALL OR REPLACE BATTERIES
Slip fingernail under battery door on back or amplifier and slide it out. Remove battery holder
from amplifier. Insert 10 new Alkaline “D” cell batteries, be sure to observe polarity, or replace
with S1465 battery holder. Carefully replace battery holder. Slide door back into place. Wireless
transmitter requires one 9-volt battery.
Do not mix battery types or attempt to recharge alkaline batteries - equipment damage, safety
hazard or fire could result.
TO OPERATE:
Insure the speaker is plugged into left SPEAKER jack. Plug wireless antenna into the jack to the right of
the auxiliary output jack. Turn amplifier on (large rocker switch located on the front of the amplifier). The
red light will go on, showing that power is available. Wireless receiver ON-OFF switch is located on right
side of amplifier. Insure both transmitter and receiver are on same frequency (A or B). Turn on power
switch located on wireless transmitter. Rotate VOLUME control knob to obtain desired loudness level
throughout the coverage area.
ON-OFF
When power switches are in the ON position, the red light will be on.
DC IN
Connection for optional power adapter:
• S1460 International AC Adapter/Recharger (110/220V, 50/60Hz)
•
S1462 12 Volt DC (automotive cigarette lighter) Adapter
AUX OUT
Connection for 12 to 15V DC accessory
LINE IN L+R (SEPARATE-COMBINED)
Combines the separate left and right AUX LINE IN channels. This combined signal will be
amplified and appear on both the LEFT and RIGHT channels of the SPEAKER and LINE
OUT OUTPUTS.
VOLUME
Rotate clockwise to increase amplification of Microphone inputs.
MICROPHONE INPUTS
There are three microphone inputs, which can be used simultaneously:
DYNAMIC
- for standard dynamic cartridge microphones
CONDENSER - for electret or condenser microphones, which require phantom power
(supplied from the amplifier)
WIRELESS
- accepts line-level output from wireless microphone receiver
AUXILIARY
To add pre-recorded music or sound effects during your presentation, just plug your CD player,
tape player or computer sound card into the LINE IN jack. Separate VOLUME and TONE
control knobs let you balance the program source with the live microphones. If using an external
wireless receiver, for best sound quality it should be connected to the LINE IN jack.
OUTPUT
To tape record your speech or program, connect the LINE OUT on the amplifier (using cable
with standard 3.5mm plug) to the input on a tape recorder.
SPEAKERS
Two separately amplified speaker jacks allow you to use one or two speakers for additional sound
power or true stereo output. (Use model S1260A for matched additional speaker.) Note: when
using a stereo AUX source with a single speaker, only one of the stereo channels will be heard.
However, all MIC inputs are heard equally on both channels.
ANTENNA
Jack for wireless antenna
INTERNAL WIRELESS RECEIVER(on right side of case)
Power on and off and Frequency A-B switches. Frequency should match wireless transmitter.
PROBLEM SOLVING
HOWLBACK is the howl or screech often heard in sound reinforcement systems. It is caused
by sound from the loudspeaker returning to the microphone. AmpliVox systems utilize proven
acoustical principles to minimize this; however, there is no way to completely eliminate
howlback under conditions of high amplification. If howlback occurs check the following:
1. User’s hand covering the head of the microphone. [Hold microphone under head slots.]
2. Sound can easily re-enter microphone. Keep loudspeaker turned toward audience. Note:
sound can be reflected from a hard surface back through the microphone. [Turn speaker.]
3. User holding microphone in a reflecting position. [Turn microphone.]
4. Volume setting too high. [Reduce microphone channel volume; compensate by speaking
louder or closer to the microphone.]
NO SOUND
Make sure amplifier POWER switch is turned on and red LED is lit. If switch is on and LED is
not lit, check to see that batteries are properly connected and at full charge. If using optional
power adapter, check to see that front panel connector is properly seated, and verify that the
power source is live.
IF YOU HAVE ANY QUESTIONS OR PROBLEMS PLEASE CALL OUR CUSTOMER
SERVICE DEPARTMENT AT 1-800-267-5486