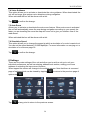
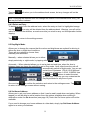
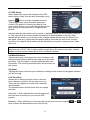
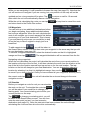
1
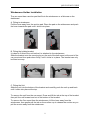
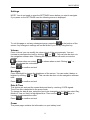
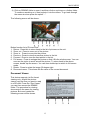
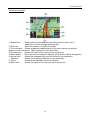
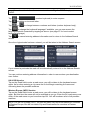
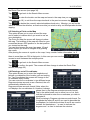
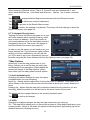
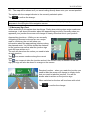
User Guide
R350
2nd edition
www.binatonegps.com
Binatone Navigation software
Binatone Helpline (for UK only)
Monday to Friday from 9:00am to 5:00pm
Tel : 0845 345 9677
** Please note that all calls are charged at local rate
IMPORTANT
IMPORTANT
Satellite signals are required for this product to function in Navigation Mode.
There may be occasions within your home or surrounding area when the signal
strength is limited and Navigation may not be possible.
This is quite normal for products of this type.
You can check the number of satellite signals that the unit is receiving and the
strength of those signals by viewing the GPS Receiver.
Unpacking your Binatone Navigation System
In the box you will find
·GPS navigation device
·Car mounting kit
·In-car charger
·USB cable
·User guide
Keep the packaging materials in a safe place in
case you later need to transport the unit. Keep your
sales (till) receipt, which is your guarantee. Before
you can use the unit, you’ll need to fully charge the
battery as described on page 6, please also read
the notes on the page 2.
WARNING:
Your GPS device operates under open sky
conditions in order to receive a satellite signal.
Please ensure that you are not using the device
indoors or in areas where the satellite signal is
weak.
For the first time of use or after a few days of no
use, it may take up to 10 minutes to acquire a
satellite signal. It is recommended to be stationary
during the start up process.
*USB cable can be either used to charge your device with your computer or
update your system. Charging via the USB cable will take much longer than by
mains/car charger and is not advised.
1
IMPORTANT
Safety
The Global Positioning System
The Global Positioning System (GPS) is a satellite based system that provides
location and timing information around the globe. The GPS is operated and
controlled under the sole responsibility of the Government of the United States of
America, who are responsible for its availability and accuracy. Any changes in
GPS availability and accuracy, or in environmental conditions, may impact the
operation of you Binatone Personal Navigation Device (PND).
Using Your PND in the Car
When using your PND while driving it is essential that you drive with due care
and attention. Never modify the settings or program you PND while driving. Only
look at the PND map when it is safe to do so. When mounting the PND in your
car make sure that it does not obscure your view or impede the operation of any
driving controls.
Prohibited Areas
Do not operate your PND in hospitals or near any electrical medical equipment.
Do not operate your PND in aircraft.
Do not operate while on a petrol station forecourt.
Battery
Your PND uses a Li-polymer battery. Do not use it in humid, wet or corrosive
environments. Do not operate or store your PND in high temperatures (>60℃) or
in direct sun light. Do not pierce or break the battery casing.
Failure to follow these cautions will invalidate the warranty and may
cause the battery to leak acid, become hot, explode or ignite and
cause injury or damage.
If you come into contact with leaked battery acid wash the contact
area thoroughly and seek medical attention.
The Li-polymer battery contained in this unit must be recycled or
disposed of properly.
Do not dispose of in household waste or burn.
2
CONTENTS
CONTENTS
Important……………………………………………………………………….
In the Box ……….………………………………………………………...
01
01
Safety …………………………………………………………………………… 02
The Global Positioning System …………………………………………… 02
Using Your PND in the Car .…………………………………………….. 02
Prohibited Areas .…………………………………………………….…… 02
Battery..…………………………………………………………………….. 02
Contents .………………………………………………………………………. 03
Quick Start Guide ……………………………………………………………
Position of the Controls …………………………………………………
Charging the Battery …………………………………………………….
SD Memory Card ………………………………………………………...
Car Adaptor ………………………………………………………………
Turning the Sat Nav Unit On/Off ………………………………………..
Turning the Sat Nav Unit Off (Sleep Mode) .…………………………..
System Reset …………………………………………………………….
Windscreen Holder Installation …………………………………………
06
06
07
07
07
08
08
08
09
Getting Started …….…………………………………………………………. 10
Starting Up ... ……………………………………………………………… 10
Settings ……………………………………………………………………. 11
Multi-Media ………………………………………………………………… 12
Picture Viewer..……………………………………………………... 12
Document Viewer …………………………………………………... 13
GPS Receiver ……………………………………………………………… 14
Additional maps and upgrades …………………………………………… 14
3
CONTENTS
NAVIGATION
1. Introduction.…………………………………………………………. 15
1.1 GPS connection.……………………………………………… 15
2. Getting Started...……………………………………………………… 16
3. Navigational Map Screens.………………………………………….. 17
3.1 Free Navigation………………………………………………….. 17
3.2 Route Navigation………………………………………………… 18
4. Browsing the Map……………………………………………………. 19
5. Navigation…………………………………………………………….. 19
5.1 Free navigation…………………………………………………... 19
5.2 Route Navigation………………………………………………… 19
6. Go to……………………………………………………………………
6.1 Entering an Address/Postcode………………………………
6.2 Searching for a POI (Point of Interest)………...……………
6.2.1 POI near Current Position……………………………
6.2.2 POI in City…………………………………….………..
6.3 Selecting an Entry from the Address Book…………………
6.4 Selecting a Recent Destination……………………….……..
6.5 Selecting a Point on the Map…………………………………
6.6 Entering a set of Co-ordinates……………………………….
6.7 To Navigate Directly Home……………………..……………
19
20
22
22
23
24
24
24
25
26
7. Map Options………………………………………………………….. 26
7.1 North Up/Heading Up………………………………...…………. 26
7.2 3D/2D……………………………………………………………... 27
7.3 Motorway Sign Post…………………………………………….. 27
7.4 Voice Guidance………………………………………………….. 28
7.5 Auto Zoom………………………………………………………... 28
7.6 Simulation Speed…………………………………………..……. 28
8. Settings……………………………………………………………..…
8.1 Language…………………………………………………………
8.2 Safety Alert………………………………………………..…...
8.3 Trace Record…………………...………………………………..
8.4 Address Book…………………...……………………………….
8.4.1 Add an Entry………………………………………….
8.4.2 Edit an Entry…………………………...……………….
8.4.3 Delete an Entry………………………...………………
8.5 Day/Night Mode…………………... ……... ……... ....…..
8.6 Set Home Address……………………………………………
8.7 GPS Status………………………………………………….…
8.8 Miles/Kilometre……………….….…………………………..…
8.9 About………………………………………………………………
8.10 Time Zone………………………….……………………..…….
4
28
29
29
29
30
31
31
32
32
32
33
33
33
33
CONTENTS
8.11 Brightness…………………………………………………………. 34
8.12 Calibration…………………………………………………….…… 34
9. Route Plan…………………………………………………..……….....…… 34
9.1 Navigating…………………………………………………….…….. 34
9.2 Waypoints……………………………………………………….….. 35
9.3 Simulate………………………………………………………….……. 35
9.4 Route Options…………………………………………………….…… 36
10. Route Navigation Menu………………………………………….……
10.1 Route Plan…………………………………………………………
10.2 Detour………………………………………………………………
10.3 Cancel Route………………………………………………………
10.4 Go to………………………………………………………………..
10.5 Route Information…………………………………………………
10.6 Map Options……………………………………………………….
10.7 Settings…………………………………………………………….
36
36
36
37
37
37
37
37
Frequently asked questions……………………………………. 38
The map contains an error / POI’s are missing………………………
I am experiencing problems getting a GPS fix……………………….
Where can I get technical support?……………………………………
Where can I get additional maps and guides……………….………..
38
38
38
38
Technical Specifications …………………………………….………. 40
EC Declaration of Conformity …………………………………….. 41
5
QUICK START GUIDE
Quick Start Guide
Please make sure that you read all of the information contained within this user
guide before operating this unit.
If you experience any problems, please go through the user guide before contacting
the customer helpline.
Position of the controls
1. Touch Screen
2. Charge Indicator– Displays the battery charging status.
Red; charging, Green; fully charged.
3. On/Off button – Turn On the unit when it is Off or in Sleep mode.
Turn the unit to Off or put into Sleep mode during operation.
4. Reset – System reset switch.
5. Speaker – For voice guidance instructions.
6. Memory Card Slot – Compatible with MicroSD cards. Do not remove a
memory card while it is in use.
7. Power Connection USB Port – For charging and data transfer.
8. Headphone Jack– Allows connection to external headphones.
6
QUICK START GUIDE
Charging the Battery
Before using your GPS device for the first time, we recommend that you charge the
unit for 5 hours via the mains/car charger, or until the charge light turns green.
Plug the mains/car charger into the
USB socket.
NOTE: Charging via USB cable. It is possible to charge the unit via the USB cable
but the charge time will be significantly increased. Also if the battery is very low the
unit will not fully charge.
The charging indicator on the unit will light up red. When fully charged the red light
will turn green.
When using the GPS device in your car, we recommend that you always use the car
charger in order to maintain the battery level.
If you have a MicroSD memory Card, you may install it refer to the picture
(below)
Switch the unit off first before installing or removing the MicroSD card.
When installing it can only be fitted one way – the contacts should be away from you
and the cut-off corner at the top (as shown above). Slide the card in and push it in so
that it clicks into place.
Once the card is installed it does not need to be removed.
If you need to remove the card, push the card in and it will eject from the slot.
Car Adapter
When using your PND in the car we recommend that you always use the in-car
charger to power the unit, especially on long journeys.
Plug the in-car charger into the USB socket of the unit. Pug the other end of the
adapter into the car’s cigarette-lighter / 12V DC socket.
The adaptor is also compatible with 24V DC sources, as found in many heavy goods
vehicles.
7
QUICK START GUIDE
Turning the Sat Nav Unit On/Off
Press and hold the On/Off button on the top of the unit for around 3 seconds, the unit
will power up and display the Menu screen.
Press and hold the On/Off button for
around 3 seconds during operation,
the unit will show the following display,
Turning the Sat Nav Unit Off or
Sleep Mode
Press the sleep icon
to put
the unit into sleep mode. Press and
hold the On/Off button again, to bring
the unit out of sleep mode. When
brought out of sleep mode the unit will
show the same screen as when the
unit entered sleep mode.
Press the Off icon
to turn the unit Off.
There is a 10 second timer which starts to count down, if there is no selection made
within 10 seconds, the unit will turn off automatically.
Note: If the unit is not to be used for a long period of time it is advised that you switch
the unit Off.
System Reset
Under extreme circumstances it may be necessary to reboot the system. Reset the
system if the following situation occurs:
• Long delay experienced with screen refresh rate or operation, resulting in an
inoperable unit.
• The system will not turn Off with the power button.
• No response with selection made on the screen.
The reset button can be found at the rear of the unit. Insert the tip of the stylus pen
or a small blunt implement into the reset switch hole in order to press. The system
will be immediately reset.
8
QUICK START GUIDE
Windscreen Holder Installation
The car mount has a suction pad that fits to the windscreen or a flat area on the
dashboard.
A. Fitting to windscreen
Pull the lever away from the suction pad. Place the pad on the widescreen and push
the lever towards the pad until it clicks into place.
B. Fitting the holding bracket
It is best to fit this to the unit before it is attached to the windscreen.
Slide the bracket onto the securing lug on the end of the ball mount at the end of the
car mount and then push down firmly, until it clicks in to place. The bracket can only
be fitted one way.
C. Fitting the Unit
Slide the unit into the bottom of the bracket and carefully push the unit up and back
until it clicks into place at the top.
To remove the unit from the car mount; Press and lift the tab at the top of the bracket
then pull the unit forward and out of the bottom of the bracket.
To remove the Car mount from the windscreen; Lift the lever away from the
windscreen, then gentle pull the tab on the suction cup to release the suction as you
pull the mount away from the windscreen.
9
MAIN MENU
Starting Up
Press the On/Off button on the top until the following screens are displayed,
When you press MENU, the following screens will be displayed:
10
MAIN MENU
Settings
NOTE: You do not need to enter the SETTINGS menu before you start to navigate.
If you press on the SETTINGS icon the following screen is displayed.
To exit this page or exit any subsequent page, press the
at the bottom of the
screen. Any changes in settings will not be saved if you exit by using this key.
Volume
Press ’volume’ you can modify the volume level of the voice prompts. You can
” or “
”. This can also be done via
increase or decrease the level by clicking “
the navigation software later. Pressing the speaker button will mute/un-mute the
speaker.
“
is shown when un-muted,
” can release the mute status.
Press
is shown when muted. Clicking “
” or
to confirm and exit
Backlight
Press ‘Backlight’ to change the brightness of the screen. You can make it darker or
” or “
”. This can also be done via the navigation software
brighter by clicking “
later.
Press
to confirm and exit
Date & Time
This device can auto-set the current date and time by receiving 3 GPS signals.
Time Zone this is defaulted to the area of sale.
To change the date & time, select the item to be changed e.g. for the date select Day,
Month or Year, so that it is highlighted blue. Then use the
and
keys, to
increase or decreased the value.
Press
to confirm and exit.
Power
The power page contains the information on your battery level.
11
MAIN MENU
Language
Press ”Language” to change the language. Use the
and
keys to
scroll between further language options. Select the language you desire from the
available options so that it is highlighted white. Then press
to confirm and exit.
About
The About page contains information about your operating system software version.
It also allows you to default the unit or to calibrate the screen to your touches.
Default
The unit will be returned to how it was when it left the factory. After selecting this
option you will be asked to confirm the reset.
Note : If you encounter any problems when connecting your unit to a PC using
ActiveSync. Carry out a reset of the unit before trying again.
Calibration
This function calibrates the unit to respond to your screen taps. You will need to use
this function only if the unit begins to respond inconsistently to your screen taps.
After selecting follow the on screen directions. Once the calibration has been
completed, press anywhere on the screen to return to the previous menu.
Multi Media
NOTE: if you press on the MULTI MEDIA icon the following screen is displayed.
Picture Viewer
This device supports, .bmp, .jpg and .gif file formats only (recommended picture size
for optimum usage: 500kb – it is not recommended to view pictures over 2mb). Press
the “Picture viewer” to show a list of names for all the picture files then click on the
file you want to view.
To view pictures (bmp and jpeg formats only):
1) Copy all the pictures you want to view onto a MicroSD card.
2) Insert your MicroSD card into the PND.
3) Select Multi Media and then the Picture viewer option.
12
MAIN MENU
4) Click on SDMMC folder to open it and then click on a picture or a further folder.
To continue searching or to load a photo it into the viewer. To go back through
the menu structure press the option “...”
The following screen will be shown:
Button function list of Picture Files:
1. Return : Press this to return back to the list of pictures on the unit.
2. Zoom out : Press to zoom out of the picture.
3. Zoom in : Press to zoom into the picture.
4. Previous : Press to view the previous picture in the list.
5. Forward : Press to view the next picture in the list.
6. Full screen : Press to enlarge the picture so that it fills the whole screen. You can
now use the stylus to scroll around the picture. To return back to the above
screen, double tap the screen. You can also double tap to switch to full screen
mode.
7. Rotate : Press to rotate the image 90 degree right.
8. Document name : This shows the file name of the current document.
Document Viewer
This device supports, txt file format
viewing only, as with the picture
viewer copy the files you want to read
to a SD card. Press the “Doc Viewer”
you can then access the SDMMC
folder. The procedure for viewing
documents is the same for viewing
pictures. But once loaded the
following screen will be shown.
13
MAIN MENU
Button function list of Document Files:
1. Return : Press this to return back to the list of pictures on the unit.
2. Page number : This shows the number of the current page and the total number
of pages in the document.
3. Page up : Press to scroll to the previous page.
4. Page down : Press to scroll to the next page.
5. Document name : This shows the file name of the current document.
GPS Receiver
NOTE: This page is for information only. You can view the number of satellite signals
the unit is receiving also the strength of these signals.
This page gives your current position in degrees longitude and latitude, your current
speed and the status of your position, i.e. Fixed 3D or Fixed Invalid etc.
The compass circle shows the satellites that the unit is receiving and the bar chart
shows the signal strength for these satellites
NOTE:
At least four GPS signals are required for the PND to function.
There may be occasions within your home or surrounding area when the
signal strength is limited and GPS navigation may not be possible.
This is quite normal of products of this type.
Additional maps and upgrades:
Please visit www.binatonegps.com or contact the helpline on 0845 3459677 for
more information.
14
NAVIGATION
1 Introduction
You have chosen a cutting-edge navigation system. Congratulations! Please enjoy using it.
This navigation system leads you straight to your destination, whether you are travelling by
car or on foot. You can navigate and plan your route with an easy-to-use and intuitive
interface, just by using your finger. You can also use this application to plan your trip to
suit your personal preferences and interests and to save interesting destinations before
you set off on your journey.
This manual leads you through the main features of the system.
1.1 GPS connection
Your navigation device uses GPS technology for navigation. The device receives signals
from a number of GPS satellites in order to determine your current position.
• Place your navigation device in a location with an unobstructed view to the sky to set up
your first satellite connection. In the car this will usually mean mounting the unit on the
lower part of the windscreen.
Note; It may take up to 10 minutes to establish the first connection. Subsequent
connections will be faster (30 seconds to 1 minute), but if you have not used the unit for
several days or are far away from the last location where you used the unit, it may take up
to 10 minutes again to find a strong signal.
15
NAVIGATION
2 Getting Started
Please make sure that the battery in your device is charged (see page 6).
Switch on the unit and from the menu select Navigation. The navigational software will
start to load.
First you will see the warning statement screen.
Tap on “Accept” to confirm that you have read the
statement and to continue. If you do not wish to
be shown this screen in the future check the box
next to “Don’t show this statement again”. You will
now be shown the Binatone screen, which shows
the progress of the loading software on the yellow
bar at the bottom.
Once the software has loaded you will be shown the
Free Navigation Menu screen, this is the starting
point for all your navigating needs.
For more information on free navigation mode (see
page 19).
In order to enter destinations and access the many
settings of the navigational software, tap Menu. This
will then take you to the Free Navi Menu screen.
You can choose from the 3 following options;
Go to – Opens the Search Menu screen. From here
you can select a point to navigate to.
Map Options – Allows you change the way the map
looks and behaves during navigation.
Settings – Allows access to the main settings menu
of the unit, which you can set to your personal
preference.
- Tap to return to the Free Navigation mode
- Tap to exit Navigation. You will be asked to confirm if you wish to exit, tap
Yes to exit, tap No to cancel and return to the Free Navi Menu.
- Returns you to either the Free Navigation screen or Route Navigation
screen if a route has been planned. This option is always available when not on any
Navigation screen.
16
NAVIGATION
3 Navigational Map Screens
The navigational map screens will be the most frequently used screens. The two
navigation screens are free navigation and route navigation and are shown below. Though
the screens look very similar there are some differences.
3.1 Free Navigation
1 Zoom out –
2 Compass –
Tap to zoom out on the maps.
Shows your current heading by means of a letter, while the red part of
the compass needle always points North. (Tapping will change
between 2D & 3D view).
3 GPS reception – Shows the current status of the GPS signal, Shown greyed out if you
do not have a valid signal and green if you do. Tap to enter the GPS
status screen (see page 31).
4 Time –
Shows the current time.
5 Current position – Shows you current position in Longitude and Latitude co-ordinates.
6 Menu button –
Tap to access the Free Navi Menu screen. (Only when in Free
Navigation)
7 Map scale –
Show a scale bar which changes as the map zoom level is altered
8 Position icon –
Shows your current position on the map as well as showing your
current direction of travel.
9 Volume – Tap to access the volume control menu.
10 Zoom in –
Tap to zoom in on the map.
17
NAVIGATION
3.2 Route Navigation
11 Speed limit–
Shown when you exceed the speed limit of the current road, if
switched on via the settings (see page 29).
12 POI icon –
Show the position of a point of interest.
13 Turn indicator – Shows a graphical representation of the next manoeuvre and the
distance to the manoeuvre. Tap to replay the voice instruction.
14 Current road – Shows the name of the road you are currently on.
15 Menu button – Tap to access the navigation options. (Only when in Route Navigation)
16 Arrival time –
Shows the estimated time you will arrive at your destination.
Distance –
Shows the remaining distance to your destination.
17 Route –
Indicates the planned route to be followed.
18 Next road –
Shows the name of the road you will be using next.
18
NAVIGATION
4 Browsing the Map
When in Free Navigation or Route Navigation it is possible to browse the map so that you
can look at parts of the map which are currently not shown.
To move the map around use the stylus (if provided) or your finger to press and hold on a
point on the map, then drag the map in the opposite direction you want to look at. E.g. to
view the map above the currently shown section, press on the screen and move the stylus
(if provided) or your finger down, the map will then re-draw to show the new section of map.
You can also change the zoom level of the map to be shown more detail or a larger
section of the map. In order to zoom simply tap on the
and
. Each tap will zoom the
map one level.
You can tap on roads or Point of Interest icons shown on the map to be given more
information relating to that point.
After moving the map from the starting location you will see the following icon appear
Tapping on this icon will return you to your current or last known GPS position.
5 Navigation
There are two modes of navigation; Free navigation and Route Navigation.
5.1 Free navigation
In free navigation the unit does not have a planned route for you to follow, so simply plots
your GPS position on the map and then follows your movement as you drive. The unit
shows you the current time and date, as well as your current position in latitude and
longitude co-ordinates.
5.2 Route Navigation
In route navigation the unit directs you via the map and with spoken directions to your
chosen destination. In order to plan a route you need to have a valid GPS signal, this can
be easily checked by looking at the GPS reception screen on the free navigation screen. If
the icon is greyed out then there is no valid signal, if the icon is white with green signal
waves then you have a valid GPS signal and navigation is possible.
From the Free Navi Menu screen select Go to, this allows you to enter your destination.
6 Go to
Tapping this opens up the Search menu screen,
from here you can enter a destination to
navigate too in several different ways. Each will
be described in turn in the pages that follow.
19
,
NAVIGATION
6.1 Entering an Address/Postcode
One of the most commonly used methods for inputting a destination into the unit, tap
Address the screen will change to show the following.
This screen shows a list of any previously used
cities/towns. You will also be able to enter a new city
name as well as changing the country you wish to
search within. Every time you enter a new city it will
be added to the list of recent cities so that it can be
quickly used in the future.
To select a previously used city, select the city from
the list so that it is highlighted orange and then tap
to accept or double tap on the city name, the
screen will change to the Address Search window with the selected city now shown on the
city field.
To change the country tap on the currently selected country name, this will be defaulted to
United Kingdom. A new screen will open with a list of all available countries (note: the list
of countries will depend on the model of unit you have purchased, e.g. UK & ROI or
Western Europe). Use the
or
keys to move through the list until you see your
desired country. Then select the country from the list so that it is highlighted orange and
then tap
to accept or double tap the country name. Alternatively tap in the white text
box which shows the name of the currently selected country, you will be shown a keyboard
screen. Enter the name of the country you are looking for and tap
. Tap
to
accept or double tap the country name. Now the screen will change to show either a
keyboard if no previous city has been entered which allows you to enter the name of the
city or postcode you are looking for or you will be shown a list of previously entered cities
as covered above.
If the country is correct and the required city does not appear on the previously used list or
you wish to enter a postcode. Tap on the white box at the top of the screen which says
“Click Here”, this will open a keyboard which allows you to enter the name of the city or the
postcode you are looking for.
Tap on the keyboard characters to enter the name of
the city or Postcode you are looking for. As you enter
characters the keyboard will start to blank out letters,
this is because the unit is narrowing down the search
and only showing characters which can be entered.
The number in the top right of the white box shows
the number of possible matches. Continue entering
characters until the unit narrows the search down to
a point where the remaining possible matches will be
shown on a list, or when the
is shown in white,
tap it to be shown all remaining matches. Scroll
through the remaining matches, select the correct city/postcode from the list and tap
to confirm or double tap the list item. The screen will change to the Address Search
window with the selected city now shown on the city field.
Note: That there is no need to enter any special characters in the city name as the unit will
20
NAVIGATION
search for and match whether these are entered or not. E.g. for CÁDIZ simply enter
CADIZ.
Tap
or
(number keyboard) to enter a space.
Tap
to delete an incorrect letter.
Tap
or
to change between numbers and letters (number keyboard only).
Tap
to change the keyboard language if available, you can now access the
languages special characters by tapping as above. (see page 27 for how to select
keyboard language).
Tap
screen.
to cancel entering address information and to return to the Address Search
Once the city/postcode has been entered, you will be taken to the Address Search screen.
If you entered a postcode the road will be automatically entered in to the Address Search
screen.
You can continue entering address information in order to narrow down your destination
even further.
UK & ROI Version
Tap on the Road field to enter a road name, you will be taken to the keyboard screen
again. As for when entering a city name the unit will begin matching the name and
narrowing down the possible matches.
Western Europe (WEU) Version
Tap on the Road field to enter a road name, you will be taken to the keyboard screen
again. But this time the name will not be matched as you go. Enter the full road name or as
much of the road name as you know then tap OK. You will be shown a list of all possible
matches.
NOTE: For the Full Europe (FEU). The unit will match City and Road names for countries
in Western Europe, But will not match City and Road names for countries in Eastern
Europe.
21
NAVIGATION
Tap on the House No. field to enter the house number, you will be taken to the keyboard
screen again. If the house number cannot be found you will be taken to the default position.
Tap on the Crossroad field to select a point where another road joins the entered road.
The screen will change to show a list of all joining roads, use the
or
keys to move
through the list until you see the correct road. Select the desired road and tap
or
double tap to confirm. You can also enter the name of the road by tapping on the white
box at the top.
When entering an address you have the following options;
Tap
. Once you have fully entered the destination you want to navigate to and are
happy, you will now be taken to the Route Plan screen (see page 34).
Tap
to view the location on the map and once in the map view you can browse
the map (see page 19), to exit from the map view back to the previous screen tap
.
You also have the option of selecting a point from this map to navigate to. This can be
used to exactly pin point your location, or allow you to quickly select a point on the map to
navigate to without having to scroll the map to the area you wish to select around. Place
the cursor on the point you would like to navigate to and tap
. You will be taken
directly to the Route Plan screen and your selected point will be entered as the destination.
Tap
to cancel entering an address and to return to the Search Menu screen.
6.2 Searching for a POI (Point of Interest)
The POI search allows you to quickly find points of
interest like petrol stations and places to eat in a
database of millions of POI. These places can be
either close by or at a distant location.
Tap POI to begin searching through the POI
database.
When tapped the screen will change to the POI
Menu, with two options available for searching for a
POI: Near Current Position and Around Address.
6.2.1 Near Current Position
Use this option to search for a POI from a particular
category or for all categories around your current
location as shown on the map (this will either be
your current GPS position or the position where you
last had a GPS lock).
From the POI category screen select the category
for which you want to search in and tap
. The
screen will change to show you all the POI for that
category which are near your position starting with
the closest.
22
NAVIGATION
Scroll through the list using the
or
keys till
you find the POI you are looking for. Select the item
so that it is highlighted orange then tap
or
double tap the item to confirm. You will be taken to
the Route Plan screen (see page 34).
Alternatively you can tap in the white box at the top
of the screen. This will bring up a keyboard screen,
which allows you to search for the name of a
particular POI. After entering the whole name or part
name tap
.
The screen will change to show a list of all possible
matching POI, scroll through the list of POI until
you find the one you are looking for and then tap
or double tap to confirm. You will be taken to
the Route Plan screen (see page 35).
At any point tap
to return to the POI
Category screen, if you are on the POI Category
screen tapping will return you to the POI menu etc.
Tap
to view the location on the map and
once in the map view you can browse the map (see page 19), to exit from the map view
back to the previous screen tap
. You also have the option of selecting a point from
this map to navigate to, this can be used to exactly pin point your location. Place the
cursor on the point you would like to navigate to and tap
. You will be taken directly
to the Route Plan screen and you selected point will be entered as the destination.
Note; When you carry out a search for a particular name of a POI. The unit will search
from a larger distance around your current position, than it did from the original search.
6.2.2 Around Address
Use this option to search for a POI in and around a
particular city. Before you can search for a POI you
will need to enter the name of the city you wish to
search around. For information on how to enter the
city name, see the section about entering a city under
the Address
section (see page
20).
As with POI near
Current Position
you will then
need to select a category for your POI. You will then
be shown a list of POI in and around your entered city.
Alternatively you can tap in the white box at the top of
the screen. This will bring up a keyboard screen, which
23
NAVIGATION
allows you to search for the name of a particular POI. After entering the whole name or
part name tap
.
Scroll through the list of POI until you find the one you are looking for and then tap
or double tap to confirm. You will be taken to the Route Plan screen (see page 34).
Note; When you carry out a search for a particular name of a POI. The unit will search
from a larger distance around your current position, than it did from the original search.
6.3 Selecting an Entry from the Address Book
This option allows you to quickly select one of your
address book entries to use as your destination.
Tap Address Book the screen will change to show
the address book screen and a list of any stored
entries.
Scroll through the list of entries using the
or
keys until you find the entry you require. Select it so
that it is highlighted orange and tap
or double
tap to confirm. The screen will then change to show
the Route Plan screen (see page 34).
Tap
Tap
to go back to the Search Menu screen.
to view the location on the map and once in the map view you can browse the
map (see page 19), to exit from the map view back to the previous screen tap
.
Tap
to delete the currently selected address book entry. Warning you will not be
asked to confirm the deletion, so make sure that you wish to carry out this operation before
tapping.
Note: In order to use the Address Book option, you will first need to store entries to the
address book. This can be done via the Address Book option in the Settings menu (see
page 31).
6.4 Selecting a Recent Destination
This option allows you to select one of your recently
used destinations and to use it again quickly. Tap
Recent Destinations the screen will change to show
the recent destinations screen and a list of any
previously entered destinations.
or
Scroll through the list of entries using the
keys until you find the entry you require. Select it so
that it is highlighted orange and tap
or double
tap to confirm. The screen will then change to show
24
NAVIGATION
the Route Plan screen (see page 34).
Tap
Tap
to go back to the Search Menu screen.
to view the location on the map and once in the map view you can browse the
map (see page 19), to exit from the map view back to the previous screen tap
Tap
.
to delete the currently selected address book entry. Warning: you will not be
asked to confirm the deletion, so make sure that you wish to carry out this operation before
tapping.
6.5 Selecting a Point on the Map
This option allows you to move around the map
and to select a location which you want to use as
your destination.
Tap Point On Map the screen will change to show
the map. The location of the map will either be your
current/last known GPS position or the last position
you viewed on the map.
You can then browse the map (see page 19) and
select a point you want to navigate to by placing
the cursor.
After placing the cursor at a point on the map, it may contain further information, i.e. if
there is more than one POI at that point. In this case you can use the
arrows to scroll between the multiple points.
Tap
to go back to the Search Menu screen.
Tap
to confirm the point. The screen will then change to show the Route Plan
screen (see page 35).
6.6 Entering a set of Co-ordinates
This option allows you to enter the longitude and
latitude co-ordinates of the location you are looking
for. Tap Coordinates the screen will change to the
co-ordinates entry screen.
You can enter the co-ordinates in two different ways,
Degrees:minutes:seconds or as a Decimal, the unit
automatically defaults to the
Degrees:minutes:seconds format (Note: when the
unit displays the co-ordinates of a location it always
shows then in the Degress:minutes:seconds format).
Tap in the white boxes next to either Lon or Lat, then
use the keyboard to enter the co-ordinates you wish to
navigate to.
When entering in Degrees:minutes:seconds format. For
Longitude the letters E and W are used to describe the
hemisphere, for Latitude the letters N and S are used to
indicate the hemisphere. ° is used to indicate the
degrees and ‘ is used to indicate the minutes.
25
NAVIGATION
When entering in Decimal format. The N, S, W and E keys are replaced with + and -,
where North and East are + and South and West are -. Use the . key to enter a decimal
point.
Tap
to change between Degrees:minutes:seconds and Decimal formats.
Tap
to delete any incorrect characters.
Tap
to go back to the Search Menu screen.
Tap
to confirm the entered co-ordinates. The screen will then change to show the
Route Plan screen (see page 34).
6.7 To Navigate Directly Home
Tapping Go Home will directly navigate you to your
set home address without having to tap any other
keys or enter an address. This is very useful as
your home address will be the destination which is
navigated to the most. The screen will change to
show the Route Plan screen (see page 33).
In order to use this option you will need to set your
home address first. If you select this option without
setting your home address first, the unit will ask
you if you wish to set it now. Alternatively this can
be done using the Set Home Address found in the Settings menu (see page 29).
7 Map Options
Allows you to set the map preferences to your
liking, it allows you to set the way the map looks
and behaves during navigation. When tapped the
screen will change to the Map Options screen,
from where you can easily select several options.
7.1 North Up/Heading Up
Changing this option changes the way the map is
orientated when you are navigating.
North Up – Means that the map will be fixed so that North is upwards. The position icon
will be shown in the centre of the screen and will rotate to show your current direction of
travel.
Heading Up – Means that the map will be rotated to always face the direction you are
travelling, while the position icon will be fixed at the lower centre of the screen.
The option with the orange indicator is the currently selected option.
Tap
to confirm the change.
7.2 3D/2D
Changing this options changes the way the map looks when you a driving.
3D – The map will be shown as if you were looking down at it from behind and above your
current position. (When in 3D mode, the option for selecting North Up/Heading Up will be
disabled and set to Heading Up only.)
26
NAVIGATION
2D – The map will be shown as if you were looking directly down onto your current position.
The option with the orange indicator is the currently selected option.
Tap
to confirm the change.
Note: You can toggle the map between 2D and 3D modes quickly, by tapping on the
compass in the top right of the navigation screen.
7.3 Motorway Sign Post
When switched on this option does two things. Firstly when driving down major roads and
motorways, it will show information about the approaching junctions. Secondly when you
approach your junction the screen will change to clearly show that this is your junction.
Approaching junctions – While you are currently
navigating a planned route and are on a major
road or motorway, the unit will show you
information about the approaching junctions along
the planned route. You will be shown the distance
to the junctions as well as what the junction sign
post will have written on it.
The unit will also show the action you need to take
at each junction;
The
road.
icon means continue along the current
The
icon means to take the junction and exit the current road, In addition to this the
sign post sign will also be shown in orange on the screen.
Required junction – when you reach the junction you
need to take the screen will change to clearly show
that you need to take this junction. You will be
shown what is written on the junction sign.
When switched on the box will be shown with a tick.
Tap
to confirm the change.
27
NAVIGATION
7.4 Voice Guidance
This option allows you to activate or deactivate the voice guidance. When deactivated the
unit will no longer give spoken voice directions during navigation.
When activated the box will be shown with a tick.
Tap
to confirm the change.
7.5 Auto Zoom
Allows you to activate or deactivate the auto zoom feature. When auto zoom is activated
the unit will automatically zoom the map during navigation according to your speed, the
faster you are travelling the more the map will zoom out to give you a better view of the
road ahead.
When activated the box will be shown with a tick.
7.6 Simulation Speed
This option allows you to change the speed at which a simulation of a route is carried out.
You can set the speed between 50-300 Mph/Kph. For more information on carrying out a
simulation of a route see page 36.
Tap
to confirm the change.
8 Settings
These are the main settings of the unit and allow you to set the unit up to suit your
individual preferences, as well as entering address book entries, setting your home
address or activating the trace record function.
When tapped the screen will change to the settings screen. Note that there is a second
page of options which can be viewed by tapping
options tap
Tap
, to return to the previous page of
.
at any point to return to the previous screen.
28
NAVIGATION
8.1 Language
Tap to open the language selection screen. You can
choose from 10 different languages. When a
language is selected not only will it affect the text on
the screen, but will also change the language of the
spoken voice directions.
Tap
or
to scroll back and forth
between each page.
Select the required language so that it is highlighted
orange and tap
to confirm. The unit will return
to the settings screen.
8.2 Safety Alert
Tap to open the safety alert options screen. From
this screen you can set two separate safety alerts.
Speed camera on – This lets you activate or
deactivate the speed camera warning, when
activated the unit will warn you of an approaching
speed camera visually and show you the distance to
the camera.
When the option is shown with an orange indicator it
is activated.
Speed alert when exceeding the road speed limit – This lets you activate or deactivate the
road speed limit warning. As well as speed camera locations, the unit contains information
about the speed limit of many roads. When activated the unit will show you the speed limit
for the road you are on with a fixed speed limit icon, if you exceed the speed limit
(including any tolerance you have set) for the road you are on the speed limit icon will flash
and the unit will beep.
When the option is shown with an orange indicator it is activated.
and
keys to
When active you can then change the speeding tolerance using the
select the tolerance you would like from 0%, 5%, 10%, 15% and 20%. The unit will then
only warn you when you exceed the speed limit by more than this percentage.
Set the required options and tap
screen.
to confirm the unit will then return to the settings
8.3 Trace Record
The unit is capable of logging all positioning
information received from the GPS satellites
during navigation. It then uses this
information to draw a track of the route on
the map. This enables you to review the
route at a later time.
If you have previously recorded any trace
records these will be shown in the list. If
there are no trace records you will have to record one first.
29
NAVIGATION
Recording a trace record: Use the
button to start the recording process. When
active this button will then change to show
. In this way the key will always show
the option which is currently not selected. It is recommended that you start recording after
your route has been planned or when you are in Free Navigation and you have a valid
GPS signal, and you should stop recording once you have reached your destination. This
will prevent the unit from continually recording while you are not driving and it will also
divide each journey into a separate trace record. Once you have started a trace recording
you will need to return back to the map screen.
Note: if you switch the unit off without stopping the trace record function then your trace
record for that journey will be lost.
Each recording will be logged with the following information.
Viewing a trace record: Select the trace record you want to view. The currently selected
trace record will be highlighted orange. Then use the
button to view the trace
record on the map. When active the button will then change to show
. The trace
record will be shown as a slightly opaque orange line with green arrows indicating the
direction of travel.
Note: it is only possible to show one trace at a time. A trace record which is been shown
will be shown with a blue highlight on the list. If you select a second Trace and tap
this will cancel the first trace and begin to show this trace instead.
To delete a trace record, highlight it so that it is orange and tap
8.4 Address Book
Opens the address book screen, from here you can
add, edit, delete and view your address book
locations on the map. You can add address book
entries to the address book so that they can quickly
be used for navigation purposes.
Any previously entered address book entries will be
shown as a list.
30
.
,
NAVIGATION
8.4.1 Add an Entry
To add an entry to the address book, tap
. You will now be able to add a location
using all of the options available when entering a destination under the Go to section (see
page 19).
Once you have added a location to the address
book you can enter further information about that
location. To enter further information tap on the
white box next to the field name, the screen will
change to show a keyboard which allows you to
enter information. Tap
to confirm the entered
text. Tap
at any point to return to the
previous screen.
Name –You can then enter a name for your address book entry; which will be shown in the
address book list. If no name is entered then the address will be automatically entered in
this field and shown as the name.
Address –You can then change the way the address is shown or add further information.
Note: Changing the address does not change the location of the address book entry, just
the way the name is shown.
Tel –You can then enter a telephone number for your address book entry.
Remark – You can then enter a short remark for the location.
Coordinate – This is fixed and shows the co-ordinates for the entered location.
Icon – Tap the
icon, you are then able to select from 10 different icons which are
used to indicate this address book location on the map. Highlight the icon you wish to use
and tap
.
Once you have entered the information and are happy. Tap
text and to return to the address book list.
Tapping
to confirm the entered
will return you to the address book screen, but the entry will not be saved.
8.4.2 Edit an Entry
To edit an entry, select the entry so that it is highlighted orange and tap
.
You will then be able to change the text and icon for this entry as under the add section.
31
NAVIGATION
Tapping
saved.
will return you to the address book screen, but any changes will not be
Note: Changing the address does not change the location of the address book entry, just
the way the name is shown.
8.4.3 Delete an Entry
To delete an entry from the address book, select the entry so that it is highlighted orange
and tap
, the entry will be deleted from the address book. Warning: you will not be
asked to confirm the deletion, so make sure that you wish to carry out this operation before
tapping.
Tap
to return to the settings screen.
8.5 Day/Night Mode
Allows you to change the map so that the colour and brightness are optimal for driving in
either day time or night time conditions.
There are two options to choose from;
manually and automatic.
Manually – when selected allows you to either
simply select day or night mode, by tapping either
or
to make your selection.
Automatic – When selected allows you to set a start and end time, when the time is
between these two times the unit will be set to Day mode. At all other times the unit will
automatically switch to Night mode. You can set
a start time of between 1:00 till 12:00 AM and
an end time of between 1:00 till 12:00PM. Use
the
and
buttons to select the start
and end time. This way you can customise the
Day/Night Mode for any time of year.
to confirm the selection and return to the settings screen. Tap
Once set tap
to return to the settings screen without saving.
8.6 Set Home Address
Allows you to set your home address so that it can be easily used when navigating. When
tapped you will be able to add a location from the options available when entering a
destination under the Go to section (see page 19). Note: the Go Home option will not be
available.
If you need to change your home address at a later date, simply tap Set Home Address
again to re-enter your address.
32
NAVIGATION
8.7 GPS Status
When tapped the screen will change to the GPS
status screen, Note; this can also be brought up by
tapping
from any of the navigation screens.
This screen shows you information about your
current GPS position. Including the date & time,
your current speed, your current altitude above sea
level and your current position in Longitude and
latitude.
Included with this information is the number of satellites which you are currently locked on
to. The right half of the screen shows the position of these satellites in the sky. Each
satellite will be shown by a coloured circle; Orange means that the unit has locked on to
the signal, while grey means that the satellite has be found but the unit is not currently
locked on to its signal. Each satellite will be identified by a specific number shown inside
the circle.
Note: In order to navigate you require that the unit is locked to 4 or more satellites and is
referred to as a 3D fix. The fix status will be shown above the circle on the right- Inactive
means not fixed, active means that a 3D fix has been obtained.
8.8 Miles/Kilometre
Tapping this option will change the units of distance; this
change will be reflected both on the map and in the voice
directions. Tap this option to change between Miles and
Kilometres. The currently selected option will be shown on
the screen.
8.9 About
Tapping this option will show you information relating to the version of navigation software
you are running.
8.10 Time Zone
Allows you to change the time zone so that the
time is always correct for the country you are in
There are two options to choose from; manually
and automatic.
The selected option will be shown with an orange
indicator.
Automatic – When selected the unit will always set
the time zone according to your current GPS
position.
Manually – When selected you can manually set the time zone by using the
keys to select the desired time zone from the list.
33
and
NAVIGATION
In addition to setting either automatic or manually, you can select to adjust the time for
daylight saving. This will adjust the time by adding 1 hour as used during British Summer
Time (BST). To activate daylight saving tap in the box so that an orange tick is shown.
Once set tap
to confirm the selection and return to the settings screen. Tap
to return to the settings screen without saving.
8.11 Brightness
Allows you to change the brightness of the screen
so as to optimise it for differently lit environments.
Tapping will change the screen to the brightness
setting screen.
There are 5 settings available and are shown as
bars, with an arrow indicating the currently selected
level. Use the
and
keys to set the
required level, the brightness will be reflected in the
screen as the change is made.
to confirm the selection and return to the settings screen. Tap
Once set tap
to return to the settings screen without saving.
8.12 Calibration
This option allows you to calibrate the screen so that it responds accurately to your screen
taps. You will need this function only if the unit begins to respond inconsistently to your
screen taps.
When tapped you will be shown a warning screen, tap
to confirm you would like
to calibrate the screen. The screen will change to the calibration screen; follow the
onscreen instructions in order to complete the calibration process.
9 Route Plan
Once you have entered your destination and
confirmed it is correct, you will be taken to the
Route Plan screen; from here you can begin
navigating, carry out a simulation of the route or
add additional waypoints to the journey.
Tap
to return to the Free Navigation Menu
screen.
Select a destination so that it is highlighted orange
and tap
to view the location on the map.
9.1 Navigating
To begin navigating to you entered destination tap
. The unit will begin to calculate
a route from your current location to your destination. Once calculated the screen will
change to the route navigation screen and you are ready to drive.
34
NAVIGATION
While you are navigating it is still possible to browse the map (see page 19). Note that the
unit will continue to navigate if you are moving, but your position on the map will not be
to return or wait for 10 seconds
updated and no voice prompts will be given. Tap
after which the unit will automatically resume normal navigation.
While the unit is calculating the route you can tap
and return back to the Route Plan screen.
at any time to cancel the route
9.2 Waypoints
You can add up to two additional destinations before
you begin navigating, these additional destinations
are know as waypoints. When the unit calculates the
route it will navigate you to each waypoint first before
continuing on to your final destination. This is handy
if you are planning a trip were you would like to stop
off on the way to take in sights or simply just for a
break/fuel.
To add waypoints tap
, you will be taken to
the Search Menu screen. You can then enter your waypoint in the same way that you did
for your destination (see page 19).
To remove a waypoint/destination, select the desired location so that it is highlighted
orange and then tap
. The waypoint/destination will be removed from the list.
Navigating using waypoints
When the unit calculates the route it will calculate the route from your current position to
the location at the top of the list first, it will then calculate the route from the location at the
top of the list to the location second from top and so on for the next location. The last
location on the list will always be your final destination. You can change the order of a
location by selecting it so that it is highlighted orange, then use the
keys
to move it up or down in the list. Once you have entered all your waypoints and they are in
the correct order tap
navigation screen.
, the unit will calculate the route and change to the route
9.3 Simulate
Before you navigate a route for real you can simulate
the route on the unit. To simulate the route tap
,
you will be asked if you would like to change your
starting point. Your current starting point will be your
current position on the map.
Tap
to change your starting point, you will
be taken to the Search Menu screen. You can then
enter the start point just as if you had entered a
destination (see page 19). Once the start point has been entered the unit will begin
calculating the route and then drive the route automatically.
35
NAVIGATION
Tap
to keep your current location as the start point, the unit will begin calculating
the route and then drive the route automatically.
9.4 Route Options
The route options menu allows you to configure the
route to your preference. Tap
the screen
will change to the route options screen.
From here you can enable or disable a number of
options relating to how the route is calculated.
The currently selected options are shown with an
orange indicator.
Use of Motorway - When selected the unit will use motorways in the route calculation.
Use of Ferries When selected the unit will use ferries in the route calculation.
Shortest Route When selected the unit will calculate a route which covers the shortest
distance.
Quickest Route When selected the unit will calculate a route which has the shortest
travel time.
Avoid Toll Roads - When selected the unit will calculate a route which does not use toll
roads.
NOTE: the Route options default to the above each time the unit is switched on.
10 Route Navigation Menu
While navigating or simulating a route tapping the
button will take you to the Route Navigation
Menu. From here you can obtain detailed information
about the route you have calculated or make changes
to the settings without having to exit navigation.
10.1 Route Plan
This takes you back to the Route Plan Menu (see
page 34). From here you can add/remove waypoints, change the Route Options or even
simulate the route. Tapping
will result in the route being recalculated from your
current position. Any changes will be taken in to consideration when calculating the route.
10.2 Detour
This option allows you to navigate around any traffic
jams or blocked roads which are along your planned
journey. When tapped the screen will change to show
the available distance options. You will need to
estimate the distance to the blocked road/traffic jam
then choose the option which is the next lowest
distance.
The unit will than calculate a detour route, this new
route can be viewed on the map as a blue line.
36
NAVIGATION
Tap
to confirm the new route the unit
will return to the navigation screen but will
now direct you via the detour route.
Tap
to return to the detour screen, if
you were not happy with the new route and
would like to select a different option or if
you no longer want to add a detour. Tap
again from the Detour screen to go back to
the Route Navi Menu screen (see page 35).
10.3 Cancel Route
Tap this option to cancel the route you have planned and stop navigating, you will be
returned to the Free Navi Menu screen.
10.4 Go To
Tapping this option will automatically cancel the route and take you to the Search menu
(see page 20). Were you will be able to enter a new destination to navigate too.
10.5 Route Information
Tapping this option will detail the route in text
format and contains useful information about the
route you have planned on a new screen.
As well as showing you your start and
destination locations it will show you the distance
between these two locations as planned by the
unit and the estimated time it will take to drive
the planned route.
Included is a detailed turn by turn explanation of
the route, which includes – the next street name, distance between turns and the turn type.
For example: Turn left onto Saxon Gate then drive for 650 yards.
Use the
or
keys to scroll through the list of directions.
If you have added waypoints then the route directions will be split between the
different destination/waypoints points. Each route is viewed separately and is
indicated by the 2 arrows and 2 numbers separated by a /.
For example: 1/2 shows there are 2 separate routes and you are currently
viewing the first route. Use the
or
keys to change between the different
routes, the information shown will only be for that particular route.
10.6 Map Options
This allows access to the Map options (see page 26).
10.7 Settings
This allows access to the Map options (see page 28).
37
Frequently asked questions
Frequently asked questions
I can’t find an address.
Please make sure you have correctly spelt your entry. If you do not know how an
address is spelt correctly, simply enter the parts of the address, you know of sure (e.g.,
“ond”, “Leic” for Leicester Square in London). Then browse the results list and look for
the address. Also make sure the the city in which you are looking for an address is
correct. Sometimes the official postal address differs from the address you are looking
for. In that case, search for a known address nearby and browse the map.
If you find the address on the map but you cannot find it while searching for it, please
let us know via our help line 0845 345 9677.
The map contains an error / POl’s are missing.
If you detect an error in the map data (e.g., a street is missing completely), we would
like to inform our map data provider. Please let us know via our help line 0845 345
9677.
I am experiencing problems getting a GPS fix.
If you have problems getting a satellite fix with GPS(you can see how many satellites
are being received by going to the main menu and selecting GPS receiver), please
make sure you are outside and the GPS antenna has good ‘visibility’ to the open sky.
Some models also support an additional external active antenna. Please consult the
hardware manual of your device to get further information on how to obtain a GPS fix.
Where can I get technical support?
Please contact our help line 0845 345 9677.
Where can I get software updates?
Please contact our helpline or your retail store for information about software updates.
Where can I get additional maps and guides?
Please refer to www.binatonegps.com.
38
Technical Specifications
Technical Specifications
CPU
MSTAR 2521 500 MHz
Operating System
Microsoft WinCE.NET 6.0 Core Version
Antenna
Built-in GPS high sensitivity receiver (64
channels)
Memory
128MB DDR2 Built-in
Display
3.5″colour TFT touch screen
Weight
0.122 kg
Input Method
Touch
Expansion Slot
MicroSD card
Speaker Built-in
1.0W loud speaker
Headphone
2.5mm Mini jack
USB
USB Client for Active Sync
Battery
Re-chargeable Lithium Polymer battery
I/O
Dimension
100mmx75.5mmx12.9mm
39
EC Declaration of Conformity
BINATONE TELECOM PLC
1 Apsley Way London NW2 7HF,United Kingdom.
Tel: +44(0) 20 8955 2700 Fax: +44(0) 20 8344 8877
e-mail: [email protected]
________________________________________
.
EC Declaration of Conformity
We the manufacturer / Importer :
Binatone Telecom Plc
1 Apsley Way London
NW2 7HF, United Kingdom.
Declare under our sole responsibility that the following product
Type of equipment:
Model Name:
GPS
R350 series
Country of Origin:
Brand:
China
Binatone
complies with the essential protection requirements of Article 3.1 (b) of R&TTE Directive
1999/5/EC and the following standards:
Radio Spectrum:
EMC:
Electrical Safety:
ETS 300487/A1:1997
EN 301489-19 V1.2.1 (2002-11)
EN 301489-1:2008 V1.8.1
EN 60950-1:2001+A11:2004
The product is labelled with the European Approval Marking CE as show. Any Unauthorized
modification of the product voids this Declaration.
Manufacturer / Importer
(signature of authorized person)
Paul Tsui, Product Operation Director
London,
Signature:
Place & Date: 1 Mar, 2012
40