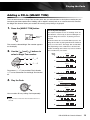
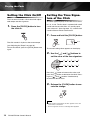
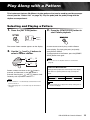
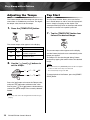
1
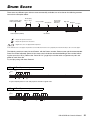
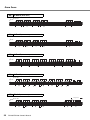
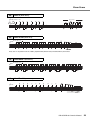
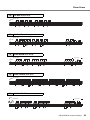
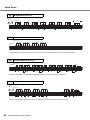
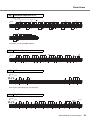
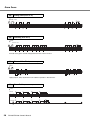
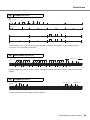
DD-45/YDD-40 Digital Percussion Owner’s Manual EN SPECIAL MESSAGE SECTION This product utilizes batteries or an external power supply (adapter). DO NOT connect this product to any power supply or adapter other than one described in the manual, on the name plate, or specifically recommended by Yamaha. This product should be used only with the components supplied or; a cart, rack, or stand that is recommended by Yamaha. If a cart, etc., is used, please observe all safety markings and instructions that accompany the accessory product. SPECIFICATIONS SUBJECT TO CHANGE: The information contained in this manual is believed to be correct at the time of printing. However, Yamaha reserves the right to change or modify any of the specifications without notice or obligation to update existing units. This product, either alone or in combination with an amplifier and headphones or speaker/s, may be capable of producing sound levels that could cause permanent hearing loss. DO NOT operate for long periods of time at a high volume level or at a level that is uncomfortable. If you experience any hearing loss or ringing in the ears, you should consult an audiologist. IMPORTANT: The louder the sound, the shorter the time period before damage occurs. NOTICE: Service charges incurred due to a lack of knowledge relating to how a function or effect works (when the unit is operating as designed) are not covered by the manufacturer’s warranty, and are therefore the owners responsibility. Please study this manual carefully and consult your dealer before requesting service. ENVIRONMENTAL ISSUES: Yamaha strives to produce products that are both user safe and environmentally friendly. We sincerely believe that our products and the production methods used to produce them, meet these goals. In keeping with both the letter and the spirit of the law, we want you to be aware of the following: Battery Notice: This product MAY contain a small non-rechargeable battery which (if applicable) is soldered in place. The average life span of this type of bat92-BP (bottom) tery is approximately five years. When replacement becomes necessary, contact a qualified service representative to perform the replacement. This product may also use “household” type batteries. Some of these may be rechargeable. Make sure that the battery being charged is a rechargeable type and that the charger is intended for the battery being charged. When installing batteries, never mix old batteries with new ones, and never mix different types of batteries. Batteries MUST be installed correctly. Mismatches or incorrect installation may result in overheating and battery case rupture. Warning: Do not attempt to disassemble, or incinerate any battery. Keep all batteries away from children. Dispose of used batteries promptly and as regulated by the laws in your area. Note: Check with any retailer of household type batteries in your area for battery disposal information. Disposal Notice: Should this product become damaged beyond repair, or for some reason its useful life is considered to be at an end, please observe all local, state, and federal regulations that relate to the disposal of products that contain lead, batteries, plastics, etc. If your dealer is unable to assist you, please contact Yamaha directly. NAME PLATE LOCATION: The name plate is located on the bottom of the product. The model number, serial number, power requirements, etc., are located on this plate. You should record the model number, serial number, and the date of purchase in the spaces provided below and retain this manual as a permanent record of your purchase. Model Serial No. Purchase Date PLEASE KEEP THIS MANUAL FCC INFORMATION (U.S.A.) 1. IMPORTANT NOTICE: DO NOT MODIFY THIS UNIT! This product, when installed as indicated in the instructions contained in this manual, meets FCC requirements. Modifications not expressly approved by Yamaha may void your authority, granted by the FCC, to use the product. 2. IMPORTANT: When connecting this product to accessories and/ or another product use only high quality shielded cables. Cable/s supplied with this product MUST be used. Follow all installation instructions. Failure to follow instructions could void your FCC authorization to use this product in the USA. 3. NOTE: This product has been tested and found to comply with the requirements listed in FCC Regulations, Part 15 for Class “B” digital devices. Compliance with these requirements provides a reasonable level of assurance that your use of this product in a residential environment will not result in harmful interference with other electronic devices. This equipment generates/uses radio frequencies and, if not installed and used according to the instructions found in the users manual, may cause interference harmful to the operation of other electronic devices. Compliance with FCC regulations does * This applies only to products distributed by YAMAHA CORPORATION OF AMERICA. (class B) OBSERVERA! Entsorgung leerer Batterien (nur innerhalb Deutschlands) Apparaten kopplas inte ur växelströmskällan (nätet) så länge som den ar ansluten till vägguttaget, även om själva apparaten har stängts av. Leisten Sie einen Beitrag zum Umweltschutz. Verbrauchte Batterien oder Akkumulatoren dürfen nicht in den Hausmüll. Sie können bei einer Sammelstelle für Altbatterien bzw. Sondermüll abgegeben werden. Informieren Sie sich bei Ihrer Kommune. ADVARSEL: Netspændingen til dette apparat er IKKE afbrudt, sålæenge netledningen siddr i en stikkontakt, som er t endt — også selvom der or slukket på apparatets afbryder. VAROITUS: Laitteen toisiopiiriin kytketty käyttökytkin ei irroita koko laitetta verkosta. (standby) 2 not guarantee that interference will not occur in all installations. If this product is found to be the source of interference, which can be determined by turning the unit “OFF” and “ON”, please try to eliminate the problem by using one of the following measures: Relocate either this product or the device that is being affected by the interference. Utilize power outlets that are on different branch (circuit breaker or fuse) circuits or install AC line filter/s. In the case of radio or TV interference, relocate/reorient the antenna. If the antenna lead-in is 300 ohm ribbon lead, change the lead-in to co-axial type cable. If these corrective measures do not produce satisfactory results, please contact the local retailer authorized to distribute this type of product. If you can not locate the appropriate retailer, please contact Yamaha Corporation of America, Electronic Service Division, 6600 Orangethorpe Ave, Buena Park, CA90620 The above statements apply ONLY to those products distributed by Yamaha Corporation of America or its subsidiaries. DD-45/YDD-40 Owner’s Manual (battery) PRECAUTIONS PLEASE READ CAREFULLY BEFORE PROCEEDING * Please keep this manual in a safe place for future reference. WARNING Always follow the basic precautions listed below to avoid the possibility of serious injury or even death from electrical shock, shortcircuiting, damages, fire or other hazards. These precautions include, but are not limited to, the following: Power supply/AC power adaptor Battery • Do not place the power cord near heat sources such as heaters or radiators, and do not excessively bend or otherwise damage the cord, place heavy objects on it, or place it in a position where anyone could walk on, trip over, or roll anything over it. • Only use the voltage specified as correct for the instrument. The required voltage is printed on the name plate of the instrument. • Use the specified adaptor (page 31) only. Using the wrong adaptor can result in damage to the instrument or overheating. • Check the electric plug periodically and remove any dirt or dust which may have accumulated on it. Do not open • This instrument contains no user-serviceable parts. Do not open the instrument or attempt to disassemble or modify the internal components in any way. If it should appear to be malfunctioning, discontinue use immediately and have it inspected by qualified Yamaha service personnel. Water warning • Do not expose the instrument to rain, use it near water or in damp or wet conditions, or place containers on it containing liquids which might spill into any openings. If any liquid such as water seeps into the instrument, turn off the power immediately and unplug the power cord from the AC outlet. Then have the instrument inspected by qualified Yamaha service personnel. • Never insert or remove an electric plug with wet hands. Fire warning • Do not put burning items, such as candles, on the unit. A burning item may fall over and cause a fire. • Always replace all batteries at the same time. Do not use new batteries together with old ones. • Do not mix battery types, such as alkaline batteries with manganese batteries, or batteries from different makers, or different types of batteries from the same maker, since this can cause overheating, fire, or battery fluid leakage. • Do not tamper with or disassemble batteries. • Do not dispose of batteries in fire. • Do not attempt to recharge batteries that are not intended to be charged. • Keep batteries away from children. • If the batteries do leak, avoid contact with the leaked fluid. If the battery fluid should come in contact with your eyes, mouth, or skin, wash immediately with water and consult a doctor. Battery fluid is corrosive and may possibly cause loss of sight or chemical burns. • Always make sure all batteries are inserted in conformity with the +/- polarity markings. Failure to do so might result in overheating, fire, or battery fluid leakage. • When the batteries run out, or if the instrument is not to be used for a long time, remove the batteries from the instrument to prevent possible leakage of the battery fluid. If you notice any abnormality • When one of the following problems occur, immediately turn off the power switch and disconnect the electric plug from the outlet. (If you are using batteries, remove all batteries from the instrument.) Then have the device inspected by Yamaha service personnel. • The power cord or plug becomes frayed or damaged. • It emits unusual smells or smoke. • Some object has been dropped into the instrument. • There is a sudden loss of sound during use of the instrument. CAUTION Always follow the basic precautions listed below to avoid the possibility of physical injury to you or others, or damage to the instrument or other property. These precautions include, but are not limited to, the following: Power supply/AC power adaptor Connections • Do not connect the instrument to an electrical outlet using a multiple-connector. Doing so can result in lower sound quality, or possibly cause overheating in the outlet. • When removing the electric plug from the instrument or an outlet, always hold the plug itself and not the cord. Pulling by the cord can damage it. • Remove the electric plug from the outlet when the instrument is not to be used for extended periods of time, or during electrical storms. • Before connecting the instrument to other electronic components, turn off the power for all components. Before turning the power on or off for all components, set all volume levels to minimum. • Be sure to set the volumes of all components at their minimum levels and gradually raise the volume controls while playing the instrument to set the desired listening level. Handling caution Location • Do not place the instrument in an unstable position where it might accidentally fall over. • Before moving the instrument, remove all connected cables. • When setting up the product, make sure that the AC outlet you are using is easily accessible. If some trouble or malfunction occurs, immediately turn off the power switch and disconnect the plug from the outlet. Even when the power switch is turned off, electricity is still flowing to the product at the minimum level. When you are not using the product for a long time, make sure to unplug the power cord from the wall AC outlet. • Use only the stand specified for the instrument. When attaching the stand or rack, use the provided screws only. Failure to do so could cause damage to the internal components or result in the instrument falling over. • Do not insert a finger or hand in any gaps on the instrument. • Never insert or drop paper, metallic, or other objects into the gaps on the panel. • Do not rest your weight on, or place heavy objects on the instrument, and do not use excessive force on the buttons, switches or connectors. • Do not use the instrument/device or headphones for a long period of time at a high or uncomfortable volume level, since this can cause permanent hearing loss. If you experience any hearing loss or ringing in the ears, consult a physician. Yamaha cannot be held responsible for damage caused by improper use or modifications to the instrument, or data that is lost or destroyed. Always turn the power off when the instrument is not in use. Even when the [ ] (Standby/On) switch is turned off, electricity is still flowing to the instrument at the minimum level. When you are not using the instrument for a long time, make sure you unplug the power cord from the wall AC outlet. Make sure to discard used batteries according to local regulations. (7)-1 1/1 DD-45/YDD-40 Owner’s Manual 3 NOTICE To avoid the possibility of damage to the product, data or other property, follow the notices below. Handling and Maintainance • Do not use the instrument in the vicinity of a TV, radio, stereo equipment, mobile phone, or other electric devices. Otherwise, the instrument, TV, or radio may generate noise. • Do not expose the instrument to excessive dust or vibrations, or extreme cold or heat (such as in direct sunlight, near a heater, or in a car during the day) to prevent the possibility of panel disfiguration or damage to the internal components. • Do not place vinyl, plastic or rubber objects on the instrument, since this might discolor the panel or keyboard. • When cleaning the instrument, use a soft cloth. Do not use paint thinners, solvents, cleaning fluids, or chemical-impregnated wiping cloths. Information About copyrights • Copying of the commercially available musical data including but not limited to MIDI data and/or audio data is strictly prohibited except for your personal use. • This product incorporates and bundles computer programs and contents in which Yamaha owns copyrights or with respect to which it has license to use others’ copyrights. Such copyrighted materials include, without limitation, all computer software, style files, MIDI files, WAVE data, musical scores and sound recordings. Any unauthorized use of such programs and contents outside of personal use is not permitted under relevant laws. Any violation of copyright has legal consequences. DON’T MAKE, DISTRIBUTE OR USE ILLEGAL COPIES. About this manual • The illustrations and LED displays as shown in this manual are for instructional purposes only, and may appear somewhat different from those on your instrument. • The company names and product names in this manual are the trademarks or registered trademarks of their respective companies. The serial number of this product may be found on the bottom of the unit. You should note this serial number in the space provided below and retain this manual as a permanent record of your purchase to aid identification in the event of theft. Model No. Serial No. (bottom) Information for Users on Collection and Disposal of Old Equipment and used Batteries These symbols on the products, packaging, and/or accompanying documents mean that used electrical and electronic products and batteries should not be mixed with general household waste. For proper treatment, recovery and recycling of old products and used batteries, please take them to applicable collection points, in accordance with your national legislation and the Directives 2002/96/EC and 2006/66/EC. By disposing of these products and batteries correctly, you will help to save valuable resources and prevent any potential negative effects on human health and the environment which could otherwise arise from inappropriate waste handling. For more information about collection and recycling of old products and batteries, please contact your local municipality, your waste disposal service or the point of sale where you purchased the items. [For business users in the European Union] If you wish to discard electrical and electronic equipment, please contact your dealer or supplier for further information. [Information on Disposal in other Countries outside the European Union] These symbols are only valid in the European Union. If you wish to discard these items, please contact your local authorities or dealer and ask for the correct method of disposal. Cd Note for the battery symbol (bottom two symbol examples): This symbol might be used in combination with a chemical symbol. In this case it complies with the requirement set by the Directive for the chemical involved. (weee_battery_eu) 4 DD-45/YDD-40 Owner’s Manual Congratulations! Thank you for purchasing the Yamaha DD-45/YDD-40. The DD-45/YDD-40 has been developed to respond and play like a drum set—but with greater ease, flexibility and sophisticated functions. Before you use the instrument, we recommend that you carefully read through this manual. Contents Panel Controls..........................................................................................................6 Setting Up .................................................................................................................7 Listening to the Demo Songs .................................................................................9 Playing the Pads ....................................................................................................10 Setting the Hand Percussion On/Off................................................................................10 Locking the Panel Buttons ...............................................................................................10 Selecting and Playing a Drum Kit ....................................................................................11 Assigning Voices to Individual Pads and Saving to a Custom Kit................................... 12 Adding a Fill-in (MAGIC TOM)........................................................................................ 13 Setting the Click On/Off .................................................................................................. 14 Setting the Time Signature of the Click .......................................................................... 14 Play Along with a Pattern ......................................................................................15 Selecting and Playing a Pattern...................................................................................... 15 Adjusting the Tempo....................................................................................................... 16 Tap Start ......................................................................................................................... 16 Muting Parts ................................................................................................................... 17 Troubleshooting .....................................................................................................18 Voice List ................................................................................................................19 Pattern List..............................................................................................................19 Drum Kit List ..........................................................................................................20 Drum Score.............................................................................................................21 Specifications.........................................................................................................31 Accessories • Owner’s Manual • AC Power Adaptor * May not be included depending on your particular area. Please check with your Yamaha dealer. • Drum Stick (x2) • My Yamaha Product User Registration * The PRODUCT ID on the sheet will be needed when you fill out the User Registration form. DD-45/YDD-40 Owner’s Manual 5 Panel Controls Front Panel Pad 2 sound can be switched between a Hi-Hat sound and a Bass Drum sound (see “Assigning Bass Drum to Pad 2” on page 11). Pad 3 features a Magic Tom function which allows you to add a fill-in (page 13). Pad 3 w q 88 e r t y i o !0 !1 u (Tom) Pad 2 Pad 4 (Hi-Hat) (Cymbal) !2 88 !3 Pad 1 !4 (Snare) q w e r t y u Display .............................................................. page 9 [ ][ ] buttons ........................................... page 11 [KIT] button ...................................................... page 11 [MAGIC TOM] button .......................................page 13 [PATTERN] button ............................................page 15 [TEMPO/TAP] button........................................page 16 [ASSIGN] button ..............................................page 12 i o !0 !1 !2 !3 !4 [START/STOP] button ......................................page 15 [MUTE] button..................................................page 17 [CLICK] button .................................................page 14 [HAND PERC.] button......................................page 10 [DEMO] button .................................................. page 9 [ ] (Standby/On) switch ................................. page 9 [MASTER VOLUME] control ............................. page 9 Rear Panel !5 !6 !7 !8 !5 !6 !7 !8 [PEDAL] jack.................................. page 8 [AUX IN] jack ................................. page 8 [PHONES/OUTPUT] jack .............. page 8 DC IN jack ..................................... page 7 Pedal (optional) (Bass Drum) Drum Sticks CAUTION • Since a speaker is built into this instrument, you should be careful to never leave any video tapes, cassette tapes, floppy disks or any kind of magnetic storage media on the panel—doing so may result in data loss or damage to the items. Also avoid using the instrument near a television or computer monitor, since interference may result. • Use the sticks with caution. Do not use them for anything other than playing the instrument. Also, to avoid damage or injury, refrain from waving them recklessly or throwing them. 6 DD-45/YDD-40 Owner’s Manual Setting Up Make all necessary settings below BEFORE turning the power on (page 9). CAUTION • Before connecting the instrument to other electronic components, turn off the power of all the components. Also, before turning any components on or off, make sure to set all volume levels to minimum (0). Otherwise, electrical shock or damage to the components may occur. Power Requirements Although the instrument will run either from an AC power adaptor or batteries, Yamaha recommends use of an AC adaptor whenever possible. An AC adaptor is more environmentally friendly than batteries and does not deplete resources. Using an AC Power Adaptor Using Batteries q Connect the AC adaptor to the power supply jack. q Open the battery compartment cover located on the instrument’s bottom panel. WARNING • Use the specified adaptor (page 31) only. The use of other adaptors may result in irreparable damage to both the adaptor and the instrument. w Plug the AC adaptor into an AC outlet. w Insert six “AA” size, LR6 or equivalent batteries, being careful to follow the polarity markings on the side of the compartment. e Replace the compartment cover, making sure that it locks firmly in place. q q w w Adaptor AC outlet CAUTION • Unplug the AC power adaptor when not using the instrument, or during electrical storms. • Even when the instrument is turned off, electricity is still flowing to the instrument at the minimum level. When you are not using the instrument for a long time, make sure you unplug the AC power adaptor from the wall AC outlet. NOTE • Connecting the AC power adaptor automatically supplies power from the adaptor and overrides battery power, even when batteries are installed. When battery power becomes too low for proper operation, the volume may be reduced, the sound may be distorted, and other problems may occur. When this happens, make sure to replace all batteries, following the precautions listed below. CAUTION • Use alkaline batteries for this instrument. Other types of batteries (including rechargeable batteries) may have sudden drops of power when battery power becomes low. • Make sure to install the batteries with the proper orientation, maintaining the correct polarity (as shown). Incorrect battery installation may result in heat, fire and/or leaking of corrosive chemicals. • When the batteries run down, replace them with a complete set of six new batteries. NEVER mix old and new batteries. Do not use different kinds of batteries (e.g. alkaline and manganese) at the same time. • If the instrument is not to be in use for a long time, remove the batteries from it, in order to prevent possible fluid leakage from the battery. DD-45/YDD-40 Owner’s Manual 7 Setting Up Using a Drum Stand Position mark An optional stand Yamaha SS662 is available for installing this instrument. Fix the instrument on the stand’s arms, aligning the stand position marks on the bottom of the instrument. NOTE • Do not tighten the arms more than necessary. Over tightening may result in bending the instrument. CAUTION Connecting an Audio Source ([AUX IN] jack) This jack is for connection to an external audio source such as an MP3 player. You can play the instrument with backing music and accompaniment, like playing with a full band. Adjust the input level from the volume control of the external audio source for optimum balance. CAUTION • When the sound of an external device is output to the instrument, first turn on the power to the external device, then to the instrument. Reverse this order when you turn the power off. NOTE • Do not place the instrument in an unstable position where it may overturn; doing so can result in damage to the instrument or personal injury. • Any audio signal input to the [AUX IN] jack is processed in mono. • Before moving the instrument, remove the stand from the instrument. Otherwise it may fall off. Connecting a Pedal ([PEDAL] jack) Connecting Headphones ([PHONES/OUTPUT] jack) This jack is for connection of an optional pedal FC4 or FC5. The pedal can be used to play the Drum Kit’s bass drum Voices—or can also be assigned to play other Voices as well. Connect a set of headphones to the [PHONES/OUTPUT] jack. The speaker of this instrument is automatically shut off when a plug is inserted into this jack. The [PHONES/OUTPUT] jack also functions as an external output. You can connect the [PHONES/ OUTPUT] jack to a keyboard amplifier, stereo system, mixer, or other line-level audio device to send the instrument’s output signal to that device. WARNING • Avoid listening with the headphones at high volume for long periods of time; doing so may not only result in ear fatigue, it may be damaging to your hearing. CAUTION • When the instrument’s sound is output to an external device, first turn on the power to the instrument, then to the external device. Reverse this order when you turn the power off. 8 DD-45/YDD-40 Owner’s Manual CAUTION • Make sure that the pedal plug is properly connected to the [PEDAL] jack before turning on the power. • Do not press the pedal while turning the power on. Doing this changes the recognized polarity of the pedal, resulting in reversed pedal operation. • Protect the floor by placing a mat or area rug underneath the pedal. The pedal may damage the floor after an extended period of time. • Avoid getting caught in or tripping over the pedal cords; this may cause the instrument to fall and result in damage or injury. NOTE • Voice: In this manual, a voice means an instrument sound or “tone.” Listening to the Demo Songs This instrument features three demonstration Songs (d1 – d3), specially created to showcase the dynamic possibilities of the instrument. 1. 2. Turn on the power. Press the [DEMO] button to start a Demo Song. d1 Turn down the volume by turning the [MASTER VOLUME] control to the left and press the [ ] (Standby/On) switch to turn on the power. A Drum Kit number is displayed after the “dd” indication, as the power is turned on. Press the [ ] (Standby/On) switch again to turn the power off. Demo Song number The indication “d1” appears on the display and the provided Demo Songs start playing in succession until you stop them. While the Demo Song is playing, you can change to the next or previous Demo Song by using the [ ] and [ ] buttons. Pressing the [ ] and [ ] buttons simultaneously calls up the “d1” Song. Adjusting the volume CAUTION • Even when the instrument is turned off, electricity is still flowing to the instrument at the minimum level. When you are not using the instrument for a long time, make sure you unplug the AC power adaptor from the wall AC outlet, and/ or remove the batteries from the instrument. Decreases the overall volume. Increases the overall volume. Auto Power Off function To prevent unnecessary power consumption, this instrument features an Auto Power Off function that automatically turns the power off if the instrument is not used—i.e., no buttons or pads are pressed—for NOTE • Any settings, such as the Custom Kit (page 12), will be restored to the factory default settings when the power is turned off. The Auto Power Off function can be disabled if you turn the power on by holding the [ NOTE • While a Demo Song is playing, available operations are limited to adjusting the volume, changing the Demo Songs, and stopping the demo. approximately 10 minutes. 3. Press the [DEMO] button again to stop the Demo Song. ] (Standby/On) switch for more than 3 seconds; the indication “dd” blinks for a while. You can also stop the Demo Song by pressing the [START/STOP] button. DD-45/YDD-40 Owner’s Manual 9 Playing the Pads Strike the pad with the supplied drum sticks or your hands to play the Drum Voices. When playing the pads with your hands, make sure to turn the Hand Percussion feature on by pressing the [HAND PERC.] button. The volume of the pads’ sounds responds to your playing; when you play soft the volume is soft, and when you play strongly the volume is loud. The actual loudness of the sound may vary according to which part of the pad is struck. Setting the Hand Percussion On/Off Locking the Panel Buttons You can play the pads of the instrument either with the supplied sticks or with your hands. Press and set the following button when you play the instrument with your hands. If you perform on the instrument solely with your hands, we recommend that you use this operation to lock the panel buttons. This protects the instrument from being inadvertently changed during your performance. 1. Press the [HAND PERC.] button to turn Hand Percussion on. on The indication “on” appears on the display, and the pad sensitivity is automatically adjusted for optimum playing by hand. To turn Hand Percussion off, press the [HAND PERC.] button again; “oF” appears on the display. NOTE • Be sure to strike the pads only with your hands when Hand Percussion is on, since the sensitivity is automatically set to appropriate level for hand playing. 1. Turn on Hand Percussion (see the left column). 2. Press and hold the [HAND PERC.] button until “Lc” appears on the display. Hold Lc All buttons other than the [HAND PERC.] button are disabled. To unlock the panel buttons, press and hold the [HAND PERC.] button until the “Lc” is no longer shown on the display. NOTE • The panel buttons cannot be locked when a Pattern or Demo Song is playing. 10 DD-45/YDD-40 Owner’s Manual Playing the Pads Selecting and Playing a Drum Kit The instrument allows you to choose from 50 different Drum Kits (see the “Drum Kit List” on page 20) quickly and easily. 50 of the kits have preset Voice combinations that will be set to the pads and the pedal when the kit is selected. Select some different kits and try playing them. The instrument also has a Custom Kit allowing you to assign the desired Voices to the four pads and the pedal (see “Assigning Voices to Individual Pads and Saving to a Custom Kit” on page 12). 1. Press the [KIT] button. Assigning Bass Drum to Pad 2 The Drum Kit’s Bass Drum Voice is normally assigned 1 to the pedal, but it can also be assigned to Pad 2 Kit number allowing you to play it without a pedal. While holding down the [KIT] button, striking Pad 2 toggles between “bd” and “HH.” The Bass Drum Voice The currently selected Drum Kit number appears on the display. 2. (Pedal Voice) is assigned to Pad 2 when “bd” is displayed, and the Hi-Hat Voice (original Pad 2 Voice) is assigned when “HH” is displayed. Releasing the [KIT] button determines the setting. Use the [ ] and [ ] buttons to select a Drum Kit number. 1 2 50 CU 1 2 50 CU Drum Kit numbers increase as the [ ] button is pressed, and decrease as the [ ] is pressed. Pressing the [ ] and [ ] buttons simultaneously calls up kit number “1.” Hold bd Bass Drum HH Hi-Hat NOTE • Drum Kit number “1” is selected when the power is turned on. • The “CU” Drum Kit is the Custom Kit. The Custom Kit is the one for which you’ve assigned desired Voices to each pad and pedal, then saved the entire assignments as a kit (see “Assigning Voices to Individual Pads and Saving to a Custom Kit” on page 12). • If an optional pedal is connected to the instrument, the Bass Drum Voice is assigned to the pedal. The Bass Drum Voice can also be assigned to Pad 2 (see the right column). DD-45/YDD-40 Owner’s Manual 11 Playing the Pads Assigning Voices to Individual Pads and Saving to a Custom Kit The instrument contains a total of 99 high quality drum Voices (see the “Voice List” on page 19)—and you can assign these freely to each of the four pads and a pedal. Try assigning some different Voices and save your own “CU” Custom Drum Kits. NOTE • Any data assigned to the Custom Kit will be replaced by factory default values (“1”) when the power is turned off. • Custom Kit “CU” and Drum Kit “1” contents are the same until modified (see the “Drum Kit List” on page 20). • Any changes made to one of the preset Drum Kits will automatically be saved in the “CU” Custom Drum Kit. 1. Press and hold the [ASSIGN] button. Striking the pad or pressing the pedal to select a Voice. Every time the pad is struck or a pedal is pressed, Voice numbers will increase by a value of 1. In this method, you can hear and select an assigned Voice. Hold 1 Keep holding down the [ASSIGN] button through steps 2 and 3. 2. Strike any pad one time (or press a pedal) to enable it to be assigned. 39 Voice number Select a Voice Number. You can select the Voice by repeatedly striking the pad or repeatedly pressing the pedal (while listening to the Voice), or by using the [ ] and [ ] buttons. 98 99 Using the [ ] and [ ] buttons to select a Voice. Voice numbers increase as the [ ] button is pressed, and decrease as the [ ] button is pressed. Pressing the [ ] and [ ] buttons simultaneously restores the original Voice. The currently assigned Voice number for that pad/ pedal appears on the display. 3. 2 1 2 98 99 1 2 98 99 Repeat the previous steps 2 and 3 for any or all of the pads and the pedal. 4. Release the [ASSIGN] button to execute the assignment. The instrument will automatically be saved to the Custom Kit “CU.” You can now play the Voice you have assigned to the pad/pedal. 12 DD-45/YDD-40 Owner’s Manual Playing the Pads Adding a Fill-in (MAGIC TOM) The instrument features a Magic Tom function which lets you add variations in the rhythm to make your performance sound more professional. Adding a fill-in requires several pads on an acoustic drum kit; however, the Magic Tom function allows you to add a fill-in easily just by hitting a single pad. 1. Press the [MAGIC TOM] button. Fill-in Rhythm Examples The rhythm examples for each of the Magic Toms are provided here. These help you practice adding fill-ins oF Magic Tom number using the Magic Tom function. Try beating out these rhythms! Drum Kit number 16 is recommended for practice. For Magic Tom number 8, playing with Drum Kit number 35 The currently selected Magic Tom number appears on the display. gives you a Latin flavor. The Magic Tom sounds differently depending on the combination of the Drum Kit number and Magic Tom number. Try various combina- 2. Use the [ ] and [ ] buttons to select a Magic Tom number. oF 1 2 tions and discover your favorite. Magic Tom # 1 Magic Tom Magic Tom Tom Magic 10 2 Snare oF 1 2 10 Magic Tom 3 Snare Ten patterns (1–10) are provided. The indication “oF” can be selected to turn the Magic Tom function off. 3. Play the Pads. Magic Tom 4 Snare Magic Tom 5 Snare Magic Tom 6 Snare Magic Tom 7 Magic Tom You can add a fill-in by striking Pad 3 repeatedly. 8 NOTE • Magic Tom does not function when the Custom Kit “CU” is selected. Magic Tom 9 Magic Tom 10 Snare DD-45/YDD-40 Owner’s Manual 13 Playing the Pads Setting the Click On/Off The instrument includes a click sound with adjustable tempo and time signature. 1. Press the [CLICK] button to turn the click on. Setting the Time Signature of the Click The time signature (beat) of the click can be set to 0, 2, 3, 4 or 6. The first beat is accented with a bell sound and the rest with clicks. “0” actually represents a beat of 1 (time signature 1/1), and the click sounds all beats without a bell accent. 1. The click sounds in rhythm at the current tempo (see “Adjusting the Tempo” on page 16). To turn the click off, press the [CLICK] button once again. Press and hold the [CLICK] button. 4 Hold Beat The current setting value appears on the display. 2. Use the [ ] and [ ] buttons to set the value of the time signature. 0 2 3 4 6 0 2 3 4 6 Press the [ ] button to increase the value, and press the [ ] button to decrease the value. Pressing the [ ] and [ ] buttons simultaneously restores the default value. 3. Release the [CLICK] button to execute the change. NOTE • While a Pattern is played back, the time signature of the click synchronizes to the Pattern. • The time signature cannot be set during Pattern playback. 14 DD-45/YDD-40 Owner’s Manual Play Along with a Pattern This instrument features 50 different rhythm patterns that can be used to provide accompaniment (see the “Pattern List” on page 19). Play the pads (and the pedal) along with the rhythm accompaniment. Selecting and Playing a Pattern 1. Press the [PATTERN] button. 01 Use the [ ] and [ ] buttons to select a Pattern number. 01 01 02 02 Press the [START/STOP] button to start Pattern playback. Pattern number The current Pattern number appears on the display. 2. 3. 50 50 A two-measure count-in plays, and the Pattern starts playing. Try playing the pads (and pedal) along with the Pattern. To stop playback of the Pattern, press the [START/ STOP] button once again. NOTE • You can also use the Tap Start function to start Patterns (page 16). About the Beat Indicator Pattern numbers increase as the [ ] button is pressed, and decrease as the [ ] button is pressed. Pressing the [ ] and [ ] buttons simultaneously calls up Pattern number “01.” During Pattern playback, the beat lamps in the display will flash in a specific pattern to help you keep the beat. NOTE • Pattern number “01” is automatically selected whenever the power is turned on. • When Click (page 14) is on, the Click stops as the Pattern is changed. 1st beat 2nd beat and later 01 01 NOTE • The beat lamps do not appear when Tempo setting value is shown in the display. DD-45/YDD-40 Owner’s Manual 15 Play Along with a Pattern Adjusting the Tempo Tap Start The Pattern tempo and Click tempo can be set anywhere from 11 to 280 beats per minute. The higher the tempo value, the faster the tempo. The Tap Start function allows you to set the Pattern’s overall tempo as well as start the accompaniment—simply by tapping out the rhythm. The accompaniment plays back at the tempo with which the pads are struck or the pedal is pressed. 1. Press the [TEMPO/TAP] button. 1. 20 Tempo value Tap the [TEMPO/TAP] button four times at the desired tempo. The current tempo value appears in the display. Tempo Display 40 40 — 120 20 Values of 100 and over are indicated by a single dot. 240 40 Values of 200 and over are indicated by two dots. 2. Comment Use the [ ] and [ set the tempo. ] buttons to NOTE • For a 6/8 measure, the [TEMPO/TAP] button needs to be tapped six times in order for the tempo to be detected. 11 12 79 80 • The detected tempo range is 32–280. 11 12 79 80 To stop playback of the Pattern, press the [START/ STOP] button. Press the [ ] button to increase the Tempo value, and press the [ ] button to decrease the value. Pressing the [ ] and [ ] buttons simultaneously restores the preset tempo of the currently selected Pattern. NOTE • The tempo value cannot be changed while the Demo Song is playing. 16 The current tempo value appears on the display, and the Pattern playback starts automatically at the tempo you tapped. The tempo can also be changed during Pattern playback by tapping the button twice at the desired tempo. DD-45/YDD-40 Owner’s Manual Play Along with a Pattern Muting Parts Each Pattern consists of a drum part and a backing part. Either the drum part or the backing part can be individually muted, letting you play along with the Pattern and practice the missing part. 1. Press the [MUTE] button to select the part to be muted. 1 2 3 oF Each time the [MUTE] button is pressed the setting changes between “1,” “2,” “3” and “oF.” 1 Mutes all drum part sounds with the exception of the bass drum. (Exceptions to this may be other sounds in certain Patterns.) 2 Mutes all drum part sounds. 3 Mutes all backing parts and plays only the drum part sounds. oF Turns the mute function off. DD-45/YDD-40 Owner’s Manual 17 Troubleshooting Problem Possible Cause and Solution When the instrument is turned on or off, a popping sound is temporarily produced. This is normal and indicates that the instrument is receiving electrical power. The LED display is dark. The batteries are low or dead. Replace all six batteries with completely new ones, or use an AC adaptor. The volume is too low. The Custom Kit Voice assignments have disappeared or been reset to their default settings. When using a mobile phone, noise is produced. Using a mobile phone in close proximity to the instrument may produce interference. To prevent this, turn off the mobile phone or use it further away from the instrument. No sound comes from the speakers. The volume is set too low. Adjust the volume (page 9). Check that nothing is connected to the [PHONES/OUTPUT] jack on the rear panel. When a plug is inserted into this jack, no sound is output. 18 None of the buttons work. The panel buttons have been locked. Turn off Panel Button Lock (page 10). The power was turned off suddenly. The Auto Power Off function (page 9) is active. When the instrument is not in use for about ten minutes, power is turned off automatically. DD-45/YDD-40 Owner’s Manual Voice List Voice No. 1 2 3 4 5 6 7 8 9 10 11 12 13 14 15 16 17 18 19 20 21 22 23 24 25 26 27 28 29 30 31 32 33 Voice Name Bass Drum Ambient Kick Gate Bass Drum Hard Bass Drum Kick Jazz Analog Bass Drum 1 Analog Bass Drum 2 Open Rim Hard Open Rim Shot Analog Snare Open Rim Snare Heavy Snare Rough Snare Hit Snare Hard Snare Soft Snare Drum Snare Jazz High Snare Jazz Low Snare Jazz Analog Snare Drum Floor Tom Low Floor Tom High Low Tom Mid Tom High Tom Tom 1 Tom 2 Tom 3 Tom 4 Analog Tom 1 Analog Tom 2 Analog Tom 3 Hi-Hat Closed Voice No. 34 35 36 37 38 39 40 41 42 43 44 45 46 47 48 49 50 51 52 53 54 55 56 57 58 59 60 61 62 63 64 65 66 Voice Name Hi-Hat Open Analog HH Closed Analog HH Open Crash Cymbal 1 Crash Cymbal 2 Ride Cymbal 1 Ride Cymbal 2 Splash Cymbal Hand Cymbal Analog Cymbal Hand Clap Side Stick Conga H Tip Conga H Open Conga H Slap Conga L Open Conga L Slide Bongo H Open Bongo L Open Timbale H Timbale L Agogo H Agogo L Guiro Short Guiro Long Cuica Mute Cuica Open Tambourine Cowbell Castanet Surdo Open Claves Shaker Voice No. 67 68 69 70 71 72 73 74 75 76 77 78 79 80 81 82 83 84 85 86 87 88 89 90 91 92 93 94 95 96 97 98 99 Voice Name Wind Chime Repique(*) Darabuka Open Darabuka Slap Darabuka Mute Cajon Tip Cajon Low Cajon Slap Tambourim Open Tambourim Slap Djembe Open Djembe Slap Djembe Mute Shekere Shake Shaker Hit Oodaiko Oodaiko Rim Atarigane Shimedaiko Kabuki Voice / Tsuzumi(*) VoicePerc. Crash VoicePerc. HH Close VoicePerc. Bass Drum VoicePerc. Snare Drum VoicePerc. Tom Timpani D Timpani G Timpani C Timpani F Rooster Dog Cow Horse (*) The sound of the Voice varies depending on the strength with which you hit the pad. Pattern List Pattern No. 01 02 03 04 05 06 07 08 09 10 11 12 13 14 15 16 17 Pattern Name 8 Beat 1 8 Beat 2 8 Beat 3 8 Beat 4 8 Beat 5 8 Beat 6 Rock 1 Rock 2 Rock’n Roll Hard Rock 1 Hard Rock 2 Hard Rock 3 Blues Soul 16 Beat 1 16 Beat 2 16 Beat 3 Pattern No. 18 19 20 21 22 23 24 25 26 27 28 29 30 31 32 33 34 Pattern Name Slow Ballad Slow 16 Beat 16 Beat Shuffle 6/8 Ballad House Drum’n Bass Hip Hop Technical Funk 70’s Funk 4 Beat Big Band Swing Jazz Country Second Line Beat Paso Doble Samba Bossa Nova Pattern No. 35 36 37 38 39 40 41 42 43 44 45 46 47 48 49 50 Pattern Name Calypso Reggae Chacha Mambo Latin Rock UK Funk Soul NY Dance African Pop New Age Acoustic Pop Africa Bahia Carnival Arabic Japan Voice Percussion DD-45/YDD-40 Owner’s Manual 19 Drum Kit List Pad 3 Pad 2 Pad 4 88 Pad 1 Pedal Kit No. 1 2 3 4 5 6 7 8 9 10 11 12 13 14 15 16 17 18 19 20 21 22 23 24 25 26 27 28 29 30 31 32 33 34 35 36 37 38 39 40 41 42 43 44 45 46 47 48 49 50 20 Kit Name Standard Kit 1 Standard Kit 2 Standard Kit 3 Standard Kit 4 Standard Kit 5 Standard Kit 6 Standard Kit 7 Standard Kit 8 Standard Kit 9 Standard Kit 10 Standard Kit 11 Standard Kit 12 Standard Kit 13 Standard Kit 14 Standard Kit 15 Standard Kit 16 Standard Kit 17 Standard Kit 18 Electric Kit 1 Electric Kit 2 Electric Kit 3 Electric Kit 4 Jazz Kit 1 Jazz Kit 2 Jazz Kit 3 Jazz Kit 4 Jazz Kit 5 Jazz Kit 6 Jazz Kit 7 Side Stick Kit 1 Side Stick Kit 2 Latin Kit 1 Latin Kit 2 Latin Kit 3 Samba Kit 1 Samba Kit 2 Samba Kit 3 Timpani Kit Tom Kit Cymbal Kit Acoustic Kit Percussion Kit 1 Percussion Kit 2 Conga Kit Cajon Kit Darabuka Kit Djembe Kit VoicePerc. Kit Japanese Kit Animal Kit Voice No. 13 14 8 15 16 9 11 14 15 9 15 16 9 12 13 13 8 11 20 10 10 20 19 18 19 18 19 17 19 45 45 57 51 49 59 68 76 92 25 37 78 44 63 48 74 70 78 90 85 96 Pad 1 Snare Hit Snare Hard Open Rim Hard Snare Soft Snare Drum Open Rim Shot Snare Heavy Snare Hard Snare Soft Open Rim Shot Snare Soft Snare Drum Open Rim Shot Snare Rough Snare Hit Snare Hit Open Rim Hard Snare Heavy Analog Snare Drum Analog Snare Open Rim Analog Snare Open Rim Analog Snare Drum Snare Jazz Snare Jazz Low Snare Jazz Snare Jazz Low Snare Jazz Snare Jazz High Snare Jazz Side Stick Side Stick Guiro Short Bongo H Open Conga L Open Cuica Mute Repique Tambourim Slap Timpani D High Tom Crash Cymbal 1 Djembe Slap Hand Clap Castanet Conga H Slap Cajon Slap Darabuka Slap Djembe Slap VoicePerc. Snare Drum Shimedaiko Rooster DD-45/YDD-40 Owner’s Manual Voice No. 33 33 33 33 34 34 34 33 33 33 33 63 33 33 34 33 24 33 36 35 35 32 33 33 33 29 33 45 45 33 33 58 52 50 56 64 75 93 24 38 80 62 65 46 72 71 79 88 84 97 Pad 2 Hi-Hat Closed Hi-Hat Closed Hi-Hat Closed Hi-Hat Closed Hi-Hat Open Hi-Hat Open Hi-Hat Open Hi-Hat Closed Hi-Hat Closed Hi-Hat Closed Hi-Hat Closed Castanet Hi-Hat Closed Hi-Hat Closed Hi-Hat Open Hi-Hat Closed Mid Tom Hi-Hat Closed Analog HH Open Analog HH Closed Analog HH Closed Analog Tom 3 Hi-Hat Closed Hi-Hat Closed Hi-Hat Closed Tom 4 Hi-Hat Closed Side Stick Side Stick Hi-Hat Closed Hi-Hat Closed Guiro Long Bongo L Open Conga L Slide Agogo L Surdo Open Tambourim Open Timpani G Mid Tom Crash Cymbal 2 Shekere Shake Cowbell Claves Conga H Tip Cajon Tip Darabuka Mute Djembe Mute VoicePerc. HH Close Atarigane Dog Voice No. 24 27 41 29 27 62 21 41 39 28 28 26 54 24 24 24 39 34 16 43 30 31 28 27 29 39 40 40 29 29 27 53 57 51 55 75 60 94 23 39 81 56 61 47 73 69 77 91 82 98 Pad 3 Mid Tom Tom 2 Splash Cymbal Tom 4 Tom 2 Cowbell Floor Tom Low Splash Cymbal Ride Cymbal 1 Tom 3 Tom 3 Tom 1 Timbale L Mid Tom Mid Tom Mid Tom Ride Cymbal 1 Hi-Hat Open Snare Drum Analog Cymbal Analog Tom 1 Analog Tom 2 Tom 3 Tom 2 Tom 4 Ride Cymbal 1 Ride Cymbal 2 Ride Cymbal 2 Tom 4 Tom 4 Tom 2 Timbale H Guiro Short Bongo H Open Agogo H Tambourim Open Cuica Open Timpani C Low Tom Ride Cymbal 1 Shaker Hit Agogo L Tambourine Conga H Open Cajon Low Darabuka Open Djembe Open VoicePerc. Tom Oodaiko Cow Voice No. 38 37 38 27 37 37 37 38 38 38 41 42 53 38 37 38 37 37 43 20 38 30 37 37 37 37 38 39 33 37 41 54 58 52 60 76 59 95 22 40 67 55 66 49 66 61 80 87 83 99 Pad 4 Crash Cymbal 2 Crash Cymbal 1 Crash Cymbal 2 Tom 2 Crash Cymbal 1 Crash Cymbal 1 Crash Cymbal 1 Crash Cymbal 2 Crash Cymbal 2 Crash Cymbal 2 Splash Cymbal Hand Cymbal Timbale H Crash Cymbal 2 Crash Cymbal 1 Crash Cymbal 2 Crash Cymbal 1 Crash Cymbal 1 Analog Cymbal Analog Snare Drum Crash Cymbal 2 Analog Tom 1 Crash Cymbal 1 Crash Cymbal 1 Crash Cymbal 1 Crash Cymbal 1 Crash Cymbal 2 Ride Cymbal 1 Hi-Hat Closed Crash Cymbal 1 Splash Cymbal Timbale L Guiro Long Bongo L Open Cuica Open Tambourim Slap Cuica Mute Timpani F Floor Tom High Ride Cymbal 2 Wind Chime Agogo H Shaker Conga L Open Shaker Tambourine Shekere Shake VoicePerc. Crash Oodaiko Rim Horse Voice No. 1 4 4 3 4 2 1 4 4 4 4 4 4 4 4 4 4 4 7 6 6 7 4 4 5 3 4 4 4 4 4 4 65 44 64 26 26 42 21 41 66 80 64 61 61 27 65 89 86 44 Pedal Bass Drum Ambient Bass Drum Bass Drum Bass Drum Hard Bass Drum Kick Gate Bass Drum Ambient Bass Drum Bass Drum Bass Drum Bass Drum Bass Drum Bass Drum Bass Drum Bass Drum Bass Drum Bass Drum Bass Drum Analog Bass Drum 2 Analog Bass Drum 1 Analog Bass Drum 1 Analog Bass Drum 2 Bass Drum Bass Drum Kick Jazz Bass Drum Hard Bass Drum Bass Drum Bass Drum Bass Drum Bass Drum Bass Drum Claves Hand Clap Surdo Open Tom 1 Tom 1 Hand Cymbal Floor Tom Low Splash Cymbal Shaker Shekere Shake Surdo Open Tambourine Tambourine Tom 2 Claves VoicePerc. Bass Drum Kabuki Voice / Tsuzumi Hand Clap Drum Score There are many different types of drum score commercially available, but we’ve chosen the following common format for the examples below. Hi-Hat Cymbals (H.H.) Ride Cymbal (RIDE) Hi-Hat (H.H.) Open Close Crash Cymbal Snare Drum Snare Drum (Side Stick/ Rim Shot) High Tom Low Tom High Hi-Hat Cymbals (PEDAL) Mid Tom Low Bass Drum : Repeat the previous measure. : Repeat the previous two measures. : Eighth notes are to be played with a triplet feel. In this manual some notes appear in parentheses. This indicates that the note is played by the instrument and you do not need to play it. The following are drum scores for each Pattern, with the Pattern number, Pattern name and the recommended Drum Kit number indicated. (Some of the scores also include the recommended Magic Tom number indicating the space for a fill-in.) Refer to the “Drum Kit List” (page 20) to see the voice assignments to pads and pedal for each Drum Kit. Try and play along with these Patterns! 01 8 Beat 1 (Drum Kit 1) H.H. =96 A typical rhythm pattern in rock and pop music based on eighth notes. 02 8 Beat 2 (Drum Kit 2) H.H. =96 DD-45/YDD-40 Owner’s Manual 21 Drum Score 03 8 Beat 3 (Drum Kit 2) CRASH H.H. =112 04 8 Beat 4 (Drum Kit 3) CRASH H.H. =118 05 8 Beat 5 (Drum Kit 4) H.H. =120 06 8 Beat 6 (Drum Kit 1) CRASH H.H. =125 07 Rock 1 (Drum Kit 14) CRASH H.H. =102 22 DD-45/YDD-40 Owner’s Manual Magic Tom 4 Drum Score 08 Rock 2 (Drum Kit 15) =140 09 CRASH H.H. Magic Tom 3 Rock’n Roll (Drum Kit 5) CRASH H.H.Open =168 Early rock ‘n’ roll pattern from the 1950’s, popularized by Elvis Presley and Chuck Berry and others. 10 Hard Rock 1 (Drum Kit 6) CRASH H.H.Open =86 11 Hard Rock 2 (Drum Kit 7) CRASH H.H. =178 DD-45/YDD-40 Owner’s Manual 23 Drum Score 12 Hard Rock 3 (Drum Kit 6) CRASH COWBELL =132 13 Blues (Drum Kit 23) CRASH H.H. =65 Blues is a genre created by African-Americans in the U.S. and is the musical root for both jazz and rock. 14 Soul (Drum Kit 24) CRASH H.H. =122 15 =96 16 Beat 1 (Drum Kit 8) H.H. A rhythm developed in dance music and jazz fusion, based on sixteenth notes. 24 DD-45/YDD-40 Owner’s Manual Magic Tom 3 Drum Score 16 16 Beat 2 (Drum Kit 8) CRASH H.H. =108 17 16 Beat 3 (Drum Kit 16) CRASH H.H. =126 18 Slow Ballad (Drum Kit 30) CRASH H.H. Magic Tom 3 =62 19 Slow 16 Beat (Drum Kit 9) CRASH H.H. =66 20 =72 16 Beat Shuffle (Drum Kit 10) CRASH H.H. Magic Tom 4 DD-45/YDD-40 Owner’s Manual 25 Drum Score 21 6/8 Ballad (Drum Kit 25) =44 CRASH H.H. 22 Magic Tom 3 House (Drum Kit 19) CRASH H.H. =128 This music genre originated in Chicago in 1977 and is characterized by drum machine sounds and rhythms. 23 Drum’n Bass (Drum Kit 20) CRASH H.H. Snare 2 =160 A dance music genre characterized by complicated and fast rhythms, with heavy bass lines. 24 Hip Hop (Drum Kit 21) =92 CRASH H.H. Hip Hop dates back to the 1970’s, with the emerging Rap music from the Bronx in New York City. 26 DD-45/YDD-40 Owner’s Manual Drum Score 25 Technical Funk (Drum Kit 17) CRASH RIDE R L R R L R L L R L R R L R L L =108 Played with a single paradiddle rudiment. 26 70’s Funk (Drum Kit 18) CRASH H.H. =114 27 4 Beat (Drum Kit 26) =120 RIDE Basic legato cymbal playing for jazz drumming. 28 =168 Big Band (Drum Kit 27) RIDE CRASH DD-45/YDD-40 Owner’s Manual 27 Drum Score 29 Swing Jazz (Drum Kit 28) =166 30 RIDE Country (Drum Kit 11) =108 SPLASH H.H. A broad music genre created and popularized in the south in the U.S. 31 Second Line Beat (Drum Kit 26) =88 Highly popular, funky rhythm born from traditional parades in New Orleans. 32 Paso Doble (Drum Kit 12) =118 DRUMS CASTANET 28 DD-45/YDD-40 Owner’s Manual Drum Score 33 =132 Samba (Drum Kit 35) High Low AGOGO SURDO Open Popular Brazilian music style. Played with agogo and surdo as shown in this example, as well as other percussion instruments such as pandeiro and tamborim. 34 Bossa Nova (Drum Kit 29) Magic Tom 3 H.H. =132 Brazilian rhythm born in Rio de Janeiro in the late 1950’s, popularized by artists such as Antônio Carlos Jobim and João Gilberto. 35 Calypso (Drum Kit 13) H.H. =240 TIMBALES High TIMBALES Low A rhythm originating from the Caribbean island of Trinidad. DD-45/YDD-40 Owner’s Manual 29 Drum Score 36 Reggae (Drum Kit 31) Magic Tom 3 =143 H.H. SPLASH This rhythm style emerged from Jamaica in the 1960’s. The example here is of the “one drop” playing style where the first beat is left empty. 37 Chacha (Drum Kit 32) =120 Long Short GUIRO TIMBALES High Low DRUMS One of the major Cuban rhythms, along with Mambo and Rumba. Now that you have played through the scores above, continue to play and enjoy the rest of the Patterns in your favorite styles! 30 DD-45/YDD-40 Owner’s Manual Specifications Size/Weight Dimensions Width 146.1 mm (5-3/4") Depth 325.9 mm (12-13/16") Weight Control Interface Voices Songs Functions Connectivity 1.5 kg (3 lbs., 5 oz.) Pad Number of Pads Touch Sensitivity Yes (Hand Percussion On/Off) Pedal Number of Pedals 1 (optional) Display Type LED (7-segment, 2-digit) Panel Language English Polyphony Number of Polyphony (Max.) 32 Voices Number of Voices 99 Drum Kits Number of Drum Kits 50 Preset + 1 Custom Magic Toms Number of Magic Tom Patterns 10 Demo Songs Number of Demo Songs 3 Patterns Number of Patterns 50 Overall Controls Connectors Amplifiers Power Supply Power Supply 4 Click Yes Tempo Range 11–280 Miscellaneous Auto Power Off, Tap Start, Part Mute DC IN 12 V AUX IN 1 (Mini, Mono) PHONES/OUTPUT 1 (Mono) PEDAL Amplifiers and Speakers Accessories 343 mm (13-1/2") Height 1 5W Speakers 12 cm Adaptor PA-130, PA-3C, or an equivalent recommended by Yamaha Batteries Six “AA” size, LR6 Power Consumption 6W (PA-130)/8W (PA-3C) Inclulded Accessories • • • • Owner’s Manual AC Power Adaptor Drum Stick (x2) My Yamaha Product User Registration Optional Accessories • • • • AC Power Adaptor PA-130, PA-3C, or an equivalent Footswitch FC4/FC5 Headphones HPE-150, HPE-30 Snare Stand SS662 Specifications and descriptions in this owner’s manual are for information purposes only. Yamaha Corp. reserves the right to change or modify products or specifications at any time without prior notice. Since specifications, equipment or options may not be the same in every locale, please check with your Yamaha dealer. DD-45/YDD-40 Owner’s Manual 31 LIMITED 1-YEAR WARRANTY ON PORTABLE DIGITAL DRUMS (DD AND YDD SERIES) Thank you for selecting a Yamaha product. Yamaha products are designed and manufactured to provide a high level of defect-free performance. Yamaha Corporation of America (“Yamaha”) is proud of the experience and craftsmanship that goes into each and every Yamaha product. Yamaha sells its products through a network of reputable, specially authorized dealers and is pleased to offer you, the Original Owner, the following Limited Warranty, which applies only to products that have been (1) directly purchased from Yamaha’s authorized dealers in the fifty states of the USA and District of Columbia (the “Warranted Area”) and (2) used exclusively in the Warranted Area. Yamaha suggests that you read the Limited Warranty thoroughly, and invites you to contact your authorized Yamaha dealer or Yamaha Customer Service if you have any questions. Coverage: Yamaha will, at its option, repair or replace the product covered by this warranty if it becomes defective, malfunctions or otherwise fails to conform with this warranty under normal use and service during the term of this warranty, without charge for labor or materials. Repairs may be performed using new or refurbished parts that meet or exceed Yamaha specifications for new parts. If Yamaha elects to replace the product, the replacement may be a reconditioned unit. You will be responsible for any installation or removal charges and for any initial shipping charges if the product(s) must be shipped for warranty service. However, Yamaha will pay the return shipping charges to any destination within the USA if the repairs are covered by the warranty. This warranty does not cover (a) damage, deterioration or malfunction resulting from accident, negligence, misuse, abuse, improper installation or operation or failure to follow instructions according to the Owner’s Manual for this product; any shipment of the product (claims must be presented to the carrier); repair or attempted repair by anyone other than Yamaha or an authorized Yamaha Service Center; (b) any unit which has been altered or on which the serial number has been defaced, modified or removed; (c) normal wear and any periodic maintenance; (d) deterioration due to perspiration, corrosive atmosphere or other external causes such as extremes in temperature or humidity; (e) damages attributable to power line surge or related electrical abnormalities, lightning damage or acts of God; or (f) RFI/EMI (Interference/noise) caused by improper grounding or the improper use of either certified or uncertified equipment, if applicable. Any evidence of alteration, erasing or forgery of proof-of-purchase documents will cause this warranty to be void. This warranty covers only the Original Owner and is not transferable. In Order to Obtain Warranty Service: Warranty service will only be provided for defective products within the Warranted Area. Contact your local authorized Yamaha dealer who will advise you of the procedures to be followed. If this is not successful, contact Yamaha at the address, telephone number or website shown below. Yamaha may request that you send the defective product to a local authorized Yamaha Servicer or authorize return of the defective product to Yamaha for repair. If you are uncertain as to whether a dealer has been authorized by Yamaha, please contact Yamaha’s Service Department at the number shown below, or check Yamaha’s website at www.Yamaha.com. Product(s) shipped for service should be packed securely and must be accompanied by a detailed explanation of the problem(s) requiring service, together with the original or a machine reproduction of the bill of sale or other dated, proof-of-purchase document describing the product, as evidence of warranty coverage. Should any product submitted for warranty service be found ineligible therefore, an estimate of repair cost will be furnished and the repair will be accomplished only if requested by you and upon receipt of payment or acceptable arrangement for payment. Limitation of Implied Warranties and Exclusion of Damages: ANY IMPLIED WARRANTIES, INCLUDING WARRANTIES OF MERCHANTABILITY AND FITNESS FOR A PARTICULAR PURPOSE SHALL BE LIMITED IN DURATION TO THE APPLICABLE PERIOD OF TIME SET FORTH ABOVE. YAMAHA SHALL NOT BE RESPONSIBLE FOR INCIDENTAL OR CONSEQUENTIAL DAMAGES OR FOR DAMAGES BASED UPON INCONVENIENCE, LOSS OF USE, DAMAGE TO ANY OTHER EQUIPMENT OR OTHER ITEMS AT THE SITE OF USE OR INTERRUPTION OF PERFORMANCES OR ANY CONSEQUENCES. YAMAHA’S LIABILITY FOR ANY DEFECTIVE PRODUCT IS LIMITED TO REPAIR OR REPLACEMENT OF THE PRODUCT, AT YAMAHA’S OPTION. SOME STATES DO NOT ALLOW LIMITATIONS ON HOW LONG AN IMPLIED WARRANTY LASTS OR THE EXCLUSION OR LIMITATION OF INCIDENTAL OR CONSEQUENTIAL DAMAGES, SO THE ABOVE LIMITATION OR EXCLUSION MAY NOT APPLY TO YOU. This Warranty gives you specific legal rights, and you may also have other rights which vary from state to state. This is the only express warranty applicable to the product specified herein; Yamaha neither assumes nor authorizes anyone to assume for it any other express warranty. If you have any questions about service received or if you need assistance in locating an authorized Yamaha Servicer, please contact: CUSTOMER SERVICE Yamaha Corporation of America 6600 Orangethorpe Avenue, Buena Park, California 90620-1373 Telephone: 800-854-1569 www.yamaha.com Do not return any product to the above address without a written Return Authorization issued by Yamaha. c 2009 Yamaha Corporation of America. 32 DD-45/YDD-40 Owner’s Manual Effective: 11/01/09 DD-45/YDD-40 Owner’s Manual 33 34 DD-45/YDD-40 Owner’s Manual For details of products, please contact your nearest Yamaha representative or the authorized distributor listed below. Para detalles sobre productos, contacte su tienda Yamaha más cercana o el distribuidor autorizado que se lista debajo. Pour plus de détails sur les produits, veuillez-vous adresser à Yamaha ou au distributeur le plus proche de vous figurant dans la liste suivante. Die Einzelheiten zu Produkten sind bei Ihrer unten aufgeführten Niederlassung und bei Yamaha Vertragshändlern in den jeweiligen Bestimmungsländern erhältlich. NORTH AMERICA CANADA Yamaha Canada Music Ltd. 135 Milner Avenue, Scarborough, Ontario, M1S 3R1, Canada Tel: 416-298-1311 U.S.A. THE NETHERLANDS/ BELGIUM/LUXEMBOURG Yamaha Music Europe Branch Benelux Clarissenhof 5-b, 4133 AB Vianen, The Netherlands Tel: 0347-358 040 FRANCE Yamaha Musique France BP 70-77312 Marne-la-Vallée Cedex 2, France Tel: 01-64-61-4000 Yamaha Corporation of America 6600 Orangethorpe Ave., Buena Park, Calif. 90620, U.S.A. Tel: 714-522-9011 ITALY CENTRAL & SOUTH AMERICA SPAIN/PORTUGAL MEXICO Yamaha de México S.A. de C.V. Calz. Javier Rojo Gómez #1149, Col. Guadalupe del Moral C.P. 09300, México, D.F., México Tel: 55-5804-0600 BRAZIL Yamaha Musical do Brasil Ltda. Rua Joaquim Floriano, 913 - 4' andar, Itaim Bibi, CEP 04534-013 Sao Paulo, SP. BRAZIL Tel: 011-3704-1377 ARGENTINA Yamaha Music Latin America, S.A. Sucursal de Argentina Olga Cossettini 1553, Piso 4 Norte Madero Este-C1107CEK Buenos Aires, Argentina Tel: 011-4119-7000 PANAMA AND OTHER LATIN AMERICAN COUNTRIES/ CARIBBEAN COUNTRIES Yamaha Music Latin America, S.A. Torre Banco General, Piso 7, Urbanización Marbella, Calle 47 y Aquilino de la Guardia, Ciudad de Panamá, Panamá Tel: +507-269-5311 Yamaha Musica Italia S.P.A. Viale Italia 88, 20020 Lainate (Milano), Italy Tel: 02-935-771 Yamaha Música Ibérica, S.A. Ctra. de la Coruna km. 17, 200, 28230 Las Rozas (Madrid), Spain Tel: 91-639-8888 GREECE Philippos Nakas S.A. The Music House 147 Skiathou Street, 112-55 Athens, Greece Tel: 01-228 2160 SWEDEN Yamaha Scandinavia AB J. A. Wettergrens Gata 1, Box 30053 S-400 43 Göteborg, Sweden Tel: 031 89 34 00 DENMARK YS Copenhagen Liaison Office Generatorvej 6A, DK-2730 Herlev, Denmark Tel: 44 92 49 00 FINLAND F-Musiikki Oy Kluuvikatu 6, P.O. Box 260, SF-00101 Helsinki, Finland Tel: 09 618511 NORWAY Norsk filial av Yamaha Scandinavia AB Grini Næringspark 1, N-1345 Østerås, Norway Tel: 67 16 77 70 ICELAND EUROPE THE UNITED KINGDOM/IRELAND Yamaha Music U.K. Ltd. Sherbourne Drive, Tilbrook, Milton Keynes, MK7 8BL, England Tel: 01908-366700 GERMANY Yamaha Music Europe GmbH Siemensstraße 22-34, 25462 Rellingen, Germany Tel: 04101-3030 SWITZERLAND/LIECHTENSTEIN Yamaha Music Europe GmbH Branch Switzerland in Zürich Seefeldstrasse 94, 8008 Zürich, Switzerland Tel: 044 3878080 AUSTRIA Yamaha Music Europe GmbH Branch Austria Schleiergasse 20, A-1100 Wien, Austria Tel: 01-60203900 CZECH REPUBLIC/SLOVAKIA/ HUNGARY/SLOVENIA Yamaha Music Europe GmbH Branch Austria Schleiergasse 20, A-1100 Wien, Austria Tel: 01-602039025 POLAND/LITHUANIA/LATVIA/ESTONIA Yamaha Music Europe GmbH Branch Sp.z o.o. Oddzial w Polsce ul. 17 Stycznia 56, PL-02-146 Warszawa, Poland Tel: 022-868-07-57 Skifan HF Skeifan 17 P.O. Box 8120, IS-128 Reykjavik, Iceland Tel: 525 5000 RUSSIA Yamaha Music (Russia) Office 4015, entrance 2, 21/5 Kuznetskii Most street, Moscow, 107996, Russia Tel: 495 626 0660 OTHER EUROPEAN COUNTRIES Yamaha Music Europe GmbH Siemensstraße 22-34, 25462 Rellingen, Germany Tel: +49-4101-3030 ASIA THE PEOPLE’S REPUBLIC OF CHINA Yamaha Music & Electronics (China) Co.,Ltd. 2F, Yunhedasha, 1818 Xinzha-lu, Jingan-qu, Shanghai, China Tel: 021-6247-2211 HONG KONG Tom Lee Music Co., Ltd. 11/F., Silvercord Tower 1, 30 Canton Road, Tsimshatsui, Kowloon, Hong Kong Tel: 2737-7688 INDIA Yamaha Music India Pvt. Ltd. 5F Ambience Corporate Tower Ambience Mall Complex Ambience Island, NH-8, Gurgaon-122001, Haryana, India Tel: 0124-466-5551 INDONESIA PT. Yamaha Music Indonesia (Distributor) PT. Nusantik Gedung Yamaha Music Center, Jalan Jend. Gatot Subroto Kav. 4, Jakarta 12930, Indonesia Tel: 21-520-2577 KOREA Yamaha Music Korea Ltd. 8F, 9F, Dongsung Bldg. 158-9 Samsung-Dong, Kangnam-Gu, Seoul, Korea Tel: 080-004-0022 MALAYSIA Yamaha Music Malaysia, Sdn., Bhd. Lot 8, Jalan Perbandaran, 47301 Kelana Jaya, Petaling Jaya, Selangor, Malaysia Tel: 3-78030900 PHILIPPINES Yupangco Music Corporation 339 Gil J. Puyat Avenue, P.O. Box 885 MCPO, Makati, Metro Manila, Philippines Tel: 819-7551 SINGAPORE Yamaha Music Asia Pte., Ltd. #03-11 A-Z Building 140 Paya Lebor Road, Singapore 409015 Tel: 747-4374 TAIWAN Yamaha KHS Music Co., Ltd. 3F, #6, Sec.2, Nan Jing E. Rd. Taipei. Taiwan 104, R.O.C. Tel: 02-2511-8688 THAILAND Siam Music Yamaha Co., Ltd. 4, 6, 15 and 16th floor, Siam Motors Building, 891/1 Rama 1 Road, Wangmai, Pathumwan, Bangkok 10330, Thailand Tel: 02-215-2626 OTHER ASIAN COUNTRIES AFRICA Yamaha Corporation, Asia-Pacific Music Marketing Group Nakazawa-cho 10-1, Naka-ku, Hamamatsu, Japan 430-8650 Tel: +81-53-460-2312 MIDDLE EAST TURKEY/CYPRUS Yamaha Music Europe GmbH Siemensstraße 22-34, 25462 Rellingen, Germany Tel: 04101-3030 OTHER COUNTRIES Yamaha Music Gulf FZE LOB 16-513, P.O.Box 17328, Jubel Ali, Dubai, United Arab Emirates Tel: +971-4-881-5868 Yamaha Corporation, Asia-Pacific Music Marketing Group Nakazawa-cho 10-1, Naka-ku, Hamamatsu, Japan 430-8650 Tel: +81-53-460-2317 OCEANIA AUSTRALIA Yamaha Music Australia Pty. Ltd. Level 1, 99 Queensbridge Street, Southbank, Victoria 3006, Australia Tel: 3-9693-5111 NEW ZEALAND Music Works LTD P.O.BOX 6246 Wellesley, Auckland 4680, New Zealand Tel: 9-634-0099 COUNTRIES AND TRUST TERRITORIES IN PACIFIC OCEAN Yamaha Corporation, Asia-Pacific Music Marketing Group Nakazawa-cho 10-1, Naka-ku, Hamamatsu, Japan 430-8650 Tel: +81-53-460-2312 HEAD OFFICE Yamaha Corporation, Pro Audio & Digital Musical Instrument Division Nakazawa-cho 10-1, Naka-ku, Hamamatsu, Japan 430-8650 Tel: +81-53-460-3273 EKB50 Yamaha Home Keyboards Home Page http://music.yamaha.com/homekeyboard/ Yamaha Manual Library http://www.yamaha.co.jp/manual/ U.R.G., Pro Audio & Digital Musical Instrument Division, Yamaha Corporation © 2009 Yamaha Corporation WT57470 911POxxx.x-01A0 Printed in China


![Press the [FUNCTION] button.](http://vs1.manualzilla.com/store/data/005738170_1-cd4fded3b03c9e88548afe52897345e1-150x150.png)