1
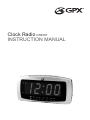
Clock Radio CR2307
INSTRUCTION MANUAL
Warnings and Precautions
TO PREVENT FIRE OR SHOCK HAZARDS, DO NOT EXPOSE THIS UNIT TO
RAIN OR MOISTURE.
This symbol, located on back or bottom of the unit, is intended to alert the user to the
presence of uninsulated “dangerous voltage” within the product’s enclosure that may be
of sufficient magnitude to constitute a risk of electric shock to persons.
This symbol, located on back or bottom of the unit, is intended to alert the user to the
presence of important operating and maintenance (servicing) instructions in the literature accompanying the appliance.
CAUTION: TO PREVENT ELECTRIC SHOCK, MATCH WIDE BLADE OF
PLUG TO WIDE SLOT, FULLY INSERT.
To reduce the risk of electric shock, do not remove cover (or back). There are no user-serviceable parts inside. Please refer any servicing to qualified service personnel.
WARNING: Changes or modifications to this unit not expressly approved by the party responsible for compliance could void the user’s authority to operate the equipment.
NOTE: This equipment has been tested and found to comply with the limits for a Class B
digital device, pursuant to Part 15 of the FCC Rules. These limits are designed to provide
reasonable protection against harmful interference in a residential installation. This equipment
generates, uses, and can radiate radio frequency energy and, if not installed and used in accordance with the instructions, may cause harmful interference to radio communications. However,
there is no guarantee that interference will not occur in a particular installation. If this equipment does cause harmful interference to radio or television reception, which can be determined
by turning the equipment off and on, the user is encouraged to try to correct the interference by
one or more of the following measures:
• Reorient or relocate the receiving antenna.
• Increase the separation between the equipment and receiver.
• Connect the equipment into an outlet on a circuit different from that to which the receiver is
connected.
• Consult the dealer or an experienced radio/TV technician for help.
2
Features
1
2
9
3
4
10
11
5
12
6
13
14
7
15
16
8
17
18
3
Features Defined
1
LED Display View the Time, Alarm Time, Sleep Time, PM Indicator, and AL Indicator through this 1.2
inch Light Emitting Diode display.
2
PM A red light appears to the right of the text “PM” to indicate that the set time is in the PM.
3
AL A red light appears to the right of the text “AL” (Alarm) to indicate that the alarm is set.
4
Frequency Display This display tells you what current AM or FM frequency of your radio.
5
ALARM Use the ALARM button in conjunction with the MINUTE and HOUR buttons, when setting
the alarm time.
6
SLEEP Use the SLEEP button in conjunction with the MINUTE and HOUR buttons to set the sleep
timer. The OFF / ON / AL toggle switch must be set to AL to activate the sleep timer.
7
AM / FM Toggle this switch to select between AM or FM radio bands.
8
TUNING Turn the TUNING dial clockwise to decrease the radio frequency and counter-clockwise to
increase the radio frequency.
9
FM Antenna The FM Wire Antenna provides flexibility and range when adjusting the FM reception.
An AM Antenna is built into the Clock Radio.
10 AC Cord (120V / 60 Hz) The attached AC (Alternating Current) Cord provides power to the Clock
Radio.
11 HOUR The HOUR button is used to adjust the hour when setting the clock, alarm, or sleep function.
12 MINUTE The MINUTE button is used to adjust the minute when setting the clock, alarm, or sleep
function.
13 TIME Use the TIME button in conjunction with the MINUTE and HOUR buttons, when setting the
clock.
14 SNOOZE Press the SNOOZE button to delay the Alarm for ten minutes after the Alarm sounds.
15 OFF / ON / AL Toggle this switch to OFF and ON to turn the radio off or on, or to AL to activate the
alarm or sleep timer.
16 HI / LO Toggle the dimmer switch between HI and LO to adjust the brightness of the LED Display.
17 VOLUME / BUZZER Turn the VOLUME dial clockwise to increase the volume. To activate the
buzzer turn the dial clockwise until it clicks into place. Turn the dial counter-clockwise to decrease the
volume.
18 Battery Back-Up (1 - 9V Battery) The Battery Back-Up will save the clock and alarm settings in case
of a power outage. The display will not be active without AC Power. (Battery Not Included)
4
Operations
Setting the Clock
a. Press and hold the TIME button.
b. While holding the TIME button, press the HOUR button to adjust the hour
and the MINUTE button to adjust the minute.
c. The PM indicator on the LED Display will tell you if the time is set to PM.
If there is no PM indicator then the time is set to AM.
Setting the Alarm
a. Press and hold the ALARM button.
b. While holding the ALARM button, press the HOUR button to adjust the
hour and the MINUTE button to adjust the minute.
c. To wake to the buzzer, turn the volume dial counter-clockwise to Buzzer
until it clicks into place. To wake to the radio turn the volume to the desired
level. Adjust the OFF/ON/AL switch to AL to activate the alarm.
Setting the Sleep Timer
a. Switch the OFF/ON/AL Toggle Switch to the OFF or AL position.
b. Press and hold the SLEEP button.
c. While holding the SLEEP button, press the HOUR button to increase the
hour and press the MINUTE button to decrease the minute. The sleep timer
cannot be set for longer than 1 hour 59 minutes.
d. After the set amount of time has expired the Radio will shut off.
5
Service Information
Address
Phone Fax
Email Website
2116 Carr Street, St. Louis MO, 63106
1-314-621-2881
1-314-588-1805
[email protected]
www.gpx.com
To download this Instruction Manual in English, Spanish, or French
visit the Support section at
www.gpx.com.
© 2007 DPI, Inc.
Para descargar este manual de
instrucción en inglés, español, o
francés visite la sección de la ayuda en www.gpx.com.
Pour télécharger ce manuel
d’instruction en anglais, espagnol,
ou le Français visitez la section de
soutien à www.gpx.com.