1
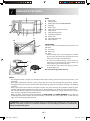
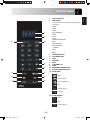
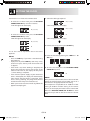
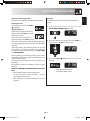
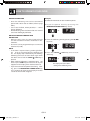
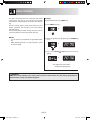
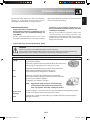
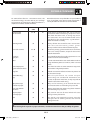
Svarīgi
Svarbu
Tähelepanu
Важно
Important
Увага
MAGYAR
SLOVENSKY
ČESKY
SLOVENŠČINA
ΕΛΛΗΝΙΚΑ
ENGLISH
Important
Σημαντικό
Pomembno
Důležité
Dôležité
Fontos
Важлива
інформація
800 W (IEC 60705)
R-640_OM_00_FRONT_B.indd 1
LIETUVIŠKAI
EESTI
БЪЛГАРСКИ
ROMÂNĂ
БЕЛАРУСКАЯ
MICROWAVE OVEN WITH GRILL - OPERATION MANUAL
ΦΟΥΡΝΟΣ ΜΙΚΡΟΚΥΜΑΤΩΝ ΜΕ ΓΚΡΙΛ - ΕΓΧΕΙΡΙΔΙΟ ΛΕΙΤΟΥΡΓΙΑΣ
MIKROVALOVNA PEČICA Z ŽAROM - NAVODILA ZA UPORABO
MIKROVLNNÁ TROUBA S GRILEM - NÁVOD K OBSLUZE
MIKROVLNNÁ RÚRA S GRILOM - NÁVOD NA POUŽITIE
MIKROHULLÁMÚ SÜTŐ GRILL FUNKCIÓVAL - KEZELÉSI ÚTMUTATÓ
МІКРОХВИЛЬОВА ПІЧ З ГРИЛЕМ - ІНСТРУКЦІЯ З ЕКСПЛУАТАЦІЇ
MIKROVIĻŅU KRĀSNS AR GRILU - LIETOŠANAS INSTRUKCIJA
MIKROBANGŲ KROSNELĖ SU KEPIMO GROTELĖMIS - VALDYMO VADOVAS
GRILLIGA MIKROLAINEAHI - KASUTUSJUHEND
МИКРОВЪЛНОВА ФУРНА С ГРИЛ - РЪКОВОДСТВО ЗА УПОТРЕБА
CUPTOR CU MICROUNDE CU GRILL - MANUAL DE UTILIZARE
МІКРАХВАЛЕВАЯ ПЕЧ З ГРЫЛЕМ - ІНСТРУКЦЫЯ ПА ЭКСПЛУАТАЦЫІ
LATVIEŠU
УКРАЇНСЬКА
R-640
2011-03-18 08:54:10
GB
This operation manual contains important information which you should read carefully before using your microwave oven.
Important: There may be a serious risk to health if this operation manual is not followed or if the oven is modified so that it operates
with the door open.
GR
Αυτό το εγχειρίδιο λειτουργίας περιέχει σημαντικές πληροφορίες, τις οποίες θα πρέπει να διαβάσετε προσεκτικά πριν τη χρήση του
φούρνου μικροκυμάτων.
Σημαντικό: Ενδέχεται να υπάρξει σοβαρός κίνδυνος για την υγεία, αν δεν ακολουθήσετε αυτό το εγχειρίδιο λειτουργίας, ή αν
τροποποιηθεί ο φούρνος έτσι ώστε να λειτουργεί με την πόρτα ανοικτή.
SI
V teh navodilih za uporabo najdete pomembne informacije, ki jih pred uporabo pečice pozorno preberite.
Pomembno: Če teh navodil za uporabo ne upoštevate ali pečico predelate tako, da deluje z odprtimi vrati, lahko to resno škoduje
vašemu zdravju.
Tento návod k obsluze obsahuje důležité informace, které byste si měli pozorně přečíst před použitím této mikrovlnné trouby.
Důležité: Pokud se nebude postupovat podle tohoto návodu k obsluze nebo se mikrovlnná trouba upraví tak, že bude moci
pracovat s otevřenými dveřmi, může dojít k vážnému ohrožení zdraví.
Tento návod na obsluhu obsahuje dôležité informácie, ktoré by ste si mali pred použitím mikrovlnnej rúry pozorne prečítať.
Dôležité: Nedodržanie pokynov uvedených v tomto návode na použitie, ako aj akýkoľvek zásah, ktorý dovoľuje prevádzkovanie rúry s
otvorenými dvierkami, môže viesť k závažnému poškodeniu zdravia osôb.
A kezelési útmutató fontos információkat tartalmaz. Olvassa végig figyelmesen a mikrohullámú sütő használata előtt!
Fontos: A jelen kezelési útmutató előírásainak be nem tartásával, illetve a mikrohullámú sütő nyitott ajtajú működését lehetővé
tevő módosításával súlyos egészségkárosodási kockázatot vállal!
Ця інструкція з експлуатації містить важливу інформацію, яку Вам слід уважно прочитати, перш ніж розпочати
експлуатацію мікрохвильової печі.
Важливо: Наслідком недотримання вказівок, наведених у цій інструкції з експлуатації, а також модифікації печі з метою її експлуатації з
відчиненими дверцятами може бути серйозний ризик для здоров'я.
Šī lietošanas instrukcija ietver svarīgu informāciju, kuru pirms mikroviļņu krāsns lietošanas jums vajadzētu uzmanīgi izlasīt.
Svarīgi: Šīs lietošanas instrukcijas neievērošana vai krāsns pārveidošana tā, lai tā darbotos ar atvērtām durvīm, var nopietni
apdraudēt veselību.
Šiame valdymo vadove rasite svarbią informaciją, kurią, prieš naudodamiesi mikrobangų krosnele, turite atidžiai perskaityti.
Svarbu: Jūsų sveikatai gali kilti rimtas pavojus, jei nesivadovausite šiuo valdymo vadovu ar krosnelė veiks su atidarytomis
durelėmis.
Käesolev juhend sisaldab olulist teawvet, mis tuleks teil enne oma mikrolaineahju kasutamist tähelepanelikult läbi lugeda.
Tähtis: käesoleva juhendi eiramine või ahju muutmine selliselt, et see töötab ka avatud ukse korral, võib kujutada tervisele
tõsist ohtu.
Това ръководство за употреба съдържа информация, която трябва да прочетете внимателно, преди да започнете да
използвате Вашата микровълнова фурна.
Важно: може да има сериозен риск за здравето, ако не се спазва настоящата инструкция или фурната е преправена
така, че да работи и при отворена врата.
Acest manual de utilizare conţine informaţii importante, care trebuie citite cu atenţie înainte de utilizarea cuptorului cu
microunde.
Important: Nerespectarea instrucţiunilor descrise în acest manual sau modificarea cuptorului pentru a funcţiona cu uşa
deschisă poate duce la rănirea utilizatorului.
Гэтая інструкцыя па эксплуатацыі змяшчае важную інфармацыю, якую неабходна ўважліва прачытаць перад
выкарыстоўваннем мікрахвалевай печы.
Увага: Ваша здароўе можа падвергнуцца сур'ёзнай рызыцы, калі гэтая інструкцыя не выканоўваецца, або печ працуе з
адкрытымі дзвярыма.
R-640_OM_00_FRONT_B.indd 2
2011-03-18 08:54:25
Congratulations on acquiring your new microwave oven with grill, which from now on will make your kitchen
chores considerably easier.
You will be pleasantly surprised by the kinds of things you can do with a microwave. Not only can you use it for
rapid defrosting or heating up of food, you can also prepare whole meals.
There are so many advantages to having a microwave oven which we are sure you will find exciting:
● Food can be prepared directly in the serving dishes, leaving less to wash up.
● Shorter cooking times and the use of little water and fat ensure that many vitamins, minerals and
characteristic flavours are preserved.
We advise you to read the cooking guides and operating instructions carefully.
You will then easily understand how to use your oven.
ENGLISH
Dear Customer,
Enjoy using your microwave oven and trying out your own favourite dishes.
Your Microwave-Team
GB-1
R-640_OM_01_EN.indd 1
2011-03-18 14:44:23
GB
Attention:
Your product is
marked with this
symbol.
It means that
used electrical
and electronic
products should
not be mixed
with general
household waste.
There is a separate
collection
system for these
products.
A. Information on Disposal for Users
(private households)
1. In the European Union
Attention: If you want to dispose of this equipment, please do not use the
ordinary dust bin!
Used electrical and electronic equipment must be treated separately and
in accordance with legislation that requires proper treatment, recovery and
recycling of used electrical and electronic equipment.
Following the implementation by member states, private households within
the EU states may return their used electrical and electronic equipment to
designated collection facilities free of charge*.
In some countries* your local retailer may also take back your old product free
of charge if you purchase a similar new one.
*) Please contact your local authority for further details.
If your used electrical or electronic equipment has batteries or accumulators,
please dispose of these separately beforehand according to local requirements.
By disposing of this product correctly you will help ensure that the waste
undergoes the necessary treatment, recovery and recycling and thus prevent
potential negative effects on the environment and human health which could
otherwise arise due to inappropriate waste handling.
2. In other Countries outside the EU
If you wish to discard this product, please contact your local authorities and ask
for the correct method of disposal.
For Switzerland: Used electrical or electronic equipment can be returned free
of charge to the dealer, even if you don’t purchase a new product. Further
collection facilities are listed on the homepage of www.swico.ch or www.sens.
ch.
B. Information on Disposal for Business Users
1. In the European Union
If the product is used for business purposes and you want to discard it:
Please contact your SHARP dealer who will inform you about the take-back of
the product. You might be charged for the costs arising from take-back and
recycling. Small products (and small amounts) might be taken back by your
local collection facilities.
For Spain: Please contact the established collection system or your local
authority for take-back of your used products.
2. In other Countries outside the EU
If you wish to discard of this product, please contact your local authorities and
ask for the correct method of disposal.
GB-2
R-640_OM_01_EN.indd 2
2011-03-18 14:44:29
Operation manual
DEAR CUSTOMER............................................................................................................................................................................... 1
INFORMATION ON PROPER DISPOSAL....................................................................................................................................... 2
OVEN AND ACCESSORIES ............................................................................................................................................................... 4
CONTROL PANEL ................................................................................................................................................................................ 5
IMPORTANT SAFETY INSTRUCTIONS ...................................................................................................................................... 6-8
INSTALLATION..................................................................................................................................................................................... 8
BEFORE OPERATION ......................................................................................................................................................................... 9
MICROWAVE POWER LEVEL ........................................................................................................................................................... 9
SETTING THE CLOCK .......................................................................................................................................................................10
HOW TO OPERATE YOUR OVEN ........................................................................................................................................... 11-12
GRILL COOKING......................................................................................................................................................................... 13-14
MIX GRILL COOKING .......................................................................................................................................................................15
AUTO DEFROST ......................................................................................................................................................................... 16-17
AUTO COOK ................................................................................................................................................................................ 18-19
OTHER CONVENIENT FUNCTIONS ...................................................................................................................................... 20-22
MICROWAVE COOKING ADVICE........................................................................................................................................... 23-24
SUITABLE COOKWARE ....................................................................................................................................................................25
DEFROSTING ADVICE .....................................................................................................................................................................26
REHEATING ADVICE ........................................................................................................................................................................27
CLEANING AND MAINTENANCE .................................................................................................................................................28
SERVICE CALL CHECK .....................................................................................................................................................................29
SPECIFICATIONS ...............................................................................................................................................................................30
ENGLISH
CONTENTS
GB-3
R-640_OM_01_EN.indd 3
2011-03-18 14:44:29
OVEN AND ACCESSORIES
9
1
8
2
7
6
5
4
3
11
10
12
13
14
15
OVEN
1. Oven lamp
2. Control panel
3. Waveguide cover (DO NOT REMOVE)
4. Coupling
5. Oven cavity
6. Door seals and sealing surfaces
7. Door latches
8. Door opening handle
9. Grill heating element
10. Power cord
11. Ventilation openings
12. Outer cabinet
ACCESSORIES:
Check to make sure the following accessories are
provided:
13. Turntable
14. Roller stay
15. Rack
• Place the roller stay in the coupling on the floor
of the cavity, then place the turntable on to the
roller stay, ensuring it is located firmly.
• To avoid turntable damage, ensure dishes or
containers are lifted clear of the turntable rim
when removing them from the oven.
• For use of the rack, refer to the grilling sections
on pages GB-13-15.
Never touch the grill when it is hot.
NOTES:
• The waveguide cover is fragile. Care should be taken when cleaning inside the oven to ensure that it is not
damaged.
• After cooking fatty foods without a cover, always clean the cavity and especially the grill heating element
thoroughly, these must be dry and free from grease. Built-up grease may overheat and begin to smoke or
catch fire.
• Always operate the oven with the turntable and roller stay fitted correctly. This promotes thorough, even
cooking. A badly fitted turntable may rattle, may not rotate properly and could cause damage to the oven.
• The turntable rotates clockwise or anti-clockwise. The rotary direction may change each time you start the
oven. This does not affect cooking performance.
• When you order accessories, please quote both the PART NAME and MODEL NUMBER to your dealer or
SHARP approved service facility. The model number is located on the rating label, which is found on the
right hand side when you open the door.
WARNING: This symbol means that the surfaces are liable to get hot during use. The door, outer
cabinet, oven cavity, accessories and dishes will become very hot during operation. To prevent burns,
always use thick oven gloves.
GB-4
R-640_OM_01_EN.indd 4
2011-03-18 14:44:30
1.
2.
1
2
12
13
3
4
5
11
6
10
7
9
8
3.
4.
5.
6.
7.
8.
9.
10.
11.
12.
DIGITAL DISPLAY
INDICATORS
The indicator will flash or light up during the
operation:
ENTER
TIMER
CODE
AMT (AMOUNT)
COOK
TIME
CLOCK
MICRO (MICROWAVE)
GRILL
DEF (DEFROST)
MEM (MEMORY)
G (GRAM)
LOCK
ENGLISH
CONTROL PANEL
Keys:
WEIGHT/PORTION
LESS/MORE TIME
TIME
MIX GRILL
GRILL
START/ +1min
STOP
MICROWAVE POWER LEVEL
KITCHEN TIMER/CLOCK SET
AUTO COOK
Pizza
Jacket Potato
Fresh Vegetables
Fish
Chicken breast
Sausage
13. AUTO DEFROST
Pork
Beef
Chicken breast
GB-5
R-640_OM_01_EN.indd 5
2011-03-18 14:44:32
IMPORTANT SAFETY INSTRUCTIONS
IMPORTANT SAFETY INSTRUCTIONS: READ CAREFULLY AND KEEP FOR FUTURE REFERENCE
To avoid the possibility of injury
To avoid the danger of fire.
The microwave oven should not be left unattended during operation. Power levels that are
too high, or cooking times that are too long,
may overheat foods resulting in a fire.
This oven is designed to be used on a countertop
only. It is not designed to be built into a kitchen unit.
Do not place the oven in a cabinet.
The electrical outlet must be readily accessible so that
the unit can be unplugged easily in an emergency.
The AC power supply must be 230V, 50Hz, with a
minimum 10A distribution line fuse, or a minimum
10A distribution circuit breaker.
A separate circuit serving only this appliance should
be provided.
Do not place the oven in areas where heat is generated.
For example, close to a conventional oven.
Do not install the oven in an area of high humidity or
where moisture may collect.
Do not store or use the oven outdoors.
If smoke is observed, switch off or unplug the
oven and keep the door closed in order to stifle
any flames.
Utensils should be checked to ensure that they
are suitable for use in the oven. See Page GB-25.
Use only microwave safe containers and utensils on microwave modes. When heating food in
plastic or paper containers, keep an eye on the
oven due to the possibility of ignition.
Clean the waveguide cover, the oven cavity and
the turntable after use. These must be dry and
free from grease. Built-up grease may overheat
and begin to smoke or catch fire.
Do not place flammable materials near the oven or
ventilation openings.
Do not block the ventilation openings.
Remove all metallic seals, wire twists, etc., from food
and food packages. Arcing on metallic surfaces may
cause a fire.
Do not use the microwave oven to heat oil for deep
frying. The temperature cannot be controlled and the
oil may catch fire.
To make popcorn, use only special microwave popcorn makers.
Do not store food or any other items inside the oven.
Check the settings after you start the oven to ensure
the oven is operating as desired.
To avoid overheating and fire, special care must be
taken when cooking or reheating foods with a high
sugar or fat content, for example, Sausage rolls, Pies
or Christmas pudding.
See the corresponding hints in operation manual and
the cookery book section.
WARNING:
Do not operate the oven if it is damaged or
malfunctioning. Check the following before use:
a) The door; make sure the door closes properly
and ensure it is not misaligned or warped.
b) The hinges and safety door latches; check to
make sure they are not broken or loose.
c) The door seals and sealing surfaces; ensure that
they have not been damaged.
d) Inside the oven cavity or on the door; make
sure there are no dents.
e) The power supply cord and plug; ensure that
they are not damaged.
If the door or door seals are damaged, the oven
must not be operated until it has been repaired by
a competent person.
Never adjust , repair or modify the oven
yourself. It is hazardous for anyone other than
a competent person to carry out any service or
repair operation which involves the removal of
a cover which gives protection against exposure
to microwave energy.
Do not operate the oven with the door open or alter
the door safety latches in any way.
Do not operate the oven if there is an object between
the door seals and sealing surfaces.
Do not allow grease or dirt to build up on
the door seals and adjacent parts. Clean the
oven at regular intervals and remove any food
deposits. Follow the instructions for "CLEANING
AND MAINTENANCE" on page GB-28. Failure
to maintain the oven in a clean condition could
lead to a deterioration of the surface that could
adversely affect the life of the appliance and
possibly result in a hazardous situation.
Individuals with PACEMAKERS should check with their
doctor or the manufacturer of the pacemaker for
precautions regarding microwave ovens.
To avoid the possibility of electric shock
Under no circumstances should you remove the outer
cabinet.
Never spill or insert any objects into the door lock
openings or ventilation openings. In the event of a
spill, turn off and unplug the oven immediately, and
call an authorised SHARP service agent.
Do not immerse the power supply cord or plug in
water or any other liquid.
Do not let the power supply cord hang over the edge
of a table or work surface.
GB-6
R-640_OM_01_EN.indd 6
2011-03-18 14:44:36
Keep the power supply cord away from heated
surfaces, including the rear of the oven.
Do not attempt to replace the oven lamp yourself or
allow anyone who is not an electrician authorised by
SHARP to do so. If the oven lamp fails, please consult
your dealer or an authorised SHARP service agent.
If the power supply cord of this appliance is
damaged, it must be replaced with a special cord.
The exchange must be made by an authorised
SHARP service agent.
To avoid the possibility of explosion and sudden
boiling:
WARNING: Liquids and other foods must not be
heated in sealed containers since they are liable
to explode.
Microwave heating of beverages can result in
delayed eruptive boiling, therefore care must
be taken when handling the container.
Never use sealed containers. Remove seals and lids
before use. Sealed containers can explode due to a
build up of pressure even after the oven has been
turned off.
Take care when microwaving liquids. Use a widemouthed container to allow bubbles to escape.
Never heat liquids in narrow necked containers
such as baby bottles, as this may result in the
contents erupting from the container when heated
and cause burns.
To prevent sudden eruption of boiling liquid and
possible scalding:
1. Do not use excessive amount of time.
2. Stir liquid prior to heating/reheating.
3. It is advisable to insert a glass rod or similar utensil
(not metal) into the liquid whilst reheating.
4. Let liquid stand for at least 20 seconds in the oven
at the end of cooking time to prevent delayed
eruptive boiling.
Do not cook eggs in their shells, and whole hard
boiled eggs should not be heated in microwave
ovens since they may explode even after microwave cooking has ended. To cook or reheat eggs
which have not been scrambled or mixed, pierce
the yolks and the whites, or the eggs may explode.
Shell and slice hard boiled eggs before reheating
them in the microwave oven.
Pierce the skin of such foods as potatoes, sausages
and fruit before cooking, or they may explode.
To avoid the possibility of burns
WARNING: The contents of feeding bottles and
baby food jars must be stirred or shaken and the
temperature checked before consumption, in order
to avoid burns.
Use pot holders or oven gloves when removing food
from the oven to prevent burns.
Always open containers, popcorn makers, oven
cooking bags, etc., away from the face and hands to
avoid steam burns and eruption of boiling.
ENGLISH
IMPORTANT SAFETY INSTRUCTIONS
To avoid burns, always test food temperature
and stir before serving and pay special attention to the temperature of food and drink given
to babies, children or the elderly. Accessible
parts may become hot during use. Young children should be kept away.
Temperature of the container is not a true indication
of the temperature of the food or drink; always check
the food temperature.
Always stand back from the oven door when opening it
to avoid burns from escaping steam and heat.
Slice stuffed baked foods after heating to release
steam and avoid burns.
This appliance is not intended to be operated by
means of an external timer or separate remotecontrol system.
To avoid misuse by children
WARNING: Only allow children to use the oven
without supervision when adequate instructions have been given so that the child is able
to use the oven in a safe way and understands
the hazards of improper use. When the appliance is operated in the GRILL, MIX GRILL and
AUTO COOK operation, children should only
use the oven under adult supervision due to the
temperature generated. This appliance is not
intended for use by persons (including children)
with reduced physical, sensory or mental capabilities, or lack of experience and knowledge,
unless they have been given supervision or
instruction concerning use of the appliance by
a person responsible for their safety. Children
should be supervised to ensure that they do not
play with the appliance.
Do not lean or swing on the oven door. Do not play
with the oven or use it as a toy.
Children should be taught all important safety
instructions: use of pot holders, careful removal of
food coverings; paying special attention to packaging
(e.g. self-heating materials) designed to make food
crisp, as they may be extra hot.
Other warnings
Never modify the oven in any way.
Do not move the oven while it is in operation.
This oven is for home food preparation only and may
only be used for cooking food. It is not suitable for
commercial or laboratory use.
To promote trouble-free use of your oven and
avoid damage.
Never operate the oven when it is empty except
where recommended in the operation manual, see
page GB-13. Doing so may damage the oven. When
GB-7
R-640_OM_01_EN.indd 7
2011-03-18 14:44:36
IMPORTANT SAFETY INSTRUCTIONS
using a browning dish or self-heating material, always
place a heat-resistant insulator such as a porcelain
plate under it to prevent damage to the turntable
due to heat stress.
T h e p re h e a t i n g t i m e s p e c i f i e d i n t h e d i s h ' s
instructions must not be exceeded.
Do not use metal utensils, which reflect microwaves
and may cause electrical arcing. Do not put cans in
the oven.
Use only the turntable designed for this oven.
Do not place anything on the outer cabinet during
operation.
Do not use plastic containers for microwaving if the
oven is still hot from using the GRILL, MIX GRILL
and AUTO COOK operation because they may melt.
Plastic containers must not be used during above
modes unless the container manufacturer says they
are suitable.
NOTE:
If you are unsure how to connect your oven, please
consult an authorised, qualified electrician.
Neither the manufacturer nor the dealer can accept
any liability for damage to the oven or personal injury
resulting from failure to observe the correct electrical
connection procedure.
Water vapour or drops may occasionally form on
the oven walls or around the door seals and sealing
surfaces. This is a normal occurrence and is not an
indication of microwave leakage or a malfunction.
This symbol means that the surfaces are liable
to get hot during use.
INSTALLATION
1. Remove all packing materials from the inside of the
oven cavity. Remove the feature sticker, if attached,
from the outside of the door.
4. Do not allow the power supply cord to run over
any hot or sharp surfaces, such as the hot air
vent area at the top rear of the oven.
Do not remove the protective film attached to the
inside of the door.
5. Ensure there is a minimum free space above the
oven of 18cm.
18 cm
✗
DO NOT REMOVE
2. Check the oven carefully for any signs of damage.
6. Securely connect the plug of the oven to a standard
earthed (grounded) household electrical outlet.
3. The oven door may become hot during cooking.
Place or mount the oven so that the bottom of
the oven is 85 cm or more above the floor. Keep
children away from the door to prevent them
burning themselves.
GB-8
R-640_OM_01_EN.indd 8
2011-03-18 14:44:37
BEFORE OPERATION
Plug in the oven.
ENGLISH
1. The oven display will flash:
2. Press the STOP key.
3. The display will show:
Use the STOP key to:
1. Erase a mistake during programming.
2. Stop the oven temporarily during cooking.
3. Cancel a programme during cooking, press the STOP key twice.
4. To set and to cancel the child lock (refer to page GB-22).
MICROWAVE POWER LEVEL
Power Level
Press the
MICROWAVE
POWER LEVEL
key
Percentage
HIGH
x1
P100
MEDIUM HIGH
x2
P70
MEDIUM
x3
P50
MEDIUM LOW
(Defrost)
x4
P30
LOW
(Defrost)
x5
P10
• Your oven has 5 power levels, as shown opposite.
• To change the power level for cooking, press the
MICROWAVE POWER LEVEL key and then enter
the cooking time.
Power level:
The microwave power level is varied by the
microwave energy switching on and off.
When using power levels other than 100% you will
be able to hear the microwave energy pulsing on
and off as the food cooks or defrosts.
IMPORTANT: The microwave power level will cook
at 100% unless you press the MICROWAVE POWER
LEVEL key to the desired setting.
Check the power level:
To check the microwave power level during cooking,
press the MICROWAVE POWER LEVEL key. As long
as your finger is pressing the MICROWAVE POWER
LEVEL key the power level will be displayed.
The oven continues to count down although the
display will show the power level.
MICROWAVE POWER
LEVEL key
Generally the following recommendations apply to
choose the power level for cooking:
100 P (800 W) used for fast cooking or reheating
e.g. soup, casseroles, canned food, hot beverages,
vegetables etc.
70 P (560 W) used for longer cooking of dense foods
such as roast joints, meat loaf and plated meals, also
for sensitive dishes such as cheese sauce and sponge
cakes. At this reduced setting, the sauce will not boil
over and food will cook evenly without over cooking
at the sides.
50 P (400 W) for dense foods which require a long
cooking time when cooked conventionally, e.g. beef
dishes, it is advisable to use this power setting to
ensure the meat will be tender.
30 P (240 W Defrost setting) to defrost, select this
power setting, to ensure that the dish defrosts
evenly. This setting is also ideal for simmering rice,
pasta, dumplings and cooking egg custard.
10 P (80 W) For gentle defrosting, e.g. cream gateaux
or pastry.
P=PERCENTAGE
GB-9
R-640_OM_01_EN.indd 9
2011-03-18 14:44:37
SETTING THE CLOCK
Your oven has a 12 hour and a 24 hour clock.
1. Select the clock type required.
• To select the 12 hour clock, press the KITCHEN
TIMER/CLOCK SET key once for 3 seconds.
"12H" will appear on the display
x1 (3 seconds)
"12H" will appear on the display
x1 (3 seconds)
x1 (3 seconds)
x1
• To select the 24 hour clock, press the KITCHEN
TIMER/CLOCK SET key twice.
"24H" will appear on the display
"24H" will appear on the display
x1 (3 seconds)
2. Enter the hours by pressing the 10 MIN key.
x1
To set the time of day follow the instructions
opposite.
NOTES:
• Press the STOP key if you make a mistake during
programming.
• If you press any of the TIME keys too many times,
continue to press the key until the desired time
re-appears.
• If the clock is set, when cooking is complete, the
display will show the correct time of day. If the
clock has not been set, the display will only show
":" when cooking is complete.
• If the electrical power supply to your microwave
oven is interrupted, the display will intermittently
show "88:88" after the power is reinstated. If this
occurs during cooking, the programme will be
erased. The time of day will also be erased.
• When you want to reset the time of day, follow the
opposite example again.
3. Enter the minutes by pressing the 1 MIN and 10
SEC keys.
4. To start the clock, press the KITCHEN TIMER/
CLOCK SET key once.
x1
NOTES:
Once you have selected either the 12 hour or 24 hour
option the clock function will not allow you to set a
time which is not appropriate for that setting.
For example it is not possible to set 13:00 on 12 hour
setting or 25:00 on 24 hour setting. If an incorrect
time is set the display will revert back to 12H or 24H.
When the KITCHEN TIMER/SET CLOCK has been
pressed and you will be able to re-enter the correct
time.
GB-10
R-640_OM_01_EN.indd 10
2011-03-18 14:44:39
Example:
To cook for 2 minutes 30 seconds on 70% microwave
power.
Opening and closing the door:
To open the oven door, pull the door opening handle.
Starting the oven:
Close the door and press the START/
+1 min key.
ENGLISH
HOW TO OPERATE YOUR OVEN
1. I n p u t t h e p o w e r l e v e l b y p r e s s i n g t h e
MICROWAVE POWER LEVEL key twice.
Stopping the oven:
If you want to stop the oven during
cooking, press the STOP key once or
open the oven door.
If you want to cancel the cooking
programme, press the STOP key twice.
x2
Your oven enables you to cook and defrost food using
the automatic programmes, or to cook and defrost food
manually.
Automatic cooking and defrosting allows you to cook
and defrost using preset programmes where the
timings have been calculated for you, e.g AUTO COOK
and AUTO DEFROST.
Manual cooking and defrosting allows you to cook/
defrost foods and weights which are not included in the
automatic programmes.
The following are examples of manual cooking and
defrosting.
For automatic cooking and defrosting refer to pages
GB-16-19.
2. Enter the cooking time by pressing the 1 MIN key
twice, then the 10 SEC key three times.
x2
x3
3. Press the START/
cooking.
MANUAL COOKING USING MICROWAVE FUNCTION
ONLY
• Enter the power level and then cooking time.
• Stir or turn the food, where possible, 2 - 3 times
during cooking, if required.
• After cooking, cover the food and leave to stand, if
required.
+1min key once to start the
x1
The display will count down
through the cooking time.
GB-11
R-640_OM_01_EN.indd 11
2011-03-18 14:44:41
HOW TO OPERATE YOUR OVEN
Example:
To defrost for 10 minutes on 30% microwave power.
MANUAL DEFROSTING
• Enter the defrosting time and use microwave
power levels 10% or 30% to defrost (refer to page
GB-9).
• Stir or turn the food, where possible, 2 - 3 times
during defrosting.
• After defrosting, cover the food in foil and leave to
stand until thoroughly defrosted.
NOTES FOR MANUAL COOKING AND
DEFROSTING:
• When the oven starts, the oven lamp will light
and the turntable will rotate clockwise or anticlockwise.
• Your oven can be programmed up to 99 minutes,
90 seconds (99.90).
NOTE:
• If the door is opened during cooking/defrosting to stir or turn over food, the cooking time
on the display stops automatically. The cooking/
defrosting time starts to count down again when
the door is closed and the START/ +1min key is
pressed.
• When cooking/defrosting is complete, open the
door or press STOP key and the time of day will
reappear on the display, if the clock has been set.
• If you want to know the power level during cooking, press the MICROWAVE POWER LEVEL key
and 3 seconds will show on the display, then after
3 seconds the time will disappear.
1. I n p u t t h e p o w e r l e v e l b y p r e s s i n g t h e
MICROWAVE POWER LEVEL key 4 times.
x4
2. Enter the defrosting time by pressing the 10 MIN
key once.
x1
3. Press the START/
defrosting.
+1min key once to start
x1
The display will count down
through the defrosting time.
GB-12
R-640_OM_01_EN.indd 12
2011-03-18 14:44:43
GRILL COOKING
Example:
First time usage of grill, using GRILL key.
ENGLISH
You may detect smoke or a burning smell when using
the grill for the first time. This is normal and not a sign
that the oven is out of order.
To avoid this problem, when first using the oven, heat
the oven without food for 20 minutes on grill.
1. Press GRILL key once.
x1
IMPORTANT: During operation, to allow smoke or
smells to disperse open a window or switch the kitchen
ventilation on. Make sure there is no food in the oven.
2. Enter the required heating time by pressing the 10
MIN key twice.
x2
3. Press the START/
operation.
+1min key once to start the
x1
The display will count down.
When the oven has finished the operation,
open the door to cool the oven cavity.
WARNING:
The door, outer cabinet, oven cavity and accessories will become very hot during operation. Take care
to avoid burns when cooling the oven down after operation.
GB-13
R-640_OM_01_EN.indd 13
2011-03-18 14:44:44
GRILL COOKING
The grill at the top of the oven cavity has one power
setting only. The grill is assisted by the turntable
which rotates simultaneously to ensure even browning.
Use the rack for grilling small items of food such as
bacon, gammon and teacakes, turn over halfway
through grilling.
Food can be placed either directly onto the rack, or
into a flan dish/heat-resistant plate on the rack.
Example:
To grill for 20 minutes, using GRILL key.
NOTES:
• It is not necessary to preheat the grill before cooking.
• When browning foods in a deep container, place
on the turntable.
2. Enter the grilling time by pressing the 10 MIN key
twice.
1. Press GRILL key once.
x1
x2
3. Press the START/
grilling.
+1min key once to start
x1
The display will count down
through the grilling time.
WARNING:
The door, outer cabinet, oven cavity and accessories will become very hot during operation. To
prevent burns, always use thick oven gloves.
GB-14
R-640_OM_01_EN.indd 14
2011-03-18 14:44:46
MIX GRILL combines microwave
power with the grill. MIX means to
cook by Microwave power and Grill
power alternately.
The combination of microwave power with the grill
reduces cooking time and provides a crisp, brown
finish.
There are 2 choices for the combination:
Example:
To cook for 15 minutes, using MIX GRILL, 30% time
microwave power.
ENGLISH
MIX GRILL COOKING
1. Press the MIX GRILL key once.
(Press the MIX GRILL key twice for COMBINATION
2.)
x1
COMBINATION 1
30% time for microwave power, 70% time for grill
cooking. Use for fish or au gratin.
COMBINATION 2
55% time for microwave cooking, 45% time for grill
cooking. Use for pudding omelets, and poultry.
2. Enter the cooking time by pressing the 10 MIN key
once and the 1 MIN key 5 times.
x1
NOTES:
• It is not necessary to preheat the grill.
• When browning foods in a deep container, place on
the turntable.
x5
3. Press the START/
cooking.
+1min key once to start the
x1
The display will count down
through the cooking time.
WARNING:
The door, outer cabinet, oven cavity and accessories will become very hot during operation. To
prevent burns, always use thick oven gloves.
GB-15
R-640_OM_01_EN.indd 15
2011-03-18 14:44:47
AUTO DEFROST
AUTO COOK/AUTO DEFROST enables you to cook or defrost the foods listed on the control panel and the
charts on pages GB-17 and GB-19.
Follow the example below for details on how to operate these functions.
AUTO DEFROST Example:
To defrost a 1000g beef.
AUTO
DEFROST
1. Press the BEEF key.
Pork
x1
Beef
Chicken breast
2. Enter the weight by pressing the WEIGHT UP key 9 times.
x9
3. Press the START/
+1min key once to start defrosting.
x1
The display will count down
through the defrosting time.
WARNING:
The door, outer cabinet, oven cavity and accessories will become very hot during operation. To
prevent burns, always use thick oven gloves.
GB-16
R-640_OM_01_EN.indd 16
2011-03-18 14:44:48
AUTO DEFROST
MENU
ENGLISH
AUTO DEFROST CHART
WEIGHT RANGE
NOTES FOR AUTO DEFROST
100g - 2000g
• You may need to turn food over during defrosting to ensure
even results.
• When action is required (example, to turn food over), the
oven stops, the audiable signals sound and an indicator will
flash on the display. To continue cooking, press the START/
+1min key.
• The final food temperature will vary according to the initial
food temperature. Check food is thoroughly defrosted. If
necessary, you can extend the defrost time manually.
• Before freezing food, ensure food is fresh and of good
quality.
Meat Joint:
Pork
Beef
100g - 2000g
Chicken breast
100g - 2000g
Frozen foods are defrosted from -18°C.
NOTES FOR MANUAL DEFROST:
• To manually defrost, press the power level to P10 or P30. Select the time required and press the START key.
• If necessary, shield small areas of meat or poultry with small flat pieces of aluminium foil. This will prevent
the areas from becoming warm during defrosting. Ensure the foil does not touch the oven walls.
• Do not cook the meat or poultry until thoroughly defrosted.
WEIGHT RANGE FOR AUTO DEFROST:
• Weigh all meat and poultry prior to cooking/defrosting as the labelled weight is only approximate.
• Food weight should be rounded up to the nearest 100g, for example, 650g to 700g.
• You are restricted to defrost a weight within the range given in the charts.
GB-17
R-640_OM_01_EN.indd 17
2011-03-18 14:44:51
AUTO COOK
AUTO COOK enables you to cook the foods listed on
the control panel.
AUTO COOK
Example:
To cook two jacket potatoes (460g).
1. Select the menu required by pressing the Jacket
Potato key.
x1
AUTO COOK
Follow the example opposite for more details on how
to operate this function.
2. Press WEIGHT UP/DOWN key to choose the
reqiured number of potatoes (up to 3).
x1
3. Press the START/
cooking.
+1min key once to start
x1
The display will count down
through the cooking time.
WARNING:
The door, outer cabinet, oven cavity and accessories will become very hot during operation. To
prevent burns, always use thick oven gloves.
GB-18
R-640_OM_01_EN.indd 18
2011-03-18 14:44:52
AUTO COOK
MENU
ENGLISH
AUTO COOK CHART
WEIGHT RANGE
Pizza
FOOD CONDITION
Ready prepared fresh Pizza, just reheat by microwave function
150g - 450g
Fish
Fresh whole Fish, cooked by microwave function
200g - 600g
Jacket Potato
(each 230g)
Fresh Potato, cooked by microwave function
230g - 690g
Chicken Breast
Fresh Chicken breast, cooked by microwave function
200g - 600g
Fresh Vegetables
Fresh Vegetables, cooked by microwave function
200g - 600g
Sausage
Fresh Sausage, cooked by microwave function
100g - 500g
WEIGHT RANGE:
• Food weight should be rounded up or down to the nearest 100g, for example 650g to 700g or 340g to 300g.
NOTES:
• If there is a requirement to stir the food during the auto cook process the oven will stop and the audio signal
will sound, at the same time the remaining cook time will show on the display. To continue cooking once the
food has been stirred press the START/ +1min key.
• The final temperature will vary according to the initial food temperature. Check food is piping hot after
cooking. If necessary, you can extend the cooking manually.
• The results when using auto cook depend on variances such as the shape and size of the food and your
personal preference as regards cooking results. If you are not satisfied with the programmed result, please
adjust the cooking time to match your requirement.
GB-19
R-640_OM_01_EN.indd 19
2011-03-18 14:44:54
OTHER CONVENIENT FUNCTIONS
1. SEQUENCE COOKING
STAGE 2
This function allows you to cook using up to 2
different stages which can include Grill or Mix Grill
cooking.
Once programmed there is no need to interfere with
the cooking operation as the oven will automatically
move onto the next stage.
3. Select Grill by pressing the GRILL key once.
Example:
To cook for:
5 minutes on 70% microwave power
6 minutes on Grill
x1
4. Enter the cooking time by pressing the 1 MIN key
6 times.
(Stage 1)
(Stage 2)
x6
STAGE 1
1. I n p u t t h e p o w e r l e v e l b y p r e s s i n g t h e
MICROWAVE POWER LEVEL key twice.
5. Press the START/
cooking.
x2
+1min key once to start
x1
2. Enter the cooking time by pressing the 1 MIN key
5 times.
x5
2. + 1min FUNCTION
The + 1min key enables you:
• To cook on 100% microwave power in multiples
of 1 minute.
• To extend cooking time during manual cooking
in multiples of 1 minute. You can use this
function for manual cooking only.
IMPORTANT NOTE:
It is very important to pay careful attention that you
enter the correct power level, function and time
when using sequence cooking. If you enter the wrong
power level, function choice or time level press the
STOP button twice and re-start the process.
Example:
To cook on P I00 for 2 minutes, press the
+1min key twice.
START/
x2
NOTE:
• The overall time can be extended to a maximum of
99 minutes.
GB-20
R-640_OM_01_EN.indd 20
2011-03-18 14:44:56
OTHER CONVENIENT FUNCTIONS
TO USE WHEN MANUAL COOKING:
Example:
To cook for 10 minutes on 50% microwave power
and then decrease the cooking time by 2 minutes.
3. Press the START/
cooking.
ENGLISH
3. MORE AND LESS TIME key
The MORE (▲) and LESS (▼) keys enable you to:
• Increase or decrease cooking/defrosting time whilst the oven is in use (manual cooking only).
+1min key once to start
x1
1. I n p u t t h e p o w e r l e v e l b y p r e s s i n g t h e
MICROWAVE POWER LEVEL key 3 times.
4. Reduce the cooking time by pressing the LESS key
twice.
x3
x2
2. Enter the cooking time by pressing the 10 MIN key
once.
x1
The cooking time is reduced by 2 minutes and
continues to count down.
NOTES:
• The cook ing/defrosting time will increase/
decrease in multiples of 1 minute.
• The overall time can be extended to a maximum
of 99 minutes.
GB-21
R-640_OM_01_EN.indd 21
2011-03-18 14:44:58
OTHER CONVENIENT FUNCTIONS
4. KITCHEN TIMER
Use the KITCHEN TIMER as a minute timer or to
monitor the standing time for cooked/defrosted food.
Example:
To set the timer for 5 minutes.
1. Press the KITCHEN TIMER/CLOCK SET key once.
NOTES:
• You can enter any time up to 99 minutes, 90
seconds.
• If using the KITCHEN TIMER without cooking, the
time will count down on the display and revert to
your standard display once finished.
• If you choose to use the KITCHEN TIMER at the
same time as cooking the actual cook time will
count down on the display. To check the KITCHEN
TIMER countdown hold down the KITCHEN TIMER
key and it will display the remaining time (this
will automatically default to cook time count
down after a few seconds).
• If the cooking sequence finishes before the
KITCHEN TIMER the remainder time of the KITCHEN
TIMER will count down on the display.
• To cancel the KITCHEN TIMER simply press
KITCHEN TIMER key to show the display of
KITCHEN TIMER firstly and then press the STOP key
and the display will return to the time of day, if set.
• The KITCHEN TIMER function can be used whilst
the oven is in use.
x1
2. Enter the desired time by pressing the 1 MIN key 5
times.
x5
3. Press the START/
+1min key.
x1
The display will count down. When the display
reaches zero, the audible signal will sound.
5. CHILD LOCK
IMPORTANT:
To activate the child lock press the STOP key for 3 seconds. The indicator LOCK is shown in the display
screen. This will lock the control panel from operation.
To cancel press the STOP key again for three seconds.
GB-22
R-640_OM_01_EN.indd 22
2011-03-18 14:45:00
Microwaves cook food faster than conventional
cooking. It is therefore essential that cer tain
techniques are followed to ensure good results.
Many of the following techniques are similar to those
used in conventional cooking.
COOKING ADVICE NOTES:
containers or jars/containers with lids on, as
pressure will build up inside and may cause the
container/jar to explode.
• Only use microwave popcorn within the
recommended packaging (follow the
manufacturers instructions). Never use oil unless
specified by the manufacturer and never cook for
longer than instructed.
• Always attend the oven when in use.
• Ensure that the utensils are suitable for use in a
microwave oven. (See "Suitable Cookware" on
page GB-25).
• Do not place hot foods/utensils on a cold
turntable or cold foods/utensils on a hot turntable.
ENGLISH
MICROWAVE COOKING ADVICE
• Liquids and foods must not be heated in sealed
WARNING:
Follow instructions in the SHARP operation manual at all times.
If you exceed recommended cooking times and use power levels that are too high, food may
overheat, burn and in extreme circumstances, catch fire and damage the oven.
Cooking Techniques
Arrange
Cover
Pierce
Place the thickest parts of food towards the outside of the dish.
e.g. Chicken drumsticks.
Foods that are placed towards the outside of the dish will receive
more energy, so cook quicker, than those in the centre.
Certain foods benefit from being covered during microwave
cooking, follow recommendations where given.
Use vented microwave cling film or a suitable lid.
Foods with a shell, skin or membrane must be pierced in
several places before cooking or reheating as steam will build
up and may cause food to explode.
e.g. Potatoes, Fish, Chicken, Sausages.
NOTE:
Stir, turn and
rearrange
Stand
Eggs in their shells and hard / soft boiled eggs
should not be heated in the microwave oven as
they may explode, even after cooking has ended.
For even cooking it is essential to stir, turn and rearrange food during cooking. Always
stir and rearrange from the outside towards the centre.
Standing time is necessary after cooking as it enables the heat to disperse equally
throughout the food.
GB-23
R-640_OM_01_EN.indd 23
2011-03-18 14:45:02
MICROWAVE COOKING ADVICE
Food Characteristics
Composition
Foods high in fat or sugar (e.g. Christmas pudding, mince pies) require less heating
time. Care should be taken as overheating can lead to fire.
Bones in food conduct heat, making the food cook more quickly. Care must be taken
so that the food is cooked evenly.
Density
Food density will affect the amount of cooking time needed.
Light, porous foods, such as cakes or bread, cook more quickly than heavy, dense
foods, such as roasts and casseroles.
Quantity
The number of microwaves in your oven remains the same regardless of how much
food is being cooked. The cooking time must be increased as the amount of food
placed in the oven increases.
e.g. Four potatoes will take longer to cook than two.
Size
Small foods and small pieces cook faster than large ones, as microwaves can
penetrate from all sides to the centre. For even cooking make all the pieces the same
size.
Shape
Foods which are irregular in shape, such as chicken breasts or drumsticks, take
longer to cook in the thicker parts. For even cooking, place the thickest parts to the
outside of the dish where they will receive more energy.
Round shapes cook more evenly than square shapes when microwave cooking.
Temperature of
food
The initial temperature of food affects the amount of cooking time needed. Chilled
foods will take longer to cook than food at room temperature.
e.g. A cake made with chilled ingredients, (i.e. margarine) will take longer to cook
than a cake made with ingredients at room temperature.
The temperature of the container is not a true indication of the temperature of the
food or drink. Cut into foods with fillings, for example jam doughnuts, to release heat
or steam.
Face & Hands: Always use oven gloves to remove food or cookware from the oven. Stand
back when opening the oven door to allow heat or steam to disperse. When removing
covers (such as cling film), opening roasting bags or popcorn packaging, direct steam away
from face and hands.
Check the temperature of food and drink and stir before serving. Take special care when
serving to babies, children or the elderly. The contents of feeding bottles and baby food
jars are to be stirred or shaken and the temperature is to be checked before consumption
to avoid burns.
GB-24
R-640_OM_01_EN.indd 24
2011-03-18 14:45:03
To cook/defrost food in a microwave oven, the
microwave energy must be able to pass through
the container to penetrate the food. Therefore it is
important to choose suitable cookware.
Round/oval dishes are preferable to square/oblong
ones, as the food in the corners tends to overcook. A
variety of cookware can be used as listed below.
Microwave
Safe
Grill
Comments
✔ /✘
✔
Small pieces of aluminium foil can be used to
shield food from overheating. Keep foil at least
2cm from the oven walls, as arcing may occur.
Foil containers are not recommended unless
specified by the manufacturer, e.g. Microfoil ®,
follow instructions carefully.
✔
✘
Always follow the manufacturers instructions.
Do not exceed heating times given.
Be very careful as these dishes become very hot.
✔ /✘
✘
Porcelain, pottery, glazed earthenware and bone
china are usually suitable, except for those with
metallic decoration.
Glassware
e.g. Pyrex ®
✔
✔
Care should be taken if using fine glassware as it can
break or crack if heated suddenly.
Metal
✘
✔
It is not recommended to use metal cookware when
using microwave power as it will arc, which can lead
to fire.
Plastic/Polystyrene
e.g fast food containers
✔
✘
Care must be taken as some containers warp, melt
or discolour at high temperatures.
Cling film
✔
✘
Should not touch the food and must be pierced to
let the steam escape.
Freezer/Roasting
bags
✔
✘
Must be pierced to let steam escape.
Ensure bags are suitable for microwave use.
Do not use plastic or metal ties, as they may melt or
catch fire due to the metal arcing.
Paper plates/cups
and kitchen paper
✔
✘
Only use for warming or to absorb moisture.
Care must be taken as overheating may cause fire.
Straw and wooden
containers
✔
✘
Always attend the oven when using these materials
as overheating may cause fire.
Recycled paper
and newspaper
✘
✘
May contain extracts of metal which will cause
‘arcing’ and may lead to fire.
Rack
✔
✔
The metal rack supplied has been specially
designed for all cooking modes and will not
damage the oven.
Cookware
Aluminium foil
Foil Containers
Browning dishes
China and ceramics
ENGLISH
SUITABLE COOKWARE
WARNING:
When heating food in plastic or paper containers, monitor the oven due to the possibility of ignition.
GB-25
R-640_OM_01_EN.indd 25
2011-03-18 14:45:04
DEFROSTING ADVICE
Defrosting food using your microwave oven is the
quickest method of all.
It is a simple proccess but the following instructions
are essential to ensure the food is thoroughly
defrosted.
Rearrange
Foods that are placed towards the outside of the dish will defrost quicker than foods
in the centre. It is therefore essential that the food is rearranged up to 4 times during
defrosting.
Move closely packed pieces from the outside to the centre and rearrange overlapping areas.
This will ensure that all parts of the food defrosts evenly.
Separate
Foods may be stuck together when removed from the freezer. It is important to
separate foods as soon as it is possible during defrosting.
e.g. bacon rashers, chicken fillets.
Shield
Some areas of food being defrosted may become warm. To prevent them becoming
warmer and starting to cook, these areas can be shielded with small pieces of foil,
which reflect microwaves. e.g. legs and wings on a chicken.
Stand
Standing time is necessary to ensure food is thoroughly defrosted.
Defrosting is not complete once the food is removed from the microwave oven.
Food must stand, covered, for a length of time to ensure the centre has completly
defrosted.
Turn over
It is essential that all foods are turned over at least 3 - 4 times during defrosting. This
is important to ensure thorough defrosting.
NOTES:
• Remove all packaging and wrapping before defrosting.
• To defrost food, use microwave power levels 30% or 10%.
GB-26
R-640_OM_01_EN.indd 26
2011-03-18 14:45:05
For the reheating of foods, follow the advice and guidelines below to ensure food is thoroughly reheated
before serving.
Plated meals
Remove any poultry or meat portions, reheat these
separately, see below.
Place smaller items of food to the centre of the plate, larger
and thicker foods to the edge. Cover with vented microwave
cling film and reheat on 50%, stir/rearrange halfway through
reheating.
NOTE: Ensure the food is thoroughly reheated before
serving.
Sliced meat
Cover with vented microwave cling film and reheat on 50%.
Rearrange at least once to ensure even reheating.
NOTE: Ensure the meat is thoroughly reheated before
serving.
Poultry portions
Place thickest parts of the portions to the outside of the dish,
cover with vented microwave cling film and reheat on 70%.
Turn over halfway through reheating.
NOTE: Ensure the poultry is thoroughly reheated before
serving.
Casseroles
Cover with vented microwave cling film or a suitable lid and
reheat on 50%.
Stir frequently to ensure even reheating.
NOTE: Ensure the food is thoroughly reheated before
serving.
ENGLISH
REHEATING ADVICE
To achieve the best results when reheating, select a suitable microwave power level appropriate to the type of
food. e.g. A bowl of vegetables can be reheated using 100%, while a lasagne which contains ingredients that
cannot be stirred, should be reheated using 50%.
NOTES:
• Remove food from foil or metal containers before reheating.
• Reheating times will be affected by the shape, depth, quantity and temperature of food together with the
size, shape and material of the container.
Never heat liquids in narrow-necked containers, as this could result in the contents erupting
from the container and may cause burns.
• To avoid overheating and fire, special care must be taken when reheating foods with a high sugar or fat
content, e.g. mince pies or Christmas pudding.
• Never heat oil or fat for deep frying as this may lead to overheating and fire.
• Canned potatoes should not be heated in the microwave oven, follow the manufacturer's instructions on the
can.
The contents of feeding bottles and baby food jars are to be stirred or shaken and the
temperature is to be checked before consumption to avoid burns.
GB-27
R-640_OM_01_EN.indd 27
2011-03-18 14:45:06
CLEANING AND MAINTENANCE
OVEN INTERIOR
• It is important to clean the interior of your microwave
oven after each use.
• To clean the oven interior, use a mild detergent
solution, such as washing-up liquid, with warm
water on a soft cloth. Do not use caustic cleaners
(including alkali, acid, thinner, benzin, alcohol or
oven cleaner).
• Heat up your oven regularly by using the grill.
refer to "Heating without food" on page GB-13.
Remaining food or fat splashed can cause smoke
or bad smell.
• Food and liquid splashes will build-up on the oven
walls and ceiling. If grease, fat and food debris is
allowed to build-up in the oven interior it may
overheat, smoke or even catch fire when next
using the oven.
• Keep the waveguide cover clean at all times. The
waveguide cover is constructed from a fragile
material and should be cleaned with care (follow
the cleaning instructions above).
NOTE: Excessive soaking may cause disintegration
of the waveguide cover.
The waveguide cover is a consumable part and
without regular cleaning, will need to be replaced.
•
•
•
•
cause condensation inside the oven and door. It
is important to wipe the oven dry. A build-up of
condensation will eventually lead to rust forming
on the oven interior.
Do not allow grease or dirt to build-up on the
door seals or areas around the door. This may
prevent the door from closing correctly and
may cause a leakage of microwaves (follow the
cleaning instructions).
Ensure the accessories are cleaned after every use
with a mild washing-up liquid solution and dried.
This will prevent the build-up of grease and food
debris. The accessories are dishwasher safe.
Keep the waveguide cover and accessories clean
at all times. If you leave grease or fat in the cavity
or accessories, it may overheat, cause arcing,
smoke or even catch fire when next using the
oven.
CLEAN THE OVEN AT REGULAR INTERVALS AND
REMOVE ANY FOOD DEPOSITS.
Failure to maintain the oven in a clean condition
could lead to a deterioration of the surface that
could adversely affect the life of the appliance
and possibly result in a hazardous situation.
• Food will release steam during cooking and
Cleaning tip - For easier cleaning of your oven:
Place half a lemon in a bowl, add 300ml (1/2 pint) water and heat on 100% for 10 -12 minutes.
Wipe the oven clean using a soft, dry cloth.
OUTER CABINET
DOOR
• Wipe the outside of the microwave oven with
a mild detergent solution, such as washing-up
liquid, with warm water on a soft cloth.
• To remove all trace of dirt, regularly clean both
sides of the door, the door seals and adjacent parts
with a soft, damp cloth.
• The control panel must be wiped clean and dried
with the door open, therefore inactivating the
oven.
• Do not use harsh abrasive cleaners or sharp
metal scrapers to clean the oven door glass since
they can scratch the surface, which may result in
shattering of the glass.
NOTES:
• Never use spray cleaners, oven pads or abrasive scourers as these damage the surface of the oven.
• A steam cleaner should not be used.
• Take care not to let soapy water drip through the small holes in the oven walls and the cavity floor. Excess
water spillage through these holes will cause damage to the oven interior.
• Slight tarnishing of the oven cavity, around the area of the grill, is likely to occur. This is normal and will not
affect the ovens performance.
WARNING:
Before cleaning, make sure the oven cavity, door, oven cabinet and accessories are completely cool.
GB-28
R-640_OM_01_EN.indd 28
2011-03-18 14:45:07
Please check the following before calling for service.
1. Power Supply
Check the power plug is properly connected to a suitable wall outlet.
Check the line fuse/circuit breaker is functioning properly.
2. When the door is opened, does the oven lamp light?
YES
3. Place a cup of water (approx. 150 ml) in the oven and close the door securely.
Programme the oven for one minute on 100P power and start the oven.
Does the oven lamp come on?
YES
Does the turntable rotate? NOTE: The turntable turns in either direction.
YES
Does the ventilation work? (You will hear the fan sound.)
YES
After 1 minute does the signal sound?
YES
Does cooking in progress indicator go off?
YES
Is the cup with water warm after the above operation?
YES
4. Take the cup of water out of the oven and close the door.
Programme the grill for three minutes and start the oven.
After 3 minutes does the grill heating element become red?
YES
ENGLISH
SERVICE CALL CHECK
NO
NO
NO
NO
NO
NO
NO
NO
If "NO" is the answer to any of the above questions, call your dealer or an authorised SHARP Service Agent and report
the results of your check.
NOTES:
Cooking Mode
Standard time
If you cook food for more than the standard time (see chart
Microwave 100%
20 Minutes
opposite) using the same cooking mode, the oven's safety
cooking
mechanisms automatically activate. The microwave power level
Grill cooking
10 Minutes
will be reduced or the grill heating element will turn on and off.
GB-29
R-640_OM_01_EN.indd 29
2011-03-18 14:45:09
SPECIFICATIONS
AC Line Voltage . . . . . . . . . . . . . . . . . . . . . . . . . . . . . . . . . . . . . . . . . . . .Single phase 230-240V, 50Hz
Power Consumption:
Microwave . . . . . . . . . . . . . . . . . . . . . . . . . . . . . . . . . . . . . . . . . . . . . .1.20kW
Grill . . . . . . . . . . . . . . . . . . . . . . . . . . . . . . . . . . . . . . . . . . . . . . . . . . . . .1.05kW
Distribution line fuse/circuit breaker: . . . . . . . . . . . . . . . . . . . . . . . .Minimum 10 A
Output Power:
Microwave . . . . . . . . . . . . . . . . . . . . . . . . . . . . . . . . . . . . . . . . . . . . . .800W (IEC 60705)
Grill . . . . . . . . . . . . . . . . . . . . . . . . . . . . . . . . . . . . . . . . . . . . . . . . . . . . .1000W
Microwave Frequency . . . . . . . . . . . . . . . . . . . . . . . . . . . . . . . . . . . . . .2450Mhz* (Group 2/Class B)
Outside Dimensions . . . . . . . . . . . . . . . . . . . . . . . . . . . . . . . . . . . . . . . .452(W) x 262(H) x 395(D)mm
Cavity Dimensions. . . . . . . . . . . . . . . . . . . . . . . . . . . . . . . . . . . . . . . . . .315(W) x 210(H) x 329(D)mm**
Oven Capacity. . . . . . . . . . . . . . . . . . . . . . . . . . . . . . . . . . . . . . . . . . . . . .20 litres**
Cooking Uniformity . . . . . . . . . . . . . . . . . . . . . . . . . . . . . . . . . . . . . . . .Turntable diameter 245mm
Weight . . . . . . . . . . . . . . . . . . . . . . . . . . . . . . . . . . . . . . . . . . . . . . . . . . . . .Approx. 12.5kg
* This Product fulfils the requirement of the European standard EN55011.
In conformity with this standard, this product is classified as group 2 class B equipment.
Group 2 means that the equipment intentionally generates radio-frequency energy in the form of
electromagnetic radiation for heating treatment of food.
Class B equipment means that the equipment suitable to be used in domestic establishments.
** Internal capacity is calculated by measuring maximum width, depth and height.
Actual capacity for holding food is less.
AS PART OF A POLICY OF CONTINUOUS IMPROVEMENT, WE RESERVE THE RIGHT TO ALTER DESIGN AND
SPECIFICATIONS WITHOUT NOTICE.
GB-30
R-640_OM_01_EN.indd 30
2011-03-18 14:45:10
R-640_OM_XX_BACK_EAST.indd 1
2011-03-18 09:13:06
SHARP ELECTRONICS (EUROPE) GmbH.
Sonninstraße 3, D-20097 Hamburg
R-640_OM_XX_BACK_EAST.indd 2
Printed in China
Τυπώθηκε στην Κίνα
Natisnjeno na Kitajskem
Vytisknuto v Číně
Vytlačené v Číne
Kínában nyomtatva
Надруковано в Китаї
Iespiests Ķīnā
Atspausdinta Kinijoje
Trükitud Hiinas
Отпечатано в Китай
Tipărit în China
Надрукавана ў Кітае
2011-03-18 09:13:09