1
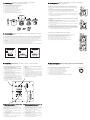
Technical specifications / Technische daten / Caractéristiques techniques /
Especificaciones técnicas / Specifiche tecniche / Technische specificaties / Tekniska
specifikationer / Технические характеристики
Min 10
Min 20
Sensitivity (SPL)
85dB (2.83 Vrms input)
87dB (2.83 Vrms input)
Frequency response
130Hz - 20kHz
130Hz - 20kHz
Impedance
8 Ohms compatible
8 Ohms compatible
Power handling
15-50W Recommended
15-75W Recommended
Drivers
1 x 2.25" BMR
2 x 2.25" BMR
Speaker himensions (H x W x D)
78 x 78 x 85mm (3.1 x 3.1 x 3.3")
154 x 78 x 85mm (6.0 x 3.1 x 3.3")
Weight
0.43Kg (0.95lbs)
0.75Kg (1.65lbs)
X200
X300
X500
Power output
200W
300W
500W
Mains voltage
100V/110-120V/220-240V
100V/110-120V/220-240V
100V/110-120V/220-240V
Drivers
1 x 6.5" Subwoofer
2 x 6.5" Passive Radiator
1 x 8" Subwoofer
1 x 8" Passive Radiator
1 x 10" Subwoofer
1 x 10" Passive Radiator
Speaker dimensions (H x W x D)
219 x 210 x 222mm (8.6 x 8.3 x 8.7")
311 x 266 x 278mm (12.4 x 10.5 x 11.0")
365 x 320 x 350mm (14.3 x 12.6 x 13.8")
Weight
5.0Kg (11.0lbs)
7.5Kg (16.5lbs)
11.7Kg (25.8lbs)
Installation guide
Installationsanleitung
Guide d’installation
Guía de instalación
Guida all’installazione
Installatiehandleiding
Installationsguide
Руководство по установке
Minx is a trademark of Cambridge Audio. All rights reserved.
© Copyright Audio Partnership Plc 2010
Cambridge Audio is a brand of Audio Partnership Plc.
Registered Office: Gallery Court, Hankey Place, London SE1 4BB, UK.
Registered in England No. 2953313
www.cambridge-audio.com
Part No. AP27393/3
This guide is designed to make installing and using this product as easy as possible. Information in this
document has been carefully checked for accuracy at the time of printing; however, Cambridge Audio's policy
is one of continuous improvement, therefore design and specifications are subject to change without prior
notice.
Befolgen Sie für die Installation und Verwendung des Produkts die Schritte in dieser Bedienungsanleitung. Die Informationen in dieser Anleitung
wurden zur Zeit der Drucklegung hinsichtlich ihrer Genauigkeit sorgfältig überprüft. Cambridge Audio ist jedoch bestrebt, seine Produkte ständig
zu verbessern, und daher können sich das Design und die technischen Daten ohne vorherige Ankündigung ändern.
Ce manuel vise à faciliter l’installation et l’utilisation de ce produit. Les informations qu’il contient ont été vérifiées soigneusement avant leur
impression. Toutefois, comme Cambridge Audio a pour principe d’améliorer constamment ses produits, les caractéristiques techniques et générales
peuvent être modifiées sans préavis.
Esta guía está diseñada para que instalar y utilizar este producto sea lo más fácil posible. La precisión de la información que contiene este
documento fue verificada cuidadosamente en el momento de su impresión. No obstante, la política de Cambridge Audio se basa en mejorar
continuamente, por lo que el diseño y las especificaciones están sujetas a modificaciones sin previo aviso.
Questa Guida è stata ideate per rendere l’installazione e l’impiego di questo prodotto più facili possibile. Le informazioni contenute in questo
documento sono state accuratamente verificate per la loro esattezza al momento della stampa; in ogni caso la poltica di Cambridge Audio è fatta
di miglioramenti continui, per cui il progetto e le specifiche sono soggetti a modifiche senza necessità di preavviso.
Deze handleiding is bedoeld om de installatie en het gebruik van het product zo eenvoudig mogelijk te maken. De in dit document verstrekte
informatie is voor het drukken zorgvuldig gecontroleerd op nauwkeurigheid; het beleid van Cambridge Audio is echter gericht op voortdurende
verbetering. Ontwerp en specificaties kunnen derhalve zonder voorafgaande kennisgeving worden gewijzigd.
Denna handbok är utformad för att underlätta installation och användning av denna produkt. Informationen i detta dokument har kontrollerats
noggrant vid tryckningstillfället. Cambridge Audio har dock en policy av kontinuerliga förbättringar, vilket innebär att design och specifikationer kan
ändras utan föregående meddelande.
Настоящее руководство поможет пользователю упростить установку оборудования и эксплуатировать его с максимальной эффективностью.
Содержащаяся в настоящем документе информация была тщательно проверена на момент публикации. Однако компания Cambridge Audio
проводит политику постоянного усовершенствования выпускаемой ею продукции, и поэтому оставляет за собой право вносить изменения
в конструкцию изделий и их технические характеристики без предварительного уведомления.
Thank you for purchasing this Cambridge Audio Minx subwoofer. Installed and used properly the
subwoofer will deliver astonishing sound quality, whether playing music or movies, whatever the
listening environment. Please read this guide carefully, as it contains essential information in
getting the very best from your subwoofer.
Deutsch
Vielen Dank, dass Sie diesen Subwoofer Minx von Cambridge Audio gekauft haben. Bei richtiger Installation
und Verwendung liefert der Subwoofer eine überragende Klangqualität, bei Musik und bei Filmen, und dies
unabhängig vom Umfeld des Hörers. Bitte lesen Sie diesen Leitfaden gründlich durch, denn er enthält wichtige
Informationen für den optimalen Hörgenuss mit Ihrem Subwoofer.
Français
Nous vous remercions d'avoir choisi ce caisson de grave Cambridge Audio Minx. Installé et utilisé dans les
règles de l'art, ce caisson de grave délivrera une qualité sonore stupéfiante avec de la musique ou des films,
quel que soit l'environnement d'écoute. Nous vous recommandons de lire attentivement ce guide. Il contient
des informations essentielles qui vous permettront de tirer le meilleur de votre caisson de grave.
Español
Gracias por adquirir este subwoofer Cambridge Audio Minx. Instalados y utilizados correctamente, los
subwoofer proporcionan una sorprendente calidad acústica, bien sea en la reproducción de música o películas,
con independencia del entorno de audición. Por favor lea esta guía detenidamente puesto que contiene
información fundamental para sacar el mayor partido de su subwoofer.
Italiano
Grazie per aver acquistato questo subwoofer Cambridge Audio Minx. Una volta installato ed utilizzato in
maniera corretta, questo subwoofer sarà in grado di offrire una qualità acustica stupefacente, che riproduca
musica o colonne sonore, in qualsiasi ambiente d'ascolto. Leggete con attenzione il presente manuale, poiché
contiene informazioni indispensabili per trarre il meglio dal Vostro nuovo subwoofer.
Read all instructions
Avoid damp
Avoid direct sunlight
Bitte lesen Sie alle Punkte genau durch
Kontakt mit Feuchtigkeit vermeiden
Nie direktem Sonnenlicht aussetzen
Lisez toutes les instructions
N'installez pas le système dans un
environnement humide
Évitez une exposition directe aux rayons
du soleil
Lea todas las instrucciones
Evite la humedad
Evite la luz directa del sol
Leggere tutte le istruzioni
Evitare l'umidità
Evitare la luce solare diretta
Lees alle aanwijzingen
Vermijd vocht
Vermijd direct zonlicht
Läs alle instruktioner
Undvik fukt
Undvik direkt solljus
Прочтите все инструкции
Не допускайте воздействия влаги
Не допускайте воздействия прямого солнечного
света
Avoid extreme temperatures
Avoid solvent-based cleaners
Secure all cables
Extreme Temperaturen vermeiden
Keine Lösemittel zum Reinigen verwenden
Alle Kabel gut sichern
Évitez les températures extrêmes
N'utilisez pas de produit de nettoyage à
base de solvant
Attachez fermement tous les câbles
Evite temperaturas extremas
Evite utilizar limpiadores basados en
disolventes
Asegure todos los cables
Evitare temperature estreme
Evitare detergenti basati su solventi
Fissare tutti i cavi
Vermijd extreme temperature
Vermijd reinigingsmiddelen op basis van
oplosmiddelen
Beveilig alle kabels
Undvik extrema temperaturförhållanden
Undvik lösningsbaserade rengöringsmedel
Säkra alla kablar
Не допускайте воздействия экстремальных
температур
Не пользуйтесь очистителями на основе
растворителей
Закрепите все кабели
Nederlands
Dank u voor de aanschaf van deze Cambridge Audio Minx subwoofer. Als de subwoofer correct wordt
geïnstalleerd en gebruikt zal deze een verbazingwekkende geluidskwaliteit geven, of u nu muziek of films
afspeelt en ongeacht de luisteromgeving. Lees deze handleiding aandachtig door, aangezien deze essentiële
informatie bevat over hoe u het beste uit uw subwoofer haalt.
Svenska
Tillykke med købet af din Cambridge Audio Minx Subwoofer. Korrekt opsat og anvendt vil subwooferen levere
en fænomenal lydkvalitet uanset om det er til musik eller film, og uanset lytteområde. Læs venligst denne
guide grundigt igennem, da den indeholder vigtige informationer om, hvordan du får mest ud af din subwoofer.
Русский
Мы благодарны Вам за покупку этого сабвуфера Minx компании Cambridge Audio. При правильной
установке и использовании сабвуфер обеспечит поразительное качество звучания при
воспроизведении музыки или фильмов в любой окружающей обстановке для прослушивания.
Внимательно прочитайте это руководство, поскольку в нем содержится важнейшая информация,
необходимая для получения самых лучших результатов от вашего сабвуфера.
1. Unpacking / Auspacken / Ouverture de l’emballage / Desembalaje /
Disimballaggio / Uitpakken / Uppackning / Распаковка
3. Connections / Anschlüsse / Raccordements / Conexiones / Collegamenti /
Aansluitingen / Anslutningar / Подключение
1.1 Follow the diagrams to unpack your subwoofer:
3.1 Connect to left and right Line inputs if using with a 2-channel hi-fi system.
1.1 Beachten Sie die Bilder beim Auspacken des Subwoofers:
3.1 Wenn Sie ein 2-Wege-HiFi-System verwenden, schließen Sie das Gerät an den linken und rechten LineEingang an.
1.1 Suivez les schémas pour déballer votre subwoofer :
1.1 Siga los diagramas para desembalar el subwoofer:
3.1 Raccordez aux entrées de ligne droite et gauche si vous utilisez un système hi-fi 2 canaux.
1.1 Per il disimballaggio del subwoofer attenersi agli schemi in dotazione:
Wireless
Port
Volume
Crossover
Frequency
Phase
90º
100
80
R
3.1 Conecte las entradas de línea izquierda y derecha si usa un sistema hi-fi de dos canales.
1.1 Volg de tekeningen voor het uitpakken van uw subwoofer:
120
65
R
On
150
L
Min
Max
180o 50Hz
0o
Auto
Detect
3.1 In caso di utilizzo di un sistema hi-fi a 2 canali collegare gli ingressi di linea destro e sinistro.
1.1 Följ ritningarna för att packa upp din subwoofer:
L (LFE / SUB)
200Hz
Out
In
Designed and engineered in London, England
CA629 Digital Subwoofer
Rated Power Consumption: 600W
www.cambridgeaudio.com
220-240V
This device complies with part 15 of the FCC Rules. Operation is subject to the
following two conditions: (1) This device may not cause harmful interference, and
(2) this device must accept any interference, including interference that may cause
undesired operation.
100-120V
Power
R
3.1 Aansluiten op linker en rechter lijninvoeren wanneer gebruik wordt gemaakt van een 2-kanaals hi-fi
systeem.
1.1. Следуйте приведенной ниже схеме для распаковки сабвуфера.
Mains Voltage
Selector Switch
100-120V/220-240V
AC ~ 50/60Hz
CAUTION
AVIS
ACHTUNG
Risk of electric
shock.
Do not open.
Risque de choc
electrique.
Ne pas ouvrir.
Vorm öffnen
des gerätes.
Netzstecker ziehen.
R
Off
On
Power AC
L
3.1 Anslut till vänster och höger Line-ingångar om du använder subwoofern med ett hi-fi-system med 2 kanaler.
Apparatet må kun tilkoples jordet stikkontakt. Laite on
liitettävä suojamaadoituskoskoskettimilla varustenttuun
pistorasiaan. Apparaten skall anslutas till jordat uttagt.
L (LFE / SUB)
Caution:
Serial Number Label Removed
Out
In
Out
In
Made under licence in China
3.1. Подключите источник сигнала к линейным входам правого и левого канала сабвуфера, если
используется 2-канальная Hi-Fi-система.
3.2 Connect to the left (LFE/Sub) Line In socket if using an AV receiver or Amp with
Sub out.
3.2 Schließen Sie das Gerät an den linken (LFE/Sub-) Line-Eingang an, wenn Sie einen AV-Receiver oder einen
Verstärker mit einem Sub-Ausgang verwenden.
R
3.2 Raccordez au connecteur d’entrée de ligne gauche (LFE/Sub) si vous utilisez un récepteur AV ou un
amplificateur avec sortie Sub.
R
Wireless
Port
L (LFE / SUB)
L
Volume
Crossover
Frequency
Phase
90º
100
80
3.2 Conecte la toma de entrada de línea izquierda (LFE/Sub) si utiliza un receptor de A/V o un amplificador
con salida de subwoofer.
R
kg
120
65
Max
0o
50Hz
180o
L (LFE / SUB)
200Hz
Auto
Detect
Out
In
Designed and engineered in London, England
CA629 Digital Subwoofer
Rated Power Consumption: 600W
www.cambridgeaudio.com
220-240V
Mains Voltage
Selector Switch
100-120V/220-240V
AC ~ 50/60Hz
This device complies with part 15 of the FCC Rules. Operation is subject to the
following two conditions: (1) This device may not cause harmful interference, and
(2) this device must accept any interference, including interference that may cause
undesired operation.
3.2 Collegare la presa sinistra Line In (LFE/Sub) in caso di utilizzo di un ricevitore AV o di un Amp con uscita Sub.
100-120V
Power
CAUTION
AVIS
ACHTUNG
Risk of electric
shock.
Do not open.
Risque de choc
electrique.
Ne pas ouvrir.
Vorm öffnen
des gerätes.
Netzstecker ziehen.
Off
3.2 Aansluiten op de linker (LFE/Sub) lijningang wanneer een AV-ontvanger of versterker met Sub-uit wordt gebruikt.
Installation Guide
R
On
150
L
Min
On
Power AC
3.2 Anslut tillvänster (LFE/Sub) Line In-ingång om du använder en AV-mottagare eller förstärkare med Sub-utgång.
Installationsanleitung
Guide d'installation
Guía done
Installatiehandleiding
Installationsguide
Руководство по установке
3.2. Подключите источник сигнала к линейному входу левого канала («LFE/Sub») сабвуфера, если
используется аудио-видеоресивер или усилитель с выходом на сабвуфер.
Your music +
our passion
2. Positioning / Aufstellen / Emplacement / Colocación / Posizionamento / Plaatsing /
3.3 To connect a second subwoofer use the Line out sockets.
3.3 Verwenden Sie die Line-Ausgänge, um das Gerät mit einem zweiten Subwoofer zu verbinden.
Placering / Расположение
3.3 Pour raccorder un deuxième subwoofer, utilisez les connecteurs de sortie de ligne.
3.3 Utilice las clavijas de salida de línea para conectar un segundo subwoofer.
Wireless
Port
Volume
Crossover
Frequency
Phase
90º
100
80
2.1 Il subwoofer può essere posizionato in praticamente qualsiasi punto della stanza in quanto il suono dei bassi è prevalentemente non
direzionale.
Max
R
On
150
180o 50Hz
0o
L (LFE / SUB)
200Hz
Auto
Detect
Out
In
Designed and engineered in London, England
CA629 Digital Subwoofer
Rated Power Consumption: 600W
www.cambridgeaudio.com
3.3 Maak gebruik van de lijnuitgangen om een tweede subwoofer aan te sluiten.
220-240V
Mains Voltage
Selector Switch
100-120V/220-240V
AC ~ 50/60Hz
This device complies with part 15 of the FCC Rules. Operation is subject to the
following two conditions: (1) This device may not cause harmful interference, and
(2) this device must accept any interference, including interference that may cause
undesired operation.
3.3 Anslut en andra subwoofer med hjälp av Line out-utgångarna.
3.3. Для подключения второго сабвуфера используйте разъемы линейного выхода.
100-120V
Power
CAUTION
Risk of electric
shock.
Do not open.
AVIS
ACHTUNG
Risque de choc
electrique.
Ne pas ouvrir.
Vorm öffnen
des gerätes.
Netzstecker ziehen.
R
Off
On
Power AC
Apparatet må kun tilkoples jordet stikkontakt. Laite on
liitettävä suojamaadoituskoskoskettimilla varustenttuun
pistorasiaan. Apparaten skall anslutas till jordat uttagt.
L
2.1 Es posible colocar el subwoofer prácticamente en cualquier lugar de la habitación, pues los graves apenas son direccionales.
120
65
Min
R
2.1 Votre subwoofer peut être placé quasiment n’importe où dans la pièce, du fait que les graves sont en grande partie non-directionnelles.
3.3 Per collegare un secondo subwoofer utilizzare le prese Line out.
L
2.1 Ihr Subwoofer kann an einer beliebigen Stelle im Raum platziert werden, da die Bassfrequenzen eher nicht geortet werden können.
R
2.1 Your subwoofer can be placed almost anywhere in the room as bass sound is largely non-directional.
L (LFE / SUB)
Caution:
Serial Number Label Removed
Out
In
Made under licence in China
2.1 Uw subwoofer kan eigenlijk overal in de ruimte worden geplaatst omdat basgeluid voornamelijk richtingloos is.
2.1 Din subwoofer kan placeras nästan var som helst i rummet eftersom basljud i stort sett inte är riktat.
2.1. Сабвуфер можно установить практически в любом месте в помещении, так как воспроизводимый им звук в основном ненаправленный.
Wireless
Port
Crossover
Frequency
Phase
90º
100
80
65
R
Volume
120
R
On
150
L
Min
Max
180o 50Hz
0o
L (LFE / SUB)
200Hz
Auto
Detect
Out
In
Designed and engineered in London, England
CA629 Digital Subwoofer
Rated Power Consumption: 600W
www.cambridgeaudio.com
220-240V
Mains Voltage
Selector Switch
100-120V/220-240V
AC ~ 50/60Hz
This device complies with part 15 of the FCC Rules. Operation is subject to the
following two conditions: (1) This device may not cause harmful interference, and
(2) this device must accept any interference, including interference that may cause
undesired operation.
100-120V
Power
CAUTION
Risk of electric
shock.
Do not open.
AVIS
ACHTUNG
Risque de choc
electrique.
Ne pas ouvrir.
Vorm öffnen
des gerätes.
Netzstecker ziehen.
Off
R
R
Power AC
Apparatet må kun tilkoples jordet stikkontakt. Laite on
liitettävä suojamaadoituskoskoskettimilla varustenttuun
pistorasiaan. Apparaten skall anslutas till jordat uttagt.
L
L (LFE / SUB)
Caution:
Serial Number Label Removed
Out
2.1
5.1
In
Made under licence in China
7.1
4. Controls /Bedienelemente / Commandes / Controles / Comandi / Bediening /
Kontroller / Органы управления
5. Wireless option / Drahtlosfunktion / Options sans fil / Opción inalámbrica /
Opzione wireless / Draadloze optie / Trådlöst alternativ / Дополнительный модуль
беспроводной связи
4.1 Set Volume to balance subwoofer output with
Min 10 or Min 20 speakers by ear.
4.2 Adjust Phase if using non Minx speakers (0 =
normal).
4.1 Stellen Sie die Lautstärke ein, um die SubwooferAusgangslautstärke mit Min 10 oder Min 20-Lautsprechern dem
Gehör nach anzupassen.
4.2 Passen Sie die Phase an, wenn Sie keine Minx-Lautsprecher
verwenden (0 = normal).
4.1 Réglez le Volume pour équilibre la sortie du subwoofer avec les
enceintes Min 10 ou Min 20 à l’oreille.
4.1 Configure el volumen para ajustar la salida del subwoofer con
los altavoces Min 10 o Min 20 a oído.
4.1 Impostare il volume per equilibrare l’uscita subwoofer con
altoparlanti Min 10 o Min 20 a orecchio.
4.1 Stel het volume op het gehoor zodanig in dat deze in balans is met
het vermogen van de subwoofer met min. 10 of min. 20 speakers.
5.1 Raccordement pour futur module sans fil Cambridge Audio.
4.2 Ajuste la fase si utiliza altavoces distintos de Minx (0 = normal).
5.1 Collegamento per un futuro modulo wireless Cambridge Audio.
4.2 In caso di utilizzo di altoparlanti non Minx regolare la fase (0 = normale).
5.1 Aansluiting voor draadloze Cambridge Audio module.
4.2 Stel de fase bij indien niet-Minx speakers worden gebruikt (0 = normaal).
5.1 Anslutning för framtida Cambridge Audio Wireless Module.
4.2 Justera Fas om du använder högtalare av en annan typ än Minx
(0 = normal).
5.1 Разъем для подключения будущего модуля беспроводной связи Cambridge Audio.
4.2. Отрегулируйте фазу (0 = обычная) при использовании
акустических систем, отличных от Minx.
4.1. Отрегулируйте громкость на слух, чтобы сбалансировать
уровень громкости сабвуфера с акустическими системами Min
10 или Min 20.
Wireless Port
Standby
Feature
Out
120Hz
80Hz
R
R
90º
In
Crossover
Frequency
Phase
160Hz
Force On
(No Standby)
(LFE/
SUB)
L
L
Min
Max
0o
180o
50Hz
(LFE/
SUB)
200Hz
Audio Detect
Out
(Normal Use)
In
Audio
Designed and engineered in London, England
CA629 Digital Subwoofer
500W Output
www.cambridge-audio.com
220-240V
Rated Consumption
(@ 1/8th Output Power)
130W
Max Consumption
Mains Voltage
Selector Switch
110-120V/220-240V
AC ~ 50/60Hz
110-120V
800W
Power
CAUTION
AVIS
ACHTUNG
Risk of electric
shock.
Do not open.
Risque de choc
electrique.
Ne pas ouvrir.
Vorm öffnen
des gerätes.
Netzstecker ziehen.
Off
On
Power AC
Caution
Serial Number Label Removed
This device complies with part 15 of the FCC Rules. Operation is subject to the following two conditions: (1) This device may not cause
harmful interference, and (2) this device must accept any interference, including interference that may cause undesired operation.
Made under licence in China
4.3 Adjust Frequency to integrate subwoofer with
Min 10 or Min 20 speakers.
4.4 Auto feature will switch your subwoofer on and
off automatically by signal detection.
4.3 Passen Sie die Frequenz an, um den Subwoofer mit Min 10oder Min 20-Lautsprechern verwenden zu können.
4.4 Wird ein Signal erkannt, schaltet die automatische
Aktivierungsfunktion den Subwoofer automatisch ein oder aus.
4.3 Ajustez la Fréquence pour intégrer le subwoofer aux enceintes
Min 10 ou Min 20.
4.4 La fonctionnalité Auto allume et éteint automatiquement votre
subwoofer par la détection du signal.
4.3 Ajuste la frecuencia para integrar el subwoofer con altavoces
Min 10 o Min 20.
4.4 La función Auto encenderá y apagará automáticamente el
subwoofer mediante detección de la señal.
4.3 Regolare la frequenza in modo da integrare il subwoofer con
altoparlanti Min 10 o Min 20.
4.4 La funzione Auto accende e spegne automaticamente il
subwoofer al rilevamento del segnale.
4.3 Pas de frequentie aan om de subwoofer te integreren met min.
10 of min. 20 speakers.
4.4 De “Auto”-functie schakelt uw subwoofer automatisch aan en uit
via signaalwaarneming.
4.3 Justera frekvens för att integrera subwoofern med Min 10 eller
Min 20 högtalare.
4.4 Autofunktionen slår på och stänger av din subwoofer
automatiskt med hjälp av signalavkänning.
4.3. Отрегулируйте частоту для интеграции сабвуфера с
4.4 Функция обнаружения звукового сигнала автоматически
акустическими системами Min 10 или Min 20.
5.1 Anschlussbuchse für Drahtlosmodul von Cambridge Audio.
4.2 Ajustez la Phase si vous utilisez des enceintes autres que celles
de la gamme Minx (0 = normal).
4.1 Ställ in volymen för att balansera subwooferns utmatning med
Min 10 eller Min 20 högtalare efter hörsel.
Volume
5.1 Connection for future Cambridge Audio Wireless Module.
включает и отключает звук сабвуфера.
5.1 Conexión para el futuro módulo inalámbrico de Cambridge Audio.
Wireless Port
On