1
SHARP
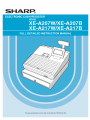
ELECTRONIC CASH REGISTER
MODEL
XE-A207W/XE-A207B
XE-A217W/XE-A217B
FULL DETAILED INSTRUCTION MANUAL
The above illustration shows the model XE-A217W/XE-A217B.
CAUTION:
The cash register should be securely fitted to the supporting platform to avoid instability when the drawer
IS open.
CAUTION:
The socket-outlet shall be installed near the equipment and shall be easily accessible.
VORSICHT:
Die Netzsteckdose muß nahe dem Gerät angebracht und leicht zugänglich sein.
ATTENTION:
La prise de courant murale devra être installée à proximité de l'équipement et devra être facilement
accessible.
AVISO:
El tomacorriente debe estar instalado cerca del equipo y debe quedar bien accesible.
VARNING:
Det matande vágguttaget skall placeras nára apparaten och vara látt átkomligt.
LET OP:
Het stopcontact dient in de buurt van de kassa en gemakkelljk tosgangbaar te zijn.
CAUTION:
For a complete electrical disconnection pull out the mains plug.
VORSICHT:
Zur vollstandigen elektrischen Trennung vom Netz den Netzstecker ziehen.
ATTENTION:
Pour obtenir une mise hors-circuit totale, débrancher la prise de courant secteur.
AVISO:
Para una desconexiôn eléctrica completa, desenchufar el enchufe de tomacorriente.
VARNING:
For att helt koppla frán strómmen, dra ut stickproppen.
LET OP:
Trek de stekker uit het stopcontact indien u de stroom geheel wilt uitschakelen.
Authorized representative responsible for the European Union Community Market
Autorisierter Reprásentant in der Europáischen Union
Représentant autorisé pour le marché de la communauté européenne
Representante autorizado responsable para el Mercado Común de la Unión Europea
Auktoriserad representant ansvarig för EU marknaden
Geautoriseerde vertegenwoordiger in de Europese Unie
SHARP ELECTRONICS (Europe) GmbH
Sonninstrañe 3, D-20097 Hamburg
INTRODUCTION
Thank you very much for your purchase of the SHARP Electronic Cash Register, Model XE-A207W/XE-
A207B/XE-A21 7WXE-A217B.
Please read this manual carefully before operating your machine in order to gain full understanding of
functions and features.
Please keep this manual for future reference. It will help you if you encounter any operational problems.
IMPORTANT
+ Be very careful when removing and replacing the printer cover, as the cutter mounted on it is very sharp.
- Install the cash register in a location not subject to direct sunlight, unusual temperature changes, high
humidity or splashing water.
Installation in such locations could cause damage to the cabinet and the electronic components.
* Never install the register in saline areas (e.g.: close to the sea).
Installing the register in such locations could cause component failure with the corrosion.
» Never operate the register with wet hands.
The water could seep into the interior of the register and cause component failure.
* When cleaning your register, use a dry, soft cloth. Never use solvents, such as benzine and/or thinner.
The use of such chemicals will lead to discoloration or deterioration of the cabinet.
» The register plugs into any standard wall outlet (official (nominal) voltage).
Other electrical devices on the same electrical circuit could cause the register to malfunction.
For protection against data loss, please install two alkaline batteries LR6 ("АА size) after initializing the
cash register. VWhen handling the batteries, please observe the following:
Incorrectly using batteries can cause them to burst or leak, possibly damaging the interior of the cash
register.
e RISK OF EXPLOSION IF BATTERY IS REPLACED BY AN INCORRECT TYPE.
DISPOSE OF USED BATTERIES ACCORDING TO THE INSTRUCTIONS.
* Be sure that the positive (+) and negative (—) poles of each battery are facing in the proper direction
for installation.
* Never mix batteries of different types.
* Never mix old batteries and new ones.
* Never leave dead batteries in the battery compartment.
* Remove the batteries if you do not plan to use the cash register for long periods.
+ Should a battery leak, clean out the battery compartment immediately, taking care to avoid letting the
battery fluid come into direct contact with your skin.
For battery disposal, follow the corresponding law in your country.
» For complete electrical disconnection, disconnect the main plug.
CONTENTS
INT RO DU CC TION EEE 3
IMPORTANT E 3
CONTENTS eee ene iaa en rra eee ae A rear reine reir RR сантененио 4
1 Part Names and FUNC ONS eee Dee ei aa rear riera a eee a ae ae a 8
EX ET a VW 4 0 4 der aa ea na ana eee ae ea eee ae aa ee de ee A A ER EEE A 8
Front view (XE-A 207 XE-A 207 B) iaa ere reee ee ae 8
Front view (XE-AZ2 1 WV XE-A 2 TB) e aria reir raras 8
Rear view (XE-A207YW/XE-A207B) (XE-A21 7 VWXE-A217B)........ nes 9
a - ER EREERERRR EEE EEE RR ER EEEERERREEREEEEEEEERREREE 10
DV VE 11
Keyboard BY OUT. ee aa aa aa aa aa ar RR RER RER RR RR 11
Function KEY LS ei a a ae a da A A A rre. 11
Keyboard XE-A21/VW/XE-AZ11B... Le ae aa arr aa cena a aa ea ae a ea eee a ea a ae a ee ea a ee ae à ee ee 12
Keyboard BY OUT. ee aa aa aa aa a a A A A A RER RER RR RR 12
Programing keyboard lAVOUL..…........... naaa aaa arrieros 12
Function Key lISt .............. ei iaa a a a A A A rre. 13
Inserting the keyboard sheet (XE-A21/VW/XE-A217B ONIV)........ Le cer a aa ra aa ra nee ae aa aa ea 14
RS232 Connector/SD Card SIOU.......... a aa aa ae ea a eee ee ee a 15
RS232 CONNEC Or. dé de ra dé racaaa ee a aa eee aa aa ee aa eee ee ae a ae a ee ea ee ee 15
SD Card Slot. TT 15
DISPIAYS eee e aa ra ra rear e rara A erre A A A A A A 16
Operator display ana ra rra ra ra rare rare renace. 16
CUStOMEr dISPIAY EER RR EERERERRERRRR EEE RER RR ER ERREEE 17
SEEN SAVE MOU EEE RER RER EEE a ee ae ee a ae ee 17
2 Selecting an Operating Mode aaa a narra res 18
Operating ModeS nee er rr rare rre rr errar recreos 18
MOE Sl OC ON ER EE ER RRERRREREERRERER RER EEE a eee a ee ea a ae ee ee ae ee A A 19
3 Prior to Making EntrieS aaa aaa area ee ee ra rre 20
Preparations for BEN TIES aa aa aaa ae da ae a a a ee ee ee 20
Receipt paper roll ee ia air aaa arar aaa earn eran. 20
Receipt ON/OFF fTUNCÉION aa a a aaa a a a a A A A 20
Cer ASS NM EN aaa RER 20
Error W@arnINnG LL eee e a aa da Aa Aa de A A ee de A ee A 20
Item Selection from the MenU. ae rre rearrrr ee ee ee ee 21
Starting Cash Memory Entry... eee rr rr rr ee 21
HELP FUN CT ION EEE RERERREERRERREEEERRERRR ER RER EEE RER à A A A A A A A 22
РплИпа пе NID MENU. RER RR ee RER 22
Printing guidance messages er LA aa Ada ea aa ea a aa a da a aa a a 0 Aa aa A A A A rear ares 22
A EN TOS. LL aa aa ra rein aa aa nana a aa ee ae a aa a ae ee aa ae ae ae a ee a A A ee A 23
== 0er dia rade e aa ra eaa ee aa ee dan a aan ee aa a ae aa ee ae ae ae ee ee A ee A ee de A ee 23
Single HEM EN TIES aaa ra rare ra rara aria RER ees 23
Repeat BNI IES RER RR ER RRERRR ER RR RER aa Aa da da à A A RER RER KR 25
MUD Ca ON BN I ES rear a arrieros 26
Split-pricing BNI IES aa anar are ra ra rare arre rr rre rara eee 27
Single item cash sale (SICS) eee iaa e rear aa a A rreereeos 28
PLU level shift (for direct PLUs) (for XE-A217/W/XE-A217B ONIV)....L eee der a aan aa a era eee aa 29
Display of Subtiotals a a aaa iaa anar a aaa ee ee A A iaa rara rre rre. 30
SUDO al EER RER ARE RERERREERR ER RRERERREERR ER RREREEREEERRERRREREEREERREEEREEEERE 30
Finalization of TTANSACTION ER EREERREERRERREREERREERRERRERRREERREREEEREEREERREEERERREERREEEEEERREERREEEE 31
Cash or check ENING. eee a a aan ra aerea renace. 31
Mixed tendering (check + Gas) e area ea area arar a 32
Cash or check sale that does not need any tender entry... rec racer arr ee era na eee 32
Credit Sale 33
Mixed-tender sale (cash or check tendering + credit tendering).........…..…..... EEE 33
Computation of VAT (Value Added Tax) Tax eee a ee ee ae 34
FIESTA 34
VAT shift entries (for XE-A217VWXE-A217B only)... es 35
GUEST CNBC EEE 36
Guest look up (GLU) system (for XE-AZ217W/IXE-AZ217B only) LL A aa aa era aa ea 36
Table bill copy print (for XE-A21/VW/KE-A217B ONIV) LL A A aa aa aa aa ea a à a аааненанно) 37
AUX ANY EN TIES ee RR ER EER ER ERRRERER RR RER ER EERR ER EEREERRREEERREER 38
Percent calculations (premium Or dISCOUNT) er aa res 38
DISCOUNT Entries LL ia ear aa aa ee eee ae ee ae a ee ae ee ae ee 39
a ES 39
Printing of non-add code NUM DES aaa area aerea aereas 40
Payment Treatment aia aa iaa aa rar aerea a ee A ee A a 40
CUrreNncy EX CN ANGE «oe 40
ReCelved-ON-aCCOUNT BN IES e ear errar riera erre ee ae 41
Paild-out entries... eee aaa ree naar ra rrar are rre rrrrrrrr rr errrr eres 41
No-sale (EXChANGE) RER RR RER ERRR ER ERRERRRRERRRRERRERRERRERRRRERREREERREREERRERERREE EEEE 42
Casning à CNE@CK RER EEE 42
Electronic Journal VIEw EERR EEE ea aa ae a a ae ae ee ee ee reir 42
TRAINING MOU. 2 era aa ra re aa ra ne aa ea aan ee a ea a ea ee ae a eee ae ee de ee ee ee ee A 43
(7. | [-Ti(-]| TETE 44
Correction of the Last Entry (Direct Void) oo eee eee e rr a ee a ee a ee 44
Correction of the Next-to-Last or Earlier Entries (Indirect Void)... eee 45
SUDO al VOI. ET 46
Correction after Finalizing a Transaction eee e ee a ee a a ee ee ee 46
Special Printing FUNC ION «ee 47
Copy Receilpt Printing eee eee rre rr rr rre erre riera eeees 47
Guest Check Receipt Bill Print) oe 48
anager MOU. eee eee ae aa ae A ee ee ee ee ee 49
Entering the Manager Mode aa aaa a A ae ee ee a 49
O [eE EEE ER da ea dead aa aa eee ae ee ae de ee AA A 49
Reading (X) and Resetting (Z) of Sales Totals LA A A aa 0004 aa aa da aa aa a 50
How to take a X 1/21 OF X22 22 ep a area A de 50
Flash EDO 1 A RER ER EE EL 50
Daily Sales TotalS LL AL A4 da a aa a aa a dan aa a aa a aa de aa a a de A a A A A ee ee 52
GENE Al TE POM ee RER EEE RERR ER ERRR ER RERERR ER RERRERERR ER RERR ER RERRERRRRERRERRRREERREREERREEEREEEE 52
PLU report by designated range. ooo aa area aaa aerea ear raras 55
PLU report by associated department... aaa aaa 55
Individual clerk report ee a reee rear reeees 56
All ClerK FEpoIt RRER RER RRRER RER ERREEERREEREEEEEE 56
HOUT IY TO eee a a a rara area ear aaa ear aerea RER ЭГ
GLU report (for XE-A217WXE-A217B Only) aa rear eres 57
GLU report by clerk (for XE-A21 7VWXE-A217B Only)... arnes 58
Balance report (for XE-A217/VWXE-A217B Only) aaa 58
Репос!с Керой Sam DIE aaa ra a a A A ee ae ee 59
General Information TE 59
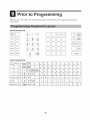
PION 10 Programming. e a aaa aa aaa aaa aaa aaa A a ee ee 60
Programming Keyboard Layout... aaa a aaa aa ae A A ae ee a 60
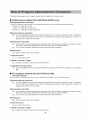
How to Program Alphanumeric Characters aaa rr. 62
Mobile phone method (XE-A20/VW/XE-A207B ONIV) LL es 62
PC keyboard method (KE-AZ2 1 7WIKE-A 217 B) e reee 62
5
Entering CharaC er COTES a ae ara rara rara erre es 63
FO POO AMIN aa aa aaa a a a à A 64
Basic INST UCT ONS. ee eee eee ni aa re à a ae aa ee ee ae de A ee A E 64
Programming SCrE@@n aaa iaa rar ra rara rare rre aereos 64
Programming example aa aaa na ra ee ee ee a ee сонно: 65
Article PrOGramming e ren a ra rare rr ee ee A a ee ee 67
DEA MIE NE aaa riera ra ee ee de A ee ee A A reee. 68
PL EEE ERR ER EERE RER ER ERERERREERERRREERREERREERREEREREE 69
PLU TANGE EEE 70
Functional Programming. aa ea aa нина aa aa a ee a A ee a 71
Discount ([G))................—.—.— eee 72
Percent ((%1) , %2) oo EEE не ненннннннннсннннннннннснченсенннннннннннннно: 73
4 VE 73
PO. ERERR ea a ae a eee ae à A ee A ee A A A A A A 74
CID (Cash IN Ara) aa aaa aaa ae A A A A rear eres 74
CHK/CG (Check change)... aa aa aa aaa ear aerea A A 74
Check CaS NING a aaa aaa aaa aaa aaa aerea aerea rear rene EEREEEE 75
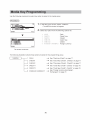
Media Key PrOGrAMMING ааананааааеоанананно, 76
Cash KEY (CaS) аанаоаанитоноааноаанааананиоя 70
Check key (Check1, Check?) LL de A4 ea aa a aa a da aa aa a a à aa a ae ae A A A (I
Credit key (Credit1, Credit2)......... LL aa RER 78
Foreign currency (Exchange1, Exchange?) .......... EEE 79
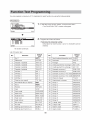
Function Text Programming... aaa aaa aa naaa a rear e rare res 80
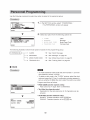
Personnel Programming ea aerea reee reee area ire ae a 82
[| EEE RER ER R RER EERR EEE RR EERR ER ERERRERERRREREERRRERR RR EREEREREEE RER EEEREERRERREREREERREEREEEE 82
CO 83
Mode Pass Code ER EE RER EEREREERRERRERRREREERER EEE a ea ae ae ee a ee ee a ee a 33
Training ClerK LL AAA AA Ada aa a aa a aa a da Aa Aa Aa à Aa ee ee ee A a ee A ee 34
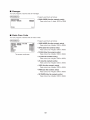
Terminal Programming... eee erre rr à ee a ae rre rre 85
Date TIME SO ING a arar aa rara naa a A A ee erre. 86
aE IIE EEE RR ea ae ae ae ae a A A A 36
Optional Feature Salat ON 20004 eee rr ee ae ee nera E 87
Вас SYS OM RER EERRR ER ERRERRRRRERRRERERRRERRERR RER RERR ER EERR RER RER EEE RRKRREE 88
Rounding ................ eee aaa aa ena arar arar area RR RER RER EEE 89
Function Prohibit................... eee e rien ner iran rn rrar ren reir rre reir 90
FUNC ON AUT OT Y a ear arar aaa a A 91
FUnction SelEctION eii ner dead 92
Print Selection LL 04e dada ra dé ra ea aa ee a aa ae aa a eee a à aa eee ea a eee a ee ae a eee ee 93
Exchange FUNCÉION e a aaa aaa errar EEE 94
EURO CaN. 95
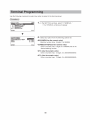
REPO Prog aM MING EEE 96
A [E | АННАН, 97
=D 97
LOU [=] PE 98
ARC IN de 1 ARE RERR ER RER RR RER ERRERERRERREREERER RER аанноааноааноаннтатнннння 99
HOUT IY TO e RR ERR ER RRRRRRRERRR ER RRERRERRRRERRRRERRRREREERRERRER EEE RER RER 99
Electronic JOUrnal EEE RR ea a ae a ee a ee ee ee 99
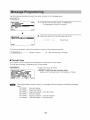
MESS aE Prog aM MING. 200004 aa aa dés aa aa aa da aa aa aa EEE RER 100
RE CE It OQ 0. нана ааа наанаана нано ааесонесонеоотеоатонаеса носа носа тон ие сааннааионинанинаананнсннони: 100
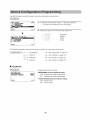
Device Configuration Programming... arena arearrea rear 101
Keyboard EEE ERRRRERR ER ERRRERRERRR RER ERRRKERRERERR ER RERRERRER ER RERR ER EERRERER EEE жисаннаннони: 101
[BST ©) aaa a rara arar rara ra rara rar errar rre. 102
a - GE TES 102
ON INE ERBE RER RER 102
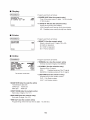
aX Pr Og aM MING. LL 4 AA a 404 a aa a aa aa aa aa ea aa da a Aa a a à A a A ee A ee A 103
aX SYS OM LA AA AA aa aa aa aa a aa aa da Aa ae de A ee A A A A A RR EEE 103
Tax 1 INrOUGN A e a aaa aa ner rr re rare rr ee ee errar raros 103
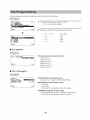
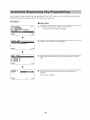
Automatic Sequencing Key Programming a arar res 104
RY TX RER RERRERRR ER RERRRERR ER RERRERRRREERERRERRER EEE 104
Key SEQUENCE RRRR RER RRRRR A RER A A A A A 105
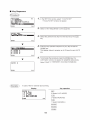
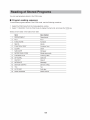
Reading of Stored Programs eee a a ri ra ra ee a ee ae rre. 106
Program reading SEQUENCE a aaa ar ar aaa aaa de arenero 106
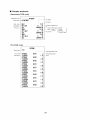
Sample printouts.............. aa a area rr rr rare rare rre ree reee eee 107
SD CARD MOE. RER EEE ee ae ee ee de A ee A 115
Inserting and removing an SD MEMOory Card... reas 115
SD card formatting.. aa aan ra rar re ra rar ere rare rare 115
FOI Er Cra ING a aaa aaa aaa aa aaa ear ear ear areas 115
Folder name selecting ................ e a ai a aaa aa ear ear aaa earn arenero 116
Data SAVING EEE 116
Data 0a NG EEE 117
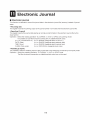
11 Electronic Journal e ee ea ene rea rena ea ae a ee ae ae ee ae 118
Electronic JoUmMaA a ana aaa aerea aaa ear ear earn areas 118
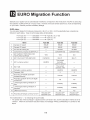
12 EURO Migration FUnction aaa aaa arar A A ааа аананананиоя 119
13 Operator Main ena Ce a aaa aaa ar aa ear aaa a A A eres 121
In Case of Power FallUre ini an arre rear erre ere errrrree erre 121
IN Case Of Printer ETT. nana rear arar rear arenero 121
Cautions in Handling the Printer and Recording Paper... aa aaa 121
Cautions in handling the Printer... e a ana rr rre rr rre 121
Cautions in handling the recording paper (thermal paper)... rer RRERE 121
Installing Batteries aa aaa aaa ear aerea a à A A A иена нана нининиоя 122
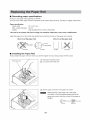
Replacing the Paper ROIl......... ea ae ia ee ee A ee rr rr rre. 124
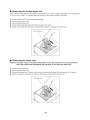
Recording paper specifications ............. ea aa aaa aa anar ener 124
Installing the Paper Roll... aaa ana ra aaa rr erre. 124
Removing the receipt paper roll... a aaa aa aa aaa aaa aaa aereas 126
Removing the Paper Jam aa aa area ear aerea a нана ааан анна ааатааннноя 126
Cleaning the Printer (Printer Head/Sensor/Roller).............. aaa aaa as 127
Removing the Till and the Drawer................ 040 A dia dar aa a aa a da aa aa aa ae ae ra ee ee a a ae 128
Opening the Drawer by Han]... aaa aaa aaa a a A A a нон иенниннннооя 128
Drawer LOCK BY aaa aaa aerea aerea rear aerea rara erario 128
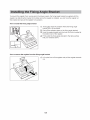
Installing the Fixing Angle Bracket. a a aaa ar areas 129
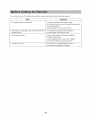
Before Calling for Service... a ra ra erre rar ee 130
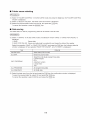
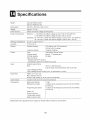
TA SPECI ICA ONS EEE RER RR ER EEE тенананиниоо 131
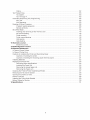
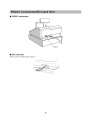
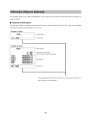
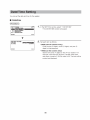
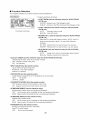
Part Names and Functions
External View
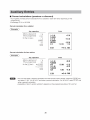
E Front view (XE-A207WIXE-A207B)
Printer cover
Normal keyboard
Operator display
Drawer
Drawer lock
SD card slot
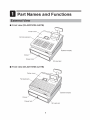
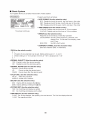
E Front view (XE-A217WIXE-A217B)
Printer cover
Flat keyboard
Drawer
Drawer lock
SD card slot
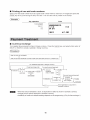
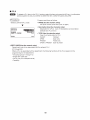
E Rear view (XE-A207WIXE-A207B)
(XE-A217WIXE-A217B)
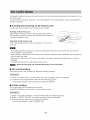
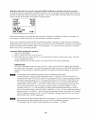
Customer display
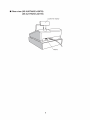
Printer
The printer is a receipt (one station) type thermal printer, and therefore it does not require any type of ink
ribbon or cartridge. The average life of the printer is approximately 5 million lines.
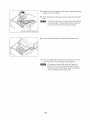
When removing the printer cover, lift up its rear.
When installing the printer cover, hook it on the pawls on the cabinet and shut it.
Caution: The paper cutter is mounted on the printer cover. Be careful not to cut yourself.
Printer cover
Printer head
Sensor
Print roller arm
Do not attempt fo remove the paper with the print roller arm in the hold position. This may result
in damage to the printer and printer head.
10
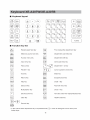
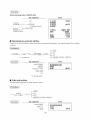
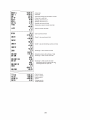
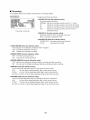
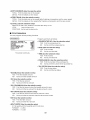
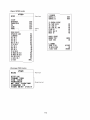
Keyboard XE-A207W/XE-A207B
HB Keyboard layout
FUN
+
RECEIPT
he
FUNC
MENU
(+)
Fe
PO
(CAPS)
FT
co
(SHIFT}
|
HELP
|
EX
SIS
ana
E Function key list
RECEIPT
“п >
me
=
TI =
seo Es) 3
-9
* In this manual each department key is represented like In order to distinguish it from direct price
lookup keys.
Receipt paper feed key
Electronic journal view key
Function menu key
Auto menu key
Paid out key
Percent 1 key
Void key
Refund key
Help key
Discount key
Multiplication key
Decimal point key
Clear key
Numeric key
7 = EZ =F =
PLU DEFT DEPT
/SUB # SHIFT | | CLK#
ho y {Pt} A (F4) y
[20] 24 28) f 32
4 7 18 ЛД Ме 116 ;
o 18) 23) f 27) f 31)
3 y Ja Jus
(18) 22) 26) 30
(2 Je JLo jua
(17) 21 25) 29
1 FR 18 HB
ESC/
ANCE
=
—
Od == ©)
1 mm
nŸ
+
=
—
-
г
==
cn
11
—
> _
|
l
Y
16
Price lookup/Sub department key
Department code entry key
Department shift key
Clerk code entry key
Department 1-32 key
Cursor (up/down arrow) key
Mode key
Escape/Cancel key
Credit 1 key
Payment menu key
Check 1 key
SER
MODE
{HOME)
SR
ESC/
CANCEL
eA
SE
PAYMENT
MENU
(NEXT)
FAY
H/TM
ST
Non-add code/Time display/Subtotal key
Total/No sale key
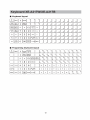
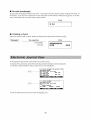
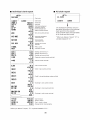
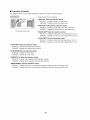
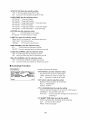
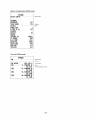
Keyboard XE-A217W/XE-A217B
HB Keyboard layout
u u | NT
f |Hecr|| + ||MoDE
RECEIPT | | 7 14 21 28 35 42 | 49 56 63 70
GC. | El | | ESC/ || 7 3 5 | | | |
RCPT || VIEW CANCEL 6 13 20 27 34 41 48 55 62 69
FUNC || AUTO | DEPT |
e L
MENÚ |MENU|| © CL | # > 5 12 19 26 33 40 || 47 54 61 68
CLK || PLU | |
CR1 L2
# |[/sue|| / 8 9 4 11 18 25 32 39 46 53 60 67
%1 | Hi | La |
© > 4 5 6 || © | | 3 10 17 24 31 38 | 45 52 59 66
| H/TM |
PO || RF GLU
1 2 3 ST 2 9 16 23 30 37 44 51 58 55
VAT PAYMENT
со TL/NS|| NBAL
sHıFT|| O | OO || Menu ||1-/NSINBAL IL all 151 >) æll se) of sol 57) es
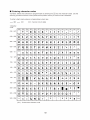
HB Programing keyboard layout
4 несе + | eae | I =< a Af IP NN Af eN Af ©
RECEIPT HELP $ MODE UP £ $ + | & § a 6
= | ese] fe Га SM az
| CANCEL) NDOFN | e | |= | | so, | 1 il?
о ee A ar far or АГ ЕВГ ar =
9 e [CL Sa e C1 à le li de a
| | || | || BEE if ol ÚN All À IN fu
7 | 8 | 9 [ODE á é | à e | о ù
(+=) || +) | 4 | 5 6 Q W E Y U | O Р
Gi
(caps 1 2 3 er A 5 D G H J K L B
(sre (DC) || O SPACE)! [TL/NS 7 X о у N M ||. A eN
JL IL CODE | | J a E A
12
Ш Function key list
+
RECEIPT
IT
rm
J
A
O
30
=
ge
т
=
=
O
MENU
CD
X= =
S| |
LK#
PLU
/SUB
Ss) 3) S) 5) ©
CA
IS
=
1
Receipt paper feed key
Help key
Guest check receipt key
Electronic journal view key
Function menu key
Auto menu key
Clerk code entry key
Price lookup/Sub department key
Discount key
Percent 1 key
Paid out key
Refund key
Void key
Value added tax shift key
Cursor (up/down arrow) key
Mode key
Escape/Cancel key
т
=
=
== O
ë 80 (2l8
m
Hy
—
2
x
©
Department 1-6 key
Multiplication key
Decimal point key
Clear key
Numeric key
Payment menu key
Department code entry key
Credit 1 key
Check 1 key
PLU level shift 1 to 3 keys
Non-add code/Time display/Subtotal
key
Guest lookup key
Total/No sale key
New balance key
EE. Direct PLU key
* In this manual each department key is represented like in order to distinguish it from direct PLU keys.
13
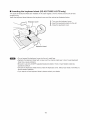
EH Inserting the keyboard sheet (XE-A217W/XE-A217B only)
Two types of keyboard sheets are installed on the cash register; one for ordinal use and one for text
programming.
Insert the keyboard sheet between the keyboard cover and the cabinet as illustrated below.
1. Turn over the keyboard cover.
2. Insert the keyboard sheet into the slit.
3. Close the keyboard cover.
» Do not spread the keyboard cover too far as it might tear.
* Replace the keyboard sheet with a new one if by chance it gets wet. Use of a wet keyboard
sheet may cause problems.
* Be sure to use only SHARP-supplied keyboard sheets. Thick or hard sheets make key
operations difficult.
* Smooth the keyboard sheet evenly under the keyboard cover, without any folds or wrinkles, to
ensure easier operation.
* If you require a new keyboard sheet, please contact your dealer.
14
RS232 Connector/SD Card Slot
Ш RS232 connector
RS232
Ш SD card slot
Refer to the “SD CARD Mode” section.
15
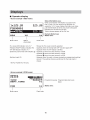
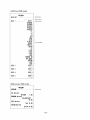
Displays
E Operator display
* Screen example 1 (REG mode)
Sales information area:
~ VWhen a transaction information occupies more
FLUOOOO1
than 2 lines, you can scroll to the direction by
1x1/5.20 125.20 using the keys. Sales information you have
- just entered such as items and prices will appear
between the 1st and the 2nd line.
Il TAL 175 , Fa Total is always appear at the 3rd line.
> Numeric Entry Area:
1 [- Status area:
HE ta Liz
Mode name Status Clerk code
information
PLU level shift indicator (L2-L3) *
Receipt ON/OFF status indicator (R)
VAT shift status indicator (V) *
Electronic journal near full indicator (J) :
; Shows the PLU level currently selected.
: Арреаге when the receipt ON-OFF function signs OFF.
. Appears when the VAT status is shifted.
Appears ([]) when the used memory is 80%.
Appears (ll) when the used memory is 90%.
: Appears (B) when the used memory is 95%.
Sentinel mark (X)
* XE-A217W/IXE-A217B only
* Screen example 2 (PGM mode)
: Appears when the cash in drawer exceeds a programmed sentinel
amount. The sentinel check is performed for the total cash in
drawer.
Pia
SOC й
PRICE
PLUS OO OL
TYPE PRESET | > Programming area: Programmable items are
DEFT . CODE ol listed.
Od > Status area:
Mode name
Clerk code
16
The display can be tilted back and forth to the
best operational viewing angle.
Do not try to force the display beyond its full
position.
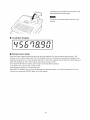
HB Customer display
LOC Cron
(IL U
E Screen save mode
VVhen you want to save the electric power or save the display's life, use the screen save function. This
function can turn off the display and the LCD backlight when any clerk does not operate the register for an
extended period of time. You can program the time for which your register should keep the normal status (in
which the backlight is ON”) before it goes into the screen save mode.
This machine will enter the screen save mode two minutes later by default.
To go back to the normal mode, press any key.
The backlight in display is a consumable part.
When the LCD display may no longer be adjusted and become darker, you should replace the LCD unit.
Consult your authorized SHARP dealer for further details.
17
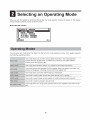
Selecting an Operating Mode
When you turn the register on and press the key, the mode selection window will appear on the display,
listing avallable operating modes as shown below.
Mode selection window
SELECT MODE Y
1 OPS MODE
= OFF MODE
+ YOID MODE
4 X417541 MODE
> X= MODE
=_
MODE Gi
Operating Modes
You can select any mode other than REG from the list in the mode selection window. Your register supports
the following operating modes:
This mode allows you to enter various sales information. The mode selection
REG mode window does not list this mode. To select this mode from the mode selection
window, press the key.
OPXZ mode This mode allows clerks to take X or Z reports on their sales information.
This mode locks all the operations of the register. When you select this mode, the
OFF mode fran
window will disappear. Pressing any key turns the register ON.
VOID mode: This mode allows correction after finalizing a transaction.
X1/Z1 mode This mode is used to take various daily total reports (X1/Z1 reports).
X2/Z2 mode This mode is used to take various weekly or monthly reports (X2/Z2 reports).
PGM mode This mode is used to program various items.
This mode allows you to save and load the data of your register to and from an SD
SD CARD mode
card.
18
Mode Selection
Procedure
Press the key. The following mode screen is displayed.
SELECT MODEL Y
1 dPXxz MODE
= OFF MODE
0 VOID MODE
4 XxX4154 MODE
5 KK MODE
—
HODE Od
Use one of the following ways:
* Move the cursor to the desired option by using the | + | or [+ key, and press the key.
* Enter the desired option number by using a numeric key and press the key.
When you want to enter the REG mode, simply press the key.
19
E Prior to Making Entries
Preparations for Entries
HB Receipt paper roll
If the receipt paper roll is not set in the machine or it is getting low, install a new one according to section
‘Replacing the Paper Roll” under “Operator Maintenance.”
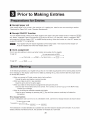
HB Receipt ON/OFF function
You can disable receipt printing in the REG mode to save paper using the receipt function. Press the
key. Select “3 RECEIPT SW and press the key for XE-A217. For XE-A207, select “4 RECEIPT SW
and press the key. Select “OFF” to disable receipt printing. When the function is in the OFF status, the
receipt off indicator “R” is highlighted.
Your register will print reports regardless of the receipt state. This means that the receipt roll
must be installed even when the receipt state is “OFF”
EH Clerk assignment
Prior to any item entries, a clerk must enter his/her clerk codes into the register.
To sign on: (In case secret code is 0000)
— Clerk code —— 1 Secret code —— [TLNS| — — >
Tosignoff: — —
Error Warning
In the following examples, your register will go into an error state accompanied with a warning beep and the
error message on the display. Clear the error state by pressing the key and then take the proper action
to remedy the problem.
* When you exceed a 32-digit number (entry limit overflow):
Cancel the entry and reenter a correct number.
+ VVhen you make an error in key operation:
Clear the error and try the entry again.
* When you make an entry beyond a programmed amount entry limit:
Check to see if the entered amount is correct. If it is correct, it can be rung up in the MGR mode.
Contact your manager.
* When an including-tax subtotal exceeds eight digits:
Clear the error message by pressing the key and then press a media key to finalize the
transaction.
Error escape function
To quit a transaction due to an error or an unforeseen event, use the error escape function as shown below:
To clear the error state
Transaction
_ — V , (escomee)— (EHE)
The transaction Is voided (treated as a subtotal void) and the receipt is issued by this function. If you have
already entered a tendered amount, the operation is finalized as a cash sale.
20
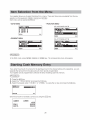
Item Selection from the Menu
Your register allows you to select functions from a menu. There are three menus available from the key
selection on the keyboard; [FUNCHENU), [Рчмемт мени) апа [AUTO MENU].
Each menu can be opened as follows:
« AUTO MENU « FUNCTION MENU
TD MENÚ XE-A207WIXE-A207B
FUHCT ION HEHL Y
3 AUTO 3 Th
4 AUTO 4 = FREER
5 AUTO 5 = =
°° Ш TOTAL AT
Ес C4
* PAYMENT MENU XE-A217WIXE-A217B
PAYMENT MEHU Y FUNCTION MEMU Y
= CREDIT = al
3 ExCHdA + RECEIPT ==
TOTAL NAO TOTAL 0.00
REG 1 REG 4
Procedure
In the REG mode, press [FUNCMENU), [Pame ven) Or key. The corresponding menu list appears.
Starting Cash Memory Entry
If you enter the amount of currency for the starting amount in the drawer before entry operations, you can
separate that amount from the sales amount when reports are generated.
Your register can be programmed to enforce the entry of starting cash into memory.
1. Press the key
2. Select the “1 OPXZ MODE” and press the key.
3. Select the desired option “3 SCM(+)” or “4 SCM(-)” by using the | + | key and press the key
SCH {+}
AMOUNT E
OPXZ Od
Enter the amount for domestic currency by using the key.
CLAHO 1 CLERKO1
*0. 00
SCH (4) +100. 00
SCH TTL #100. 00
21
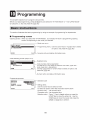
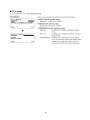
HELP FUNCTION
The help function allows you to print guidance messages for basic programming procedures of the cash
register.
E Printing the help menu
Press the key to print the help menu. This menu provides a list of the programming procedures for which
you can print the guidance messages.
Key operation Print
HELP MENU
1 HOW TO SET THE PAPER
2 EJ VIEW
3 DATE SETTING
4 TIME SETTING
5 VAT RATE SETTING
6 VAT TEXT SETTING
7 VAT ASSTGNHENT TO DEPT.
8 DEPARTMENT TENT SETTING
3 MINUS DEPARTMENT SETTING
10 PLU TO DEPT. ASSIGNMENT
11 PLU TEXT SETTING
12 PLU PRICE SETTING
13 LOGO MESSAGE SETTING
14 REPORT PRINT
15 HOW T0 SIGN ON A CLERK
16 HOM TO SET RCPT SW OFF /ON
17 HOW TO FORMAT SD CARD
T0 PRINT ABOVE EACH HELP
CONTENTS. EX) TIHELP].
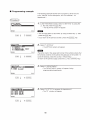
EH Printing guidance messages
By reference to the help menu above, press the corresponding numeric key and then the key to print the
guidance message for each programming procedure.
Key operation Print
4 4 TIME SETTING
Mode selection: PGM MODE
Select "2 SETTING”.
Select “7 DATE/TIME".
Push [1] key to skip DATE.
EX) PH 4:30
(TIME FORMAT=24 HOUR)
1630 [TL/NS]
Sample print of TIME SETTING
22
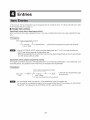
Entries
Item Entries
In this manual, the key description is given basically with the model XE-A217. For those with XE-A207, refer
to the Function key list on page 11.
E Single item entries
Department entries (direct department entries)
Enter a unit price and press a department key. If you use a programmed unit price, press a department key
only.
Procedure
When using a programmed unit price
—L + Unitprice* —— Department key *Less than the programmed upper limit amounts
(max. 8 digits)
* For XE-A207W/XE-A207B, when using the department key 17 to 32, you need to press the
key before pressing the department key
* When those departments for which the unit price has been programmed as zero (0) are entered,
only the sales quantity is added.
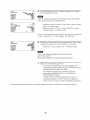
Department entries (indirect department entries)
The register provides a maximum of 99 departments for a merchandise classification. Group attributes, such
as taxable status, are applied to items when they are entered to the departments.
Procedure
When using a programmed unit price
“Less than the programmed upper
(1-99) (max. 8 digits) limit amounts
Dept. code —— [DEPT Ta Unit price * — +— — —= [TL/ns
In case only preset price entry is allowed
You can directly enter the code No. of the department using the numeric key.
For the code No. exceeding the figure on the numerical key board (33 and above for XE-A207W/
XE-A207B, 7 and above for XE-A217W/XE-A217B), use this function.
23
Key operation Print
1200 (6)
1x 12.00 #12. 00
DPT. 06
3 1х 7.10 #7. 10
520 IPT. 05
TL/NS ar о +5. 20
1x 6.80 16.80
TL/NS DPT.O4
CASH x31. 10
PLU entries (indirect PLU entries)
Enter a PLU code and press the key. If you do not use a programmed unit price, you need to enter a
unit price after pressing the key
When using a programmed unit price
— PLU code — | PLU/SUB — Unit price *
(max. 8 digits)
In case only preset price entry is allowed
o» UNS
When those PLUS for which the unit price has been programmed as zero (0) are entered, only
the sales quantity is added.
PLU entries (direct PLU entries) (For XE-A217W/XE-A217B only)
Enter the assigned PLU code using the direct PLU keys provided in the keyboard. Here you can simply
press the assigned direct PLU keys. The price assigned to the selected PLU code is displayed on the
screen.
The direct PLU keys are the numerical keys arranged on the right side of the keyboard and with numbers 1
to 70.
Procedure
When using a programmed price
_, Unit price +. Direct PLU key *Less than the programmed upper limit amounts
(for subdept.)
Key operation Print
2
1х 5. 10 *5. 10
16 PLUODOO2
1200 1х 12.00 +12. 00
TL/NS one > 0
e) X £ Же.
ns PLU00008
CASH x19. 20
24
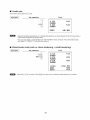
HB Repeat entries
The Repeat Entry function allows you to enter a sale of two or more of the same items.
You can simply press the department key, [DEPT+], or key to repeat entry
Key operation Print
200
Repeated 3x 2.00 *6. 00
department DPT. O2
entry (direct) 2x. 6.89 #13, 60
4 OPT. O4
Repeated DEPT# 3x 5.10 15. 30
department entry 680 ri +13. 00
(indirect) TL/NS PLUGODOS `
2¢ 5.00 #10. 00
Repeated PLU 10 PLUODOBO
entry PLU/SUB =
(indirect) CASH x57. 90
Repeated PLU*
entry (direct)
Repeated S0
subdepartment 500 [TLS
entry
TUNS
* XE-A21 /WIXE-A21 B only
25
HB Multiplication entries
Use this feature when you need to enter two or more of the same items.
This feature helps you when you sell a large quantity of items or need to enter quantities that contain
decimals.
Procedure
When you use a programmed
unit price
Q'ty — — Unit price _+, | Department key | Prensa
— Dept. code — 1. Unit price +, TL/NS
— PLU code —+[PLU/SUB | Lo uni price [INS
* XE-A217WIXE-A217B only
* Qty: Up to four-digit integer + three-digit decimal
« Unit price: Less than a programmed upper limit
« Q'ty x unit price: Up to eight digits
Key operation Print
7[-]5 7.500% 1.65 412. 38
Te EE ex
2 X Ze ¥3.
DPT. 05
5 15x 1.20 x18.00
250 PLU00008
TLINS 6 230 | .50 #12. 38
15
° ИОВ -
8[.]25
CASH x50. 76
3
60
100
TLNS
Dept. entry (direct)
Dept. entry (indirect)
PLU entry (indirect)
PLU/subdept. entry (direct)
PLU/subdept entry (indirect)
E Split-pricing entries
You will use this function when your customer wants to purchase more or less than the base quantity of a
loose item.
Procedure
When you use a programmed
unit price
Selling g'ty — (©) — Base q'ty — | Unit price apartment key |
per base q'ty
— Dept.code — > Le. Unit price + TL/NS
—» PLU code —
per base qty Direct PLU
— PLU code — e. Unit price + TL/NS
* XE-A217WIXE-A217B only
* Selling quantity: Up to four-digit integer + three-digit decimal
* Base quantity: Up to two digits (integer)
Key operation Print
ENE 7x 10/ 6.00 14.20
600 DPT. 02
8(®]5(®] Вх 5/ 1.50 #2. 40
35 PLU00035
18 CASH #6. 60
27
E Single item cash sale (SICS)
* This function is useful when a sale is for only one item and is for cash; such as a pack of cigarettes. This
function is applicable only to those departments that have been set for SICS or to their associated PLUS.
* The transaction is finalized and the drawer opens as soon as you press the department key, key,
key or the direct PLU key.
Key operation Print
1x 2.50 *2.50
250 DPT. 03
For finishing — —
the transaction CASH x?. 50
If an entry to a department, PL U/subdepartment set for SICS follows the ones to departments,
PL Us/subdepartments not set for SICS, if does not finalize and results in a normal sale.
28
EH PLU level shift (for direct PLUs) (for XE-A217WIXE-A217B only)
This shift can double or triple the number of direct PLUs on your register without pressing additional direct
PLU keys. You can use direct PLUs in three levels by the PLU level shift keys through El
Level key shifts the PLU level from the other two to the required level. (The normal level is the level 1.)
You must program your machine in the PGM mode to select one of the two PLU level shift modes —
automatic return mode* and lock shift mode** — and decide whether to allow PLU level shift in both the
REG and MGR modes or in the MGR mode alone.
* The automatic return mode automatically shifts the PLU level back to level 1 after pressing a direct PLU
key or finalizing each transaction.
** The lock shift mode holds the current PLU level until depression of a PLU level shift key.
Automatic return mode (for PLU levels)
If your register has been programmed for PLU level in the automatic return mode, press a desired PLU level
shift key before a numeric entry.
Procedure
(Returning every item entry)
— through [L3 aN Numeric entry — foire PLUÍ ¡> Return to level 1
(Qty, [@])
(Returning every transaction)
— + [11] through mercer brea Pr (Finalization) -
Lock shift mode (for PLU levels)
If your register has been programmed for PLU level in the lock shift mode, press a desired PLU level shift
key before a numeric entry.
Procedure
— through [L3 uN Numeric entry Direct PLU| PLU|H— Stay in the current level
Qty, [®))
29
Level 1 : PLU code 1, PLU code 2
Level 2 : PLU code 71, PLU code 72
+ VVhen your register has been programmed for the automatic return mode (by one item):
Key operation Print
1х 1.20 *1.20
PLU00001
1х 5. 30 #5. 30
TL/NS PLU00071
1x 2.50 *2.50
000002
CASH xg. 00
Level 1 : PLU code 1, PLU code 2
Level 2 : PLU code 71, PLU code 72
* When your register has been programmed for the lock shift mode:
Key operation Print
1x 1.20 ¥1.20
PLUDOOO!
1х 5.30 #5. 30
TL/NS PLU00071
1х 6.10 +6. 10
PLU000 72
C ASH *12. BO
Display of Subtotals
Your register provides the following types of subtotals:
E Subtotal
Press the key at any point during a transaction. The sales subtotal including tax will appear in the
display.
30
Finalization of Transaction
H Cash or check tendering
Press the key to get an including-tax subtotal, enter the amount tendered by your customer, then
press the key if it is a cash tender or press the key if it is a check tender. When the amount
tendered is greater than the amount of the sale, your register will show the change due amount and the
symbol “CHANGE.” Otherwise your register will show the symbol "DUE" and a deficit. Make a correct tender
entry.
Cash tendering
Key operation Print
{
1x 1.20 #1. 20
PLUDOGO!
1000 198 1x 2.50 2.50
PL U00002
TOTAL *3. 70
CASH *10. 00
CHANGE *6. 30
Check tendering
Key operation Print
д
1x 1.20 #1. 20
ms | atun
1x 2.50 #2, 50
PLU00002
x#*TÜ0TAL *x3. 70
CHECK1 *10.00
CHANGE #6. 30
You can also enter a check tender from the PAYMENT menu window. Press the key and
select “1 CHECK 2” and enter the amount.
31
HB Mixed tendering (check + cash)
Key operation
{
1000
500 [TL/NS
Print
1x 5.10 #5. 10
PLU00010
2x 4.80 #4. 50
PLU00008
*%%[(TAL x14. 70
CHECK #10. 00
CASH *5. 00
CHANGE *0. 30
HB Cash or check sale that does not need any tender entry
Enter items and press the key If it is a cash sale or press the key if it is a check sale. Your register
will display the total sales amount.
Key operation
_d
10 | PLU/SUB|
TL/NS
32
Print
1x 3.00 *3. 00
PLUCODOS
1x 7.15 #7. 15
PLU00010
CASH x10.15
In the case of check sale
1x 3.00 *3.00
PLU0000G
1x 7.15 x1.15
PLU00010
CHECHI x10. 15
E Credit sale
Enter items and press the [cri] key.
Key operation
Ве
#TM/ST
с
=
Print
1x 3.00 *3. 00
PLUDOOOG
1x 6.00 ¥B. 00
PLUDOOO7
CREDIT1 x3. GO
* Amouní tendering operations (ie. change calculations) can be achieved by the key when a
PGM mode programming allows them.
* You can also enter a credit tender from the PAYMENT menu window. Press the key
and sefect “2 CREDIT 2” and enter the amount.
Ш Mixed-tender sale (cash or check tendering + credit tendering)
Key operation
ot
+t
3
=
cn
—
O
OT
o
—
—
5
о
с
=
Print
1x 1.20 #1. 20
PLU0O00 1
1x 2.50 *2, 50
PLUDOOO?
3x 3.00 *9. 00
FLU00003
TOTAL *12. 70
CASH +9, 50
CREDITY #3. 20
Press the |cH1| key in place of the [TLNS| key when your customer makes payment by checks.
33
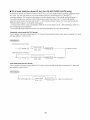
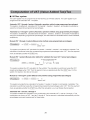
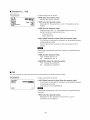
Computation of VAT (Value Added Tax)/Tax
E VAT/tax system
The cash register may be programmed for the following six VAT tax systems. The cash register is pre-
programmed as automatic VAT 1-4 system.
Automatic VAT 1 through 4 system (Automatic operation method using programmed percentages)
This system, at settlement, calculates VAT for taxable 1, taxable 2, taxable 3, and taxable 4 subtotals by
using the corresponding programmed percentages.
Automatic tax 1 through 4 system (Automatic operation method using programmed percentages)
This system, at settlement, calculates taxes for taxable 1, taxable 2, taxable 3, and taxable 4 subtotals by
using the corresponding programmed percentages, and also adds the calculated taxes to those subtotals,
respectively.
Manual VAT 1 through 4 system (Manual entry method using programmed percentages)
Procedure) — |#TM/ST| — — 5
select “VAT”
This system provides the VAT calculation for taxable 1, taxable 2, taxable 3, and taxable 4 subtotals. This
calculation is performed using the corresponding programmed percentages when VAT” from the payment
menu is selected just after the key.
Manual VAT 1 system (Manual entry method for subtotals that uses VAT 1 preset percentages)
To use a programmed rate
HTMIST | — > 5 L VAT rate + TLINS
select VAT”
This system enables the VAT calculation for the subtotal. This calculation is performed using the VAT 1
preset percentages when “VAT” from the payment menu is selected just after the key. For this
system, the keyed-in tax rate can be used.
Manual tax 1 through 4 system (Manual entry method using programmed percentages)
Procedure) — [#TM/ST|— > 5
select “VAT”
This system provides the tax calculation for taxable 1, taxable 2, taxable 3, and taxable 4 subtotals. This
calculation is performed using the corresponding programmed percentages when VAT” from the payment
menu is selected just after the key. After this calculation, you must finalize the transaction.
Automatic VAT 1 and tax 2 through 4
This system enables the calculation in the combination with automatic VAT 1 and tax 2 through 4. This
combination can be any of VAT 1 and tax 2 through 4. The tax amount is calculated automatically with the
percentages previously programmed for these taxes.
34
VAT/tax assignment is printed at the fixed right position of the amount on the receipt and bill as
foffows:
УАТ1Лах1 — — — > А
УАТ2Лахг — — — => В
VAT3/1ax3 ———C
VAT4/tax4 ——— =D
When the multiple VAT fax is assigned to a department or a PLU, a smaller number of the VAT/
tax will be printed.
(When the manual
VAT 1 through 4 #TM/ST
system is selected) ‘own venu
о
TL/NS
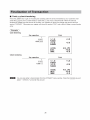
E VAT shift entries (for XE-A217W/XE-A217B only)
Print
1x 9.60 x9. 60
PLU00008
SUBTOTAL *9. 60
TAXI ST +9. 60
VAT | *0. 28
NET 1 #9. 32
CASH #9. 60
This feature is intended to shift the tax status of a particular department (or PLU) programmed for taxable 1
or taxable 1 and taxable 3.
1. When the VAT shift entry is made for a particular department or PLU programmed for taxable 1, their tax
status shifts to taxable 2.
2. When this entry is made for a particular department (or PLU) programmed for taxable 1 and taxable 3,
the tax status "taxable 1" remains unchanged, but the other, “taxable 3" is ignored.
Key operation
(When the Auto VAT 1
through 4 system is
selected
TLNS
35
Print
1x 1.20 #1. 20
PLUO0001
1x 1.20 #1. 20
PLUOOOO!
SUBTOTAL #2. 40
TAXI ST ¥].20
VAT 1 *0. 06
NET 1 *). 14
ТАК ST *1.20
VAT 2 *0.11
NET 2 *1. 09
CASH #2. 40
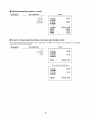
Guest Check
HB Guest look up (GLU) system (for XE-A217W/XE-A217B only)
New guest
Procedure
For automatic GLU
code generation
GLUcode Y — 1. [Item entries] LI
(1 to 9999)
*1
» ——= GRP] ——
— = [Payment operation] —— GC RCPT ——
*2 When paid in full (settlement) (Cash, Check, Credit, Exchange)
* A clerk must has been registered before starting GLU entry.
» The GLU code refers fo a code that will be used whenever the guest check must be accessed
for re-ordering or final payment.
*1 The tax is not calculated.
*2 The tax is calculated and is added to the tax totalizer.
Key operation Print
1001 GLUYTOO1
wa
5 X i. #1.
я PLU00001
1x 2.50 #2.50
PLU00002
ж+ВА, ¥3.70
36
Additional ordering
GLUcode — — > vr [Item entries] I
- 6) — = —
When paid in full (settlement) ach oh С orange) —
Key operation Print
1001 GLU#1001
TLNS BILL#
1x 1.20 #1. 20
PLU00001
1x 2.50 #2. 50)
PLUDO00Z
1% 6.00 #6. 00
PLUO0007
CASH x9. 70
E Table bill copy print (for XE-A217WIXE-A217B only)
This function is used for issuing a table bill copy to the guest.
w= | GC.RCPT
Procedure
Key operation
37
Print
*COP Y +
*BILL:
1x 1.20 #1. 20
PLU00001
1x 2.50 #2. 50
PLU00002
1x 6.00 +6. 00
PLU00007
CASH x9. 70
Auxiliary Entries
HB Percent calculations (premium or discount)
Your register provides percent calculations for a subtotal or each item entry depending on the
programming.
» Percentage: 0.01 to 100.00%
Percent calculation for a subtotal
Key operation Print
(When a discount of | a
10% is program med > 000 003 *3. 00
for the [+1] key.) 2х 6.59 £12.00
WE ДЕ
*B.
TUNS x1 -10.00% -1.60
CASH *714. 40
Percent calculation for item entries
Key operation Print
(When a premium of
15% is programmed A #8. 00
forthe [%1) key) — 30 %1 15.00% +1. e
7 [. |5 [% 1х 5. 00 #3. 00
9 Р 000030
41 7.50% +0.38
CASH *¥14. 58
- You can also enter a percent calculation from the function menu window. Press the key
and select ‘2 %2° for XE-A217 and enter a percent calculation. For XE-A207, select “3 %2" and
enter a percent calculation.
* Availability of item % and/or subtotal % depends on the programming data of %1 and %2.
38
E Discount entries
Your register allows you to deduct a certain amount less than a programmed upper limit after the entry of an
item or the computation of a subtotal depending on the programming.
Discount for a subtotal
Key operation Print
1% 5.75 ¥5. 75
60 PLU00006
Ix 12.00 *12.00
PLU000GO
100 (9) SUBTOTAL 417.75
TUNS (—) ~1. 00
CASH xj. 75
Discount for item entries
Key operation Print
7
1x 6.00 *5. 00
PLU00007
TUNS (-) -0.75
CASH x5. 25
E Refund entries
For a refund entry, press the key just before you press a department key, key, direct PLU key (XE-
A217W/XE-A217B only) or key. The operation before pressing the [rr | key is the same as the one
of normal operation.
For example, if a refund item is the one entered into a department, enter the amount of the refund, then
press the key and the corresponding department key in this order; if an item entered into a PLU is
returned, enter the corresponding PLU code, then press the and keys.
Key operation Print
TE nm
7 -7x 6.00 R-42.00
TL/NS PLUDOOO7
CHANGE *45. 00
39
E Printing of non-add code numbers
Enter a non-add code number such as a guest code number within a maximum of 16 digits and press the
#TM/ST | key at any point during the entry of a sale. The non-add code is printed on the receipt.
Key operation Print
1230
#0000000000001 230
700 1x 7.00 47.00
СВ! DPT.O1
CREDIT! *x7. 00
Payment Treatment
E Currency exchange
Your register allows payment entries in foreign currency. Press the key, and select either option of
EXCH1 or EXCH?2 to create a subtotal in foreign currency.
Procedure
| After an entry is completed
or E]
' After the amount tendered is found smaller than the sales amount in a sales entry '
For additional payment in foreign currency
3 Preset exchange rate 7 exact amount payment
= ame | Con iT = Amount = —
4 — (Open rate) —TL/NS| tendered
(EXCH2) 0.000000 (max. 8 digits)
to
999 999999 For exact amount payment
(CHECK 2) Amount
—— (event ven) | or . = tendered ——+ [TLINS
| lorena | (тах. 8 digits)
7 [ESCICANCEL
(CL __ Next registration or payment in
- domestic currency
* When the amount tendered is short, its equivalent in deficit is shown in domestic currency.
* Change amount will be displayed in domestic currency.
» Availability of credit and cheque tendering depends on the programming. (Only for the exchange 1)
40
Preset exchange rate (1.550220) :EX1
Key operation Print
La 1x 23.00 *23.00
Currency PLU00006
exchange se [PAYMENT MENU 1x 46.50 *46, 50
3 (Select “EXCH1”) PLUQOO07
Amount [— 12000 (TLIIS
tendered in ###T0TAL x69- 50
foreign currency EXCH 1.550220
107.74
CASH 120.00
CHANGE *7. 90
HB Received-on-account entries
From the FUNCTION MENU, select RA option to proceed the operation. You cannot receive RA in foreign
currency.
Procedure
TLINS
CH1
——[FUNC NENU) — 1* (select ** RA) — (max. 9 diglts) — (TUNS E ort
* “2 for XE-A207
(CHECK2, CREDIT2)
Key operation Print
12345 [tmwsT 4000000000001 2345
CHECK!
1* (select *** RA) ЖАК *48. 00
4800 [TLS]
CHI
* 2 for XE-A207
E Paid-out entries
You can make a payment by cash, check or credit.
TL/NS
Amount Gr
(max. 9 digits) CAT
(CHECK2, CREDIT?)
Key operation Print
M/ST
0189 (ATMS #0000000000006 789
3000 CASH
TL/NS w*#P0 #30. 00
41
E No-sale (exchange)
Simply press the key without any entry. The drawer will open and the printer will print “NO SALE" on
the receipt. If you let your machine print a non-add code number before pressing the key, a no sale
entry is achieved with a non-add code number printed.
Print
NO SALE
HB Cashing a check
When you need to cash a check, enter the check amount and press a check key ((cH1)).
Key operation Print
6769 [#TWST 40000000000006789
3000 CA/CHK #30. 00
Electronic Journal View
The transaction data is kept in the electronic journal memory.
To display the journal data, press the key, the last transaction data is displayed.
To retroact to past transaction data, press the key repeatedly.
—_— ET VIEW — Y
te LE LE
+ snaacaca eco ceca A 49:47
1x 4 2 Hq | Or
FP Li LIE Ori}
1 4 0 SEL] Ee
JP Li LIA OF
LGANCELT)] TO EXIT
— EJ VIEW
Od FOOT
EJVEIW pp SADA 14 9 m 4
H
PLUG O00
E Aa Зв CCS
COSHCELI TU EXIT
To exit the electronic journal view, press the |ESCICANCEL | key.
42
TRAINING Mode
The training mode is used when the operator or the manager practices register operations.
When a clerk set in training is selected, the register automatically enters the training mode, while a clerk
not set in training is selected, the register automatically enters the ordinary REG mode. A training text and a
training clerk can be programmed.
The training operations are valid in all modes.
A mark which is identifying a training receipt is printed on the receipt which is issued in the training mode.
The consecutive number is not updated. The preceding number is repeated in printing.
Training clerk programming is performed in PGM mode. (lt allows only for 1 Clerk.)
The memory In clerk is updated in the training mode. Other memories are not updated.
The GLU codes which are opened in the training mode are also printed on the GLU report. In this case,
those GLU codes are distinguished from others by the character of “1.” The data of training GLU codes are
not added to the total.
The reading and resetting of training clerks is printed on the clerk reports. However, the sales total of training
clerks is not included in the clerk total on the full clerk report.
Key operation Print
Selecting the TRAINING
clerk set in 3 1x 2.25 #2.25
training ; PLU00005
5 3x 4.20 +12. 60
PLUO0003
CASH x*14. 85
43
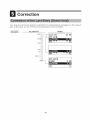
Correction
Correction of the Last Entry (Direct Void)
If you make an incorrect entry relating to a department, PLU/subdepartment, percentage ([%1], %2), discount
(O), oritem refund, you can void this entry by pressing the [<>] key immediately.
Key operation Display
1250 1%12 .50 17.50
css | DPT.O1
2 TOTAL 12.50
DES > 1=.3%
600
328
28 |
250
DPT. OS
TENS CASH 9.28
ТОТА!. т
H Eta oi
44
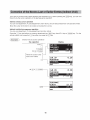
Correction of the Next-to-Last or Earlier Entries (Indirect Void)
If you find an incorrect entry before finalizing the transaction (e.g. before pressing the key), you can void
the entry by the cursor operation or the key sequence operation.
Indirect void by cursor operation
You can void department, PLU/subdepartment, item refund, amount discount/premium and percent entries.
Move the cursor to the item to be voided, and press the | <>] key.
Indirect void by key sequence operation
You can void department, PLU/subdepartment and item refund.
Press the [<>] key just before you press a department key, key, direct PLU key or key. For the
refund indirect void, press the | <>] key after you press the | nr | key
(Indirect void by cursor operation)
Key operation Display
1310
10
50 |8]5 PLUOOOOS 1412.50
HE ix
Move the cursorto the |——
item to be voided.
1x. 20 0.20
PLUOCO 10
PLU C5 нс | 4 СЬ
HE oa
49 [©] 5 [co] [PLuisus] 1х8 .20 8.20
PLU00010
TOTAL NET
РТО “7—4 14} _ «=
RES >
PLU00005
CASH 23.55
TUNS —— IUTAL 23.55
REG oq
45
Subtotal Void
You can void an entire transaction. Once subtotal void is executed, the transaction is aborted and the
register issues a receipt.
Key operation Display
SBIL VOID -10.45
TOTAL 0.00
10 ТОТАТ. 0.00
| REG O4
Subtotal void
#TM/ST
Correction after Finalizing a Transaction
When you need to void incorrect entries that are found after finalizing a transaction or cannot be corrected
by direct, indirect or subtotal void, follow this procedure.
1. Select “3 VOID MODE” in the mode selection window.
2. Repeat the entries that are recorded on an incorrect receipt. (All data in the incorrect receipt is removed
from register memory; the voided amounts are added to the void mode totalizer.)
Incorrect receipt Cancellation receipt
#000101 02/08/2011 19:00
#000102 02/08/2011 19:05
oe, +3. 60 #010 MODE
1x 2.50 42. 50 > 3х 00901 *3.00
PLUODOD? 1x 2.50 12.50
CASH x6. 10 PLU00002
CASH ¥6. 10
Your register leaves the VOID mode whenever a transaction is canceled (i.e. finalized in the
VOID mode). To void additional transactions, repeat steps 1 and 2 above.
46
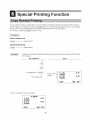
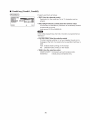
Special Printing Function
Copy Receipt Printing
If your customer wants a receipt after you have finalized a transaction with the receipt ON-OFF function in
the OFF status (no receipting), press the key and “4” key for receipting (for XE-A217). Your register
can also print a copy receipt when the receipt ON-OFF function is in the “ON” status.
For XE-A207, press the key and “5” key.
Procedure
XE-A217WIXE-A217B
— = 4 (Select “RCPT”)
XE-A207W/IXE-A207B
— 5 (Select “RCPT”)
Printing a receipt after making the entries shown below with the receipt ON-OFF function
“OFF” status
Key operation Print
3
TUNS
For receipting — | 1% 2.50 #2. 50
© coo - % 1.20. 3.60
+ up» X fe %3.
5" for XE-A207 PLU00001
CASH *6. 10
“COPY” 1s printed on the copy receipt.
*COP Y +
1x 2.50 #2. 50
Р100002
3x 1.20 3.60
PLU00001
CASH *6. 10
47
Guest Check Receipt(Bill Print)
You can use this function when you want to take a bill for guest check.
Procedure
XE-A217WIXE-A217B
— ск]
XE-A207W/XE-A207B
— [FUNCMENU| — = 1 (select "G.C.RCFT")
* This function is available immediately after the finalization of transaction.
» You can also print the bill copy on receipt only once. When you want to fake a bill copy, operate
it again.
Key operation
10(®][ 4
TL/NS
48
Print
BILL
10x 1.20 +12. 00
PLU00001
CASH «12-00
*COP Y +
BILL +:
10x 1.20 *12.00
PLU00001
CASH x12- 00
Manager Mode
The manager mode is used when managerial decisions must be made concerning register entries, for
example, for overriding limitations and for other various non-programming managerial tasks.
Normal register operations may also be performed in this mode.
Entering the Manager Mode
To enter the manager mode, use the following procedure in the REG mode:
When “0” is programmed for the secret code
99 OO
Manager code | Secret code TUNS
The secret code entry box will appear.
If the code is correct, the register enters the manager EHTER Pass CODE
mode. 1
TOTAL we
= =r
REGS < 1
Override Entries
Programmed limits (such as maximum amounts) for functions can be overridden by placing the register in
the manager mode.
This example presumes that the register has been programmed not to
allow coupon entries over 2.00.
Key operation Print
E |
REG-mode entries < 250 [© Error 00s *3.00
(-) -2.50
Enter to the 99
manager mode 250 CASH x0. 50
TL/NS
eg | < Vhen a transaction is finalized, manager is automatically signed off.
Wh t tion is finalized : t tically signed off.
« In the initial programming, the HALO function is programmed as "INVALID"
49
Reading (X) and Resetting (£)
of Sales Totals
* Use the reading function (X) when you need to take the reading of sales information entered
after the last resetting. You can take this reading any number of times. It does not affect the
registers memory.
« Use the resetting function (Z) when you need to clear the register's memory. Resetting prints all
sales information and clears the entire memory except for the GT1 through GT3, reset count,
and consecutive number.
« X1 and Z1 reports show daily sales information. You can take these reports in the X1/Z1 mode.
« X2 and Z2 reports show periodic (monthly) consolidation information. You can take these
reports in the X2/72 mode.
+ In the OPXZ mode, a clerk can take his or her report.
« If you want to stop the printing report, press the key.
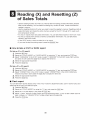
H How to take a X1/Z1 or X2/Z2 report
[To take an X1 or X2 report:]
1.
2.
3.
4.
5.
Press the key.
Select the “4 X1/Z1 MODE" or “5 X2/Z2 MODE" by using the | + key, and press the key.
Select “2 READING" in the X1/Z1 mode or select “1 READING" in the X2/22 Mode menu window
and press in both cases the key to display the items list.
Select the appropriate report title.
Press the key
[To take a Z1 or Z2 report]
1.
2.
3.
4.
5.
Press the key.
Select the “4 X1/Z1 MODE" or “5 X2/Z2 MODE" by using the | + key, and press the key.
Select “3 RESETTING” in the X1/21 mode or select 2 RESETTING" in the X2/22 mode menu
window and press in both cases the key to display the items list.
Select the appropriate report title.
Press the key
E Flash report
You can take flash reports (display only) in the X1/21 mode for department sales, cash in drawer (CID) and
sales total at the point you take the report.
1
2.
3.
4.
5.
Press the key.
Select the “4 X1/Z1 MODE” by using the [+ key, and press the key.
Select the "1 FLASH READ" ,and press the key.
Select “1 DEPT. SALES” to take a flash report of department sales, “2 CID" to take a flash report of
cash in drawer, or “3 SALES TOTAL" to take a flash report of sales total.
Press the key
50
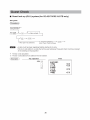
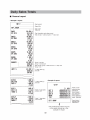
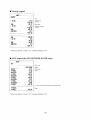
Mode
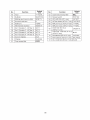
Item OPXZ X1/21 X2/Z2
Z X Z
General report O O
PLU report by designated range O O
PLU report by associated department O O
Individual clerk report O O O
All clerk report O O
Hourly report O O
GLU report * O O
GLU report by clerk* O O
Balance report * O
Flash report O
* For XE-A21/VW/XE-A217B only
21
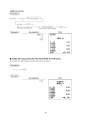
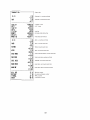
Daily Sales Totals
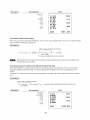
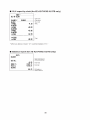
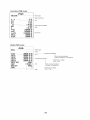
H General report
* Sample X report
TÉ
010 7.000 q
ОРТ. 10 -15. 00
DEPT (-) 1.000
-15.00
D117 1.000 Q
DPT.11 *11.00
*HASH TL 1.000 Q
#11.00
D12 2.000 0
DPT. 12 -24. 00
HASH (-) 2.000 q
-24. 00
|. dept. sales q'ty
and total
N_—
"Hash "-" dept.sales
q'ty and total
"Hash "+" dept.sales
q'ty and total
2
— Ratio of dept. 1 sales amount to “+” dept. total
+ Ratio of dept. group 1 sales amount to “+” dept. total
+M 7 * Read symbol
| Report title
DEPT. /GROUP Dent cod
| FF sales dy
DO1 230.500 §
OPT. 0 1 #131 4. gh + Dept. description and sales amount
59. 01%
DOZ 99.000 4
NPT.02 #257. 01
| 11.56%
DOS 59. 500 À
NPT.O3 +504. 56
22.64%
DO4 8.000 0
DPI. O4 #53. 60
2.41%
pos 16.000 0
IPT. 05 #94. 53
4. 25%
DOG 1.000 0
OPT. OG +3. 00
0.13%
GROUPOT 414.000 Q + Group 1 total qty
#2228. 45 | Group 1 total amount
‘ 100. 00%
Group 1 text
*DEPT TL 414.000 Q ||, dept. cales at
#2228, 45 bn total 7
100. 00%
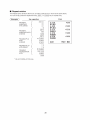
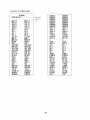
* Sample Z report
214
#1 00014
GT *00000001437. 61 -
al? *000000601581. 99 —
GIT 3 -00000000124.38 +
BAL 400000000064, 20 —
TR #00000000050. 80 |
DEPT. /GROUP
Mi Reset counter
|| Net grand total
(GT2-GT3)
— Grand total of
plus registration
Grand total of
| minus registration
Order - paid total
Grand total of
training-mode
y
The subsequent printout occurs
in the same format as in the
sample X1 report.
registrations
TRANSACTION
—_ A
Report title
(—) ? 0 + Subtotal (—) counter and total
71. 10
7 | 2 0 1 Subtotal % counter and total
-4. 1
TAN ST ¥1588. 19 + Taxable 1 total
VAT 1 £0). 00 + VAT 1 total
TAXZ SI 4575. de
VAT £ #0. 2b
TTL TAX 4D. 2B | total tax
NET *7228, 45 {Net sales total without tax
VAT SFT *70. 90
NET 2 ¥2228. T1 + Net sales total with tax
( — ) 3 0 —— ltem (-) counter and total
-3. 79
y 2 q — Item % counter and total
-3, 83
REFUND 7 () + Refund counter and total
#51, 00
VOID 0 0 I Item void counter and total
#96. 94
VOID MODE 1 0 + Void-mode transaction counter and total
419. 00
MOR VOI 7 fl TT Void mode item counter and total
*19, 50
SBTL VOID 18 Q TT Subtotal void counter and total
#221. 76
HASH VOID ] Q 7— Hash item void counter and total
*11.00
HASH: RF 1 Q 7— Hash item refund counter and total
*11.00
BILL CNT 27 Q + Bill print counter
NO SALE 7 0 +- No-sale (exchange) counter
#+PBAL 27 J 1 PBAL counter
GUEST 89 ) + Transaction counter
53
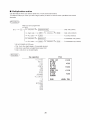
—_—
ORDER TL 42228. Л 1 Order total
PAID TL #2164, 5] -— Рай total
AVE. #24. 32 + Paid total average per transaction counter
0-P #64. 20 + Order total - paid total
SCH (+) #4. 00 1 Starting cash memory (+)
SCH (-) -| ‘ 50 T— Starting cash memory (—)
SCH TTL #2, 50 + Starting cash memory total
RA | Q 1 Received-on-acount counter and total
#48. 00
HP 2 ( + Paid-out counter and total
#1, 10
С ASH 10 Q —— Cash counter and total
#1756. 28
CHECK] 11 0 — Check 1 sale counter and total
CHECK? 5 q
+60. 60
CREDIT! 4 M — Credit 1 sale and tendering counter and total
#14. 00
CREDIT? 30
432. 40
EXCHI ? 0 —+ Exchange 1 cash counter and total
240. 00
DON. CUR] *191 . 68 —+ Domestic currency for exchange 1 total
EXI CHK 0 Q + Exchange 1 check counter and total
0.00
DOM. CUR? CHI +0. 00
EXT CR 0 0 Exchange 1 credit counter and total
0. 00 (Exchange tor the programmed rate)
DOM. CURT CR 4. 00 Exchange2:for the open rate
EXCH? 2 0
8280. 10
DON. CURZ #09. В3
Цен |
EE
HCD #1696. 60 | che in daver
ACH ID #209. 40 1 Cash+check in
CA/CHK ID #1 906. 00 + drawer
PES BA I Genial
54
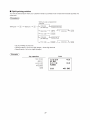
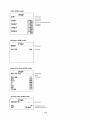
HB PLU report by designated range
МТ
PLU
PLU code
00001- 00010 — PLU range
PLU
P 00001 6, 000 0 T— Sales q'ty and sales
PLUGOOO1 40.00 | amount
P 00002 1.000 4
PLU00002 #0. 00
P (0003 9.000 4
PLU00003 #21, 00
Р00004 1.000 0
pumas MA,
АА UE
PLU00010 +8. 20
***T0TAL 25. 000 0 —— Total sales q'ty and amount for PLUs
#44. 50
* When you take a Z report, “Z1” is printed instead of “X1.”
In case of a PLU X report only header information is stored in the Electronic Journal fife.
HB PLU report by associated department
¥¥ 1 +
ul a DEFT Description of ,
associated dep
DPT.02 — — DO? -- Associated
O PLU code
P0002 —— 38.000 0 7
PLU00002 #171. 00 + sales g'ty and
P 00003 8. 000 0 sales amount
PLU00003 24.80
P 00007 65.000 À
PLU00007 #140. 40
P 00010 46.000 0
PLU00010 4354. 50
P 00012 12.000 À
PLU00012 +144. 00
*#*T0TAL | 169.000 0 PLU total of associated department
*034.
* When you take a Z report, “Z1” is printed instead of “X1.”
DD
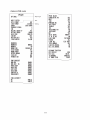
HB Individual clerk report Hl All clerk report
X 1* ^ #4 +
I. ий. NU sa ALL CLERK
СОТ ЕО Clerkname ОТ CLERKO1
ORDER TL #2233. 51 Order total
PAID TL #2169. 311 Paid total |
AUF, ¥24. 931 Paid total average per
0-P #64. 20 transaction counter The subsequent printout occurs in
REFUND э [| | Order total-paid tota the same format as in the individual
445. 00) | und counter and total clerk report from the clerk #1.
VOID 9 {J tem void counter and total In the all clerk report, the total sales
#96. 94 of all clerks are also printed.
VOID MODE ane | Void mode transaction * When you take a Z report, “Z1” is
. printed instead of “X1.”
1 VOID 1/08 | Soares ot
SATL VOID 18 Q— Subtotal void counter
#221 76 and total
44% PRAL 27 0-- PBAL counter
GUEST B7 0 Transacion counter
SEN (+) *d, 0) —— Starting cash memory (+)
SCN (=) -1.5)—- Starting cash memory (-)
SCN TTL “7. 50 —— Starting cash memory total
*x#HA 1 1+ Received-on-acount counter and total
#48. 00
#+##Р0 2 Y Paid-out counter and total
#1. 10
CASH ba 01 Cash counter and total
| *1761.08
CHECK] 11 Q-—- Check 1 sale counter and total
*100, 80
CHECK 510
#60. 60
CREDIT] 4 0 Credit 1 sale and tendering counter and total
#14.00
CREDITZ 3 4
#32. 40
EXCH 2 Q + Exchange 1 cash counter and total
| 240. 00
DAM. CURT #191. 66
EX! CHK 0 0 + Exchange 1 check counter and total
0.00
DON. CURT CHK *0. 00
; EXT CR 0 0-1 Exchange 1 credit counter and total
0.00 Y
ee O #1701. 40 + cash in drawer
*CH ID | | %209. 40 + Check in drawer
CA/CHK ID #1910. 8) Cash + check in drawer
CHK/CG *B. 40 — Change total for check tendering
* When you take a Z report, “Z1” is printed instead of “X1.”
56
EH Hourly report
* +
HOURLY
|
18:00
#122.00 -
AVE. *10. 17
18:30 à Q
+175. 87
AVE. #43. 97
SUBTOTAL 16 0
—— Rae,
AVE. #19. 24
22:30 00
+0. 00
AVE. #0. 00
SUBTOTAL 30
#237. 71
Time
12 0 —+ Transaction
counter
Sales total
— Average of sales
amount
* When you take a Z report, “Z1” is printed instead of “X1.”
HB GLU report (for XE-A217WI/XE-A217B only)
ХТ
GLU
GLU code
| 0001-3999 —_ Range
В OT | Clerk code
*+xPBAL 1.20 —— PBAL
GLU#1001 ОТ
+#*PRAL #49. 50
GLU#1002 01
ВА) #16. 80
GLUF1003 01
+##PBAL #22. 50
GLU#10057 —— —— 04
И 426.70 | ____ o
T”: This GLU code was used in the training mode.
**NTOTAL Total
*+*PBAL +90, 00
* When you take a Z report, “Z1” is printed instead of “X1.”
57
HB GLU report by clerk (for XE-A217W/XE-A217B only)
HM +
GLU BY CLERK
cdo 1 -
CLERKO1
Clerk code
— Clerk name
GLU#12
ВА)
GLU#1001
***PBAL
GLU#1002
***PBAL
GLU#1003
4**PBAL
GLU code
¥1.20 1+ PBAL
#49. 50
¥16. 80
#22. 50
###TOTAL
AXAPBAL —
490. 00
|
* When you take a Z report, “Z1” is printed instead of “X1.”
E Balance report (for XE-A217WIXE-A217B only)
WT +
BALANCE
OLD BAL.
ORDER TL
PAID TL
BALANCE
#0. 00 —
#2164. 51 +
#64. 20 -
Grand total balance
of the previous day
Order total
e
T Paid total
— Old balance +
today's balance
58
Periodic Report Sample
Your register allows you to take consolidation X and Z reports of a chosen period (the period is usually one
week or month).
E General information
The periodic reading or resetting reports are the same in format as those in the X1/71 report for daily sales
information except mode indication ("X2" or “Z27).
Sample X report
#¥ 22%
Read symbol
DEPT. /GROUP
Report title
* Sample Z report
Reset symbol
— Reset counter of daily total
— Reset counter of periodic consolidation
Grand totals
ZA
Z1 0005 —
22 0001 —
GTi #00000002222. 15.
GT2 *00000002376. 78
GT3 00000000154. 63
BAL #00000000064. 20
TR 400000000050. 80 —
DEPT. /GROUP
Report title
Y
The subseguent items are printed out in the same format as in
the X/Z report on daily totals.
59
Programming Keyboard Layout
XE-A207W/XE-A207B
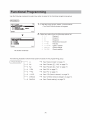
Prior to Programming
When you are in the PGM mode, the keyboard layout will be set to one of the programming layouts as
shown below.
4 A @ 5 à x nF
RECEIPT © (er) (Pt) (PJ) 1 MODE
JN | u N (A (TOME),
— FA 7 7 HF A FA
ESC/
(+=) (>) 1 CANCEL
E A ABC u N LS)
YN E 7 7 А р
(CAPS) (5) (PREV.)| |{NEXT)
Я he В he Ah
Ny E 7 7 = Sy
Ef) DE =
bo A te u Y A
Ny 7 7 FF
HELP | | (DEL 0 00 TL/NS
SPACE CODE Ч u AN 3
XE-A217WIXE-A217B
; \ ми м mE 5 — 7 y Y AA 5
RECEIPT | EP t pee UP $ Il |] [8 a (6
| | l Esc pre | I = “О < > >| || | 6
CANCEL DOWN X ) | ||» | ?
I | | | PREY. || МЕХТ | 1 | Ô | Ú All | Ó 0
® e || СГ o) EZ a о ë ë ú
o > > о <> ; a al 5 Al Nal 5
7 | 8 | 9 OE) é и ё 6 ù
(+) (>) 4 5 6 WwW T Y O P
[cars 1 | 2 3 4 S е || н L || 8
[сне (ес) || O | 00 |lisrace)||TL/Ns X BN A - “I. °
ote
60
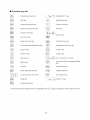
JJ]
TLNS
ESC!
CANCEL
пе ог (Е
or
Por fe]
ЖЕ
a ©)
ea) |) Le
DE
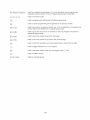
—
Numeric keys
Used for programming characters. For more information about programming
characters, see the section “How to Program Alphanumeric Characters.”
: Used to move the cursor.
: Used to program each setting and to finalize programming.
: Used to cancel programming and to get back to the previous screen.
: Used to go back to the previous record, e.g., from the department 2 programming
window back to the department 1 programming window.
: Used to go to the next record, for example, in order to program unit prices for
sequential departments.
: Used to scroll the window to go to the next page.
: Used to scroll the window to go back to the previous page.
: Used to clear the last setting you have programmed or clear the error state.
: Used to toggle between two or more options.
- Used to list those options which you can toggle by the E key.
: Used to delete a record.
: Used for entering figures.
61
How to Program Alphanumeric Characters
This section discusses how to program alphanumeric characters for various texts.
E Mobile phone method (XE-A207W/XE-A207B only)
Entering alphanumeric characters
To enter a character, simply press a corresponding character key on the programming keyboard.
To enter “A”, press the “8” key.
To enter “B”, press the “8” key fwice.
To enter “C”, press the “8” key three times.
Entering double-size characters
. This key toggles the double-size character mode and the normal-size character mode. The default
Is the normal-size character mode. When the double-size character mode is selected, the letter "VW
appears at the bottom of the display.
Entering upper-case letters
: You can enter an upper-case letter by using this key. Press this key just before you enter the upper-
case letter. You should press this key each time you enter an upper-case letter.
снес] : You can lock the upper-case letter mode once the this key is pressed.
Entering space
. Enter a space in the cursor position.
To move the cursor
: Moves the cursor.
To delete a character or figure
. Deletes a character or figure in the cursor position.
To change the text input mode
[TEXT] - This key toggles the text input mode, Alphabet(A), European character (A), numeral (1), and symbol
(%).
B PC keyboard method (XE-A217W/XE-A217B)
(Key sheet layout)
You can enter a character using the primary character are located on PLU direct key area.
Entering double-size characters
: This key toggles the double-size character mode and the normal-size character mode. The default
Is the normal-size character mode. When the double-size character mode 15 selected, the letter “VW
appears at the bottom of the display.
Entering upper-case letters
: You can enter an upper-case letter by using this key. Press this key just before you enter the upper-
case letter. You should press this key each time you enter an upper-case letter.
iches) ; You can lock the upper-case letter mode once the this key is pressed.
Entering space
- Enter a space in the cursor position.
To move the cursor
: Moves the cursor.
To delete a character or figure
: Deletes a character or figure in the cursor position.
62
HB Entering character codes
Numerals, letters and symbols are programmable by entering the Key and character codes. Use the
following procedure with the cursor placed at the position where you want to enter characters:
To enter a digit, simply press a corresponding numeric key.
— [00] — XXX
Character
code:
032 - 047
048 - 063
064 - 079
080 - 095
096 - 111
112-127
128-143
144 - 159
160-175
176-191
192 - 207
208 - 223
224 - 239
240 - 255
XXX : character code (3 digits)
032 | 033 | 034 | O35 | 036 | 037 | 038 | 039 | 040 | 041 | 042 | 043 | 044 | 045 | 046 | 047
#4 | 1 S|: + —
H 2 (|) |=] +], |
048 | 049 | 050 | 051 | 052 | 053 | 054 | 055 | 056 | 057 | 058 | 059 | 060 | 061 | 062 | 063
O 1 2 3 4 5 66 7 a Mila <|=|>|"1
064 | 065 | 066 | 067 | 068 | 069 | 070 | 071 | 072 | 073 | 074 | 075 | 076 | 077 | 078 | 079
080 | 081 | 082 | 083 | 084 | 085 | 086 | 087 | 088 | 089 | 090 | 091 | 092 | 093 | 094 | 095
FOR SIT UV XxX Y 2 Ls
096 | 097 | 098 | 099 | 100 | 101 | 102 | 103 | 104 | 105 | 106 | 107 | 108 | 109 | 110 | 111
EL a | =m
a blcdie|f o hi JJ k|]l] m no
112 | 113 | 114 | 115 | 116 | 117 | 118 | 119 | 120 | 121 | 122 | 123 | 124 | 125 | 126 | 127
i ur
pq rs tu vw x U|j=z| 4/1 |+
128 | 129 | 130 | 131 | 132 | 133 | 134 | 135 | 136 | 137 | 138 | 139 | 140 | 141 | 142 | 143
== | = | & | == | Ww | = A | == wT] Ae | == =
Cu é â a a ass él ee Ti ia
144 | 145 | 146 | 147 | 148 | 149 | 150 | 151 | 152 | 153 | 154 | 155 | 156 | 157 | 158 | 159
JJ" ai | == A | ww | == | == | ==
Е | * |6 8106 |0 |0 |1 |0 || в || Я | х |}
160 | 161 | 162 | 163 | 164 | 165 | 166 | 167 | 168 | 169 | 170 | 171 | 172 | 173 | 174 | 175
rs | A EEE | MB " |IΠBa | | !
а 11014 | A NN E BI El 42 |4 | + | * >
176 | 177 | 178 | 179 | 180 | 181 | 182 | 183 | 184 | 185 | 186 | 187 | 188 | 189 | 190 | 191
18/8 | dé ah aà 0e (ns t ze
192 | 193 | 194 | 195 | 196 | 197 | 198 | 199 | 200 | 201 | 202 | 203 | 204 | 205 | 206 | 207
our | TU == e
ta EL -—DDAaAaRnrERNÉEÉ:ES T=O:O
208 | 209 | 210 | 211 | 212 | 213 | 214 | 215 | 216 | 217 | 218 | 219 | 220 | 221 | 222 | 223
& | == | 7 "| m | mm | * | N
SIDE E? EEC 1 1 TI #5 r Eu ' 11
224 | 225 | 226 | 227 | 228 | 229 | 230 | 231 | 232 | 233 | 234 | 235 | 236 | 237 | 238 | 239
ВПАЛ ” | & | % | = | = |— | -
О 00 |8 |0 ИВР |0 |0 |0 || У
240 | 241 | 242 | 243 | 244 | 245 | 246 | 247 | 248 | 249 | 250 | 251 | 252 | 253 | 254 | 255
— | + | = © |= Ф* |" AE DC
+ | Elo, M|(D0)
*(DC) : Double-size character code
63
Programming
This chapter explains how to program various items.
Before you start programming, press the key and select the "6 PGM MODE" or "7 SD CARD MODE"
by using the | + key and press the key.
Basic Instructions
This section illustrates the basic programming by using an example of programming for departments.
E Programming screen
Opening screen: VWhen you select the "6 PGM MODE", your display will show a programming opening
screen corresponding to the mode you selected.
Mode you are in
PCM MODE | |
4 READIHG Programming menu: Use the cursor keys or numeric key to select
= SETTIHG an option, and press the (TL/ns| key.
PSM 24 | _— Numeric entry and status information area
Code selecting screen (Dept. PLU):
PLU F |} Selected menu
ALE Code number and its description
PLUOOO O2 (In case of PLU, two lines are used for one code, upper line -
code, lower line - description.)
PM 1 Use the cursor keys or numeric keys to select an option, and
press the key.
Numeric entry and status information area
Programming screen:
О 1— Selected code
PRICE
PLUCO O
TYPE PRESET o
DEPT, CODE od Setting items:
Use the cursor keys to select an item.
EGM Ged To select an option, follow the instruction shown below.
Numeric entry: Use numeric keys
Character entry: Use character keys
Selective entry: Press e] key to toggle options or press the
key to show the option list. Use the
cursor keys to move the cursor and press the
or key to select it.
64
E Programming example
Procedure
PGM MODE
4d HEADIHG
с ТТН
PSH ord
T/Ns) $ + + (ESCICANCEL
E TT IHG Y
1 ARTICLE
= FUNCTIONS
3 MEDIA
4 FUHCTIOHNH TEXT
=> FERSOHHEL
Ea Ci
TLNs) $ + + |(ESCICANCEL
ARTICLE
1 DEPARTMENRHT
= PLU
= FLU RANGE
PSH ord
T/Ns) $ + + (ESCICANCEL
DEPARTMENT т
ci DPT E НН
OO DET «PE
053 DPT _{{»=
4 DPT . > -
CS DPT E
Ea Ci
TLNs) $ + + [ESCICANCEL
The following example shows how to program 2.00 for the unit
price, ABCDE” for the description, and “non-taxable 1” for
department 1.
1. In the PGM MODE screen, select “2 SETTING” by using the
[+ key and press the key.
* The SETTING screen will appear.
* You can also select “2 SETTING” by using numeric key “2,” then
press the key.
* If you return to the previous screen, press the |ESCICANCEL | key.
2. Select “1 ARTICLE”
* The ARTICLE screen will appear.
The arrow mark in the upper-right corner of the window shows that
the window contains more options than are now on the screen. To
scroll the window, press the key ( | PAGEDOWN) | key).
To return to the previous page, press the key ( |(PAGE UP)| key).
3. Select “1 DEPARTMENT.
* The DEPARTMENT screen will appear, listing
programmable departments.
4. Select “01 DPT.01" to program for department 1.
* The “017 window will appear.
65
O41 Y
PRICE DO
ОРТ . {45 EL
TYFE PHESET
Tard YES
Toa X= HO
TAX= но
PGM od
od Y
PRICE = _ 00
ABCDE
TYPE PRESSE T
ТАН YES
THX HO
TAX HO
PGM A O4
OI y
PHICE = ey
2 EC DE
TYPE PRESET
TAXA1 HO
TAX HO
TAX HO
Pam Lt й
5. On the first page of the “01” window, program the unit price
and description as follows:
There are three entry patterns for the programming: the numeric
entry, character entry, and selective entry.
* Move the cursor to “PRICE,” enter 200” by using numeric
keys. — Numeric entry
* Move the cursor to DP T.01” enter "ABCDE” by using
character keys. — Character entry
If you want to clear setting, press the key before you press the
key, (PAGE DOWN)| Key, key, (PAGE UP) key, key.
6. Press the | + key twice to move to the cursor to “TAX 1”, then
program the machine to set “non-taxable 1° as follows:
* Press the | - | key to select “NO.” — Selective entry
The e] Key toggles between two options as follows:
NO— YES—NO— ...
Pressing the key displays all pertinent options.
7. Select one of the following actions:
* To cancel the programming, press the key. A
confirmation window appears to ask you whether to save
the data; select the option you prefer.
* To finalize the programming, press the key,
then press the key. You will return to the
“DEPARTMENT” window.
* To program for the following department, press the
NEXT RECORD) (OF flEX)) key. The “02” window will appear. To
return to the “01” window, press the (PREV. RECORD) (Or PRE) key.
The following sections describe how to program each item which is contained in a programming group.
66
Article Programming
Use the following procedure to select any option included in the article programming group:
Procedure
SETT TH Y I té n
1 ARTICLE 1. In the SETTING window, select 1 ARTICLE.
- FUNCTION: * The ARTICLE window will appear.
3 MEDIA
4 FUNCTION TExT
> FERSOHHEL
FGM Gi
TLNs) $ + + (ESCICANCEL
2. Select any option from the following options list.
= PLU
= PLU RANGE 1 DEPARTMENT: Departments
2 PLU: PLUs
PGM Od 3 PLU RANGE: A range of PLUs
The following illustration shows those options included in this programming group.
1 ARTICLE —— DEPARTMENT —» See “Department” on page 66.
——2 PLU —» See "PLU" on page 69.
— 3 PLU RANGE —» See PLU range” on page 70.
67
E Department
The register can be equipped with maximum of 99 departments.
Use the following procedure to program for department.
To delete a department item in the “DEPARTMENT” window, select the item and press the
key À confirmation window appears to ask you whether to delete the item, select the option you
prefer.
Program each item as follows:
Select a pertinent dept. code from
the departments list For more information about the entry patterns, see the “Basic
У Instructions” section.
os hd
PRICE e .1 50 * PRICE (Use the numeric entry)
TUDE DET - EH Unit price (max. 8 digits)
TAX A YES EN
Taxe HO) * Description (Use the character entry)
FGM os Description for a department. Up to 16 characters can be
entered. (Default text: DP T.nn)
* TYPE (Use the selective entry)
Type of unit price entry for departments
The screen continues.
INHIBIT: Inhibited
OPEN: Open only
PRESET: Preset only
OPEN 8 PRESET. Open & preset
* TAX1 through 4 (Use the selective entry)
Taxability
YES : Taxable
NO : Non-taxable
The tax system of your register has been factory-set to automatic VAT1 - 4.
* SICS (Use the selective entry)
YES: SICS department
NO: Normal department
* GROUP No. (Use the numeric entry)
01-09: Plus department
10: Minus department
11: Plus hash department
12: Minus hash department
* HALO (Use the numeric entry)
This function is intended for prevention of accidentally entered unreasonably amounts.
Limit amount: 0.00 to 999999. 99
In the initial programming, the HALO function is programmed as "INVALID"
68
EH PLU
To delete a PLU item in the "PLU" window, select the item and press the pe.) key. A confirmation
window appears fo ask you whether to delete the item, select the option you prefer.
Procedure
Select a pertinent PLU code.
OOO
FRICKE
Ен ЦНСн) Сиб»
ТУРЕ PHEZET
DEFT . CODE ord
FGM Gi
DEPT. CODE (Use the numeric entry)
Program each item as follows:
* PRICE (Use the numeric entry)
Unit price of each price level (max. 8 digits)
* Description (Use the character entry)
Description for a PLU. Up to 16 characters can be entered.
(Default text: PLUnnnnn)
* TYPE (Use the selective entry)
Type of unit price entry for PLU
INHIBIT: Inhibited
OPEN: Open only
PRESET: Preset only
OPEN & PRESET. Open & preset
Department code to be associated with the entered PLU
(01 through 99)
When a PLU is associated with a department, the following functions of the PLU depend on the
programming for the department.
« Grouping (group 1 through 12)
Single item cash sale
* HALO (only for subdepartments)
* Taxability
69
EH PLU range
You can program PLUs in the designated range.
Procedure
PLU RANGE
START OH
EHD 0 Or ir Or
ODFEFATIOHHEN&HAIHTE.
Pa ard
КиО) DE
PRICE
TYPE
DEFT CODE
PSH od
Enter a value or select an option for each item as follows:
START (Use the numeric entry)
Starting PLU code (max. 5 digits)
END (Use the numeric entry)
Ending PLU code (max. 5 digits)
* OPERATION (Use the selective entry)
DELETE: Enables you to delete a specified range of
PLUS.
MAINTE.: Enables you to change the setting you have
programmed.
NEYEMAINTE.: Enables you to change the current setting
when the specified codes have already been
created or to create new codes when the
specified codes have not been created yet.
70
Functional Programming
Use the following procedure to select any option included in the functional programming group:
Procedure
SETT Lin
1 ARTICLE
5 MEDIA
4 FUNCTION TEXT
3 FERSOHHEL
PSH
od
У
FUHGT IOHS
Crd
The screen continues.
1. In the SETTING window, select “2 FUNCTIONS.”
« The FUNCTIONS window will appear.
2. Select any option from the following options list.
1
0 1 Oh An = UN N
(-) Discount
%1 Percent 1
%2 Percent 2
++**RA Received on account
+++ PO Paid out
****CID Cash in drawer
CHK /CG Check change
CA/CHK Check cashing
The following illustration shows those options included in this programming group.
2 FUNCTIONS H———1
(-)
%1
%2
RA
“PO
GID
CHK/CG
CA/CHK
ТЕТЕ
See
See
See
See
See
See
See
See
71
“Discount ( ©)” on page 72.
“Percent ([%1), %2)" on page 73.
“Percent ([%1), %2)" on page 73.
“RA” on page 73.
“PO” on page 74.
“CID (Cash in drawer)” on page 74.
“CHK/CG (Check change) on page 74.
“Check cashing” on page 75.
E Discount (©)
Procedure
<>
AMOUNT
TEXT EZ — =
= IaH —
HALD 9977999 _ 797
ITEM YES
=UB TOTAL YES
PGM Ch
Program each item as follows:
* AMOUNT (Use the numeric entry)
Discount amount (max. 8 digits)
* TEXT (Use the character entry)
Description for the discount key. Up to 12 characters can be
entered.
* SIGN (Use the selective entry)
Programming of the + or - sign assigns the premium or
discount function to each discount key.
+: Plus amount (premium)
-: Minus amount (discount)
HALO (High Amount Lockout) (Use the numeric entry)
This function is intended for prevention of accidentally entered
unreasonably amounts.
Limit amount: 0.00 to 999999 99
in the initial programming, the HALO function is programmed as
"INVALID",
* ITEM (Use the selective entry)
YES: Enables the item discount.
NO: Disables the item discount.
* SUBTOTAL (Used the selective entry)
YES: Enables the subtotal discount.
NO: Disables the subtotal discount.
72
E Percent (1), %2)
Procedure
== A
RATE mA
TEXT -
SIGH —
HALO 100 HA
ITEH HO
SUBTOTAL YES
PGM O4
EH RA
Program each item as follows:
* RATE (Use the numeric entry)
Percent rate (0.00 to 100.00)
* TEXT (Use the character entry)
Description for the percent key. Up to 12 characters can be
entered.
* SIGN (Use the selective entry)
Programming of the + or - sign assigns the premium or
discount function to each percent key.
+: Plus (premium)
-: Minus (discount)
HALO (High Amount Lockout) (Use the numeric entry)
This function is intended for prevention of accidentally entered
unreasonably amounts.
HALO (High Amount Lockout) for the percent key (0.00 to
100.00)
in the initial programming, the HALO function is programmed as
"INVALID",
* ITEM (Use the selective entry)
YES: Enables the item %.
NO: Disables the item %.
* SUBTOTAL (Used the selective entry)
YES: Enables the subtotal %.
NO: Disables the subtotal %.
You can program an upper limit amount and description for received-on-account key.
Procedure
FEAR
HALO
TEXT
Ea
23559353 _ 55
EER
od
Program each item as follows:
* HALO (High Amount Lockout) (Use the numeric entry)
This function is intended for prevention of accidentally entered
unreasonably amounts.
Limit amount: 0.00 to 9999999. 99
In the initial programming, the HALO function is programmed as
INVALID”.
* TEXT (Use the character entry)
Description for the received-on-account key. Up to 12
characters can be entered.
73
Ш РО
You can program an upper limit amount and description for paid-out key.
Procedure Program each item as follows:
PO * HALO (High Amount Lockout) (Use the numeric entry)
pan This function is intended for prevention of accidentally entered
unreasonably amounts.
Limit amount: 0.00 to 9999999. 99
FGH ed NOTE
in the initial programming, the HALO function is programmed as
"INVALID",
TEXT (Use the character entry)
Description for the paid-out key. Up to 12 characters can be
entered.
m CID (Cash in drawer)
You can program the description and the upper limit amounts for cash in drawer (sentinel).
Procedure Program each item as follows:
CID * HALO (High Amount Lockout) (Use the numeric entry)
HALO 35555955 55 : a |
TEXT эбен. ТО This function is intended for prevention of accidentally entered
unreasonably amounts.
Limit amount: 0.00 to 99999999 99
FGM od NOTE
* {In the initial programming, the HALQ function is programmed as
INVALID”.
* When the cash in drawer amounts exceeds a limit amount, the
sentinel mark(X) will be displayed.
TEXT (Use the character entry)
Description for the cash in drawer. Up to 12 characters can be
entered.
E CHK/CG (Check change)
You can program the description and the upper limit amounts for check change.
Procedure Program each item as follows:
CHK ACG * HALO (High Amount Lockout) (Use the numeric entry)
HALO РЕНН, | an ie | : :
TEXT CHE Ce This function is intended for prevention of accidentally entered
unreasonably amounts.
Limit amount: 0.00 to 999999 99
PGM wd NOTE
in the initial programming, the HALO function is programmed as
"INVALID",
TEXT (Use the character entry)
Description for check change. Up to 12 characters can be
entered.
74
EH Check cashing
You can program the description and the upper limit amounts for check cashing.
Procedure
Cas CHE
PSH
FF
Ca HR
ord
Program each item as follows:
* HALO (High Amount Lockout) (Use the numeric entry)
This function is intended for prevention of accidentally entered
unreasonably amounts.
Limit amount: 0.00 to 999999 99
in the initial programming, the HALO function is programmed as
"INVALID",
TEXT (Use the character entry)
Description for check cashing. Up to 12 characters can be
entered.
75
Media Key Programming
Use the following procedure to select any option included in the media group:
Procedure
ETT IHG
1 ARTICLE
= FUHCT IOHS
+ FUNCTION TEXT
= PERSOMMEL
т 1. In the SETTING window, select “3 MEDIA.”
* The MEDIA window will appear.
Pam Lt й
У 1 CASH
2 CHECEKL
3 CHECK2
MED If Y
Shas 4 CREDIT
a СНЕС" 5 CREDIT?
4 CHEDITAi 6
5 CKEDIT=
PGM od
The screen continues.
2. Select any option from the following options list.
Cash
Check1 key
Check?
Credit! key
Credit?
FOREIGN CURRENCY Foreign Currency
The following illustration shows those options included in this programming group.
3MEDIA |—— 1
CASH —+ See
CHECK1 —+ See
СНЕСК2 —+ See
CREDIT1 —+ See
CREDIT2 —+ See
See
FOREIGN CURRENCY —
“Cash key (Cash) on page 77.
“Check key (Check1, Check2 y on page 77.
“Check key (Check1, Check2 y on page 77.
“Credit key (Credit 1, Credit2) on page 76.
“Credit key (Credit 1, Credit2) on page 76.
“Foreign currency (Exchange,
Exchange2) on page 79.
76
E Cash key (Cash)
Procedure
— asH
TEXT AH
HALO 999999_99
FOOTER FHIHI HO
ТЕН. HOH—COHPUL .
PGM A Cd
Program each item as follows:
TEXT (Use the character entry)
Description for the cash key. Up to 12 characters can be
entered.
* HALO (High Amount Lockout) (Use the numeric entry)
This function is intended for prevention of accidentally entered
unreasonably amounts.
Limit amount: 0.00 to 999999 99
in the initial programming, the HALO function is programmed as
"INVALID",
* FOOTER PRINT (Use the selective entry)
This item decides whether or not your register should print a
message at the foot of a receipt when a specified cash key is
used.
YES: Enables footer printing on the receipt.
NO: Disables footer printing on the receipt.
TEND. (Use the selective entry)
NON-COMPUL.: Non-compulsory amount tendered entry.
COMPULSORY: Compulsory amount tendered entry.
HB Check key (Check1, Check2)
Procedure
CHECK
TEXT
HALO 999999 99
FOOTER PRIHT HO
TEHD HOH-COMPUL
PCM A o
Program each item as follows:
* TEXT (Use the character entry)
Description for the check key. Up to 12 characters can be
entered.
* HALO (High Amount Lockout) (Use the numeric entry)
This function is intended for prevention of accidentally entered
unreasonably amounts.
Limit amount: 0.00 to 999999 99
in the initial programming, the HALO function is programmed as
"INVALID",
* FOOTER PRINT (Use the selective entry)
YES: Enables footer printing on the receipt.
NO: Disables footer printing on the receipt.
TEND. (Use the selective entry)
NON-COMPUL.: Non-compulsory amount tendered entry.
COMPULSORY: Compulsory amount tendered entry.
77
E Credit Key (Credit1, Credit2)
Procedure Program each item as follows:
CREDIT * TEXT (Use the character entry)
ARTO Description for the credit key. Up to 12 characters can be
FOOTER FRIMT HO entered.
TEHD. IHHIE ITED
* HALO (High Amount Lockout) (Use the numeric entry)
This function is intended for prevention of accidentally entered
unreasonably amounts.
Limit amount: 0.00 to 999999 99
in the initial programming, the HALO function is programmed as
"INVALID",
* FOOTER PRINT (Use the selective entry)
This item decides whether or not your register should print a
message at the foot of a receipt when a specified credit key is
used.
YES: Enables footer printing on the receipt.
NO: Disables footer printing on the receipt.
TEND. (Use the selective entry)
COMPULSORY: Compulsory amount tendered entry.
INHIBITED: Inhibits amount tendered entry.
PGM A Crd
78
E Foreign currency (Exchange1, Exchange2)
Procedure
FORETGH CURREHC Y
FHESET RATE |
Ч
RATE O CCC
TEXT EXCHL
= YMBOL
TAB =
ОВЕН RATE Ens BLE
PGM Ch
The screen continues.
Program each item as follows:
* PRESET RATE (Use the selective entry)
ENABLE: Enables preset rate
DISABLE: Disable preset rate
* RATE (Use the numeric entry)
Currency exchange rate (0.000000 to 999 999999)
TEXT (Use the character entry)
Description for the currency exchange key. Up to 12
characters can be entered.
* SYMBOL (Use the character entry)
Currency descriptor. Up to 4 characters can be entered.
* TAB (Use the selective entry)
Tabulation (0 to 3)
* OPEN RATE (Use the selective entry)
ENABLE: Enables open rate
DISABLE: Disable open rate
* TEXT (Use the character entry) for open rate
Description for the currency exchange key for open rate. Up to
12 characters can be entered.
* SYMBOL (Use the character entry) for open rate
Currency descriptor for open rate. Up to 4 characters can be
entered.
* TAB (Use the selective entry) for open rate
Tabulation for open rate (0 to 3)
Currency symbol is printed with (+) amount of foreign currency.
The programmed character is printed at left side of amount
EX) Case of “DM”:
EXCH1 1.234567
DM 1.23
Programmed symbol
79
Function Text Programming
You can program a maximum of 12 characters for each function by using the following table:
Procedure
ETT IHG
1 ARTICLE
= FUNCTION
> MEDIA
4 FUNCTION TEXT
= PERSOMMEL
т
1. In the SETTING window, select “4 FUNCTION TEXT”.
« The FUNCTION TEXT window will appear.
30
P&M os
У
FUNCTION TEXT Y 2 Pro
E = gram each Item as follows:
3 axl 21 * Text (Use the character entry)
5 Tax3 ST Description for each function. Up to 12 characters can be
PSM Gi entered.
The screen continues.
List of function text
No. Function Default No. Function Default
1 Net 1 NET1 25 |Guest (customer/transaction count) | GUEST
2 | Difference DIFFER 26 |Paid total PAID TL
3. | Taxable 1 subtotal TAX1 ST 27 | Average AVE.
4 | Taxable 2 subtotal TAX2 ST 28 | Check payment for exchange 1 |EX1 CHK
5 | Taxable 3 subtotal TAX3 ST 29 [Credit payment for exchange 1 ¡EX1 CR
6 | Taxable 4 subtotal TAX4 ST 30 | Domestic currency 1 DOM.CUR1
7. |VAT tax 1 VAT 1 31 [Domestic currency 2 DOM.CUR?
8 | VATtax 2 VAT 2 32 [Domestic currency 1 for check | DOM.CURT CHK
9 |VAT/ax 3 VAT 3 33 |Domestic currency 1 for credit | DOM.CUR1 CR
10 | VAI/tax 4 VAT 4 34 | Check in drawer *CH ID
11 | Total tax (on report) TIL TAX 35 | Cash/check in drawer CA/CHK ID
12 | Net without tax (on report) NET 36 | Group 1 GROUPO1
13 [Net 2 NET2 37 | Group 2 GROUPO?
14 |Refund REFUND 38 | Group 3 GROUPOS
15 | Void VOID 39 | Group 4 GROUPO4
16 |Void mode VOID MODE 40 |Group 5 GROUPOS
17 | MGR void MGR VOID 41 |Group 6 GROUPOE
18 | Subtotal void SBTLVOID 42 | Group 7 GROUPO/
19 |Hash void HASH VOID 43 | Group 8 GROUPOS
20 |Hash refund HASH RE 44 | Group 9 GROUPO9
21 | Bill counter BILL CNT 45 |(+)dept. total *DEPT TL
22 |No sale NO SALE 46 |(-)dept. total DEPT(-)
23 | Starting cash memory (+) SCM(+) 47 |Hash(+) total *HASH TL
24 | Starting cash memory (-) SCM(-) 48 |Hash(-) total “HASH()
No.
Function
Default
text
49 | Total *** TOTAL
50 | Subtotal SUBTOTAL
51 | Starting cash memory total SCM TIL
52 |Non-add code text H
53 |Sales gty ITEMS
54 | Merchandise subtotal MDSE ST
55 |Net 1 (Taxable 1-VATAax 1) [NET 1
56 |Net 2 (Taxable 2 - VATAax 2) |NET 2
57 |Net 3 (Taxable 3 - VATAax 3) |NET 3
58 | Net 4 (Taxable 4 - VATAax 4) |NET 4
59 | Due (on display) DUE
60 |Change CHANGE
61 | Copy receipt title COPY
31
No. Function Default
62 | Guest check receipt title BILL
63 |Receipt switch RCP SW.
64 | VAT shift (XE-A217 only) VAT SFT
65 |VAT/tax delete (XE-A217 only)| TAX DELE
66 | PBAL (for GLU) (XE-A217 only) 1***PBAL
67 |NBAL (for GLU) (XE-A217 only) | ***NBAL
Order total (for GLU
68 (XE-A217 on | ORDER TL
Order total - Paid total (for GLU
69 (XE-A217 only) | o-F
{О |Old balance (XE-A217 only) |OLD BAL.
71 |New balance (XE-A217 only) | BALANCE
72 |GLU code text (XE-A217 only)| GLU#
Personnel Programming
Use the following procedure to select any option included in the personnel group:
Procedure
SE TTING UE т 1. In the SETTING window, select “5 PERSONNEL.”
2 FUNCTIONS + The PERSONNEL window will appear.
= MEDIA
E FUNCTION TEXT
= FERSOHHEL
PGM Od
У 2. Select any option from the following options list.
PERSOHHEL
1 CLERK Clerk
= MANAGER
3 MODE PASS CODE 2 MANAGER Manager
4 TRAINING CLK 3 MODE PASS CODE Mode Pass Code
4 TRAINING CLK Training Clerk
FGM OL
The following illustration shows those options included In this programming group.
5 PERSONNEL 1 CLERK —» See “Clerk” this page.
— 2 MANAGER —» See “Manager on page 83.
—— 3 MODE PASS CODE —» See "Mode Pass Code” on page 83.
—4 TRAINING CLK —
See “Training Clerk” on page 84.
HB Clerk
* TO create additional clerks enter the clerk number 5 - 25 in the
clerk selection window "CLERK".
+ fo delete a clerKk code in the "CLERK" window, select the clerk
code and press the Key. A confirmation window appears fo
ask you whether to delete the clerk select the option you prefer.
Program each item as follows:
CLERK * PASS CODE (Use the numeric entry)
Pass code (max. 4 digits: 0001 to 9999/0000)
> CLERH&Z
04 CLERKO=4 * Text (Use the character entry)
Description for the clerk name (Up to 16 characters can be
EGM o entered.)
У e AUTO KEY (Use the selective entry)
ENABLE: Enables operation of the [AUTO MENU |key.
51 DISABLE: Disables operation of the key.
PASS CODE O o
CLERKOA1
AUTO KEY EHABLE
FGM OL
32
E Manager
You can program a secret code for manager.
Procedure
MANAGER
PASS CODE ETT]
PSH od
E Mode Pass Code
Program each item as follows:
* PASS CODE (Use the numeric entry)
Pass code (max. 4 digits: 0000 to 9999)
You can program a secret code for each mode.
Procedure
MODE Pas CODE т
YoOID HODE +
DOF x = plain li
FLASH plain li
xl >
ad Or Or Or
EA oO CeCe
Ea Ci
The screen continues.
Program each item as follows:
* VOID MODE (Use the numeric entry)
Pass code (max 4 digits: 0000 10 9999)
* OPXZ (Use the numeric entry)
Pass code (max 4 digits: 0000 to 9999)
* FLASH (Use the numeric entry)
Pass code (max 4 digits: 0000 to 9999)
* X1 (Use the numeric entry)
Pass code (max 4 digits: 0000 to 9999)
* Z1 (Use the numeric entry)
Pass code (max 4 digits: 0000 to 9999)
e X2Z2 (Use the numeric entry)
Pass code (max 4 digits: 0000 to 9999)
* PGM (Use the numeric entry)
Pass code (max 4 digits: 0000 to 9999)
* SD CARD (Use the numeric entry)
Pass code (max 4 digits: 0000 to 9999)
83
EH Training Clerk
You can set the training clerk code and text for the training mode title.
Procedure
TRAINING CLK
CODE
TEXT TR&IHIHG
PSH
+
ord
Program each item as follows:
CODE (Use the numeric entry)
Clerk code In training (max. 2 digits: 00 to 25)
TEXT (Use the character entry)
Description for the training mode title (Up to 12 characters can
be entered.)
34
Terminal Programming
Use the following procedure to select any option included in the terminal group:
Procedure
SETTING AW 1. In the SETTING windows, select “6 TERMINAL.”
7 DATE, TIME * The TERMINAL windows will appear.
5 OPTIOHAL
9 REFORT
40 MESSAGE
Рем od
У
TERM [HAL 2. Select any option from the following options list:
Сто ENEE 2 | * MACHINE# (Use the numeric entry)
STS o - 0 Machine number (max. 6 digits: O to 999999)
PSH od * CONSECUTIVEF (Use the numeric entry)
Enter a number (max. 6 digits: 0 to 292999) that is the
desired starting number.
* GT2: (Use the numeric entry)
Enter a number (max. 13 digits: 0 to 9999999999999
* GT3: (Use the numeric entry)
Enter a number (max. 13 digits: 0 to 9999999999999)
85
Date/Time Setting
You can set the date and time for the register.
HB Date/time
Procedure
SETT Lin
E TERMINAL
7 DATE
8 OPTIONAL
7 REPORT
10 MESSAGE
PSH
AY
el
У
Dé TE TIHE
DATE E
TIME
PGM
SEW FT FEN
Or Only
Crd
1. In the SETTING window, select “7 DATE/TIME".
« The DATE/TIME window will appear.
2. Set each item as follows:
DATE (Use the numeric entry)
Enter the day (2 digits), month (2 digits), and year (2
digits) in this sequence.
TIME (Use the numeric entry)
Set the time (max. 4 digits) on the 24-hour system. For
example, when the time is set to 2:30 AM, enter 0230;
and when it is set to 2:30 PM, enter 1430. The time will be
printed and displayed.
36
Optional Feature Selection
Use the following procedure to select any option included in the optional group:
Procedure
SETTING
© TERMINAL
5 REPORT
10 MESSAGE
PSH
AW
ri O
CaN) e ©
ord
У
OT T I ORAL
= ROUHD IHG
= FUHEC_FROHIBGIT
4 FUHC AUTHORITY
== FUNCTION “SELECT
PSH
ed
The screen continues.
1. In the SETTING window, select “8 OPTIONAL.”
* The OPTIONAL window will appear.
2. Select any option from the following options list.
BASIC SYSTEM
ROUNDING
FUNC, PROHIBIT
FUNC, AUTHORITY
FUNCTION SELECT
PRINT SELECT
EXCHANGE FUNCTION
Basic system
Rounding
Function prohibited
Function authority
Function selection
Print selection
Exchange function
0 1 à N HEBE UN FH
EURO CHANGE
Euro change
The following illustration shows those options included in this programming group.
8 OPTIONAL ——1 BASIC SYSTEM —» See
— 2 ROUNDING —+ See
— 3 FUNC.PROHIBIT —» See
— 4 FUNG.AUTHORITY —» See
——— 5 FUNCTION SELECT —» See
—— 6 PRINT SELECT —» See
—— 7 EXCANGE FUNCTION —> See
— 8 EURO CHANGE —+ See
37
“Basic System” on page 36.
“Rounding” on page 89.
“Function Prohibit” on page 90.
“Function Authority” on page 21.
“Function Selection” on page 92.
“Print Selection” on page 93.
“Exchange Function” on page 94.
“EURO Change” on page 95.
E Basic System
Your register allows you to select various item of basic system.
Procedure Program each item as follows:
BASIC SYSTEM т + DATE FORMAT (Use the selective entry)
TIME FORMAT __24 HOUR MD Y: Display and print the month, day, and year In this order
CURRENCU SUMEOL 3%. DMY: Display and print the day, month and year in this order
YMD: Display and print the year, month, and day in this order
* TIME FORMAT (Use the selective entry)
12-HOUR: Display and print the time on 12-hour system
The screen continues. 24-HOUR: Display and print the time on 24-hour system
* ERROR (Use the selective entry)
Response to an erroneous, invalid key operation
LOCK ERROR: Sound a short buzzer for 2 seconds, and
display Error. To hide the Error display, press
the [CL] key.
MISS OPE.: Sound a short buzzer
* CURRENCY SYMBOL (Use the character entry)
Enter the character (Max. 4 characters)
TAB =
DECIMAL CQUAHTITY YE
PSH ord
TAB (Use the selective entry)
0
1 | Position of price delimiter can be set. Setting options are 0, 1, 2, and 3.
2 | When setting to "2" for example, the entry of “100” is displayed as “1.00”.
3
DECIMAL QUANTITY (Use the selective entry)
YES: Enable to enter the decimal quantity
NO: Disable to enter the decimal quantity
DECIMAL ROUND (Use the selective entry)
ROUND: Round off the number
UP: Round up after the decimal point
DOWN: Round down after the decimal point.
* HALO FUNC. (Use the selective entry)
VALID: Valid HALO function
INVALID: Invalid HALO function
* [00] KEY (Use the selective entry)
[00]: Display [00] by pressing the [00] key
[000]: Display [000] by pressing the [00] key
* PRT/DSP EDIT (Use the selective entry)
YES: All of printing and display are edited
NO: All of printing and display aren't edited
* ITEM DISPLAY (Use the selective entry)
2-LINE: The 1st line displays the quantity, price and amount. The 2nd line displays the text.
1-LINE: The quantity and text.
38
EH Rounding
Your register allows you to select various item of rounding system.
Procedure Program each item as follows:
POUMD IMG т * ROUND 100 (Use the selective entry)
AH au AE Rounding system selection Ш
CH/CR TOR 1 TEMÉTOTAL NORMAL: Minimum rounding currency unit is 1 (1 cent)
ROUND PRINT HO 25: Minimum rounding currency unit is 25 (25 cents)
DIFFER MEMORY HO _ Lo
Рен od 50: Minimum rounding currency unit is 50 (30 cents)
100: Minimum rounding currency unit is 100 (ex: 1
The screen continues. Swedish Krona)
* ROUND 10 (Use the numeric entry)
Rounding up/down of the units digit of amount.
Enter a number (2 digits 00 to 99)
* ROUND FOR (Use the selective entry)
ITEM& TOTAL: Rounding of the item and total
TOTAL: Rounding of the total
* CH/CR ROUND (Use the selective entry)
This selection is not effective at Manual TAX 1-4 system.
YES: Enable the Australian rounding
NO: Disable the Australian rounding
* ROUND PRINT (Use the selective entry)
YES: Print the rounding amount
NO: Not print the rounding amount
DIFFER MEMORY (Use the selective entry)
YES: Memory the difference between before-rounding and after-rounding
NO: No memory the difference between before-rounding and after-rounding
* ITEM ENT (Use the selective entry)
Limit on the least significant digit in entering the amount of item
ANY: No limit at the least significant digit in each amount entry
O ONLY: Limit to O at the least significant digit in each amount entry
0.5 ONLY: Limit to 0.5 at the least significant digit in each amount entry
* PAYMENT ENT (Use the selective entry)
Limit on the least significant digit in entering the amount of payment
ANY: No limit at the least significant digit in each amount entry
O ONLY: Limit to À at the least significant digit in each amount entry
0.5 ONLY: Limit to 0.5 at the least significant digit in each amount entry
39
HB Function Prohibit
Your register allows you to select whether to enable or disable various functions.
Procedure Program each item as follows:
FUHC . PROHIBIT Ч * NON-ADD (Use the selective entry)
HOHER + HE SRA ENABLE: Enable to enter Non-add code
Minus DEFT ENABLE DISABLE: Disable to enter Non-add code
core RE ENSELE * NON-ADD + NS (Use the selective entry)
Рем ei ENABLE: Enable No sale after Non-add code entry
DISABLE: Disable No sale after Non-add code entry
* MINUS DEPT (Use the selective entry)
ENABLE: Enable to enter the minus department or PLU
DISABLE: Disable to enter the minus department or PLU
* HASH DEPT (Use the selective entry)
ENABLE: Enable to enter the hash department or PLU
DISABLE: Disable to enter the hash department or PLU
The screen continues.
* COPY RCPT (Use the selective entry)
ENABLE: Enable the receipt copy function
DISABLE: Disable the receipt copy function
* VOID MODE (Use the selective entry)
ENABLE: Enable the void mode
DISABLE: Disable the void mode
* SUBTOTAL<0 (Use the selective entry)
ENABLE: Enable to go negative merchandise subtotal
DISABLE: Disable to go negative merchandise subtotal
* TEND+DIRECT (Use the selective entry)
ENABLE: Enable the direct non-tendering finalization after the previous tender entry
DISABLE: Disable the direct non-tendering finalization after the previous tender entry
90
E Function Authority
Your register allows you to select whether to public or to limit function authority.
Procedure
PO
REFUHD
HNO ISSUED WD
I==UED “Ir
=HIL VD
PSH
FUHC AUTHORITY
НА F
FUPBLI
PUBLI
PURBL I
PURBLI
PUFLI
EL
The screen cont
Inues.
(XE-A217W/XE-A217B only)
Program each item as follows:
* RA (Use the selective entry)
LIMITED: Allowed only In the Manager mode.
PUBLIC: Allowed in the REG mode and the Manager mode.
* PO (Use the selective entry)
LIMITED: Allowed only in the Manager mode.
PUBLIC: Allowed in the REG mode and the Manager mode.
* REFUND (Use the selective entry)
LIMITED: Allowed only in the Manager mode.
PUBLIC: Allowed in the REG mode and the Manager mode.
* ITEM VD (Use the selective entry) for XE-A207W/XE-A207B
only
LIMITED: Allowed only in the Manager mode.
PUBLIC: Allowed in the REG mode and the Manager mode.
* NO ISSUED VD (Use the selective entry) for XE-A217W/XE-A217B only
LIMITED: Allowed only in the Manager mode. (for GLU registration)
PUBLIC: Allowed in the REG mode and the Manager mode. (for GLU registration)
* [ISSUED VD (Use the selective entry) for XE-A217W/XE-A217B only
LIMITED: Allowed only in the Manager mode. (for GLU registration)
PUBLIC: Allowed in the REG mode and the Manager mode. (for GLU registration)
« SBTL VD (Use the selective entry)
LIMITED: Allowed only in the Manager mode.
PUBLIC: Allowed in the REG mode and the Manager mode.
* NO SALE (Use the selective entry)
LIMITED: Allowed only in the Manager mode.
PUBLIC: Allowed in the REG mode and the Manager mode.
91
E Function Selection
Your register enables you to select various functional selections.
Procedure Program each item as follows:
FUNCTION SELECT Ч * LV.SFT MODE (Use the selective entry) for XE-A217W/XE-
LY . SFT MODE AA A217B only
RETURN TO Li RECEIET
CLUE ENTRU AUTO LIMITED: Allowed only inthe Manager mode.
GLU CLE CHECK HO PUBLIC: Allowed in the REG mode and the Manager mode.
SPLIT COUHT QUAHTITY
Рем ei * LV.SFT TYPE (Use the selective entry) for XE-A217W/XE-
A217B only
The screen continues. AUTO: Automatic return mode
MANUAL: Lock shift mode
* RETURN TO L1 (Use the selective entry) for XE-A217W/XE-
A217B only
When the PLU level shift system is set to "AUTO," the PLU
level can be returned to level 1 by one of the following
methods:
BY ITEM: Returns the PLU level to level 1 by one item.
RECEIPT: Returns the PLU level to level 1 by one receipt.
* GLU# ENTRY (Use the selective entry) for XE-A217W/XE-
A217B only
AUTO: Assign GLU code in an automatic serial number
MANUAL: Require manual GUL code entry
* GLU CLK CHECK (Use the selective entry) for XE-A217W/XE-A217B only
Checking of the clerk, when GLU reorder is made.
YES: Enable to check of the clerk
NO: No checking
SPLIT COUNT (Use the selective entry)
Count method of split pricing entry.
PACKAGE: Unit of the package
QUANTITY: Quantity
* CRIN RA/PO (Use the selective entry)
Credit totalizer update if RA or PO finalization by the credit key.
NON: Not update
UPDATE: Update
VD MODE TO HOURLY (Use the selective entry)
YES: Enable to add to the hourly total in void mode.
NO: Disable to add to the hourly total in void mode.
e ST BEFORE DIRECT (Use the selective entry)
Subtotal entry before direct non-tendering finalization
NOT: Not to require entry of subtotal for the non-tendering finalization
MUST: Require entry of subtotal for the non-tendering finalization
« ST BEFORE TEND (Use the selective entry)
Subtotal entry before tender
NOT: Not to require entry of subtotal for the tendering finalization
MUST: Require entry of subtotal for the tendering finalization
* NS RECEIPT (Use the selective entry)
Printing the receipt at the time of No Sale
PRINT: Print the receipt
NOT: Not to print the receipt
92
* RCPT CONTENTS (Use the selective entry)
TOTAL: Print the total only on the receipt
DETAIL: Print the details on the receipt
* AFTER TRANS. (Use the selective entry)
TOTAL: Print the total only on the receipt after finalizing a transaction and the copy receipt
DETAIL: Print the details on the receipt after finalizing a transaction and the copy receipt
* E.J.FULL (Use the selective entry)
When the EJ file is full, whether to lock the item entry or not.
LOCK: Lock the item entry
CONTINUE: Not to lock the item entry
E Print Selection
You can program various printing functions.
Procedure Program each item as follows:
PRIHT SELECT Y” * CONSECUTIVE NO. (Use the selective entry)
CONSECUTIVE HO. NES YES: Print the consecutive No.
TRE ASE HO. “Re NO: Not to print the consecutive No.
TAR STATUS VES * DATE (Use the selective entry)
PGM o YES: Print the date
NO: Not to print the date
* TIME (Use the selective entry)
YES: Print the time
NO: Not to print the time
* PURCHASE NO. (Use the selective entry)
YES: Print the number of the purchase No.
NO: Not to print the number of the purchase No.
* TAX STATUS (Use the selective entry)
YES: Print the tax status
NO: Not to print the tax status
The screen continues.
* TAXABLE (Use the selective entry)
YES: Print the taxable amount
NO: Not to print the taxable amount
* TAX (Use the selective entry)
YES: Print the tax amount
NO: Not to print the tax amount
* TAX (TAXABLE=0) (Use the selective entry)
YES: Print the tax amount when the taxable amount is zero.
NO: Not to print the tax amount the taxable amount is zero.
e TAX (TAX=0) (Use the selective entry)
YES: Print the tax amount when the tax amount is zero.
NO: Not to print the tax amount when the tax amount is zero.
* NET (Use the selective entry)
YES: Print the NET amount
NO: Not to print the NET amount
SPLIT ENTRY (Use the selective entry)
A=1st quantity, B=2nd quantity and C=unit price
FORMAT1: Ax B/C
FORMAT?2: Ax C/B
93
ST AT ST KEY (Use the selective entry)
YES: Print the subtotal using the ST key
NO: Not to print the subtotal using the ST key
e LOGO FORM (Use the selective entry)
PATTERN 1: 3 line text header
PATTERN 2: Image logo header
PATTERN 3: Image logo header + 3 line text footer
PATTERN 4: 6 line text header
PATTERN 5: Image logo header + 3 line text header
PATTERN 6: 3 line text header + 3 line text footer
* FOOTER (Use the selective entry)
ALL: Print the footer in any media
BY MEDIA: Print the footer by media
* 0 AMT PLU (Use the selective entry)
When the PLU unit price is O, printing the amount is:
TEXT ONLY: Print the text only
NORMAL: Print the price and the text
+ ITEM JOURNAL (Use the selective entry)
ALL: Print all items on electronic journal
SELECT: Print the selected items on electronic journal
* LOGO ON JOURNAL (Use the selective entry)
YES: Print the logo text on electronic journal
NO: Not to print the logo text on electronic journal
* BILL ON JOURNAL (Use the selective entry)
YES: Print the bill contents on electronic journal
NO: Not to print the bill contents on electronic journal
H Exchange Function
Procedure
FAY FOR Ex1
EXA CALC.
TILÉCHÈèAHSE
PGM
EXCHANGE FUHCOTIOH
MULTI .
DOMES TIC
=T SHORT TEHD PRIMT
Crd
Program each item as follows:
PAY FOR EX1 (Use the selective entry)
Payment for the amount of Exchange 1
CASH: Payment is made by cash only
ALL: Payment is made by all media
« EX1 CALC. (Use the selective entry)
Method of the calculation for Exchange 1
MULTI: Multiplication
DIVIDE: Division
« TTL & CHANGE (Use the selective entry)
Print the total and change for the amount of Exchange 1
DOMESTIC: The domestic item only
WITH EX1: Print the total and change for the amount of
Exchange 1
* ST SHORT TEND (Use the selective entry)
Print the subtotal after Exchange short tendering
NOT. Not to print the subtotal
PRINT: Print the subtotal
94
E EURO Change
You can program optional functions for EURO change. For the details, refer to EURO Migration Function
section.
Procedure Program each item as follows:
EURO CHAMGE * DATE (Use the numeric entry)
NE Preset the date to execute the automatic EURO modification
FRICE CONVERT YES operation.
EURO JOE HON—COMPUL a
Enter the day (2 digits), month (2 digits), and year (2 digits) In
Рен od this sequence.
* TIME (Use the numeric entry)
Preset the time of the date to execute the automatic EURO
modification operation.
Enter the hour (00-23)
* PRICE CONVERT (Use the selective entry)
YES: Converts the preset unit prices of Dept./PLU in the automatic EURO modification operation.
NO: Does not convert the preset unit prices of Dept /PLU to the ones of EURO currency in the
automatic EURO modification operation.
The preset rate of the Exchange 1 is applied as the conversion rate, and the calculation method
Is set to “division”.
* EURO JOB (Use the selective entry)
NON-COMPUL.: Non-compulsory the automatic EURO modification operation in the X2/22 mode after
the preset date.
COMPULSORY: Compulsory the automatic EURO modification operation in the X2/22 mode after the
preset date.
When the EURO STATUS of your register is already “D” (i.e. the domestic currency has been
changed to EURO in your register), this programming is disabled.
95
Report Programming
Use the following procedure to select any option included in the report group:
Procedure
== ATT [ME Ay 1. In the SETTING window, select “9 REPORT.”
5 OPTIOHAT: * The REPORT window will appear.
E LN
10 MESSAGE
11 DEVICE CONFIG
FGH wd
2. Select any option from the following options list:
REPORT ”
= HOURLY REPORT 2 PRINT SELECT Print select
3 Z COUNTER
DEM 54 Z counter
4 71 GENERAL REPORT 211 General report
The screen continues. > HOURLY REPORT Hourly report
6 E. JOURNAL Electronic journal
The following illustration shows those options included in this programming group.
9 REPORT uu 14 0 SKIP —» See “Zero skip” on page 97.
——2 PRINT SELECT —» See "Print select” on page 97.
—3 Z COUNTER —» See Z Counter on page 96.
4 71 GENERAL REPORT —» See “Z1 General report” on page 99.
—— 5 HOURLY REPORT —+ See "Hourly report” on page 99.
— 6 E. JOURNAL —» See “Electronic Journal” on page 99.
96
E Zero skip
You can program whether or not to skip “O” in each report.
Procedure Program each item as follows:
© SKIP + DEPARTMENT (Use the selective entry)
DEFAR TAE 4 ELE SKIP: Skips those data that are “0” in the department
CLERK SKIP
HOURLY SKIP NOT SKIP: Does not skip those data that are “0” in the
FM od department report.
* TRANSACTION (Use the selective entry)
SKIP: Skips those data that are “O” in the transaction
report.
NOT SKIP: Does not skip those data that are “0” in the
transaction report.
* PLU (Use the selective entry)
SKIP: Skips those data that are “O” in the PLU report.
NOT SKIP: Does not skip those data that are “O” in the PLU report.
* CLERK (Use the selective entry)
SKIP: Skips those data that are “O” in the clerk report.
NOT SKIP: Does not skip those data that are “0” in the clerk report.
* HOURLY (Use the selective entry)
SKIP: Skips those data that are “0” in the hourly report.
NOT SKIP: Does not skip those data that are “O” in the hourly report.
E Print select
You can program whether or not to print the item on the report.
Procedure Program each item as follows:
PRINT SELECT Y * SEPARATOR LINE (Use the selective entry)
E COUNTER LR THE o YES: Print the separate line on the report.
STi OH = VES
ето OH = VPS NO: Not to print the separate line on the report.
SAL er SH = VES * Z COUNTER (Use the selective entry)
Pan “1 YES: Print the Z counter on the Z report.
NO: Not to print the Z counter on the Z report.
* GT1 ON Z (Use the selective entry)
YES: Print GT1 on the Z report.
NO: Not to print GT1 on the Z report.
The screen continues.
* GT2 ON Z (Use the selective entry)
YES: Print GT2 on the Z report.
NO: Not to print GT2 on the Z report.
* GT3 ON Z (Use the selective entry)
YES: Print GT3 on the Z report.
NO: Not to print GT3 on the Z report.
* BAL GT ON Z (Use the selective entry) for XE-A217W/XE-A217B only
YES: Print the balance GT on the Z report.
NO: Not to print the balance GT on the Z report.
* TR GT ON Z (Use the selective entry)
YES: Print the training GT on the Z report.
NO: Not to print the training GT on the Z report.
97
* GT1 ON X (Use the selective entry)
YES: Print GT1 on the X report.
NO: Not to print GT1 on the X report.
* GT2 ON X (Use the selective entry)
YES: Print GT2 on the X report.
NO: Not to print GT2 on the X report.
* GT3 ON X (Use the selective entry)
YES: Print GT3 on the X report.
NO: Not to print GT3 on the X report.
* TR GT ON X (Use the selective entry)
YES: Print the training GT on the X report.
NO: Not to print the training GT on the X report.
* VD MODE ON X121 (Use the selective entry)
YES: Print total of VOID MODE on X1Z1 report
NO: Not to print total of VOID MODE on X1Z1 report
* VD MODE ON X222 (Use the selective entry)
YES: Print total of VOID MODE on X2Z2 report
NO: Not to print total of VOID MODE on X2Z2 report
* PLU DATA ON Z (Use the selective entry)
YES: Print PLU data on the PLU Z report.
NO: Not to print PLU data on the PLU Z report.
EJ DATA ON Z (Use the selective entry)
YES: Print EJ data on the EJ Z report.
NO: Not to print EJ data on the EJ Z report.
* EJ SIZE (Use the selective entry)
SMALL: Print EJ in a small size.
NOR MAL: Print EJ in a normal size.
EH Z Counter
Procedure Program each item as follows:
= COUNTER * GENERAL Z1: Max.4 digits (0000 to 9999)
GEHERAL 241 TE a
GEHERAL zZ о « GENERAL 22: Мах. 4 digits (0000 to 9999)
Ea Ci
98
E Z1 General report
Procedure Program each item as follows:
=4 &£SPHERAL REPORT * 5D: SAVE SALES (Use the selective entry)
=D : SAVE Es но YES: Save the sales data in the SD card,
CLEAR EJ HO NO: Not to save the sales data in the SD card.
RESET DE ST HO |. SD: SAVE EJ (Use the selective entry)
PSM o YES: Save the electronic journal data in the SD card.
NO: Not to save the electronic journal data in the SD card.
* SD: SAVE ALL RAM (Use the selective entry)
YES: Save all the RAM data in the SD card.
NO: Not to save all the RAM data in the SD card.
* CLEAR EJ (Use the selective entry)
YES: Clear the electronic journal data
NO: Not to clear the electronic journal data
« RESET BAL GT (Use the selective entry) for XE-A217W/XE-A217B only
YES: Reset the balance GT.
NO: Not to reset the balance GT.
« RESET GT (Use the selective entry)
YES: Reset the GT.
NO: Not to reset the GT.
HB Hourly report
You can program the memory type and the starting time for the hourly report.
Procedure Program each item as follows:
HOURLY REPORT + MEMORY TYPE (Use the selective entry)
MEMORY TIRE ERLE 30MIN: Selects the 30-minute type.
60MIN: Selects the 60-minute type.
* START TIME (Use the numeric entry)
PM vi Starting time entry (max. 2 digits: O to 23)
E Electronic Journal
Procedure Program each item as follows:
E _ JOURHÁL: * STORE TO SD (Use the selective entry)
AO TA STORE ETE When the EJ data is recorded on the SD card:
A DATA STORE HEADER AS IS: Control characters are recorded as they are
VW SPACE: Control characters are recorded as double space.
PM vi * TR DATA STORE (Use the selective entry)
YES: Record the EJ data in the training mode.
NO: Not to record the EJ data in the training mode.
+ À DATA STORE (Use the selective entry)
When the X report data in the EJ is recorded:
HEADER: Record only the header of X report in the electronic journal.
DETAIL: Record the detail of X report in the electronic journal.
99
Message Programming
Use the following procedure to select any option included in the message group:
Procedure
SETI IMG AW 1. e >
S OPTIOHAL Inthe SETTING window select 10 MESSAGE.
2 REPORT * The MESSAGE window will appear.
10 MESSAGE
14 DEVICE COHMFIS
12 TAX
PSH ord
У
MESSAGE 2. Select any option from the following options list:
1 RECEIPT LOGO Receipt logo
PSH od
The following illustration shows those options included in this programming group.
| 10 MESSAGE ———1 RECEIPT LOGO —» See “Receipt logo” this page.
HB Receipt logo
Your register can print programmed messages for customers on every receipt.
The logo text is printed in a centering form on the receipt.
Procedure Program each item as follows:
* RECEIPT LOGO (Use the character entry)
Logo text for the receipt (max. 30 characters x 6 lines)
ENEE
DONE
La APT
DEDO 17
PALEAS
Iho 8
ME (CK
A a
MO
ed
The programmable number of lines for a message varies according to the following message
types:
PATTERN 1: 3 line text header
PATTERN 2: Image logo header
PATTERN 3: Image logo header + 3 fine text footer
PATTERN 4: 6 line text header
PATTERN 5: Image logo header + 3 line text header
PATTERN 6: 3 line text header + 3 line text footer
100
Device Configuration Programming
Use the following procedure to select a device configuration programming:
Procedure
SETTING AY 1. : ;
S OPTIOHAL In the SETTING window, select 11 DEVICE CONFIG.
+ REPORT * The DEVICE CONFIG window will appear.
15 MESSAGE
12 TAX
FGH oi |
2. Select any option from the following options list:
У 1 KEYBOARD Keyboard
DEVICE COHF IG 2 DISPLAY Display
RESECARD 3 PRINTER Printer
5 FRIHTER 4 ONLINE Online
4 OHLIHE
PSM oi
The following illustration shows those options included in this programming group.
11 DEVICE CONFIG —— KEYBOARD —» See “Keyboard” on page 101.
— 2 DISPLAY —+ See Display" on page 102.
—3 PRINTER —» See Printer on page 102.
——4 ONLINE —» See Online” on page 102.
E Keyboard
Program each item as follows:
KE VEDARD * BUFFERING (Use the selective entry)
Era RS In va YES: Enables the buffering keyboard.
NO: Disables the buffering keyboard.
* TOUCH SOUND (Use the selective entry)
FGM od YES: Set to sound.
NO: Not to sound.
101
E Display
Procedure
DISPLAY
POWER SAVE Cn |
D_SAUE AT TM UES
PGM OL
E Printer
PRIMTER
DEH ITY =.
Pa ord
EH Online
DHL IHE Y
TERMIHAL HO. Сна.
CI SIGHAL HOH
LIHE FORM FULL
BAUD RATE 49200
START CODE Qu
EHD CODE E
Pa ord
The screen continues.
« BAUD RATE (Use the selective entry)
Transmission data rate.
38400 bps 19200 bps
9600 bps 4800 bps
* START CODE (Use the numeric entry)
Start code (3 digits: O to 127)
* END CODE (Use the numeric entry)
End code (3 digits: O to 127)
* TIME OUT (Use the numeric entry)
Program each item as follows:
* POWER SAVE (Use the numeric entry)
Time of the power save (2 digits: 1 to 99 minutes,
0:100minutes).
* P. SAVE AT TM (Use the selective entry)
Power saving during time display:
YES: Enables power saving during time display.
NO: Disables power saving during time display.
Program each item as follows:
* DENSITY (Use the numeric entry)
Select a density level (2 digits: 00 to 99).
00: 89% for standard
50: 100% for standard
99: 111% for standard
Program each item as follows:
* TERMINAL No. (Use the numeric entry)
Terminal number (6 digits: O to 999999.
* Cl SIGNAL (Use the selective entry)
Sensing of the Cl signal
NON: Disables sensing of the Cl signal.
SENSING: Enables sensing of the Cl signal.
* LINE FORM (Use the selective entry)
Programming of the modem control
FULL: Full duplex system.
HALF: Half duplex system.
Programming of the time-out time (3 digits: 1 to 255 sec.)
102
Tax Programming
Use the following procedure to select any option included in the tax group:
Procedure
SETT IHG à 1. In the SETTING window, select “12 TAX”
2 REPORT
10 MESSAGE * The TAX window will appear.
11 DEVICE COHF TG
153 AUTO KEY
PSH gi 2. Select any option from the following options list:
v 1 TAX SYSTEM Tax system
2 TAX1 Tax1
TAX
3 ТАХ2 Тах2
= Taxi
3 1h Do G
= Fang 5 TAX4 Tax4
PGM od
E Tax system
Procedure
Tax SYSTEM
* Tax system (Use the selective entry)
AUTO TAX 1-4
AUTO VAT 1-4
MANUAL VAT 1-4
MANUAL VAT 1
MANUAL TAX 1-4
VAT1 8: TAX 2-4
PSH ord
EM Tax 1 through 4
Procedure
* TAX RATE (Use the numeric entry)
TAXA
Tax RATE, Tax rate (max. 7 digits: 0.0000 to 999.9999%)
LOWER TAX D. RATE SIGN (Use the selective entry)
+: Plus rate
PGM Gi — Minus rate
* This option Is not available In the VAT system.
LOWER TAX (Use the numeric entry)
Lowest taxable amount (max. 5 digits: 0.00 to 999.99)
This option is not available in the VAT system.
103
Automatic Sequencing Key Programming
If you program frequently performed key operations for the AUTO keys, you can enter those key operations
simply by pressing the corresponding AUTO keys in key operations.
Procedure
Ш Кеу Тех!
a E | и >
SETIING 1 In the SETTING window, select “13 AUTO KEY.
10 MESSAGE * The AUTO KEY window will appear.
11 DEVICE COHF IS
Ea vi
У
AUTO KEY _ — 2. Select “1 KEY TEXT” by the key
= KEY SEQUENCE
P GM Od
У
3. Select the pertinent Auto key from the key list by the
= AUTO = key.
= AUT0 3
3 AUTO 4
> AUTO S
E a < 1
e 1 EE EEE 4. Enter the title of the operation for the key sequence to
allocate.
TEXT: up to 12 digits
E a ä < 1
104
E Key Sequence
Procedure
SETTIHG
2 REPORT
10 MESSAGE
11 DEVICE
d= TA
COHF LS
PGM Ch
У
AUTO HEY
HEY
TEXT
= HEY SEGUEHCE
a
Bis Ci
У
REY SEGUEHLE
= AUTO =
= AUTO 5
4 AUTO =
= AUTO =
PSH
ord
AUTO 4
PSH ord
In the SETTING window, select “13 AUTO KEY.”
* The AUTO KEY window will appear.
Select “2 KEY SEQUENCE” by the key
Select the pertinent Auto key from the key list by the
key.
Enter the key operation sequence by any key except the
key.
The register allows to program up to 25 keys for each AUTO
key.
To terminate the procedure press the key, the
confirmation window will appear for sequence data saving.
Select “SAVE” or “ABANDON” and press the key.
In case of the X1 General report printing.
Display Key operation
AUTO 4 MODE
4 = KEY
= TL/HS 4=(select X1/Z1 MODE)
5 ESCYCANCEL
S ESC/CAHCEL TLNS
BoM 51 2=(select READING)
TL/NS
1=(select GENERAL)
SCICANCE
Fr | rm
—
SCICANCEL
AUTO MENU
105
Reading of Stored Programs
You can read programs stored in the PGM mode.
E Program reading sequence
To read those programs stored in the PGM mode, use the following procedure:
1. Select the PGM mode from the mode selection window.
2. Select “1 READING” from the PGM mode to display the items list, and press the key.
Select an item listed in the table shown later.
Item: Description:
1 DEPARTMENT Department
2 PLU PLU
3 FUNCTIONS Function
4 MEDIA Media
5 FUNCTION TEXT Function Text
6 CLERK Clerk
/ MANAGER Manager
8 MODE PASS CODE Mode pass code
9 TRAINING CLK Training clerk
10 OPTIONAL Optional
11 REPORT Report
12 MESSAGE Message
13 DEVICE CONFIG Device config.
14 TAX Tax
15 AUTO KEY Auto key
16 ROM VERSION ROM version
106
Ш Sample printouts
* Departments (PGM mode)
Operating mode — PGM:
Report type — DEPARTMENT ax status
[ Unit price
Dept. code — [301 0.00 -
Description — DPT. 01 Ti (1 + Function programming
Group no. — GO! | 999999, 99 | PL amount entry type /O:Inhibit
Doz | 12. re SICS Ne | Ga |
ol 02 | gubgog, 99 — HALO limit 3:0pen&Preset
DN 0.00
DPT. O3 N 01
601 | 999999. 99
PLU (PGM mode)
*POGM+
Report type — PLU
| Associated dept code
PLU code —- F 00001 (0 T ) 2 +— Amount Entry type
Description —- PLU00001 1.20 + Price
P 00002 (02) 2
PLUDOQOZ 4.50
P 00003 (02) 2
PLU00003 3.10
P 00004 (OT) 2
PLUDOOD4 4.50
P 00005 01) 2
PLUO0005 2.25
P 00006 (GT) 2
P.U00006 0.00
P 00007 (02) 2
PLU00007 2.10
P00008 (01) 2
PLUD0008 1.20
F-00009 01) 2
PLU00009 0.00
P 00010 (02) 2
PLIJOOO10 8. 20
107
* Functions (PGM mode)
PG
FUNCTIONS Report type
: | Sign (plus/minus)
(-) — 0.00 | Text
IS |2. 00
zw -0. 00%
> " L100. 10% Type I=ltem S=Subtotal
’ L Rate
I L100.00% | °°
TERA 19999999. 99 |
xx=P0) 19999999. 89
1 109999999. 89 | |-HALO limit
CHK/Ch 1.999999. 99
CA/CHK 1999999. 99 _
e Media (PGM mode)
HP GM
MEDIA Report type
Г HALO
CASH — 1999999. 99 00 —-—— Programming data(00)
CHECK 1.999399. 59 00 Entry of amount tendered
CHECK? 1.999999. 99 00 (0:Non-Compulsory, 1:Compulsory)
CREDIT 1.999999. 99 (0 —— Programming data(00) Е | |
CREDIT? 1999999. 99 00 Footer prt on receipt
PRESET RATE ENABLE |
EXCH] 1.550220 2— Tab Entry of amount tendered
OPEN RATE ENABLE (O:Inhibit, 1:Compulsory)
EXCH? 2 Footer printon receipt
Rate (0:No, 1:Yes)
108
* Function Text (PGM mode)
*P GM:
FUNCTION TEXT
NET1 NET 1 —
TANT ST TAR ST
TAN? ST TANZ ST
TAN3 ST TAX3 ST
TAX4 ST TAR ST
VAT 1 VAT 1
VAT 2 VAT 2
VAT 3 VAT 3
VAT 4 VAT 4
TTL TAX TTL TAX
NET NET
NET? NET?
REFUND REFUND
VOID VOID
VOID MODE VOID MODE
HGR VOID HGR VOID
SBTL VOID SATL VOID
HASH VOID HASH VOID
HASH RF HASH RF
BILL CNT BILL CNT
NO SALE NO SALE
SCH (+) SCH (+)
SCH(-) SCH{-)
GUEST GUEST
PAID TL PAID TL
AVE. AVE.
DON. CUR? DOM. CUR 1
DOM. CUR2 DOM. CUR2
*CH ID “CH ID
CA/CHK ID CA/CHK ID
GROUPO1 - GROUFO!
Ca ROUPOZ GROUPOZ
Report type
Function
— Text
GROUPO3
GROUPO4
CaRDUPOS
GROUPOG
CaRDUPO7
GROUPO8
G:ROUPOS
*DEPT TL
DEPT (-)
HASH TL
HASH (-)
##*TOTAL
SUBTOTAL
SCH TTL
ITEMS
MDSE ST
NET 1
NET 2
NET 3
NET 4
DUE
CHANGE
COPY
BILL
RCP SH.
VAT SFI
TAR DELE
РВ.
НВА.
ORDER TL
0-P
OLD BAL.
BALANCE
GLUR
—
GROUPO3
GROUPO4
GROUPOS
GROUPO6
GROUP07
GROUPOS
GROUP09
*DEPT IL
DEPT (=)
HASH TL
HASH(-)
*XTOTAL
SUBTOTAL
SCH TTL
#
ITEMS
MDSE ST
NET 1
NET 2
NET 3
NET 4
DUE
CHANGE
COPY
BILL
RCP SH.
VAT SFI
TAN DELE
+4PBAL
AXIAL
ORDER TL
0-P
OLD BAL.
BALANCE
GLUR
e Clerk (PGM mode)
HPC M+
CLERK Report type
| Clerk code
CLK#O 1 (МЕЛКО! +— Clerk name
0 0000 +— Auto key operation/Pass code
CLARO 2 CLERKOZ pres \
0 0000 1:Disable /
CLARO 3 CLERKO3
0 0000
CLKRO 4 CLERNOG
0 0000
* Manager (PGM mode)
HLM
MANAGER Report type
PASS CODE 9999 1- Pass code
* Mode Pass Code (PGM mode)
HP GM#
MODE PASS CODE Report type
Mode
VOID HODE —— 1111 Pass code
OPXZ 0000
FLASH 0000
A 0000
21 0000
R222 0000
POH 1234
SD CARD ИП
* Training clerk (PGM mode)
HP GM
TRAINING CLK
CODE 00 -
TEXT TRAINING -
Report type
— Training clerk code
— Training mode title text
110
* Optional (PGM mode)
*PGM#
OPTIONAL
Report type
BASIC SYSTEM
DATE FORMAT ——
TIME FORMAT
ERROR
CURRENCY SYMBOL
TAB
DECIMAL QUANTITY
DECTHAL ROUND
HALO FUNC.
[003 KEY
PRT/DSP EDIT
ITEM DISPLAY
ROUNDING
ROUND 1 00
ROUND10
ROUND FOR
CH/CR ROUND
ROUND PRINT
DIFFER MEMORY
ITEM ENT
PAYMENT ENT
FUNC. PROHIBIT
NON-ADD
NON-ADD + NS
MINUS DEPT
HASH DEPT
COPY RCPT
VOID HODE
SUBTOTAL<0
TEND+DIRECT
FUNC. AUTHORITY
RA
PO
Item
DMY
24-HOUR —— Setting
LOCK ERROR
#
2
YES
ROUND
INVALID
[00]
YES
2-LINE
NORMAL
00
ITEM&TOTAL
YES
NO
NO
ANY
ANY
ENABLE
ENABLE
ENABLE
ENABLE
ENABLE
ENABLE
ENABLE
ENABLE
PUBLIC
PUBLIC
111
о
PRINT SELECT
CONSECUTIVE No. YES
DATE YES
TIME YES
PURCHASE ND. NO
TAX STATUS NO
TANABLE YES
TAN YES
TAX (TAXABLE=0) ND
TAX (TA¥=0) NO
NET YES
SPLIT ENTRY FORMAT!
ST AT ST KEY NO
LOGO FORM PATTERNS
FOOTER ALL
0 ANT PLU TEXT ONLY
[TEM JOURNAL ALL
LOGO ON JOURNAL NO
BILL ON JOURNAL NO
EXCHANGE FUNCTION
PAY FOR EX} CASH
EXT CALC. MULTI.
TILACHANGE DOMESTIC
ST SHORT TEND PRINT
не
* Report (PGM mode)
Report type
— Setting
tem
HP GM
REPORT
0 SHIP
DEPARTMENT SKIP
TRANSACTION SKIP
PLU SKIP
CLERK SKIP
HOURLY — SKIP —
PRINT SELECT
SEPARATOR LINE YES
7 COUNTER YES
GTI ON 7 VES
672 ON 2 YES
613 ON 2 YES
BAL GT ON Z YES
TR GT ON 2 YES
GTI ON Y ND
GT2 ON X NO
GT3 ON X NO
TR GT ON X MN
VD MODE ON 171 YES
VD MODE ON Y2Z2 VES
PLU DATA ON 7 VES
EJ DATA ON 7 VES
EJ SIZE SHALL
—
* Message (PGM mode)
AP GM
MESSAGE
RECEIPT LOGO
THANK YOU
FOR YOUR
PURCHASE
WE ARE LOOKING
FORWARD TO
YOUR NEXT VISIT
Report type
— Receipt logo text
Z COUNTER
GENERAL 2
GENERAL 22
21 GENERAL REPORT
SD: SAVE SALES
SD: SAVE EJ
SD: SAVE ALL RAN
CLEAR EJ
RESET BAL GT
RESET GT
HOURLY REPORT
MEMORY TYPE
START TIME
E. JOURNAL
STORE TO SD
TR DATA STORE
XK DATA STORE
30MIN
00
W SPACE
NO
HEADER
112
* Device configuration (PGM mode)
#PGM+
DEVICE CONFIG Report type
KEYBOARD |
ie В
+ Setting
DISPLAY | tem
PONER SAVE
P. SAVE AT TH YES
PRINTER
DENSITY 50
ONLINE
TERMINAL No. 000001
CI SIGNAL NON
LINE FORM FULL
BAUD RATE 19200
START CODE 002
END CODE 013
TIME OUT 007
° Tax rate (PGM mode)
*РОМ*
TAR Report type
Tax no.
TAX SYSTEM AUTD TAR1-4 -{— Tax system
ТА — 1.0000 % | Rate
О = 01 —+— Lowest taxable amount
TAX2 2.0000 %
0.02
ТАХЗ 3. 0000 %
‚0.03
TAA 4. 0000 %
0-04
113
* AUTO key (PGM mode)
*PGM*
AUTO KEY
AUTO | AUTO 1—
P 00001
P 00008
P 00015
P0022
P0029
GLI
NBAL
TL/NS
#/TH/ST
CHECK]
CREDIT!
DEPTH
CL
9 HEY
6 KEY
3 KEY
2 KEY
PAYMENT MN
VAT SHIFT
REFUND
0 KEY
1 KEY
AUTO 2
AUTO 3
AUTO 4
AUTO 5
AUTO 2
AUTO 3
AUTO d
AUTO 5
Report type
— AUTO key no.
— Auto key text
-
> Key operation
Lund page
* ROM version (PGM mode)
*PGM+#
VERSION
IPL Version
XE-R207 1.00
PROGRAM Version
XE-A207/A217
V1.05
TEXT Version
SYSTEM Version
Text V1.00
System V1. 00
Reporttype
114
SD CARD Mode
The register's data can be saved to the SD memory card, and the programming data can be loaded from the
SD memory card.
To use the SD card function, select the “7 SD CARD MODE" in the mode selection window and perform the
following operations.
Ш Inserting and removing an SD memory card
The SD card slot is located on the front side of your register.
Inserting an SD memory card TT A A
Insert an SD memory card into the SD card slot with the printed Y
SD logo facing upwards. Push the card in steady with a finger until =R | |
It clicks and release it slowly. =
T= IL
Removing the SD memory card KCAL UT >
Push in the card gently with a finger and release it. The card will — |
come out.
* This model supports SD cards only. Use of any other types of SD cards such as mini SD, micro SD, etc.
with an adapter is not supported.
» When inserting or removing the SD memory card, be sure to release it slowly. Otherwise, the card may pop
out and injure your finger.
* Never fouch or remove the SD memory card while it is accessed, otherwise the data stored in it may be
damaged.
« Formatting the SD memory card erases aff the data in it.
Never turn the power off, while the SD memory card is accessed.
HB SD card formatting
When the SD card is not formatted yet, take the formatting operation.
Procedure
(1) Select “4 FORMATTING” in the SD CARD mode, the confirmation window is displayed.
(2) To perform the format operation, select OK and press the key.
To cancel the operation, select CANCEL and press the key.
E Folder creating
The master folder can be created for the data file.
(¥ SHARP¥ ECRXXX11¥ nnnnnnnn¥ : nnnnnnnn/folder name)
Procedure
(1) Select “3 FOLDER CONTROL” in the SD CARD mode and press the key.
(2) Select “1 CREATE FOLDER”, the folder name entry window is displayed.
(3) Enter the required folder name and press the key.
To cancel the operation, press the key
115
Ш Folder name selecting
Procedure
(1) Select “3 FOLDER CONTROL” in the SD CARD mode and press the key the FOLDER CONTROL
window is displayed.
(2) Select 2 SELECT FOLDER”, the folder name list window is displayed.
(3) Select the required folder name from the list, and press the key.
To cancel the operation, press the key
E Data saving
The sales data, EJ data or programming data can be saved to the SD card.
Procedure
(1) Select “1 SAVING” in the SD CARD mode, the selection window “SAVE” or “SAVE FOR ONLINE” is
displayed.
1. SAVE: Saves data
2. SAVE FOR ONLINE: Saves and adds data to existing file and clears the data at the register
Select the operation “SAVE” or “SAVE FOR ONLINE" and press the key: the following data list
window is displayed. (If you selected "SAVE FOR ONLINE", only "EJ DATA" is displayed.)
Text Data list
SALES DATA Sales data (CSV format)
EJ DATA Electronic journal data
Select the individual programming data:
DEPARTMENT,
IND. PROGRAM PLU,
GRAPHIC LOGO
LOGO TEXT
TAX
ALL PROGRAM All programming data
ALL RAM DATA All RAM data
(2) Select the data menu from the list and press the key, the confirmation window is displayed.
To save the required data file, select OK and press the key.
To cancel the operation, select CANCEL and press the key.
116
E Data loading
The programming data can be loaded from the SD card.
Procedure
(1) Select “2 LOADING” in the SD CARD mode and the press key. The following selection window is
displayed.
Text Data list
Select the individual programming data:
DEPARTMENT,
PLU,
IND. PROGRAM GRAPHIC LOGO
LOGO TEXT
TAX
ALL PROGRAM All programming data
ALL RAM DATA* All RAM data
(2) Select the data menu from the list and press the key, the confirmation window is displayed.
To load the programming data file, select OK and press the key.
To cancel the operation, select CANCEL and press the key.
* When "ALL RAM DATA” is selected, the register resets the program in the last save point after loading all
the RAM data.
The loading operation must be circumspect in execution, the sales data and/or all programming
data will be recovered with the back-up data.
117
Electronic Journal
E Electronic journal
This function is intended to record the journal data in the electronic journal file (memory) instead of journal
paper.
* Recording data
The register records the printing output to the journal printer in all modes into the electronic journal file.
* Reporting (X report)
The register reports the journal data (same as normal journal formats) in the electronic journal file by the
report printer.
Operation: Select the reading operation "E.JOURNAL" in X1/Z1 or OPXZ (only printing) mode.
It Is possible to use filter functions (consecutive no./date/time/clerk code).
C.C. No. (Consecutive no.): ALL or RANGE (designate start no./end no.)
DATE (Date): ALL or RANGE (designate start date/end date)
TIME (Time): ALL or RANGE (designate start time/end time)
CLERK (Clerk code): ALL or INDIVIDUAL (designate clerk code)
* Resetting (Z report)
It Is possible to take the resetting report of the journal data in the electronic journal file by the report printer.
Operation: Select the resetting operation “E.JOURNAL" in X1/Z1 or OPXZ mode.
The filter functions (consecutive no./date/time/clerk code) can not be used.
118
Basically your register can be automatically modified to correspond to the introduction of EURO by executing
the operation “EURO STATUS” in X2/72 mode. However, there are several options you must set depending
on your need. Carefully conduct necessary settings.
EURO status:
EURO Migration Function
You can select status from following 4 types ((A), (B), (C), or (D)). And the selectable type is decided as
follows for each status. Type (A) is the base status (initial status).
From type (A) —— selectable ———» Type (B), (C), or (D)
From type (B) —— selectable ———» Type (©), (D)
From type (C) —— selectable ———» Type (D)
Items Type (B) Type (C) Type (D)
1 |General Z1 report ISSUE ISSUE ISSUE
2 |General Z2 report ISSUE ISSUE ISSUE
3 [GT1/2/3 & Training GT CLEAR CLAER
4 | Convert the unit price of DEPT/PLU* — CONVERTING CONVERTING
EX1 AMOUNT PRINTING FOR
> TOTAL AND CHANGE YES YES NO
6 [EX1 CALCULATTION METHOD DIVISION MULTI. MULTI.
The current
7 |EX1 currency symbol [EURO] domestic —
Currency symbol
The current
° [FRIAS : domestic TAB —
9 | Domestic currency symbol — [EURO] [EURO]
10 | Domestic TAB — 2 2
11 Rounding SYSTEM (Denmark/ _— Normal Normal
Sweden/Normal)
Rounding up/down of the unit digits
121 of AMOUNT — No No
13 Lowest digit entering limitation of _ Arbitrary Arbitrary
Item
14 |Lowest digit entering limitation of — Arbitrary Arbitrary
payment
15 | Difference memory — No No
16 | Rounding of foreign currency for EX1 ROUND OFF ROUND OFF ROUND OFF
9 9 y (ADOVN-5UP) (ADOWN-5UP) (ADOWN-5UP)
The marked ¡items “—” is remaining the current data.
* The preset rate of the Exchange is applied as the conversion rate, and the calculation method is set to
“division”. When the conversion has been made, the message "PRICE CONVERTED" is printed on the
report.
119
Setting the date and time when the automatic EURO modification operation should be executed
To certainly execute the automatic modification operation, you can program the scheduled date and time to
execute the automatic EURO modification operation. From ten days before the preset date, the remaining
days are printed at the bottom of the daily full resetting report.
(1) *191. 00
*CH ID #10. 00
CA/CHK ID *201.00
CHK/CG +4. 00
EURO START
01/06/2011 10:00
DAYS TO EURO <10>
Date and time setting will be reset after the execution of automatic modification operation, and again you
can program the date and time for the next automatic modification operation.
Also you can make the automatic EURO modification operation compulsory. When the above-mentioned
preset date and time has come, and also when you start an entry in the REG/MGR mode, the error message
‘EURO CHANGE ENTRY COMPULSORY” will be displayed. You cannot start any operation in the REG/
MGR mode until you make the operation.
Automatic EURO modification operation
1. Select "5 X2/72 MODE”.
2. Select "3 EURO STATUS” from the menu.
3. Select the status you want to set (B, C or D) referring to the table on the previous page. Press the
| + | key to toggle the options.
Please note that once you set a status, you cannot return to the previous status(es).
Important note
As for the miscellaneous keys, such as and keys, and for the HALO setting, the automatic
conversion will not be made. You need to change the % rates or amounts in the PGM mode after the
execution of the automatic modification operation for EURO so that they are based on amounts in
EURO.
It is executed some of following operation which is needed for each status.
1) Issue General Z1 report. 2) Issue General Z? report. 3) Clear GT1/2/3 and Training GT. 4)
Convert the unit price of DEPT/PLU from LOCAL currency to EURO. If new unit price Is over the
max digits, its price is sef as "0.00". 5) Change PGM function “EX1 AMOUNT PRINTING FOR
TOTAL AND CHANGE YES/NO”. 6) Change PGM function “EX1 CALCULATTION METHOD
DIVISIONMULTIPLICATION”. 7) Set “EXT currency symbol” as the suitable data. 8) Set "EX1
TAB” as the suitable data. 9) Set “Domestic currency symbol” as EURO SYMBOL. 10) Set
‘Domestic TAB” as "27. 11) Set "Rounding SYS TEM (Denmark/Sweden/Normal)” as “Normal”
12) Set "Rounding up/down of the unit digits of AMOUNT” as “No”. 13) Set “L owest digit entering
limitation of item” as “Arbitrary”. 14) Set “Lowest digit entering limitation of payment” as “Arbitrary”.
15) Set “Difference memory” as No”. 16) Set "Rounding of foreign currency for EX" as “Round
off(4-DOWN, 5-UP)" (EURO Regulation)
This job cannot set the following additional EURO function. You must set the following items by
each programming after executing the automatic EURO modification operation.
1) Exchange rafe, (2) “Check, Credit operation for Exchange! — YES/NO”
120
Operator Maintenance
In Case of Power Failure
When power is lost, the register retains its memory contents and all information on sales entries.
* When power failure is encountered in register idle state or during an entry, the register returns to the
normal state of operation after power recovery.
* When power failure is encountered during a printing cycle, the register carries out the correct printing
procedure after power recovery.
In Case of Printer Error
If the printer runs out of paper, the printer will stall, and “PAPER EMPTY” will appear on the display. Key
entries will not be accepted. Referring to “Replacing the Paper Roll” in this chapter, install a new paper roll
in the proper position, then press the key. The printer will print the power failure symbol and resume
printing.
If the print roller arm comes up, the printer stalls, and "PAPER EMPTY” will appear on the display. Key
entries will not be accepted. Push down the arm until it is securely locked, then press the key. The
printer will print the power failure symbol and resume printing.
Cautions in Handling the Printer and Recording Paper
HE Cautions in handling the printer
» Avoid the following environments:
Dusty and humid places
Direct sunlight
Iron powder (A permanent magnet and electromagnet are used in this machine.)
* Never pull the paper when the print roller arm is locked. First lift up the arm, and then remove the paper.
* Never touch the surface of the printer head and print roller.
HB Cautions in handling the recording paper (thermal paper)
* Use only the paper specified by SHARP.
* Do not unpack the thermal paper until you are ready to use it.
» Avoid heat. The paper will color at around 70°C.
» Avoid dusty and humid places for storage. Avoid direct sunlight.
+ The printed text on the paper can discolor under the following conditions:
Exposure to high humidity and temperature
Exposure to the direct sunlight
Contact with glue, thinner or a freshly copied blueprint.
Heat caused by friction from scratching or other such means.
Contact with a rubber eraser or adhesive tape.
Be very careful when handling the thermal paper. If you want to keep a permanent record, copy the printed
text with a photocopier.
121
Installing Batteries
This register displays a low battery warning message “LOW BATTERY” when the batteries are low, and
displays a no battery warning message "NO BATTERY" when batteries are extremely low or batteries are
not installed.
If no batteries are installed, install two new alkaline batteries LR6 ("AA” size) at once. If batteries are already
installed, replace them with new ones as soon as possible. If the AC power cord is disconnected or a power
failure occurs when the batteries are dead or not installed, all the programmed settings will be reset to the
default settings and any data stored in memory will be cleared.
Improper use of batteries could cause them to burst or leak, which might damage the interior of
the register. Please take the following precautions:
* Ве sure that {the positive (+) and negative (-) poles of each battery are oriented properly.
» Never mix batteries of different types.
» Never mix old batteries and new ones.
* Never leave dead batteries in the battery compartment.
» Remove the batteries if you plan not to use the register for long periods.
* Should a battery leak, clean out the battery compartment immediately, taking care not to let the
battery fluid come info direct contact with your skin.
* fan incorrect battery is used, it may explode or leak
For battery disposal, follow the relevant law or regulation in your country.
Replacement
1. Be sure the register is plugged in.
2. Remove the printer cover.
3. Open the battery cover and remove the old batteries.
122
A. Install two new LRE6(AA” size) batteries into the battery
compartment.
5. Close the battery cover.
6. Replace the printer cover.
123
Replacing the Paper Roll
E Recording paper specifications
Be sure to use paper rolls specified by SHARP.
The use of any other paper rolls than specified could cause paper jamming, resulting in register malfunction.
Paper specification
Paper width: 57.5+ 05 mm
Max. outside diameter: 80 mm
Quality: High quality(0.06 to 0.08 mm thickness)
* Be sure to set a paper roll prior to using your machine, otherwise it may cause a malfunction.
Install the paper roll in the printer. Be careful then to set the roll and cut the paper end correctly.
(How to set the paper roll) (How to cut the paper end)
To the printer
Incorrect Correct Correct Incorrect
Ш Installing the Paper Roll
Always install the paper roll even when you set the register for not printing receipt in REG mode.
1. Remove the printer cover.
2. Lift up the print roller arm.
Print roller arm
3. Set the paper correctly in the paper roll cradle.
Before placing a new paper roll in the paper
roll cradle, cut off the pasted (taped) part of the
paper and confirm that the cut end of the paper is
straight.
== NA
To the printer (9 To the printer
Correct Incorrect
124
A. Feed the end of the paper along with the paper positioning
guides as per the diagram.
5. While holding down the paper, slowly close the print roller
arm.
If the print roller arm is not securely locked, printing
is not done right. If this problem occurs, open the
arm, and close the arm as instructed above.
Paper positioning guides
6. Cut off the excess paper and replace the printer cover.
7. Press the key to make sure the paper end comes
out of the printer cover and clean paper appears.
If the paper end does not come out, open the
printer cover, and pass the paper end between
the paper cutter and the paper guide of the printer
cover, and replace the printer cover.
125
HB Removing the receipt paper roll
When colored dye appears on the edges of the paper roll, it is time to replace the paper roll. Use paper of
2/.5+ 05 mm in width. To prevent jamming be sure to use paper specified by SHARP.
Confirm that the REG mode has been selected.
Remove the printer cover.
Lift up the print roller arm.
Remove the remaining paper roll from the paper roll cradle.
Install a new paper roll correctly by following the steps in “Installing the Paper Roll.”
о Ко ю
Print roller arm
Ш Removing the Paper Jam
Caution: The paper cutter is mounted on the printer cover. Be careful not to cut yourself. Never
touch the printer head immediately after printing, as the head may still be hot.
Remove the printer cover.
Lift up the print roller arm.
Remove the paper jam. Check for and remove any shreds of paper that may remain in the printer.
Reset the paper roll correctly by following the steps in “Installing the Paper Roll.”
мою
Print roller arm
126
Cleaning the Printer (Printer Head/Sensor/Roller)
When the printed text is getting dark or faint, paper dust may be stuck to the printer head, sensor and/or
roller. Clean them as follows:
Caution: Never touch the printer head with a tool or anything hard as it may damage the head.
The paper cutter is mounted on the printer cover. Be careful not to cut yourself.
Select the OFF mode.
Remove the printer cover.
Lift up the print roller arm.
Remove the paper roll referring to the "Removing the
paper roll” section.
Clean the printer head with a cotton swab or soft rag
moistened with ethyl alcohol or isopropyl alcohol.
Clean the roller and the sensor in the same manner.
6. Reset the paper roll correctly by following the steps in
“Installing the paper roll.”
Printer head
Sensor
Roller
a RON.
Print roller arm
127
Removing the Till and the Drawer
The till in the register is detachable. After closing your business for the day, remove the till from the drawer
and keep the drawer open. The coin case Is also detachable from the till. To detach the drawer, pull it
forward fully with the till removed, and remove it by lifting it Up.
Coin case
Till
Drawer
Opening the Drawer by Hand
The drawer automatically opens in the usual way. However, when power failure is encountered or the
machine becomes out of order, slide the lever located on the bottom of the machine in the direction of the
arrow. (See the figure below.) The drawer will not open, if it is locked with a drawer lock key.
Drawer Lock Key
This key locks and unlocks the drawer.
To lock it, turn 90 degrees counterclockwise.
To unlock it, turn 90 degrees clockwise.
128
Installing the Fixing Angle Bracket
To prevent the register from moving when the drawer opens, the fixing angle bracket is supplied with the
register. By attaching the bracket to the table where the register is installed, you can hock the register on
this bracket and secure the register to its position.
How to install the fixing angle bracket
. 1horoughly clean the location where the fixing angle
bracket (B) is to be placed.
. Peel off the adhesive tape on the fixing angle bracket.
. Hook the angle bracket onto the hook (A) that is located at
the bottom rear of the register.
Firmly stick the fixing angle bracket to the table surface
that your cleaned above.
a WN =
How to remove the register from the fixing angle bracket
1. Lift up the front of the register and pull the register towards
YOU.
129
Before Calling for Service
If you encounter any of the following problems, please read below before calling for service.
Fault
Checking
« The display does not illuminate.
+ |s power supplied to the electric outlet?
+ |s the power cord plug out or loosely connected to
the electric outlet?
* |5 the register in screen-save mode?
* The display is illuminated, but the whole machine
refuses entries.
+ |s a clerk code assigned to the register?
* |5 the register in the REG mode?
* No receipt is issued.
* |5 the receipt paper roll properly installed?
* Is there a paper jam?
* |s the receipt function in the “OFF” status?
* |5 the print roller arm securely locked?
* Printing is unusual.
* Are the printer head/sensor/roller clean?
* Is the paper roll properly installed?
130
Specifications
Model: XE-A20/VWXE-A207B
XE-A21/VWXE-A217B
Dimensions: 360 (VW) x 425 (D) x 330 (H) MM
Weight: Approx. 11.0 kg
Power Source:
Official (nominal) voltage and frequency
Power Consumption:
Stand-by: 7.4 VW (When the official voltage is 220 to 230 Y, 50 Hz/60 Hz)
7.5 W (When the official voltage is 230 to 240 V, 50 Hz)
Operating: 32.4 W (max.) (When the official voltage is 220 to 230 V, 50 Hz/60 Hz)
32.2 W max.) (When the official voltage is 230 to 240 V, 50 Hz)
Working Temperature:
0 to 40 °C (32 to 104 °F)
Humidity: 20 % to 20 %
Display: Operator display: LCD display with Tilt mechanism
160 (VW) x 64 (H) (dots)
Customer display: /-segment display
Printer: Type: One-station thermal printer
Printing speed: Approx. 12 lines/second
Printing capacity: 30 digits
Other functions:
- Receipt (ON-OFF) function
- Compression print for an electronic journal
Logo: Graphic logo printing:
Size: 130 (H) x 360 (VW) pixel
Area of black must be less than 35% of all area.
Logo message printing:
Logo message for the receipt (max. 30 characters x 6 lines)
Paper Roll: Width: 57.5 + 0.5 mm
Max. diameter: 80 mm
Quality: High quality (0. 06 to 0.08 mm thickness)
Cash Drawer:
5 slots for bills and 8 for coin denominations
Accessories:
Basic User Manual: 1 copy
Standard key sheet: 1 (placed under keyboard cover) for XE-A2 17 VWXE-
A217B only
Programing key sheet: 1 (placed under keyboard cover) for XE-A217W/XE-
A217B only
Paper roll: 1
Drawer lock key 2
Fixing angle bracket 1
Battery caution label 1
“Specifications and appearance are subject to change without notice for improvement.
131
Warning
This is a Class A product. In a domestic environment this product may cause radio interference in which case the
user may be required to take adequate measures.
Achtung
Dies ist ein Gerät der Klasse A. Dieses Gerät kann im Wohnbereich Funkstörungen verursachen; in diesem Fall
kann vom Betreiber verlangt werden, angemessene Gegenmaßnahmen durchzuführen und dafür aufzukommen.
Advertencia
Este es un producto de la clase A. En un ambiente doméstico es posible que este producto cause
radiointerferencia, En este caso se solicita al usuario que tome medidas adecuadas.
Advertencia
Este é um produto de classe A. Num ambiente doméstico este produto pode causar interferéncia radio sendo que
neste caso o Utilizador terá que tomar medidas adequadas.
Avertissement
Ceci est un produit de Classe A. Dans un environnement domestique ce produit risque de provoquer une
interférence radio, auquel cas l'utilisateur sera obligé d'observer les mesures adéquates.
Waarschuwing
Dit is een Klasse A-product. Het is mogelijk dat dit product in de huiselijke omgeving radiostoringen veroorzaakt
waartegen de gebruiker afdoende maatregelen dient te nemen.
Avvertenza
Questo & un prodotto di Classe À. In un ambiente domestico questo prodotto puo causare interferenze radio, nel
qual caso l’utilizzatore pud essere tenuto à prendere provvedimenti adeguati.
Advarsel
Dette er et klasse A produkt. | et hjemligt milja kan produktet forársage radio forstyrrelser, hvor brugeren kan veere
forpligtet til at trasffe passende foranstaltninger.
Advarsel
Dette er et klasse À produkt. Innenders kan dette produktet skape radioforstyrrelser. | sá tilfelle má brukeren
Iiverksette nodvendige tiltak,
Varoitus
Тата on luokan A tuote. Kotiympáristóssá támá tuote saattaa aiheuttaa radiohäiriôtä, jossa tapauksessa
käyttäjän on ehkä ryhdyttävä tarvittaviin toimenpiteisiin.
Varning
Detta ar en produkt av klass À. l hemmiljà kan produkten stôra radiomottagning, i vilket fall användaren kan
behova vidta motátgarder,
Varovani
Toto je vyrobek trídy A. Je-li vyrobek provozovan v domacim prostredi, múz¿e zpúsobevat radiové rusení jinych
zarízení a uzivatel proto musi provést adpovidajici opatreni,
Upozorenje
Ovo je proizvod A klase. U domacem okruzenju ovaj proizvod moZe prouzrociti radio smetnje sto moZe zahtijevati
od korisnika da poduzme odgovarajuée mjere.
Varovanie
To je proizvod razreda A. V domacem okolju lahko ta izdelek povzroci radijske motnje. Y tem primeru mora
uporabnik ustrezno ukrepati.
Hoiatus
Tegemist on A-klassi tootega. Kodukeskkonnas kasutamisel voib antud toode pohjustada raadicinterferentsi, mis
omakorda nóuab kasutajalt sobivate meetmete rakendamist.
MpoctóoTONOn
AUTO elval Eva T1po/ôv KaTnyopiac À. 5e éva ECOTEPIKÓ TEPIGÁXXoY AUTO To Mpcióv UTopel Va TIpokahégel
TN padôto akKtivoBoAla. 2e aun TNV MEPÍNTWON 9 XPÑOTIC TPEMEl va AdPsl STTdpkN HÉTEA MpodTadidac.
Uwaga
Urzadzenie to jest urzadzeniem klasy A. W srodowisku mieszkalnym moze ono powodowaé zaktécenia
radioelektryczne. W takich przypadkach mozna zadac od uzytkownika zastosowania cdpowiednich srodkow
zaradczych.
Upozorenje
Ovo je proizvod klase A. U kuénom okruZenju ovaj proizvod moZe prouzrokovati radio smetnje, U tom slucaju od
korisnika se zahteva da preduzme odgovarajuée mere.
132
FOR CUSTOMERS IN U.K.
IMPORTANT
The wires in this mains lead are coloured in accordance with the following code:
BLUE: Neutral
BROWN: Live
As the colours of the wires in the mains lead of this apparatus may not correspond with the coloured
markings identifying the terminals in your plug proceed as follows.
The wire which is coloured BLUE must be connected to the terminal which is marked with the letter N
or coloured black.
The wire which is coloured BROWN must be connected to the terminal which is marked with the letter
L or coloured red.
The apparatus must be protected by a 3A fuse in the mains plug or distribution board.
CAUTION: DO NOT CONNECT THE LIVE (BROWN) WIRE OR THE NEUTRAL (BLUE) WIRE TO
THE EARTH TERMINAL OF YOUR 3-PIN MAINS PLUG.
CAUTION:
Shielded interface cables must be used with this equipment to maintain compliance with EMC regulations.
Noise level LpA: 60.7 dB(A-weighted)
Measured according to EN ISO 7//79:2001
[Maximum value if the cash drawer springs open LpAl: 80.4 dB(A-weighted)]
SHARP
SHARP ELECTRONICS (Europe) GmbH
Sonninstralie 3, D-20097 Hamburg
SHARP CORPORATION