1
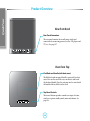
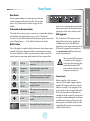
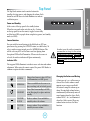
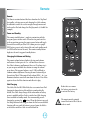
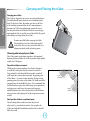
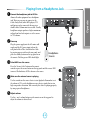
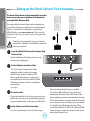
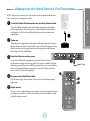
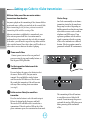
iPod Speaker System kleer c e r t i fi e d Important Safety Instructions Important Safety Instructions 6. Heat This product is designed and manufactured to meet strict quality and safety standards. However, you should be aware of the following installation and operation precautions. Locate the equipment away from naked flames or heatproducing appliances such as radiators, stoves or other appliances that produce heat. 7. Climate This symbol precedes important operating or servicing information. The equipment has been designed for use in moderate climates and in domestic situations. 8. Cleaning 1. Follow all warnings and instructions Unplug the unit from the mains supply before cleaning. You must read all the safety and operating instructions before operating this equipment. Retain this handbook for future reference and adhere to all warnings in the handbook or on the equipment. The case should normally only require a wipe with a dry, soft, lint-free cloth. Do not use chemical solvents for cleaning. We do not advise the use of furniture cleaning sprays or polishes as they can cause permanent white marks. 2. Water and moisture The presence of electricity near water can be dangerous. To prevent water dripping or splashing into the equipment, do not use near water – for example near a bathtub, kitchen sink or swimming pool, etc. 9. Power sources Only connect the equipment to a power supply of the type described in the operating instructions or as marked on the equipment. 3. Object or liquid entry The primary method of isolating the equipment from the mains supply is to remove the mains plug. The equipment must be installed in a manner that makes disconnection possible. Take care that objects do not fall and liquids are not spilled into the enclosure through any openings. Liquidfilled objects such as vases should not be placed on the equipment. 10. Power-cord protection 4. Placing the equipment Power supply cords should be routed so that they are not likely to be walked on or pinched by items placed upon or against them. Pay particular attention to the point where they exit from the equipment. Only use a rack or shelf that is stable and strong enough to support the weight of this equipment. 5. Ventilation 11. Non-use periods Do not block any ventilation openings in the equipment. Do not place the equipment on a bed, sofa, rug or similar soft surface, or in an enclosed bookcase or cabinet, since ventilation may be impeded. We recommend that the power cord of the equipment is unplugged from the power outlet during lightning storms or if the equipment is not being used for an extended period of time E-2 12. Abnormal smell Safety and Standards Compliance If an abnormal smell or smoke is detected from the equipment, turn the power off immediately and unplug the equipment from the wall outlet. Contact your dealer and do not reconnect the equipment. This equipment has been designed to meet the IEC/EN 60065 international electrical safety standard. This device complies with Part 15 of the FCC Rules. Operation is subject to the following two conditions: (1) This device may not cause harmful interference, and (2) this device must accept any interference received, including interference that may cause undesired operation. 13. Servicing You should not attempt to service the equipment. Contact your dealer to arrange servicing. 14. Damage requiring service kleer The equipment should be serviced by qualified service personnel when: A. the power-supply cord or the plug has been damaged, or B. objects have fallen, or liquid has spilled into the equipment, or C. the equipment has been exposed to rain or moisture, or D. the equipment does not appear to operate normally or exhibits a marked change in performance, or E. the equipment has been dropped or the enclosure damaged. c e r t i fi e d “Made for iPod,” and “Made for iPhone” mean that an electronic accessory has been designed to connect specifically to iPod or iPhone respectively, and has been certified by the developer to meet Apple performance standards. Apple is not responsible for the operation of this device or its compliance with safety and regulatory standards. iPhone, iPad and iPod are trademarks of Apple Inc., registered in the U.S. and other countries. Correct disposal of this product This marking indicates that this product should not be disposed with other household waste throughout the EU. To prevent possible harm to the environment or human health from uncontrolled waste disposal and to conserve material resources, this product should be recycled responsibly. To dispose of your product, please use your local return and collection systems or contact the retailer where the product was purchased. E-3 Important Safety Instructions Important Safety Instructions Welcome Contents Contents Safety Information....................................... E-2 Welcome........................................................ E-4 What’s in the Box?........................................................E-5 Available Accessories..................................................E-5 Product Overview........................................................E-6 Rear Panel........................................................................E-7 Connections Overview..............................................E-8 Top Panel.........................................................................E-9 Remote..........................................................................E-10 Carrying and Placing the rCube..........................E-12 Operate.........................................................E-13 Playing from an iPod or iPhone...........................E-13 Playing from a Line-Level Source.......................E-14 Playing from a Headphone Jack.........................E-15 Using Video Outputs................................................E-16 rCube goes where you go.....................................E-17 Options.........................................................E-18 Setting up the rWave USB transmitter ............E-18 Playing from the rWave USB Transmitter .......E-19 Setting up the rWand iPod transmitter . .........E-20 Playing from the rWand iPod Transmitter . ....E-21 Setting up rCube-to-rCube transmission........E-22 Upgrading the Firmware........................................E-23 Troubleshooting........................................ E-24 Specifications............................................. E-25 Warranty...................................................... E-26 E-4 Thank you for purchasing the rCube and welcome to the Arcam family. Arcam has been producing specialist audio products of remarkable quality for discerning Hi-Fi enthusiasts for over three decades. Your rCube has the heritage of a long line of award winning Hi-Fi components. The rCube is unique among iPod® speakers. It is designed to be small in size but big in sound. Side firing full range drivers create a spacious sound from a small unit. The rCube can stream music wirelessly, too. With its integral battery and using an optional wireless transmitter, the rCube can wirelessly receive music from your PC or iPod, enabling you to bring music anywhere you like in the home. The rCube is intuitive and easy to use. This handbook gives you all the instructions you will need to get the most from your ‘Cube’. It will help you set up your rCube, connect it and position it to get the best sound. This handbook also shows you how to play music from your iPod, from an external source and from another rCube or a PC wirelessly. We hope you will enjoy your rCube. If you require further information about Arcam products, our network of dealers will be happy to help you. Further information can also be found on the Arcam website at www.arcam.co.uk. QuickTour What’s in the Box? rCube AC Adapter (supplied with the apppropriate power lead) Remote (supplied with battery) Available Accessories Arcam rWave USB transmitter for wireless audio streaming from your PC or Mac Arcam rWand iPod® transmitter for wireless audio streaming from your iPod, iPhone® or iPad® Arcam rTube Component video breakout cable for connecting to high quality component video enabled displays Other accessories may become available in future — please contact your Arcam dealer for the latest information. E-5 QuickTour Product Overview View from Back Rear Panel Connectors The rear panel contains the overall power switch and connectors for connecting power as well as CD players and TVs etc. See page E-7. O I View from Top iPod Dock and Handle (with dust cover) The iPod dock and integrated handle is protected by a dust cover. Press on the rear of the cover to rotate it and reveal the dock and handle. Note the unit must not be carried with the handle while an iPod is in the dock. Top Panel Controls This row of buttons provides control over input selection, wireless reception, standby mode, mute and volume. See page E-9. E-6 Rear Panel The rear panel contains the master power switch and sockets for power and connecting the rCube to other devices (see Connections Overview on page E-8 for details). O Video and audio connections The rCube has a variety of ways to connect to external video displays and analogue and digital audio sources. See the ‘Connection Overview’ section of this manual or look for your specific connection in the ‘Playing from a ....’ in the Table of Contents for details. BASS button The rCube applies a sophisticated psychoacoustic bass enhancement carefully designed to compensate for the reduction in bass output that occurs when the rCube is not placed near a wall or corner. The natural acoustics near room walls reinforce the bass output of the AUX-in External analogue input via 3.5mm connector. Composite VIDEO Composite video output from supported iPods BASS When pressed, reduces bass output, useful for placement in a corner. Y, Pb, Pr O I VIDEO Component video output from supported iPods UPGRADE USB connector for upgrading firmware DC IN DC Voltage supply input from power module. POWER Main on/off switch for entire unit. E-7 I cube, so we recommend pressing the Bass button to deactivate the bass boost when placing the rCube near a wall or corner. USB upgrade The rCube has a USB connector on the back of the unit for future upgrade via a USB memory stick. You should not upgrade your unit unless advised to do so. If you need to upgrade your unit please visit www.arcam.co.uk for instructions and the latest firmware. The rear panel USB connector is for future rCube upgrades only. The rCube does not play music files from this USB port nor does it interface with computers via this port. Power Switch Before using the rCube it must be connected to the mains supply using the supplied AC adaptor (unless the integral battery is charged). Once plugged in, the power switch on the rear panel will switch the rCube from off to standby mode. In standby, the rCube responds to front panel or remote control commands but also uses a small amount of power. If you are using battery power you should switch the unit completely off using the rear-panel power switch when not in use. QuickTour Rear Panel QuickTour Connections Overview Power Cube O I Your rCube can be powered from the mains or from the integral rechargeable battery. Connect the power supply to power the unit from the mains and/or to charge the battery. Connecting to external sources TV There are two types of sources that can be connected to the rCube’s AUX-in input: linelevel analogue (e.g. from a hi-fi CD player or a TV) and headphone jack analogue (e.g. MP3 player). For more details on a specific connection please see the ‘Playing from a ...’ in the Table of Contents to locate your scenario. A B Connecting to a TV (iPod video playback) Video-enabled iPods can be connected to a television with either composite video A or component video B connectors (see figure). To connect to a display with component video (3 wires) use the optional break out cable. For a list of currently compatible iPod products that output video see http://support.apple.com/kb/HT1454. Please note that Apple devices do not output any menu graphics or any application graphics to a connected display — the video out is used only for playback of video files. CD OUT L R External Source Power Only use the AC adaptor that was originally supplied with your rCube. Other adaptors may damage the rCube. E-8 Top Panel QuickTour The Top Panel contains touch-sensitive buttons for standby, selecting sources, and changing the volume. Each button has an LED above it which illuminates to indicate each button press. Power and Standby At the centre of the top-panel is the standby button. When the rear-panel rocker switch is on, the 2 button on the top-panel (or on the remote) toggles between fully on (blue front LED, or purple when using battery power) and standby mode (red LED). Source Selection You can switch between listening to the iPod dock or AUX rear panel sources by pressing the SOURCE button (see table below). To select a wireless source instead, press the WIRELESS button. This will de-select any AUX or iPod source and start playing from the optional USB or iPod Transmitter. When a wireless source is selected, the wireless indicator will glow continuously. Indicator LEDs In order to use the wireless transmitter you must first set it up. See the section “Setting up the rWave Optional USB transmitter” on page E-18 or “Setting up the rWand Optional iPod transmitter” on page E-20 The top panel LEDs illuminate to indicate source selection and volume adjustment. When using the remote control, the power LED flashes to confirm reception of remote commands. SOURCE Chooses local source to play: AUX-in (red illumination) or iPod (green). WIRELESS Chooses available wireless sources to play: searching (red) or locked (green). STANDBY Turn rCube from standby (red LED) to on (blue/purple) or place unit into standby. VOLUME DOWN Reduces volume. Press and hold to smoothly reduce the volume. VOLUME UP Increase volume. Press and hold to smoothly increase volume. E-9 Changing the Volume and Muting A short press of - or + will increase or decrease the rCube’s volume a small amount or you can press and hold the button to ramp the volume up or down. Pressing both volume buttons simultaneously will instantly mute all sound coming from the device. Both volume LEDs (- & +) are illuminated when the rCube is muted. Press any volume button to release the Mute function. Remote QuickTour Remote The Remote contains buttons like those found on the Top Panel for standby, selecting sources and changing the rCube volume. In addition it can also be used to navigate through menus and tracks on the iPod and change the iPod play mode (to ‘shuffle’ for example). Power and Standby The remote standby button 2 works in conjunction with the rear panel power rocker switch. When the rear panel switch is in the on position pressing the remote power button will toggle the unit between fully on (blue LED (mains power) or purple LED (battery power) on the front of the unit) and standby mode (red LED on the front of the unit). The remote standby button duplicates the unit’s top panel standby button. Changing the Volume and Muting The remote volume buttons duplicate the top panel volume and buttons. A short press of + or - will increase or decrease the rCube’s volume a small amount (there are 52 volume steps) or you can press and hold these buttons to ramp the volume up or down. The top panel volume + and - LEDs will flash to confirm volume adjustment. Pressing the mute button will put the unit into ‘Mute’. When muted, both volume LEDs (- & +) are illuminated and no sound will come from the device. Press Mute again to release the Mute function and allow it to play. iPod Charging The rCube, like the ARCAM irDock, has user control over iPod charging for longer battery life and better sound quality. By default, the rCube always charges iPods when mains or battery power is available and the rCube is switched on. iPod charging is not available in Standby mode. You can manually prevent charging by pressing the button. When this button is pressed, the charge indicator will disappear from the iPod screen and iPod charging will cease until the button is pressed again, the iPod is re-inserted or until the rCube is switched back on. E-10 Before first use: remove the battery protection tab to activate the battery. The remote must be pointed toward the front of the rCube in order to work. STANDBY MUTE Turn rCube on from standby or place unit into standby from on. Mute the rCube volume. VOLUME DOWN Reduces volume. Press and hold to smoothly reduce the volume. VOLUME UP Increases volume. Press and hold to smoothly increase volume. CHARGE IPOD Turns iPod charging on and off. Turn off charging to prolong battery life. SOURCE SELECT Toggles between iPod and external sources. WIRELESS Selects a wireless source. Press to select the next available wireless source associated with the rCube. SCROLL Scroll up and down to choose from listed iPod page items. SELECT MENU Select current item move to sub-page. Navigate back on page level. REW/SKIP Press and hold to fast forward or single press to skip to the next track. PLAY/ PAUSE Press to toggle between play and pause modes. FWD/SKIP Press and hold to review or single press to skip to the previous track. PLAY MODE Rotates through the popular play modes on the iPod. E-11 iPod control NOTE: these functions are only available for docked iPods and iPhones. They are not available when an iPod is connected wirelessly. Navigating iPod Menus You can navigate through the menus of a docked iPod by using the 4 navigation buttons. Pressing B or C scrolls up or down through listed page items to highlight a selection. The E arrow functions as ‘select’ and will moves to the sub-page of any selected menu item. The D button functions as a menu or back button. Pressing D causes the iPod to go up one page level to the previous page. Playing, Using Rew/Fwd and Changing iPod Tracks There are three iPod track navigation buttons on the remote. The 4/; button toggles between play and pause. If an iPod is docked but not playing and its display is dark, pressing 4/; will also activate the iPod. Press and hold 9 or : to continuously rewind or fast forward; single presses will skip to the previous or next track respectively. Play Mode (Repeat and Shuffle iPod playback mode is controlled by the ‘Play Mode’. button. Single presses rotate through the 5 possible play modes: (a) single track repeat, (b) playlist or folder repeat, (c) playlist or folder repeat plus shuffle, (d) no repeat but with playlist or folder shuffle instead, (e) no repeat and no shuffle, plays the playlist or folder once (default). QuickTour Remote QuickTour Carrying and Placing the rCube Carrying your rCube The rCube is designed to be easy to carry around the house; the hidden handle under the dust cover comfortably fits a hand. To lift your rCube, first make sure there is no iPod in the docking station and that the AC mains adaptor is disconnected. With your palm facing toward the rear of the unit push down on the back of the dust cover and grip underneath the lid. As you lift, your rCube will tilt. Be gentle when lifting or setting down your rCube. Remove any iPod before carrying the rCube. You should not carry the rCube with an iPod in the dock. You can carry the rCube while it is playing wirelessly whilst on battery power. Choosing where to put your rCube The rCube sounds great almost anywhere. Side mounted front angled drivers allow the rCube to produce high-quality sound over 270 degrees. Do put the rCube in a corner! While good just about anywhere, the rCube is designed to sound best when placed in the corner of a room. In this position the side-firing full-drivers reflect sound off walls to produce a more spacious sound. Try placing your rCube 50cm (~2’) from a corner angled at 45 degrees and pointing toward the centre of the room. We think you will be surprised how the sound fills the space. We recommend that the BASS button is pressed in when using corner placement or placing near a wall, since the corner/wall acoustics naturally enhance bass. Select the bass boost (BASS button not pressed in) when placing the rCube away from a corner or wall. Don’t put the rCube in a confined space The side firing drivers work best when they are not obstructed (e.g. on a kitchen counter). Do not place the rCube on a bookshelf with books on either side as this will block the sound. E-12 Left Channel Right Channel Playing from an iPod or iPhone Power up Plug one end of the laptop-style power supply into the AC mains wall supply and the other into the DC power input jack on the rear panel of the rCube. Switch the rCube on by pressing its power rocker switch on the rear panel. The front LED will glow red (standby mode). Press the standby button on the top panel or on the remote. The power LED will change from red to blue and the rCube is now on. O I Operate 1 1 2 MENU 2 Dock the iPod , Open the dust cover to reveal the universal docking well. Gently insert your iPod or iPhone onto the connector. . ;4 When docking or removing, insert the iPod gently and at the same angle as the connector. Do not twist or pull the iPod while it is in contact with the dock connector! This can damage the connector. 3 Select iPod as the source When the iPod is docked, the rCube will automatically select iPod as the source and the source button will glow green. If the iPod is in the dock but not the current source, press the source button on the remote control or on the top panel until the source LED glows green. 4 Choose track and play Use your iPod controls or rCube remote to select a track and begin audio playback. 5 Adjust volume Use the + and - volume buttons on the remote or on the top panel to adjust the volume to desired level. NOTE: The Apple iPad is too large for the docking connector, but can be connected wirelessly using a transmitter accessory. See page E-20. E-13 Playing from a Line-Level Source 2 1 Connect the line level source to AUX-in Operate Line level sources (e.g. a CD player or preamplifier output) typically have RCA phono connectors (pictured at right) and they do not usually have any volume control. To connect a line level source you will need a cable that has dual (left and right) RCA phono male connectors on one end and 3.5mm stereo mini-jack on the other. If there is a volume control on the source set it to 90%. Make this connection with the unit switched off. 2 O 1 I 2 CD OUT L CD OUT R Dig tal SERIAL NO Line-Level Source 1 Power up Plug one end of the power supply into the AC mains wall supply and the other into the DC power input jack on the rear panel of the rCube. Switch the rCube on by pressing its power rocker switch on the rear panel, the front LED will glow red (standby mode). Press the standby button on the top panel or on the remote. The power LED will change from red to blue and the rCube is now on. Note: some devices output line level from a 3.5mm stereo mini jack. If you have one of these you will need a stereo male to male 3.5mm cable instead of the one shown. 3 Select AUX-in as the source Press the ‘Source Select’ button on the remote control or press the source button on the top panel until the source LED turns red. Red indicates AUX is chosen as the source. 4 Make sure the external source is playing Use the controls on the line-level source to start playback and verify the device is playing. 5 Adjust volume Use the + and - volume buttons on the remote or on the top panel to adjust the volume to desired level. E-14 Playing from a Headphone Jack 1 Almost all audio equipment has a headphone jack. This is an easy way to connect to the rCube. Early iPods, other MP3 players, TVs and laptops can be connected this way via a double-ended 3.5mm mini-stereo cable. Usually headphone outputs produce a higher maximum voltage than line level outputs so set the source to 75% volume. 2 O 1 2 Operate Connect the headphone jack to AUX-in I 2 Power up Plug the power supply into the AC mains wall supply and the DC power input jack on the rear panel of the rCube. Switch on the rCube by pressing power switch on the rear panel, and press the standby button on the top panel or on the remote. The blue power LED should light. 1 7 8 Headphone Source 4 3 Select AUX-in as the source Press the ‘Source Select’ button on the remote control or press the source button on the top panel until the source LED turns red. Red indicates AUX is chosen as the source. 4 Make sure the external source is playing Use the controls on the source device to start playback. Remember to set the volume to 75% on the headphone source device, signals that are too high can produce distortion. You can verify the device is playing properly by using a pair of headphones. 5 Adjust volume Use the + and - volume buttons on the remote or on the top panel to adjust the volume to desired level. E-15 Operate Using Video Outputs In addition to playing audio the rCube can output video from supported iPods. When a video-enabled iPod is docked and playing, video is routed to both the composite (option A) and Y, Pb, Pr (option B) video outputs on the rear panel. The output you use is entirely up to you and what your display supports. Note that some iPods may need to have their settings changed to enable video — please contact Apple for iPod support. Please note that Apple devices do not output any menu graphics or any application graphics to a connected display — the video out is used only for TV playback of video files. 1 rCube O I A B Connect the video display to the rCube Composite video and Y, Pb, Pr (also called ‘component’) video are common video formats. To connect your iPod to a composite video display you will need a video cable with RCA phono connectors on either side (option A). For Y, Pb, Pr video use the optional breakout cable (option B). Y, Pb, Pr video provides the best picture quality. To purchase this component video cable please contact your Arcam dealer. 2 Power up Plug the power supply into the AC mains wall supply and the DC power input jack on the rear panel of the rCube. Switch on the rCube by pressing power switch on the rear panel, and press the standby button on the top panel or on the remote. The blue power LED should light. 3 Select iPod as the source and play a video Press the ‘Source Select’ button on the remote control or press the source button on the top panel until the source button turns green. Green indicates iPod is chosen as the source. Start the iPod video playback. 4 Make sure your display’s source is correctly set Use the controls on the display device to select the video input your rCube is connected to as the current video source. 5 Adjust volume Use the + and - volume buttons on the remote or on the top panel to adjust the volume to desired level. E-16 rCube goes where you go Lithium Ion power means it goes where you go Operate Your rCube has an integral high-capacity Lithium-Ion (Li-ion) rechargable battery — it goes where you go. Into the garden and around the home. The front power LED glows purple to indicate that the rCube is running on battery power. Charging the battery The rCube automatically charges the battery and has built in charge methods to make the battery last as long as possible. To find out how much battery power is remaining, connect the power supply, put the rCube into standby and press the button on the remote control. The rCube top panel button LEDs indicate the level of charge remaining: - 4 illuminated LEDs indicate 100% remaining; - 3 illuminated LEDs indicate 75% remaining; - 2 illuminated LEDs indicate 50% remaining; - 1 illuminated LED indicates 25% remaining. Storage If you need to store the rCube, you should ensure the rear power switch is in the off position. E-17 Setting up the rWave Optional USB transmitter Options The Arcam rWave wireless USB transmitter lets you play music anywhere in the home from files on your PC. You can purchase the optional Arcam rWave USB wireless transmitter for your rCube to broadcast your computer music anywhere around the house. To purchase the rWave please visit your local ARCAM dealer or visit www.arcam.co.uk. Before using the rWave for the first time, you must associate it with a particular rCube receiver. You only need to perform this setup once. After an association is established it is remembered, even if the units are powered off. 1 Install the rWave USB transmitter into your PC or laptop 3 Plug the USB disk drive-style rWave transmitter into a free USB port in your computer. The computer will recognize the device as a sound device and set it as your default output device. 2 1 O I Set the rWave to search for a rCube Press the ‘associate’ button on the rWave USB transmitter. The rWave LED will flash rapidly indicating it is searching for an association. For the next 30 seconds the rWave will associate with any rCube also searching for an association (see step 4). 3 Turn on the rCube Plug in and switch the rCube to on by pressing the rear panel rocker switch to the on position and pressing the top panel standby button, so that the power LED is blue. 4 Set the rCube to search for a transmitter Press the wireless button to select the wireless input. Release the button briefly, then press and hold. E-18 The wireless LED will flash red as it searches for a transmission. When the wireless LED on the rCube glows continuous green, the association has been made. The rWave remains in association mode for 30 seconds in case any more cubes are being set up. Do not remove the rWave from the PC during this time. When association is finished, the LED on the rWave will flash briefly every five seconds. You will now be able to hear the wireless source. Playing from the rWave Optional USB Transmitter The Arcam rWave wireless USB transmitter lets you play music anywhere in the home from files on your PC. 1 Operate note: You will need to associate each cube with a wireless transmitter before that cube can receive audio. Install the rWave USB transmitter into your PC or laptop. Plug the USB disk drive-style rWave transmitter into a free USB port in your computer. The computer will recognize the device as a sound device. You may need to enable audio output to the rWave (“Arcam Wireless DAC”) in your system settings — some operating systems do this automatically. You can check to see if the rWave is broadcasting by looking at its LED, which will flash briefly every five seconds when transmitting. 2 1 O Power up 2 Plug the power supply into the AC mains wall supply and the DC power input jack on the rear panel of the rCube. Switch on the rCube by pressing power switch on the rear panel, and press the top panel standby button. The blue power LED should light. 3 Select the rWave as wireless source To select the rWave transmitter, press the ‘Wireless’ button on the rCube remote control or on the top panel. If a source is available the light will turn green and the source will begin to play. Note: if a second wireless source is also transmitting you may have to press the ‘Wireless’ button twice to select the correct transmitter. 4 Play tunes on the computer Go to iTunes or your favourite software music player and choose and play a song. N.B. Always insert the USB transmitter before starting iTunes. 5 Adjust volume Use the + and - volume buttons on the remote or on the top panel to adjust the volume to desired level. E-19 I Options Setting up the rWand Optional iPod transmitter The Arcam rWand wireless Apple-compatible transmitter means you can play music anywhere in the home from your Apple iPod, iPhone or iPad. You can purchase an Arcam rWand wireless transmitter for your rCube to broadcast your iPod’s music wirelessly around the house. To purchase the rWand please visit your local ARCAM dealer or visit www.arcam.co.uk. Before using the rWand for the first time, you must associate it with a particular rCube receiver. MENU MENU , . ;4 , . ;4 You only need to perform this setup once. After an association is established it is remembered, even if the units are powered off. 1 Insert the rWand iPod transmitter into your iPod, iPhone or iPad. Plug the rWand into the docking connector at the bottom of your Apple player. 2 3 O I Set the rWand to search for a rCube Press the ‘associate’ button on the rWand transmitter within 3 seconds of inserting it. Hold the button until the transmitter LED flashes rapidly indicating it is searching for an association. For the next 30 seconds the rWand will associate with any rCube also searching for an association (see step 4). 3 Turn on the rCube Plug in and switch the rCube to on by pressing the rear panel rocker switch to the on position and pressing the top panel standby button, so that the power LED is blue. 4 Set the rCube to search for a transmitter Press the wireless button to select the wireless input. E-20 Release the button briefly, then press and hold. The wireless LED will flash red as it searches for a transmission. When the wireless LED on the rCube glows continuous green, the association has been made. The rWand remains in association mode for 30 seconds in case any more cubes are being set up. Do not remove the rWand from the iPod during this time. When association is finished, the LED on the rWand will flash briefly every five seconds. You will now be able to hear music played from the iPod. Playing from the rWand Optional iPod Transmitter 1 MENU Install the rWand iPod transmitter into your iPod, iPhone or iPad. , Plug the rWand transmitter into the docking connector at the bottom of your Apple player. You can check to see if the rWand is broadcasting by looking at its LED, which will flash briefly every five seconds when transmitting. 2 Operate NOTE: You need to associate each cube with a wireless transmitter before that cube can receive the transmitter’s audio. . ;4 Power up Plug the power supply into the AC mains wall supply and the DC power input jack on the rear panel of the rCube. Switch on the rCube by pressing power switch on the rear panel, and press the top panel standby button. The blue power LED should light. 3 O Select the rWand as wireless source To select the rWand iPod transmitter, press the ‘Wireless’ button on the remote control or on the top panel. If a source is available the light will turn green and the source will begin to play. Note: if a second wireless source is also transmitting you may have to press the ‘Wireless’ button twice to select the correct transmitter. I 2 4 Play tunes on the iPod/iPhone/iPad NOTE: Some Apple devices require you to select the iPod music player application. 5 Adjust volume Use the + and - volume buttons on the remote or on the top panel to adjust the volume to desired level. The rCube volume can also be adjusted using the iPod’s volume control. E-21 Setting up rCube-to-rCube transmission Operate With two rCubes, one rCube can receive wireless transmissions from the other. Wireless Range Any music played on the transmitting rCube, from an iPod or an external source, will be sent wirelessly to the second rCube. Before transmitting for the first time, you must associate the transmitting rCube with the receiving rCube. After an association is established it is remembered, even if the units are powered off. Note: Association must be performed twice if you want each cube to be able to transmit to the other - you will need to repeat the steps below with the cubes switched around. Once this is done, you’ll be able to set either cube to receive whatever the other is playing. 1 Power on all rCubes Connect power, turn on at the rear panel and power on using the top panel standby buttons, so that the power LED glows blue. 2 An rCube can normally receive from a transmitter situated in the same house. Range may be reduced depending on building materials and interference from other wireless sources such as cordless telephones and WiFi routers. If you experience problems with the wireless signal, try moving either the receiving rCube or the transmitter to a different location. Wireless operation cannot be guaranteed in hostile RF environments. O I Set the transmitter rCube to search for receiver rCubes Press and release the source select button to select the source (iPod or AUX) that you want to transmit. Press and hold the wireless button until the wireless LED flashes red. For the next 30 seconds this transmitter rCube will associate with any rCube searching for an association (see step 3). 3 Set the receiver rCube(s) to search for a transmitter Press the wireless button to select the wireless input. Release the button briefly, then press and hold. The wireless LED will flash red as it searches for a transmission. When the wireless LED on the rCube glows continuous green, the association has been made. E-22 The transmitting rCube will continue to search for receiver rCubes for 30 seconds. Do not interrupt this process – wait until the wireless LED glows green before powering off the transmitter rCube. Upgrading the Firmware You should only upgrade the firmware if directed by Arcam or your dealer To upgrade the rCube you will need a USB flash drive and a PC or laptop computer that can connected to the internet. 1 Download the firmware file to your memory stick. 3 Power on the rCube into standby mode Turn the rCube on by pressing the power rocker switch on the rear panel. Press and hold the standby button until the power LED flashes red. The power LED will flash red rapidly while the unit is upgrading. When the LED will stops flashing and glows continuously, the rCube is updated. 4 Remove the memory stick It is now safe to remove the memory stick. Visit www.arcam.co.uk to download the latest firmware and place the file on your USB flash drive. There must not be any other files present on the drive. 2 With the rCube off, insert the USB flash drive. If the rCube is put into upgrade mode accidentally, turn off the power. When the power is turned back on, the rCube will operate normally. First make sure the rCube is fully powered off (using the rear panel switch) and then insert the memory stick with the downloaded file into the USB style upgrade port on the rear panel of the unit. O I E-23 Operate The rCube has the ability to have its software upgraded by the user. This allows additional features to be added and allows compatibility with yet to be released iPods and iPhones. Troubleshooting Problem Check that... There are no lights lit on the unit << the rCube rear panel power switch is in the ‘on’ position. The power light is flashing red << the rCube is in upgrade mode. Insert a USB flash drive with upgrade file to update or turn the power off and back on to reset to normal. My rCube is on and an iPod is docked, it appears to be playing but I can’t hear any sound << the source is set to play from iPod by pressing the ‘iPod’ button on the remote or the source button on the top panel until the source LED lights green (indicting iPod source chosen). << both volume LEDs are not lit. If they are, this indicates that sound is muted. Press the ‘MUTE’ button on the remote or a volume control button to unmute the sound. << the rCube is powered on, if it is in standby mode press the P button on the remote to turn it on. << there are fresh batteries in the remote. << there is a ‘line of sight’ (no obstruction) between the remote and the rCube’s front panel IR receiving point. << all cables are making good connection. If necessary withdraw the cable from he connector and plug it fully in again (turn the power off before doing this). << the connections inside the source cable connector are not broken or badly soldered. << if the hum originates only when one particular source component connected, check that the source is properly grounded. Check that any aerial cable is ground isolated. Contact an installation contractor for assistance. The iPod is playing a video and I have connected a display to one of the video outputs but my images are not displayed. << all cables are making good connection. If necessary withdraw the cable from he connector and plug it fully in again (turn the power off before doing this). << the display source is set to display the input the cable is plugged into. The sound is thin and lacking in bass. << the Bass button on the rear panel is pressed. Deselect this button to add extra bass. << the rCube is not too far from a wall. Move the rCube closer to a wall or a corner for more bass output. << the Bass button on the rear panel is not pressed. Depress this button to reduce the bass output. << the rCube is too close to a wall or corner. Move the rCube away from a wall or a corner for less bass output. The unit responds erratically or not at all to the remote control Hum when playing the ‘AUXin’ Analogue input The sound is boomy with too much bass E-24 Specifications 35W/Ch Tweeter channels, 6Ω, at 1kHz Harmonic distortion, 80% power, 1kHz 10W/Ch 0.1% Inputs Line inputs: Nominal sensitivity 250mV—1.5V Input impedance Signal/noise ratio (CCIR, 45W) 22kΩ 90dB Amplifier output Nominal output level Output impedance 90W <50Ω Speakers Output Level Output impedance ~94dB SPL/Vrms 100Ω General Mains voltage Power consumption (maximum) Dimensions W x D x H (including feet) Weight (net) Weight (packed) Supplied accessories 110—120V or 220—240V 90W 200 x 200 x 200mm 5 kg 6.2 kg Power Supply Mains Lead Remote Control with CR2025 Battery E&OE NOTE: All specification values are typical unless otherwise stated. E-25 Remote Continuous power output (20Hz—20kHz at 0.5% THD), per channel Woofer channels, 4Ω, 100Hz—3.7kHz Warranty Remote Worldwide Guarantee This entitles you to have the unit repaired free of charge, during the first two years after purchase, provided that it was originally purchased from an authorised Arcam dealer. The Arcam dealer is responsible for all after-sales service. The manufacturer can take no responsibility for defects arising from accident, misuse, abuse, wear and tear, neglect or through unauthorised adjustment and/or repair, neither can they accept responsibility for damage or loss occurring during transit to or from the person claiming under the guarantee. The warranty covers: Parts and labour costs for two years from the purchase date. After two years you must pay for both parts and labour costs. The warranty does not cover transportation costs at any time. Claims under guarantee This equipment should be packed in the original packing and returned to the dealer from whom it was purchased. It should be sent carriage prepaid by a reputable carrier – not by post. No responsibility can be accepted for the unit whilst in transit to the dealer or distributor and customers are therefore advised to insure the unit against loss or damage whilst in transit. For further details contact Arcam at: Arcam Customer Support Department, Pembroke Avenue, Waterbeach, CAMBRIDGE, CB25 9QR, England or via www.arcam.co.uk. Problems? If your Arcam dealer is unable to answer any query regarding this or any other Arcam product please contact Arcam Customer Support at the above address and we will do our best to help you. On-line registration You can register your product on-line at www.arcam.co.uk. E-26