1
Getting Started
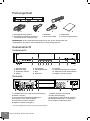
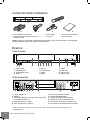
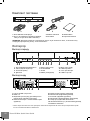
Remove the transparent protecting film from the front panel of the player to ensure good look of the player.
Ensure there is enough space around the player for proper cooling. The space at each side should be not
less than 10 cm.
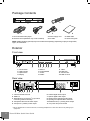
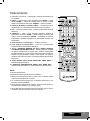
Ensure the RC has batteries installed.
Connect the player to your TV and to other A/V equipment in an appropriate way. Use HDMI connection
to get the best possible quality of video and audio. Make sure to switch off the player and all relevant A/V
equipment before connecting them. Ensure your TV and other A/V equipment are configured to use proper
inputs.
Switch on the player. The player will perform its initial loading procedure, which may take up to about 1
minute. During the loading procedure, "DUNE" logo is shown on the TV.
● If you do not see "DUNE" logo on the TV when you switch on the player, it may mean some problem with
the connection between the player and the TV or that a wrong video input is chosen in the TV or A/V
receiver/switch. In such a case, recheck the cables and the settings of the TV or A/V receiver/switch, or
try to use different cables or a different way of connecting the player to the TV.
● If you see "DUNE" logo on the TV when you switch on the player, but then the picture disappears and
no other picture appears during at least 10 seconds, it may mean that a wrong video output mode is
configured in the player. In such a case, press the "MODE" RC button, and then press one of the RC
buttons "1", "2", "3", "4" or "5" to switch to a different video output mode (see "Quick Setting of Video
Output Mode").
Finally, you should see the main screen of the player menu. The main screen shows items allowing to
use different player functions and access all storage devices and network drives connected to the player.
Adjust the player settings as needed using "SETUP" item on the main screen of the player menu (or by
pressing the "SETUP" RC button). In particular, you may want to adjust video settings, audio settings, and
network settings.
To choose the language of the player menu, use “Setup / General / Interface language” setting.
Use the RC buttons "LEFT", "RIGHT", "UP", "DOWN", "ENTER", "RETURN" to navigate through the
player menu. Use the "MENU" RC button to show the list of available commands. Use the "INFO" RC
button to show the information about the selected item.
Quick Setting of Video Output Mode
The “MODE” RC button allows quick setting of video output mode without entering the player setup menu.
This way of video output configuration may be required if you see no picture on the screen after connecting your player to a TV.
Press the “MODE” RC button and then one of the RC buttons “1”, “2”, “3”, “4”, or “5” to switch to one
of the following video output modes respectively:
1. Composite/Component, PAL
2. Composite/Component, NTSC
3. HDMI, 480i, 60 Hz
4. HDMI, 720p, 60 Hz
5. HDMI, 1080i, 60 Hz
After you see a picture on the TV, press the “ENTER” RC button, and then go to the player setup menu to
perform a more precise configuration of the video output mode if needed.
NOTE: The procedure of quick setting of video output mode can not be used during playback. To ensure this procedure can
be used, switch the player off, then switch the player on, and the wait about 1 minute to ensure the player loading is finished.
8
Dune HD Max Quick Start Guide